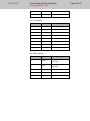
1
Robotics Motion Control Machine Vision VELTRU U10H Unloading Robot User’s Guide VELTRU AG User’s Guide and Planning Manual Unloading Robot U10H Title Page 2 of 73 VELTRU U10H Unloading Robot Type of Documentation User’s Guide Document Typecode 9800003000 Internal File Reference Purpose of Documentation Record of Revision Copyright This documentation describes the unloading robot VELTRU U10H Version Release Date Notes v1.0 02.08.2010 V1.1 26.08.2010 STO safety data V1.2 30.11.2010 Servo control structure V1.3 11.01.2011 Website Download V1.5 26.08.2011 GemDriveStudio handling V1.6 19.10.2011 Manual Drive Connection V1.7 31.03.2012 updated SerialNumber, oRing maintenance V1.8 21.12.2012 updated Maintenance V2.0 20.08.2013 updated GemDriveStudio © 2008 – 2013 VELTRU AG. All rights reserved. Copying this document, giving it to others and the use or communication of the contents thereof without express authority, are forbidden. Offenders are liable for the payment of damages. All rights are reserved in the event of the grant of a patent, or any other enforceable intellectual property rights. Validity Trademarks Published by The specified data is for product description purposes only and may not be deemed to be guaranteed unless expressly confirmed in the contract. All rights are reserved with respect to the content of this documentation and the availability of the product. Trademarks used throughout this user’s guide are registered trademarks of their respective owners VELTRU AG Flurlingerweg 3 ■ 8245 Feuerthalen, Switzerland Phone +41 (0)52 654 03 80 ■ Fax +41 (0)52 654 03 81 http://www.veltru.com ■ [email protected] VELTRU AG User’s Guide and Planning Manual Unloading Robot U10H Page 3 of 73 Table of content 1 2 Introduction ......................................................................................................................7 1.1 How to use this manual................................................................................................................ 7 1.2 Related Manuals .......................................................................................................................... 8 1.3 Notes, Cautions and Warnings used in this Manual ..................................................................... 8 1.4 What you must know before you use the VELTRU U10H Robot ................................................. 9 1.5 Compatibility ................................................................................................................................ 9 1.6 Product Identification ................................................................................................................. 10 1.7 Where to Get Help ..................................................................................................................... 11 Safety .............................................................................................................................. 12 2.1 Introduction ................................................................................................................................ 12 2.2 Applicable Safety Standards ...................................................................................................... 13 2.2.1 Safety Standards .......................................................................................................................13 2.2.2 Definitions of Safety Functions ..................................................................................................14 2.3 Intended Use of the Robots ....................................................................................................... 15 2.4 Qualification of Personnel .......................................................................................................... 16 2.5 Safe Working Procedures .......................................................................................................... 16 2.5.1 Normal Operations ....................................................................................................................16 2.5.2 Risks during Operation Disturbances ........................................................................................16 2.6 Risk Assessment ....................................................................................................................... 17 2.7 Safety Functions and Safeguards .............................................................................................. 19 2.7.1 2.8 Computer-Controlled Robots .....................................................................................................20 Safety Requirements for Additional Equipment and Peripherals ................................................ 20 2.8.1 Robot Modifications ...................................................................................................................21 2.8.2 Safety Risks Related to End Effectors .......................................................................................21 2.8.3 Other VELTRU C10 Controlled Devices ....................................................................................22 2.9 Sound Emissions ....................................................................................................................... 22 2.10 Thermal Hazard ......................................................................................................................... 23 2.11 Protection against Unauthorized Operation ............................................................................... 23 2.12 Safety Aspects while Performing Maintenance .......................................................................... 23 2.13 Transport and Lifting .................................................................................................................. 24 2.14 Risks Due to Incorrect Installation or Operation ......................................................................... 24 VELTRU AG User’s Guide and Planning Manual Unloading Robot U10H Page 4 of 73 2.15 Limitation of Liability................................................................................................................... 25 2.16 How Can I Get Help ................................................................................................................... 25 3 4 Product Specification .................................................................................................... 26 3.1 Description ................................................................................................................................. 26 3.2 Orientation in Cartesian Space .................................................................................................. 26 3.3 Intended Use of the VELTRU U10H Robot ................................................................................ 27 3.4 Dimension Drawings VELTRU U10H robot ................................................................................ 29 3.5 Configuration of the VELTRU U10H Robot ................................................................................ 30 3.6 Workrange and Joint Motions of the VELTRU U10H Robot ....................................................... 31 3.7 Technical Data and Specifications ............................................................................................. 32 3.7.1 Performance Specifications .......................................................................................................32 3.7.2 Power Supply Specifications .....................................................................................................33 3.7.3 Required Safety Category .........................................................................................................33 3.7.4 Environment Requirements .......................................................................................................33 3.7.5 Emissions ..................................................................................................................................34 3.7.6 Requirements for Frame and Workcell of U10H Robots ...........................................................34 Transport, storage and disposal of the VELTRU U10H Robot System ...................... 35 4.1 5 Packing, Transport and Storage ................................................................................................ 35 4.1.1 Incoming goods inspection ........................................................................................................35 4.1.2 Repackaging for Relocation ......................................................................................................35 4.1.3 Transportation and Storage .......................................................................................................36 4.2 Handling and Lifting ................................................................................................................... 36 4.3 Decommissioning ...................................................................................................................... 36 Installation of the VELTRU U10H Robot ....................................................................... 37 5.1 Facility Requirements for Robot Installation ............................................................................... 37 5.2 Integrator Provided Hardware and Fixtures ............................................................................... 37 5.3 Requirements for Robot Frame.................................................................................................. 38 5.3.1 Structural requirements .............................................................................................................38 5.3.2 Interface Robot-Frame ..............................................................................................................38 5.3.3 Mounting Space Required .........................................................................................................38 5.4 Hints for Successful Integration ................................................................................................. 39 5.5 Installing the VELTRU U10H Robot in a frame .......................................................................... 39 5.6 Mounting the Forearms and Tool Carrier to the Robot ............................................................... 40 VELTRU AG User’s Guide and Planning Manual Unloading Robot U10H Page 5 of 73 5.7 Minimum Safety Requirements .................................................................................................. 41 5.8 Wiring ........................................................................................................................................ 42 5.8.1 Grounding .................................................................................................................................42 5.8.2 Default wiring ............................................................................................................................42 5.8.3 Recommended cabling crossections and precautions ..............................................................43 5.9 Servo amplifier configuration ..................................................................................................... 44 5.9.1 Configuration Software ..............................................................................................................44 5.9.2 Version of Drive Parameters .....................................................................................................46 5.9.3 Write Parameter File to Drive ....................................................................................................47 5.9.4 Write Drive Firmware .................................................................................................................48 5.9.5 Backup Parameter of Drives .....................................................................................................48 5.9.6 Integrated Safety .......................................................................................................................49 5.9.7 Status information .....................................................................................................................50 5.9.8 DipSwitches ..............................................................................................................................50 5.9.9 Manually setting up drive communication ..................................................................................51 5.10 Kinematics and Axes Definitions ................................................................................................ 53 6 Optional features ........................................................................................................... 54 6.1 6.1.1 Manual Brake Release ..............................................................................................................54 6.1.2 Mounting a Brake Release Button .............................................................................................54 6.2 7 8 Motor Brakes ............................................................................................................................. 54 Adding Hoses to Joints .............................................................................................................. 54 System Cabling and Checks ......................................................................................... 56 7.1 Introduction ................................................................................................................................ 56 7.2 General System Overview: Minimum Requirements .................................................................. 56 7.3 Inspections before Switching On ............................................................................................... 57 Maintenance Instructions .............................................................................................. 58 8.1 Introduction ................................................................................................................................ 58 8.1.1 General Maintenance Principles and Safety Precautions ..........................................................58 8.1.2 Maintenance Log Book..............................................................................................................58 8.1.3 Maintenance Interval .................................................................................................................59 8.2 Cleaning..................................................................................................................................... 59 8.2.1 Cleaning Agents and Utensils ...................................................................................................60 8.2.2 General Cleaning Instructions ...................................................................................................60 VELTRU AG 8.2.3 8.3 User’s Guide and Planning Manual Unloading Robot U10H Page 6 of 73 Cleaning of the ceramic ball bearings .......................................................................................60 Maintenance .............................................................................................................................. 60 8.3.1 Tools, Materials and Supplies ...................................................................................................60 8.3.2 Check Mounting Screws............................................................................................................61 8.3.3 Check for Traces of Oil or Fat ...................................................................................................61 8.3.4 Check o-rings for arm structure .................................................................................................61 8.3.5 Servo motor Replacement.........................................................................................................63 8.3.6 Servo motor Calibration .............................................................................................................63 8.3.7 Check cabling ............................................................................................................................64 Appendix A Motor Data Sheets ......................................................................................... 65 A.1 General Motor Information ......................................................................................................... 65 A.1.1 General .....................................................................................................................................65 A.1.2 Motor Data ................................................................................................................................65 A.2 Motor Specifications................................................................................................................... 65 A.2.1 A.3 VELTRU U10H Axis 1 and 2 .....................................................................................................66 Motor Pin assignment ................................................................................................................ 67 A.3.1 Power connector .......................................................................................................................67 A.3.2 Feedback Connector .................................................................................................................68 Appendix B Servo amplifier............................................................................................... 69 Appendix C System Cabling .............................................................................................. 71 Appendix D Servo Amplifier Control Loop Structure ...................................................... 73 VELTRU AG User’s Guide and Planning Manual Unloading Robot U10H Page 7 of 73 1 Introduction The VELTRU U10H Robot is a two-axis industrial robot with a parallel structure, specifically designed for industries with a need for flexible automation. The two axes of the robot can move the common platform (gripper connection plate) in a vertical plane (2D). The following picture shows the VELTRU U10H Robot. The VELTRU U10H Robot requires a VELTRU C10 Motion Controller for operation. The robot is programmed and controlled using the C10 motion controller. The robot motion code runs on servo amplifiers integrated in the robot base. To run an application, the robot must be integrated in a structure or frame and additional equipment is required. 1.1 How to use this manual This manual provides information on installation, preventive maintenance, troubleshooting and repairs on the VELTRU U10H Robot. VELTRU AG User’s Guide and Planning Manual Unloading Robot U10H Page 8 of 73 Chapter 1 provides information on how to use this manual and other additional manuals which may be required. Chapter 2 explains the necessary safety measures. Chapter 3 provides the technical specifications. This chapter includes drawings to specify the dimensions of the VELTRU U10H robot system. Chapters 4 to 7 provide information on transportation, assembly, installation and operation of the VELTRU U10H Robot system. Chapter 8 provides information on the servicing and maintenance procedures. 1.2 Related Manuals The VELTRU U10H Robot is delivered with a VELTRU C10 Motion Controller. The VELTRU C10 Motion Controller is not described within this manual. Please refer to the VELTRU C10 Motion Controller User’s Guide and Planning Manual. For programming the Motion Controller, please refer to the corresponding software documentation, as listed in the VELTRU C10 Motion Controller User’s Guide and Planning Manuel. Older versions of the VELTRU U10H Robot system are described in Document 9800001200. Please refer to section 1.5 for product identification. The following table gives a brief description of the contents and organization of the VELTRU documentation set. Manual Material Covered VELTRU C10 Motion Controller User’s Guide and Planning Manual This manual provides information on the installation, configuration, and maintenance of your VELTRU C10 Motion Controller. VELTRU U10 User’s Guide and Planning Manual This manual covers older revisions of the U10H robot system. No reference manual is shipped with the VELTRU C10 Motion Controller. For details on the VELTRU C10 Motion Controller functions, please contact VELTRU AG. Please refer to section 1.7. 1.3 Notes, Cautions and Warnings used in this Manual There are three levels of special notations used in VELTRU manuals. CAUTION If the action specified in the “Caution” is not complied with, damage to your equipment could result. VELTRU AG 1.4 User’s Guide and Planning Manual Unloading Robot U10H Page 9 of 73 WARNING If the actions indicated in a “Warning” are not complied with, injury or major equipment damage could result. A Warning statement will typically describe the potential hazard, and the measures that you must take to reduce the hazard. NOTE A “Note” provides supplementary information, emphasizes a point or procedure or gives a tip for easier operation. What you must know before you use the VELTRU U10H Robot Standard tools are required for normal maintenance and repair work. Tools and special procedures are described in more detail in chapter 8.3.1. WARNING 1.5 All personnel working with the VELTRU U10H Robot System must read the safety regulations outlined in Chapter 2: Safety. Incorrect operation can cause injury to personnel or damage to the equipment. Compatibility The VELTRU U10H Robot system as described in this manual consists of the hardware and software listed in the following table. All new systems shipped from the factory will include the correct equipment as shown. If you have existing VELTRU equipment, this table can help distinguish new equipment from older equipment, especially since some of it is visibly similar. See the VELTRU C10 Motion Controller product data label or the VELTRU U10H Robot serial number for model number or part number information. Description Machine Type Number VELTRU U10H Robot VELTRU U10H Robot standard version IP54 or or 1.5.1.1.1.1 VELTRU U10 Robot discontinued version IP54 VELTRU U10H Robot discontinued version IP54 Machine Type 9014001200 Machine Type 9014000100 Machine Type 9014000200 For discontinued versions of the robot, please refer to the corresponding manual. See section 1.2 for further details. VELTRU AG 1.6 User’s Guide and Planning Manual Unloading Robot U10H Page 10 of 73 Product Identification A 5-digit serial number identifies the VELTRU U10H Robot. The serial number is on the type plate, which is located inside the robot housing on the robot base near the connector. NOTE The type plates and marks shown in the figures below only serve as examples. For exact identification see the plates and marks on your robot. Please have the serial number available when you call VELTRU Customer Service for technical support. The location of the type plate is shown in following picture. Serial Number The layout of the type plate is shown in following picture. VELTRU AG 1.7 User’s Guide and Planning Manual Unloading Robot U10H Page 11 of 73 Where to Get Help VELTRU may be contacted at the following address: VELTRU AG Flurlingerweg 3 8245 Feuerthalen Switzerland When calling, please have the serial number of the VELTRU C10 Motion Controller and the serial number of the VELTRU U10H Robot ready. Service Calls For service, maintenance or spare part requests please call our Support Center: +41 (0)52 654 03 80 (Monday to Friday, 7:30 am to 5:00 pm, CET) +41 (0)52 654 03 81 (Fax) Please direct all support E-Mails to: [email protected] Training Information For information regarding VELTRU Training Courses, please contact your sales partner at VELTRU AG. VELTRU AG User’s Guide and Planning Manual Unloading Robot U10H Page 12 of 73 2 Safety This chapter describes the safety features of the VELTRU U10H Robot System. The VELTRU U10H Robot is applied in various applications. The information in this manual does not cover every application, nor does it cover all the peripheral equipment which can influence the safety of the total system. This manual provides instructions on how to use the robot safely and which standards are taken into account. To protect personnel, the robotic system must be installed in compliance with the safety requirements set out in the standards and regulations of the country where the robot is installed. The user of a VELTRU Robot is responsible for ensuring that the safety requirements and regulations in the country concerned are observed. The user of a VELTRU Robot must ensure that the safety devices necessary to protect people working with the robot system have been designed and installed correctly. The user of a VELTRU Robot shall consult the integrator of the robot system to determine the required safety concept. 2.1 Introduction The user of a VELTRU robot must read and understand this manual and the safety precautions described. It is the responsibility of the integrator to make the personnel working with the VELTRU robot aware of the information contained in this document, and the details given on how to run the system and perform maintenance safely. CAUTION The VELTRU U10H Robot moves at high speed and can exert considerable force. Only trained personnel should operate the VELTRU U10H Robot. WARNING ALL personnel who operate or maintain VELTRU U10H Robot systems, or who work within or near the workcell must read the VELTRU U10H User's Guide. The guide assumes that the integrator has a sound working knowledge of the VELTRU C10 Motion Control system when operating a VELTRU U10H robot. The user should provide the necessary additional training for ALL personnel working within or around the workcell. VELTRU AG 2.2 User’s Guide and Planning Manual Unloading Robot U10H Page 13 of 73 Applicable Safety Standards The VELTRU U10H Robot conforms to the requirements of all the standards listed below, if you install it safely as described in this user’s guide. The system is designed in accordance with: EC Machine Directive 2006/42/EC. EC Low Voltage Directive 2006/95/EC. EC Electromagnetic Directive 2004/108/EC. The applicable directives are EN 292-1/292-2, EN 775, EN 954-1, and EN 1050 The safeguards and interlocks are not included in the VELTRU U10H Robot System. They need to be installed by the Integrator. WARNING You must not override the robot safety devices at any time. The system must conform to all local and national regulations and safety standards. If used in an EU or EEA member country, all components in the robot workcell must comply with the safety requirements above and related harmonized standards. In non-EU or EEA member countries, VELTRU strongly recommends that, in addition to complying with the applicable local and national regulations, a similar level of safety as described above is maintained. In the USA, applicable standards include ANSI/RIA R15.06-1999 and ANSI/UL 1740. In Canada, applicable standards include CAN/CSA Z434. If the robot is installed in the USA or Canada you must follow the American National Standard for Industrial Robot Systems-Safety Requirements, published by the RIA in conjunction with the American National Standards Institute (ANSI). The publication, ANSI/RIA R15.061999, contains guidelines for robot system installation, safeguards, maintenance, testing, start-up, and operator training. The document is available from: American National Standards Institute 1430 Broadway New York, NY 10018 2.2.1 Safety Standards Some of the safety standards applicable to industrial robots are shown in the following table. The list is a partial list of robot safety standards. It is not a VELTRU AG User’s Guide and Planning Manual Unloading Robot U10H Page 14 of 73 complete list. You must comply with all local and national standards for the location where the robot is installed. International USA Canada ISO 10218 ANSI/RIA R15.06 Europe Title of Standard EN775 Manipulating Industrial Robots - Safety CAN/CSA Z434-94 Industrial Robots and Robot Systems - Safety Requirements EN 292-2 Safety of Machinery- Basic Concepts, General Principles for Design EN 954-1 Safety Related Parts of Control Systems - General Principles for Design EN 1050 Safety of Machinery - Risk Assessment VELTRU recommends the following standards to the Integrator: • For safety fences, see EN 294 and EN 811. • For fixed and moveable guards, see EN 953. • For pneumatic system, see EN 983. • For safeguards and interlocks, see EN 418, EN 1088, and EN 60947-4. Please consider using the most actual version of the above standards. 2.2.2 Definitions of Safety Functions Emergency Stop – IEC 60204 If operated, the Emergency Stop cuts all power to the Servo Amplifiers. This removes power from the robot axis actuators and stops all moving parts of the robot. Safety Stop – ISO 10218 (EN 775) When a safety stop circuit is provided, each robot is delivered with the necessary connections for the safeguards and interlocks associated with this circuit. You must reset the power to the machine actuators before any robot motion can be initiated. Resetting power to the machine actuators will not cause the robot to move. Safeguard Interlock– ISO 10218 (EN 775) VELTRU AG User’s Guide and Planning Manual Unloading Robot U10H Page 15 of 73 This is an interlock which connects a guard or safety device to the robot controller and/or the power supply of the robot and its associated equipment. 2.3 Intended Use of the Robots The installation and use of VELTRU Robots and related products must comply with all safety instructions and warnings in this manual. Installation and use must comply with all applicable local and national requirements and safety standards. The VELTRU U10H Robots are intended for use in pick-and-place applications and material handling for payloads of up to 6kg including gripper weight. WARNING For safety reasons, you must not modify the VELTRU U10H Robots. WARNING You must not use the VELTRU U10H Robot System for non intended use. (See also chapter 3 for further Product Specifications.) The VELTRU C10 Motion Controller used to control the U10H robot system is a component subassembly of a complete industrial automation system. You must install the motion controller inside a suitable enclosure. The motion controller must not come into contact with liquids. The standard VELTRU U10H Robot robot must not come into contact with liquids. Do not use VELTRU Robots or related equipment in any of the following situations: WARNING • In hazardous or explosive atmospheres. • In mobile, portable, marine, or aircraft systems. • In life-support systems. • In residential installations. • In situations where the VELTRU Robot and/or related equipment is subject to extremes of heat or humidity. See Chapter 3.7.4 for temperature and humidity ranges. You must observe the instructions for operation, installation, and maintenance given in the VELTRU U10H User’s Guide. Improper use of a VELTRU U10H Robot can: • Cause injury to personnel. VELTRU AG User’s Guide and Planning Manual Unloading Robot U10H • Damage the robot or other equipment. • Reduce system reliability and performance. Page 16 of 73 All persons that install, commission, operate, or maintain the robot must: • Have the necessary qualifications. • Read and follow exactly the instructions in the VELTRU U10H User’s Guide. Application Questions If you have a question concerning the application of the robot, please contact our support center (see section 1.7). 2.4 Qualification of Personnel This manual is intended for personnel who have a working knowledge of the system. The user must provide the necessary additional training for all personnel who will work with the system. Only trained or skilled personnel should perform certain procedures. Before working with the VELTRU U10H Robot, you must make sure that all personnel: 2.5 • Have received the VELTRU U10H User’s Guide. • Have read the VELTRU U10H User’s Guide. • Understands the VELTRU U10H User’s Guide. • Work in the manner specified in the VELTRU U10H User’s Guide. Safe Working Procedures You must use safe working procedures to prevent injury. You must not modify, bypass or change any safety device or safety circuit in any way, at any time. 2.5.1 Normal Operations All normal operations, in automatic mode, are controlled from outside the safeguarded space. WARNING 2.5.2 Make sure the safety interlock is in place before power is applied to the robot. Risks during Operation Disturbances During operational disturbances you must cut power to the VELTRU U10H Robot. You must interrupt the power supply to the VELTRU Servo Amplifiers VELTRU AG User’s Guide and Planning Manual Unloading Robot U10H Page 17 of 73 using a suitable electromechanical device. See chapter 7.2, General System Overview: Minimum Requirements. You must release pressure in the pneumatic systems before performing any work. Use an approved lockout and tag procedure, e.g. switch off and lock the mains switch, before performing any work on cabling or in the electric cabinet. Other hazards can occur, other than those associated with regular operation, if the working process is interrupted. Call maintenance or service if you think there is a fault. Only trained personnel, who are familiar with the entire installation, as well as the special risks associated with its different parts, may perform service or troubleshooting. The VELTRU U10H Robot is a flexible tool which is used in many different industrial applications. The appropriate safety regulations apply to any work or maintenance performed on the robot. Take care at all times. 2.6 Risk Assessment VELTRU has performed a Risk Assessment for this product, based on the possible applications of the robot. The conclusions are summarized below. The following are recommendations on how to minimize the risks and how to meet the applicable safety standards. CAUTION Commissioning of a VELTRU U10H Robot System requires step-by-step installation and testing procedures. WARNING Without special safeguards in the control system, the VELTRU U10H Robot can inflict serious injury to personnel within the work envelope. Safety standards in several countries require appropriate safety equipment as part of the system. The robot is a Category 3 device (according to EN 954). Safeguards in accordance with the EN 954 Category 3 Control System must protect the user. Gravity Heavy components (e.g. the base plate) of the VELTRU U10H Robot can drop if the attaching screws are loose. Heavy components can cause injury during installation if improper lifting techniques are used. The forearms of the robot will move and can cause injury if the motor brakes are released. Moving Parts VELTRU AG User’s Guide and Planning Manual Unloading Robot U10H Page 18 of 73 The VELTRU U10H Robot is a mechanical device. Single links of the mechanism are accessible and will cause pinching. You must avoid contact with moving parts. Always keep the all robot covers closed during operation. Hazards from the attached tooling The maximum joint tip speeds achieved by VELTRU U10H Robots in a runaway situation are shown in the below table. The table thus also shows the 1 maximum tool carrier velocities in runaway situations Make sure that the robot arm cannot expel any tooling, fixtures, end effectors, etc. Also make sure that if the end effector holds a payload, that payload is not expelled accidentally. WARNING Joint Description Maximum Velocity Tool Carrier in y and z cartesian space 23 m/s Design the safeguards around the robot to withstand the impact of any item expelled accidentally. Projectile energy can be as high as 220 J (162 ft.-lb). Hazards from electrical power WARNING To avoid injury or damage to equipment, always remove the mains power before performing any repair or upgrade. Use appropriate lockout and tag procedures, e.g. a lockable mains switch. WARNING The amplifiers use large capacitors with residual energy also after switching off the mains. Use appropriate procedures to avoid residual energy causing damage or injury. The manipulator uses potentially lethal voltages in the following areas: 1 • The power supply for the motors (up to 390 V DC) • The power supply for the amplifier units (up to 230 V AC, 20A) • The power supply for tools • The external voltage connected to the control cabinet. This voltage is present even when the robot is disconnected from the mains • Only non lethal 24VDC are applied to the C10 Motion Controller These velocities can occur only in a runaway situation or mechanical failure situation. They are not performance specifications. VELTRU AG NOTE User’s Guide and Planning Manual Unloading Robot U10H Page 19 of 73 VELTRU recommends you keep the VELTRU C10 Motion Controller running, even when you operate the Emergency Stop of the VELTRU U10H Robot . VELTRU also recommends to keep the 24VDC control supply to the servo amplifier alive when operating the Emergency Stop. Otherwise, manual operation of the brakes will not be possible. Hazards related to tools, etc. Mains power is present on tools, material handling devices, etc., even if the robot system is switched off. Damage can occur to power supply cables which are in motion during the working process. 2.7 Safety Functions and Safeguards VELTRU recommends the following points to make sure that your VELTRU U10H Robot conforms to the regulations described in section 2.2, Applicable Safety Standards. It is the responsibility of the Integrator to make sure the installation conforms to all applicable local and national regulations. Safeguards are an integral part of robot cell design. All VELTRU Robot systems are computer-controlled, and can activate remote devices at times or along paths you may not anticipate. Make sure that all necessary safeguards are in place to prevent personnel from entering the workcell whenever power is present to the equipment. The operator or maintenance personnel must make sure that adequate safeguards are installed. Light curtains or safety floor mats are not adequate safeguards, as the robot may expel parts with high kinetic energy. The robot has ONE security circuit. VELTRU recommend that you do not include the VELTRU C10 Motion Controller and the 24 V power supply in the robot security circuit. You do not need to switch off power to the motion controller when you enter the robot cell. The brake release and HMI (or any other optional equipment) use the 24 V supply. EN 954 prescribes the use of a safety interlock. A Category 3 device requires a double interlock. When you open the safeguards or operate the Emergency Stop the interlock must cut all power to the robot. It must cut the power supply to the Amplifiers, by a double electromechanical device. You must reset the interlock circuits manually before you start the robot in the automatic mode. See also EN 60947-4 for devices to cut power off and EN 1088 for safety interlocks. WARNING The VELTRU U10H Robot is capable of moving at high speeds. Death or serious injury can occur if the robot strikes the operator or maintenance personnel. VELTRU AG User’s Guide and Planning Manual Unloading Robot U10H Page 20 of 73 When power is applied to the VELTRU U10H Robot interlocked perimeter barriers stop the operator and/or maintenance personnel from entering the robot work envelope. In any other operating mode including calibration, teaching or tool changes you must interrupt the power supply to the VELTRU Servo Motors. See section 7.2, General System Overview: Minimum Requirements. WARNING The VELTRU supplied system components provide no safety control system as defined by EN 954. It is the integrator‘s responsibility to supply interlocked barriers. The interlocked barrier must interrupt the supply to the VELTRU Servo Motors in the event of personnel attempting to enter the workcell. Failure of the integrator to install suitable safeguards could result in injury or death. The VELTRU U10H Robot system is not designed to run in a manual mode as described in EN 775. You may observe the complete workcell from outside the safeguards. Make sure all security devices are in place, according to EN 954, Category 3, before you run the robot NOTE For system calibration it is sometimes necessary to have the peripherals running even when the security circuits of the robot are open. If the security level of the peripherals allows you to work without safeguards VELTRU recommends you install two security systems: The main interlock for all the equipment and an interlock for the robot. Programming or calibration with amplifier power off is done using the brake button to maneuver the robot manually. Power for the servo amplifiers is therefore not required for any other manipulation. You must design your applications so that the programmer does not have to enter the work envelope while the amplifiers are enabled. 2.7.1 Computer-Controlled Robots VELTRU systems are computer controlled, and the program that is currently running the VELTRU U10H Robot may cause the robot to move at times or along paths you may not anticipate. When programming the robot make sure it only runs with the security circuits closed and that no one is inside the workcell. 2.8 Safety Requirements for Additional Equipment and Peripherals Additional equipment used with the VELTRU U10H Robot, such as grippers or conveyor belts, must not reduce the workcell safeguards. Make sure that all Emergency Stop switches are visible and accessible. All components and equipment must comply with the safety requirements as listed in section 2.2, Applicable Safety Standards. VELTRU AG 2.8.1 User’s Guide and Planning Manual Unloading Robot U10H Page 21 of 73 Robot Modifications The following information is provided as a guideline to modifications. For further information see chapter 5. Acceptable Modifications The following robot modifications will not cause problems, but may affect robot performance: Attaching pneumatic hoses, or electrical cables to the robot. You must design the attaching cables or hoses so that they do not restrict joint motion or cause robot motion errors. Routing pneumatic hoses, or electrical cables through the robot. If you feed additional pneumatic hoses, or electrical cables through the robot they must comply with the applicable safety standards. Acceptable Modifications which will void the warranty on certain parts Modifications to the tool carrier. This will annul the warranty for the tool carrier. Modifications of the robot access covers. This will annul the warranty with ingress protection. Unacceptable Modifications The modifications listed below may damage the robot, reduce system safety and reliability, or shorten the life of the robot. CAUTION 2.8.2 Making any of the modifications outlined below will void the warranty on any components that VELTRU determines are damaged due to the modification. You must contact VELTRU Customer Service if you are considering any of the following modifications (see also Chapter 1, section 7): • Attaching tooling, utility boxes, solenoid packs, vacuum pumps, tools, lighting, etc., to links other than the tool carrier. • Modifying any components of the drive system. • Modifying, including drilling or cutting, any robot housing. • Modifying any of the robot printed-circuit boards (PCBs) or electrical components. • Any modifications that will compromise EMC performance. Safety Risks Related to End Effectors Gripper Make sure that if a gripper is used to hold a work piece, the work piece cannot come loose. VELTRU AG User’s Guide and Planning Manual Unloading Robot U10H Page 22 of 73 You must design the grippers so that they retain the work piece in the event of a power failure or a malfunction of the controller. Make sure that you can release the work piece manually in the event of a malfunction. VELTRU is not responsible for grippers or their use. Pneumatic/magnetic systems Special safety regulations apply to pneumatic and magnetic systems. According to EN 983, you must anticipate a pressure release in pneumatic systems. After the mains are cut, it must be possible to dissipate residual energy remaining or stored in the circuits of the machinery without risk to exposed persons. Gravity will cause any parts or objects held by these systems to drop. 2.8.3 Other VELTRU C10 Controlled Devices You can program a VELTRU U10H Robot to control equipment or devices other than the robot, e.g. peripheral devices. The software controlling other devices can cause them to operate unexpectedly. Make sure that safeguards are in place to prevent personnel from entering the workcell when a program is running. 2.9 Sound Emissions The sound emission level of the VELTRU U10H Robot depends on the speed and payload. The maximum value is 75dB, at the maximum speed allowed in the preconfigured settings. NOTE With a typical cell design, the sound emission level of the VELTRU U10H Robot is usually below 70 dB. To achieve sound emission levels below 70 dB a work cell with a first eigenfrequency of at least 22 Hz, and safety fences made of 12mm polycarbonate (PC) are to be used. WARNING Acoustic emissions from VELTRU Robots were measured without any peripherals, such as valves or pumps. The integrator must make sure, that valves, pumps or other peripheral equipment complies with the appropriate sound emission levels. VELTRU AG User’s Guide and Planning Manual Unloading Robot U10H Page 23 of 73 2.10 Thermal Hazard WARNING Do not touch the robot joint motors. If the robot is operated at cycle times of over 80 cycles per minute the robot joint motor surface temperature can exceed 70°C (158°F). WARNING Use a CARBON DIOXIDE extinguisher in the event of a fire in the robot. 2.11 Protection against Unauthorized Operation You must protect the system against unauthorized use. Use locking keyboards and secure pointing devices in a lockable cabinet to prevent unauthorized access to the system. 2.12 Safety Aspects while Performing Maintenance WARNING Use an appropriate lockout and tag procedure during maintenance and repair of the VELTRU U10H Servo Amplifiers and the VELTRU C10 Motion Controller. The robot is extremely powerful, even at low speed. You must observe the applicable safety regulations and instructions when you enter the robot’s safeguarded space. You must read and understand the following points: • It is the responsibility of the integrator of the complete system to make sure that all safety circuits are interlocked according to the applicable standards for that circuit. • User and integrator must read and understand the instructions in the VELTRU U10H Robot User’s Guide. • The integrator must make sure that the mains supply to the robot is connected in such a way that it can be turned off and interlocked outside the robot’s working space. • It is the responsibility of the Integrator to make sure that all Emergency Stop circuits are interlocked according to the applicable standards for that circuit. • The integrator must make sure that emergency stop buttons are highly visible and accessible. • It is the responsibility of the user to make sure that safety instructions are available for the installation at all times. • Only skilled personnel should install the robot. VELTRU AG NOTE User’s Guide and Planning Manual Unloading Robot U10H Page 24 of 73 • Make sure that when disconnecting or connecting electric cables and disconnecting or connecting sub-assemblies that the mains power is switched off and locked. Use an appropriate lockout and tag procedure. • Gravity will cause the robot to move when the brakes are released. You must secure the tool carrier before you release the brakes. You can support the tool carrier with one hand while you release the brakes. • Be aware of stored energy (capacitance) and hot surfaces (heat sinks) inside electrical equipment. • External power is supplied to units inside the controller e.g. I/O modules. • Only trained or otherwise skilled personnel should perform maintenance and/or repairs. 2.13 Transport and Lifting WARNING Do not stand underneath the robot when it is lifted or transported. Only skilled persons shall transport or lift the robot. You must use the proper equipment when transporting or lifting the VELTRU U10H Robot. Always use the appliances provided for lifting. See chapter 4 to 6 for more information on transporting, lifting, and installing. 2.14 Risks Due to Incorrect Installation or Operation WARNING Do not remove or replace any assemblies, subassemblies, Printed Circuit Boards (PCBs), or components with power present. To prevent injury or equipment damage, always remove power before attempting repair or upgrade procedures. To prevent injury or damage to the equipment while performing maintenance, repairs or installing upgrades do not: • Disable the emergency stop circuits. • Install unauthorized programs on the robotics system. • Use cables other than those supplied. • Use modified components in the robotics system. • Disable the interlock or any other safety device so that operator can enter the workcell with power ON. VELTRU AG User’s Guide and Planning Manual Unloading Robot U10H Page 25 of 73 2.15 Limitation of Liability The above information describes all safety features required to protect personnel from injury or death. It is not a guarantee by VELTRU AG, that the robot cannot damage equipment or peripherals even if all the safety instructions are complied with. 2.16 How Can I Get Help For further support, see section 1.7 VELTRU AG User’s Guide and Planning Manual Unloading Robot U10H Page 26 of 73 3 Product Specification The VELTRU U10H Robot is a two-axis industrial robot specifically designed for flexible automation, material handling and static pick-and-place applications. VELTRU U10H Robots are designed to interface with the VELTRU C10 Motion Controller. The control and operation of the robot is programmed and performed through the VELTRU C10 Motion Controller. The controller has an open PC-based structure that is specially adapted for flexible use and can communicate extensively with external systems. This chapter describes the characteristics of the VELTRU U10H Robot. For the VELTRU C10 Controller, see the VELTRU C10 User’s Guide and Planning Manual. 3.1 Description The VELTRU U10H Robot is a parallel industrial robot designed for static pick-and-place applications. The main characteristics of the VELTRU U10H Robot are: 3.2 • Minimum cycle time of typically 0.7 – 1.0 s • Pick & Place between static positions • Workload up to 6 kg (13.2 lb including gripper weight • Working envelope up to 1000 mm horizontally and 300mm stroke • Single sided mechanical interface • Conformity with international standards • Rugged design Orientation in Cartesian Space The robot joint locations used in all documentation related to the VELTRU U10H Robot are shown in the following picture: VELTRU AG User’s Guide and Planning Manual Unloading Robot U10H Page 27 of 73 Z Joint 2 Passive arm Y X Joint 1 VELTRU uses the following convention to define the orientation of the robot in cartesian space. The robot is moving in y-z plane. It is assumed the robot is working perpendicular to a machine, e.g. a thermoformer or traysealer, having its main moving direction in x. z is looking up vertically. Joint 1 is driving the passive arm for keeping the tool carrier plate horizontally at all times and is defining the y-axis. Joint 2 is having the two parallel forearms. 3.3 Intended Use of the VELTRU U10H Robot The VELTRU U10H Robots are used in various applications in areas of flexible automation. They are intended for use in parts pick-and-place applications with product weight of up to 6kg. VELTRU AG User’s Guide and Planning Manual Unloading Robot U10H Page 28 of 73 1 3 4 6 2 5 The figure above shows a drawing of the VELTRU U10H Robot structure. The base plate (1) does not move. It supports the entire robot structure. Two motors (6 ), mounted on the base plate, actuate the 2 degrees of freedom of the structure. Two kinematic chains (2 and 3) link the base plate (1) to the tool carrier (5). Each kinematic chain consists of an arm (2) and a forearm (3). A third passive kinematic chain (4) ensures the tool carrier plate remains horizontal at all times. WARNING You must not make modifications to VELTRU U10H Robots. For permissible modifications refer section 2.8. WARNING You must not use the VELTRU U10H Robot System for any application other than its intended use. If you have any doubts about your application, please contact VELTRU (see section 1.7) VELTRU AG 3.4 User’s Guide and Planning Manual Unloading Robot U10H Dimension Drawings VELTRU U10H robot Page 29 of 73 VELTRU AG 3.5 User’s Guide and Planning Manual Unloading Robot U10H Page 30 of 73 Configuration of the VELTRU U10H Robot The VELTRU U10H Robot System consists of a manipulator and a motion controller. Each different manipulator uses the same motion controller. Description Machine Type Number VELTRU U10H Robot VELTRU U10H Robot incl. servo amplifier standard version IP54 Machine Type 9014001200 VELTRU U10 Robot incl. servo amplifier discontinued version IP54 Machine Type 9014000100 VELTRU U10H Robot incl. servo amplifier Machine Type 9014000200 VELTRU AG User’s Guide and Planning Manual Unloading Robot U10H Page 31 of 73 discontinued version IP54 VELTRU C10 Motion Controller VELTRU C10 Motion Controller Machine Type 90010000100 For discontinued versions refer to the corresponding manual. All specifications are subject to change without notice. 3.6 Workrange and Joint Motions of the VELTRU U10H Robot Joint 1 and 2 consist of two arms and forearms, linked to the tool carrier. The rotational movements of the arms in space determine the travel of the tool carrier. The rotational movement of the arms is limited to +40° from the horizontal position by a hardstop. The software also limits the travel of the arms. The software constantly calculates soft stops to limit the travel of the tool carrier. CAUTION When you move the robot in joint mode, the resulting trajectory of the tool carrier is not linear, but quasi spherical. Make sure that the robot does not contact any of the peripherals. VELTRU AG 3.7 3.7.1 User’s Guide and Planning Manual Unloading Robot U10H Page 32 of 73 Technical Data and Specifications Performance Specifications The performance specifications and technical data of the VELTRU U10H robot are shown in the following table. The payload includes product and gripper. The defined payload does not include the weight of the tool carrier. You must include the tool carrier and gripper to the total load (product weight + tooling) for correct specification. Feature VELTRU U10H Robot Axes 2 axis Protection Classification NEMA2 / IP54 Payload incl. customer supplied End Effector up to 6kg / 13.2 lb VELTRU AG User’s Guide and Planning Manual Unloading Robot U10H Typical cycle times under optimal integration: Page 33 of 73 0.6s 1.0kg payload , 100mm/700mm/100mm Repeatability Y and Z ± 0.15 mm / ± 0.006 in Accuracy Y and Z ± 0.5 mm / ± 0.019 in Maximal speed of tool carrier Y and Z 10m/s Joint acceleration of tool carrier Use the VELTRU robot calculator to determine the maximum acceleration for your application. Minimal jerk time 10 ms Weight 75kg Life expectation 42000 h Design Life 6000h Revision cycles 3.7.2 Power Supply Specifications The power supply requirements are shown in the following table 3.7.3 Feature U10H Mains Supply voltage 230V AC, single phase Mains Supply power 4.5 kVA Mains Supply frequency 45 Hz to 66 Hz Control Supply voltage 24VDC +/-15% Control Supply power 30VA Required Safety Category The VELTRU U10H Robot is considered an industrial robot. Therefore EN954 safety category 3 is required for the installation of the equipment. 3.7.4 Environment Requirements The environmental requirements are shown in the following table VELTRU AG 3.7.5 User’s Guide and Planning Manual Unloading Robot U10H Page 34 of 73 Feature Value Ambient temperature (operating) 2º C to 50º C / 35.6.º F to 122 º F Ambient temperature (transportation and storage) - 25º C to 55º C / -13º F to 131 º F Humidity (operating and storage) max. 95 % Emissions The emissions data is shown in the following table. 3.7.6 Feature Values Noise < 75 dBA Pollution degree 2 (EN 61131-2) Requirements for Frame and Workcell of U10H Robots The frame and workcell requirements are shown in the following table. See also chapter, Requirements for Robot Frame, for more details. Requirement Value Static load > 80 kg Natural frequency (for optimal performance) > 18 Hz Max. force in fixing points (referring to the z-direction in the base coordinate system) 1500 N Mounting hole pattern see chapter 5 Mounting surface must be leveled to within ±10 degrees Category EN 954 Category 3 required Doors lockable VELTRU AG User’s Guide and Planning Manual Unloading Robot U10H Page 35 of 73 4 Transport, storage and disposal of the VELTRU U10H Robot System This chapter provides information on transport, storage and disposal of the VELTRU U10H Robot. WARNING 4.1 Only trained, skilled personnel, used to handling heavy industrial equipment should handle the robot. Packing, Transport and Storage The following are guidelines for transporting and unpacking the robot. WARNING 4.1.1 VELTRU accepts no responsibility for damage or injury due to improper handling or installation of a VELTRU U10H robot. Incoming goods inspection The VELTRU U10H Robot and the VELTRU C10 Motion Controller are delivered pre-assembled. Each shipment is accompanied with a delivery note containing the necessary information to keep track of the goods received. Inspect all shipping crates for evidence of damage during transport before unpacking them. If any damage is present do not open the crate. Request that the carrier’s agent be present at the time the crate is unpacked. When you have unpacked the robot, check again for damage during transport. Compare the items received, the delivery note and your equipment purchase order. Verify that all the items are present and that the shipment is correct and free from damage. If the items received do not match the delivery note or your order, contact your VELTRU representative. After unpacking retain all containers and packaging material. You can use these items later if you have to relocate the equipment. 4.1.2 Repackaging for Relocation To transport the robot, repack it as originally packed at the factory. VELTRU recommends that you use the original packing material and follow all safety notes applicable for handling and installation. Improper packaging for shipment will void the warranty. VELTRU AG 4.1.3 User’s Guide and Planning Manual Unloading Robot U10H Page 36 of 73 Transportation and Storage Store the robot and the motion controller in the VELTRU supplied packing. This packing is designed to prevent damage from normal shock and vibration. Protect the package from excessive shock and vibration. • Allowed temperature range: -25 ºC to 55 ºC. • Allowed humidity range: 5 to 90%, non-condensing. VELTRU ships the equipment in a number of boxes and shipping crates, depending on the sales order. The boxes have different dimensions and weights. WARNING 4.2 The center of gravity of the robot shipping crates is not in the middle of the boxes. Be careful when you transport the crates. Handling and Lifting VELTRU recommends that you use lifting straps and a traverse crane to lift the VELTRU U10H Robot. WARNING 4.3 Never walk under a suspended load. Do not transport the robot crate by hand. VELTRU cannot accept responsibility for injury due to improper handling or lifting of a VELTRU U10H Robot. Decommissioning The components of the robot are manufactured from many different materials. Some of them are listed below to facilitate decommissioning. This allows you to dispose of the robot in a way that does not have a detrimental effect on health or the environment. • The robot arm system is carbon fiber. • The robot base and the metallic moving parts are aluminum. • The ball bearings on the forearms are AlO2 ceramics • The covers are ABS. • The plastics used are PA and POM. • Take care when dismantling the motors and cables. The motors are filled with food grade oil. VELTRU AG User’s Guide and Planning Manual Unloading Robot U10H Page 37 of 73 5 Installation of the VELTRU U10H Robot Make sure that the robot is installed in a safe and secure manner by professionals familiar with the structural engineering principles related to the installation of large industrial equipment. The information on the following pages is a guide to help you install your robot. WARNING 5.1 The customer must have the installation plan for the selected site verified by a structural engineer or a similarly qualified professional. VELTRU does not accept responsibility for damage due to improper installation. Facility Requirements for Robot Installation The site for the standard VELTRU U10H Robot installation must meet the following conditions: 5.2 • Temperature: 2° to 40°C (32 to 104°F). • Humidity: 5 to 95% (non-condensing). • No dust or smoke. • No flammable or corrosive material. • Non-flammable and non-corrosive atmosphere. • No vibration. • Enclosed control cabinet. • Easy access to the robot and the control unit for service and repair. • No abrasive dust such as sand or metal powder. Integrator Provided Hardware and Fixtures The Integrator must provide the following hardware and fixtures: • Suitable robot base or frame • Installation tools and handling devices (e.g. torque wrench or screw wrench with suitable inserts) • Lifter or crane • Mounting screws or bolts (4 x M10, with large washer) • End effector to fit the tool carrier • Safeguarding • A suitable electrical ground point • A single phase, 230 V AC power supply • A 24 V DC power supply for the controls VELTRU AG 5.3 5.3.1 User’s Guide and Planning Manual Unloading Robot U10H Page 38 of 73 Requirements for Robot Frame Structural requirements You must install the VELTRU U10H in a frame. A frame is a dedicated robot support on a packaging or production machine. The floor under the frame must be level, stable and continuous. The stiffness of the frame or support (including the robot weight) must have an eigenfrequency of at least 18 Hz. The robot produces vertical forces of up to 1500 N and horizontal forces of up to 600N. 5.3.2 Interface Robot-Frame The VELTRU U10H has four fixation holes, where the base plate of the robot must be connected to the frame. For the bore pattern, see the following picture: Suitable attaching screws: Metric M 10 Property class 8.8 socket screws with large washer. 5.3.3 • Tightening torque: 48 Nm (lubricated) • Use Loctite or similar to retain the screws. Mounting Space Required The space required to successfully install the VELTRU U10H is shown in chapter 3.4, Dimension Drawings VELTRU U10H robot. Each arm rotates VELTRU AG User’s Guide and Planning Manual Unloading Robot U10H Page 39 of 73 about its rotation axis on a radius of 350mm up to its hardstop. There must be no restrictions within that range. The VELTRU U10H Robot is specially designed for fast movements and may break if a collision happens. You must make sure that you have a proper cell layout and programming to avoid collisions. WARNING Broken robot parts may fall on your peripheral systems and cause more damage. VELTRU is not responsible for any damage caused due to collisions. Do not install any mechanical joint limits on the VELTRU U10H Robot other than those in place. To define software joint limits or collision detection in the control system, please refer to the VELTRU Software Manuals. 5.4 Hints for Successful Integration Due to its nonlinear construction the robot will perform best in the center of the given workrange and lose performance and stability at the borders. For optimum performance make sure the robot is centered within the working area. 2 The tool carrier can reach an acceleration of up to 8 G (1 G = 9.81 m/s ). Even light weights appear as heavy loads to the robot. Try to keep the gripper weight and dimensions as small as possible (see chapter 3 for Product Specifications). Minimize the distance between the tool carrier and the center of gravity of the gripper and product. The distance multiplied with the weight will result in a moment of inertia on the tool carrier and reduce the stability of the robot. 5.5 Installing the VELTRU U10H Robot in a frame The following paragraphs describe the installation of the robot to a frame or a production machine. WARNING Never walk under a suspended load The following tools are required to install the robot using a traverse crane. Tool Part Number Traverse Crane Integrator provided 4 x M10 ISO Property Class 8.8 Mounting Screws and large washers Integrator provided Torque Wrench Integrator provided VELTRU AG User’s Guide and Planning Manual Unloading Robot U10H Lifting strap with a breaking strain of more than 50 kg Integrator provided 1. Place the robot under the frame. 2. Wrap the lifting strap around the robot base between the two motors. WARNING Do not attempt to lift the robot around the covers, as they will break. If the robot falls it will cause personnel injury and equipment damage. CAUTION The robot assembly weighs approximately 50kg. Make sure your lifting straps can support more than the weight of the robot assembly. 3. Use the crane to lift the robot housing to mount the struts. 4. Install the M10 mounting screws through the base plate of the robot into the threaded holes in the frame. First tighten them loosely by hand. 5. Tighten all screws using a torque wrench. 6. CAUTION 5.6 Page 40 of 73 Tightening torque: 48 Nm (lubricated) Use Loctite or similar to secure the screws. Remove the lifting equipment. The robot must be fully attached and secured to the frame before starting the motion. Mounting the Forearms and Tool Carrier to the Robot The arms are delivered preassembled. First, mount the two upper arms to the actuator flanges. Use the screws delivered with the robot (four hex-head M6x30 screws with washer). The bolt to attach the passive arm determines the orientation of the arm structure. Then mount the passive arm on the corresponding bolt. Ensure one O-Ring is placed on each side of the ball bearing of the passive arm. VELTRU AG User’s Guide and Planning Manual Unloading Robot U10H Page 41 of 73 Mount the passive arm on this bolt, placing one O-Ring on each side of the bearing and securing with the retaining ring provided. Mount the tool carrier to the tool carrier plate. The following is the mounting pattern on the tool carrier plate: 5.7 Minimum Safety Requirements The robot arm is a potential danger when running. Make sure that the installation conforms to all applicable local and national safety standards (see Chapter 2, Safety). WARNING Do not switch on the power until all of the interlocks are installed and tested. VELTRU AG 5.8 User’s Guide and Planning Manual Unloading Robot U10H Page 42 of 73 Wiring WARNING Turn off the power to the power chassis before installing or removing any cables. Use an approved lockout and tag procedure (see the OSHA Lockout/tagout standard). VELTRU U10H robots are using an Heavy Duty Connector. The corresponding counterpart (female connector) is delivered with the robot. 5.8.1 Grounding Proper grounding is essential for safe and reliable robot operation. The integrator is responsible for the grounding to the robot. All motors are connected to ground with the motor power cable. The integrated drive is connected to ground with the mains supply on the Heavy Duty Connector. Further grounding of the housing is not necessary but is possible at any point of the robot. It is not possible to ground the arm system of the VELTRU U10H Robot. WARNING 5.8.2 Failing to ground robot-mounted equipment or tooling that uses hazardous voltages could lead to injury or death Default wiring The following is a cut through the Heavy Duty connector, as seen by the integrator: Signals GND A B C D RJ45 patch cable for EtherCAT 1x230VAC Connector and PIN Signal VELTRU AG User’s Guide and Planning Manual Unloading Robot U10H Page 43 of 73 A EtherCAT RJ45 Patch Cable) B Optional (EtherCAT RJ45 Patch Cable, Out) C1 +24VDC for drive logic and motor brakes C2 0VDC Reference Potential (BGND) C3 STO 1 (Safe Torque Off, +24VDC) C4 STO GND (0VDC) C5 STO 2 (Safe Torque Off, +24VDC) C6 Brake Release (24VDC, 1A) C7 NC C8 NC D1 N (230VAC) D2 L1 (230VAC) GND GND Additional Integrator wiring is accepted. The Pins support up to 250V/10A each. WARNING 5.8.3 The STO signals must be connected to the safety circuitry. Cutting the mains supply only, the robot will continue moving with the residual energy of the servo amplifier capacitors. Recommended cabling crossections and precautions The Integrator must provide external fusing for the robot. For further basic precautions and system wiring requirement, see chapter 7, System Cabling and Checks. VELTRU uses the EN 60204 standard (for AWG: table 310-16 of the NEC 60°C or 75°C column). VELTRU recommends for the U10H Robot System: Connection Cable type remark PE 4 mm² (12 AWG) AC connection 4 mm² (12 AWG) 230V ,105°C +24 V / XGND max. 2.5 mm² (14 AWG) check voltage drop. EtherCAT RJ45, Cat5 or higher patch cable VELTRU AG 5.9 User’s Guide and Planning Manual Unloading Robot U10H Page 44 of 73 Servo amplifier configuration The VELTRU U10H servo amplifier is compact, digital amplifier. It provides the power to drive the robot joint motors in a VELTRU U10H Robot system. The VELTRU U10H servo amplifiers receive EtherCAT control signals from the VELTRU C10 Motion Controller. The original manufacturer’s documentation as well as the setup software GEMDriveStudio can be downloaded at http://www.infranor.com or from the VELTRU website www.veltru.com . The amplifiers are fully configured by VELTRU. No special adaptations should be required for your application. If required, settings are configured with the servo amplifier setup software through the serial interface of a PC (RS 232). A single access connector is to be found inside the closest servo motor cover (axis 2) to the servo amplifiers. The standard communication COM baudrate setting is 115200. Please contact VELTRU before you change any parameters. 5.9.1 Configuration Software At startup of the software, the default login requests for password ‘admin’. The software configuration allows for different versions of the status and control window display: VELTRU AG User’s Guide and Planning Manual Unloading Robot U10H Page 45 of 73 The standard procedure to connect the servo amplifier is by scanning the network with the following settings: Click here to scan the network. After scanning the network, all connected servo amplifiers are displayed in a ‘tree’ on the left hand side of the screen. Each servo amplifier node can be expanded to access tools and configuration screens, which will open in the main screen section. The main information can be checked in the Device Info and the Device Control. The Device Info shows Firmware Version and Hardware Revision. The Device Control displays mode of operation, warnings and faults, and many more. VELTRU AG User’s Guide and Planning Manual Unloading Robot U10H Page 46 of 73 The servo amplifier settings can be stored in a parameter file. This file is also used to configure a new drive in case of spare part replacements. The latest version of the file is to be found in the VELTRU Software Release Package. NOTE 5.9.2 The parameters may be firmware dependent. Before overwriting settings using a parameter file, make sure to have parameters compatible with the installed firmware or upgrade the firmware to be compatible with your parameters. Version of Drive Parameters The Drive Parameter version (1) information is displayed in the motor configuration. The parameter ‘manufacture’ shows the motor type and parameter version. VELTRU AG User’s Guide and Planning Manual Unloading Robot U10H Page 47 of 73 1 5.9.3 Write Parameter File to Drive In the device tree, select the corresponding drive and open folders ‘parameters setting’ ‘drive parameter’. In the pop-up window, select ‘restore parameters from PC file. NOTE Change the default file filter to .txt file VELTRU AG 5.9.4 User’s Guide and Planning Manual Unloading Robot U10H Page 48 of 73 Write Drive Firmware In GemDriveStudio, click ‘Tools – File service’ In the file service window, use the button ‘Update drive firmware’ to choose the corresponding drive firmware to be loaded. 5.9.5 Backup Parameter of Drives VELTRU recommends to use the ‘project’ approach to backup the configuration of the robot servo amplifiers. A project contains the entire tree configuration information as well as parameter files for each of the drives. The project is stored in a project folder with subfolders for each drive, containing the drive parameter files. VELTRU AG User’s Guide and Planning Manual Unloading Robot U10H Page 49 of 73 The Default Path used by GemDriveStudio to save a project is: C:\Users\‘user‘\Documents\GemDriveStudio\MyProject 5.9.6 Integrated Safety The servo amplifiers provide safe electrical separation according to EN 50178 between the power input / motor connections and the signal electronics. It provides soft-start, overvoltage recognition, short-circuit protection, phasefailure monitoring and temperature monitoring of servo motor. The servo amplifiers also provide SafeTorqueOff (STO) with two independent channels. This allows to disconnect power from the servo motors according to the safety regulations. Please refer to the original manufacturer’s manual for details about integrating these signals in the safety circuit. NOTE The two Safe Torque Off (STO1 and STO2) connected to the Heavy Duty Connector must be switched at the same time – within 50ms. If both signals are high, the servo amplifier can be operated. If both a low, an STO Warning is pending and the servo amplifier does not allow powering the motor. If only one of two signals is switched, a wiring fault is assumed. The servo amplifier go into STO FAULT state. To reset, the servo amplifiers must be rebooted (switch off logic power supply of 24VDC). The integrated STO function fulfills PLd requirements and fulfills SIL2. VELTRU AG 5.9.7 User’s Guide and Planning Manual Unloading Robot U10H Page 50 of 73 Status information Two LED on the drive indicate the status of the drive. Each EtherCAT plug has two additional activity LED’s. Main LED information Green LED Red LED Status on Operational Flashing, 1Hz EtherCAT Pre Operational off No Error Flashing, 1Hz Undervoltage error, no power supply on Fault EtherCAT LED information 5.9.8 Green LED Status off No link Flickering Connected, communication activity On Link active, but not communication activity DipSwitches The Servo Amplifiers provide DipSwitches for the Configuration Communication (RS232 – CAN) – They have no impact on the EtherCAT communication. VELTRU AG User’s Guide and Planning Manual Unloading Robot U10H Page 51 of 73 VELTRU standard setting is “OFF” for the Baud Rate (1 MBits) and Node ID equivalent to EtherCAT / axis number. The NodeID is set using the binary representation. 5.9.9 Manually setting up drive communication In normal operation, the communication between the drives and GemDriveStuido is established automatically using the scanner function as described in chapter 5.9.1. If e.g loading a firmware is interrupted, the necessary functionalities for this scanning may be unavailable on the drive. Thus the drive needs to be connected manually. Ensure a direct and unique RS232 communication line between the GemDriveStudio PC and the drive. Disconnect any CAN communication. Start GemDriveStudio with an empty project. Open the Communication Configuration: Define the Node ID and COM Port as necessary. Set the COM Baudrate to 19200. Use Right Mouse Click on the configuration tree and add a device: VELTRU AG User’s Guide and Planning Manual Unloading Robot U10H Page 52 of 73 The Type and Node ID must correspond to the drive. Right Mouse Click on the device in the configuration tree to connect. The device will change to a green / orange color. The firmware can be uploaded as described in chapter 5.9.4. VELTRU AG User’s Guide and Planning Manual Unloading Robot U10H Page 53 of 73 5.10 Kinematics and Axes Definitions See chapter 3.2, Orientation in Cartesian Space, for the robots coordinate system convention. VELTRU AG User’s Guide and Planning Manual Unloading Robot U10H Page 54 of 73 6 Optional features 6.1 Motor Brakes Both axes actuating the upper arms are equipped with electromechanical brakes. These brakes hold the robot in position as long as the drives are not controlling the robot. As the robot has very little friction the brakes prevent the robot arms from falling due to gravity. In operation the Servo Amplifier performs the brake control. WARNING 6.1.1 Do not move the robot manually without releasing the brakes, this will damage the servo motors. Manual Brake Release The brakes may be released manually by either applying 24VDC/0.7A to the Brake Release signal on the heavy duty connector or a soft signal over EtherCAT to the drive. 6.1.2 Mounting a Brake Release Button VELTRU recommends that you install a push button to release the brakes manually. This is helpful when cleaning or performing maintenance on the robot. It also allows easy access to the gripper or any other tooling. You must attach the push button within the workcell of the robot. CAUTION 6.2 If the push button is mounted outside the cell and you release the brakes the controller may start moving the robot before it is in a safe position. Gravity will cause it to fall if the end effecter is not held manually. This will damage parts of the robot system. Adding Hoses to Joints VELTRU recommends to mount any hoses or similar on the forearm of axis 2. The Integrator may use the reinforcement brackets to attach user supplied equipment. NOTE Any additional equipment must not hinder the robot motion. The additional weight of the equipment has to be taken into account for the specifications. The maximum weight of external equipment (e.g. hoses or wiring) mounted on the arms of the manipulator must not exceed 300 g/m. Attach any external equipment in such a way that no torque is applied to the lower arms. VELTRU AG User’s Guide and Planning Manual Unloading Robot U10H Page 55 of 73 WARNING Any changes applied to the structure of the robot may affect its reliability and performance. Do not make any changes without the written permission of VELTRU. NOTE Attach the air hose valves as near as possible to the tool carrier. This will keep the tube length short and enable short evacuating times. VELTRU AG User’s Guide and Planning Manual Unloading Robot U10H Page 56 of 73 7 System Cabling and Checks 7.1 Introduction This chapter provides an overview of the system cabling. It remains the Integrators responsibility to ensure, the installation is in accordance to national safety law and requirements. The following notes are basic precautions to ensure proper working of the VELTRU robots. For details (e.g. pin assignment) please refer to the installation chapter for the respective component and the appendices of this User’s Guide. 7.2 WARNING Make sure the mains supply is switched off. Follow an approved lockout and tag procedure before starting electrical work (see the OSHA Lockout/tagout standard). WARNING Only a skilled electrical engineer should install the power cable. Incorrect installation could cause injury or equipment damage in the robot workcell. WARNING Make sure that a proper ground connection exists before turning on the power. WARNING Make sure that all connectors are fully inserted and attached correctly. Poor connections can cause unexpected robot motion leading to injury or equipment damage in the robot workcell. General System Overview: Minimum Requirements WARNING Appropriately-sized branch circuit protection and lockout/tagout capability must be provided in accordance with the National Electrical Code and any local codes. Ensure compliance with all local and national safety and electrical codes for the installation and operation of the robot system. NOTE To ensure EN 954 Category 3, the security circuit has to interrupt the power supply in two independent ways. All signals have to be wired fail safe and with two independent wires. Use the STO (Safe Torque Off) according to the servo amplifier manufacturer documentation. The integrated STO function fulfills PLd requirements and fulfills SIL2. VELTRU AG NOTE 7.3 User’s Guide and Planning Manual Unloading Robot U10H Page 57 of 73 VELTRU recommends you keep the VELTRU C10 Motion Controller running, even when you operate the Emergency Stop of the VELTRU U10H Robot. VELTRU also recommends to keep the 24VDC control supply to the servo amplifier alive when operating the Emergency Stop. Inspections before Switching On WARNING Check the position of the Emergency Stop before you switch on. Before switching on the power supply, check the following: • The robot is properly mounted. • The cell is stable. • The electrical connections are correct and correspond to the manual. • Any peripheral equipment is properly connected. • Limiting devices that establish the restricted space (when utilized) are installed. • The physical environment is as specified. • All necessary security devices and safeguards are in place. • The function of all security devices and interlocks has been tested. CAUTION You must verify all files and parameters on the VELTRU C10 Motion Controller before running the robot. Refer to the Software User’s Manual for further details. CAUTION Before running the system, check for obstacles in the robot workcell. Pay special attention to obstacles hindering the upper arms. VELTRU AG User’s Guide and Planning Manual Unloading Robot U10H Page 58 of 73 8 Maintenance Instructions VELTRU U10H Robots are designed to work under very demanding conditions with a minimum of maintenance. Each robot uses maintenancefree AC servo motors. The cabling is designed for longevity, and, in the unlikely event of a failure, its modular design makes it easy to change. The gearing is oil lubricated for life time. You must perform certain routine checks and preventive maintenance after specified intervals. The maintenance intervals depend on the usage of the robot. This chapter contains information on maintenance procedures and the frequency of these procedures. 8.1 8.1.1 Introduction General Maintenance Principles and Safety Precautions CAUTION On-site maintenance of the VELTRU U10H Robot is the user‘s responsibility. The user must assign the on-site maintenance to skilled and trained personnel. CAUTION To ensure safe operation damaged parts shall be replace immediately. CAUTION Use only VELTRU spare parts. VELTRU guarantees safe operation only if original VELTRU spare parts are used. To order spare parts use the spare parts list provided with the robot. Do not remove any parts as this will influence the calibration and the performance of the robot. If you need to remove any part not described in this maintenance chapter, contact VELTRU (see section 1.7). After performing any maintenance, check that all safety devices are fully operational. Make sure no one is within the workcell of the robot and that there are no obstacles to movement before you switch on the power. 8.1.2 Maintenance Log Book VELTRU recommends that you keep a maintenance log book. You must record all maintenance carried out and all system failures and/or malfunctions in the maintenance log book. The maintenance log book, if kept up to date, is a very useful information source for service personnel and for VELTRU customer service. VELTRU AG 8.1.3 User’s Guide and Planning Manual Unloading Robot U10H Page 59 of 73 Maintenance Interval The maintenance intervals depend on the production conditions. You must wipe up any spillage immediately. Make sure you clean especially exposed parts immediately, as described above. Typical, recommended maintenance intervals are as follows. Weekly: • By the machine operator: Cleaning and control of exposed surfaces to ensure optimal functioning of the robot. Periodic: • By the maintenance staff: Detailed maintenance of the robot. Revision: • By the maintenance staff: Intended to prevent breakdowns. Time is necessary to change the worn and defective parts. Types of maintenance Maximum number of working hours between two maintenances Maximum duration between two maintenances Weekly 80 1 week Periodic 1000 3 months Revision 5000 1 year The list shown below gives the cleaning and maintenance intervals for all functional parts. 8.2 Unit/Element Maintenance interval Cleaning Procedure Ceramic ball bearings weekly Clean with a wet cloth Robot housing weekly Clean and dust with a dry cloth Inspection of srews, o-rings, cabling and actuators periodic none Cleaning The cleaning intervals depend on the degree of soiling and the working environment. To ensure proper and safe working clean all the exposed parts including the housing, arms and tool carrier. You must clean all functional parts regularly since cleaning is part of the maintenance inspection. For cleaning intervals see section 8.1.3. VELTRU AG User’s Guide and Planning Manual Unloading Robot U10H Page 60 of 73 The VELTRU U10H Robot is not designed for any wash down procedure. 8.2.1 Cleaning Agents and Utensils WARNING Make sure the mains supply is switched off. Follow an approved lockout and tag procedure before starting cleaning procedure. Use a suitable industrial vacuum cleaner to remove dust and loose particles within the robot and the workcell. Never use a compressed air blower. Clean the system with a damp cloth, brushes, and HACCP compatible cleaning agents. Do not use harsh solvents (such as Acetone) on the VELTRU U10H Robot as they will damage the sealing joints, bearings or cabling. For disinfection of the surfaces use alcohol based disinfection tissues 8.2.2 General Cleaning Instructions Exterior Surface Coating The coatings on the exterior surfaces of VELTRU U10H Robots are ALTEF. You can not apply a coating after the robot is assembled. Users, maintenance personnel, cleaning crews, etc., must take care to protect the robot surface from sharp or abrasive objects and strong chemical cleaning agents (such as sodium hydroxide). If the surface is damaged, contact VELTRU (see section 1.7) for information on possible rework. Fixed Seals The removable access covers are sealed with silicone rubber gaskets. Several mating parts of the VELTRU Robot are sealed with silicone adhesive. You must replace these seals if they degrade due to physical abuse, chemical attack, etc. Contact VELTRU (see section 1.7) for further information. 8.2.3 Cleaning of the ceramic ball bearings Check the ball bearings for intensive dirt or any wear. You may rinse the bearings, if necessary. WARNING 8.3 8.3.1 Never lubricate the ceramic ball bearings. Maintenance Tools, Materials and Supplies Loctite 243: All screws at the VELTRU U10H Robot are secured with Loctite 243. If you need to break a Loctite seal, apply Loctite 243 to the screw before VELTRU AG User’s Guide and Planning Manual Unloading Robot U10H Page 61 of 73 mounting it. The robot is exposed to vibrations which will loosen all screws not properly secured. Otherwise, only standard tooling if required. 8.3.2 Check Mounting Screws Any screw in a VELTRU U10H installation should be secured against vibration, e.g. using Loctite. VELTRU recommends to visually check the mounting screws every 3 months. 8.3.3 Check for Traces of Oil or Fat The ball bearings of the forearms are ceramic ball bearings and must not be greased. Only the actuators – the motor and gearbox units – are filled with food grade oil. They are lubricated for life and should require no service. If the ball bearings of the gearbox become overheated or defective you may see oil traces around the front sealing of the gearbox. You must check the bearings every three months for traces of oil. Tiny traces of oil may just be removed with a towel. In case of oil leakage around the gearing, you must replace the actuator block. Please contact VELTRU (see section 1.7) before following the steps described in the next section. 8.3.4 Check o-rings for arm structure The U10H arm is pretensioned using o-rings. Please note their exact mounting position, there are 13 o-rings in total: 1 2 VELTRU AG User’s Guide and Planning Manual Unloading Robot U10H Page 62 of 73 3 5 4 6 7 8 9 10 12 11 13 To replace o-rings, it is recommended to detach the complete arm from the robot and to work on a bench. VELTRU AG 8.3.5 User’s Guide and Planning Manual Unloading Robot U10H Page 63 of 73 Servo motor Replacement The AC servo motors are integrated into the actuator block containing also the gearbox. If you change a motor you must remove all screws and replace the entire actuator block. To replace the actuator block of axis one or two proceed as follows: 8.3.6 • Remove the motor cover and the respective upper arm. • Detach the connectors from the motor cable. • Remove the screws which secure the actuator block to the robot base and remove the entire actuator block. • Install a new actuator block and secure it with the screws removed previously. • Mount the connectors to the motor cable. Check the motor is turning correctly before mounting the arms. • Mount the arms and the covers. Servo motor Calibration The AC servo motors are equipped with absolute feedback encoders (Hiperface). The offset of the feedback must be calibrated. The calibration must be executed whenever the AC servo motor is removed or replaced. The reference position is stored on the encoder. The calibration routine is executed using the servo amplifier configuration software, GemDriveStudio. The parameters are defined in the default servo amplifier file. The latest version can be found in the VELTRU Software Release Package. The routine will perform a homing to hard stop. To execute the calibration, connect a service laptop with GemDriveStudio installed to the robot using a RS232 connection. See section 5.9 for details. In the device control window choose mode of operation ‘Homing Mode’ and Execute the homing. Switch the operation mode back to ‘Interpolated Position Mode’ and save parameters to flash. The home offset is automatically saved in the encoder. VELTRU AG 8.3.7 User’s Guide and Planning Manual Unloading Robot U10H Page 64 of 73 Check cabling You must inspect the cabling periodically to make sure that the movements of the robot do not rub or tear any of the cables. If any of the cables show signs of abrasions then you must replace the cable. NOTE It is very helpful to have a copy of the circuit diagram at hand when trying to troubleshoot electrical faults. VELTRU AG Appendix A User’s Guide and Planning Manual Unloading Robot U10H Page 65 of 73 Motor Data Sheets A.1 General Motor Information A.1.1 General The motors are permanent magnet, synchronous type servo motors. A.1.2 Motor Data Unless otherwise specified, the data is the RMS value of measurements over U-V, V-W and U-W. A.2 Motor Specifications name Description unit T0 Locked-rotor torque Torque produced on motor shaft at the speed n=0 (stall) . (Nm) TN Rated torque Definitions as for T0 but at the speed n=nN and motor consumes the current I=IN (Nm) Tmax Maximum motor shaft torque (Nm) nN Rated speed (rpm) KT Torque constant (Nm/A RMS) motor shaft motor shaft dimensions (mm) winding class winding class according to IEC 85 (IEC 85) Protection class Protection class according to IEC 34-1 (IEC 34-1) R20 winding resistance per phase at 20°C (ohms) LN Winding inductance per phase at IN (mH) Imax Current at torque Tmax (A RMS) UDC DC-link voltage (V) mass mass of motor (kg) Poles Number of poles (-) J Moment of inertia of the rotor, excluding brake and resolver (kgm2) Pn nominal power (kW) nmax maximal speed (1/min) brake brake installed - VELTRU AG A.2.1 User’s Guide and Planning Manual Unloading Robot U10H Page 66 of 73 VELTRU U10H Axis 1 and 2 Motor Type: TPM025F-031K-5PB1-094C-W1 The motors are provided with a PTC-type thermistor installed in the stator winding. It will close to hot-spot point at N-side. See section 2 in this chapter for an explanation of the definitions. The following table shows the motor data for axis 1 and 2 to the U10H robot. name value unit T0 5.4 (Nm) TN 7 (Nm) Tmax 10.3 (Nm) nN 6775 (rpm) KT 0.56 (Nm/A RMS) motor shaft gearbox, i = 31 (mm) winding class F (IEC 85) Protection class IP 64 (IEC 34-1) R20 0.75 (ohms) LN 1,98 (mH) I0 9.6 (A RMS) IN 10.1 (A RMS) Imax 25.3 (A RMS) UDC 320 (V) Poles 12 (-) mass 9.8 (kg) J 2.74 (kgm2) Pn 1.4 (kW) nmax 7800 (1/min) brake yes - The brakes require a 24V ±10% power supply. The brakes are failsafe so they will remain closed if no voltage is applied. Each brake will operate for 2 x 10⁶ openings and closings at zero speed. The Feedback is a Hiperface Multiturn Absolute Encoder. VELTRU AG User’s Guide and Planning Manual Unloading Robot U10H Description number type SKM36 SinCos Periods per Revolution 128 Multiturn Revolutions 4098 Power supply 7 – 12V A.3 Motor Pin assignment A.3.1 Power connector Connector type: Intercontec, B series Pin signal Description 1 U Phase 1 2 V Phase 2 6 W Phase 3 4 Brake + Motor Brake, +24VDC 5 Brake - Motor Brake, GND GND GND GND Page 67 of 73 VELTRU AG A.3.2 User’s Guide and Planning Manual Unloading Robot U10H Feedback Connector Connector type: Intercontec, A series Pin signal Description 3 Temp motor temperature sensor 4 Temp 5 SIN 6 REFSIN 8 COS 1 REFCOS 2 +485 7 -485 10 GND 12 +10V 9 Shield Shielding is also on connector housing. Page 68 of 73 VELTRU AG Appendix B User’s Guide and Planning Manual Unloading Robot U10H Servo amplifier X10 - Power connector Pin signal Description 1 U Motor phase 2 V 3 W 4 DC- 5 DC+ 6 RInt 7 RInt 8 230VAC L 9 230VAC N 10 GND GND DC coupling Resistor bridge X8 - Logic Power connector Pin signal Description 1 Br- Motor Brake 2 Br+ 3 Br in Brake Control 4 +24VDC Logic supply 5 0VDC X3 - Encoder connector Pin signal Description 14 Temp motor temperature sensor 5 Temp 17 SIN 18 REFSIN 9 COS 8 REFCOS 12 +485 3 -485 Page 69 of 73 VELTRU AG User’s Guide and Planning Manual Unloading Robot U10H 16 GND 24 +10V X2 – I/O connector Pin signal Description 6 +24VDC Power Supply Regulator 13 GND 3 10V Regulator Out 19 STO2 Safe Torque Off 20 EGND Safe Torque Off 21 STO1 Safe Torque Off 5 Br Out Brake Control 15 Br Out Brake Control X5 - CAN connector Pin signal Description 1 CAN H With terminal resistor, 120 Ohm 9 CAN L With terminal resistor, 120 Ohm 2 Tx RS 232, on Drive 1 only 3 Rx RS 232, on Drive 1 only 5 GND RS 232, on Drive 1 only Page 70 of 73 VELTRU AG Appendix C User’s Guide and Planning Manual Unloading Robot U10H System Cabling Main wiring Page 71 of 73 VELTRU AG User’s Guide and Planning Manual Unloading Robot U10H Servo Amplifier I/O cable Communication Cable Page 72 of 73 VELTRU AG User’s Guide and Planning Manual Unloading Robot U10H Appendix D Servo Amplifier Control Loop Structure Page 73 of 73