1
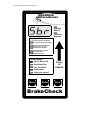
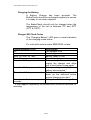
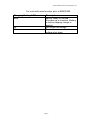
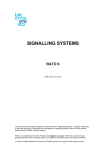
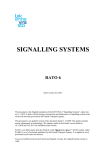
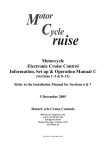
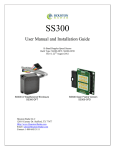
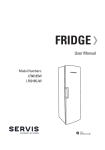
© 2001-2006 Circuitlink International Pty Ltd
BrakeCheck
User Manual
Fraser Gauge and Tool
1352 Harvard Street
Grosse Pointe, MI 48230
313-882-9192
[email protected]
Copyright 2009
Neither the whole nor part of the information herein, nor the product described may be adapted or
reproduced in any material form except with the prior written consent of Circuitlink International Pty Ltd.
The product described in this manual is subject to continuous development and improvement. All
information herein of a technical nature, and particulars of the product and its use, are given in good
faith but are liable to change without notice.
All installation, maintenance or service of this product must be carried out by Circuitlink International Pty
Ltd or its accredited agent, and loss or damage caused by installation, maintenance or service which is
carried out by unauthorised personnel will not be accepted.
This manual is intended only to assist the reader in the use of the product, and therefore Circuitlink
International Pty Ltd shall not be liable for any loss or damage whatsoever arising from the use of any
information or particular in or any error of omission from this manual or any incorrect use of this product.
elcomes comments or suggestions relating to the product or this
manual. All correspondence should be addressed to:
Fraser Gauge and Tool
(313) 882-9192
[email protected]
© 2001-2006 Circuitlink International Pty Ltd
Table of Contents
Welcome! .......................................................................................................... 1
Unit Description ................................................................................................................1
Charging the Battery.........................................................................................................2
Charge LED Flash Codes .................................................................................................2
Function Keys................................................................................................... 4
Performing a Test............................................................................................. 7
Setting the unit up for a Test .............................................................................................7
To Test the Service Brake.................................................................................................8
Service Brake Test Results.............................................................................................10
To Test the Hand Brake..................................................................................................12
Hand Brake Test Results ................................................................................................14
Hand Brake Incline Test (Quarry Unit).............................................................................16
To display the Temperature of the Unit ...........................................................................17
Recalling Stored Test Results (units that support multiple test results) .. 18
Recalling Brake Test Results ..........................................................................................18
Printing Test Results (single test units)....................................................... 20
To Print using the Cable .................................................................................................20
To Print using the Infra-Red Link.....................................................................................21
Printing Test Results (units that support multiple test results) ................. 22
To Print using the Cable .................................................................................................22
To Print using the Infra-Red Link.....................................................................................24
Explanation of Terms..................................................................................... 26
Peak Deceleration (Front/Rear) ......................................................................................26
Average Deceleration (Front/Rear) .................................................................................26
Peak Acceleration (Left/Right).........................................................................................26
Vehicle pulls to the Left (or Right) ...................................................................................26
Stopping Distance (metres):............................................................................................26
Test Speed (km/h): .........................................................................................................27
Brake Efficiency:.............................................................................................................27
Downloading the test results to your PC ..................................................... 28
Single test units ..............................................................................................................28
Multiple Test Units ..........................................................................................................30
Interpreting the Print out Results ................................................................. 34
Warranty.......................................................................................................... 35
Warranty.........................................................................................................................35
Please Note....................................................................................................................35
Calibration ......................................................................................................................35
Page 1
© 2001-2006 Circuitlink International Pty Ltd
Circuitlink
International
Charging
Battery
Calibration
Required
Displayed Result
Peak Deceleration (Front/Rear)
Average Deceleration (Front/Rear)
Peak Acceleration (Left/Right)
Vehicle pulls to the Left
Vehicle pulls to the Right
Stopping Distance (metres)
Test Speed (km/h)
Brake Efficiency (%)
Current Mode
Service Brake Test
Hand Brake Test
Last Test Result
Temperature
Setup (see manual)
Menu
Enter
Front
of
Vehicle
Print
BrakeCheck
© 2001-2006 Circuitlink International Pty Ltd
Welcome!
Congratulations on
BrakeCheck unit!
purchasing
a
Circuitlink
Please take some time to read this manual and
familiarise yourself with the operation of the
BrakeCheck unit.
Unit Description
The Circuitlink BrakeCheck is a self-contained unit,
incorporating an Accelerometer, which is used to
determine your vehicle’s braking performance. It can
also be used to monitor the condition of the brake
components in conjunction with normal, routine
inspection.
The BrakeCheck will test the performance of both the
Service Brake (foot brake) and the Hand Brake
(parking brake) and will report the magnitude of any
sideways pull detected during testing.
All of the BrakeCheck’s functions are controlled with
the three keys on the front panel. The unit’s status,
Current Mode and Displayed Result are all indicated
by the LED’s.
The BrakeCheck has a 3 character LED display
which shows the unit’s status, the test to be
performed and the test results. It will also display the
temperature of the unit in both 0C and 0F.
The optional printer can be configured to operate via
cable connection or wireless Infra-Red. The Battery
Charger is used as the power supply for the printer.
Page 1
© 2001-2006 Circuitlink International Pty Ltd
Charging the Battery
A Battery Charger has been provided. The
BrakeCheck should be recharged regularly to ensure
it is ready to use when required.
The BrakeCheck should only be charged when the
temperature of the unit is between 00C and 430C
(320F & 1090F)
Charge LED Flash Codes
The “Charging Battery” LED gives a visual indication
of the charging mode status.
For units with serial number BRK02200 or later:
Charging Battery LED
Off
On
Blink, on 1sec, off 1sec
Blink 5 times per second
One short blink per second
Description
The charger is off
Fast charge mode
Battery ready to use
Normal charging
Battery temperature too high,
unplug the charger and allow
unit to cool before trying again *
Two short blinks per second
Battery voltage too high, or
battery disconnected *
Three short blinks per second
Battery is cold, charger will
warm up the batteries before
normal charging can start *
Four short flashes every two Battery has failed to charge *
seconds
* If this happens repeatedly the BrakeCheck should be returned for
servicing.
Page 2
© 2001-2006 Circuitlink International Pty Ltd
For units with serial number prior to BRK02200:
Charging Battery LED
Blink
On
Off
Description
Battery ready to use OR
At power-up or insertion, Battery
is cold as topping charge is
applied
Soft-Start/Fast charge
Power down or over/under
voltage shut down
Page 3
© 2001-2006 Circuitlink International Pty Ltd
Function Keys
Menu
Hold the Menu key down for 2 to 3 seconds to turn
the BrakeCheck ON
Menu
Press the Menu key repeatedly to change the
Current Mode.
Enter
Press the Enter key to change the Displayed
Result.
Print
Press the Print key to send the test results to the
Printer (if available) via either the cable or the InfraRed link, depending upon the configuration of your
printer.
Page 4
© 2001-2006 Circuitlink International Pty Ltd
When the BrakeCheck is turned ON, the Service
Brake Test LED will be lit and the display will show:
The unit is ready to begin the Service Brake Test
routine.
Menu
the Hand Brake Test LED will be lit
Press
and the display will show:
The unit is ready to begin the Hand Brake Test
routine.
Menu
Press
again, the Service Brake Test LED
and the Last Test Result LED will be lit and the
display will show:
The unit is ready to display the results of the most
recent Service Brake Test.
Menu
Press
again, the Hand Brake Test LED and
the Last Test Result LED will be lit and the display
will show:
Page 5
© 2001-2006 Circuitlink International Pty Ltd
The unit is ready to display the results of the most
recent Hand Brake Test. If your unit is a Quarry
testing type it will say “HbI” instead, meaning the uint
is ready to do an incline test.
Menu
again, the Temperature LED will be
Press
lit and the display will show:
Menu
Press
again, the Temperature LED will be
lit and the display will show:
Menu
Press
again, if your unit supports multiple
test results the display will show:
The unit is ready to clear the log memory
Enter
Pressing
the stored test results.
Page 6
at this stage will erase all
© 2001-2006 Circuitlink International Pty Ltd
Performing a Test
Setting the unit up for a Test
Ensure the battery is charged sufficiently.
Choose a safe test area that is as level as possible.
The test area should be straight, flat and long
enough to attain the recommended test speed
and then to stop the vehicle quickly and safely.
Avoid loose and wet surfaces. Avoid areas where
there are other vehicles or people.
Place the BrakeCheck in the vehicle with the arrow
pointing in the direction of travel.
Front
of
Vehicle
NB. The BrakeCheck should be placed on the
vehicle seat or front floor and as close as possible to
parallel with the road surface. The unit is fitted with
rubber feet to help prevent it from moving around
during the test.
In the UK, when carrying out a Statutory MOT
Test it is essential that the brake test procedure
detailed in the latest version of the MOT
Inspection Manual be followed.
Page 7
© 2001-2006 Circuitlink International Pty Ltd
To Test the Service Brake
Menu
Press
Brake Test.
until the Current Mode is Service
Enter
Press
once, the display will indicate whether
or not the unit is level enough to perform the test.
Before an accurate test can be performed the display
must show:
Do NOT tilt the unit to achieve level. Find a more
level vehicle test area and ensure the unit is
parallel with the road.
Note: If you have a Quarry type unit, the display will
show “C 1”, “C 2”, “C 3” or “C 4” before levelling.
Menu
These are ground condition codes, press
to
Enter
switch between codes and
to select the code.
The ground condition codes are:
C1 – “Wet Ground”
C2 – “Dry Ground”
C3 – “Snow/Ice Ground”
C4 – “Tarmac Ground”
The selected code does not change the operation of
the BrakeCheck, it is just stored and printed later.
Enter
Press
again after levelling, the unit is now
ready to perform the test and the display will show:
Page 8
© 2001-2006 Circuitlink International Pty Ltd
Accelerate the vehicle smoothly to approximately
35kph (22mph).
Without causing the vehicle to skid, apply heavy and
consistent pressure to the Service Brake until the
vehicle comes to a complete stop as quickly as
possible.
The Test is now complete, move the vehicle off the
roadway if necessary.
At the end of the test (if the unit supports multiple
tests) the unit will show what ‘log’ number the test
was stored in, for example:
This means the test result was stored in log number
36. You will have to remember this if you want to
recall this result.
Page 9
© 2001-2006 Circuitlink International Pty Ltd
Service Brake Test Results
If the unit powers down, go to the Service Brake
Test / Last Test Result mode and press
Enter
Then, (or if the unit did not power down),
the Peak Deceleration (Front/Rear) LED will be lit
and the display will show a value, eg:
Enter
Press
and the Average Deceleration
(Front/Rear) LED will be lit and the display will show
a value, eg:
Enter
Press
again, the Peak Acceleration
(Left/Right) LED will be lit and either the Vehicle
pulls to the Left OR the Vehicle pulls to the Right
LED will be lit. The display will show a value, eg:
Page 10
© 2001-2006 Circuitlink International Pty Ltd
Enter
Press
again, the Stopping Distance
(metres) LED will be lit and the display will show a
value, eg:
Enter
again, the Test Speed (km/h) LED
Press
will be lit and the display will show a value, eg:
Enter
Press
again, the Brake Efficiency (%)
LED will be lit and the display will show a value, eg:
Enter
Press
again, the Peak
(Front/Rear) is displayed again.
Deceleration
These results will be retained until the next Service
Brake test is performed.
Page 11
© 2001-2006 Circuitlink International Pty Ltd
To Test the Hand Brake
Menu
until the Current Mode is Hand Brake
Press
Test.
Enter
Press
once, the display will indicate whether
or not the unit is level enough to perform the test.
Before an accurate test can be performed the display
must show:
Do Not tilt the unit to achieve level. Ensure the
unit is parallel with the road surface and then, if
necessary, locate a more level vehicle test area.
Note: If you have a Quarry type unit, the display will
show “C 1”, “C 2”, “C 3” or “C 4” before levelling.
Menu
These are ground condition codes, press
to
Enter
switch between codes and
to select the code.
The ground condition codes are:
C1 – “Wet Ground”
C2 – “Dry Ground”
C3 – “Snow/Ice Ground”
C4 – “Tarmac Ground”
The selected code does not change the operation of
the BrakeCheck, it is just stored and printed later.
Enter
Press
again, the unit is now ready to
perform the test and the display will show:
Page 12
© 2001-2006 Circuitlink International Pty Ltd
Accelerate the vehicle smoothly to approximately
20kph (13mph).
Without causing the vehicle to skid, apply the Hand
Brake firmly and consistently until the vehicle comes
to a complete stop as quickly as possible.
The Test is now complete, move the vehicle off the
roadway if necessary.
Note: If you have a Quarry type unit a ‘hand brake
incline’ test replaces the normal hand brake test.
Enter
to start the incline test, the
After pressing
BrakeCheck shows the detected incline. If the
vehicle does not move while the hand brake is on,
Enter
press
again to pass the test. If the vehicle
Menu
moves, press
to fail the test.
At the end of the test (if the unit supports multiple
test results) the unit will show what ‘log’ number the
test was stored in, for example:
This means the test result was stored in log number
36. You will have to remember this if you want to
recall this result.
Page 13
© 2001-2006 Circuitlink International Pty Ltd
Hand Brake Test Results
If the unit powers down, go to the Hand Brake Test /
Last Test Result mode and press
Enter
then, (or if the unit did not power down),
the Peak Deceleration (Front/Rear) LED will now
be lit and the display will show a value, eg:
Enter
Press
and the Average Deceleration
(Front/Rear) LED will be lit and the display will show
a value, eg:
Enter
Press
again, the Peak Acceleration
(Left/Right) LED will be lit and either the Vehicle
pulls to the Left OR the Vehicle pulls to the Right
LED will be lit. The display will show a value, eg:
Page 14
© 2001-2006 Circuitlink International Pty Ltd
Enter
Press
again, the Stopping Distance
(metres) LED will be lit and the display will show a
value, eg:
Enter
again, the Test Speed (km/h) LED
Press
will be lit and the display will show a value, eg:
Enter
Press
again, the Brake Efficiency (%) LED
will be lit and the display will show a value, eg:
Enter
Press
again, the Peak Deceleration
(Front/Rear) is displayed again.
These results will be retained until the next Hand
Brake test is performed.
Page 15
© 2001-2006 Circuitlink International Pty Ltd
Hand Brake Incline Test (Quarry Unit)
If you have a Quarry type unit, a ‘hand brake incline’
test replaces the normal hand brake test. The test
result will take the form:
This indicates a pass at an incline of 46%. An incline
of 100% is 45 degrees.
The following would indicate a failed test at an incline
of 6%:
Page 16
© 2001-2006 Circuitlink International Pty Ltd
To display the Temperature of the Unit
Menu
until the Current Mode is
Press
Temperature and the display shows the desired
temperature scale. i.e.:
or
Enter
Press
once, the display will alternate
between the measured temperature and the selected
scale, for example:
To now display the temperature in Fahrenheit, or to
select another Mode,
Menu
Press
until the display and LED indicate the
desired Mode.
Page 17
© 2001-2006 Circuitlink International Pty Ltd
Recalling Stored Test Results
(units that support multiple test results)
At the end of each test the BrakeCheck will show
what ‘log’ number the test was stored in, for
example:
This means the result was stored in log number 36.
You will have to remember this if you want to recall
the result.
Recalling Brake Test Results
Menu
until the Current Mode indicates
Press
the test results you wish to view, i.e., Last Service
Brake Test or Last Hand Brake Test.
Enter
Press
once, the display will show
Menu
Press
once, the latest log number will
be displayed. You may select a different log number
Menu
by pressing
until the required number
is displayed, for example:
Page 18
© 2001-2006 Circuitlink International Pty Ltd
Enter
once, the Peak Deceleration
Press
(Front/Rear) LED will be lit and the display will show
a value, eg:
The test results have been recalled and you may
now scroll thru all the Displayed Result values for
Enter
this test by pressing
Page 19
repeatedly.
© 2001-2006 Circuitlink International Pty Ltd
Printing Test Results (single test units)
The BrakeCheck can output test results to a printer if
required. An impact printer is available and is
recommended, although any correctly configured
printer can be used. A cable is provided with the
printer, or an optional Infra-Red link can be used.
To Print using the Cable
Connect the printer to the power pack provided.
Connect the supplied cable to the printer and Brake
Check.
If the BrakeCheck has powered-down due to
inactivity:
Menu
until the Current Mode indicates the
Press
test results to be printed. Ie, either Last…Service
Brake Test or Last…Hand Brake Test
Enter
Press
once, (this is not necessary if the
unit has not powered-down) the Peak Deceleration
(Front/Rear) LED will be lit and the display will show
a value, eg:
Print
Press
once, the display will show:
and the printer will print the results for the last test
performed.
Page 20
© 2001-2006 Circuitlink International Pty Ltd
To Print using the Infra-Red Link
Plug the power pack into the Infra-Red receiver. Plug
the lead from the receiver into the printer.
If the BrakeCheck has powered-down due to
inactivity:
Menu
until the Current Mode indicates the
Press
test results to be printed: ie, Last Service Brake
Test or Last Hand Brake Test
Enter
once, (this is not necessary if the
Press
unit has not powered-down) the Peak Deceleration
(Front/Rear) LED will be lit and the display will show
a value, eg:
With the BrakeCheck pointing at the Infra-Red
receiver,
Print
Press
once, the BrakeCheck will emit a
long beep sound, keep the unit pointed at the
receiver until a second, short beep is heard. The
display will show:
And the printer will print the results for the last test
performed.
Page 21
© 2001-2006 Circuitlink International Pty Ltd
Printing Test Results (units that support
multiple test results)
The BrakeCheck can output test results to a printer if
required. An thermal printer is available and is
recommended, although any correctly configured printer can
be used. A cable is provided with the printer, or an optional
Infra-Red link can be used.
To Print using the Cable
Connect the printer to the power pack provided.
Connect the supplied cable to the printer and Brake
Check.
If the BrakeCheck has powered-down due to
inactivity:
Menu
until the Current Mode indicates the
Press
test results to be printed. Ie, either Last…Service
Brake Test or Last…Hand Brake Test
Enter
Press
once, the display will show
Print
at this stage will
result in all the stored tests being printed.
NOTE: Pressing
Menu
Press
once, the latest log number will
be displayed. You may select a different log number
Menu
by pressing
until the required number
is displayed, for example:
Page 22
© 2001-2006 Circuitlink International Pty Ltd
Enter
once, (this is not necessary if
Press
the unit has not powered-down) the Peak
Deceleration (Front/Rear) LED will be lit and the
display will show a value, eg:
Print
Press
once, the display will show:
and the printer will print the results for the last test
performed.
Page 23
© 2001-2006 Circuitlink International Pty Ltd
To Print using the Infra-Red Link
Plug the power pack into the Infra-Red receiver. Plug
the lead from the receiver into the printer.
If the BrakeCheck has powered-down due to
inactivity:
Menu
until the Current Mode indicates the
Press
test results to be printed. Ie, either Last…Service
Brake Test or Last…Hand Brake Test
Enter
once, the display will show
Press
NOTE: This option allows all the stored test
results to be printed, it is unavailable in Infra-Red
mode!
Menu
Press
once, the latest log number will
be displayed. You may select a different log number
Menu
by pressing
until the required number
is displayed, for example:
Enter
Press
once, (this is not necessary if the
unit has not powered-down) the Peak Deceleration
Page 24
© 2001-2006 Circuitlink International Pty Ltd
(Front/Rear) LED will be lit and the display will show
a value, eg:
With the BrakeCheck pointing at the Infra-Red
receiver,
Print
once, the BrakeCheck will emit a
Press
long beep sound, keep the unit pointed at the
receiver until a second, short beep is heard. The
display will show:
And the printer will print the results for the last test
performed.
Page 25
© 2001-2006 Circuitlink International Pty Ltd
Explanation of Terms
Peak Deceleration (Front/Rear)
This is the maximum recorded G Force (m/s2)
detected during the test, in the front to rear direction.
It corresponds to the Peak Brake Efficiency and is
expressed as a percentage of one G.
This is the figure to be used in the UK for
statutory MOT Testing.
Average Deceleration (Front/Rear)
This refers to the average G Force (m/s2) over the
duration of the test, in the front to rear direction.
Peak Acceleration (Left/Right)
This is the maximum recorded G Force (m/s2)
detected during the test, in the left or right direction.
NOTE: This feature is included for reference only.
There may not be any regulatory data available to
determine if a test result should be considered a
Pass or Fail result.
Road camber, tyre condition, driver action and so on
may cause a test vehicle to pull off centre under
heavy braking. If the pull is noticeable, it is
suggested that the brake components be checked for
signs of wear or leaks etc.
Vehicle pulls to the Left (or Right)
This is an indication of the direction from centre the
vehicle is deviating toward during the test.
Stopping Distance (metres):
This is an estimate of the distance the vehicle travels
from commencement of braking to complete stop. It
is calculated from Average Deceleration and the test
time.
Page 26
© 2001-2006 Circuitlink International Pty Ltd
Test Speed (km/h):
This is an estimate of the speed at which the vehicle
was travelling when braking was commenced. It is
calculated from Average Deceleration and Stopping
Distance.
Brake Efficiency:
This is the average brake efficiency figure - an
expression of braking performance (%). It is
calculated from Test Speed and Stopping Distance
and can be compared with some statutory
requirements.
It should NOT be used in the UK for the statutory
MOT Testing (refer to the Peak Deceleration on
the top of the previous page).
Page 27
© 2001-2006 Circuitlink International Pty Ltd
Downloading the test results to your PC
The Downloader software may be used when a
printer is unavailable or if you wish to save your test
results to file.
Single test units
1. Use the cable provided to connect
BrakeCheck to the PC’s RS232 port.
the
2.
Run the BrakeCheck downloader software, you
will see this form:
3.
Select the appropriate port name from the COM
port list, e.g. COM1.
4.
Make sure the BrakeCheck is switched on and
click the “Download Report” button. You will see
this form:
Page 28
© 2001-2006 Circuitlink International Pty Ltd
5.
Follow the onscreen instructions, after pressing
Print
the
button a text document
containing the test result will automatically open.
6.
The file can be printed to any printer supported
by the PC by selecting “Print…” from the “File”
menu.
Page 29
© 2001-2006 Circuitlink International Pty Ltd
Multiple Test Units
1. Use the cable provided to connect
BrakeCheck to the PC’s RS232 port.
the
2.
Run the BrakeCheck downloader software, you
will see this form:
3.
Select the appropriate port name from the COM
port list, e.g. COM1.
Page 30
© 2001-2006 Circuitlink International Pty Ltd
4.
Make sure the BrakeCheck is switched on and
click the “Download Report” button. You will see
this form:
5.
If only downloading the latest test result and this
test is still being displayed by the BrakeCheck,
Print
press the
button
document containing the
automatically open.
6.
and
a
text
test result will
Otherwise if the BrakeCheck has powered down,
Menu
press
until the Current Mode
indicates the test results to be downloaded, i.e.,
either
Last…Service
Brake
Test
or
Last…Hand Brake Test
Page 31
© 2001-2006 Circuitlink International Pty Ltd
Enter
once, the display will show
Press
Print
NOTE: Pressing
at this stage
will result in all the stored tests being
downloaded.
Menu
once, the latest log
Press
number will be displayed. You may select a
Menu
different log number by pressing
until the required number is displayed, for
example:
Enter
Press
once,
the
Peak
Deceleration (Front/Rear) LED will be lit and
the display will show a value, eg:
Page 32
© 2001-2006 Circuitlink International Pty Ltd
Print
Press
once, the display will show:
and a text document containing the test result
will automatically open.
7.
The file can be printed to any printer supported
by the PC by selecting “Print…” from the “File”
menu.
Page 33
© 2001-2006 Circuitlink International Pty Ltd
Interpreting the Print out Results
Please note that the print out generated by your
BrakeCheck unit may differ to the example below,
the format of the print out is determined by the
software version in the unit.
Designated serial number of the unit
Version of software
Company Information
Memory location where this test is
stored (if multiple tests supported)
Date and time of test
Test results
Refer to Explanation of Terms Section
Date next calibration is due
Area to write relevant details
Page 34
© 2001-2006 Circuitlink International Pty Ltd
Warranty
Warranty
The warranty is 12 months from the date of
purchase.
Please Note
Deliberate or unintentional damage of the unit may
result in the warranty becoming void. Likewise, if the
unit is interfered with by anyone other than an
authorized service agent, the unit will not be covered
under this warranty.
Calibration
Please refer to the Calibration Certificate for the
unit’s next calibration due date. The BrakeCheck will
blink the “Calibration Required” indicator as a
warning that the unit must be calibrated soon. If the
“Calibration Required” indicator is on solid then the
unit must be calibrated immediately.
Page 35