1
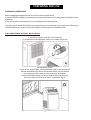
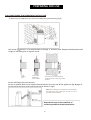
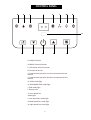
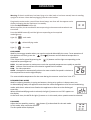
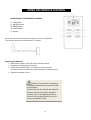
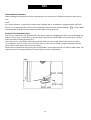
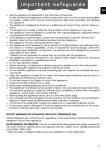
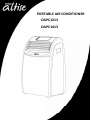
PORTABLE AIR CONDITIONER
OAPC1213
OAPC1413
1
__SAFETY INSTRUCTIONS & CAUTION__
•
•
•
•
•
•
•
•
•
•
•
•
•
•
•
Read all instructions carefully and keep this manual for future reference.
For indoor use only.
This appliance is designed for home air conditioning and must not be used for other purposes.
It is dangerous to modify the appliance in any way.
Switch off and unplug when not in use
If the appliance requires repair, contact a Service centre suggested by the manufacturer. Repairs
carried out by unauthorised personnel may be dangerous.
If the power cable is damaged, it must be replaced by a qualified professional authorised by the
manufacturer.
The appliance is not intended for use by persons (including children) with reduced physical, sensory
or mental capabilities, or lack of experience and knowledge, unless they have been given
supervision or instruction concerning use of the appliance by a person responsible for their safety.
Children should be supervised to ensure that they do not play with the appliance.
Before cleaning or maintenance, always unplug the appliance from the mains socket.
Do not move the appliance by pulling the power cable.
Do not rest heavy or hot objects on top of the appliance.
Always transport the appliance upright.
Do not place objects on the unit or block the air inlet / outlet
To avoid electric shock, do not place the cord, the plug or the appliance in water or other liquids.
Do not insert fingers or other objects into the air conditioner during operation.
2
__ DESCRIPTION___
1. Control panel
2. Air outlet grills
5. Filter
6. Evaporator air intake grill
3. Castors
4. Handles
7. Air exhaust hose housing
8. Condensate drain connection
9. Power Cable
10. Flange with cap
11. Suction caps
12. Air exhaust hose
13. Window outlet
14. Castor locks
15. Remote control
16. Window Slider
3
_
_ PREPARING FOR USE __
ELECTRICAL CONNECTIONS
Before plugging the appliance into the mains socket, please check:
•The mains power supply corresponds to the value indicated on the rating plate on the back of the
appliance;
•The mains socket and electrical circuit are adequate for the appliance;
The instructions below will enable you to prepare your air conditioner for operation as efficiently as
possible. Before use, make sure the air Intake and outlet grills are not obstructed.
AIR-CONDITIONING WITHOUT INSTALLATION
1. Fit the air exhaust hose [12] in the housing
[7] at the back of the appliance. Insert it as shown in figure A.
For optimum results:
If you have a sash window, place the bracket [16] on the window sill
extend the bracket fully within the window frame, fix the bracket
by using the pin then lower the window onto the bracket.
Insert the window outlet [13] of the exhaust hose [12] into the
slot, then connect the hose to the air conditioner (fig. B).
4
_
_ PREPARING FOR USE __
AIR-CONDITIONING WITHOUT INSTALLATION Cont.….
French window
• Open the French window slightly and position the outlet [13] as shown in figure c.
Use the suction pads provided to hold the two parts of the window together (fig. D).
Keep the air hose as short and free of
curves as possible to avoid constrictions.
5
_
_ PREPARING FOR USE __
AIR-CONDITIONING SEMI-PERMANENT INSTALLATION
If required, your appliance can also be installed semi-permanently (fig.E)
Drill a hole ( 134 mm) in an outside wall or through a window pane. Respect the dimensions and
height of the hole given in figure F and G.
In the
window
pane
In the wooden
kickboard of a
French window
In the wall: you are recommended to
insulate the section of wall using suitable
insulation.
Fit the wall flange [10] into the hole.
Fit the air exhaust hose in the relevant hose located on the rear side of the appliance. (fig. A page 4).
Fit the end of the hose to the wall flange [10] as shown in fig.G.
NOTE: When installing the air conditioner semi-permanently,
you should leave a door slightly open (as little as 1 cm) to
guarantee correct ventilation.
Keep the air hose as short and free of
curves as possible to avoid constrictions.
6
_
G
H
_ CONTROL PANEL __
I
J
K
L
M
N
D
B
F
A
E
C
A: ON/OFF button
B: MODE selection button
C: FAN speed selection button
D: Remote IR sensor
E: Programmed operation increase temperature/time
button
F: Programmed operation decrease temperature/time
button
G: COOL mode light
H: DEHUMIDIFYING mode light
I: FAN mode light
J: Display area
K: Auto-speed fan
mode light
L: Low-speed fan mode light
M: Mid-speed fan mode light
N: High-speed fan mode light
7
_
_
OPERATION
__
Warning: If the air conditioner has been lying on its side, back or has been moved, leave it standing
upright for at least 1 hour before plugging into the mains socket.
Plug into the mains socket, you will hear three beeps, two lines will also appear on the
display indicating that the appliance is in standby.
Press the ON/STAND-BY button (A).
When turned on, the air conditioner starts operating in the same mode as when it was
turned off.
Press the MODE button (B) until the light corresponding to the required
mode lights up.
Light (G)
: cool mode
Light (H)
: dehumidifying mode
Light (I)
: fan mode
COOL MODE
Ideal for hot muggy weather when you need to cool and dehumidify the room. To set operation of
the appliance correctly, press the
(E) or (F) buttons until the desired temperature is
displayed.
Then select the fan speed by pressing the
(C) button until the light corresponding to the
required fan speed lights up:
HIGH: the cool operates at maximum to reach the required temperature as rapidly as possible
MED: reduces noise levels but still maintains a good level of comfort
LOW: for silent operation
AUTO: the appliance automatically selects the most suitable fan speed in relation to
the temperature set on the digital display.
The most suitable temperature for the room during the summer varies from 24 to 27oC
DEHUMIDIFYING MODE
Ideal for reducing humidity in spring and autumn, during rainy spells or in damp rooms, etc.
In dehumidifying mode, the appliance must have the same configuration as for the air conditioning
mode, with the air exhaust hose fitted to the appliance to allow air to be discharged
externally.
When the dehumidifying mode is selected, the light (I) comes on and "dh" appears on
the display.
At the same time, the AUTO fan light (J) comes on. In this mode, other speeds cannot be selected.
FAN MODE
Adjust the fan speed by pressing
button (C) as described for the cool mode.
In this mode, Auto cannot be selected.
The fan speed will be displayed.
8
_
_ USING THE REMOTE CONTROL __
DESCRIPTION OF THE REMOTE CONTROL
1)
2)
3)
4)
5)
FAN button
ON/OFF button
MODE button
TIMER button
Display
Point the remote to the remote IR sensor on the air conditioner.
The remote works at a max distance of 7 meters
Replacing the batteries
• Remove the cover on the rear of the remote control;
• Remove the old batteries if present.
• Insert two new R03“AAA” 1.5v batteries, inserting them
correctly (see the instructions inside the battery compartment);
• Replace the battery cover
Caution: If the remote is replaced or
discarded, the batteries must be removed
and disposed.
Caution: Do not mix old and new batteries
Caution: do not mix alkaline, standard
(carbon-zinc) or rechargeable batteries
Caution: Do not dispose batteries in fire.
They may explode or leak.
9
_
_
USING THE REMOTE CONTROL
_
TURNING THE APPLIANCE ON
Plug into the mains socket.
Press the ON/OFF button (2) (when turned on, the air conditioner starts operating in the same
mode as when it was turned off).
Press the MODE button (3) to select the required mode
AIR-CONDITIONING (COOL)
DEHUMIDIFYING (DRY)
FAN ONLY (FAN)
An arrow on the display indicates the selected mode.
AIR-CONDITIONING MODE (COOL)
Ideal for hot humid weather when you need to cool and dehumidify the room.
In air-conditioning mode, use the
buttons to select the desired temperature.
The display shows the set temperature.
To change the fan speed, use the FAN button 1 on the remote control, choosing from the
available speeds:
AUTO: the appliance automatically selects the most suitable fan speed in relation to the
temperature set on the digital display.
HIGH: the air conditioner operates at maximum to reach the required temperature as rapidly as
possible
MED: reduces noise levels but still maintains a good level of comfort
LOW: for silent operation
Two arrows on the display indicate respectively COOL and the fan speed.
The most suitable temperature for the room during the summer varies from 24 to 27oC.
DEHUMIDIFYING MODE (DRY)
Ideal to reduce room humidity (spring and autumn, damp rooms, rainy periods, etc). In
dehumidifying mode, the appliance selects fan speed automatically.
Two arrows on the remote control display indicate DRY and AUTO respectively.
FAN MODE ONLY (FAN)
In fan mode, fan speed can be set by pressing the FAN button 1.
The fan speed changes between the speeds available (LOW/MED/HIGH).
Two arrows on the display indicate FAN mode and the speed set.
In this mode, AUTO speed cannot be selected.
10
_
_
USING THE REMOTE CONTROL
_
SETTING THE TIMER
The timer can be used to delay appliance start up or shut down. This avoids wasting electricity by
optimising operating periods.
How to programme delayed shutdown
• With the air-conditioning unit on, press the TIMER button 4. The time is displayed and the "h"
symbol flashes, with a flashing arrow indicating TIMER OFF.
• Set the time when you want the appliance to go off using the
buttons (from 30 minutes to
24 hours).
During the first ten hours, you can select half hour intervals. For times greater than ten hours, one
hour intervals can be selected.
• Press the TIMER button again to confirm the selection. The appliance emits a beep and the
light (H) flashes on the control panel, confirming successful activation of the timer. A count- down of
the time left is displayed on the remote control display and the light (H) flashes on the air
conditioner display.
• At the end of the set time the appliance switches off automatically.
• To cancel the timer programme, press the TIMER button again. The appliance emits a beep and both
displays reset to display the settings prior to activation of the timer.
How to programme delayed start up
• With the air conditioner off, press the TIMER button. An arrow indicating TIMER ON flashes on the
display. Now make all the desired settings for when the appliance will switch on (operating mode,
fan speed and temperature). Confirm the settings by pressing the TIMER button. The time is
displayed and the "h" symbol flashes.
Set the time when you want the appliance to switch off using the button
(from 30 minutes to
24 hours).
During the first ten hours, you can select half hour intervals. For times greater than ten hours, one
hour intervals can be selected.
• Press the TIMER button again to confirm the start-up time. A beep sounds and the time set is also
displayed on the control panel, confirming setting of the timer. The light (H) flashes on the air
conditioner display. A countdown of the time left is displayed on both displays.
• At the end of the set time the appliance switches on automatically, with the settings made
previously.
• To cancel the timer programme, press the TIMER button again. The appliance emits a beep and both
displays reset to stand-by.
11
_
TIPS
__
To get the best from your air conditioner, follow these recommendations:
• Close the windows and doors in the room to be air conditioned.
The only exception is when the appliance is installed through a hole in the wall.
In this case, you are recommended to leave a slight draught through a door or window to guarantee
correct ventilation.
• Never use the appliance in very damp rooms (laundries for example).
• Never use the appliance outdoors.
• Protect the room from direct exposure to the sun by partially closing curtains and/or blinds to make
the appliance much more economical to run.
• Never rest objects of any kind on the air conditioner.
• Never obstruct the air intake [ 6 ] or outlet grills [1].
• Make sure there are no heat sources in the room.
• Make sure the air conditioner is on a level floor. If necessary, place the two castor locks [14] under
the front wheels [3]
Do not cover
the appliance
12
_
TIPS
__
WATER DRAINAGE METHOD
Water drainage will generally only be required when you store the air conditioner away or when not in
use.
NOTE
As a safety measure, to positively prevent water spillage, the air conditioner is equipped with a fail-safe
device, if, the water tank fills. The unit will completely stop, the control panel displays”
“(FULL TANK)
the compressor and fan will not restart until the tank has been drained.
INTERMITTENT DRAINAGE (fig.h)
Turn the air conditioner off, and then drain the water tank by unplugging the drain cap and allowing the
water to flow onto a drain pan. It may be easier to wheel the unit outside, remove the drain cap and
drain the water onto the ground freely.
The water tank is considered sufficiently drained when no more water flows from the drain outlet.
To completely drain all water from the water tank, tilt the unit by lifting it slightly upwards from the
front until no more water drains from the outlet.
Restart the air conditioner by pressing the on/off button. Ensure that the unit is in COOL or DRY mode. The
compressor will start approximately 3 minutes after the unit is switched on.
Fig.h
13
_
CLEANING
__
Before cleaning or maintenance, turn the appliance off by pressing the ON/OFF button [A] then unplug
the appliance from the mains socket.
CLEANING THE CABINET
You should clean the appliance with a slightly damp cloth then dry with a dry cloth.
For safety reasons, never wash the air conditioner with water.
Caution: Never use petrol, alcohol or solvents to clean the appliance. Never spray liquids or similar.
CLEANING THE AIR FILTERS
To keep your air conditioner working efficiently, you should clean the dust filter every week of operation.
The filter is housed in the intake grill.
To clean the filters proceed as follows:
Remove the dust filter by extracting it upwards (figure. h).
Use a vacuum cleaner to remove dust accumulations from the filter. If it is very dirty, wash in warm water
and rinse. The water should never be hotter than 40°C.
After washing, leave the filter to dry, and then put back in place.
Fig.h
14
_
TROUBLESHOOTING
__
Wait for three minutes
15
Omega Altise products are distributed in
Australia by Shriro Australia Pty Ltd.
Locked Bag 5002, Kingsgrove NSW 2208
Phone: 1300 795 572 Fax: (02) 9415 5525
Web: www.omegaaltise.com.au
16