1
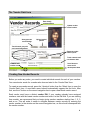
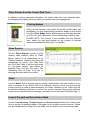
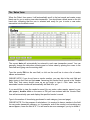
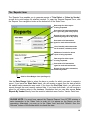
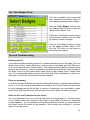
VendACE
A comprehensive vendor management system for global street papers
User’s Manual
VendACE (Vendor Administration and Circulation Executive) is a specialized database
application designed exclusively for INSP member street papers. This system offers a
user-friendly and holistic solution to vendor management and sales tracking, and is
compatible with Microsoft Access 2003 or 2007.
Key System Components
‘Sales’ form – Track individual sales transactions with automated price calculations.
Manages diverse sales formats, including pre-paid papers, earned papers, discounted
past issues and other related merchandise.
‘Vendor Data’ form – Create updatable profiles for individual vendors, including photos,
pitch information, sales statistics, and social development data. Capacity to automatically
generate and print vendor badges and individual sales reports from this form.
‘Reports’ form – Request sales reports and summaries to easily track progress of
magazine sales at the end of each day and over time. Reports available for overall sales
and for individual vendors, by specified date range.
Administrative forms – ‘Prices’ and ‘Staff’ forms enable you to easily update the system
directly from the main interface to handle new calculations and users, as needed.
*The Golden Rule of Microsoft Access*
All data that you enter into forms using Microsoft Access is automatically and
immediately saved in the system. You can close the program at any time without
pressing ‘save’ on the menu bar and all of the data will be there the next time you open
it. This is a great function, but it can also be dangerous. So remember…
NEVER type over existing data unless you want to permanently replace it.
A Note on Security
When you open VendACE in Microsoft Access 2003, you may receive a ‘Security Warning’
asking if you want to open the file or cancel the operation. In version 2007, you may see a
message bar at the top of the screen asking if you would like to enable all content. In both
cases, you should opt to ‘open’ the file (2003) or ‘enable’ the content (2007). This is a
standard security procedure, and you will likely have to repeat this step each time you open
the database.
record selector
scroll bar
form navigation buttons
record navigation bar
Navigation
Each time you open the database, the ‘Sales’ form will automatically pop up. This form is
the home base of your operations. You should leave it open and use the form navigation
buttons at the bottom of this screen to access all other forms.
To view past ‘Sales’ records, scroll up and down using the scroll bar on the right.
Navigate between the records on any form by using the record navigation bar at the
bottom left of the screen. Use |< to skip to the first record, >| to skip to the last record,
> and < to skip between records, and >* to open a new record (i.e. A new row for a sales
transaction or a new vendor account in the ‘Vendors’ form).
To jump to a specific record, enter a record number in the window of the record navigation
bar or scroll and use the record selector in the far left column.
To move between fields (i.e. Date, ID#, Name, etc), use the tab key on your keyboard.
2
Useful Toolbar Functions
DO NOT TOUCH!
Should always be
in ‘Form View’
Print preview
Print current
selection
Create a new
blank record
Delete selected
record
Undo last action
Online Help
Getting Started
The ‘Prices’ and ‘Staff’ forms are the two main administrative forms on this database. They
must be filled in before you use the database for the first time, in order for it to function
properly. Remember to update them as needed.
Entering Staff Members
From the ‘Sales’ form, click the ‘Staff’ button to open the
‘Staff’ form. Enter the name of each distribution staff
member or volunteer who will be managing sales
transactions through the database. These names will
appear on the ‘Staff member’ field of the ‘Sales’ form as
a drop down list. When staffing changes, simply add or
remove names from this form.
Setting Prices
From the ‘Sales’ form, click the ‘Prices’ button
to open the ‘Prices’ form. For each item, enter
the price that the vendor pays for one item
(i.e. one copy of the current issue, one bag, etc.)
The database will use these numbers to calculate
the amount of money due in each transaction.
If the price of your sales items changes in the
future, simply update the prices on this form.
3
The ‘Vendor Data’ form
Enter timely
communication
Update vendor
sales location
Auto-generate
vendor badge
Upload vendor
photos
Track loaned, pre-paid
and earned magazines
Request vendor
sales reports
Track outreach and
recruitment data
Create a new
vendor record
Scroll down to
enter social
development data
Creating New Vendor Records
Before you make any sales, you need to create individual records for each of your vendors.
You cannot enter a sale for a vendor who does not exist in the ‘Vendor Data’ form.
To create a new vendor record, press the ‘Vendors’ button from the ‘Sales’ form to open the
‘Vendor Data’ form. A new blank record should automatically appear the first time. After
that, use the >* button on the record navigation bar to open a new blank vendor record.
Each vendor must have a distinct vendor ID#. If your vendors already have assigned
numbers, start with the lowest vendor number and enter it in the ID# field. If you are starting
from scratch, we recommend that you begin giving vendors numbers starting from 1, 2, 3,
and so on. This will make it easier to navigate between vendor records by entering the
vendor number in the window on the record navigation bar, as this should correspond with
the vendor number.
4
Searching Vendor Records
To browse vendor records, use the record navigation bar at the bottom left. To search for
a specific vendor number, place the cursor in the vendor number field, select ‘Find’ from the
‘Edit’ column of the menu bar (or type Ctrl+F) to bring up the search function. Type the
vendor ID# you are searching for into the ‘Find What’ field and click the ‘Find Next’ button.
If you are searching by name, make sure the cursor is in the ‘Name’ field and open the
search function. If you do not know the whole name, simply change the ‘Match’ option to
‘Any Part of Field’ and search as usual. You may also easily bring up a specific vendor
record by double clicking on the vendor’s Name or ID# from the ‘Sales’ form.
Select to search by
Name or Vendor ID#
Use ‘Any Part of Field’
to search by partial
vendor name or ID#
Ctrl+F or ‘Edit’, ‘Find’ from the main menu bar to bring up the search function
If you have entered vendor ID#’s in chronological order starting from 1, the record
number displayed in the window on the record navigation bar should match the vendor ID#
that you have entered. To search for a specific vendor record, simply type the ID# into this
window and press enter. The record you are searching for should automatically appear. To
determine the next Vendor ID# for a new vendor account, just open a new, blank record
and use the number displayed in the window on the record navigation bar.
Uploading Vendor Photographs
Click the ‘Select Picture’ button and browse your files for the photo you want. Please note
that the photo file itself is not stored in the database. Instead, the database stores a link to
the photo’s location on your computer. If you move the photo to another folder in the future,
you will need to update this link.
For best results:
(1) Resize your photos to fit the dimensions of the space.
(2) Store all vendor photos in a single, easily accessible folder
(3) Name vendor photo files with their corresponding vendor number (i.e. 124.jpg)
5
Other Actions from the ‘Vendor Data’ Form
In addition to storing permanent information, the ‘Vendor Data’ form is an important place
for managing key ongoing functions relating to vendors sales and management:
Printing Badges
Once you have created a new vendor record with an ID#, Name and
photograph, you may automatically generate a badge for this vendor
using the ‘Print Badge’ button. After bringing up the badge preview,
go to the ‘File’ menu and select ‘Print’ from this page to print a copy.
PLEASE NOTE: This function is also available from the ‘Reports’
form, where you may print badges for any number of selected
vendors simultaneously (see Page 11 for details).
Sales Reports
Use the ‘Sales Reports’ function to track
vendors’ sales statistics, either by ‘Detail
Report’ (record of all transactions) or by
‘Monthly Summary’ (monthly sum total of all
transactions, by month). Use ‘Start Date’
and ‘End Date’ fields to set the date range
for your report request. Print reports by
selecting ‘Print’ from the ‘File’ menu. See
’Refreshing Data’ on Page 12 for tips on
ensuring that report data is up-to-date.
Notes
Use the ‘Notes’ field to manage ongoing, timely communication with your vendors. If you
enter a message in the ‘Notes’ field on an individual vendor’s record, the next time the
vendor comes in to make a sales transaction, the ‘Notes’ checkbox on the ‘Sales’ form will
be checked, indicating that there is a note on the vendor’s account. Bring up the individual
vendor record, communicate the message, and delete it from the ‘Notes’ field (See Page 7).
Loaned, Pre-paid and Earned Issue Bank
Use the ‘Loaned issues’, ‘Prepaid issues’ and ‘Earned issues’ fields of the ‘Vendor Data’
form to account for pending copies of the paper on an individual vendor’s account. Please
see the following section (Page 8) on the Sales form for details on how to use these fields.
6
The ‘Sales’ form
When the ‘Sales’ form opens, it will automatically scroll to the last record and create a new
blank row for you to enter a new sales transaction. You should see a black arrow on the left
hand side, indicating that the row is selected and ready for you to enter a new sales
transaction into the blank record.
The current date will automatically be entered in each new transaction record. You can
manually change the date when entering past or future sales by placing the cursor in the
Date field and typing over the existing date.
Type the vendor ID# into the next field, or click on the scroll bar to view a list of vendor
names and numbers.
PLEASE NOTE: If you do not know a vendor number, you may skip to the next field and
begin typing in their first and last name. Assuming this vendor has a record in the ‘Vendor
Data’ form, their name should come up as you begin to type it. Click ‘enter’ and the
associated vendor number will automatically be filled in for you.
If you would like to view the vendor’s record (for any notes, sales reports, earned or prepaid papers), double click on the name or ID# you have entered and the ‘Vendor Data’
form will automatically open and display the specified vendor’s record.
Type in the number of items being purchased in each category (see next page).
PLEASE NOTE: For the purpose of calculations, it is required to have a number in the field
for every sales transaction category, so, for example, even if the vendor is not receiving any
earned papers, leave the field at ‘0’. You will receive an error message if you try to delete it.
7
Sales Transaction Types
‘Current’ / ‘Past’
Use these fields to enter the number of current or past issues the vendor is purchasing.
‘Loaned’ (if applicable)
Use this field to enter the number of loaned issues you give to vendors who have run out of
money. If you have a set number of times per month that a vendor may receive loans, you
will need to view a ‘Detail Report’ sales report for that vendor for the current month (see
next section) to determine if s/he has already received his/her allotted loans for the month.
When a vendor requests a loan, open up his/her individual record and manually modify the
data in the ‘Loaned issues’ field to note of the number of loaned issues s/he is receiving.
The next time the vendor comes in to make a transaction, the loaned checkbox on the
Sales form will be checked after you enter his/her vendor ID#, indicating that s/he needs to
pay for the outstanding loaned issues on his/her account. You should ONLY enter loaned
issues on the Sales form when the vendor returns to pay for the issues. You will then
receive a prompt reminding you to reduce the number of loaned issues on his/her record to
indicate that these issues have been paid for.
‘Earned’ (if applicable)
Use this field to enter the number of free papers that the vendor has earned for a particular
task, achievement, etc. These papers should have been entered on the vendors’ individual
record in the ‘Earned Issues’ field.
After you enter the vendor’s ID#/Name in the transaction record, the checkbox in the far
right columns marked ‘Earned’ should be checked if that vendor currently has any earned
issues on his/her record waiting to be collected. To view the number of earned papers s/he
has on his/her record, double click on the vendor’s name or ID# in the current sales
transaction row to open their vendor record in the ‘Vendor Data’ form.
At this point, you should manually modify the data in the ‘Earned issues’ section of the
vendor’s record to reflect the number of earned issues remaining after this transaction.
Return to the Sales form and enter the number of earned issues being carried out in the
‘Earned’ field, signifying that the vendor is collecting that number of earned issues from his/
her record. You will receive a prompt reminding you to reduce the number of earned issues
on his/her record if you have not already done so.
While the vendor will not be charged for earned issues, it is important to enter them in the
Sales database when they are collected, in order to track the number of outgoing issues of
your magazine.
8
‘Prepaid’ (if applicable)
Use this field to enter the number of issues a vendor is paying for now but picking up at a
later time. After you enter a number in this field for a particular vendor’s transaction, you will
receive a prompt reminding you to modify the number of pre-paid issues on his/her
individual vendor record.
To do this, double click on the vendor’s name or ID# in the current sales transaction row to
open their vendor record in the ‘Vendor Data’ form. Manually enter in the number of prepaid issues being paid for and the date. If there are existing pre-paid issues on the vendor’s
record, you will need to add the number of pre-paid issues being purchased to the current
number on the record and update the date to the current date.
You should only enter a number in the ‘Pre-paid’ field upon receiving money from the
vendor. When s/he comes in to pick up the papers, you do not need to enter anything on
the ‘Sales’ form. Simply open his/her vendor record in the ‘Vendor Data’ form and manually
modify the data in the ‘Prepaid issues’ section to reflect the number of pre-paid issues
remaining after this transaction.
PLEASE NOTE: It is very important to remember to modify the loaned, earned or pre-paid
issues fields on an individual vendor’s record in order to avoid under- or over-crediting a
vendor for papers s/he has earned or paid for. If there are no loaned, earned or pre-paid
issues remaining on a vendor’s record, you must enter a zero in this field.
Other Transactions
Use supplemental fields to enter sales transactions for other merchandise (pins, books,
bags, etc.) according to the specifications that have been requested. PLEASE NOTE: If
you have only one field (“Other”) for other merchandise and you have various items with
different prices, you will need to set the price for “Other” according to the price of the most
common item and manually adjust the amount due in the “TOTAL” field for all other items.
Completing a Sales Transaction
The TOTAL amount due will automatically be calculated based on the prices set in the
‘Prices’ form (see Page 3). You may also manually modify the number in the TOTAL field to
reflect the actual amount of money being collected (i.e. If a vendor is $0.05 short). Simply
put the cursor in the ‘TOTAL’ field and type over the existing total. This degree of accuracy
is important for measuring actually money in hand against the overall sales report.
Enter the name of the ‘Staff Member’ who is making the sale either by selecting your name
from the drop-down list or beginning to type it and pressing enter when it appears in the
field. Names of staff members not yet entered in the ‘Staff’ form will not appear on the list
but may be manually typed into the field.
9
The ‘Reports’ form
The ‘Reports’ form enables you to generate reports of ‘Total Sales’ or ‘Sales by Vendor’,
as well as to print badges for selected vendors. To open the ‘Reports Request’ form, click
the ‘Reports’ form navigation button at the bottom left of the ‘Sales’ form.
Date range for which report
is being requested
Sum total of all sales transactions
for a given day (end of day report)
Record of every sales transaction,
collated by day (end of day report)
Sum totals of all transaction
types for each selected month
List of monthly sales summaries
for all vendors, ranked top seller
ID#/Name of vendor for whom
report is being requested
Date range for which report
is being requested
Sum totals of all transaction
types for each selected month
Record of every sales transaction,
collated by month
Click for ‘Print Badges’ form (see Page 11)
Use the Date Range fields to select the days or months for which you want to request a
report. If you leave the ‘Start Date’ blank, you will receive a report from the date at which
the earliest sales transaction was made. If you leave the ‘End Date’ blank, you will receive
reports through the most recently entered sale. If you leave both blank, you will receive a
report for all existing sales in the database. Remember that you can also access Sales
Reports By Vendor directly from the vendor’s individual record on the ‘Vendor Data’ form.
PLEASE NOTE: You must have opened the ‘Reports Request’ form AFTER entering a
sales transaction in the ‘Sales’ form in order for it to appear on the Report you are
requesting. Alternately, you may go to the ‘Sales’ form and click ‘Refresh’ from the
‘Records’ column of the toolbar menu to refresh the data.
10
The ‘Print Badges’ Form
This form is available only to those that
have requested the elective feature to
automatically generate vendor badges.
Click the ‘Print Badges’ buttons from
the ‘Reports Request’ form to open the
‘Badge Print Request’ form.
Check the ‘Print Badge’ check box next
to the vendors’ names or use the ‘Mark
All’ button to select all badges.
Click the ‘Print Badges’ button to bring
up the badge preview. Select ‘Print’
from the ‘File’ menu on the toolbar to
send them to the printer.
Tips and Troubleshooting
Deleting records
If you make a mistake entering a record (i.e. a sales transaction row on the ‘Sales’ form or a
vendor record on the ‘Vendor Data’ form), and you need to start again, go to the ‘Edit’ menu
on the menu bar and select ‘Delete Record.’ This will permanently delete the current record
that you are currently on, which is indicated by the black arrow at the left of the screen on
the ‘Sales’ form or by the current vendor record that you are viewing on the ‘Vendor Data’
form. If you accidentally delete a record, select ‘Edit’ and ‘Undo’ immediately, as there is no
other way to recover the record after it has been deleted.
Zeros are necessary
In all of the number fields that are used for making calculations, the default value has been
set at ‘0’. If you try to enter a record without a number in one of these fields, you will receive
an error message and will not be able to continue. Occasionally, you must delete a sales
record (‘Edit’ and ‘Delete Record’ from the menu bar) and re-enter it in order to continue.
Don’t use the ‘scroll’ function on your mouse
You may notice that if you try to scroll up and down on a single page (i.e. a vendor record
on the ‘Vendor Data’ form) using the little wheel in the middle of some mice, something
strange happens… You are actually scrolling through different records, not up and down in
the current record. Be careful of this because it can become very confusing if you enter
data in the wrong record.
11
Tips and Troubleshooting — Continued
Search settings
If you are using the ‘Find’ function to search for a specific vendor record and are having
trouble locating it, try using the ‘Any Part of Field’ setting instead of the ‘Whole Field’
setting. If a word doesn’t match perfectly, searching the ‘Whole Field’ will not work.
Lost photos
If the photo in one of your vendor records suddenly disappears, check to be sure that this
photo or the folder containing this photo was not deleted or moved to a different location on
your computer. Remember that this photo is not stored in the database. It is linked from its
location on your computer.
Refreshing Data
You must open the ‘Vendor Data’ form or the ‘Report Request’ form AFTER entering a
transaction in the ‘Sales’ form in order for this data to register on the Report you are
requesting. Thus, it is a good idea to close the ‘Vendor Data’ form and the ‘Report Request’
form after use and reopen them the next time you need to access them. Alternately, to
ensure that your report has the most up-to-date data, you may open the ‘Sales’ and ‘Report
Request’ forms and then click ‘Refresh’ from the ‘Records’ menu to refresh the data.
Beware of ‘Design View’
This database has been created to enable easy administration from the forms on the
user interface. There is a dangerous button at the left of the menu toolbar at the top of the
page that allows you to select different options for viewing the database. This should
always be kept in ‘Form View’. ‘Design View’ enables you to manipulate the structure and
format of the database, but it is very easy to mess up calculations or links between forms
unless you have a very strong knowledge of Microsoft Access.
PLEASE NOTE: The database’s creators will not be able to help repair mistakes made in
attempts to change the database’s structure through ‘Design View’.
Keep your database clean
In order to keep your database from growing unnecessarily large over time, you should
periodically ‘compact and repair’ the database. This function shrinks the database down to
reclaim unused space. From the menu bar, go to the ‘Tools’ menu and scroll down to
Database Utilities. Select ‘Compact and Repair Database’.
Back up data regularly!
Always a good idea. (Select ‘Back up Database’ from the ‘File’ column of the menu bar).
12