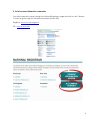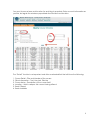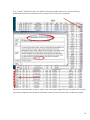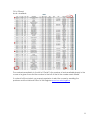
1
SIS
Student Information
System
Hebrew Union College – Jewish Institute of Religion
Student User’s Manual (SIS)
March 26, 2015
Table of Contents
1. FERPA reminder ............................................................................................................................... 3
2. Locate HUC-JIR websites ............................................................................................................. 4
3. Introduction to SIS........................................................................................................................... 5
4. Accessing your account: ............................................................................................................. 7
5. List of courses offered for a semester ....................................................................................... 8
6. Changing your password........................................................................................................... 12
7. Update personal information ................................................................................................... 13
8. Emergency contact information ............................................................................................. 14
9. Information on administrative and financial holds............................................................. 15
10. List of courses being offered for a semester....................................................................... 16
11. Registering for cross-campus courses .................................................................................. 18
12. Student self-registration guide................................................................................................ 19
13. Pending registrations ................................................................................................................. 23
14. View and print your course schedule .................................................................................. 26
15. Student schedule summary .................................................................................................... 28
16. View and print your unofficial transcript ............................................................................. 29
17. Requesting an official transcript ............................................................................................ 31
18. Combining HUC-JIR and personal e-mail addresses ....................................................... 32
19. Quick instructions – log-in / register for courses................................................................. 35
20. Financial aid award letter ....................................................................................................... 36
21. Accepting or declining your financial aid.......................................................................... 37
22. Missing financial aid documents ........................................................................................... 39
23. Current tuition bill and tuition account detail ................................................................... 40
24. Financial aid shopping sheet ................................................................................................. 42
2
1. FERPA reminder
FERPA Annual Notice to Students: Access to Student Record Hebrew Union College-Jewish
Institute of Religion annually informs students of the Family Educational Rights and Privacy
Act of 1974, (FERPA) as amended. The Office of the National Registrar will disclose FERPA
information by publishing a notice on the College-Institute’s Registrar Website and in other
appropriate locations. This annual notice shall prescribe the procedures whereby a student
may make a formal request for non-disclosure of directory information, exercise the right to
inspect and review education records, request an amendment of education records and
obtain a copy of the College-Institute’s education records policy. The Family Educational
Rights and Privacy Act (FERPA) affords students certain rights with respect to their education
records.
http://huc.edu/registrar/docs/FERPA%20Annual%20Notice%20to%20Students%202012.pdf
3
2. Locate HUC-JIR websites
Listed on the home page: www.huc.edu under Current Students is a list of locations for
various websites for HUC-JIR.
1. Jewish Studies Portal (JSP) - https://jsp.huc.edu/Citrix/XenApp/auth/login.aspx
2. Student Information System (SIS) - https://sis.huc.edu/fusebox.cfm
3. Sakai - https://huc.anisakai.com/portal
4. Email https://owa.huc.edu/owa/auth/logon.aspx?replaceCurrent=1&reason=3&url=https%3a%2f%
2fowa.huc.edu%2fowa%2f
5. Libraries - http://huc.edu/research/libraries
6. National Registrar - http://huc.edu/academics/national-registrar
7. Fiancial Aid - http://huc.edu/admissions/financial-aid-scholarships
8. Student Billing - http://huc.edu/student-billing
9. Campus Directions (Campus Life) - http://huc.edu/campus-life
10. Directory - http://huc.edu/directory
11. Calendars - http://huc.edu/news-events/calendar/additional-calendars
12. LiveText - http://huc.edu/about/institutional-research-assessment
4
3. Introduction to SIS
The website for our Student Information System can be found at:
sis.huc.edu
There is also a quick link to the Student Information System on the Registrar’s page:
http://huc.edu/registrar/
5
The opening page of the website looks like this:
From here you can find information on how to:
a . Locate forgotten password • Click on the Forgotten Password tab circled above.
• Enter your HUC-JIR email address.
• Once you enter your HUC-JIR email address and date of birth: the SIS will email
you your user name and password to your HUC-JIR email address.
• You do not need to enter your Student ID Number.
b . See all the courses offered in a given semester using the “Course Catalog” tab.
c . Login to your account using your user name and password.
6
4. Accessing your account:
a . Enter your user name in the textbox above the label: username.
• Your user name is not case sensitive.
b . Enter your password in the textbox.
• Your password is case sensitive.
(If you are having issues please e-mail the National Office of the Registrar
[email protected] for assistance.)
After you enter your user name / password and are logged in, you will see a screen similar to
this:
7
5. List of courses offered for a semester
You may locate all courses through the National Registrar’s page and click on ALL Campus
Courses or go through the Student Information System (SIS).
Registrar: www.huc.edu/registrar
SIS: www.sis.huc.edu
8
You must choose a term and location for anything to populate. Enter as much information as
you like, but again the minimum populated must be term and location.
The “Detail” function is an important and often overlooked link that will show the following:
1. Course Detail – Title and Number of the course
2. Other Information – Text, Non-text, Elective
3. Course Notes – Description of the course itself
4. Location – Which campus this course is being offered
5. Seats Offered
6. Seats Available
9
The “Course” details function can also list other information about a course including
additional expenses if needed and if consent of the instructor is required.
When a red exclamation is shown next to the class (see image above) this means the course
has met its capacity and students will need consent from the instructor to add more seats.
10
Off = Offered
Avail = Available
The number immediately to the left of “Detail” is the number of seats available/empty in the
course at a given time and the number to the left of that is the number seats offered.
If a class is full the student can request permission to add the course by emailing the
professor and the National Office of the Registrar www.huc.edu/registrar.
11
6. Changing your password
The first thing you should do once you login to SIS is change your password using the Settings
and Tool tab and selecting Change Password.
Follow the directions given to change your password to one you can easily remember, but
one that is also secure.
12
7. Update personal information
If you have a change of permanent address, a new phone number, etc., you need to
update your personal information.
• Select Settings and Tools – Update Personal Information.
Select the appropriate information you need to update. Notice that you can select other
information to update besides just your address. Please note this will take a day or so for
the change to reflect in your account.
13
8. Emergency contact information
You can enter emergency contact information when you select Settings and Tools –
Update Emergency Contact.
And here is the page that allows you to enter your emergency contact information or to
make updates to what you entered previously.
14
9. Information on administrative and financial holds
If there is a hold on your account, you will not be able to drop or add a class, view your
grades in SIS, or get a copy of your transcript. Holds are listed on the first page when you
log in to SIS.
Holds are blocks on your account by the Business, Financial Aid or the National Registrar
Offices. The Hold Description conveniently gives you the phone number of the office to
call to find out more about the hold.
15
10. List of courses being offered for a semester
To obtain a list of courses being taught at HUC-JIR, select Student Records – Course Tools
– Course Registration – Select a Term – Add Courses – Select Location.
Make sure to click on the correct catalog and click continue.
If you see the screen below this means that registration is closed and you will need to
contact the National Registrar’s office for any further assistance.
16
Once you click on the catalog year the screen below will appear.
Click on the Add Courses button to register for classes.
Below is the dialogue window that you will get when you make this selection.
You must select a Location. The other selections are optional.
If you do not make any other selections, this will give you a complete list of all classes
taught by HUC-JIR. You can view the courses taught by a specific department, certain
time of day, or those taught by a specific professor.
17
11. Registering for cross-campus courses
During the Fall and Spring semesters, and occasionally over the Summer, courses are
broadcast in real-time between HUC-JIR campuses. A list of these cross-campus courses will
appear on the National Registrar’s webpage: http://huc.edu/academics/national-registrar
before web registration begins. This list will be updated periodically in case cross-campus
courses are added or cancelled.
When registering for a cross-campus course, please note the campus it is being broadcast
from. When you log into web registration, select the campus that the course is originating
from and choose it from that campus’s list of courses to be added to your course schedule.
Please note the time difference between our Eastern time zone campuses and our LA
campus.
Before you register for a cross-campus course, please consult with your academic program
director or academic advisor to make sure that the course will count toward the
requirements of your academic program.
18
12. Student self-registration guide
Note: If you have any questions or problems with your schedule, please contact your
Program Director. The Office of the National Registrar can provide only limited assistance
and they will always ask you to see your Program Director first.
Login to SIS as usual. Choose Student Records – Course Tools – Course Registration.
Enter the catalog year for which you wish to register and click on continue.
To add, or to enroll in a class, click on the “Add Courses” button.
19
The screen below now appears. Select as many options as desired to narrow the number
of courses displayed. If no options are selected, all the courses offered by HUC-JIR will be
displayed. It is usually a good idea to select Location to see only the courses offered on
your specific campus.
For this example, we selected Education (EDU) for Department. This lists all the Education
courses offered this semester. To enroll in a course, click the box on the left. Click on
Detail to find out about courses fees or additional expenses associated with the course or
if the course requires consent of the instructor.
20
After selecting all the courses in which you wish to enroll, click the “Register” button at the
top or bottom of the screen. Note that you can also click under Enroll Type if the course
you want to take is for credit or audit. The default in SIS will always be for credit, so please
be aware that if you intend to audit a course check the Enroll Type and click the button
listed as Audit.
21
After you have clicked on the “Register” button, click on See Detail to return to the
Online Registration screen. The course registration screen will make you aware of how
many classes you have successfully registered for, or if you have any conflicts with other
classes.
22
13. Pending registrations
Notice that if there is a Pending Registration indicator these are the reasons you will not
be able to register through SIS:
a. a time conflict
b. after the first two weeks of school
c. a summer intensive which has begun
d. exceeded the 18 credit hours per semester rule that is contained in the National
Student Academic Handbook
Please contact the National Registrar’s Office to remedy any issue listed above.
Clicking on the Delete link will remove such courses from the pending list and give you
the original list of classes that you have registered for.
If you exceed the 18 credit hours:
a. You will need to attempt to register for the credit hours above 18, which will
then go into “Pending Registration.”
b. Contact your Program Director for permission and have them email the
National Registrar’s office with verification. The National Registrar’s staff will then
“force add” the additional class in the SIS and let you know of the change.
To add another class, just click on Add Courses and repeat the process as listed above.
23
If the course you want requires the professor’s permission, this will be the screen that you
will see:
The faculty member will be notified through SIS that you wish to take their class, which
they will approve or reject. Either way the professor will contact you via email concerning
your registration. If the professor has given his/her consent through SIS, you can now add
the class in Course Registration. You will not be enrolled in this class until you go into your
SIS account under Course Registration and click on the Reprocess Pending button, which
is circled below. Once you have completed this process your name will automatically
appear on the professor’s class roster and your student schedule.
24
Don’t forget to log out when you finish with changing your schedule. This is especially
critical if you are using a public-use computer.
After the end of the second week of the semester a student may not add any courses to
his/her program. Using the Student Information System (SIS), students may drop a course
before the semester begins and during the semester until registration closes. A student
may drop a course until the end of the second week of classes without a notation
appearing on the student’s academic record. After the close of registration, students
must use an add/drop form. These are available on the National Registrar’s website. In
intensive courses or in the SJNM summer session, students may only add a course prior to
the second meeting. Withdrawing from an intensive course after the second session will
incur a grade of “W.”
Students will need to contact the National Registrar’s Office to make all changes to their
schedule after the first two weeks of classes. Please refer to the academic calendar for
exact date. www.huc.edu/registrar
25
14. View and print your course schedule
Select Student Records then under Schedule Information heading choose Student
Schedule (detail). This will give you a detail of everything that you have taken at HUC-JIR.
And here’s what this will look like:
26
You can print this page or select the Printable Version and get a schedule that looks like
the one shown below:
27
15. Student schedule summary
To view a summary of courses that you are taking for the current semester click on
Student Records and then Student Schedule Summary.
There are many features that you can utilize from this screen. One of which is that you
can download your courses into your iphone, google or outlook calendars. Directions for
this feature are listed below the download itself.
28
16. View and print your unofficial transcript
Select Student Records – Schedule Information – Student Schedule (Detail)
Then you will need to click on the Printable Version in blue. This will give you an unofficial
copy of your transcript:
29
This option lists all the classes that you have taken at HUC-JIR, all the classes that you may
have transferred to HUC-JIR, exemptions and the classes you are currently enrolled in for
the next semester. This also has a Printable Version so you can easily print an unofficial
copy of your transcript.
30
17. Requesting an official transcript
To request an official transcript go the Student Records – Degree Information – HUC-JIR
Transcript Request
Please fill out the required information along with the five dollar fee for the transcript.
31
18. Combining HUC-JIR and personal e-mail addresses
To combine your HUC e-mail and Gmail please follow these steps:
1. Click the gear icon
in the upper right, and then select Settings.
2. Open the Accounts and Import tab. (For Google Apps domains, open the
Accounts tab.)
3. In the Check mail using POP3 section, click Add POP3 email account.
4. Enter the full email address of the account you'd like to access, and then click
Next Step.
5. Gmail will populate sample settings, but we recommend checking with your other
provider to learn the correct server name and port. Enter your Password.
6. Click Add Account.
7. Once your account has been added successfully, you'll have the option of setting
it as a custom From address. This allows you to compose messages in Gmail, but
have them appear to be sent from your other email account. Click Yes to set up a
custom From address.
More information can be found at:
http://support.google.com/mail/bin/answer.py?hl=en&answer=21289
To combine your HUC e-mail and Yahoo please follow these steps:
1. Go to the Mail Accounts page in att.net Mail.
2. Select the mail account that you want to edit from the list of accounts.
Details about the account appear on the right side of the page.
32
3. Make your changes to the current account information.
Tip: See Adding a Non-Yahoo! Mail Account if you need more information about what
each account attribute is.
4. Click the Save Changes button.
att.net Mail confirms that your changes have been saved.
More information can be found at:
http://help.yahoo.com/sbc/tutorials/mmail/mm_accessother3.html
33
34
19. Quick instructions – log-in / register for courses
If you do not remember your user name or password please use the Forgotten Password
button.
1. Locate forgotten password • Click on the Forgotten Password tab circled above.
• Enter your HUC-JIR email address.
• Once you enter your HUC-JIR email address and date of birth, the SIS will email
you your user name and password to your HUC-JIR email address.
• You do not need to enter your Student ID Number.
To register for courses you will need to go to SIS which can be located at:
sis.huc.edu
Please follow these directions to register for courses:
1. Once you have logged in, please select “Course Registration” under the Student
Records tab.
2. Select the catalog you would like to register for and press “continue."
3. On the next screen select “add courses."
4. You will then be taken to the next screen which will allow you to filter your search,
under location select the campus you are registering for.
5. You will then be able to register for courses.
35
20. Financial aid award letter
To view your Financial Aid letter select Financials – Financial Aid – Financial Aid Award
Letter.
You will be prompted to select the academic Award Year.
After selecting the academic year, you will be able to view your complete financial aid
package.
36
21. Accepting or declining your financial aid
There is a direct link to Accept/Decline Financial Aid by clicking on
Financials – Financial Aid –Accept/Decline Financial Aid
You also have the option to Accept/Decline your financial aid when you view your
financial aid award letter.
This option takes you directly to a page like the one shown below. On this page, you can
accept or decline the financial aid package that has been prepared for you by clicking
on the Accept / Delete Financial Aid link.
37
After reviewing the award letter, select Accept/Decline Financial Aid.
If you would like to accept all the financial aid loan awards and the amount given, then
you can select “accept all.”
If you would like to decline all the financial aid loan awards then you can select “decline
all.”
You also have the option of accepting or declining some of the awards; simply select the
“accept” or “decline” box next to the appropriate award.
You can change the amount you would like to receive from each award accordingly.
After you have accepted, declined and / or indicated award amount desired, then
select “Accept / Decline Financial Aid.”
You do not have to make a decision on all of your awards at once; you can go back
and make changes as necessary. However, once a decision is made on a particular
award in SIS you will have to e-mail the Financial Aid Director directly to make any
changes.
38
22. Missing financial aid documents
To make sure you have all of your financial aid documents completed, select Financials –
Financial Aid – Missing Documents.
The Financial Aid office cannot complete your financial aid package until you have
submitted all of your documents to them.
This is what the report looks like for a student who has not turned in all his/ her documents.
Make sure to click on Award Year for the missing documents to appear.
39
23. Current tuition bill and tuition account detail
To view your current tuition bill for the semester, select Financials – Student Billing – Billing
Detail Summary. This will give you the tuition for the current school year.
40
There is also the option to view your total tuition account detail by clicking on Financials –
Student Billing – Tuition Account Detail. This will give you an overview of everything related to
your fees while at HUC-JIR.
41
24. Financial aid shopping sheet
This page allows you to get a realistic look at the cost of your college education for the
current year. The first part of the “Shopping Sheet” is shown below. The information on the
left side is your personal information and the information along the right side of the page
gives you information such as HUC-JIR college’s graduation rate and loan default.
Information regarding the Financial Aid office is located at the bottom of the “Shopping
Sheet” as well.
42