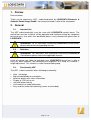
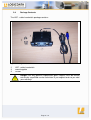
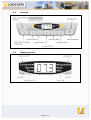
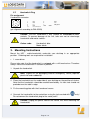
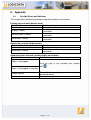
1
User manual Cable Handswitch for installation below the desktop HSF Rev 2 Subject to change without notice. Errors and omissions excepted. LOGICDATA cannot accept responsibility for incorrect operation or use of the products other than for the intended purpose. Under the warranty terms, LOGICDATA shall replace or repair any products that prove defective at the time of delivery. LOGICDATA shall not assume any further liability. If you have any questions or special requests, please contact LOGICDATA direct. 2011 LOGICDATA Contents 1. 2. Preface ................................................................................................................ 3 General................................................................................................................ 3 2.1 Intended Use................................................................................................ 3 2.2 Definition ...................................................................................................... 3 2.3 Functionality HSF ......................................................................................... 3 2.4 Package Contents ........................................................................................ 4 2.5 Overview ...................................................................................................... 5 2.6 Display overview .......................................................................................... 5 2.7 Handswitch Plug........................................................................................... 6 3. Mounting Instructions .......................................................................................... 6 4. Functions............................................................................................................. 7 4.1 Display ......................................................................................................... 7 4.2 Information LEDs.......................................................................................... 7 4.3 Basic Functions ............................................................................................ 8 4.4 Advanced Functions..................................................................................... 9 4.4.1 Storing a position .................................................................................. 9 4.4.2 Recalling a saved position .................................................................. 10 5. Technical Data .................................................................................................. 10 6. Appendix ........................................................................................................... 11 6.1 Possible Errors and Solutions .................................................................... 11 7. Further Information ............................................................................................ 12 7.1 Final Disposal............................................................................................. 12 7.2 Manufacturer information ........................................................................... 12 Page 2 / 12 1. Preface Dear customer, Thank you for choosing a HSF - cable-handswitch by LOGICDATA Electronic & Software Entwicklungs GmbH. You have purchased a state-of-the-art product. 2. General 2.1 Intended Use The HSF cable-handswitch must be used with LOGICDATA control boxes. The control box must be installed, initially operated and functional tested by competent personnel only. Use other than described above is only allowed with permission of LOGICDATA. Information: For all information concerning LOGICDATA control boxes please refer to the corresponding manual. 2.2 Definition Information: For definitions and information concerning LOGICDATA Control boxes please refer to the applicable manual. Aside of moving your table up and down your LOGICDATA control box is able to carry out other functions, like controlling the brightness of a lamp or a monitor – height adjustment. This function is called second motor group. 2.3 Functionality HSF The HSF - cable-handswitch offers following functionality: • • • • • • • Ultra - flat design Big and comfortable to use buttons New info display with status information Display of 1/10 inch or cm soft click button feeling shift mechanism under table plate Easy and fast underside mounting (screws are included) Page 3 / 12 2.4 Package Contents The HSF - cable-handswitch package contains: Figure 1: Package contents HSF - cable-handswitch mounting plate screws Danger: Use only genuine replacement parts! Repairs must be carried out only by a qualified service technician! If you neglect to do so you void your warranty! Page 4 / 12 2.5 Overview Figure 2: Overview HSF 2.6 Display overview Figure 3: Display of HSF Page 5 / 12 2.7 Handswitch Plug Pin assignment Handswitch connector 7 6 1 2 3 4 n.c. 3 1 5 2 4 HS1 HS3 n.c. HS2 not connected 5 6 7 Shell HS4 +5V SER_OUT GND (pin alignment according to DIN 45329) Caution: The HSF handswitch is only suitable for LOGICDATA motor controls. To prevent damage of the unit, take care not to interchange handswitch and motor sockets. Colour code: Handswitch: blue Motor: black 3. Mounting Instructions Mount the HSF - cable-handswitch underside your desktop in an appropriate position. Following tools are required for installation: • 1 screw driver Please take note, that the handswitch is equipped with a shift mechanism. Therefore always mount the handswitch in a drawn in position. 1. Unpack the handswitch. Note: Dispose of the packaging material ecologically sound (separate plastic foil and cardboard)! 2. Place the handswitch on the underside of your desktop on the position of choice. Note that the handswitch should be reached comfortably. Its front side should not protrude over the table’s edge. 3. Fix the mounting plate with the 6 enclosed screws. 4. Connect the handswitch to the control box using the jack marked with Do not connect the handswitch plug to the motor jacks! only! Caution: Unplug the power cord of the control unit while mounting the handswitch! Page 6 / 12 Figure 4: Connect the HSF cable-handswitch to the control box (e.g. COMPACT) 4. Functions The HSF – cable-handswitch is capable of a wide range of functions, which are described below. 4.1 Display The display of the HSF – cable-handswitch consists of a 3 digit position and information display and 6 lateral information LEDs. 4.2 Information LEDs Note: Please refer to your control box manual for further information regarding the functions mentioned below Container – LED This LED shows that the Containerstop function is active. Reset – LED This LED shows that the control box is being reset. Flex – LED This LED shows that the Flex Function is active. Ergotrainer – LED This LED shows that the Ergotrainer is active. Page 7 / 12 Info – LED This LED warns you of important information on the position and information display. PIN – LED This LED shows that the Pincode function is active. 4.3 Basic Functions Function Description Note For an upward adjustment of upwards the desk push this button. Push this button until the desired height of the desk has been reached. The desk will continue driving upwards until you release the button, or the maximum height is reached. For a downward adjustment of Desk downwards the desk push this button. Push this button until the desired height of the desk has been reached. The desk will continue driving downwards until you release the button, or the minimum height is reached. Desk For an upward adjustment of the motor group 2 (e.g. monitor Motor group 2 / adjustment) or desk, push this Desk upwards button. Push this button until the desired height of the desk has been reached. In case of no motor group 2 attached this button is used for the Desk upwards function. Motor group 2 will continue driving upwards until you release the button, or the maximum height is reached. In case of no motor group 2 For a downward adjustment of attached this button is used for the Desk downwards function. Motor group 2 / the motor group 2 (e.g. monitor Desk downwards adjustment) or desk, push this button. Motor group 2 will continue Push this button until the driving downwards until you desired height of the desk has release the button, or the been reached. minimum height is reached. Note: In case of no motor group 2 attached the therefore assigned buttons (motor group 2 upwards / motor group 2 downwards) are used for the desk upwards / desk downwards functions. Page 8 / 12 4.4 Advanced Functions 4.4.1 Storing a position Using this function you are able to store a desk-height. Note: On initial operation all stored positions are equal to the lowest possible desk-height (lower end position). Note: Only one desk-height per button is allowed. 1. Move the desk to the position you want to store. The display reads the actual height of the desk (e.g. 73cm). 2. Press the S button. The display reads S –. 3. Press the position button of choice (e.g. S2). The display reads S 2. 4. Now the height is stored on the chosen position button. The saving operation is confirmed with a double-click sound and after approximately 2 seconds the stored height will be displayed. Page 9 / 12 4.4.2 Recalling a saved position Using this function you are able to recall a stored position. Alternative A (manually) 1. Press and hold the desired position button (e.g. 2). The desk moves until the saved position is reached. If you release the button before reaching the saved position, the desk stops and the saved position will not be reached. 2. The desk has reached the saved height. Release the position button The display reads the actual desk-height. Alternative B (using double click automatic function) Note: If the double click function is available depends on the configuration of your control box. 1. Double-click the desired position button (e.g. 2) 2. The desk automatically moves to the saved position. If you press any button before reaching the saved position, the desk stops and the saved position will not be reached. The display reads the actual desk-height. 5. Technical Data Supply voltage Current consumption (average) Life cycle (switching cycles) Ambient temperature Cable length Dimensions (l, w, h) Weight 5VDC ± 10% 75 mA 10. 000 0 – 40° C 2070 mm ± 50mm 141mm x 129 mm x 9,6mm 0,13 kg (incl. Cable) Note: The foil of the handswitch might perish or might grow pale due to intensive UV radiation. Therefore avoid direct solar radiation! Page 10 / 12 6. Appendix 6.1 Possible Errors and Solutions This chapter offers detailed information on possible troubles and solutions: Display does not work (buttons work) Possible Cause Solution Cable is defect Contact our customer service Contact our customer service / change the Display is defect handswitch Contact our customer service / change the Microcontroller is defect handswitch Contact our customer service / change the Handswitch is defect handswitch Buttons do not work (display works) Possible Cause Solution Cable is defect Contact our customer service Contact our customer service / change the Handswitch is defect handswitch Handswitch does not work (neither display nor buttons) Possible Cause Solution Cable is not plugged Plug the plug in the intended jack marked with . Cable is not plugged as intended Bad pin contact Cable is defect Plug off the plug an plug it in as intended ( as described above) Contact our customer service Page 11 / 12 7. Further Information 7.1 Final Disposal Please heed following disposal instructions when disposing of the HSF-cablehandswitch: Note: Dispose of the components ecologically sound (separate plastic from electronics parts)! 7.2 Manufacturer information LOGICDATA Electronic & Software Entwicklungs GmbH Wirtschaftspark 18 A-8530 Deutschlandsberg Tel.: +43 (0)3462 5198 0 Fax: +43 (0)3462 5198 530 Email: [email protected] www.logicdata.at Page 12 / 12