1
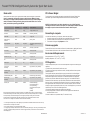
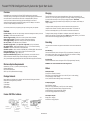
Foscam FHC790 Intelligent Security Camcorder Quick Start Guide
Overview
Charging
Congratulations on your purchase of the Foscam FHC790 intelligent security camcorder!
The Foscam FHC790 is an intelligent security camcorder with multiple triggering methods and multi
auto on/off modes. The camcorder comes with a built-in rechargeable battery which can
record up to 8 hours continuous video during typical use and standby for more than 3
months when vibration triggering is enabled. By plugging in the 5V DC adapter, it can achieve
192 hours of looped recording for surveillance use.*
The camcorder comes with an internal rechargeable battery. When using the camcorder for the
first time, or if you are using it after a long period of non-usage, remember to fully charge the battery
for at least 4 hours and resync the time by using the widget (see section “PC Software
Widget”). You can charge your camcorder using the USB port of your computer, the DC adapter, or
using a car adapter.
To charge the battery through USB port, connect the USB cable to the USB port of the
computer and the camcorder. For details, please see the status below. The camcorder will
function as a mass storage device, you will not be able to record video at this moment.
* Actual life and performance may vary depending upon usage and settings; battery not replaceable.
Features
Circular recording – Also known as “loop recording”. Overwrites recordings once memory card is full.
Time stamp – Inserts a time stamp onto the video.
Vibration-trigger recording – Select this to record only when vibration is detected.
Motion-trigger recording – Select this to record only when motion is detected.
Voice-trigger recording – Select this to record only when voice/talk is detected.
Auto on/off mode – Select different auto on/off scenarios.
Selectable day/night mode – Select day mode or night mode to suit your environment.
Auto gapless split file – Splits files without gaps at every 10 / 15 / 30 minutes of recording.
Orientation – Use when the camcorder is turned upside-down.
Selectable resolution – Select a resolution of 640x480(VGA) or 320x240(QVGA) video and sound.
Frame rate adjustment – Adjust or lower the frame rate to save memory space.
Configurable video quality – high / medium / low
Support max 64GB microSD (TF) card (for better performance, use a card with class 4 or
above and format the card before usage. Check the following link for more information:
(http://www.softpedia.com/get/System/Hard-Disk-Utils/HP-USB-Disk-Storage-Format-Tool.shtml)
To charge the battery through a DC adapter or car adapter, connect the DC adapter or car
adapter to the camcorder. For details, please see the Status section below. Moreover, you will also be
able to record video while charging, depending on the mode you set.
Minimum System Requirements
WARNING: Turn off the camcorder before removing the card!
Windows 2000, XP, Vista, 7, 8, Mac OS X (mass storage class)
Windows Media Player 9
Intel Pentium class computer
USB 2.0 port for hi-speed transfers and charging
custom mode
camera
microphone
Stop Recording
Press and hold the Power button until the green LED is off (for approximately 2 seconds).
DC adapter plugged in
Red LED flashing: charging
Red LED on: no card, card failed, or card full (not in circular recording)
Orange / Green LED intermittent flashing: charging and recording
Green LED flashing: charging complete and recording
All LEDs off: charging complete and not recording
Foscam FHC790 at a Glance
surveillance mode
Start Recording
Press and hold the Power button until the green LED is on (approximately 2 seconds), and
then release the button. When you see the green LED flashing, the camcorder is recording.
If you see otherwise, please read the Status section below.
Without DC adapter
Green LED on: camcorder is booted up
Red LED on: no card, card failed, battery low, or card is full (not in circular recording)
Green LED flashing: normal recording
Green / Red LED intermittent flashing: battery low and recording
Please unpack your intelligent security camcorder and check that the following were included:
Foscam FHC790 intelligent security camcorder
5V DC Adapter
5V Car Adapter
USB 2.0 Cable
Quick Start Guide
on/off
The power button is located on the right side of the camcorder. It can turn the camcorder on
or off.
Status
Package Contents
LED indicator
Recording
USB port
Connected to computer
Orange LED on: charging
Green LED on: charging complete
card slot
On-the-GO mode
www.foscam.us
Foscam FHC790 Intelligent Security Camcorder Quick Start Guide
Mode switch
PC Software Widget
Switch between surveillance, on-the-go and custom modes. Default settings are in parentheses.
Note: For custom mode configuration, please use the PC software Widget to change
the settings. The widget can be downloaded from www.foscam.us/pc-software-widget. To
make the custom mode settings effective, please push the mode switch to the “custom
mode” position before powering up the FHC790.
To synchronize the time and customize settings, download the PC software “Widget” from
www.foscam.us/pc-software-widget and follow the instructions in the software guide.
Surveillance
On-the-GO
Custom (default)
Video Quality
High
High
(High) / Medium / Low
Resolution
320x240
640x480
640x480 / (320x240)
Frame Rate
High
High
(High) / Low
Indoor Lighting
Condition
50Hz
50Hz
(50Hz) / 60Hz
Day / Night Mode
Day mode
Day mode
(Day mode) / Night mode / Auto
switching
Orientation
Normal
Normal
(Normal) / Up-side-down
Time Stamp
Enable
Enable
(Enable) / Disable
Circular Recording
Enable
Disable
(Enable) / Disable
Split File Time (min)
30
15
10 / (15) / 30
Mic
Enable
Enable
(Enable) / Disable
LED On / Off
On
On
(On) / Off
Voice-Trigger
Sensitivity
Disable
Disable
High / Medium / Low / (Disable)
Vibration-Trigger
Sensitivity
Disable
Disable
High / Medium / (Low) / Disable
Vibration Standby Mode
N/A
N/A
Fast Wake Up / (Power Saving)
Motion-Trigger
Sensitivity
Disable
Medium
High / Medium / Low / (Disable)
Auto On / Off
Disable
Disable
Scheduled Recording /
Car-activate Recording /
Car-stop Recording /
Car-activate and Car-stop Recording /
(Disable)
NOTE: If the time shown is year 2026 or beyond due to a loss of Real Time Clock,
recording time will not be shown on the video, even if timestamp is enabled. Please use
the widget to resync the time and delete files created in 2026 or beyond!
Connecting to computer
To
1
2
3
connect the camcorder to your computer, follow these instructions:
Connect the larger end of the USB cable into an available USB port on the computer.
Connect the smaller end of the cable into the USB port of the camcorder.
The camcorder will appear in My Computer as a drive.
Firmware upgrades
Foscam will from time to time release new firmware for enhancements or adding new features.
Visit www.foscam.us/firmware to check on the latest firmware for your FHC790.
Environmental Requirements
Storage temperature: 32˚ to 113˚F (0˚ to 45˚C)
Operating temperature: 32˚ to 113˚F (0˚ to 45˚C)
FCC Regulation
When the FHC790 is connected to the lighter through the 5V car adapter and the auto on /off mode is selected:
Car-activated Recording: Auto-starts recording once the car is started, auto-stops recording when car is stopped.
Car-stop Recording: Auto-starts recording when car is stopped, auto-stops recording once car is started.
Car-activate and Car-stop Recording: Auto-starts recording once car is started and continues to record
even when the car is stopped. The camcorder needs to be turned off manually.
This device complies with part 15 of the FCC Rules. Operation is subject to the following two
conditions:
1 This device may not cause harmful interference, and
2 This device must accept any interference received, including interference that may cause
undesired operation.
This equipment has been tested and found to comply with the limits for a Class B digital
device, pursuant to Part 15 of the FCC Rules. These limits are designed to provide reasonable protection against harmful interference in a residential installation. This equipment
generates, uses, and can radiate radio frequency energy and, if not installed and used in
accordance with the instructions, may cause harmful interference to radio communications.
However, there is no guarantee that interference will not occur in a particular installation. If
this equipment does cause interference to radio or television reception, which can be determined by turning the equipment off and then on, the user is encouraged to try to correct the
interference by one or more of the following measures:
1 Increase the separation between the equipment and camcorder.
2 Connect the equipment to a different outlet so that the equipment and camcorder are
on different branch circuits.
3 Consult the dealer or an experienced radio / TV technician for help.
* For the longest recording time, set Video Quality to Low, Resolution to 320x240 and Frame Rate to Low. This way
the FHC790 can act as a digital voice recorder.
** If a recording is started, you cannot switch between modes.
*** If triggering is enabled, the FHC790 will record for 10 seconds after powering-up. Then it will go into standby. If there
is a trigger, it will keep recording until there are no further triggers. After that, it will record for 5 more minutes and
then standby again.
www.foscam.us
version: 1.0