1
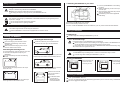
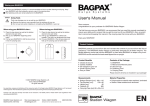
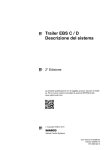
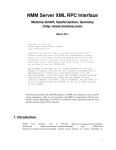
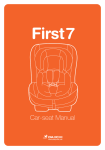
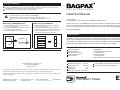
Storing your BAGPAX®
To store your BAGPAX® properly, it is recommendable to fold it up after cleaning and drying. Keep
your BAGPAX® with the accessory vacuum cups in the carrying case.
The fastening cords can remain attached to the BAGPAX®.
DANGER
Tools may damage your car as well as your BAGPAX®.
Remove the vacuum cups manually form the windows of your car.
Do not use tools when installing or uninstalling the BAGPAX® in your car.
Dear customer,
congratulations to your purchase of a BAGPAX® Compact Class.
When using your BAGPAX® often...
When storing your BAGPAX®...
1. Place the top element as well as the bottom
1. Place the top element as well as the bottom
element onto each other.
up starting at the folded edge.
3. Put your BAGPAX® into the carrying case.
S y s t e m s
User's Manual
Using Tools
2. Fold up the BAGPAX® to half its size and roll it
C a r g o
element onto each other.
The first time you use your BAGPAX®, we recommend that you read this manual completely to
ensure your safety and to ensure that you get the most out of your BAGPAX®. Also, we would
like to recommend keeping this manual in the carrying case that comes with your BAGPAX®.
and then to a length of a little less than 40 cm.
Enjoy your BAGPAX®!
2. Fold up the BAGPAX® five times lengthwise
3. Put your BAGPAX® in the carrying case and
fold up the carrying case to half its size.
Anwendung
Product
Features
Sicherheitshinweise
BAGPAX® protects your trunk from dirt and it screens the contents in your trunk from the view of
passers-by. The BAGPAX® Compact Class is particularly adequate for all compact class cars as
2
well as SUVs. The flexible fastening cords that hold the BAGPAX® in place allow BAGPAX® to
adapt to any trunk. BAGPAX® can be used with the back seats flipped over or upright.
Product Benefits
Closed all around
Quickly installed
No changes to your car
Small Carrying Case
Easy to Clean
Contents of the Package
1 x BAGPAX®
1 x Manual and Warranty Card
5 x Vacuum Cup
2 x Fastening Cord
1 x Carrying Case
Please check if all items are included in your package!
Measurements
© 2007 BAGPAX Cargo Systems e.K.
User s Manual KW49/2007
All rights reserved.
Any reprinting, copying or distributing of this manual or parts of it is illegal unless BAGPAX Cargo Systems e.K. has issued
written approval. The manufacturer grants a two year warranty according to the accompanying warranty card.
Bottom Element [cm]: 130 x 95
Top Element [cm]:
130 x 85
Height [cm]:
70
Capacity [l]:
818
Carrying
Case [cm]: 26 x 39 x 7
Reinigung
Material Properties
Polypropylene material:water-resistant, laminated
Seams: water-resistant and reinforced
Improper use voids the warranty and leads to the exclusion of all liability claims. Please follow local regulations when
discarding the BAGPAX®.
BAGPAX Cargo Systems e.K.
Saarbruecken, Germany
http://www.bagpax.com
[email protected]
Hotline: 09001 BAGPAX
(49 Cent/min from German land line net)
(09001224729)
Compact Class
EN
Safety
Instructions
Sicherheitshinweise
DANGER
4. Mounting the BAGPAX® in your trunk
Danger of Suffocation
2. Attach the fastening cords to the loops of the
vacuum cups.
3. Open the zipper and place the protective rear
end over the bumper.
The fastening cord must be tightened
reasonably.
Inflammable and Hot Materials
Hot materials may damage your BAGPAX®. Inflammable materials may be ignited by direct
exposure to sunlight.
Do not transport easily inflammable materials.
Do not transport hot or glowing materials.
WARNING
the trunk.
C
People or animals may suffocate in the BAGPAX®.
Never leave children unattended around your BAGPAX®.
Promptly put away the carrying case for your BAGPAX® after use.
DANGER
1. Fold out your BAGPAX® in the loading area of
B
A
D
E
A fastening cord; B vacuum cup; C hatch;
D rim of the trunk; E protective rear end.
If it turns out that the BAGPAX® cannot be installed in your car, please contact the manufacturer.
Obstructed view through the rear window
The view through the rear window may be obstructed.
Use the BAGPAX® in cars that are equipped with two exterior mirrors.
Using your BAGPAX®
Loading Cargo
Sicherheitshinweise
Installing
your BAGPAX®
Sicherheitshinweise
1. Unpacking your BAGPAX®
Open the carrying case and take out the
BAGPAX®, the fastening cords and the
vacuum cups.
Make sure that the carrying case is out of
reach of children when stored.
Load all cargo after installing the BAGPAX® in your car.
3. Mounting the Vacuum Cups
DANGER
Unsecured Cargo
Unsecured Cargo in your BAGPAX® may be hazardous.
Secure cargo to prevent it from shifting on the slippery surface of the BAGPAX®. It is also
recommendable to secure cargo that has pointed or sharp edges.
Place heavy cargo on the bottom of your BAGPAX® and make sure that heavy cargo is in a
position that is no higher than 40 cm.
Clean the surface of your car windows and
press the vacuum cups onto the windows.
2. Mounting the Fastening Cords
Pull the fastening cords through the loops and
tie them to the respective loops of your
BAGPAX®.
It is not necessary to shorten the fastening
cords.
WARNING
Overtaxing your BAGPAX®
Your BAGPAX® may be damaged if it is carried or moved while cargo is inside.
Load all cargo after installing the BAGPAX® in your car.
If the backseats are in an upright position, place the
vacuum cups as indicated in the illustration above.
Closing your BAGPAX®
1
If the backseats are upright, the two rear loops
should be used.
2
Close the zippers
after loading cargo
into your BAGPAX®.
If the backseats are flipped over, place the vacuum
cups as indicated in the illustration above.
Place the rear vacuum
cups on the inside of
the deck lid.
If the backseats are flipped over, the outer loops
to the right and the left should be used.
Open the zipper up
to the rim of the
trunk of your car.
In individual cases
you will have to
deviate from these
recommendations.
Cleaning your BAGPAX®
Clean your BAGPAX® after use.
You may use mild detergents like dishwashing liquid and a piece of cloth to clean your BAGPAX®.
Do not use aggressive detergents.