1
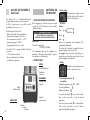
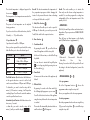
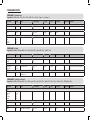
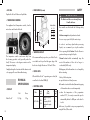
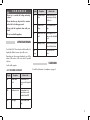
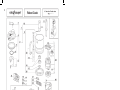
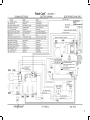
DECLARATION OF CONFORMITY Robot-Coupe SNC: Declares that the machines identified by their type above, comply with: • The essential requirements of the following European directives and with the corresponding national regulations: - Directive «Machinery» 2006/42/EC, - Directive «Low voltage» 2006/95/EC, -D irective «Electromagnetic compatibility» 2004/108/EC, - Regulation (EC) n°1935/2004 «Materials and articles intended to come into contact with food», - Regulation (EU) n°10/2011 «Plastic materials and articles intended to come into contact with food», - Directive «Reduction of Hazardous Substances (RoHS) 2002/95/EC, - Directive «WEEE» 2002/96/EC, • The requirements of the European harmonized standards and with the standards specifying the hygiene and safety requirements: - EN 12100 -1 & 2 - 2004: Safety of machinery – General principles for design, - EN 60204-1 -2006: Safety of machinery – Electrical equipment of machines, - EN 12852: Food Processors and Blenders, - EN 1678-1998: Vegetable Cutting Machines, - EN 454: Blender-Mixers, - EN 12853: Hand-held Blenders and Whisks (stick blenders), - EN 14655: Bread Slicers, - EN 13208: Vegetable Preparation Machines, - EN 13621: Salad Spinners, - EN 60529-2000: Degrees of protection, - IP 55 for the electrical controls, - IP 34 for the machines. Signed in Montceau en Bourgogne on 19 February 2013 Alain NODET Industrial Director Robot-Coupe SNC - 12 avenue du Maréchal Leclerc – BP 134 – 71305 Montceau-les-Mines Cedex - France SUMMARY WARRANTY IMPORTANT WARNING YOU HAVE JUST ACQUIRED A Robot Cook® SWITCHING ON THE MACHINE • Advice on electrical connections • Control panel • Settings • Operations • Programming • Programmed Recipes ASSEMBLY USES & EXAMPLES HYGIENE CLEANING • Motor base • Bowl • Blade • Scraper arm • Lid seal MAINTENANCE • Blade • Motor seal • Scraper arm • Lid seal • Temperature control TECHNICAL SPECIFICATIONS • Weight • Dimensions • Working height • Noise level • Electrical data SAFETY OPERATION ERRORS STANDARDS TECHNICAL DATA • Exploded views • Electrical and wiring diagrams 17 ROBOT-COUPE S.N.C., LIMITED WARRANTY Your new ROBOT-COUPE appliance is warranted to the original buyer for a period of one year from the date of sale if you bought it from ROBOT-COUPE S.N.C. 2 - Labour to sharpen and/ or replacements for blades which have become blunt, chipped or worn after a normal or excessive period of use. 3 - Materials or labour to replace or repair If you bought your ROBOT-COUPE product scratch ed, stained, chipped, pitted, dented or from a distributor your product is covered discoloured surfaces, blades, knives, attachments by your distributor’s warranty (Please check or accessories. with your distributor terms and conditions of the warranty). The ROBOT-COUPE S.N.C. limited warranty is against defects in material and/or workmanship. 1 - Damage caused by abuse, misuse, dropping, or other similar damage caused by or resulting from failure to follow assembly, operating, cleaning, user maintenance or storage instructions. SHIPPING DAMAGES. Visible and latent defects are the responsibility of the freight carrier. The consignee must inform the carrier and consignor immediately, or upon discovery in the case of latent defects. KEEP ALL ORIGINAL CONTAINERS AND PACKING MATERIALS FOR CARRIER INSPECTION. 4 - Any alteration, addition or repair that has not been carried out by the company or an approved service agency. 5 - Transportation of the appliance to or from an approved service agency. THE FOLLOWING ARE NOT COVERED BY THE ROBOT-COUPE S.N.C. WARRANTY: 8 - 6 - Neither ROBOT-COUPE S.N.C. nor its affiliated companies or any of its distributors, directors, agents, employees, or insurers will be liable for indirect damage, losses, or expenses linked to the appliance or the inability to use it. Labour charges to install or test new attachments or accessories (i.e., bowls, discs, blades, attachments) which have been arbitrarity replaced. 7 - The ROBOT-COUPE S.N.C. warranty is given The cost of changing direction-of-rotation expressly and in lieu of all other warran- of three-phase electric motors (installer is ties, expressed or implied, for merchanta- responsible). bility and for fitness toward a particular purpose and constitutes the only warranty made by ROBOT-COUPE S.N.C. France. 18 important warning WA R N I N G Keep these instructions in a safe place Warning: In order to limit accidents such as electric shocks or personal injury or fire, and in order to limit material damage due to misuse of the a ppliance, please read these instructions carefully and follow them strictly. Reading the operating instructions will help you get to know your appliance and enable you to use the equipment correctly. Please read these instructions in their entirety and make sure that anyone else who may use the appliance also reads them beforehand. unpacking ASSEMBLY PROCEDURES • Carefully remove the equipment from the packaging • Follow the various assembly procedures carefully (see page 24) and make sure that all the attachments are correctly positioned and take out all the boxes or packets containing attachments or specific items. use • WARNING - some of the tools are very sharp e.g. blades, discs... etc. too alkaline (i.e. containing too much caustic soda or ammonia). • Robot-Coupe can in no way be held responsible for the user’s failure to follow the basic rules of cleaning and hygiene. • Never try to override the locking and safety systems. installation • We recommend you install your machine on a perfectly stable solid base. • Never insert an object into the container where the food is being processed. • Never push the ingredients down with your hand. • Do not overload the appliance. connection • Always check that your mains supply corresponds to that indicated on the identification plate on the motor unit and that it can withstand the amperage. • The machine must be earthed. handling • Always take care when handling the blades, as they are extremely sharp. • For plastic parts , do not use detergents that are • Never switch the appliance on when it is empty. cleaning • As a precaution, always unplug your appliance before cleaning it. maintenance • Before opening the motor housing, it is absolutely vital to unplug the appliance. • Check the seals and washers regularly and ensure that the safety devices are in good working order. • It is particularly important to maintain and check the attachments since certain ingredients contain corrosive agents, e.g. citric acid. • Never operate the appliance if the power cord • Always clean the appliance and its attachments at the end of each cycle. or plug has been damaged or if the appliance fails • Never immerse the motor base in water. to work properly or has been damaged in any way. • For parts made from aluminum, use cleaning fluids intended for aluminum. • Do not hesitate to contact your local Maintenance Service if something appears to be wrong. 19 U HAVE JUST ACQUIRED A O Robot Cook® The Robot Cook® is a Cutter-Emulsifier-Heater perfectly adapted to the needs of professionals. It will be of great service to you which you will gradually discover as you use it. The Advantages of Robot Cook®: - Cutter function with a bottom bowl blade. - Maximum liquid capacity of 2.5 litres. - Precise temperature control of 1° or 2° C. - Heating capacity up to 140° C. - Programming function for 9 recipes. Your Robot Cook® is equipped with the following accessories: - 3.7 litre stainless steel bowl. - Micro-serrated stainless steel blades. - Lid and bowl scraper arm. S WITCHING ON THE MACHINE - Power supply: The general power supply is turned off by the black switch located at the back of the machine. • ADVICE ON ELECTRICAL CONNECTIONS Before plugging in, check that your power supply corresponds to that indicated on the machine’s identification plate. warning This appliance must be plugged into an earthed socket (risk of electrocution). Robot Cook® This model is adapted to 220-240V / 50-60Hz The standardized plug must be calibrated to a minimum of 10 amps, and preferably 16 amps, if the appliance is used intensively. • CONTROL PANEL SETTINGS Low and High Heat Function • SETTINGS: Switches: Heat: Low heat . High heat . Speed: Timer: Allow you to respectively choose temperature (°C), speed (rpm) and time (min). The rotary dial is designed to regulate the chosen parameter (temperature, speed, time). For example: after pressing the speed button, you regulate the speed using the rotary dial; the chosen speed is displayed on the speed line. - Settings: The small arrow shows the parameter where the rotary dial is active. Speed Function Timer Function PROGRAMMING Programme Function Step Button ON/OFF (behind the machine) 1. Low and high heat function: 2 possibilities: Adjustable temperature from 20°C - 140°C. Low heat (small flame): High heat (big flame): You press the heat switch Rotary Dial (parameter setting) CONTROL PANEL 20 Pulse Switch Run Switch Stop Switch once to select low heat. Then use the rotary dial to select the desired temperature. Press twice on the heat switch to select high heat. Then use the rotary dial to select the desired temperature (big flame displayed). The desired temperature is displayed opposite the . chosen arrow The temperature is the temperature measured in the bowl . Benefit: This function maintains the temperature of the preparation-in-progress without changing the texture. It also prevents the motor from overheating on low speed if the bowl is very full. The power or heat temperature can be adjusted 3. Turbo/Pulse Function: during operations. This function will enable you to reach a speed of If you do not wish to use the heat function, select the 4500 rpm. To obtain this, you need to press on the 2 dashes (—— °C) on the heat line. Turbo/Pulse switch for the required run time. 2. Speed function: 4. Timer Function: Speed variator from 80 to 3 500 rpm. 1 - Countdown Mode By pressing the switch dial will allow you to choose the desired speed. time of the appliance with the rotary dial. Blend Speeds 100 to 500 rpm or R-Mix -100 to -500 rpm Cut 600 to 2 000 rpm Mix 2 100 to 3 000 rpm Emulsify 3 000 to 3 500 rpm The R-Mix function (blend function: the blade turns in the opposite direction so as not to cut the food) can be accessed between –100 rpm and –500 rpm. To obtain this, you need to turn the rotary dial to minus (–). If the motor is running, it will stop when reaching 0 rpm. You will need to restart the machine once the speed has been chosen. • OPERATIONS: The Pulse, Run and Stop switches send instructions to the machine. They are present on all ROBOT-COUPE appliances. They will carry out what appears on the display panel. (What has been « programmed »). Once you have pressed the speed switch, the rotary Functions Benefit: This mode enables you to activate the Timer only once the chosen cooking temperature is reached. You can thus program the cooking time independently of the start temperature and of the quantity of food. , you will set the run At the end of the run time, a short bell will ring by default. You can choose to activate the long bell option to set a long ring alert by pressing twice on the Timer button . Black switch Turbo Pulse Green switch Run Red switch Stop Pressing 2 seconds on the Red Stop switch will reset the settings to the initial configuration. (connect the appliance). 2 - Timer Mode A timer records the run time of the appliance by default. • PROGRAMMING: + - Use a programme: 3 - Differed Mode Go to the Programme function By pressing 2 seconds on the Timer switch , the following display appears on your screen . You will set the desired run time of the appliance , choose the programme number using the rotary dial. Turn on your appliance to the chosen programme. Intermittent Speed Function: the blade rotates a few times every 3 seconds. using the rotary dial once the chosen temperature - Read a programme: is reached.. Once the programme has been chosen using the key o obtain this, you need to turn the rotary dial to minus (–) until you reach the display . This mode will automatically deactivate after use and the indicator will disappear. , press on the step button using the rotary dial. to view all the steps 21 You have the possibility of registering 9 programmes on your Robot Cook®. The active step has now been replaced by the next step. 3 recipes are already pre-programmed, (see page 23): When all steps have been deleted, the programme is deactivated. Programme 1: Béchamel The word End is displayed at the last step. During operations, the programme will stop at this point. Programme 2: Custard Programme 3: Confectioner’s custard After each step of the programme, a bell will ring to indicate that the programme is moving onto the next step. - Create or modify a programme: By pressing once on the Programme Function you then obtain the desired programme by using the rotary dial. It allows you to choose from the programmes 1 - 9. For each step of the programme following parameters: , you enter the Heat power and Temperature Speed Timer To create or modify a step, choose the desired step , which by pressing the switch for a few seconds will allow you to enter your parameters. After entering your parameters, confirm them by again so as register pressing the step switch them. - Delete a step: Go to the step to be deleted, press the step switch for a few seconds and then press the red stop to delete the step. switch 22 • PROGRAMMED RECIPES: PROGRAMME 1: Béchamel Sauce Ingredients for 1 litre: Butter 100 g - Flour 100 g - Milk 1 litre - Salt 5 g - Pepper 1 g - Nutmeg 1 g Ingredients Weight Action Heat setting Step 1 Butter Speed 100 g Melt + 115° C 200 rpm Step 2 Flour 100 g Add + 120° C Step 3 Milk Salt Poivre Nutmeg 1 Litre 5g 1g 1g Cook + 100° C Time Lid opening Scraper Arm Comment 2 min. Closed No 200 rpm 5 min. Closed Yes 500 rpm 15 min. Closed Yes Lid opening Scraper Arm Comment Add in gently all at once PROGRAMME 2: Custard Ingredients for 1 litre: Full Cream Milk 1 Litre - White Sugar 200 g - Egg Yolks 160 g - Vanilla 1 Pod Ingredients Weight Action Heat setting Step 1 Full cream milk Vanilla Speed Time 1 Litre 1 Pod Infuse the vanilla seeds in the milk + 85° C 600 rpm 20 min. Closed No Step 2 White sugar Egg yolks 200 g 160 g Add into the hot milk + 85° C 600 rpm 3 to 4 min. Open Yes The more yolks there are the creamier it is. Step 3 Chill rapidly. Set aside at + 4° C PROGRAMME 3: Confectioner’s Custard Ingredients for 1 litre: Full Cream Milk 1 Litre - White sugar 230 g - Egg Yolks 120 g - Vanilla 1 Pod - Flour 50 g - Cornflour 50 g - Chilled Butter 80 g Ingredients Weight Action Step 1 White sugar Egg yolks Flour Cornflour Vanilla 230 g 120 g 50 g 50 g 1 Pod Blanch the ingredients Step 2 Milk 1 Litre Add the milk to the mixture Step 3 Butter 80 g Add the butter in small pieces Heat setting Speed Time Lid opening Scraper Arm Comment 2000 rpm 30 sec. Closed Yes + 95° C 1000 rpm 12 min. Open Yes + 95° C 1000 rpm 30 sec. Open Yes 23 ASSEMBLY 1) With the motor unit facing you, make sure that the bowl handle is slightly to the left. HYGIENE 4) Make sure that the scraper arm is correctly assembled with the lid and the handle locked. IMPORTANT: NEVER USE PURE BLEACH - Correctly dilute the detergent / disinfectant following the manufacturer instructions which are generally printed on the packaging. - Scrub well if required. - Let the detergent act. 5) Place the lid on the bowl and rotate it to the right until it locks. With everything in place, your appliance is ready to run. USES & EXAMPLES Never put your ingredients in the bowl before the blade is in place. 24 warning As a precaution, always unplug your appliance before cleaning it (hazard of electrocution) and handle the blades with care (hazard of injury). • MOTOR BASE • For liquids, never fill the bowl more than ²/³ or less than 2 cm below the upper part of the blade. Never immerse the motor base in water. Clean using a damp cloth or sponge. • Your Robot Cook® is designed to carry out the following functions: • BOWL Emulsify H O I M P O RTA N T - Dry thoroughly with a disposable cloth. CLEANING 2) Turn the bowl handle to the right until the motor lugs are securely positioned in their sockets. The handle should now be straight in front of you. 3) Position the blade on the motor shaft and lower it right to the bottom of the bowl. Make sure that it is correctly positioned, by rotating it in the bowl. - Rinse carefully. T Grind C Mix O Chop L Blend D Knead - Remove the lid - Release the bowl by rotating it on the motor unit to unlock it. - Gently lift it up to disengage it, leaving the blade in the bowl in order to prevent any spillage if the preparation is liquid. If the food has a solid consistency, remove the blade and empty the bowl of its contents. You can also remove any mixture stuck to the blade by running it in the emptied bowl of your Robot Cook®. Your bowl can be washed in the dish-washer. MAINTENANCE • BLADE It is important to thoroughly clean your blade after • BLADE each use. The quality of the cut depends mainly on the sharpness of your blades and the degree of wear and tear. The blade is subject to wear and tear and should be replaced regularly to ensure consistent quality in the final product. A cleaning tool is available to remove any mixture remaining on the blade. 1 • MOTOR SEAL 2 Proceed as follows: 3 In order to keep the motor completely watertight, it is advisable to check the seal ring regularly for wear and tear and replace it at least once per year. • LID SEAL After using your Robot Cook, clean the lid seal as follows: 1 After cleaning the blades, always dry well to prevent rusting. • SCRAPER ARM To clean the scraper arm, dismantle it as follows: 1- Hold the scraper arm in one hand and the handle in the other hand. 2- Press the two parts one on the other, then turn the handle 45° anti-clockwise 3- It is now possible to remove the two parts (scraper arm and handle) from the lid and clean them. 3 The seal ring on the motor shaft should be lubricated regularly using a food safe lubricant. 2 The seal ring can be easily replaced without having to dismantle the motor, so we strongly advise you to always check that it is in good condition. • SCRAPER ARM The scraper arm is equipped with rubber parts which are subject to wear and tear. They should be replaced regularly to ensure optimum efficiency of the scraper arm. The lid scraper is easy to dismantle and also to assemble. The scraper bowl needs to be replaced by a professional as it is attached to the scraper arm. 25 SAFETY • DIMENSIONS (in mm) • LID SEAL Replace the lid seal if there are liquid leaks. warning The blades and discs are extremely sharp. Handle with care. • TEMPERATURE CONTROL Your appliance has 8 temperature controls, 4 on the motor base and 4 under the bowl. Robot Cook® A A522 These models are fitted with the following safety B338 systems: C226 D - Mechano-magnetic safety and motor brake. D264 - As soon as you open the lid, the motor stops. - In order to avoid any splash when processing B C liquids, we recommend you stop the machine before opening the lid. Caution: The risk of burns is • WORKING HEIGHT The temperature controls can become dirty from the cleaning products used (especially under the bowl). This causes a few degrees variation in the temperature display. Simply brushing the 4 contacts with the abrasive side of a sponge will correct this malfunctioning. T ECHNICAL SPECIFICATIONS We recommend that you position your Robot Cook on a stable work top so that the upper edge of the bowl is at a height of between 1.20 and 1.30 m. Robot Cook® NetGross 13,5 kg motor if the machine is left on for too long or is overloaded. (Er02 error). before restarting. When the Robot Cook® is operating on no-load, the - Safety of the heat system: sound level is less than 70dB (A). a - specific detection of bowl presence b - thermal cut-out inside the bowl (automatic stopping • ELECTRICAL DATA Motor Speed (rpm) 15 kg 230V / 50-60 Hz 26 - Thermal cut-out which automatically stops the If this happens, allow the machine to cool completely • NOISE LEVEL • WEIGHT greater when processing hot liquids. ® 100 to 4,500 of the machine above a safe temperature). Power (Watts) Maximum heat capacity: 1200 W Motor capacity: 1000 W Nominal machine capacity: 1800 W Intensity (Amp.) c- when the temperature of the preparation reaches 85° C, for security reasons the speed is automatically limited to 600 rpm as the bowl is 8 too hot. In this case, it’s possible to mix your preparation by using the Turbo/Pulse switch. R E M E N B E R Never try to override the locking and safety systems. Never introduce any object into the container where the food is being processed. Never push the ingredients down with your hand. Do not overload the appliance OPERATION ERRORS Your Robot Cook® has a function which enables it to display the different causes of possible errors. Depending on the message displayed, you will be aware of the nature of the error, and of possible solutions. See the table opposite. Description Description Action to take Er04 Inconsistent configuration Dismantle and assemble all accessories; press on the Stop Switch to reset Er05 Internal bus overvoltage Check the machine’s power supply Er06 Thermal cut-out control Allow the appliance to cool board down; press on the Stop Switch to reset Er07 Checking bowl safety Other message Remove the bowl then replace it to reset the safety features. Contact your After-Sales Service STANDARDS Consult the declaration of compliance on page 2. • LIST OF ERRORS DISPLAYED Display Display Action to take Er01 Thermal variator cut-out Allow the machine to cool down; press on the Stop switch to reset Er02 Thermal motor cut-out Allow the machine to cool down; run faster or use the intermittent function 0101 Er03 Power supply Check the machine’s power supply 27 54 55 57 24/04/13 17:15 Page 1 Head Office, French, Export and Marketing Department: 48, rue des Vignerons 94305 Vincennes Cedex- France Tel.: 01 43 98 88 15 - Fax: 01 43 74 36 26 Email: [email protected] Robot Coupe Australia Pty Ltd: Unit 3/43 Herbert St Artarmon NSW 2064 Australia T (02) 9478 0300 F (02) 9460 7972 Email: [email protected] www.robot-coupe.com Robot-Coupe U.K. LTD: Fleming Way, Isleworth, Middlesex TW7 6EU Tel.: 020 8232 1800 Fax: 020 8568 4966 Email: [email protected] Réf. : 450 674 - 09/2013 4 de Couv UK:R 5 V.V. - Couv