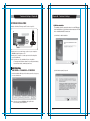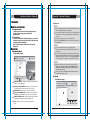
1
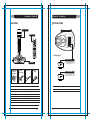
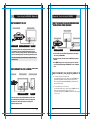
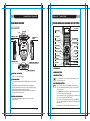
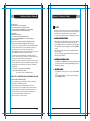
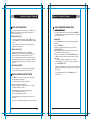
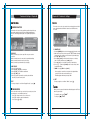
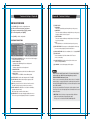
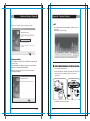
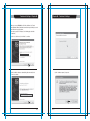
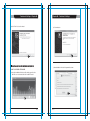
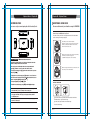
Nava
D Y N A M I C
S O U N D
&
V I S U A L
E X P E R I E N C E
DENSING USER’S MANUAL
Thank you for your purchase
Please read this carefully before using your DENSING
MODE
Thank you for purchasing Donya e Nava's DENSING.
ALL-IN-ONE KARAOKE
Nava
E T19KV
VER.100
With this wireless karaoke system, you can enjoy singing.
Sing together and have fun with your family and friends.
Show off your talent anytime, anywhere!
User’s Manual
VER.100
|
ET19KV
Chapter.01 - Introduction
CONTENTS
Chapter 01. Introduction
Specifications
Basic Items
Optional Items
01-01
01-02
01-03
Chapter 02. How to Set up Your DENSING
How to Connect to a TV
How to Connect to a TV & Stereo (Sound System)
How to Change the Background Video using Other Video Sources
How to Convert [PAL] or [NTSC] mode of TV
02-01
02-01
02-02
02-02
Chapter 03. Product Guide
ET19KV Main Station
ET19KV Wireless Karaoke Key Buttons
ET19KV Remote Control
03-01
03-02
03-07
SPECIFICATIONS
ET19KV MAIN STATION
·
·
·
·
Model No.
ET19KV
RF Frequency
2.4GHz ISM Band
Dimension / Weight
137(W) x 203(H) x 60(L)mm / 322g
Power Consumption
During the Stand-By : 17mA / 153mW
During the Playing
- JPEG MODE : 300mA / 2.7W
- MOVING MODE : 540mA / 4.86W
Chapter 04. Functions and Settings
KARAOKE
- Song Search
- Recording
- MY-MIC
- User's Contents
- Theme
- Jump
- Vocal Assist (Multiplex)
- Musical Notation
- User Background (Memory Card)
HOW TO SING
MOVIE
GAME
Configuration Menu
Software Installation
ET Manager
ET Encoder
04-01
04-03
04-05
04-06
04-07
04-07
04-08
04-08
04-09
04-10
04-11
04-11
04-12
04-14
04-22
04-25
·
Audio Output
Stereo Line Out(Full scale Output)
- TV Mode : 2Vrms - AMP Mode : 3.5Vrms
·
·
·
Video Output
Format : NTSC or PAL 1Vp-p @ 75 Ohm Load
External Video Input
Composite1Vp-p @ 75 Ohm Load
Resolution
NTSC : 720 x 480(interlace) / PAL : 720 x 576(interlace)
·
USB(Slave only)
USB2.0(HI Speed), USB1.1Support
·
Operating Temperature
0°C ~ 60°C
·
Power Supply
AC Adaptor(DC 9V/1A)
WIRELESS KARAOKE
·
·
·
·
·
·
·
·
Chapter 05. Optional Items
Recording Pack
Additional Song Pack
05-01
05-02
Chapter 06. Additional Information
Precaution
Troubleshooting
FCC Information to User
06-01
06-02
06-03
User Manual
|
ET19KV
VER.100
01
|
Model No.
EX19DD
RF Frequency
2.4GHz ISM Band
Battery
1.5V (AA) x 2 EA
Dimensions
43.5(W) x 43.5(L) x 259(H) mm
Weight
182g ( without the batteries )
Wattage
70mA / 210mW
Operating Temperature
0°C ~ 60°C
Effective Distance
Up to 10m unobstructed distance
CHAPTER. 01
VER.100
Introduction - Chapter.01
Chapter.01 - Introduction
BASIC ITEMS
OPTIONAL ITEMS
Wireless Karaoke
Remote Control
MODE
ET19KV Main Station
Additional Song Pack
You can add Additional Song Packs.
(Refer to Chapter 05-02)
Main Station
Karaoke Handbook
(Song list &
User’s Manual)
AV Cable
(Phone to RCA)
Video Cable
AC Adaptor
(DC 9V)
Recording Pack
You can record your own singing.
(Refer to Chapter 04-03, 05-01)
OPTIONAL ITEMS
BASIC ITEMS
. ET19KV Main Station
. Karaoke Handbook (Songlist & User’s Manual)
. Wireless Karaoke x 2 ea / Battery AA x 4 ea
. Remote Control / Battery AAA x 2 ea
. USB Installation CD
. AV Cable (Phone to RCA)
. Video Cable
. AC Adaptor (9V)
. USB Cable
. Memory Card
CHAPTER. 01
|
02
VER.100
. Recording Pack
03
|
CHAPTER. 01
VER.100
. Additional Song Pack
How to Set up Your DENSING - Chapter.02
Chapter.02 - How to Set up Your DENSING
HOW TO CHANGE THE BACKGROUND VIDEO
USING OTHER VIDEO SOURCES
HOW TO CONNECT TO A TV
ET19KV Main Station
Television
Television
ET19KV Main Station
AUDIO L / R & VIDEO OUT
INPUT PORT I AUDIO L / R & VIDEO IN
External Device
AV CABLE (RCA)
1. Connect the Audio / Video cable to the RCA jack terminal on your TV,
as shown above. If there are only two RCA jack terminals on your TV
(mono TV), connect the yellow jack (male) to the yellow RCA jack terminal
and connect the white jack (male) to the other RCA jack terminal of your TV.
VIDEO IN
OUTPUT PORT | VIDEO OUT
1. Connect the video cable to the VIDEO OUT jack terminal on other optional
video sources (VCD, DVD,VIDEO).
※Please turn off the function “Automatic Volume Levelling” (AVL / AVC) on
your television set.
2. Connect the other side of the video cable to the VIDEO IN jack terminal of
DENSING.
3. Press [MODE + 0] on the mic or on the remote control to use other video
sources as background by setting "EXT.VIDEO INPUT" on the “configuration
menu”.
HOW TO CONNECT TO A TV & STEREO
ET19KV Main Station
Television
(SOUND SYSTEM)
HOW TO CONVERT [PAL] OR [NTSC] MODE OF TV
Stereo ( Sound System )
1. To convert to PAL mode, turn off the mic first.
Press and hold button [8] on the mic, and then press the [POWER] button
using another finger until the word “PAL” appears on the TV screen.
(Do not release button [8] and the [POWER] button until the word “PAL”
appears on the TV screen.)
INPUT PORT I VIDEO
2. To convert to NTSC mode, turn off the mic first.
Press and hold button [9] on the mic, and then press the [POWER] button using
another finger until the word “NTSC” appears on the TV screen.
(Do not release button [9] and the [POWER] button until the word “NTSC” appears
on the TV screen.)
AUDIO L / R
1. Connect the yellow jack to the yellow RCA terminal on your TV. Connect
the red and white jack to jack terminals on your stereo (sound system).
You might need an extension cable if your stereo (sound system)
is placed-far away from your TV.
CHAPTER. 02
|
01
VER.100
02
|
CHAPTER. 02
VER.100
Product Guide - Chapter.03
Chapter.03 - Product Guide
ET19KV MAIN STATION
ET19KV WIRELESS KARAOKE KEY BUTTONS
ET19KV Main Station
DC IN
Number button
2
USB PORT
SONG PACK COVER
Cancel Button
3
POWER ON / OFF
SWITCH
ANTENA
ON
POWER
Play / Stop Button
6
Search Button
7
MY-MIC Button
9
Vocal Assist Button
10
A
Volume Button
12
Echo Button
15
POWER INDICATOR
WIRELESS MIC INDICATOR
B
Key Button
16
LCD Display
1
Reservation Button
4
Navigation Button
5
Mode Button
18
Pause Button
11
MIC Button
13
Melody Button
14
Record Button
17
Power Button
8
C
1. LCD DISPLAY
MEMORY CARD SLOT
2. NUMBER BUTTON
A POWER ON / OFF SWITCH
3. CANCEL BUTTON
- Turns on or off the main station.
- Press this button to erase one by one what you input or to cancel
some function you chose.
B POWER INDICATOR
- A green light indicates that the ET19KV is turned on and ready for
use.
- A red light indicates that the ET19KV is in the standby mode.
Press the power button on the remote control or turn off the power
button on the main station and turn it on again.
- No light indicates that the power button on the main station is in
the off position. Please turn it on.
4. RESERVATION BUTTON
RES - Please select a song and press [RES] to reserve the song
(The song number will be displayed on the screen under the
“Reserved” menu.)
- Press [MODE] twice to exit the reservation list and go back to
the on-screen list by pressing [▼] [▲].
- In case you want to delete a reserved song, select that song in
the “reserved” list and press [RES] again.
C WIRELESS MIC INDICATORS
- A blue light indicates that the wireless mic is connected to
the main station.
- You can reserve up to 100 songs, but only 4 songs with their
respective numbers will appear on a blue bar on the upper portion
of the screen.
- This button also used to exit from some function you chose.
CHAPTER. 03
|
01
VER.100
02
|
CHAPTER. 03
VER.100
Product Guide - Chapter.03
Chapter.03 - Product Guide
5. NAVIGATION BUTTONS
11. PAUSE BUTTON
- Press these buttons to choose different modes,
different songs and so on by scrolling up/down and left/right.
II
- Press this button to pause the song you are singing.
- After pressing this button, you can also enjoy the
"Singing Practice" function by using the navigation buttons.
6. PLAY / STOP BUTTON
- Press [▶/■] once to play the selected song.
- Press [▶/■] again to stop playing the song.
12. VOLUME BUTTON
VOL - When you press [VOL], two different sub volume control menus
appear on the TV screen ① Music (press once)
② Vocal Assist : Multiplex (press two times).
7. SEARCH BUTTON
SEARCH
- Pressing [SEARCH] will prompt you to different modes of
choosing a song.
- You can also search a song from the on-screen list by pressing
[▼] [▲] or inputting characters. (Refer to Chapter.04-01)
13. MIC BUTTON
MIC - Press [MIC] to adjust the volume of the main mic then press [▼] [▲]
to decrease / increase the volume.
- This setting will remain until the product is reset or the values are
changed by users.
8. POWER BUTTON
- Turns on or off the mic.
Press [POWER] slightly to turn it on.
Press [POWER] for 3 seconds to turn it off.
- When there is no input signal within 10 minutes, the power will be
turned off automatically.
(You can change this function in the Configuration.)
14. MELODY BUTTON
MEL - Press this button, and then use the navigation buttons to adjust the
melody levels of a song.
15. ECHO BUTTON
9. MY-MIC BUTTON
ECHO - Press this button and then use the navigation buttons to adjust
- This function enables you to save your own customized settings over
the song you chose.
- While singing a song, adjust settings such as the volume, melody,
echo, etc., press [ ] on the mic to save the settings.
- To see the stored [MY-MIC] song list, press [ ] again.
the ECHO levels of a song.
16. KEY BUTTON
KEY - Press [KEY] and then press [▼] [▲] to decrease / increase the pitch
level while singing a song.
The TV screen will display the range of keys ( -7 ~ 8 ) with the default
value [0] on the key bar at the upper part of the screen.
- Press [▼] [▲] to select the song you wish to sing again with the
adjusted settings. Press [▶/■] to play the song and press [RES] to
delete it from the list.
- At the end of the song or when you press [▶/■] to stop the song,
this setting will return to the initial default value [0].
- The lists containing the customized settings will be retained even after
turning off the ET19KV.
10. VOCAL ASSIST BUTTON
- Press this button to see the list of vocal assist.
(Refer to Chapter.04-08)
- While singing a song, you can activate or deactivate vocal assist
function by pressing this button repeatedly.
CHAPTER. 03
|
03
VER.100
04
|
CHAPTER. 03
VER.100
Product Guide - Chapter.03
Chapter.03 - Product Guide
*MODE Function
17. RECORD BUTTON
[MODE]+[1] VOLUME (3 Different Sub Volume Control Menus Appear)
① Music volume control 0~15 / ② Melody volume control 0~15
③ Vocal Assist volume control 0~15
REC - Choose/select a song first before recording.
- Press [MODE + REC] to start recording.
- Press [▶/■] to stop recording.
- Press [REC] to start the playback of the song.
[MODE]+[2] TEMPO (Adjusts the Tempo of a Song)
The range of the tempo adjustment is between -7 ~ 8, and you can
select a tempo at which you want to play the song by selecting a value
from this scope.
[MODE]+[3] KEY (Adjusts the Level of the Pitch)
18. MODE BUTTON
The range of the pitch adjustment is between -7 ~ 8, and you can
select the pitch level.
MODE - You can see the function menu bar on the upper screen by
pressing [MODE]. First, find a function you want to use by
pressing [▼] [▲] and then press [▶/■] to
prompt you to the sub-menu.
Press [▼] [▲] then [▶/■] to choose an option.
[MODE]+[4] SEARCH (Song Search Function)
Look for your favorite song.
[MODE]+[5] EFFECT (Musical Effects) : 4 Different Sub Menus Appear
① Mic Echo volume control 0~15
② Instrument : You can change the melody instrument by using [▼] [▲]
[◀] [▶] to one of the 8 instrumental sounds while singing a song.
③ Voice change : Mic voice alteration function that can change your voice
either to female voice or to male voice.
④ Vocal assist ON / OFF
- [MODE] is used in conjunction with other buttons to access
secondary functions.
[MODE]+[6] PLAYING (Technical Effects) : 5 Different Sub Menus Appear
① Jump : Skips the prelude or interlude
② Continuous Playback : If you wish to continue playing songs in sequential
order, select a starting song and press MODE → 6 → 2 (for example,
if you select song number 241, play the song, and then press MODE → 6 → 2).
③ Random Play : DENSING randomly chooses a song for you.
④ Pause : A song pauses. Press [▶/■] to continue playing.
⑤ Selected Section Repeat : Repeats a certain section in a song.
※ Press [MODE + 6 + 5] to set the starting point and [MODE + 6 + 5]
again to set the ending point. Pressing [MODE + 6 + 5] 3rd time
turns off this function.
※ This "selected repeat function" is not available for the prelude and
interlude sections of a song
[MODE]+[7] USER'S CONTENTS
① USER'S JPEG / ② MP3
[MODE]+[8] REC & PLAY
① Record / ② Playback (Playing the recorded song)
③ Chain Recording / ④ Chain Reply
[MODE]+[9] SPECIAL EFFECT : 5 Different Sub Menus Appear
① Musical Notation (Key Note Guide) / ② My-Mic / ③ Theme : Background
Themes (9 background themes to choose from) and Scoreboard (Records
your scores at the end of each song) / ④ Silence : Silent mode (you can
choose from “level 1”, “level 2”, and “off”) / ⑤ Lyrics ON / OFF
[MODE]+[0] CONFIG. (Configuration)
CHAPTER. 03
|
05
VER.100
06
|
CHAPTER. 03
VER.100
Product Guide - Chapter.03
Chapter.04 - Functions & Settings
KARAOKE
ET19KV REMOTE CONTROL
6
1
3
2
1 SONG SEARCH
1 POWER :POWER ON/OFF.
2 VOCAL ASSIST SETTING :Vocal Assist ON / OFF
Ⅰ. Entering the Song Search Mode
3 MY-MIC :MY-MIC.
- Press [SEARCH] or [MODE+4] on the remote control to enter the Song
Search Screen.
4 BACKGROUND CHANGE :Changes backgrounds.
4
5 THEME :Selecting background image.
6 SHORTCUT :Guides directly to some modes.
5
7 NAVIGATION :Muilt-function guide buttons.
8
8 PLAY / STOP :Plays & Stops a song or function.
7
9 KEY :Adjusts the song key.
10 TEMPO :Adjusts the song tempo.
9
10
11
12
11 VOLUME :Adjusts the volume.
12 MELODY :Adjusts the melody level.
13 ECHO :Adjusts the echo level.
13
14 0~9 :Arabic numbers.
15
14
15
17
20
23
25
:Cancel.
16 RES :Reserves and cancels a reservation.
16
18 MODE 19
21
22
24
27
26
II. Buttons for the song search mode on the remote control
17 SEARCH :Song search.
18 MODE :Functions.
19 II :Pause.
- [SEARCH] : Press [SEARCH] repeatedly to select one of these three modes below.
1) Searching by Title : You can search for a song by typing some letters or numbers or special
characters of the song title. (Refer to “IV. How to Search a Song”on the next page, chapter
04-02)
2) Searching by Singer : You can search for a song by typing some letters or numbers or
special characters of the singer’s name. (Refer to “IV. How to Search a Song” on the next
page, chapter 04-02)
3) Exit Mode : Neither the “title” icon nor the “singer” icon will be highlighted on the screen.
20 RANDOM :Random song select.
21 REPEAT :Section repeat.
22 JUMP :Skips the Prelude / Interlude of a song.
23 SCORE :Changes the level of difficulty.
24 M/F :Converts voice to man’s or woman’s
25 VOICE :Changes the voice.
- [← ] : Press this button to erase characters.
- [MODE] : Pressing this button repeatedly while keying in characters toggles you to either
the letters, numbers or special characters.
26 SILENCE :Silence mode.
27 REC :Recording & Playback.
CHAPTER. 03
|
07
VER.100
01
|
CHAPTER. 04
VER.100
Functions & Settings - Chapter.04
Chapter.04 - Functions & Settings
2 RECORDING
Ⅲ. Exiting the “Song Search” mode
Use this function to record your singing(VOICE with the MUSIC) and to
playback your recorded singing performance.
- After entering the “song search” mode, search a song using [▼] [▲] [◀] [▶]
and play the song by pressing [▶/■] or reserve the song by pressing [RES].
- After entering the “song search” mode, set it to the "exit mode" by pressing
[SEARCH] and end the search by pressing any number button.
(If there are reserved songs, the list containing those reserved songs will be
displayed on the screen.)
1. RECORDING TO THE MEMORY IN THE MAIN STATION
In case of no Memory Card and or Recording Pack on the main
station, follow the procedure below.
How to Use:
①
Ⅳ. How to Search a Song
After entering the song search screen, press [MODE] to set one of the three input methods below.
① Input letters
[1]
[2] A → B → C [3] D → E → F [4] G → H → I [5] J → K → L
[6] M → N → O [7] P → Q → R → S [8] T → U → V [9] W → X → Y → Z [0] SPACE
②
② Input numbers
[1] → 1 [2] → 2 [3] → 3 [4] → 4 [5] → 5
[6] → 6 [7] → 7 [8] → 8 [9] → 9 [0] → 0
1) Select a song.
2) Press [ ] the remote control to start
recording ( ① ).
3) To stop : Press [▶/■].
4) To do playback :
Press [▶] on the remote control ( ② ).
5) To stop the playback : Press [▶/■].
※ A song recorded less than two seconds will not be recorded.
※ You can record a song of up to five minutes long.
[approximately for 1(one) song]
③ Input special characters
[1] . → , → : → ; [2] ‘ → “ → ` [3] _ → = → ~ [4] + → - → * → / [5] ! → # → $ → %
[6] & → ? → @ [7] ^ → ₩ → | [8] ( → ) → < → > [9] [ → ] [0] SPACE
2. RECORDING TO AN MEMORY CARD AND/OR RECORDING PACK
You can record your own singing into an Memory Card or a Recording Pack.
If both the Memory Card and Recording Pack inserted at the same time,
you need to decide which one to use.
(The recording pack looks exactly the same as an additional song pack
but contains no songs and its data is replaceable.)
(The search function disregards spaces. E.g. : If you want to search a song whose title
is “A DONDE VOY,” you only have to enter “AD” without space between characters
to execute the search.)
- Press the [0] ~ [9] buttons to input characters.
- Examples
To enter "TOU" : Press [8] once → [6] three times → [8] two times
To enter "ABC" : Press [2] once → [2] two times → [2] three times
How to Use:
1) Insert an Memory Card or Recording Pack
before turing on the main station.
2) Select a song.
3) Press [ ] under the "RECORD" section
on the remote control to start recording
4) To stop, press [▶/■].
5) To see the list of the recorded songs, press [▶] the remote control.
6) To play back the song, choose a recorded song first by pressing
[▼] [▲] [◀] [▶] on the remote control. After selecting the song
the song, press [▶/■] on the remote control.
7) To stop the playback, press [▶/■].
8) To delete a recorded song, choose the song and press [RES].
CHAPTER. 04
|
02
VER.100
03
|
CHAPTER. 04
VER.100
Functions & Settings - Chapter.04
Chapter.04 - Functions & Settings
9) Chain Recording
Records your reserved songs continuously.
Select songs you want to record and reserve them.
Choose the "Chain Recording"(MODE + 8 + 3) to start singing
& recording of all the reserved songs simultaneously.
3 MY-MIC
This function enables you to save your own customized settings over
the song you chose such as the volume of music, melody, microphone,
echo effect, and vocal assist as well as the tempo, key setting.
You can recall these settings when you select and sing the song again.
10) Chain Replay
Replays the recorded songs.
Select a song you want to replay first from the list.
Choose the "Chain Replay"(MODE + 8 + 4) to start replaying all
the reserved songs.
When you choose a particular song in the "Chain Replay" function,
the replay continues until the song right before the chosen song.
1. SAVING ADJUSTED SETTINGS
- While singing a song, adjust settings such as the volume of music,
melody and so the way you want to customize the song, and
then press [♥] on the remote control while the song is still playing.
- The song with the adjusted settings will be saved in the [MY-MIC ]
song list.
(If the same song is already in the list, the song will be updated
with new settings.)
- The lists containing the customized settings will be retained even
after turning off the ET19KV.
※ You can’t record your singing to an Memory Card when MOVING PICTURES
are playing.While an Memory Card or Recording Pack is being used,
your singing cannot be recorded on the main station memory.
※ When an Additional Song Pack is used on the main station, songs recorded
from the Additional Song Pack can be played or deleted too.
※ You cannot record your singing performance in the middle of the song.
Therefore, even if you press [ ● ] on the remote control while singing a song,
the song stops, restarts, and then the recording takes place.
※ Settings such as tempo or key should be set in advance as these cannot
2. SELECTING & PLAYING A SONG
- Press [♥] to see the [MY-MIC ] song list while not playing any song.
- Select the song from the list and press [▶/■] to play the song
with the stored settings.
be changed while the song is being recorded. Also, during the recording,
certain functions such as continuous play or pause are not available.
※ Recording time
1. Recording Pack : About 180 minutes (NAND 1Gb)
2. Memory Card : About 60 Hours (2GB)
(In case there is no files on the Memory Card)
3. DELETING A SONG
- Press [♥] while selecting a song to see the stored list of MY-MIC
songs.
- Press [▼] [▲] [◀] [▶] to select the song you want to delete,
and press [RES] to delete it .
3. HOW TO SET UP A RECORDING PACK & AN ADDITAONAL SONG PACK
CAUTION: TURN THE POWER OFF FIRST.
It is very important to power off first before removing or inserting a
recording pack or an additional song pack
1. Locate the back cover of main station. Open the back cover.
2. The arrow on the top of a recording pack or other packs should be
pointing towards the main station head. Insert any pack into one of
the 6 slots in the back of the main station and carefully press it.
A click sound indicates that it is properly inserted.
3. Close the back cover. Turn the power on.
CHAPTER. 04
|
04
VER.100
05
|
CHAPTER. 04
VER.100
Functions & Settings - Chapter.04
Chapter.04 - Functions & Settings
THEME (BACKGROUND THEME AND SCOREBOARD)
35
4 USER'S CONTENTS
Users can play their own contents (MP3 and Picture) saved in an Memory Card.
Press [MODE + 7] to explore.
1. THIS FUNCTION CAN ONLY BE SET BEFORE CHOOSING A SONG
- Press [MODE + 9 + 3] or [THEME] on the remote control for this
function.
1. USER'S JPEG
Play & Enjoy your own picture through TV.
- Before putting JPEG files into an Memory Card, the files have to be
converted by ET-MANAGER.
(Refer to the chapter 04-09 "USER BACKGROUND" section)
- Insert the Memory Card into ET19KV and turn on the power.
- Select this function for your pictures to be shown on the screen.
- To move pictures forward and backward, press [◀] or [▶].
- To exit, press [ ] or [RES].
2. TO FINISH THIS FUNCTION, PRESS [RES]
3. BACKGROUND THEME
- You can select any theme from a set of nine different themes as
screen background.
- Press number buttons [1] ~ [9] or [▼] [▲] [◀] [▶] to set the
theme you want.
[1] Love
[4] Nature
[7] City
2. MP3
Play & Enjoy MP3 files through TV.
(No need to convert any MP3 files and to use any music player.)
- Move the downloaded MP3 files into the "MP3" folder on the
Memory Card from your PC.
- Insert the Memory Card into ET19KV and turn on the power.
- When you select this function, a MP3 list will appear on the screen.
- Select a song from the list and press [▶/■] to play the song.
- Follow the direction of "Control Bar" shown on the screen.
- To exit, press [ ] or [RES].
※ HELP = Press [MODE]
[2] Party
[5] Carnival
[8] Country
[3] Summer
[6] Sports
[9] Tour
Once a background theme is set, only the pictures related to the
selected theme will be shown on the screen.
4. SCOREBOARD
- The scoreboard shows the corresponding song numbers and the
scores of the songs that you have played.
(Only 7 songs will be displayed on the screen.)
JUMP (PRELUDE / INTERLUDE SKIP)
36
- You can use the [JUMP] function only during the prelude or the interlude
of a song.
- Press [JUMP] on the remote control to skip the prelude or the
interlude part of a song.
CHAPTER. 04
|
06
VER.100
07
|
CHAPTER. 04
VER.100
Functions & Settings - Chapter.04
Chapter.04 - Functions & Settings
7 VOCAL ASSIST (MULTIPLEX)
9 USER BACKGROUND (MEMORY CARD)
1. BACKGROUND IMAGES
The song comes up with a professional singer's voice with the music.
This feature is available only songs indicated "Vocal Assist" on
the TV screen and song book.
- If you have background images in a folder named "BACKGROUND"
on your Memory Card, you can display them on the TV screen when you
select "USER'S JPEG" mode.
1. VOCAL ASSIST [ ON ]
- If you wish to activate this function, press the [ ] on remote
control or [MODE + 5 + 4] to turn it ON, while singing a multiplex
song.
2. HOW TO USE
- Install “ET MANAGER” on your computer using the CD provided
with the mic.
- Execute “ET MANAGER”.
- Change the format of image files that you have by selecting
“BACKGROUND IMAGE”.
- When changing the image file format, these files are stored in a
designated folder with the format of “*.ebj”.
- Move the converted image files into the “BACKGROUND” folder on
the Memory Card, and insert the Memory Card into the slot of the
main station.
※If the Memory Card drive is designated as “E : \”, and the
converted image file is “image.ebj”, move the “image.ebj” into
the “E:\BACKGROUND” folder.
- The voice will fade out when you sing a song and if you stop
singing, the voice will fade in.
2. VOCAL ASSIST [ OFF ]
- If you wish to deactivate this function, press [ ] or
[MODE + 5 + 4] to turn it OFF, while singing a multiplex song,
which enables you to sing along with the singer's voice.
- If you do not want to hear any voice of the vocal assist at all, press [-]
button of [Vocal Assist ] on the remote control, and then the volume bar
will appear on the upper part of the TV screen. Then press [-] until it
reaches “0”.
3. VOLUME ADJUSTMENT
※Image file formats that you can convert into ".ebj" format include
Bitmap file (*.bmp), JPEG file (*.jpg, *.jpeg), TIF file (*.tif, *.tiff), and
GIF file (*.gif).
- Press Vocal Assist [-], [+] on the remote control to adjust the
volume of the vocal assist until it reaches a desired level.
※For the detail information, refer to "ET-MANAGER"section.
(Chapter.04-22)
8 MUSICAL NOTATION (KEY NOTE GUIDE)
1. Press [MODE + 9 + 1] on the mic to see the song list containing only
the songs with this note guide function.
(This function is available only for the songs in the list.)
2. Choose a song from the list and play the song.
After that, press [MODE + 9 + 1] on the mic to choose one of the two
settings which are “Normal”, and “OFF”.
A. Normal : Displays the musical notes on the upper part of the
screen with the original key of the song.
B. OFF : Does not display any musical notes.
※ A musical notation appears on the upper part of the screen as soon as
a song starts.
※ This gives the user an idea of the) key/pitch of the song he/she is about to sing.
CHAPTER. 04
|
08
VER.100
09
|
CHAPTER. 04
VER.100
Functions & Settings - Chapter.04
Chapter.04 - Functions & Settings
MOVIE
HOW TO SING
This mode is for users to enjoy music videos, moving pictures and their
own contents downloaded from the internet such as MTV, movies,
TV shows.
1 SINGING PRACTICE
This function is for users to keep practicing a particular part of a song
they want by moving the part of the song forward and backward.
You also can find any particular parts of a song with its play time as
well.
1. HOW TO USE
1) Press the [MOVIE] button located on the upper part of the remote control.
2) When the list of movies is shown, press the [▼] [▲] buttons to navigate
through movie files, and then select the movie file you want to play.
3) Press [▶/■] to play or stop.
4) Press [◀◀] [▶▶] to move it faster (Pressing once : x2 faster,
twice : x4 faster) and then press [▶/■] to play.
5) Press [▼] [▲] to select another movie file you want to play.
6) Press [ + ] [ - ] under the [VOLUME] section on the remote control
to adjust the volume.
7) ZOOM : Press [ 0 ] HELP : Press [MODE]
1. PURPOSE
- When you want to repeat some part of the song over and over
to practice.
- When you want to move to some part of song without waiting.
- When you want to memorize some part of song.
- When you want to go backward to repeat singing.
2. HOW TO USE
1) Press [ II ] while singing.
2) Press [▼] [▲] [◀] [▶] to show lyrics.
3) Press [▼] [▲] to go forward or backward.
4) Press [▶/■] to play.
5) Press [ II ] again if you want to repeat the part and follow
the same procedure from 2) above.
※ If the capacity of a movie file is too big due to its high definition,
some delay on its video and sound may occur.
※ ET19KV supports an Memory Card up to 4GB.
2. EXIT
3. EXIT
To change categories or exit from "Singing Practice", press [
To change categories or exit from "Movie", press [
].
].
GAME
2 TUNING METER
When you select a game, its instructions will be displayed on the TV screen
before the game starts.
This is a function in which you can check if your notes(scores) from
your singing are correct with the piano keys.
- Press [9] to change female voice or to male voice.
- Press [0] to change the musical instruments.
- To exit, press [ ] or [RES].
- To restart the game, press [MODE].
- To exit, press [ ] or [RES].
CHAPTER. 04
|
10
VER.100
11
|
CHAPTER. 04
VER.100
Functions & Settings - Chapter.04
Chapter.04 - Functions & Settings
CONFIGURATION MENU
[7] SCORE CHECK
1) BEGINNER :
This level only evaluates your tempo when you sing a song.
2) AMATEURE :
This level evaluates both tempo and pitch when you sing a song.
Singing in suitable chord is accepted.
3) PROFESSIONAL :
This level evaluates both tempo and pitch based on the original
Song’s key and tempo.
4) OFF :
Turns off(hides) score check function when you sing a song.
1. Press [MODE]+[0] to enter the configuration menu.
[1] Select a function using the [▼] [▲] buttons.
[2] Change the mode pressing the [◀] [▶] buttons.
[3] To exit configuration, press [MODE].
2. Press [MODE] to exit the configuration.
3. CONFIGURATION OPTIONS
[8] REAL TIME SCORE : Shows your score throughout the whole song
your are currently singing if you turn this function on.
[9] SONG COUNTDOWN : Sets the countdown (4, 3, 2, 1) display ON/OFF.
[10] LYRICS LINE :
Selects the number of lyric lines shown on the TV screen
(2 lines, 3 lines, Auto).
[1] SELECTING BACKGROUNDS : Users can select one of the four types
of background images as below.
1) DONYA E NAVA JPEG :
Showing built in JPEG image files as a background.
2) EXT-VIDEO INPUT :
Showing external videos as a background.
3) MOVING PICTURE :
Showing moving pictures (video files) from a Memory Card.
4) USER'S JPEG :
Showing the user’s JPEG files from an Memory Card.
[11] LYRICS POSITION : Sets the position of lyrics on the screen.
(Center, Left-Right, All Mixed)
[12] LANGUAGE : Selects the language for the system.
Notice
Please note that certain TV models and 5.1-7.1 surround home theatre
systems might cause INPUT LAG (sound delay) when you use the
DONYA E NAYA DENSING Karaoke system.
[2] OUTPUT MODE : Sets the audio output mode to TV or AMP.
[3] LYRICS BAR : ON (A blue bar behind lyrics appears) / OFF.
(The blue bar disappears)
In this case, we recommend using other audio devices such as a 2.1 amplified
speaker system or a component system for the sound output. Just connect the
audio cables (RED and WHITE RCA cable) to the female audio input of the external
device. (RED and WHITE)
If you are using a surround Home Theater system, set the output to 2-channel
stereo. Please refer also to the input/output connection instructions in the user's
manual of the device.
[4] MIC V.C. : Changes your voice either to a female’s or male’s.
(The “OFF” mode means to go back to your own voice)
[5] AUTO POWER OFF : ON (If there is no action for 10 minutes,
automatically shuts down.)
OFF (Power stays on until user shuts down.)
[6] SONG DISPLAY : Sets song sorting type displayed on screen.
The list of song can be displayed by the title or song number.
※ INPUT LAG : Refers to latency or lag measured by the difference
between the input signal and actual display output.
This lag occurs in most LCD, LED, PDP, and HD Digital TVs.
CHAPTER. 04
|
12
VER.100
13
|
CHAPTER. 04
VER.100
Functions & Settings - Chapter.04
Chapter.04 - Functions & Settings
SOFTWARE INSTALLATION
1) USB Driver Installation
Installing the USB driver, ET manager and ET encoder in your PC :
This installation should be completed in advance to execute ET Manager.
Click "Install USB Driver" (①) and follow the below instruction of “ET USB
Driver - InstallShield Wizard”as shown below.
*PC
INSTALLATION CD
a) Click “Next” to start the installation.
USB Port
*USB Cable
1. Enables you to use your own images or pictures in your computer as
DENSING background pictures on TV.
2. Enables you to convert the recorded songs from the Recording Pack
to your PC as MP2 files.
Note : In the absence of the Installation CD, you can install the
ET manager and USB driver softwares in your PC by downloading
them from our website. (www.donyaenava.com)
1 HOW TO INSTALL
b) Click “Continue anyway” to proceed.
USB DRIVER + ET MANAGER + ET ENCODER
Insert the Installation CD into your PC, and then you will see the pop-up
screen as shown below.
1
2
3
4
Note : Please do not connect DENSING to a PC by USB cable
before installing "Install USB Driver".
CHAPTER. 04
|
14
VER.100
15
|
CHAPTER. 04
VER.100
Functions & Settings - Chapter.04
Chapter.04 - Functions & Settings
3) EXIT
c) Select “Yes” and click “Finish” to restart the computer.
After completing the two previous installations, you will see the screen
below again.
In order to exit, click "Cancel" (④).
1
2
3
4
And follow the below steps to execute the ET Manager properly.
2) ET Manager Installation
After restarting the computer, take the “Installation CD” out and put it back
into your PC again.
Click "Install ET Manager" (②) on the first pop-up screen and follow the
instructions of “ET Manager InstallShield Wizard”.
2 HOW TO CONNECT DENSING TO A PC WITH A USB CABLE
1. Turn on the power of main station.
2. Plug the USB cable in the PC’s USB port as shown in the picture below.
When you see the pop-up screen below, click "Finish" to complete
the ET Manager installation.
3. Plug the USB cable in the Densing's USB port as shown in the
picture below.
DC IN 8V
“USB CONNECTED” will appear on TV SCREEN.
CHAPTER. 04
|
16
VER.100
17
|
CHAPTER. 04
VER.100
Functions & Settings - Chapter.04
Chapter.04 - Functions & Settings
4. When you connect DENSING to a PC for the first time, the “Found
New Hardware Wizard” window below will show up as it will try to search
the USB driver in your PC system.
(In order to operate “ET manager”, the following steps should be
completed.)
a) Click “Yes, this time only” and “Next” to continue.
c) Click “Continue anyway” to proceed.
b) Click “Install the software automatically (Recommended)” and
“Next” to continue.
CHAPTER. 04
|
18
VER.100
19
|
CHAPTER. 04
VER.100
Functions & Settings - Chapter.04
Chapter.04 - Functions & Settings
d) Click “Finish” to close the wizard.
b) Follow direction.
3 INSTALLING THE ET ENCODER IN YOUR PC.
c) Now Installation is finished. Program will be shown.
1. HOW TO USE INSTALL ET ENCODER
a) Insert the installation CD into your PC, and then you will see the
POP-UP screen as shown below. Click ‘Install ET Encoder’.
CHAPTER. 04
|
20
VER.100
21
|
CHAPTER. 04
VER.100
Functions & Settings - Chapter.04
Chapter.04 - Functions & Settings
ET MANAGER
2) How to use
STEP1
1 GENERAL DESCRIPTION
A. Background Image
Open the ET Manager window by double-clicking the ET Manager icon in
your PC a Background Image” screen will appear.
2 Search and select images from your files.(Choose from among the folders
first, and then select an image by checking off the small box beside the
file name.)
3 Click the file name to see the image on the Image Viewer.
4 Click the “SAVE IMAGE IN Memory Card” to save the selected images as
background files.
1
Converts image files you have in your PC into background images of
Densing so that you can enjoy your personalized picture
backgrounds on TV.
B. Recorded Song
You can save your songs in the Recording Pack and you can convert and
transmit the recorded songs into your PC as a "MP2" file (USB cable needed)
to play those through PC or MP3 player.
Note : This function is available only when you use a Recording and
Memory Card.
STEP2
Search for your Memory Card and click it, and then click ok.
(You will see the progress bar moving which indicates that the files are
being saved.)
6 To make sure that the images were saved in the Memory Card, open the
Memory Card by clicking “My Computer”, and then click “Removable Disk”
(the Memory Card folder). You will see a folder entitled “BACKGROUND”,
click it and you will see your image files converted to EBJ.file format.
5
2 FUNCTION
A. Background Image
1) User Interface Layout
6
1
STEP3
Safely remove the Memory Card from your PC and insert it into the
Memory Card slot located on the right side of the DENSING main station.
(IMPORTANT : THE MAIN STATION SHOULD BE TURNED OFF before
inserting the. Memory Card)
8 Turn the main station on. DENSING will automatically display the images
saved in the Memory Card on your TV.
7
2
4
5
1
2
3
4
5
6
B. Record
1) User Interface Layout.
3
BACKGROUND IMAGE : Shows the "Background Image" window
when you click on this button.
IMAGE FILE SEARCH WINDOW : Enables you to search folders in
your PC and select the images from the chosen folders.
IMAGE VIEWER : Enables you to see your chosen images.
SAVE IMAGE IN MEMORY CARD : Converts the selected image to a
DENSING background image file when you click on this button.
CONVERT PROGRESS BAR : Shows the length of the time in which
your image files are being saved into an Memory Card.
EXIT : Allows you to exit from the "ET manager window"
above.
CHAPTER. 04
|
22
VER.100
10
1
3
2
4
5
9
23
|
CHAPTER. 04
VER.100
6
7
8
Functions & Settings - Chapter.04
Chapter.04 - Functions & Settings
ET ENCODER
1
2
3
4
5
6
7
8
9
10
RECORDED SONG : Click on the "RECORDED SONG" tab to work with
Recorded Songs.
SONG LIST : When you click “LIST”, it shows you the list of the
song titles recorded in the recording pack. (if there’s any)
RECORDED SONG INFO : Shows the song info. of a song recorded
in the recording pack which is currently playing.
SONG COUNTER BAR : Time counter of the song currently playing.
LIST : Clicking on this tab shows you the song titles(if there's any)
in the "Song list" window.
PLAY / STOP : Clicking on this “PLAY” tab plays the selected song
(Select a song by checking off the box beside the song title.)
Clicking on this “STOP” tab stops the song currently playing.
(The “PLAY” button will be transformed into the “STOP” button
as soon as the song starts playing.)
NEXT : Clicking on this tab plays the next song on the list.
(Check off the box first beside the song title(s) you want to play next.)
SAVE : Clicking on this tab saves the selected songs in your
PC as a MP2 file.
DOWNLOAD PROGRESS BAR : Shows the length of the recorded
song currently playing.
EXIT : Allows you to exit from the “RECORDED SONG” window.
1 GENERAL DESCRIPTION
ET encoder convert video files.
There are many kinds of video files. DENSING does not support all
kinds of formats. So files need to be converted to play on DENSING.
2 FUNCTION
User Interface layout
1
4
2
2) How to use
1
2
3
4
5
6
7
8
9
10
11
3
①
②
③
④
⑤
1 Video display : Shows Video preview.
Insert a recording pack into the main station and turn on the power.
If there are recorded songs in the recording pack, just go to step 3.
If not, record your favorite songs first which you want to convert
and save into your PC.
Connect the main station to a PC by USB cable.
Execute “ET MANAGER”.
Click on the “RECORDED SONG” tab.
Click on the “LIST” tab to show you the song titles (if there's any)
in the “Song List” window.
Select a song from the song list by checking off the box beside
the song.
Click on the “PLAY/STOP” tab to hear the selected song on your PC.
Click on the “NEXT” tab to play the next song.
(Check off the box first beside the song title(s) you want to play next.)
Click on the “PLAY/STOP” tab to stop the song currently playing.
Click on the “SAVE” tab to save the selected song into your PC
as a MP2 file.
CHAPTER. 04
2 File list box : Shows list of files.
(Drag and drop video files to this box)
3 Instruction : Shows step to convert video file.
4 Quality : Video quality selecting mode.
5 Buttons :
①
②
③
④
⑤
|
24
VER.100
25
|
CHAPTER. 04
VER.100
Preview : Play video preview.
Open folder : Search video files.
Add Files : Search video files.
Clear list : Clear list of files on File list box.
Convert : To start converting.
5
Functions & Settings - Chapter.04
Chapter.04 - Functions & Settings
3 HOW TO USE
1. Double – click ET Encoder icon to open the ET Encoder program
on your PC.
3. First select a video file by double click. Then list will be appear on "File list box".
2. Click “Add file” button. Search and select files from your PC.
4. Click “Convert” button. Converting will start. Converting will take time
depend on the size.
CHAPTER. 04
|
26
VER.100
27
|
CHAPTER. 04
VER.100
Functions & Settings - Chapter.04
Chapter.04 - Functions & Settings
5. Progress bar will show during converting.
7. Encoded file will be next to original file.
8. Drag and drop encoded file to Memory Card.
9. Safely remove Memory Card from your PC and insert it into
the Memory Card slot located on the right side of DENSING
main station.
(IMPORTANT : THE MAIN STATION SHOUKD BE TURNED OFF before
inserting the Memory Card)
10. Turn the main station on and go to movie mode. Enjoy video!
6. "1 file(s) converted" pop up message will appear after converting is finished.
CHAPTER. 04
|
28
VER.100
29
|
CHAPTER. 04
VER.100
Optional Items - Chapter.05
Chapter.05 - Optional Items
RECORDING PACK
ADDITIONAL SONG PACK
You can record your own singing into the Recordng Pack.
You can add more of your favorite songs to DENSING.
How to Insert an Additional Song Pack
First, turn OFF the power. This is very important to turn off the main station
before removing or inserting a song pack.
main station
●
●
Turn off the power of the main station
Pull up the clip lock on the back cover of the main
station, according to the direction of the arrow,
then remove the back cover.
Clip Lock
Make sure the arrow on the song pack is pointing
left when you insert the song pack.
(6 additional song packs can be inserted.)
●
Mag
: DENSING should be turned off first.
Turn off DENSING
Insert the Recording Pack into one of the slots in the back of the main
station according to the direction of the arrow.
Turn on the power of main station then select a song number and
press [ ● ] under the “record” section on the remote control.
●
●
After the song pack is inserted, close the back cover.
Turn on the power of main station.
To stop the recording, press [ ● ] again on the remote control or you can
also press [▶/■ ].
To play back the recorded songs, press [▶] under the “record” section on
the remote control, and your recorded songs will be listed on the screen.
Select a song using [▼/▲] then press [▶/■ ].
To stop the playback, press [▶/■ ] again.
SONGLIST INSERTION
To delete the recorded songs, press [RES] on the highlighted songs.
You cannot record your singing performance in the internal memory of
main station while you are recording it in the recording pack.
You cannot record your singing performance in the middle of a song. If you
press [ ● ] in the middle of the song, the song stops, restarts, and then
recording takes place.
Press down both the top and the bottom metal tabs of the binder
simultaneously to open the binder rings.
The Tempo, Jump and Key functions will not work when you are playing
back the recorded songs.
Insert the new song list between the binder rings.
Close the binder rings.
CHAPTER. 05
|
01
VER.100
02
|
CHAPTER. 05
VER.100
Additional Information - Chapter.06
Chapter.06 - Additional Information
TROUBLESHOOTING
PRECAUTION
In case of problems, please check the following recommendations before
contacting the service center.
Use the adaptor that comes with DENSING only. There are
many adaptors that are plug-compatible with DENSING, but
have different electrical specifications. These adaptors would
work only for a short period of time but would very soon
damage DENSING.
If DENSING doesn’t power up
ET19KV MAIN STATION
Make sure the adaptor is correctly plugged into the power outlet.
Check that the male plug is properly inserted into the female jack.
USE THE RECOMMENDED ACCESSORIES ONLY (DC 9V/1A)
WIRELESS KARAOKE
Check if the battery type is AA. If the battery is low, DENSING may not
work properly.
Do not drop DENSING. Any external or internal damage due
to dropping is not covered under warranty.
If the user's voice cannot be heard
Do not insert or remove song packs while DENSING
is turned on.
Press the VOL button and check the volume of the wireless karaoke.
Do not store DENSING in direct sunlight, in a high
temperature, or highly humid.
If the TV does not show pictures or emit sound
Make sure all the AV connectors are properly connected according to the
correct colors. Check if the TV is in the video mode.
Do not use strong chemicals to clean DENSING, as these
chemicals may damage the unit.
Keep DENSING away from pets and small children.
If the video does not show properly (converting PAL or NSC mode)
To convert to PAL mode, turn off a wireless mic first. Press and hold button “8” on the
wireless mic, and then press “POWER” button using another finger until the word “PAL”
appears on the TV screen. (Do not release button “8” and the “POWER” button until the
word “PAL” appears on the TV screen.) To convert to NTSC mode, turn off a wireless
mic first. Press and hold button “9” on the wireless mic, and then press the “POWER”
button using another finger until the word “NTSC” appears on the TV screen.
(Do not release button “9” and the “POWER” button until the word “NTSC” appears on
the TV screen .)
Do not press the LED / LCD part.
Never use a sharp object on the keypad.
In case DENSING was stored in a high-temperature
setting, allow sufficient time for it to cool down before
using it.
If there is any doubt about the product’s performance
Turn off a wireless mic first, and then press and hold the “0” button on the
wireless mic, and press the [POWER] button using another finger until the words
“USER RESET” appear on the TV screen. (Do not release the “0” button and
the [POWER] button until the words “USER RESE”appear on the TV screen)
Do not immerse DENSING in water or splash water on it.
Water damage is not covered by the warranty.
Do not disassemble the parts of the DENSING.
This will void the warranty.
When the wireless karaoke needs to be repaired, the main station
should be included and returned to your nearest service center.
Do not plug DENSING in if it is wet. Immediately contact the
service center. If any solid object or liquid gets inside DENSING,
unplug it and have it checked by our service center.
To contact our nearest service center in your area,
please visit our website. "www.donyaenava.com"
CHAPTER. 06
|
01
VER.100
02
|
CHAPTER. 06
VER.100
Additional Information - Chapter.06
MEMO
FCC Information to User (For U.S. territory)
This equipment has been tested and found to comply with the limits for a
Class B digital device, pursuant to Part 15 of the FCC Rules. These limits
are designed to provide reasonable protection against harmful
interference in a residential installation. This equipment generates, uses
and can radiate radio frequency energy and, if not installed and used in
accordance with the instructions, may cause harmful interference to radio
communications. However, there is no guarantee that interference will not
occur in a particular installation. If this equipment does cause harmful
interference to radio or television reception, which can be determined by
turning the equipment off and on, the user is encouraged to try to correct
the interference by one of the following measures :
• Reorient or relocate the receiving antenna.
• Increase the separation between the equipment and receiver.
• Connect the equipment into an outlet on a circuit different from that to
which the receiver is con-nected.
• Consult the dealer or an experienced radio/TV technician for help.
Caution
Modifications not expressly approved by the party responsible for
compliance could void the user’s authority to operate the equipment.
FCC Compliance Information : This device complies with Part 15 of the
FCC Rules. Operation is subject to the following two conditions : (1) This
device may not cause harmful interference, and (2) this device must
accept any interference received, including interference that may cause
undesired operation.
IMPORTANT NOTE
FCC RF Radiation Exposure Statement :
This equipment complies with FCC RF radiation exposure limits set forth
for an uncontrolled environment. This equipment should be installed and
operated with a minimum distance of 20 centimeters between the radiator
and your body.This transmitter must not be co-located or operating in
conjunction with any other antenna or transmitter.
CHAPTER. 06
|
03
VER.100
04
|
CHAPTER. 06
VER.100
www.donyaenava.com
Nava
DONYA E NAVA LLC.
15760 Ventura Blvd. Suite 1010 Encino, California 91436
TEL : +818-907-7077 | FAX : +818-465-1458
Made in China
VER.100
VER.100