1
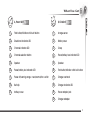
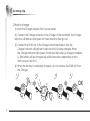
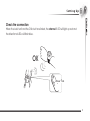
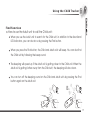
What You Get ......................................... 1
Product Layout ........................................ 2
Important Information............................. 4
Setting Up ................................................ 5
Set up the Child Unit ...........................5
Set up the Parent Unit ...........................8
Check the connection...........................9
Using the Child Tracker ...........................10
Channel selection function ................... 11
Adding Child units ................................. 13
Removing Child units ............................ 13
Battery low indicator ............................. 14
Directional indicator function ................ 14
Warning range setup ............................. 16
Find function ......................................... 17
Features .................................................. 19
Troubleshooting ...................................... 20
Technical Specification .......................... 21
Care and maintenance.......................... 21
What You Get
Adult Unit
Child Unit
Child Unit charger
Child Unit charger main power adapter
LIR2450 Li+ 3.6V rechargeable battery for Child Unit
2 x AAA 1.5V non rechargeable alkaline batteries for Adult Unit
User’s Manual
Produc t Layout
A, Adult Unit
Fig. 1
B, Chid Unit Fig. 2
9
7
8
2
10
1
3
8
2
7
5
3
1
6
2
4
6
4
5
9
What You Get
A, Parent Unit Fig. 1
B, Chid Unit Fig. 2
1
Find button/Initiation child unit button
1
charge sensor
2
Directional indicator LED
2
Battery cover
3
Channel indicator LED
3
Clasp
4
Channel selection button
4
Power/battery low indicator LED
5
Speaker
5
Speaker
6
Power/battery low indicator LED
6
Find button/lnitiation child unit button
7
Power off/warning range <near/normal/far> switch
7
Charger contacts
8
Belt clip
8
Charger indicator LED
9
battery cover
9
Power adapter jack
10
Charger adapter
Impor tant Information
1. To prevent electric shock, do not open the case of the Child Unit and Parent Unit (except battery covers)
2. Risk of explosion if batteries are replaced by an incorrect type. For the Child Unit, always use LIR2450 3.6V Li+ rechargeable battery. For the Parent Unit, suggestion use AAA non rechargeable 1.5V alkaline batteries.
Setting Up
Set up the Child Unit
When you use this product for the first time, please charge it.
1. How to install the batteries
(1)Insert the two belt clips into the battery cover on the back of the Child unit and open
the battery cover by turning it counterclockwise.
(2)Install the LIR2450 battery into the battery cover and turn the belt clips clockwise to
combine the battery cover with the Child unit. (Please note the polarity when
installing batteries.) In the meantime, the Power LED will light red.
Setting Up
2.How to charge
(1) Insert the Charger Adapter into a power outlet.
(2)Connect the Charger Adapter to the Charger. In the meantime, the Charger indicator will flash red and green for three times and then go out.
(3)Connect the Child unit to the Charger as illustrated below, and the
Charger indicator will light red to indicate that it is being charged. When the Charger indicator lights green, it indicates the battery is charged complete
ly. (The battery will be charged fully within three hours depending on how much power is left in it.)
(4)When the battery is completely charged, you can remove the Child unit from the Charger.
1
2
3
4
OK
Setting Up
3. How to use the watch band
(1)Place the Child unit on the child’s wrist as illustrated below.
(2)Wind the end of the band without the clasp around the child’s wrist and thread
the clip on the inside. Adjust the band to the right tension.
(3)Click the clasp to lock the watch in place.
(4)Make sure the watch is secure and the button is facing upwards.
1
2
3
4
OK
Setting Up
Set up the Adult Unit
1.Open the battery cover in the direction as illustrated.
2.Install two AAA alkaline batteries in the battery compartment.
3.Close the battery cover on the Adult unit.
4.Turn the side switch to any distance setting: near, normal or far.
The Power LED will light red.
5.You can wear the Adult unit on your waist.
1
2
3
4
Setting Up
Check the connection
When the Adult unit and the Child unit are linked, the channel 1 LED will light up red and
the directional LEDs will flash blue.
OK
channel
1
LED
Using the Child Tracker
Please do not put the Child unit in your child’s pocket when you use it. The Child unit
shoukd be worn on your child’s wrist to get the best directional indication. When the
Adult unit is searching the Child unit, hold the Adult unit in a horizontal position to get
the best directional indication.
10
Using the Child Tracker
1
2
channel
1
Be
LED
channel
Be
1
LED
Channel selec tion func tion
The Parent Unit can be connected to up to 4 Child units
a. When you only have one Child unit:
If the Adult unit is used with only one Child unit, the Child unit and the Adult unit will be set
to channel 1. When the Child unit is within the warning range of the Adult unit, the channel
1 LED will light up red. When the Child unit is out of the warning range of the Adult unit, the
channel 1 LED will flash red and the buzzer will beep.At that moment, you can press eithe
the channel selection button or find button to turn off the buzzer. Because there’s only one
Child unit, when you press the channel selection button the channel won’t be switched.
11
Using the Child Tracker
e
BB
e
Be
35
m
channel
3
LED
channel
1
LED
b. When there are several Child units:
If the Adult unit is corresponding to several Child units, you can press channel selection
button to select the Child unit you want to monitor. When the selected Child unit is
within the warning range, the channel LED will light red. When the selected Child
unit is out of the warning range, the channel LED will flash red. Other channel LEDs
of the Parent unit corresponding to configured Child units will light green when
the Child units are within the warning range. When the Child units are out of the
warning range but within the monitoring range, the LED will flash green. When the
Child units are out of valid monitoring range, the channel LED will go out.
**Note: You can purchase additional child watches from Levana. (CT1001)
12
Using the Child Tracker
Adding Child units
When you want to add more Child units to the Adult unit, hold both
the Find button /initiation child unit button of the Adult unit and the
Find button/ initiation child unit button of the Child unit for 8 seconds.
The buzzers of both Adult and Child units will beep to inform you the
Child unit is added. The channel of the newly added Child unit will
automatically be set at the lowest channel that hasn’t been set.
Be
channel
2
LED
Removing Child units
When you want to remove any Child units from the Adult unit, please
hold the channel selection button for 8 seconds. Then the buzzer of the
Parent unit will beep to inform you the Child unit is removed. Please
note that when you complete this process, the Child unit and the Adult
unit will not be connected. If you want to connect them, please repeat the steps described in Adding Child Units.
Be
channel
2
LED
13
Using the Child Tracker
Low Batter y Indicator
a. Adult unit:
When the battery power is low, the Power LED will flash red as a warning, please
replace with new batteries.
b. Child Unit:
When the battery power is low, the Power LED will flash red as a warning, please
put the Child unit in the charger to charge the battery. It is recommended that the batteries be removed to extend the battery life when The Child unit is not used for
extended periods.
Direc tional indicator func tion
There are 6 blue LED indicators on the Adult unit as shown. When
three of the LEDs are flashing at the same time, it suggests that
the Child unit is in this direction with an angle of 120 degrees.
When only one of the LEDs is flashing, it suggests that the Child
unit is in this direction with an angle of 60 degrees. When all the
6 LEDs go off, it suggests that the Child unit is out of the monitoring
range. In this case, the Channel indicator becomes red.
14
3
2
4
1
5
6
2 3 4
1 2 3
Using the Child Tracker
a
b
1 2
c
d
e
6
2 3 4
f
4 5 6
2 3 4
1 2 3
3 4 5
23 4
1
5 6
a. When Indicator 1 flashes or Indicator 1, 2 and 6 flash at the same time, it indicates the monitored Child unit is
in
d the relative position
e of the left-half of
f the Adult unit. At this moment, please stay where you are and hold the Adult unit. Then turn4 counterclockwise
until LED 2, 3 or 4 lights up.
5 6
b. When Indicator 2 flashes or Indicator 1, 2 and 3 flash at the same time, it indicates the monitored Child unit is
in the relative position of the front left of the Adult unit. At this moment, please hold the Adult unit and move toward front-left to search for the Child unit.
c. When Indicator 3 flashes or Indicator 2, 3 and 4 flash at the same time, it indicates the monitored Child unit is in the relative position of the front of the Adult unit. At this moment, please hold the Adult unit and 5 6
move forward
unit. 1
3 4 5to search for the
2 3 Child
4
d. When Indicator 4 flashes or Indicator 3, 4 and 5 flash in the same time, it indicates that the Child unit being monitored is in the relative position of the front right of the Adult unit. In the meantime, please hold the Adult unit and move front-right to search for the Child unit.
e. When Indicator 5 flashes or Indicator 4, 5 and 6 flash at the same time, it indicates the monitored Child unit is
in the relative position of the right-half of the Adult unit. At this moment, please stay where you are and hold the Adult unit. Then turn clockwise until LED 2, 3 or 4 lights up.
f. When Indicator 6 flashes or Indicator 1, 5 and 6 flash at the same time, it indicates the monitored Child unit is in the relative position of the back of the Adult unit. At this moment, please hold the Adult unit and turn 180 degrees.
Note: The LEDs will flash quicker when the Adult unit is getting closer to the Child unit. Meanwhile, when the Parent unit is getting further away
from the Child unit, the LEDs will be flash slower.
15
Using the Child Tracker
) 16-32ft )) 26-65ft ))) 49-98ft
Warning range setup
There is a Power and Warning Range (Far, Normal and Near) switch
on the lateral side of the Adult unit. When the switch is turned to ),
it indicates the warning range is set at 16-32ft. When the switch is
turned to )), it’s 26-65ft. When the switch is turned to ))), it indicates
the warning range is set at the farthest, i.e. 49-98ft. The user can set
the distance of the warning range based on the environment and requirement. When the distance between the Child unit and the Adult unit is
within the warning range, the channel LED will light red or green. When the distance between the Child unit and the Adult unit is out of the warning range, the channel LED will
flash red or green and the buzzer of the Adult unit will beep as a warning. You can press
the Find button or channel
selection button
e
e
to turn off the buzzer. Then press
e
B
m
the channel selection button
35
1
again to select the desired chan3
nel of the direction to monitor.
B
channel
B
LED
channel
16
LED
Using the Child Tracker
Find func tion
a. How to use the Adult unit to call the Child unit:
When you use the Adult unit to search for the Child unit, in addition to the directional
LED indicators, you can also do so by pressing the Find button.
When you press the Find button, the Child and Adult units will beep. You can also find
the Child unit by following the beep sound.
The beeping will speed up if the Adult unit is getting closer to the Child unit. When the
Adult unit is getting further away from the Child unit, the beeping will slow down.
You can turn off the beeping sound on the Child and Adult units by pressing the Find
button again on the Adult unit.
Be
Be
Be
channel
1
LED
channel
1
LED
17
Using the Child Tracker
b. How to use the Child unit to call the Adult unit:
The user can also use the Child unit to call the Adult unit. When the Find button on
the Child unit is pressed, the Adult unit will beep as a warning. If the Find button or
channel selection button on the Parent unit is pressed, the beeping sound will stop.
Be
Be B
18
e
Be
Be B
e
19
Troubleshooting
If you are not getting any signal at all
Please check if you turned on the power switch on the Parent unit.
Please check if the power LED on the Adult unit lights red. If not, please check whether the
batteries are installed in the right direction.
If the batteries installed in the Adult unit are in the right direction, please replace with new
batteries.
Please check if the power LED on the Child unit lights red. If not, please check whether the
batteries are installed in the right direction.
If the batteries installed in the Child unit are in the right direction, please put the Child unit on
the charger to charge the battery.
If the power LED of both the Child unit and Adult unit light red but the channel LED is not lit,
please add Child units by following the procedures described on Page 13.
There’s something wrong with the direction indication
Please make sure that the child wears the Child unit on his or her wrist to get the best direction
indication.
Please make sure that when you use the Adult unit to search the direction of the Child unit, you
are holding the Adult unit tightly in a horizontal position to get the best direction indication.
The direction indication may be slightly inaccurate if the user uses this product in a smaller and
enclosed room. It is ideal for uses in public places, such as parks or shopping malls.
20
Technical Specification/ Care and maintenance
Technical Specification
System
Radio Frequency
Operating Range Typical 2477.5 to 2482.5 MHz, Direct Sequence Spread Spectrum
50 meters/150 feet light of sight
Warning Range
5 to 30 meters/15 to 90 feet
Adult Unit
Power Supply Dimension Weight Operating temperature
2 x AAA 1.5V non rechargeable alkaline batteries
W:45mm H:45mm D:11.5mm
50g
0ºC ~ 40ºC (32ºF ~ 104ºF )
Child Unit
Power Supply
1 x AC power adapter DC 6V 200 mA
1 x LIR2450 Li+ 3.6V rechargeable battery
Dimension Weight Operating temperature
W:45mm H:110mm D:140mm
34g
0ºC ~ 40ºC (32ºF ~ 104ºF )
Specifications are subject to change without notice.
Care and maintenance
Remove batteries from the unit if you do not plan to use it for a period of time.
Dispose of used batteries in an environmentally friendly manner.
Clean the child finder with a damp cloth.
21