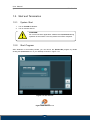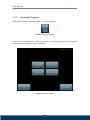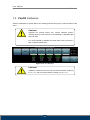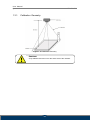
1
User Manual Veterinary Acquisition and diagnostic software Doc No.: TM -703-EN-S Rev 0.1.4 Jan 2012 Part No.: CR-FPM-04-002-EN-S 3DISC, FireCR, Quantor and the 3D Cube are trademarks of 3D Imaging & Simulation s Corp, South Korea, and its affiliates. All other trademarks are held by their respective owners and are used in an editorial fashion with no intention of infringement. The data in this publication are for illustration purposes only and do not necessarily represent standa rds or specifications, which must be met by 3D Imaging & Simulations Corp. All inform ation contained herein is intended for guidance purposes only, and characteristics of the products and services described in this publication can be changed at any time without n otice. Products and services may not be available in your local area. Please contact your local sales representative for availability information. 3D Imaging & Simulations Corp. s trives to provide as accurate information as possible, but shall not be responsible for any typographical error. © Copyright 2010 3D Imaging & Simulations Corp, all rights reserved, printed, and published in South Korea by 3D Imaging & Simulations Corp. User Manual QuantorVet TM-703-EN Contact 815, Tamnip-Dong, Yuseong-Gu, Daejeon, Korea Tel : 82-42-931-2100 Fax : 82-42-931-2299 Website : www.3DISCimaging.com E-mail : [email protected] 3DISC Americas 22560 Glenn Dr, Suite 116 Sterling, VA 20164 USA Tel : 1-703-430-6080 E-mail : [email protected] 3DISC Europe Gydevang, 39-41, 3450 Alleroed, Denmark Tel : 45-88-276-650 E-mail : [email protected] 2 User Manual QuantorVet TM-703-EN Warnings and used symbols To ensure the safety of patients, staff and other persons, any changes to software and hardware delivered by 3D Imaging & Simulations Corp. may only be made with prior written permission from 3D Imaging & Simulations Corp. Please read the respective manuals of the connected devices, such as of the X-ray generator, sensor, or reader, before starting to use the QuantorVet software. The following symbols will be used throughout this manual: DANGER The functionality of the software can be destroyed in the case of incorrect use. If unauthorized changes have been made to delivered software and hardware components, the warranty by 3D Imaging & Simulations Corp. becomes void. 3D Imaging & Simulations Corp. will not accept any responsibility or liability for the proper functioning oh the product in such a case. CAUTION The functionality of the software can be limited in the case of incorrect use. Hints that require special attention. NOTE Notes represent information that is important to know but which do not affect the functionality of the software. 3 User Manual QuantorVet TM-703-EN Device Security User Authentication Only authorized users should logon to computers on which Veterinary information systems are installed. Password Security In today’s world, passwords can be compromised in literally seconds by using a wide variety of tools and techniques. To lower the possibility of a compromised password, it is vital to adhere to a set of protocols. Choose a password between 7 ~ 10 characters using both alpha and numeric characters. Do not share the password. Do not base the password on a pet, relative, or dictionary name. Do not write down the password. Do not leave the account logged on. User Access Control Configure the workstation to prompt for logon after coming out of stand-by mode. Internet Usage Accessing to the Internet exposes the computer to a plethora of vulnerabilities such as: Virus Spyware Trojans Hostile Code It is not recommended to install any unauthorized software on the computer. Peer-topeer software can expose your entire hard drive to any individual running the same type of software. Antivirus Products Use of antivirus software can increase CPU and memory usage, which can cause a slight degradation in the performance of the system. However, functionality should not be affected. Physical Security It is recommended that the user employs some method of physical security when dealing with the system to ensure that only authorized personnel have access to the product. There are several vulnerabilities a malicious user could exploit locally. Some examples are: Theft of equipment Local password cracking Installation of hardware keyloggers 4 User Manual QuantorVet TM-703-EN Index of contents Chapter 1. Introduction .................................................................... 8 1.1. 1.2. Main Features................................................................................... 9 Start and Termination...................................................................... 10 1.2.1. System Start ................................................................................................... 10 1.2.2. Start Program ................................................................................................. 10 1.2.3. Terminate Program ......................................................................................... 11 1.3. FireCR Calibration.......................................................................... 12 1.3.1. Calibration Geometry ..................................................................................... 13 Chapter 2. Acquisition.................................................................... 14 2.1. Add Study ....................................................................................... 14 2.1.1. Create Study Using Work List ........................................................................ 14 2.1.2. Work List Window ........................................................................................... 15 2.1.3. Columns of Work List ..................................................................................... 16 2.2. Add Study (Manual) ........................................................................ 17 2.2.1. New Study Window ........................................................................................ 17 2.2.2. Buttons of the New Study Window ................................................................. 18 2.2.3. Patient and Study Information ........................................................................ 18 2.3. Edit Column .................................................................................... 19 2.3.1. 2.4. Edit Column Window ...................................................................................... 19 Add Exam ....................................................................................... 20 2.4.1. Exam Window................................................................................................. 20 2.4.2. Add Exam ....................................................................................................... 21 2.4.3. Edit Exam ....................................................................................................... 23 2.5. Image Acquisition ........................................................................... 24 2.5.1. Acquisition Window ........................................................................................ 24 2.5.2. Exam / Review Window .................................................................................. 25 2.6. Study Management ........................................................................ 27 2.6.1. Study List Window .......................................................................................... 27 2.6.2. Study / Image Transfer ................................................................................... 28 2.6.3. CD / DVD Write (Option) ................................................................................ 29 2.7. Transport Status ............................................................................. 30 2.7.1. Transport Status Window ............................................................................... 30 2.7.2. Columns of Transport List .............................................................................. 31 5 User Manual QuantorVet 2.8. TM-703-EN Print (Option) .................................................................................. 32 2.8.1. Print Window .................................................................................................. 32 2.8.2. Buttons of the Print Window ........................................................................... 33 Chapter 3. Image Manipulation ...................................................... 34 3.1. Image Manipulation ........................................................................ 34 3.1.1. Image Manipulation Window .......................................................................... 34 3.1.2. Marking ........................................................................................................... 35 3.1.3. ROI (Region of Interest) ................................................................................. 36 3.1.4. LUT (Look Up Table) ...................................................................................... 37 3.1.5. Processing ...................................................................................................... 38 3.2. Multi View ....................................................................................... 39 3.2.1. 3.3. Multi View Window ......................................................................................... 39 Image Stitching (Option) ................................................................. 40 3.3.1. Screen Layout ................................................................................................ 41 3.3.2. Buttons of Stitching Window ........................................................................... 42 3.3.3. Clip Images..................................................................................................... 44 3.3.4. Removal of Non-Exposure Area Automatically .............................................. 45 3.3.5. 2 Point Automatic Function ............................................................................. 46 Chapter 4. QuantorView Express .................................................. 47 4.1. Screen Layout ................................................................................ 47 4.1.1. Screen Layout and Name of Parts ................................................................. 47 4.1.2. Change Study Layout at Image Window ........................................................ 48 4.1.3. Study List, Patient Study List .......................................................................... 49 4.1.4. Set Image Manipulation Apply Range ............................................................ 49 4.1.5. Short Cut Key ................................................................................................. 49 4.2. File Menu ........................................................................................ 50 4.2.1. Open DICOM Files ......................................................................................... 50 4.2.2. Open Non-DICOM Files ................................................................................. 50 4.2.3. Export ............................................................................................................. 50 4.2.4. Close .............................................................................................................. 51 4.2.5. Close All .......................................................................................................... 51 4.2.6. Previous Study ............................................................................................... 51 4.2.7. Next Study ...................................................................................................... 51 4.3. Edit Menu ....................................................................................... 52 4.3.1. Select Image................................................................................................... 52 4.3.2. Copy to Clipboard ........................................................................................... 52 6 User Manual QuantorVet TM-703-EN 4.3.3. Overlay Delete All ........................................................................................... 52 4.3.4. Select All ......................................................................................................... 52 4.4. View Menu ...................................................................................... 52 4.4.1. Text Overlay.................................................................................................... 52 4.4.2. Annotation ...................................................................................................... 52 4.4.3. Ruler ............................................................................................................... 53 4.4.4. Toolbar ............................................................................................................ 53 4.4.5. Caption ........................................................................................................... 53 4.4.6. Study List ........................................................................................................ 53 4.4.7. Full Screen ..................................................................................................... 53 4.4.8. Reset View ..................................................................................................... 53 4.5. Image Menu ................................................................................... 53 4.5.1. Select .............................................................................................................. 53 4.5.2. Zoom .............................................................................................................. 53 4.5.3. Pan ................................................................................................................. 54 4.5.4. Magnify ........................................................................................................... 54 4.5.5. Rotate Right .................................................................................................... 54 4.5.6. Rotate Left ...................................................................................................... 54 4.5.7. Flip Horizontally .............................................................................................. 54 4.5.8. Flip Vertically .................................................................................................. 54 4.5.9. Inverse ............................................................................................................ 54 4.5.10. Display Original .............................................................................................. 54 4.6. Annotation Menu ............................................................................ 55 4.6.1. ROI - Rectangle .............................................................................................. 55 4.6.2. ROI -Ellipse .................................................................................................... 55 4.6.3. ROI - Polygon ................................................................................................. 55 4.6.4. ROI - Free....................................................................................................... 55 4.6.5. ROI Property................................................................................................... 56 4.6.6. Measure - Distance ........................................................................................ 56 4.6.7. Measure - Angle ............................................................................................. 56 4.6.8. Text ................................................................................................................. 57 4.6.9. Arrow .............................................................................................................. 57 4.6.10. Pixel View ....................................................................................................... 57 4.6.11. Profile ............................................................................................................. 58 7 User Manual QuantorVet TM-703-EN Chapter 1. Introduction QuantorVet is intuitive, easy-to-use workstation software that provides facilities using 3D Imaging & Simulations Corp. CR readers with optimized image acquisition, processing, and management capabilities. Its DICOM compliant interface allows for simple integration into a facility’s HIS, RIS, and PACS, providing the full range of capabilities needed for improved productivity and workflow in busy clinics and practices. This user manual provides detailed information about the operation of QuantorVet and the use of the range of facilities included in the software to make the processing and administration of your medical X-ray images as efficient as possible. Safety Instruction To ensure the safety of patients, staff and other persons, any changes to software and hardware delivered by 3D Imaging & Simulations Corp. may only be made with prior written permission from 3D Imaging & Simulations Corp. Liability If unauthorized changes have been made to delivered software and hardware components, the warranty by 3D Imaging & Simulations Corp. becomes void. 3D Imaging & Simulations Corp. will not accept any responsibility or liability for the improper functioning of the product in such a case. QuantorVet is not approved for the acquisition of medical or mammographic image data. 8 User Manual QuantorVet TM-703-EN 1.1. Main Features Image Acquisition & Study Management QuantorVet Software allows facilities to quickly input patient data – or access it directly from their HIS, RIS or PACS for improved productivity and accuracy. Image acquisition is supported by a fully developed list of exams and anatomies, and a viewer displays images on a monitor to facilitate quality control and image management. Once completed, the study can be sent to the PACS, printed on a dry film printer, or burned onto a CD or DVD. Image Manipulation, Multi-Viewing & Stitching To optimize images, technicians can crop, etch, enhance, increase brightness and contrast, and perform other adjustments. Regions of interest can be highlighted, and users can easily change the order of images or delete images at the multi-view window. Stitching capabilities for images of legs, spines, and other anatomical areas are particularly useful for orthopedic and chiropractic facilities. QuantorView Express For smaller facilities without a HIS, RIS or PACS, QuantorVet’s local database enables direct management of patients and studies utilizing a unique viewer function. Technicians and radiologists can review DICOM and non-DICOM images on the same station they acquired it on. Full Range of Output Options QuantorVet features a full range of output options, including DICOM CD-burn, embedded view, DICOM send SCU, and DICOM print for dry film printers. The combined DICOM Patient CD and dry film print option creates patient CD / DVDs that include DICOM DIR structure and a built-in viewer. 9 User Manual QuantorVet TM-703-EN 1.2. Start and Termination 1.2.1. System Start 1. Turn on FireCR CR Reader. 2. Turn on monitor and PC. CAUTION Do not execute other application software than QuantorVet during operation of the scanner. This may slower the scanner response. 1.2.2. Start Program After Windows is successfully booted, you can launch the QuantorVet program by double clicking the QuantorVet icon on your desktop as shown in Figure 1.10. Figure 1.9. Start Window Figure 1.10. Short Cut Icon 10 User Manual QuantorVet 1.2.3. TM-703-EN Terminate Program Select System button as shown in Figure 1.11 on main Window. Figure 1.11. System Button Now you can “Exit Application” or “Shut Down System” by selecting buttons in the System Menu. “Shut Down System” will turn off your workstation. Figure 1.12. System Menu 11 User Manual QuantorVet TM-703-EN 1.3. FireCR Calibration Select IP Calibration in System Menu, then following window will pop up. Follow the steps of the menu. CAUTION Calibrate the scanner before use. “Please calibrate system” message pops up if the scanner is not calibrated or calibration data does not exist. It is recommended to calibrate the reader after moving it and as a part of regular maintenance. Figure 1.13. IP Calibration CAUTION Calibration should be done for both Universal Cassette containing IP 14” x 17” and Universal Cassette containing IP 10” x 12”. 12 User Manual QuantorVet 1.3.1. TM-703-EN Calibration Geometry Figure 1.14. Calibration Geometry CAUTION X-ray radiation field must cover the whole area of the cassette. 13 User Manual QuantorVet TM-703-EN Chapter 2. Acquisition 2.1. Add Study There are two methods for creating a study. One is to retrieve study information from a Work List server and the other is to input study information manually. NOTE DICOM Worklist server has to be configured appropriately in QuantorVet to add studies from Worklist server. 2.1.1. Create Study Using Work List Select “Work List” button at Start Window. Figure 2.1. Work List Button Select “Query Server” button at Work List Window. Figure 2.2. Query Server Button Select desired study in the Work List Window. Select “Start Study” button in the Work List Window. Figure 2.3. Start Study Button 14 User Manual QuantorVet 2.1.2. TM-703-EN Work List Window You can query Work List using various options in the Work List Window as shown in Figure 2.4. The Work List Window consists of function buttons and a list which displays query results. Page Input Window Query Result Page Up Page Down Figure 2.4. Work List Window You can input query conditions for all columns. You can scroll through pages using the page up/down buttons or mouse wheel button. Page information is “Current Page/Total Page” format Input Window (Query Condition) This is input field for query condition. Type query condition in each column of Input Window, and click Search button. In order to use Auto Query function, Auto Query interval has to be set in QuantorVetSetting, and its unit is minute. Query Result Worklist query results up on each query condition are shown in Query Result. Each column of Worklist can be sorted. Click the title of each column to sort by the value of this column. 15 User Manual QuantorVet 2.1.3. TM-703-EN Columns of Work List Item Description Sch.Date Scheduled Study Date. Query format is one of following. – YYYY/MM/DD – YYYY.MM.DD – YYYY-MM-DD – YYYYMMDD – MM-DD – MM/DD – DD – Blank will be changed to today automatically Sch.Time Scheduled Study Time. Query format is one of following. – HH:MM – HHMM – Blank will be changed to “00:00” automatically Mod Modality StationAE Station Application Entity Title Name Patient Name ID Patient ID Sex Patient Sex. Only ‘M’, ‘F’, ‘O’ are used for query. Birth Patient Birth Date Age Patient Age Proc.Desc Procedure Scheduled Description Station Station Name Proc.ID Procedure Scheduled ID Study UID Study UID Acc.No. Accession Number Ref.Phy. Referring Physician 16 User Manual QuantorVet TM-703-EN 2.2. Add Study (Manual) 2.2.1. New Study Window You can add new studies at the New Study Window. If you use touch screen monitor, select input window and use on-screen keyboard. Patient and Study Information On-Screen Keyboard Function Buttons Figure 2.5. New Study Window Input animal ID in ID field. ID is a required field. Input animal name in Name field. Name is a required field. Input species of animal in Species field. Input breed of animal in Breed filed. Input owner of animal in Owner field. Input age of animal in Age field. Select animal sex. Male is the default setting. Input study accession number in Acc.No. field. Accession number is not a required field Input study description in Study Desc. field. 17 User Manual QuantorVet 2.2.2. Buttons of the New Study Window Icon 2.2.3. TM-703-EN Name Hot Key Description Previous Window ESC Go back to the previous window Start Study Enter Add new study and start study Emergency F9 Fill patient and study information automatically Patient and Study Information Name Description ID ID of animal Name Name of animal Species Species of animal Breed Breed of animal Owner Owner of animal Age Age of animal Sex Sex of animal Acc. No. Accession number Study Desc. Study description 18 User Manual QuantorVet TM-703-EN 2.3. Edit Column 2.3.1. Edit Column Window You can add or remove columns in Edit Column Window. Selected Columns Hidden Columns Figure 2.6. Edit Column Window Left Column: List that is displayed in column header in Work List and Study List Right Column: List that is not displayed in column head in Work List and Study List Order of Edit Column list is identical to the order of column header in Work List and Study List. 19 User Manual QuantorVet TM-703-EN 2.4. Add Exam 2.4.1. Exam Window If you select “Start Study” button in Work List Window or in Add Study Window, Exam Window (Figure 2.7) will come up. If the Scheduled Procedure Description or ID of the study matches with database, exam will be added automatically. Patient and Study Information Body Part Exam Exam List Figure 2.7. Exam Window Edit Patient and Study Information will be always displayed at top of the window (Figure 2.8). Select “Edit” button to edit information. Animal ID/ Animal Name Accession No. Sex / Age / Birth Date Figure 2.8. Patient and Study Information 20 Study Date User Manual QuantorVet 2.4.2. TM-703-EN Add Exam a. b. c. d. Select animal species. All related Exams will be displayed at Exam area. Select Exam. Selected Exam will be added to Exam List. If you select Exam with “Add Study” button selected, predefined studies which have selected Exam will be displayed (Figure 2.10) e. Select Study. f. Selected Study will be added to Exam List. a c b d Figure 2.9. Add Exam Exam List (c) displays all exams belonging to each study. Acquired exam images are displayed as thumbnails and spots under the study bar show the status of image acquisition. Dark spots represent exams which images were acquired exam and white spots represent exams which images were not acquired. 21 User Manual QuantorVet TM-703-EN e f Figure 2.10. Predefined Study List 22 User Manual QuantorVet 2.4.3. a. b. c. d. TM-703-EN Edit Exam Select an exam in the Exam list. Click Edit Mode button, then Add Mode button will be released. Body Part of selected Exam will be changed to newly selected Body Part. Exam Position of selected Exam will be changed to newly selected Exam Position. a c b d Figure 2.11. Edit Exam 23 User Manual QuantorVet TM-703-EN 2.5. Image Acquisition 2.5.1. Acquisition Window Acquisition Window is composed of CR Control at the left half of the screen and Exam List at the right half of the screen (Figure 2.11). Scan Buttons Scan Resolution Patient & Study Information Selected Exam Scan Progress Figure 2.12. Acquisition Window Select Exam. Change resolution if needed. Press the Scan Button. Image will come up after several seconds. (Figure 2.13) Rectangular ROI (Region of Interest) box will be displayed automatically. ROI box can be moved by dragging. Size of ROI can be modified by dragging the small control boxes. ROI is applied by double clicking the ROI box. Figure 2.14 is the ROI applied image. Select next Exam and repeat above process. 24 User Manual QuantorVet 2.5.2. TM-703-EN Exam / Review Window Figure 2.13. Acquired Image Scanned images are displayed as shown in Figure 2.13, and ROI box and marks are displayed on the image. NOTE ROI size, Mark and Mark position can be created and edited in QuantorVet Organizer. Size and position of ROI and Mark can be adjusted and moved by dragging of the mouse with the left mouse button click. Window settings can be adjusted by dragging the mouse with the right mouse button clicked. After ROI adjustment, ROI is applied to the image by double clicking of the left mouse button. This adjustment is applied to Thumbnail image in the Exam list. 25 User Manual QuantorVet TM-703-EN Figure 2.14. ROI Applied Image ROI applied image is displayed as shown in Figure 2.14. Selected Exam can be retaken by using Retake button. Auto Window button finds optimized window settings for the ROI applied image. Window settings of the image can be adjusted by dragging the mouse with the right mouse button clicked. ROI box appears for adjustment when the image is double clicked. Stitching button is enabled when there are more than 2 exam images. NOTE Refer to Chapter 4.3. Image Stitching. Close the study by clicking End Study button when all image acquisitions are finished. If Auto-Send button is enabled, non-transferred images in study are transferred to the archive server automatically when study ends. 26 User Manual QuantorVet TM-703-EN 2.6. Study Management 2.6.1. Study List Window Studies can be managed at the Study List (Figure 2.15.). You can search, delete, edit and send studies at the Study List. Page Input Window Query Result Page Up Page Down Figure 2.15. Study List Window You can page up/down using buttons and mouse wheel button. Page information is “Current Page/Total Page” format. Input Window (Query Condition) This is the input field for query condition. Type query in each column of Input Window, and click Search button. If you select Input Window of Date, selectable menu is displayed as shown blow. 27 User Manual QuantorVet TM-703-EN Query Result Study List query results for each query condition are shown in Query Result. Each column of Study List can be sorted. Click the title of each column to sort by the value of this column. 2.6.2. Study / Image Transfer If a PACS is installed, images are transferred to the DICOM Archive server after image acquisition and adjustment. CAUTION QuantorVet provides image storage for temporary purpose. So it is strongly recommended to transfer and store images in permanent storage after image acquisition for safety and security reasons. QuantorVet provides Study and image transfer / auto transfer functions. You can perform all other tasks in QuantorVet while Study and image are being transferred. NOTE DICOM Archive server has to be configured appropriately in QuantorVet to transfer Study and images. 28 User Manual QuantorVet 2.6.3. TM-703-EN CD / DVD Write (Option) Figure 2.16. CD / DVD Write Choose Recorder: Select recorder to burn media Volume Label: Insert Volume Label Write Speed: Select writing speed Burn: Start burn to media Abort: Abort burning Erase: Erase rewritable media Close: Close dialog box 29 User Manual QuantorVet TM-703-EN 2.7. Transport Status 2.7.1. Transport Status Window You can check send and print information on Transport Status Window (Figure 2.17). Figure 2.17. Transport Status Window 30 User Manual QuantorVet 2.7.2. TM-703-EN Columns of Transport List Item Description Start Date Start Date of Transport. Query format is one of following. – YYYY/MM/DD – YYYY.MM.DD – YYYY-MM-DD – YYYYMMDD – MM-DD – MM/DD – DD – Blank will be changed to today automatically Start Time Start time of transport. Query format is one of the following. – HH:MM – HHMM – Blank will be changed to “00:00” automatically Lap Time Times lapsed AE Title Destination Application Entity Title Host Destination IP Address Port Destination Port PatName Patient Name PatID Patient ID Status Transport Status 31 User Manual QuantorVet TM-703-EN 2.8. Print (Option) 2.8.1. Print Window You can print multiple (1-4) images on a single film using Print Window. Print Preview is displayed on the left side of the window. You can add images to Print preview by selecting an exam and clicking on the Print Preview. Print Preview Figure 2.18. Print Window QuantorVet provides DICOM print function, and image layout can be configured in preview window. NOTE DICOM Printer has to be configured appropriately in QuantorVet to transfer Study and images to DICOM Printer. 32 User Manual QuantorVet 2.8.2. Icon TM-703-EN Buttons of the Print Window Name Hot Key Name 1x1 1 row 1 column mode 2x1 2 row 1 column mode 1x2 1 row 2 column mode 2x2 2 row 2 column mode Start Print Main Window Start Print (Send to Print Server) Move to Main Window 33 User Manual QuantorVet TM-703-EN Chapter 3. Image Manipulation 3.1. Image Manipulation 3.1.1. Image Manipulation Window You can adjust image processing by pressing the QA button. Figure 3.1 is a QA (Quality Assurance) window. Image is displayed at left half and various controls are displayed at right half. Figure 3.1. QA Window 34 User Manual QuantorVet 3.1.2. TM-703-EN Marking Write text to insert in the image. Enter string to input box and press “+” button and click at the position you want to insert on the image. Predefined: You can insert predefined Markings on the image. Select predefined marking and select “+” button and click at the position you want to insert on the image. Vertical Flip: Flip image vertically. Horizontal Flip: Flip image horizontally. Rotate Right: Rotate image to right. Rotate Left: Rotate image to left. Vertical Flip Rotate Right Horizontal Flip Figure 3.3. Predefined Marking Rotate Left Figure 3.2. Marking 35 User Manual QuantorVet 3.1.3. TM-703-EN ROI (Region of Interest) ROI Show / Hide: Show or hide ROI rectangular box. ROI Size Setting: Set ROI Size. If you press this, all ROI sizes will be displayed. ROI Move Buttons: You can move the ROI by pressing Left, Top, Right and Bottom buttons. ROI Show / Hide ROI Size Setting ROI Move Button Figure 3.4. ROI Control Buttons Figure 3.5. ROI Size Setting 36 User Manual QuantorVet 3.1.4. TM-703-EN LUT (Look Up Table) Curve: You can define the curve by click and drag the control point. You can add control point by click on the line. You can remove a control point by clicking and dragging it to the outside of the curve box. Set: Save current curve as default value of current exam. Load: Load default curve of the exam. Reset: Remove all control points. Histogram: Shows histogram of the image. Window Center: You can adjust window center using slide control. Window Width: You can adjust Window width using slide control. Curve Histogram Window Center Window Width Figure 3.6. LUT 37 User Manual QuantorVet 3.1.5. TM-703-EN Processing Contrast: Control the level of contrast enhancement. Detail Contrast: Control the level of detail contrast enhancement. Edge Enhancement: Control the level of edge enhancement. Edge Frequency: Control the frequency of edge. Dynamic Range Comp.: Control the level dynamic range compress ratio. Noise Reduction Level: Control the level of noise reduction. Set: Save current curve as default value of current exam. Load: Load default curve of the exam. Reset: Remove all control points. Figure 3.7. Processing 38 User Manual QuantorVet TM-703-EN 3.2. Multi View 3.2.1. Multi View Window You can change the order of images or delete images easily in the multi view window. Page Switching Image Page Up Page Down Figure 3.8. Multi View Window Switching Image button is a toggle button (on / off). In order to switch images, click Switching Image button and select the image you wish to switch. 39 User Manual QuantorVet TM-703-EN 3.3. Image Stitching (Option) Stitching function supports 2 or 3 image stitching. Stitch button is enabled when there are 2 more images in single study. If there are stitched images in the study, stitch button will be disabled. You have to delete stitched image to make new stitch image. Figure 3.9. Stitch Button 40 User Manual QuantorVet 3.3.1. TM-703-EN Screen Layout Stitching window consists of image window and toolbar. Image window displays images from top to bottom by order of image number. Image Window Toolbar Figure 3.10. Stitch Window 41 User Manual QuantorVet 3.3.2. Icon TM-703-EN Buttons of Stitching Window Name Hot Key Zoom In / Out Description Zoom in / out image Fit to Page Size Fit images to page size Pan Single Pan selected single image Pan All Pan all images Fit to Page Width Fit images to page width and align to next stitching region. Show or hide clipping lines. Clipping is used for removal of boundary area. Clipping Guide Line Show or hide guide line 2 Point Auto Move images using 2 intersection points Detect and remove non-exposure area automatically. Auto Remove 42 User Manual QuantorVet TM-703-EN On / Off mix intersection function. Mix function makes overlapping area look natural and smooth by fade in / out effects. Mix Reset Reset all images to initial state. Rotate Left Rotate selected image to left side. Rotate Right Rotate selected image to right side. Angle Change the rotating angle. Click this button will show combo box of 5 angles (0.01, 0.05, 0.1, 0.5, 1). Select new angle. Cancel Cancel stitching and return to previous screen. Stitch Stitch images and return to previous screen. 43 User Manual QuantorVet 3.3.3. TM-703-EN Clip Images Turn on Clipping button. Dotted line will be displayed around the images. Selected image has green line and the others have yellow line. Moving mouse on to the line will change the cursor style to arrow. Click mouse left button and move the line to requested position. Turn off clipping button will make clipping line invisible. Figure 3.11. Clipping Lines 44 User Manual QuantorVet 3.3.4. TM-703-EN Removal of Non-Exposure Area Automatically Non-exposure area is where X-ray is not exposed. Selection of Auto Remove button will detect and remove non-exposure area. Non-Exposure Area Figure 3.12. Removing Non-Exposure Area 45 User Manual QuantorVet 3.3.5. TM-703-EN 2 Point Automatic Function 2 Point Auto function uses 2 images. Upper image is the first image and lower image is the second image. Select 2 Point Auto button. Click intersection point on the first image. Red cross mark will be displayed. Click intersection point on the second image. Second image will move to the first image so that the intersection point of the second image matches the intersection point of the first image. Figure 3.13. 2 Point Auto 46 User Manual QuantorVet TM-703-EN Chapter 4. QuantorView Express 4.1. Screen Layout 4.1.1. Screen Layout and Name of Parts a b c d e Figure 4.1. Screen Layout Viewer screen is composed of following parts a. Upper Toolbar b. Study List c. Patient Study List d. Image Window e. Lower Toolbar 47 User Manual QuantorVet 4.1.2. TM-703-EN Change Study Layout at Image Window You can see multiple studies at Image window. Use study layout toolbar to change study layout. Study Layout 1x1 Study Layout 1x2 Study Layout 2x1 Study Layout 2x2 First Study Study Layout Second Study Figure 4.2. Change Layout 48 User Manual QuantorVet 4.1.3. 4.1.4. Study List, Patient Study List Study List Window displays all open studies. If you select study at study list, Patient Study List Window will display all studies of the same patient. You can open study by select and dragging study on the Study List Window or Patient Study List Window Set Image Manipulation Apply Range There are 5 application ranges 4.1.5. TM-703-EN Active: Current Image Select: All selected Images Series: All images of current series Study: All images of current study Apply All: All opened images Following image manipulations works for apply range. Export Zoom, Pan Rotate, Flip, Invert Window Level Short Cut Key There are 5 short cut keys F1: Select F2: Zoom F3: Pan F4: Magnify F5: Full Screen 49 User Manual QuantorVet TM-703-EN 4.2. File Menu 4.2.1. 4.2.2. 4.2.3. Open DICOM Files Open DICOM files and display image. You can select multiple images at Open File Dialog Box. Open Non-DICOM Files Open non DICOM files (JPEG, Bitmap, Tiff) You can select multiple images at Open File Dialog Box. Export Figure 4.3. Export Export selected DICOM image as different image file format. File Name: Insert new file name. File Type: Select one of following formats. DICOM Files: DICOM type JPEG Files: JPEG type Bitmap Files: Windows bitmap type 50 User Manual QuantorVet TM-703-EN 4.2.4. 4.2.5. 4.2.6. 4.2.7. TIFF Files: TIFF type AVI File: Windows AVI type. You have to select more than 2 images with same series. Transfer Syntax: Enabled when you select DICOM type Keep Original: Keep the original Transfer Syntax Uncompressed: Do not use compressing. If selected image is compressed, it will be saved as uncompressed. JPEG Baseline: JPEG 8bit. JPEG 12bit Lossy: JPEG 12bit. JPEG 16bit Lossless: JPEG 16bit lossless. Quality: Enabled when you use lossy JPEG codec Low: JPEG Q Value = 10 Low-Mid: JPEG Q Value = 25 Mid: JPEG Q Value = 50 Mid-High: JPEG Q Value = 75 High: JPEG Q Value = 90 Close Close selected study and related images Close All Close all studies and related images Previous Study Add previous study to study list and open related images. Next Study Add next study to study list and open related images. 51 User Manual QuantorVet TM-703-EN 4.3. Edit Menu 4.3.1. 4.3.2. 4.3.3. 4.3.4. Select Image Select [Image – Select] in the menu or press F1 key to select the image. Image is selected when the image is clicked by left mouse button. Yellow box is displayed for the selected image. You can select multiple images by using the CTRL key and clicking each image using the left mouse button. You can select a row of images by using the SHIFT key and clicking the first and the last image. Copy to Clipboard Copy active image to clipboard Overlay Delete All Delete all annotations from selected images. Select All Select all images in current series. 4.4. View Menu 4.4.1. 4.4.2. Text Overlay Show or hide text overlay Annotation Show or hide annotation 52 User Manual QuantorVet 4.4.3. 4.4.4. 4.4.5. 4.4.6. 4.4.7. 4.4.8. TM-703-EN Ruler Show or hide ruler Toolbar Show or hide toolbar. Caption Show or hide caption. Study List Show or hide study list. Full Screen Hide caption, toolbar, study list and maximize the image window Reset View Show toolbar, caption and study list. 4.5. Image Menu 4.5.1. 4.5.2. Select Set mouse mode to select. At select mode you can select image and annotation. Zoom Set mouse mode to zoom. You can zoom in and out by clicking the left mouse button and moving it in any direction. North and east directions zoom in the image. South and west directions zoom out the image. 53 User Manual QuantorVet 4.5.3. 4.5.4. 4.5.5. 4.5.6. 4.5.7. 4.5.8. 4.5.9. TM-703-EN Pan Set mouse mode to pan. You can move the image by mouse left button click and dragging. Magnify Set mouse mode to magnify glass. You can magnify small parts of the image by mouse left button click and moving. Default zoom ratio is x2. Use with CTRL key to change zoom ratio. Use with SHIFT key to change the size of the glass box. Rotate Right Rotate selected images 90° right Rotate Left Rotate selected images 90° left Flip Horizontally Flip selected images horizontally. Flip Vertically Flip selected images vertically. Inverse Invert selected images 4.5.10. Display Original Return selected images to original state 54 User Manual QuantorVet TM-703-EN 4.6. Annotation Menu 4.6.1. 4.6.2. 4.6.3. 4.6.4. ROI - Rectangle Click mouse left button and drag. You can modify the position of the object by clicking and dragging the object You can modify the shape of the object by clicking and dragging a control point. ROI -Ellipse Click mouse left button and drag. You can modify the position of the object by clicking and dragging the object You can modify the shape of the object by clicking and dragging control point. ROI - Polygon Whenever you click the mouse left button, new point is added. Double click mouse left button to finish drawing. You can modify the position of the object by clicking and dragging the object You can modify the shape of the object by clicking and dragging control point. ROI - Free Click mouse left button and drag. You can modify the position of the object by clicking and dragging the object You can modify the shape of the object by clicking and dragging control point. 55 User Manual QuantorVet 4.6.5. TM-703-EN ROI Property If you click the right mouse button on the ROI, a short cut menu will be displayed. Delete deletes ROI. Property shows the property dialog box. Figure 4.5. ROI Property 4.6.6. 4.6.7. Position: Display rectangular coordinate of the ROI. Size: Display height, width and area of the ROI. Statistics: Display minimum, maximum, mean and standard deviation values. Measure - Distance Click mouse left button and drag. Distance is displayed at the end of the line. You can modify the position of the object by clicking and dragging the object You can modify the shape of the object by clicking and dragging a control point. Measure - Angle Click mouse left button three times at center, left, right of the angle. Inner angle and outer angle are displayed. You can modify the position of the object by clicking and dragging the object You can modify the shape of the object by clicking and dragging a control point. 56 User Manual QuantorVet 4.6.8. 4.6.9. TM-703-EN Text Click the left mouse button or draw a rectangle by clicking and dragging. Edit box will come up. Add your text. Click the left mouse button on the outside of the edit box. You can modify the position of the object by clicking and dragging the object You can modify the shape of the object by clicking and dragging a control point. Arrow Click mouse left button and drag. You can modify the position of the object by clicking and dragging the object You can modify the shape of the object by clicking and dragging a control point. 4.6.10. Pixel View Click mouse left button and drag. A small white box will show pixel coordinate and value. 57 User Manual QuantorVet TM-703-EN 4.6.11. Profile Click mouse left button and drag. Releasing the left mouse button will show profile dialog box. If you click and drag left mouse button on the profile graph, red point will be displayed on the image which indicates current position on the graph. You can modify the position of the object by clicking and dragging the object You can modify the shape of the object by clicking and dragging a control point. Right clicking the line will show a short cut menu which enables you to show the profile dialog box. Figure 4.7. Profile The profile dialog displays the following. Distance: distance between two points Start Point: start point coordinate End Point: end point coordinate Min: minimum value Max: maximum value Mean: mean value Pixel Value: value of mouse clicked point 58