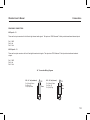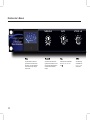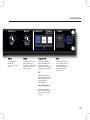
1
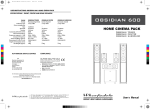
Dramastic Audio® THRESHOLD 8 12 1 6 dB COMPRESSION RATIO 0 4 2 20 0 4 8 ATTACK - mS 1 10 .3 RELEASE - S 3 .3 10 .1 12 .1 .6 MAKEUP 6 1.2 Auto Obsidian™ +15 EXTERNAL SIDE-CHAIN POWER 0 30 Lo-Fi -15 COMPRESSOR I 0.5 +12 USER’S MANUAL Obsidian User’s Manual Warning CAUTION RISK OF ELECTRIC SHOCK DO NOT OPEN WARNING: TO REDUCE THE RISK OF ELECTRIC SHOCK DO NOT REMOVE COVER. NO USER SERVICEABLE PARTS INSIDE. REFER SERVICING TO QUALIFIED SERVICE PERSONNEL. The lightning flash with arrowhead symbol, within an equilateral triangle, is intended to alert the user to the presence of uninsulated “dangerous voltage” within the product’s enclosure that may be of sufficient magnitude to constitute a risk of electric shock to persons. The exclamation point within an equilateral triangle is intended to alert the user to the presence of important operating and maintenance (servicing) instructions in the literature accompanying the appliance. WARNING: TO PREVENT FIRE OR SHOCK HAZARDS, DO NOT EXPOSE THIS PRODUCT TO RAIN OR MOISTURE. BEFORE OPERATING THIS UNIT, CAREFULLY READ THE OPERATING INSTRUCTIONS AND SAFETY PRECAUTIONS IN THIS MANUAL AS WELL AS ON THE UNIT ITSELF. THIS APPARATUS MUST BE EARTHED. 3 Obsidian User’s Manual Safety 1. POWER SOURCES – The unit should be connected to a power supply only of the type described in the operating instructions, or as marked on the unit. Please check to make sure the voltage selector switch on the back of the unit is set for the proper voltage in your area (either 100-120v or 200-240v 50/60Hz) before connecting to the AC. For best noise performance always use a grounded 3 core / 3 pin AC cord. 2. POWER CORD PROTECTION – AC power cords should be routed so that they are not likely to be walked on or pinched by items placed upon or against them. Never take hold of the plug or cord if your hand is wet. Always grasp the plug body when connecting or disconnecting it. 3. GROUNDING OF THE PLUG – This unit is equipped with a 3-wire grounding type plug. This plug will only fit into a grounding-type power inlet. This is a safety feature. Do not defeat the purpose of the grounding-type plug. If you are unable to insert the plug into the outlet, contact your electrician to replace your obsolete outlet. 4. HEAT – The unit should not be located near heat sources, or other units that produce heat. 5. VENTILATION – When installing this unit in a rack or any other location, be sure there is adequate ventilation. Improper ventilation will cause overheating, and damage to the unit. 6. WATER AND MOISTURE – Do not use the unit near any source of water or in excessively moist environments. Care should be taken so that liquids are not spilled on or near the unit. 7. CLEANING – First disconnect the unit from AC power. The unit should only be cleaned with a damp lint free cloth. Do not use solvents or abrasives to clean the unit, as this will damage the finish. Please make sure the unit is completely dry before reconnecting to AC power. 8. DAMAGE REQUIRING SERVICE – The unit should be serviced by authorized service personnel when: a) The AC power supply cord or plug has been damaged. b) Objects have fallen or liquids have spilled into the unit. c) The unit has been exposed to rain. d) The unit does not operate normally or exhibits a marked change in performance. e) The unit has been dropped, or the enclosure damaged. 9. SERVICING – The user should not attempt to service the unit. There are no user serviceable parts inside. Servicing only to be performed by authorized personnel. WARRANTY VOID IF CASE IS OPENED. Copyright ©2006, Dramastic Audio Corp. All Rights Reserved. Part No. 07-0007 4 www.DramasticAudio.com Obsidian User’s Manual Table Of Contents Warnings 3 Safety 4 Introduction 6 Installation 9 Rear Panel View 10 Connections 12 Front Panel View 14 Front Panel Controls 16 Limited Warranty 19 Technical Specifications 20 5 Obsidian User’s Manual Introduction Introduction Thank you for purchasing the Obsidian™ Stereo Compressor. Inspired by some of the most popular compressors in the world, the Obsidian™ is a stereo feed-forward VCA style compressor designed with the recording, mixing, and mastering engineer in mind. Each unit is hand crafted in the U.S.A using high quality precision components. Developing this product has truly been a rewarding experience. It originally started as a project to build a compressor that suited my needs as a producer and engineer. One day while working on a project with another producer, I was explaining to him that after using so many great compressors, there isn’t one that has all the characteristics I want in one box. He replied, “You’re a tech guy, why don’t you build one”? I thought to myself, “Why not”? My goal was to build a compressor based on feel, musicality, character, and whether or not it sounds good. What do technical specs really mean to people anyway? All most people really care about is how it sounds, and I’ve always trusted my ears. After over a year of R&D, trial and error, and numerous prototypes, I finally got it sounding right. Due to such a positive response from fellow engineers, producers, and clients, as well as many requests asking if I would build them one, I decided to go into production. Each unit is calibrated and tested with precision equipment, as well as with real music in a studio environment, just like you would be using it in. I hope you enjoy using it as much as I do. Sincerely, John Ellis Copyright ©2006, Dramastic Audio Corp. All Rights Reserved. Part No. 07-0007 6 www.DramasticAudio.com Obsidian User’s Manual Introduction Obsidian™ The Obsidian is a feed-forward VCA style stereo compressor featuring transformer balanced I/O, electronically balanced external side-chain input, internal high pass filter and precision stepped controls to accurately recall settings. Through the use of several proprietary methods, the Obsidian performs a range of tasks unheard of from the average buss compressor. The Obsidian offers superior imaging. The stereo image always remains intact, the highs stay brilliant and clear, and the bottom continues to thunder [especially with the internal “High Pass Filter” engaged on the detection circuitry]. For even greater control, an “External Side-Chain” input is available and may be used in conjunction with the “High Pass Filter.” Six ratio settings are available from a subtle 2:1, to a bone crushing extremely versatile on many different types of program material. . Six attack, and six release settings further complement the Obsidian making it Employing the “Auto” release time gives the audio a smooth rich texture without any pumping and breathing. From there, if you have decided that the audio is a little too smooth for the application, a simple click of the release switch to the “Lo-Fi” setting will net all the “IN YOUR FACE” aggression one may desire. Try it on a drum submix! Overall, the clarity, performance and musicality of the Obsidian is unparalleled. The Obsidian is hand crafted in the USA using the finest quality precision components available. TXIO Enhanced™ TXIO is a transformer balanced input / output interface which gives the Obsidian it’s unique character. The TXIO interface provides a “phat” classic analog sound allowing the Obsidian to add warmth, depth and character to digital audio workstations. Specifically designed for the Obsidian, the TXIO interface is a collaboration between Dramastic Audio and Jensen Transformers. 7 Obsidian User’s Manual This page is left intentionally blank. ....except for this stupid message! 8 Obsidian User’s Manual Installation INSTALLATION Operating Voltage Before applying power to the unit, make sure the voltage selector on the rear panel is set to the proper voltage for your area of use. The Obsidian™ can be configured for either 110 or 220 volt operation. To change the voltage, use a narrow flat bladed screwdriver to adjust the voltage setting. Fuse Before applying power to the unit, make sure the appropriate fuse is installed. It is unsafe to operate the unit without the proper fuse. 1 A for 110v operation 0.5 A for 220v operation AC Power Connection The unit is equipped with a 3-wire grounding type IEC connector (110v operation). Use the included 3-wire grounding type AC power cord to connect the unit to AC power. This cord will only fit into a grounding-type power outlet. If you are unable to insert the plug into the outlet, contact your electrician. Do not defeat the purpose of this grounding-type plug. Always grasp the plug body when connecting or disconnecting it. Be advised that different operating voltages require the use of a different type line cord and attachment plug. If in doubt, consult your electrician. Mounting The chassis can to be mounted into a standard equipment rack (19” or 48.3 cm wide). Other components may be stacked above or below the unit provided they don’t generate excessive heat. Do not rely solely on the front screws when mounted in a touring rack. Support the back of the Obsidian as well. 9 Obsidian User’s Manual No User Serviceable Parts Inside Manufactured In USA by Dramastic Audio® www.DramasticAudio.com SIDE-CHAIN INPUT 110 220 FUSE S 115/230V 50/60Hz AC Power Standard 3-pin IEC power connector; 115/230V, 50/60Hz. 10 2 1 3 PIN 1: Gnd PIN 2: Hot PIN 3: Cold FUSE 1 AMP GND Fuse 3AG Fast Blow Fuse. Voltage Select Switchable between 110 and 220V operation. GND Chassis ground terminal. Side-Chain Input XLR Electronically balanced. Rear Panel View 2 1 3 Input L R 2 1 2 1 3 Output L R 3 3 Audio Input XLR Transformer balanced, TXIO Enhanced™. 2 1 Audio Output XLR Transformer balanced, TXIO Enhanced™. 11 Obsidian User’s Manual Connections REAR PANELCONNECTIONS Power Input IEC Connector Use the included 3-wire grounding type AC power cord to connect the unit to AC power. This cord will only fit into a grounding-type power outlet. If you are unable to insert the plug into the outlet, contact your electrician. Do not defeat the purpose of this grounding-type plug. Always grasp the plug body when connecting or disconnecting it. Voltage Select Switch The Obsidian™ can be configured for either 110 or 220 volt operation. To change the voltage, use a narrow flat bladed screwdriver to adjust the voltage setting. Fuse 1 A for 110v operation 0.5 A for 220v operation GND Chassis ground terminal Side-Chain Input XLR When the External Side-Chain switch is “IN”, external side-chain input XLR connector on the rear panel is engaged. This allows you to “Key” the compressor from an external signal rather than the program material itself. Although the input is mono, it affects the left and right channels equally. The external side-chain input is electronically balanced. Pin 1: GND Pin 2: Hot Pin 3: Cold 12 Obsidian User’s Manual Connections REAR PANEL CONNECTIONS XLR Input L – R These are the input connectors for the left and right channel audio signals. The inputs are TXIO Enhanced™ which provides transformer balanced inputs. Pin 1: GND Pin 2: Hot Pin 3: Cold XLR Output L – R These are the output connectors for the left and right channel audio signals. The outputs are TXIO Enhanced™ which provides transformer balanced outputs. Pin 1: GND Pin 2: Hot Pin 3: Cold 1/4” Connection Wiring Diagram XLR - 1/4” Jack (unbalanced) TIP Pin 1 (Ground) - Sleeve Pin 2 (Hot) - Tip Pin 3 (Cold) - Sleeve Sleeve XLR - 1/4” Jack (balanced) Pin 1 (Ground) - Sleeve Pin 2 (Hot) - Tip Pin 3 (Cold) - Ring TIP Ring Sleeve 13 Obsidian User’s Manual 7+5(6+2/' 12 1 6 dB COMPRESSION $77$&.P6 14 5$7,2 20 0 4 8 Meter Threshold Ratio Attack The meter shows the amount of gain reduction in db scaled from 0 db to 20 db. The meter illuminates “blue” to allow for easy viewing in dimly lit rooms. This sets the level above which signals will be compressed. There are 23 precision steps allowing for accurate recalls of threshold settings. Compression ratio is selectable from 2:1, 4:1, 8:1, 10:1, 12:1 and The attack range is selectable from 0.1, 0.3, 1, 3, 10, and 30 mSec. Front Panel View RELEASE - S .3 .6 .1 MAKEUP COMPRESSOR 6 1.2 EXTERNAL SIDE-CHAIN Auto POWER 0 Lo-Fi I 0.5 +12 Release Makeup Compressor IN Power The release range is selectable from 0.1, 0.3, 0.6, 1.2 Sec., Auto, and Lo-Fi. Makeup is the final output gain adjustment. There are 23 precision steps in .5db increments allowing for accurate recalls of makeup gain settings. When pressed in (Illuminates Blue), the compression circuitry is engaged. When depressed (Illumination off), the compression circuitry is electronically bypassed. Switches the AC power to the unit on, and off. The top position “O” is off, the bottom position “I” is on. The blue LED to the right of the power switch illuminates to confirm the unit is on. HPF When pressed in (Illuminates Blue), a high pass filter is engaged before the detector circuitry. The high pass filter is set at 125Hz,12db/octave. External Side-Chain IN When pressed in (Illuminates Blue), the external side-chain input XLR connector on the rear panel is engaged. 15 Obsidian User’s Manual Front Panel Controls FRONT PANEL CONTROLS Meter The meter shows the amount of gain reduction in db scaled from 0 db to 20 db. The meter illuminates “blue” to allow for easy viewing in dimly lit rooms. Threshold This sets the level above which signals will be compressed. There are 23 precision steps allowing for accurate recalls of threshold settings. Ratio Compression ratio is selectable from 2:1, 4:1, 8:1, 10:1, 12:1 and signal once the input signal is above the threshold. . The ratio knob controls how the output signal will change in relation to the input For Example: 2:1 Setting: An increase of 2 db above the threshold on the input will result in a 1 db output change. 4:1 Setting: An increase of 4 db above the threshold on the input will result in a 1 db output change. 8:1 Setting: An increase of 8 db above the threshold on the input will result in a 1 db output change. 10:1 Setting: An increase of 10 db above the threshold on the input will result in a 1 db output change. 12:1 Setting: An increase of 12 db above the threshold on the input will result in a 1 db output change. Setting: An increase of 20 db above the threshold on the input will result in a 1 db output change. Attack The attack range is selectable from 0.1, 0.3, 1, 3, 10, and 30 mSec. The attack control adjusts the time it takes the compressor to react to the input signal. The longer the attack time, the more of the input signals transients are passed through before compression takes place. 16 Obsidian User’s Manual Front Panel Controls FRONT PANEL CONTROLS Release The release range is selectable from 0.1, 0.3, 0.6, 1.2 Sec., Auto, and LoFi. The release control adjusts the time it takes the compressor to return to unity gain after going into compression. In Auto mode, the release time is dependent on the duration of the signal peak. LoFi is a program dependent distortion mode. A short release time causes the compressor to track every little change in level, producing a “pumping” effect. A long release time will “squash” the signal more resulting in less overall output but retaining more of the dynamics. Auto release is program dependant on the signal peak. This is an extremely musical setting, which sounds very natural on final mixes or whatever else you decide to use it on. Lo-Fi mode is program dependent. The more you compress the more aggressive the distortion. Makeup Makeup is the final output gain adjustment. There are 23 precision steps in .5db increments allowing for accurate recalls of makeup gain settings. Compressor IN When pressed in (Illuminates Blue), the compression circuitry is engaged. When depressed (Illumination off), the compression circuitry is electronically bypassed. HPF When pressed in (Illuminates Blue), a high pass filter is engaged before the detector circuitry and may be used in conjunction with the external side-chain. Engaging the high pass filter will allow program material to really “thunder” since the detector circuitry is not being triggered by the low end content. The high pass filter is set at 125Hz,12db/octave. 17 Obsidian User’s Manual Front Panel Controls FRONT PANEL CONTROLS External Side-Chain IN When pressed in (Illuminates Blue), the external side-chain input XLR connector on the rear panel is engaged. This allows you to “Key” the compressor from an external signal rather than the program material itself. Although the input is mono, it affects the left and right channels equally. Example 1: You have a stereo drum submix running through the compressor but the combination of the bass guitar and the kick drum is resulting in too much low end content. By bussing the bass guitar to the side-chain input and engaging the External Side-Chain on the front panel, the detector circuitry will now be triggered by the bass guitar, however the compression will take place on the drum submix. By adjusting the threshold, ratio, attack and release, you can make the bass guitar transients “duck” the drum submix to your liking. Example 2: You have a bass guitar running through the compressor but the combination of the kick drum and the bass guitar is resulting in too much low end content. By bussing the kick drum to the side-chain input and engaging the External Side-Chain on the front panel, the detector circuitry will now be triggered by the kick drum, however the compression will take place on the bass guitar. By adjusting the threshold, ratio, attack and release, you can make the kick drum transients "duck" the bass guitar to your liking. You may also use the internal high pass filter (HPF) in conjunction with the External Side-Chain to “eq.” the side-chain input signal. The HPF is post external-sidechain and pre detector. The HPF is set at 125Hz, 12db/octave. For even greater control, you can use an outboard eq. on the side-chain signal to achieve frequency-dependent limiting or de-essing. Power Switches the AC power to the unit on, and off. The top position “O” is off, the bottom position “I” is on. The blue LED to the right of the power switch illuminates to confirm the unit is on. 18 Obsidian User’s Manual Limited Warranty Dramastic Audio Corp. warrants this product to be free of defects in material and workmanship for a period of 1 year from the original date of purchase. This warranty is valid only for the original purchaser and is non-transferable. This warranty only applies to products sold in the United States of America. During the warranty period Dramastic Audio shall, at its sole and absolute option, either repair or replace free of charge any product that proves to be defective by Dramastic Audio or its authorized service representative. To obtain warranty service, the purchaser must first call or write Dramastic Audio to obtain a return authorization number and instructions concerning where to return the unit for service. All returns must be accompanied by a copy of the original sales receipt and a description of the problem. All authorized returns must be sent to Dramastic Audio or an authorized Dramastic Audio repair facility postage prepaid, insured and properly packaged. Dramastic Audio reserves the right to update any unit returned for repair. Dramastic Audio reserves the right to change or improve the design of the product at any time without prior notice. This warranty does not cover claims for damage resulting from misuse, abuse, neglect, water damage, in-transit damage, fire damage, dropping the unit, improper maintenance, alteration or attempted repair by unauthorized personnel, and is limited to failures arising during normal use that are due to defects in material or workmanship in the product. In no event will Dramastic Audio be liable for incidental, consequential or other damages resulting from the breach of any express or implied warranty, including, among other things, damage to property, damage based on inconvenience or on loss of use of the product, and, to the extent permitted by law, damages for personal injury. Some states do not allow the exclusion or limitation of incidental or consequential damages, so the above limitation or exclusion may not apply to you. Any implied warranties, including implied warranties of merchantability and fitness for a particular purpose, are limited in duration to the length of this limited warranty. Some states do not allow limitations on how long an implied warranty lasts, so the above limitation may not apply to you. This warranty gives you specific legal rights, and you may also have other rights which vary from state to state. Dramastic Audio Corp. 22 Greystone Place Milford, NH 03055 (978) 263-5096 phone (603) 769-4599 fax www.DramasticAudio.com Copyright ©2006, Dramastic Audio Corp. All Rights Reserved. www.DramasticAudio.com Part No. 07-0007 Copyright © 2006 Dramastic Audio Corp. Specifications Subject To Change Without Notice. 19 Obsidian User’s Manual Analog Input Connectors: Impedance: XLR balanced (pin 2 hot) 10k ohms (transformer balanced) Analog Output Connectors: XLR balanced (pin 2 hot) ,PSHGDQFH WUDQVIRUPHUEDODQFHG Max Output: +24dbu (above 0dbu with 1% THD ) +23.7dbu (onset of clipping) Noise: < -86dbu in bypass < -80dbu with compressor IN THD: .005% @ 1kHz IMD: In Bypass: .054% With compressor IN and no compression: .069% Freq. Response: 10Hz to 50kHz @ 10Hz – 0.04db @ 20kHz – 0.36db Crosstalk: Measured referenced to +20dbu -109db @ 1kHz -73db @ 20kHz Side-Chain Input Connectors: XLR balanced (pin 2 hot) Impedance: >20k ohms (electronically balanced) HPF: 125Hz 12db/octave General Finish: Chassis: Chassis Ground: Dimensions: Weight: AC Power: Black Painted 2 piece cold rolled steel 5-way binding post 19” x 1.75” x 8” 8 lbs 5oz 115 / 230 VAC 50 – 60Hz 3 Pin IEC power connector All specifications are subject to change without notice. 20 Technical Specifications Dramastic Audio, Obsidian, And TXIO Enhanced are trademarks or registered trademarks in the US and other countries. Copyright ©2006, Dramastic Audio Corp. All Rights Reserved. Part No. 07-0007 www.DramasticAudio.com