1
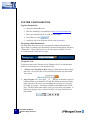
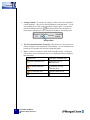
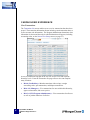
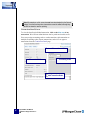
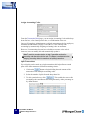
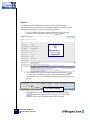
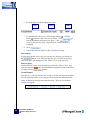
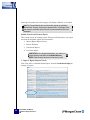
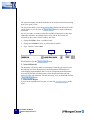
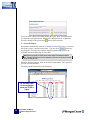
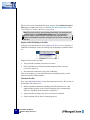
User Manual
PAYMENTNET
TABLE OF CONTENTS ................................................... 3
PAYMENTNET ACCESS ROLES.................................... 5
SYSTEM CONFIGURATION............................................ 6
CARDHOLDER EXPERIENCE ........................................ 8
ADMINISTRATIVE FUNCTIONS AND
CONFIGURATION ......................................................... 20
PaymentNet: User Manual
© 2004 J.P. Morgan Chase & Co.
rev.10/06
INTRODUCTION TO PAYMENTNET
This User Manual provides a quick tour of the PaymentNet® user interface, basic
functionality, and gives an idea of why cardholders, managers, and
administrators find PaymentNet so robust, helpful, and easy-to-use.
This User Manual is suitable for cardholders, managers, and Administrators and
covers the following topics:
•
Logging into PaymentNet and the Welcome Screen
•
Navigating within PaymentNet
•
Viewing Transactions
•
Creating Queries
•
Creating Reports
•
Displaying and Editing Employee Profiles
•
Merchant Profiles
•
Editing Accounting Codes and MCC Profiles
•
Administrative Functions and Configuration
Other PaymentNet Materials
JPMorgan Chase Commercial Card Solutions provides the following materials
for PaymentNet:
•
PaymentNet User Manual—This guide.
•
PaymentNet “How to…” Help Guide—Step-by-step instructions for
Program Administrators.
If you are missing any of the above items, please contact your Account Manager.
2
PaymentNet: User Manual
© 2004 J.P. Morgan Chase & Co.
rev.10/06
PAYMENTNET USER MANUAL TABLE OF
CONTENTS
PaymentNet Access Roles
System Configuration
Log Into PaymentNet
Navigating within PaymentNet
Cardholder Experience
View Transactions
Assign Accounting Codes
Split Transactions
Review/Approve Transactions
Disputes
Resolving a Dispute
Enhanced Transaction Detail
Display Credit Card Number in Transaction List
Create Queries
Create Reports
Display and Edit Employee Profiles
Merchant Profiles
Administrative Functions and Configuration
Accounting Code List
Merchant Category List
Accounting Code Setup
Accounting Cycle
Accounting Export File
Auto Accounting Export Setup
Approval Level/E-Mail
3
PaymentNet: User Manual
© 2004 J.P. Morgan Chase & Co.
rev.10/06
Billing Cycle
Compliance Monitor
Screen View Setup
Edit E-Mail Message
Fleet Purchase Exception
General Information Setup
Hierarchy Setup
Hierarchy Management
Import File
Import List
Summary Statistics
Merchant Classification Setup
Reports
Transaction Edit/Viewable
Feedback
4
PaymentNet: User Manual
© 2004 J.P. Morgan Chase & Co.
rev.10/06
PAYMENTNET ACCESS ROLES
There are five different access roles that control the amount of access a user has
within PaymentNet. Keep in mind that differing access roles can be assigned to
users placed throughout the various hierarchy levels to ensure appropriate and
secure access to relevant data. This means that a Program Administrator (Role 4)
may be low on the hierarchy level but for access reasons has a higher User Role.
Cardholder
Manager
Division
CFO
Administrator
5
Role 0 Cardholder—Users can view their own
transactions, profile, and reports specified by the Program
Administrator.
Role 1 Manager— Users can view their department’s
transactions (any transactions within their Hierarchy ID),
profiles, and reports specified by the Program Administrator.
Role 2 Division—Users can view transactions within their
Hierarchy ID and all Hierarchy levels below them, including
transactions, profiles, and reports specified by the Program
Administrator.
Role 3 CFO— Users have universal access to transactions,
profiles, and reports. They do not have access to any
configuration functions.
Role 4 Administrator—Program Administrators have
universal access to all functions.
PaymentNet: User Manual
© 2004 J.P. Morgan Chase & Co.
rev.10/06
SYSTEM CONFIGURATION
Log Into PaymentNet
1. Open your Internet Browser.
2. Enter the following in your address bar: http://www.paymentnet.com.
3. Enter your Organization ID, User ID, and Pass Phrase.
4. Press [Enter] or click
.
5. On the left side of the Welcome Screen, select PaymentNet.
Navigating within PaymentNet
The menu drop-down list (see below) navigates throughout all PaymentNet
pages. When you initially open PaymentNet, the menu drop-down list defaults to
“Transaction”. Click on the menu to see all of the options available. For now,
we’ll talk about the Transaction List page.
Navigation Tools
To better navigate on the Transaction List, Employee/User List, and Merchant
Profile List screens here are a few navigation tools:
6
•
“Select a View” Drop-Down Box: Displays queries that have been created
and saved. If no queries have been created, this will show only the Default
View option.
•
Page Navigator: The “Go to page __ of __” displays the number of pages of
transactions that are available for viewing. By clicking on the arrows on the
upper right part of the screen, you can display the first page, previous page,
next page, or last page. The options available are dependant on the current
page. The drop-down feature allows you to go to a specific page number. If
more than 100 pages exist, a text box will allow you to type in the desired
page number.
PaymentNet: User Manual
© 2004 J.P. Morgan Chase & Co.
rev.10/06
•
Sorting Columns: To sort data by category, click on one of the underlined
column headings. This will sort the information in ascending order. To sort
in descending order, click on the underlined category again. An upward or
downward triangle indicator (
) will appear next to the column that is
being sorted, depending on if it is sorted in ascending or descending order.
Sorting Indicator
•
The Transaction Identifier (Trans ID): This number is a unique reference
number assigned to each transaction in PaymentNet. As new transactions are
posted, the row numbers will become sequentially higher.
•
Icons: A variety of icons are visible in the Trans ID column. Clicking on
each of these icons will allow the user to view additional detail pertaining to
that transaction.
Note Icon
Airline Addendum Icon
Car Rental Addendum
Icon
7
Purchase Addendum Icon
Shipping Services
Addendum Icon
Temporary Services
Addendum Icon
Fuel Addendum Icon
Dispute Initiated Icon
Lodging Addendum Icon
Dispute in Process Icon
PaymentNet: User Manual
© 2004 J.P. Morgan Chase & Co.
rev.10/06
CARDHOLDER EXPERIENCE
View Transactions
The Transaction List screen enables users to review transactions that have been
posted. The transaction information shown includes general transaction data, as
well as account code information. The Program Administrator determines what
information is shown and the order in which information will appear, including
accounting codes, on the Screen View Setup screen (see page 23).
Access to transactions depends on the user role access levels and corporate
hierarchy levels. From the Transaction List page all user roles can complete
many functions:
8
•
Role 0 (Cardholders)—Match transactions with receipts, reassign
accounting codes, split transactions, and dispute transactions.
•
Roles 1-2 (Managers)—View transactions for users within their hierarchy,
approve transactions, and create queries.
•
Role 3-4 (CFO/Program Administrator)—View transactions for all users
as well as perform functions of all roles.
PaymentNet: User Manual
© 2004 J.P. Morgan Chase & Co.
rev.10/06
Note All transactions on this screen have not been downloaded into the General
Ledger. Once that has been done, transactions cannot be edited, although they
can still be viewed or used for reporting.
Transaction Detail Screen
To view the detail an individual transaction, click on the blue text of any
transaction. We will learn what functions can be performed on this screen.
Users may assign accounting codes to each transaction, split transaction to
multiple accounting codes, dispute transactions, and review or approve
transactions from the Transaction Detail page.
Return to Transaction List link
Transaction Detail
Accounting Codes
Add Transaction Notes
9
PaymentNet: User Manual
© 2004 J.P. Morgan Chase & Co.
rev.10/06
Assign Accounting Codes
From the Transaction Detail page, you can assign Accounting Codes with a dropdown list box, a free-form input text box, or a combination of the two.
Later we’ll learn how Administrators set default accounting codes for employees,
merchants and Merchant Category Codes (MCCs). This will help with
accounting by automatically assigning accounting codes to merchants.
However, if a transaction does not have a default cost center or the code is
incorrect, users can modify this and automatically update it.
Note To assist the accurate selection of data, PaymentNet combines the
accounting code description with the code. This feature is available both when
assigning accounting codes to transactions and splitting transactions.
Split Transactions
Up to 99 splits can be made on a single transaction; this helps allocate certain
parts of the dollar amount to different accounting centers.
1. Click on the
button to begin dividing the total amount of the
transaction it into multiple accounting codes.
2. Select the number of splits from the drop-down list.
3. To edit a particular row, click
. This enables the user to edit
accounting codes and allocate the billing amount by either percentage or
by dollar amount.
10
PaymentNet: User Manual
© 2004 J.P. Morgan Chase & Co.
rev.10/06
4. When you are finished allocating a row, click
. This will
refresh the screen and enable you to edit any additional rows.
5. When you have finished the entire split, click
like to cancel the changes you have made, click the
button.
. If you would
Note For tax calculating purposes, in split transactions, the parent transaction
will retain the total amount, or estimated tax amount due.
Review/Approve Transactions
Using the checkboxes (which are also viewable on the Transaction List page),
cardholders can match transactions with receipts and click “Review.” Managers
can click “Approve” and so on.
From Transaction List
From Transaction Detail Screen
Note to Program Administrators: The review and approval process is entirely
dependent upon your company’s internal procedures and therefore will differ
from company to company.
11
PaymentNet: User Manual
© 2004 J.P. Morgan Chase & Co.
rev.10/06
Disputes
Cardholders can initiate disputed transactions on-line. By choosing the
appropriate reason, PaymentNet will automatically supply you with any further
information fields that are required to complete the dispute.
1. When a cardholder wishes to dispute a transaction, they select the
button.
transaction, access the detail, and click the
*
Items with the gray
asterisk (*) are
required fields
.
2. The cardholder then enters the required information and clicks
A yellow square immediately appears next to the transaction on the
Transaction List screen, indicating that the dispute has been initiated (see
below).
Yellow Square Indicator
3. The cardholder can cancel the dispute at this point by clicking the
button on the Transaction Detail screen. The yellow square
indicator will be removed and the dispute will be dropped.
12
PaymentNet: User Manual
© 2004 J.P. Morgan Chase & Co.
rev.10/06
4. Once the JPMorgan Chase Dispute department has processed all required
information, the yellow square indicator next to the transaction will be
replaced with a red square ( ), indicating that the transaction is currently
in the dispute process.
Resolving a Dispute
Cardholders can resolve disputed transactions online with the
button. This option will appear for transactions already displaying the red square
indicator.
After the Mark as Resolved button is clicked, PaymentNet displays the
following message:
Once the resolution has been processed, the red square indicator will
automatically be removed.
Enhanced Transaction Detail
Depending on a merchant’s enhanced data capture abilities, PaymentNet can
display Level I, II, and III information. If Level III information is available from
the merchant, a green dollar icon appears next to the Trans ID on the
Transaction List screen. By clicking on the icon, the Purchase Detail, including
sales tax amounts and, if transmitted, line item details are displayed (see the
graphic below).
13
PaymentNet: User Manual
© 2004 J.P. Morgan Chase & Co.
rev.10/06
Display Credit Card Number in Transaction List
Administrators can configure whether or not the credit card numbers appear in
the Transaction List and Employee/User List pages.
If this field is utilized, reports and queried export files can be generated with the
credit card number, allowing more specific and tailored information.
For security purposes, most clients mask the first 8 – 10 characters of the account
number on the display. The export file, created from the Transaction List page
will not mask the account number.
Create Queries
The Query function enables you to view the transactions that meet user-specified
criteria. Queries are available on the Transaction List page as well as many other
pages. This feature is available to all user roles.
Create a Query
1. In order to create a query, click on the Create Query button.
2. Determine if the query is to:
a. Meet All questions asked within the query.
b. Meet Any questions asked within the query (meaning that a
transaction only has to meet one of the criteria to appear in the
query).
3. Select your choice of All or Any from the drop-down box.
4. In the first drop-down box, select the field to query.
5. In the second drop-down box, select the variable of the query:
a. Is between will create a range between two dates or two
amounts.
b. Contains is recommended for all text field searches.
14
PaymentNet: User Manual
© 2004 J.P. Morgan Chase & Co.
rev.10/06
6. Fill in the last box with the appropriate value.
Field
Variable
Value
7. To add additional criteria rows, click the plus button ( ). Click the
delete ( ) button to remove one row of criteria. Click
to
clear all information and begin a new query. Click
to
revert to your previous query. Repeat Steps 4-7 until your query is
completed.
8. Click
.
9. Your results will now display on the Transaction List page.
Save a Query
If you need to run this query often, you can now save the query by clicking on
button. You will be prompted to type in a name for the query.
the
This saved query will then appear in the “Select a View” drop-down box.
Delete a Query
In order to delete a query, first select that query from the “Select a View” dropdown box and click
. Once the information has populated on the Transaction
button.
List page, click the
Create Reports
Now that we’ve seen the Transaction List page, as well as the functions available
for individual transactions, we are going to create reports from transaction data.
Select All Reporting from the menu drop-down list. There are five different
categories of reports:
15
PaymentNet: User Manual
© 2004 J.P. Morgan Chase & Co.
rev.10/06
Selecting each option next to the category will display a different set of reports.
Note The Program Administrator can restrict which reports are available to
different Roles. However, should anyone between Roles 1-2 (Manager Roles)
have access to cardholder reports, they will only see transactions within their
department.
Submit Criteria and Create a Report
There are three steps to creating a report. Each step will help narrow your report
criteria down and make reports more informative:
1. Input or Bypass Report Criteria
2. Narrow Hierarchy
3. Generate the Report
4. Access the Report
CASE STUDY—As a Program Administrator, you need to run
a report showing cardholders with available limits over
$3500. Follow the steps below and run the report yourself.
1. Input or Bypass Report Criteria
First, click on the “Cardholder Status Report” from the Cardholder/Employee
category of reports.
16
PaymentNet: User Manual
© 2004 J.P. Morgan Chase & Co.
rev.10/06
The report description will show fields that can be used as criteria for narrowing
down your report’s focus.
The next screen allows you to input criteria that will help limit the results of the
and run a report without any
report. However, you can click on
restrictions.
For our case study, we want to restrict the Available Limit report to only show
cardholders who have an available limit over $3,500.00. The criteria are
restricted by three values: Field, Variable, and Value.
•
Change the Field to show “Available Limit.”
•
Change the Variable to show “is greater than or equal to.”
•
Type “3500.00” in the Value.
Field
When finished, click the
Variable
Value
button.
2. Narrow Hierarchy
The hierarchy will closely match your company’s hierarchy (up to nine levels)
and will help you focus the report on a certain department. Hierarchies are
created during implementation. Role 2-4 users can input the desired hierarchy
level and ID, instead of clicking on the various drop-down folders and subfolders to select your hierarchy. For this case study, we’ll go ahead and click the
button.
3. Generate the Report
If you want to regularly run this report, you can click
point.
17
PaymentNet: User Manual
© 2004 J.P. Morgan Chase & Co.
at this
rev.10/06
If desired, enter a file prefix to help identify the report. Now, select the format
you want the report generated in: Adobe PDF, Microsoft Excel, or Microsoft
Word by clicking on the green arrow
next to the format type.
4. Access the Report
PaymentNet automatically loads the Available Download Files page. As soon as
until your
the report is ready, it appears on this page. You may click
report appears. You may also continue using PaymentNet and return to the
Available Download Files page at a later time.
Note Users may select the “Notify me by e-mail when files become available”
box. Choosing this option will send a message to the users e-mail account when
the file is ready to view.
When the file name appears, click on the desired report name. The report will
generate in selected format.
The report should look similar to the following:
All Available Limits
for the cardholders
shown are $3,500 or
higher.
18
PaymentNet: User Manual
© 2004 J.P. Morgan Chase & Co.
rev.10/06
When you are ready to download the report, return to the Available Download
Files page and right mouse-click over the blue text of the report title. Select
“Save Target As” and save the file on your system.
Note If you know you will be using a particular report often, new reports may also
be added directly in the Schedule Auto Reports page. This functionality is
especially helpful for larger reports that may take longer to generate. Auto
Reports are scheduled for generation during off hours and can be accessed at a
later time.
Display and Edit Employee Profiles
Using the menu drop-down list, select Employee/User List to see a summary of
cardholder information, such as accounting code assignments, cardholder status,
etc.
Employee/User Profiles will help:
•
Assign default accounting codes and cost centers
•
Edit e-mail addresses for notification that transactions have not been
reviewed or approved
•
Resynchronize transactions for specific cardholders
Click on an employee to view individual details, including hierarchy, credit
limits and current available balance.
Merchant Profiles
Next, select Merchant Profile List from the menu drop-down list. This section of
PaymentNet will enable you to:
19
•
Modify merchant information, including 1099/TIN data (however, with
enhanced data reporting, some of this information may be automatically
filled out, depending on the merchant’s capabilities.)
•
Assign default accounting codes and cost centers to merchants
•
Export merchant file for other accounting purposes
PaymentNet: User Manual
© 2004 J.P. Morgan Chase & Co.
rev.10/06
FEEDBACK
At JPMorgan Chase, we strive to produce the highest quality documentation for
our products and welcome your feedback. If you have comments or suggestions
about our online Help or printed manuals, you can e-mail us.
Please include the following information with your feedback:
•
Product Name
•
Printed manual or online Help
•
Topic title (for online Help)
•
Page number (for printed material)
•
Brief description of content (for example, are you reviewing step-by-step
instructions that are inaccurate, grammatical errors in a specific
paragraph, information that requires clarification or more details, etc.)
•
Your suggestion for how to correct/improve documentation
Please send e-mail messages to: [email protected].
20
PaymentNet: User Manual
© 2004 J.P. Morgan Chase & Co.


![Forms [packet] specific to Licensed Child Care](http://vs1.manualzilla.com/store/data/005750447_1-ace0dbf587046d14d311f9d21e5da3df-150x150.png)