1
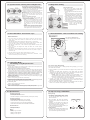
1.0 Introduction
Congratulations on owning your LED Heart Rate Watch.
To get most of your purchase, be sure to read this
manual carefully and keep it on hand for later reference
when necessary.
Although this Watch appeals you with its normal analog
watch outlooks, it includes digital Time, Calendar, Daily
Alarm and Heart rate monitor functions.
In order to utilize the above features of your Watch, it is
advise to use the watch in conformity with the below
notes:
! Avoid exposing your Watch to extreme conditions for
an unreasonable time.
! Avoid rough uses or severe impacts to your Watch.
! Clean the Watch with a soft and moistened cloth
occasionally.
! Store the Watch in a dry place when it is not in use.
! For Battery Replacement, we recommend replacing
the battery by a certified service agency.
LED Heart Rate Watch
User Manual
3.0 Setting the Analog Watch
2.0 Buttons Overview
TIME
Button
Heart Rate
Button
Sensor
Contact
Daily Alarm
Button
Crown
Back Cover
TIME Button [T]
! To select the Current Time Display among
hour-minute, month-day / day-month, day
of week and second
! In Current Time Mode: Hold down the
button to enter the Current Time Setting
Mode
Heart Rate Button [HR]
! Hold down the button to start measuring
Heart Rate
! I n S e t t i n g d i s p l a y : To s e l e c t a m o n g
different setting items
Daily Alarm Button [D]
! To select Daily Alarm Display
! In Setting display: To increase the setting
value
Sensor Contact [S1]
! Heart Rate sensor contact
Back Cover [S2]
! Heart Rate sensor contact
! Battery door
click
Set Analog Time
5 sec.
[Any Key]
NOTE: Check the coming chapters for the
detailed operations.
Hour-Minute
Display
Second Display
How to Set the Analog Watch
! To set the analog time, gently pull out the
crown to the 'click' position.
! When the crown is pull out, the second hand
will be stopped and the digital time will be
flashing.
! Then turn the crown either clockwise or
counter-clockwise until the time is set correctly.
! User can make use of the digital time as a
reference for setting the analog time. Press
any key on the watch can switch displaying
the ‘hour-minute’ or ‘second’ of the digital
time.
! When the time is set, gently push the crown
back to its original position to resume the
normal operation .
Second-hand Alignment
! When pushing the crown back, make sure
that the digital ‘second’ is match with the
analog ‘second’ (the digital ‘second’ is the
same as the second-hand pointing at.)
! IMPORTANT: If the analog ‘second’ and the
digital ‘second’ are not aligned, the
synchronization feature in the digital setting
will be malfunctioned.
! Check the chapter 5.1 for more details on
the synchronization feature in the digital
setting
4.0 Time / Date / Day of Week / Heart rate Display
Sunday
AM
PM
[T]
Monday
*Remark: If [S1] is not pressed at the same time
NO heart rate reading can be acquired
[T]
Tuesday
Wednesday
Current Time
Display
[T]
[HR]*
Heart Rate Mode
Time (hour-minute)
Second
[T]
Note: If there is no key stroke for
3 seconds, the watch will turn OFF the
LED display automatically
Daily Alarm Display
Thursday
[T]
Auto
Display
[D]
Friday
Saturday
Day of week
Daily Alarm Mode
Date (month-day)
Alarm Time
(If Alarm is set ON)
5.0 Current Time and Date Setting
Hold [T] 2 sec
[HR]
[HR]
[HR]
[T]
Reset Second*
Current Time Display
Set Minute
[HR]
[HR]
[HR]
*Remark: When the Second is
reset the second-hand of the
analog watch will be synchronized
at the same time.
Set Year
Set Hour
Set Time format
(12 hour /
24hour)
[HR]
Set Date format
(day-month /
month-day)
[D]:
Increase number/
Change setting
[HR]
Set Day
Hold [D]:
Increase number
in a faster speed
Set Month
How to Set Date and Time
! Hold down the [T] button in Current Time Display to select setting
display, and the second digits will start flashing:
! Press the [HR] button to select the target setting item among different
setting items (second, minute, hour, year, month, day, date format and
time format).
! When the 'second' is selected, press the [D] button to reset 'second' to
zero and the watch will synchronize the analog and digital ‘second’.
! NOTE: Check for the chapter 5.1 for more details on the
synchronization feature.
! When the 'Date format' or 'Time format' is selected, press the [D]
button to select display format.
! When other setting is selected, press the [D] button to increase the
setting value (hold down the button to increase the setting value
faster).
! If the setting is completed, press the [T] button once to return to
current time display.
! If there is no key stroke for 1 minute, it will exit the setting mode
automatically.
5.1 Synchronization of Analog Time and Digital Time
Second-hand
Stopped
Analog and
Digital time
Synchronized
Example 1
(reset before 30 second)
Second-hand
fast moving
Analog and
Digital time
Synchronized
Example 2
(reset after 30 second)
Synchronization of analog time and digital time
! Generally, the analog time and the digital time of a
ana-digit watch will have a little bit asynchronous
because they are two independent time systems
which need user to set their time manually.
! However, this watch can synchronize the analog and
digital time so that they will run exactly in phase.
IMPORTANT: Make sure the Second-hand Alignment
has been performed while setting the analog time,
otherwise, the synchronization feature will be
malfunctioned.
How the synchronization implement
! When the digital ‘second’ reset, the watch will
perform one of the following actions to do the
synchronization automatically:
! Case 1: If the current digital ‘second’ is smaller
than 30 sec, e.g. 12 sec, when the ‘second’ reset,
the second-hand will be stopped until the ‘second’
are matched. (e.g. The second-hand wait until
digital ‘second’ is also 12, then continuous
running)
! Case 2: If the current digital ‘second’ is larger or
equals to 30 sec, e.g. 45 sec, when the ‘second’
reset, the second-hand will move fast forward to 0
and the digital ‘minute’ will be advanced by one.
7.0 Heart Rate Mode - Precautions / Tips
PRECAUTIONS/TIPS
! One of the heart rate sensor contact [S2] is located on the back of the
watch. This contact must make firm contact with the user's skin during
measurement.
! DO NOT take heart rate measurement when diving or under water.
! Clean the Back Cover occasionally by applying a few drops of water, and
wipe it dry with a paper towel to remove any residual grease.
! DO NOT use hand cream; it will insulate the signal between the skin and
the contacts.
! Clean your skin and fingers with soap and water for a better signal
transmission.
! DO NOT use the fingertips where the skin is dry and thick. For those with
extremely dry skin, moisten fingers and wrist with tap water or apply a
conductive gel.
! Hold the watch firmly when taking measurement in motion.
! Avoid doing any awkward motion during measurement, otherwise, it will
create an inaccuracy heart rate reading.
6.0 Daily Alarm Setting
[T]
Daily Alarm display
(Alarm is OFF now)
Hold [D] 2 sec
[HR]
Set Alarm Minute
Set Alarm OFF
[D]
[HR]
How to Set Alarm Time
! Hold down the [D] button in Daily Alarm
Display to select setting display, and the “ON” /
“OF” will start flashing:
! Press the [D] button to switch ON or OFF the
alarm.
! Press the [HR] button to select the target
setting item among different setting items
(alarm ON/OFF, alarm hour, alarm minute).
! When alarm hour or minute is selected,
press the [D] button to increase the setting
value (hold down the button to increase the
setting value faster).
! If the setting is completed, press the [T]
button once to return to current time display.
! If there is no key stroke for 1
[D]:
minute, it will exit the setting
Increase number/
Change setting
mode automatically.
[HR]
Set Alarm ON
Set Alarm Hour
Hold [D]:
Increase number
in a faster speed
7.1 Heart Rate Mode - How to Get Heart rate reading
Make sure [S2] on the
back of the watch sits
firmly on the skin
Then, press the [HR] button with
your index finger for about 5 seconds
user's wrist
Press [S1]
with your thumb
Hold [HR] & [S1]
Any Display Mode
Heart Rate Measuring
(” ” icon appears)
Heart Rate Measured
7.2 Heart Rate Mode No Reading / Long Response time
1) Cause: Dry Skin.
Solution: Apply conductive gel or saliva thoroughly to fingers and wrist area. (Even water /
saliva will help if conductive gel is not available).
2) Cause: Fingers are not placed firmly over the sensors.
Solution: Make sure fingers (not the tips) press firmly over the sensors and watch is placed
securely on wrist. Do not use the very tips of your fingers (i.e. visualize tip toeing with your
fingertips.) Fingertips do not allow for enough contact, therefore, ECG will not be picked up.
3) Cause: Muscle tremors, caused by: A) Pressing down too hard on the sensors with
fingertips. B) Person is in motion and holding the watch in an awkward manner.
Solution: It is best to place your thumb on the sensor contact [S1], and index finger on the
[HR] button. This will ensure good and consistent readings even while walking or jogging
with arms swing naturally.
4) Cause: Dead skin on wrist.
Solution: Usually rubbing your skin with a towel will help.
5) Cause: A thin layer of body grease can insulate the ECG signal-basically prevents
the back sensor on the watch from picking up one's ECG.
Solution: Wipe wrist and the back of watch with a tissue or soft towel.
6) Cause: Hairy arms.
Solution: Apply conductive gel to wrist area.
7) Cause: Irregular heartbeats.
Solution: N/A It is difficult to consistently pick up a reading for those with irregular heart
beats. Inconsistent response times are expected for those with arrhythmia.
How to Get a Heart Rate Reading
During any functional mode or display (except setting display), you can get
your heart rate as follows:
! Wear the Watch on your wrist and make sure [S2] is firmly contact with
the wrist.
! Hold down the [HR] button and [S1] by your index finger and thumb
respectively to start, then the “Heart” icon is appeared. If the heart rate is
acquired, the display will show your heart rate reading.
! NOTE: When heart rate is measuring, the second-hand of the
analog watch will be stopped until the measurement is finished.
! When the analog watch is resumed, the second-hand will be fastmoving to synchronize the time with digital watch.
! If there is no heart rate acquired for 40 seconds or [HR] button is
released before heart rate is acquired for more than 1 seconds, the watch
will stop measuring and return to previous display.
! After the heart rate reading is acquired, the measured heart rate will be
shown for 10 seconds if the [HR] button is kept holding.
8.0 Specifications
9.0 Tips for Using a LED Watch
Timekeeping (Analog)
! Time System: Quartz movement
! Hands: 3 hand (hour, minute and second) / 2 hand (hour, minute)
Timekeeping (Digital)
! Time System: AM, PM, Hour, minute, second
! Calendar: Month, date and day of week display
! Time Format: 12-hour or 24-hour format selectable
! Calendar format: Month-Date or Date-Month selectable
Heart Rate Monitor
! Range: 40 ~ 240 bpm
Battery
! Battery Type: 3V lithium
! Battery model: CR2032
! Battery in use: 1 piece
Battery Usage
! In general, Light Emitted Diode (LED)
watches give a brighter digits to user, so that
you can see the digits clearly even in the
dark environment.
! But, this Watch, like most LED watches,
consumes more power if the LED turn ON
frequently.
! Therefore, to save power, this watch will
automatically turn OFF the LED display if
there is no key stroke for 3 seconds.
! If the LED intensity is getting weaker, you
may need to replace the battery.
Display Viewing
! In order to have a better viewing effect under
direct sun light or strong light source, use
your hand to block light source will help.