1
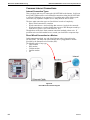
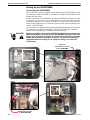
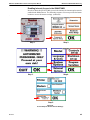
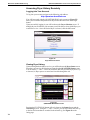
Web-Based QUANTUM® Monitoring
BROCK® QUANTUM® Controller Owner/Operator Manual
Web-Based QUANTUM® Monitoring
Features
Web-Based QUANTUM® Monitoring allows the viewing
of the QUANTUM® drying process remotely via a smart
phone, tablet, PC or Mac with an internet connection.
The following features are supported with Web-Based
Monitoring:
• Remote viewing of the Dryer Status screen and the last
sixteen (16) Dryer passes
• Remote viewing of the Dryer Alarm Log
• Remote viewing of the Dryer Settings for easy system
diagnostics
• Text alerts when the Dryer experiences an alarm
• Future QUANTUM® software updates delivered as a
direct download to the QUANTUM®
System Requirements
Because of the longevity of the QUANTUM® Monitor,
support is only provided for the two latest QUANTUM®
Monitors. These two Monitors are referred to as the EB
and PL Monitors. Identification of these Monitors can be
Figure 42.
found on page 61.
Web-Based Apps
A wired internet connection must also be provided at the
QUANTUM®. There are several methods by which a
connection can be made. The three most typical
connections are shown on pages 62-63.
•
Finally, for viewing the QUANTUM remotely, the following is recommended.
For viewing on PC or Mac:
For viewing on a Smartphone or Tablet
• Google Chrome 23.0 or newer
• Iphone 4/4s/5
• Firefox 16.0 or newer
• Andriod 3.0 or higher
• Safari 5.1 or newer
• Ipad running iOS 5.1.1 or higher
• IE 10.0 or newer
• Opera 12.1 or newer
IMPORTANT!
The BROCK® Web-Based QUANTUM® Monitoring System allows near real-time remote viewing of
certain types of data from your QUANTUM®-managed Dryer, from any compatible computer, tablet
or smart phone device.
This System DOES NOT PROVIDE FOR ANY CONTROL or changes of Dryer settings.
It DOES NOT PROVIDE FOR STOPPING the Dryer remotely.
Please be aware that there can be a time lag between actual onsite changes to the QUANTUM® and
that data displayed remotely on the Web-Based Monitoring System. Additionally, due to the nature of the
SMS Text Messaging system, there may also be a time lag between the OCCURRENCE of an event
recorded by the QUANTUM® and the notification (receiving) of that event to any remote device.These
lag times may vary depending upon several variables, including but not limited to internet and/or cellular
data connection speeds.
Finally, although Brock makes every effort to make the Web-Based Quantum Monitoring System
available at all times, the system may be unavailable at times for various reasons, including but not
limited to web site maintenance.
Thus, the Web-Based Monitoring System is not to be relied upon or used in place of the proper Dryer
operation and maintenance measures described in this Manual herein, particularly with regard to the
QUANTUM® alarm alert function. The Web-Based Monitoring System is intended as a tool for
providing Users with non-time sensitive reports and data via alternate communication devices.
Brock shall not be held liable for damages resulting from any other use of this Web Based Monitoring
System, or the information provided therein.
The User’s failure to provide adequately trained onsite personnel may result in equipment damage
and may void the Dryer and/or QUANTUM® Warranty.
60
MFH1978E
BROCK® QUANTUM® Controller Owner/Operator Manual
Web-Based QUANTUM® Monitoring
QUANTUM® Model Identification
The most accurate way to identify the Monitor version that you have is by checking
the software version in the QUANTUM® hidden menus. To access the hidden menu,
press the lower left arrow while on the Status Screen (the screen with the Wet and
Dry graphs).
At this time, also record the
Model Number displayed in the
top left box. This is the Dryer
Serial Number entered into the
QUANTUM®. This number must
be entered exactly when adding
this Dryer to your web monitoring
account in a later step. (Example:
SQ40C34206121M would be
recorded now and entered later.)
In the second box down on the
left, the Program Version
will be listed. If the third and
fourth digits are EB or PL,
then the QUANTUM® has the
required hardware to access
the internet.
If these digits are SX or DX,
the QUANTUM® will not be
able to use Web-Based
Monitoring.
Figure 43.
Accessing the Hidden Menus
MFH1978E
61
Web-Based QUANTUM® Monitoring
BROCK® QUANTUM® Controller Owner/Operator Manual
Common Internet Connections
Internet Connection Types
There are three main ways to connect the QUANTUM® to the internet. In all cases
the QUANTUM® must have a wired Ethernet connection exiting the QUANTUM®.
A wireless USB dongle is not supported. If a problem arises when setting up the
connection, any reputable computer service shop should be able to assist.
The three main connection types are listed below in order of complexity:
• Direct Wired connection to a modem
• Wired connection to a wireless bridge that accesses a local wireless network
• Wired connection to a wireless bridge that accesses a WiFi Hotspot created by a
smart device (Iphone, Ipad, Android device, etc..)
Though these are the three most common connection methods, others exist. If
questions arise on which method to use, consult your local ISP or computer shop.
Direct Wired Connection to a Modem
In this connection method, one end of the Ethernet cable is plugged into the
QUANTUM®. The other end of the Ethernet cable is plugged into a modem
provided by the Internet Service Provider (ISP).
The Modem can be of any type:
• Cable modem
• DSL modem
• Cellular modem
• Satellite modem
• etc.
Internet
Figure 44.
Direct Wired Connection Diagram
62
MFH1978E
BROCK® QUANTUM® Controller Owner/Operator Manual
Web-Based QUANTUM® Monitoring
Wired Connection to a Wireless Bridge that Accesses
a Wireless Network
In this connection method, one end of the Ethernet cable is plugged into the
QUANTUM®. The other end of the Ethernet cable is plugged into a wireless bridge.
The wireless bridge communicates with the local wireless network provided by the
wireless router. The wireless router provides the access to the internet either from a
built in modem or a connection to an external modem provided by the ISP.
Internet
Figure 45.
Wireless Bridge to Wireless Router
Connection Diagram
Wired Connection to a Wireless Bridge That Accesses
a Local WiFi Hotspot
This connection is very similar to the previous connection. In this case the Ipad or
other smart device creates a local wireless network by using its WiFi Hotspot
functionality. This can be done with any device that can create a WiFi Hotspot and
has a connection to a cellular 3G and/or 4G network.
Figure 46.
Wireless Bridge to Local WiFi Hotspot
Connection Diagram
MFH1978E
63
Web-Based QUANTUM® Monitoring
BROCK® QUANTUM® Controller Owner/Operator Manual
Setting up the QUANTUM®
Connecting the QUANTUM®
DANGER!
Once an internet connection is supplied to the location of the QUANTUM®, it must
be connected to the QUANTUM®. A standard Cat5e Ethernet cable should be used
to make this connection.
In order to gain access to the Ethernet port on the QUANTUM®, the back cover must
be removed. A 5/16” nut driver or wrench should be used to remove the twelve (12)
acorn nuts holding the cover in place. With the cover removed, the cable should be
inserted into the Ethernet port. The Ethernet port’s location varies depending on the
version of QUANTUM®.
Once connected, the Ethernet cable should be threaded through the hole in the back
cover and the cover should be reinstalled. The other end of the cable should be
connected to the equipment providing the internet connection.
Electricity can KILL! Use extreme CAUTION around electrical components.
UNPLUG the Monitor from electrical power BEFORE opening for thsi step.
Failure to do so will result in death or serious injury. Brock Grain Systems
neither will be liable for damage to the Dryer or to person(s) because of
unqualified electrical testing or use. Improper testing or use will void
the Warranty.
Figure 47.
Ethernet Port Location
on PL QUANTUM®
Detail
Detail
Figure 48.
Ethernet Port Location
on EB QUANTUM®
64
MFH1978E
Web-Based QUANTUM® Monitoring
BROCK® QUANTUM® Controller Owner/Operator Manual
Enabling Internet Access in the QUANTUM®
In order to allow the QUANTUM® to access the internet, the internet option must be
enabled in the hidden menus. The following sequence of screens provides the button
location to access the internet settings. (continued)
.
Step 1.
Step 2.
Step 4.
Step 3.
Step 5.
Figure 49.
Screen Steps to Access Internet Settings
MFH1978E
65
Web-Based QUANTUM® Monitoring
BROCK® QUANTUM® Controller Owner/Operator Manual
Enabling Internet Access in the QUANTUM® (continued)
To enable the internet option, press the upper left arrow labeled Enabled IP
Network. This will place a check mark in the box and activate the IP network. The
QUANTUM® should then be power cycled (turn the power off, wait a few seconds,
and turn the power back on). This allows the QUANTUM® to obtain an IP Address.
Press the upper left button to put a
check mark in the Enable IP
Network box. This will allow the
QUANTUM® to access the
Figure 50.
Internet Setup Screen
As the QUANTUM® software loads, it will
now check online to see if a new version of
software is available. At this point you can
accept or decline the software download. It
is highly recommended that you download
all new software updates. The software will
contain bug fixes, as well as new features for
both the Dryer and the internet monitoring
feature. Deciding not to update the software
can result in a subpar user experience.
Figure 51.
Program Update Acceptance Screen
Once the QUANTUM® has rebooted, the internet connection should be checked to
verify that everything is operating properly. To do this, navigate back to the Internet
Setup Screen using the step-by-step guide found on page 65.
Before entering the Internet Setup Screen, you should have additional information
displayed on the Internet setup button. The first line is the MAC address and can be
used to do advanced MAC filtering on the network if needed. The second line is the
IP address of the QUANTUM®. If this is 0.0.0.0, a connection problem exists.
Verify the Ethernet cable is plugged in properly and that an internet connection can
be obtained by connecting a laptop or other device to the bridge, modem or router
being used.
The QUANTUM’s MAC address, as well
as the assigned IP address, is now displayed
on the Internet Setup Button.
Figure 52.
System Options Screen
66
MFH1978E
BROCK® QUANTUM® Controller Owner/Operator Manual
Web-Based QUANTUM® Monitoring
As a final test to verify everything is working properly, press the Test File Transfer
button. An X will briefly appear in the box as the required files are sent to the website.
To verify the files have been sent, refer
to the File Transfer Count box on the
left-hand side of the screen. If the top
number increments up, the transfer was
a success. If instead the bottom number
increments, a connection problem still
exists. Verify that you can access the
internet using another device.
Figure 53.
Inernet Setup Screen
Setting an Access Code and File Transfer Rate
Before you can access your QUANTUM® data using the web, you must first enter a
File Access Code. This numeric code will prevent unauthorized users from viewing
your Dryer history online. Make note of the File Access Code entered, as this in
conjunction with the Dryer Serial Number recorded earlier will be needed when
adding the Dryer to your QUANTUM® Web Account in a future step.
To enter a File Access Code, hit the arrow
beside the File Access Code button. Using
the “+” and “-” arrows and the arrow
beside OK, enter a 4-6 digit number.
By pressing the arrow beside
the Transfer Rate box, you
can select how frequently
updates are sent to the web.
You can choose between
1/16, 1/8 and 1/4 of a
Dryer pass.
Figure 54.
Internet Setup Screen
MFH1978E
This setting allows you to
reduce the amount of data
being sent in the case that
you are using an internet
connection with a restriction
on the amount of data that
can be used each month.
67
Web-Based QUANTUM® Monitoring
BROCK® QUANTUM® Controller Owner/Operator Manual
Creating a Web Account
To begin creating an account, navigate to the following web address:
http://quantum.brocklink.com
You will be greeted with the
QUANTUM® Web Login
screen. At the bottom of the
screen a link is available to
create an account. Click the
“Create an Account” link to
begin the account creation
process.
Figure 55.
QUANTUM® Web Login Screen
To create an account, fill out
all requested information.
Your email address will only
be used to login and for
password retrieval in the event
of a forgotten password.
Your password should be a
unique password and must be
at least 8 characters long.
A verification email will be
sent to you after successful
account creation.
Figure 56.
QUANTUM® Web Account Creation Screen
Linking Dryers to Your Account
After creating an account and verifying your email address by clicking on the link
sent to you in your verification email, you can begin linking dryers to your account.
To begin, again navigate to the above web address: http://quantum.brocklink.com.
Login using your email address and password used in the account creation process.
See Figure 55 above.
Upon successfully logging in
for the first time, you will be
greeted with a message
allowing you to quickly begin
managing your account.
Click on the provided link to
begin managing your account.
Figure 57.
QUANTUM® Web Account Welcome Screen
68
MFH1978E
BROCK® QUANTUM® Controller Owner/Operator Manual
Web-Based QUANTUM® Monitoring
The Dryer Serials box will contain all Dryers linked to your account. You can delete
these Dryers or manage their settings by clicking on the desired Dryer and then
clicking the VIEW/EDIT button or DELETE button.
To add a dryer to your account, click the ADD button.
To change your password, click the CHANGE PASSWORD button. A dialog will be
displayed allowing you to enter a new password.
Figure 58.
QUANTUM® Web Account Management Screen
IMPORTANT!
IMPORTANT!
The Add Dryer dialog allows you to add a new dryer to your account.
The Serial Number entered MUST MATCH the serial number in the
QUANTUM® monitor. See page 61 for details.
The Name is used to help identify the Dryer for accounts that have multiple dryers
entered. This field is optional.
Finally, the Access Code must match the Access Code entered in the
QUANTUM®. See page 67 for details.
Once all items are entered, click the OK button to add the dryer to the list of dryers
linked to your account.
When complete, click the Exit button to return to the Dryer Selection Screen.
Figure 59.
Add Dryer Dialogue Screen
MFH1978E
69
Web-Based QUANTUM® Monitoring
BROCK® QUANTUM® Controller Owner/Operator Manual
Accessing Dryer History Remotely
Logging into Your Account
To log into your account, navigate to the following web address:
http://quantum.brocklink.com
You will be greeted with the QUANTUM® Web Login screen (see Figure 55).
Enter your Username and password in the provided area and click on the login
button.
Upon successfully logging in you will be taken to the Dryer Selection screen. If
multiple dryers are linked to your account you will be able to select which Dryer you
would like to view. Once the desired dryer is selected, click the OK button.
Figure 60.
Dryer Selection Screen
Viewing Dryer History
Upon selecting the desired Dryer to view, you will be taken to the Dryer Status screen.
From here you can view all items that are located on the QUANTUM® Status screen.
You can use the “+” and “-” arrows to scroll back and view previous Dryer passes. Up
to sixteen (16) Dryer passes are stored and viewable through the web.
Figure 61.
QUANTUM® Web Status Screen
Pressing the STATUS/LOG button will cycle between the Status Screen and the
Alarm Log Screen. Using the “+” and “-” arrows, you can scroll back and view up
to the last 100 items that are recorded in the Alarm Log. See Figure 62 on the
facing page.
70
MFH1978E
BROCK® QUANTUM® Controller Owner/Operator Manual
Web-Based QUANTUM® Monitoring
Figure 62.
Dryer Alarm Log Screen
Viewing Dryer Settings
When the OPTIONS button is pressed, a
popup will be displayed allowing
access to several additional features.
From here you can switch to a different
Dryer linked to your account, set up text
messaging options, view all Dryer
settings, and logout of your account.
Pressing the SHOW QUANTUM®
SETTINGS button will take you to the
Settings screen (below). From here you
can view all Dryer settings. This will
allow you to remotely verify settings as
well as assist in diagnosing problems.
Figure 63.
QUANTUM® Web
Options Popup
Figure 64.
Dryer Settings Screen
MFH1978E
71
Web-Based QUANTUM® Monitoring
BROCK® QUANTUM® Controller Owner/Operator Manual
Enabling SMS Text Alerts
Pressing the TEXT MESSAGING OPTIONS button on the Web Options popup
(Figure 63) will allow you to enable text alerts and enter the phone number that you
would like the alerts sent to.
Figure 65.
SMS Text Alerts Options Popup
Figure 66.
Alarms That Will Generate a Text Alert
EXAMPLE TEXT ALERTS
72
MFH1978E
BROCK® QUANTUM® Controller Owner/Operator Manual
Web-Based QUANTUM® Monitoring
Troubleshooting
Problem
Solution
1) Verify cookies are enabled in browser
settings
Redirected back to Login screen after
2) Clear Cache
logging in
3) Add an exception in anti-virus
software for quantum.brocklink.com
1) Reboot QUANTUM®, attempt
transfer again
QUANTUM® File Transfer Count does 2) Verify a valid IP address is displayed
not increment properly after clicking
on the External Options Screen
Test File Transfer.
3) Hook a laptop or other device up to the
Ethernet cable and verify a connection
can be obtained.
After selecting a Dryer on the Dryer
Selection Screen, the Web Status Screen 1) Verify that you are using a supported
will not load or does not function
browser and that it is the latest version
properly
MFH1978E
73