1
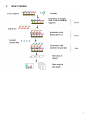
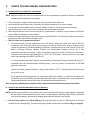
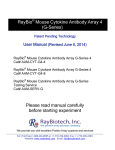
RayBio® C-Series Human RTK Phosphorylation Antibody Array C1 For the semi-quantitative detection of 71 phosphorylated human receptor tyrosine kinases (RTKs) in cell and tissue lysates Patent Pending Technology User Manual (Revised April 14, 2015) Cat# AAH-PRTK-1-2 (2 Sample Kit) Cat# AAH-PRTK-1-4 (4 Sample Kit) Cat# AAH-PRTK-1-8 (8 Sample Kit) Please read manual carefully before starting experiment Tel: (Toll Free) 1-888-494-8555 or +1-770-729-2992; Fax: +1-770-206-2393; Website: www.raybiotech.com Email: [email protected] 0 C-Series Antibody Arrays TABLE OF CONTENTS I. II. III. IV. V. VI. VII. VIII. IX. X. XI. XII. Introduction……………………………………………………………………………………………………. How It Works…………………………………………………………………………………………………. Components and Storage……………………………………………………………………... Additional Materials Required…………………………………………………………… Sample Tips and General Considerations…………........................... A. Sample Collection, Preparation, and Storage……………......... B. Sample Types and Recommended Dilutions/Amounts C. Handling Membranes……………………………………….................................... D. Incubations and Washes………………………………………………..................... Chemiluminescence Detection Tips……………………….......................... Component Preparation…………………………................................................. Protocol………………………………………………………......................................................... A. Blocking…………………………................................................................................. B. Sample Incubation………………………………………………................................... C. First Wash………………………………………………....................................................... D. Biotinylated Antibody Cocktail Incubation…………………………. E. Second Wash………………………………………………………………………………............... F. HRP-Streptavidin Incubation…………………………………………………………. G. Third Wash………………………………………………………………………………………………... H. Chemiluminescent Detection………………………………………………......... I. Storage…………………………………………………………………………………………………………… Typical Results……………………………………………………………..................................... Interpreting the Results…………………………………………………………………………. A. Control Spots……………………………………………………………………………………………. B. Data Extraction……………………………………………………………………………….......... C. Data Analysis………………………………………………………………………………………....... Array Map…………………………………………………………………………….............................. Troubleshooting Guide…………………………………………………………………………... 2 3 4 4 5 5 5 5 6 6 7 8 8 8 8 8 9 9 9 9 10 10 11 11 11 11 13 14 1 I. INTRODUCTION Protein phosphorylation plays an unusually prominent role in cell signaling, development and growth. The RayBio Human RTK Phosphorylation Antibody Array C1 is a very rapid, convenient and sensitive assay to simultaneous detect multiple protein phosphorylations and can be used to monitor activation or function of important biological pathways. RayBiotech is committed to developing a series of phosphorylation antibody arrays. Our first product in this series is RayBio Human RTK Phosphorylation Antibody Array C1, which is specifically designed for simultaneously identifying the relative levels of phosphorylation of 71 different human receptor tyrosine kinases (RTKs) in cell lysates. By monitoring the changes in protein tyrosine phosphorylation in your experimental model system, you can verify pathway activation in your cell lines without spending excess time and effort in performing an analysis of immunoprecipitation and/or Western Blot. By using RayBio Human RTK Phosphorylation Antibody Array C1, treated or untreated cell lysate is added into antibody array membranes. The antibody array membranes are washed and biotinylated antiphosphotyrosine antibody is used to detect phosphorylated tyrosines on activated receptors. After incubation with HRP-streptavidin, the signals are visualized by chemiluminescence. RayBio® C-Series Antibody Arrays have several advantages over detection of cytokines using single-target ELISA kits: 1. More Data, Same or Less Sample: Antibody arrays provide high-content screening using about the same sample volume as traditional ELISA. 2. Global View of Cytokine Expression: Antibody array screening improves the chances for discovering key factors, disease mechanisms, or biomarkers related to cytokine signaling. 3. Similar (sometimes better) Sensitivity: As little as 4 pg/ml of MCP-1 can be detected using the C-Series array format. In contrast, our similar MCP-1 ELISA assay has a sensitivity of 40 pg/ml of MCP-1. 4. Increased Range of Detection: ELISA assays typically detect a concentration range of 100- to 1000-fold, however, RayBiotech arrays can detect IL-2 at concentrations of 25 to 250,000 pg/ml, a range of 10,000-fold. 5. Better Precision: As determined by densitometry, the inter-array Coefficient of Variation (CV) of spot signal intensities is 5-10%, comparing favorably with ELISA testing (CV = 10-15%). 2 II. HOW IT WORKS 3 III. COMPONENTS AND STORAGE Store kit at ≤ -20 °C immediately upon arrival. Kit must used within the 6 month expiration date. AAH-PRTK-14 AAH-PRTK-18 STORAGE TEMPERATURE AFTER THAWING** Antibody Arrays 2 membranes 4 membranes Blocking Buffer 1 vial (25 ml) Biotinylated Anti-Phosphotyrosine 3 1 vial 2 vials Antibody 1,000X HRP-Streptavidin 4 1 vial (50 µl) Concentrate 5 20X Wash Buffer I Concentrate 1 vial (30 ml) 6 20X Wash Buffer II Concentrate 1 vial (30 ml) 7 2X Cell Lysis Buffer Concentrate 1 vial (5 ml) 8 Detection Buffer C 1 vial (1.5 ml) 9 Detection Buffer D 1 vial (1.5 ml) 10 8-Well Incubation Tray w/ Lid 1 tray 11 Protease Inhibitor Cocktail 1 vial 12 Phosphatase Inhibitor Cocktail II 1 vial Other Kit Components: Plastic Sheets, Array Map Template, User Manual *Each package contains 2 or 4 membranes **For up to 3 months (unless stated otherwise) or until expiration date 8 membranes 2 vials (25 ml/ea) ≤ -20 °C ITEM COMPONENT AAH-PRTK-12 1 2 IV. • • • • • • 4 vials 2-8 °C (for up to 3 days after dilution) 2 vial (30 ml/ea) 2 vial (30 ml/ea) 1 vial (5 ml) 1 vial (2.5 ml) 1 vial (2.5 ml) 2 vials 2 vials 2-8 °C Room Temperature ≤ -20 °C ADDITIONAL MATERIALS REQUIRED Pipettors, pipet tips and other common lab consumables Orbital shaker or oscillating rocker Tissue paper, blotting paper or chromatography paper Adhesive tape or plastic wrap Distilled or de-ionized water A chemiluminescent blot documentation system: o CCD Camera o X-Ray Film and a suitable film processor o Gel documentation system o Or another chemiluminescent detection system capable of imaging a western blot 4 V. SAMPLE TIPS AND GENERAL CONSIDERATIONS A. Sample Collection, Preparation, and Storage NOTE: Optimal methods will need to be determined by each experimenter empirically based on researched literature and knowledge of the samples. • • • • • • • If not using fresh samples, freeze samples as soon as possible after collection. Avoid multiple freeze-thaw cycles. If possible, sub-aliquot samples prior to initial storage. It is strongly recommended to add a protease inhibitor cocktail to cell and tissue lysate samples. Avoid sonication of 1 ml or less as this can quickly heat and denature proteins Most samples will not need to be concentrated. If concentration is required, a spin column concentrator with a chilled centrifuge is recommended. Always centrifuge the samples hard after thawing (~10,000 RPM for 2-5 minutes) in order to remove any particulates that could interfere with detection. The Cell Lysate can be prepared as follows: • For attached cells, remove supernatant from cell culture, wash cells twice with cold 1X PBS (for suspension cells, pellet the cells by spinning down the cells at 1500 rpm for 10 min) making sure to remove any remaining PBS before adding Lysis Buffer. Solubilize the cells at 2x10⁷ cells/ml in 1X Lysis Buffer containing Protease Inhibitor Cocktail and Phosphatase Inhibitor Cocktail Set II (see preparation note shown on page 7 under Component Preparation Section). Pipette up and down to resuspend cells and rock the lysates gently at 2–8 °C for 30 minutes. Transfer extracts to microfuge tubes and centrifuge at 14,000 x g for 10 min. It is recommended that sample protein concentrations be determined using a total protein assay. For incubation with the Phosphorylation Antibody Array I, use at a protein concentration of 50-1000 µg/ml for cell lysates. Lysates should be used immediately or aliquot and stored at -70 °C. Thawed lysates should be kept on ice prior to use. If you experience high background, you may further dilute your samples. If signals are too weak, the cell lysates can be pretreated by immunoprecipitations before incubation with array membranes. Immunoprecipitations can be done using anti-phosphotyrosine and protein A. General tips for preparing lysate samples can be viewed on the online Resources page of the website. B. Sample Types and Recommended Dilutions/Amounts NOTE: Optimal sample dilutions and amounts will need to be determined by each experimenter empirically but the below recommendations may be used as a starting point. Blocking Buffer (ITEM 2) should be used to dilute samples. Normalize by loading equal amounts of protein per sample. • Cell and Tissue Lysates: load 50 to 1000 µg of total protein (after at least a 5-fold dilution to minimize the effect of any detergent(s)). Therefore the original lysate concentration should be 250 µg to 5 mg/ml. 5 C. Handling Membranes • • • The antibody printed side of each membrane is marked by a dash (-) or number (#) in the upper left corner. Do not allow membranes to dry out during the experiment or they may become fragile and break OR high and/or uneven background may occur. Grasp membranes by the corners or edges only using forceps. DO NOT touch printed antibody spots. D. Incubations and Washes • • • • • • • Perform ALL incubation and wash steps under gentle rotation or rocking motion (~0.5 to 1 cycle/sec) using an orbital shaker or oscillating rocker to ensure complete and even reagent/sample coverage. Rocking/rotating too vigorously may cause foaming or bubbles to appear on the membrane surface which should be avoided. All washes and incubations should be performed in the Incubation Tray (ITEM 10) provided in the kit. Cover the Incubation Tray with the lid provided during all incubation steps to avoid evaporation and outside debris contamination. Ensure the membranes are completely covered with sufficient sample or reagent volume during each incubation. Avoid forceful pipetting directly onto the membrane; instead, gently pipette samples and reagents into a corner of each well. Aspirate samples and reagents completely after each step by suctioning off excess liquid with a pipette. Tilting the tray so the liquid moves to a corner and then pipetting is an effective method. Optional overnight incubations may be performed for the following steps to increase overall spot signal intensities: o Sample Incubation o Biotinylated Antibody Cocktail Incubation o HRP-Streptavidin Incubation NOTE: Overnight incubations should be performed at 4 °C (also with gentle rocking/shaking). Be aware that longer incubations can also increase the background response so complete liquid removal and washing is critical. VI. • • • CHEMILUMINESCENCE DETECTION TIPS Beginning with adding the detection buffers and ending with exposing the membranes should take no more than 10-15 minutes as the chemiluminescent signals may start to fade at this point. Trying multiple exposure times is recommended to obtain optimum results. A few seconds to a few minutes is the recommended exposure time range, with 30 seconds to 1 minute being suitable for most samples. 6 VII. COMPONENT PREPARATION NOTE: Thaw all reagents to room temperature immediately before use. If wash buffers contain visible crystals, warm to room temperature and mix gently until dissolved. NOTE: The Biotinylated Antibody Cocktail (ITEM 3) and the HRP-Streptavidin Concentrate (ITEM 4) vials should be briefly centrifuged (~1000 g) before opening to ensure maximum recovery and mixed well as precipitates may form during storage. ITEM COMPONENT 1 Antibody Arrays 2 Blocking Buffer PREPARATION EXAMPLE No Preparation N/A N/A 3 Biotinylated Antibody Cocktail* Pipette 2 ml of Blocking Buffer into each vial. Mix gently with a pipette. 4 1,000X HRP-Streptavidin Concentrate Dilute 1,000-fold with Blocking Buffer. Mix gently with a pipette. 5 20X Wash Buffer I Concentrate 6 20X Wash Buffer II Concentrate Dilute each20-foldwith distilledor deionized 10 ml of 20X concentrate + 190 ml of water water. = 200 ml of 1X working solution 7 2X Cell Lysis Buffer Concentrate** 8 9 10 Detection Buffer C Detection Buffer D 8-Well Incubation Tray w/ Lid 11 Protease Inhibitor Cocktail 12 Phosphatase Inhibitor Cocktail II Dilute 2-fold with distilledor deionized water. No Preparation 10 µl of 1,000X concentrate + 9990 µl of Blocking Buffer = 10 ml of 1X working solution 10 ml of 2X concentrate + 10 ml of water = 20 ml of 1X working solution N/A Pipette 60 µl of 1X Cell Lysis Buffer into the vial to prepare 100X Protease Inhibitor Cocktail concentrate. Add 180 µl of 1X Lysis Buffer into the vial to prepare 25X Phosphatase Inhibitor Cocktail Set II Concentrate. Dissolve the powder thoroughly by gentle mixing. *1 vial is enough to test 2 membranes **Only for use for preparing cell or tissue lysates. General tips for preparing lysates and other common sample types can be found on the online Resources Page Note: Prior to preparing cell or tissue lysates: Add 20 µl Protease Inhibitor Cocktail Concentrate (100X) and 80 µl Phosphatase Inhibitor Cocktail Set II Concentrate (25X) into 1.9 ml 1X Lysis Buffer immediately before use. Mix well. 7 VIII. PROTOCOL NOTE: Prepare all reagents and samples immediately prior to use. See Sections V and VII. ALL incubations and washes must be performed under gentle rotation/rocking (~0.5-1 cycle/sec) 1) Remove the kit from storage and allow the components to equilibrate to room temperature (RT). 2) Carefully remove the Antibody Arrays (ITEM 1) from the plastic packaging and place each membrane (printed side up) into a well of the Incubation Tray (ITEM 10). One membrane per well. NOTE: The antibody printed side is marked by a dash (-) or number (#) in the upper left corner. A. Blocking 3) Pipette 2 ml of Blocking Buffer (ITEM 2) into each well and incubate for 1 hour at RT. 4) Aspirate blocking buffer from each well with a pipette. B. Sample Incubation 5) Pipette 1 ml of diluted or undiluted sample into each well and incubate for 1.5 to 5 hours at RT OR overnight at 4 °C. NOTE: Longer incubations can help maximize the spot signal intensities. However, doing so can also increase the background response so complete liquid removal and washing is critical. 6) Aspirate samples from each well with a pipette. C. First Wash NOTE: The 20X Wash Buffer Concentrates I and II (ITEM 5 and 6) must be diluted 20-fold before use. See Section VII for details. 7) Wash Buffer I Wash: Pipette 2 ml of 1X Wash Buffer I into each well and incubate for 5 minutes at RT. Repeat this 2 more times for a total of 3 washes using fresh buffer and aspirating out the buffer completely each time. 8) Wash Buffer II Wash: Pipette 2 ml of 1X Wash Buffer II into each well and incubate for 5 minutes at RT. Repeat this 1 more time for a total of 2 washes using fresh buffer and aspirating out the buffer completely each time. D. Biotinylated Antibody Cocktail Incubation NOTE: The Biotinylated Antibody Cocktail (ITEM 3) must be prepared before use. See Section VII for details. 8 9) Pipette 1 ml of the prepared Biotinylated Antibody Cocktail into each well and incubate for 1.5 to 2 hours at RT OR overnight at 4°C. 10) Aspirate biotinylated antibody cocktail from each well. E. Second Wash 11) Wash membranes as directed in Steps 7 and 8. F. HRP-Streptavidin Incubation NOTE: The 1,000X HRP-Streptavidin Concentrate (ITEM 4) must be diluted before use. See Section VII for details. 12) Pipette 2 ml of 1X HRP-Streptavidin into each well and incubate for 2 hours at RT OR overnight at 4°C. 13) Aspirate HRP-Streptavidin from each well. G. Third Wash 14) Wash membranes as directed in Steps 7 and 8. H. Chemiluminescence Detection NOTE: Do not allow membranes to dry out during detection. 15) Transfer the membranes, printed side up, onto a sheet of chromatography paper, tissue paper, or blotting paper lying on a flat surface (such as a benchtop). 16) Remove any excess wash buffer by blotting the membrane edges with another piece of paper. 17) Transfer and place the membranes, printed side up, onto a plastic sheet (provided) lying on a flat surface. NOTE: Multiple membranes can be placed next to each other and fit onto a single plastic sheet. Use additional plastics sheets if necessary. 18) Into a single clean tube, pipette equal volumes (1:1) of Detection Buffer C (ITEM 8) and Detection Buffer D (ITEM 9). Mix well with a pipette. EXAMPLE: 250 μl of Detection Buffer C + 250 μl of Detection Buffer D = 500 μl (enough for 1 membrane) 19) Gently pipette 500 μl of the Detection Buffer mixture onto each membrane and incubate for 2 minutes at RT (DO NOT ROCK OR SHAKE). Immediately afterwards, proceed to Step 20. NOTE: Exposure should ideally start within 5 minutes after finishing Step 19 and completed within 10-15 minutes as chemiluminescence signals will fade over time. If necessary, the signals can usually be restored by repeating washing, HRP-Streptavidin and Detection Buffers incubations (Steps 11-19) 9 20) Place another plastic sheet on top of the membranes by starting at one end and gently “rolling” the flexible plastic sheet across the surface to the opposite end to smooth out any air bubbles. The membranes should now be “sandwiched” between two plastic sheets. NOTE: Avoid “sliding” the top plastic sheet along the membranes’ printed surface. If using X-ray film, do not use a top plastic sheet so that the membranes can be directly exposed to the film. 21) Transfer the sandwiched membranes to the chemiluminescence imaging system such as a CCD camera (recommended) and expose. NOTE: Optimal exposure times will vary so performing multiple exposure times is strongly recommended. See Section VI for additional details. I. Storage 22) To store, without direct pressure, gently sandwich the membranes between 2 plastic sheets (if not already), tape the sheets together or use plastic wrap to secure them, and store at ≤ -20 oC for future reference. IX. TYPICAL RESULTS Typical results obtained with RayBio® C-Series Antibody Arrays Sample-1 Sample-2 Control The preceding figures present typical images obtained with RayBio® C-Series Antibody Arrays. These membranes were probed with conditioned media from two different cell lines. Membranes were exposed with Kodak X-Omat® film at room temperature for 1 minute. Note the strong signals of the Positive Control spots in the upper left and lower right corners. (See below for further details on the control spots.) The signal intensity for each antigen-specific antibody spot is proportional to the relative concentration of the antigen in that sample. Comparison of signal intensities for individual antigen-specific antibody spots between and among array images can be used to determine relative differences in expression levels of each analyte sample-to-sample or group-to-group. 10 X. INTERPRETING THE RESULTS A. Control Spots Positive Control Spots (POS) – controlled amount of biotinylated antibody printed onto the array. Used for normalization and to orientate the arrays. Negative Control Spots (NEG) – buffer printed (no antibodies) used to measure the baseline responses. Used for determining the level of non-specific binding of the samples. Blank Spots (BLANK) – nothing is printed here. Used to measure the background response. B. Data Extraction Visual comparison of array images may be sufficient to see differences in relative protein expression. However, most researchers will want to perform numerical comparisons of the signal intensities (or more precisely, signal densities), using 2-D densitometry. Gel/Blot documentation systems and other chemiluminescent or phosphorescent detection systems are usually sold as a package with compatible densitometry software. Any densitometry software should be sufficient to obtain spot signal densities from your scanned images. One such software program, ImageJ, is available for free from the NIH website along with an array plug-in. We suggest using the following guidelines when extracting densitometry data from our array images: • • • For each array membrane, identify a single exposure that the exhibits a high signal to noise ratio (strong spot signals and low background response). Strong Positive Control Spot signals but not too strong that that they are “bleeding” into one another is ideal. The exposure time does not need to be identical for each array, but Positive Control signals on each array image should have similar intensities. Measure the density of each spot using a circle that is roughly the size of one of the largest spots. Be sure to use the same extraction circle dimensions (area, size, and shape) for measuring the signal densities on every array for which you wish to compare the results. For each spot, use the summed signal density across the entire circle (ie, total signal density per unit area) C. Data Analysis NOTE: RayBiotech offers Microsoft® Excel-based Analysis Software Tools for each array kit for automatic analysis. Please visit the website at www.raybiotech.com or contact us for ordering information. Once the raw numerical densitometry data is extracted, the background must be subtracted and the data normalized to the Positive Control signals to analyze. Background Subtraction: Select values which you believe best represent the background. If the background is fairly even throughout the membrane, the Negative Control Spots (NEG) and/or Blank Spots (BLANK) should be similar and are accurate for this purpose. 11 Positive Control Normalization: The amount of biotinylated antibody printed for each Positive Control Spot is consistent from array to array. As such, the intensity of these Positive Control signals can be used to normalize signal responses for comparison of results across multiple arrays, much like housekeeping genes and proteins are used to normalize results of PCR gels and Western Blots, respectively. To normalize array data, one array is defined as "Reference Array" to which the other arrays are normalized to. The choice of the Reference Array is arbitrary. NOTE: The RayBio® Analysis Software Tools always designate Array 1/Sample 1 as the Reference Array. Next, the simple algorithm below can be used to calculate and determine the signal fold expression between like analytes. X(Ny) = X(y) * P1/P(y) Where: P1 = mean signal density of Positive Control spots on reference array P(y) = mean signal density of Positive Control spots on Array "y" X(y) = mean signal density for spot "X" on Array for sample "y" X(Ny)= normalized signal intensity for spot "X" on Array "y" For example: Let’s determine the relative expression for IL-6 on two different arrays (Arrays 1 and 2). Let's assume that the duplicate signals for the IL-6 spots on each array are identical (or that the signal intensity used in the following calculation is the mean of the two duplicates spots). Also assume the following: P1 = 2500 P2 = 2700 IL-6 (1) = 300 IL-6 (2) = 455 Then IL-6(N2) = 455 *2500/2700 = 421.30 The fold increase of IL-6(N2) vs IL-6(1) = 421.3/300 = 1.40-fold increase or a 40% increase in the signal intensity of IL-6 in Array 2 vs. Array 1. 12 XI. A ARRAY MAP B C D E F G H I J K L 1 POS1 POS1 POS2 POS2 POS3 POS3 ABL1 ABL1 ACK1 ACK1 ALK ALK 2 NEG NEG NEG NEG Axl Axl Blk Blk BMX BMX Btk Btk 3 Csk Csk Dtk Dtk EGFR EGFR EphA1 EphA1 EphA2 EphA2 EphA3 EphA3 4 EphA4 EphA4 EphA5 EphA5 EphA6 EphA6 EphA7 EphA7 EphA8 EphA8 EphB1 EphB1 5 EphB2 EphB2 EphB3 EphB3 EphB4 EphB4 EphB6 EphB6 ErbB2 ErbB2 ErbB3 ErbB3 6 ErbB4 ErbB4 FAK FAK FER FER FGFR1 FGFR1 FGFR2 FGFR2 FGFR2 (α isoform) FGFR2 (α isoform) 7 Fgr Insulin 8 R 9 LTK PDGFR10 α 11 ROS Fgr Insulin R LTK PDGFRα ROS FRK FRK Fyn Fyn Hck Hck HGFR HGFR IGF-IR IGF-IR Itk Itk JAK1 JAK1 JAK2 JAK2 JAK3 JAK3 LCK LCK Lyn PDGFRß RYK Lyn PDGFRß RYK MATK MATK M-CSFR M-CSFR MUSK MUSK NGFR NGFR PYK2 PYK2 RET RET ROR1 ROR1 ROR2 ROR2 SCFR SCFR SRMS SRMS SYK SYK Tec Tec 12 Tie-1 Tie-1 Tie-2 Tie-2 TNK1 TNK1 TRKB TRKB TXK TXK NEG NEG 13 Tyk2 Tyk2 TYRO10 TYRO10 VEGFR2 VEGFR2 VEGFR3 VEGFR3 ZAP70 ZAP70 POS4 POS4 POS = Positive Control Spot NEG = Negative Control Spot BLANK = Blank Spot NOTE: Protein alternative names, accession numbers, and official symbols can be accessed on www.raybiotech.com via the Resources Page. 13 XII. TROUBLESHOOTING GUIDE PROBLEM CAUSE Chemiluminescent imager is not working properly No signals (not even the positive controls spots) Too Short Exposure Degradation of components due to improper storage Improper preparation or dilution of the HRP-Streptavidin Waiting too long before exposing Positive controls spots signals visible but no other spots Uneven signals and/or background Low sample protein levels Skipped Sample Incubation Step Too Short of Incubations Contact image manufacturer Expose the membranes longer Store entire kit at ≤ - 20°C. Do not use kit after expiration date. See storage guidelines. Centrifuge vial briefly before use, mix well, and do not dilute more than 1000-fold The entire detection process should be completed in 10-15 minutes Decrease sample dilution, concentrate samples, or load more protein initially Samples must be loaded after the blocking step Ensure the incubations are performed for the appropriate time or try the optional overnight incubation(s) Bubbles present on or below membrane Don’t rock/rotate the tray too vigorously or pipette the sample or reagent with excessive force Insufficient sample or reagent volume Load enough sample and reagent to completely cover the membrane Insufficient mixing of reagents Gently mix all reagents before loading onto the membrane, especially the HRP-Streptavidin and Biotin Antibody Cocktail Rocking/Rotating on an uneven surface while incubating Rock/rotate on a flat surface or the sample or reagent can “pool” to one side Too much HRP-Streptavidin or Biotinylated Antibody Cocktail Prepare these signal enhancing components precisely as instructed Do not let the membranes dry out during the experiment. Cover the incubation tray with the lid to minimize evaporation Membranes dried out High background signals or all spots visible RECOMMENDATION Too High of Sample Protein Concentration Exposed Too Long Increase dilution of the sample or load less protein Decrease exposure time Insufficient Washing Ensure all the wash steps are carried out and the wash buffer is removed completely after each wash step Non-specific binding Ensure the blocking buffer is stored and used properly. 14 RayBio® is the trademark of RayBiotech, Inc. The RayBio® Cytokine Antibody Array C-Series is patent-pending technology developed by RayBiotech. This product is intended for research only and is not to be used for clinical diagnosis. Our produces may not be resold, modified for resale, or used to manufacture commercial products without written approval by RayBiotech, Inc. Under no circumstances shall RayBiotech be liable for any damages arising out of the use of the materials. Products are guaranteed for 6 months from the date of purchase when handled and stored properly. In the event of any defect in quality or merchantability, RayBiotech’s liability to buyer for any claim relating to products shall be limited to replacement or refund of the purchase price. Kodak X-Omat is a registered trademark of Eastman Kodak Company. Microsoft Excel is a registered trademark of Microsoft Corporation. 15 Note: 16 This product is for research use only. ©2010 RayBiotech, Inc. 17