1
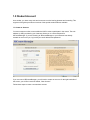
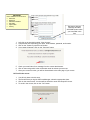
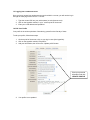
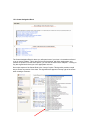
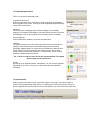
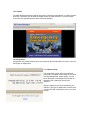
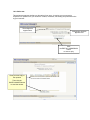
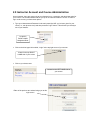
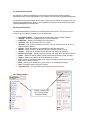
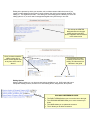
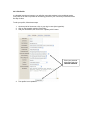
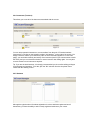
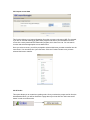
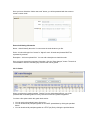
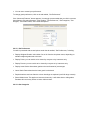
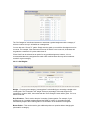
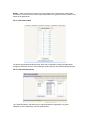
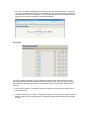
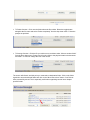
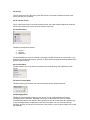
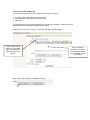
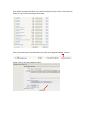
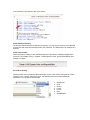
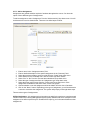
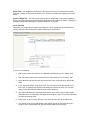
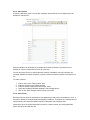
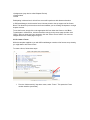
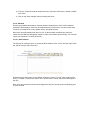
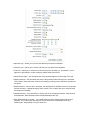
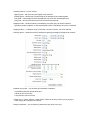
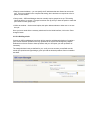
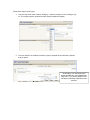
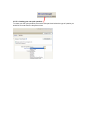
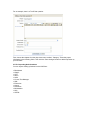
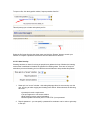
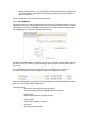
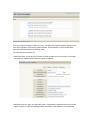
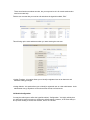
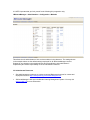
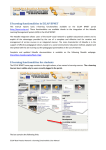
JBCOURSEMANAGER – Powered by Moodle USER’S GUIDE The learning management system (LMS) you are about to use has many features to help you succeed. This guide will help you to understand how to use, navigate, and benefit from this LMS. It is strongly recommended that you read this entire guide before beginning the course. TABLE OF CONTENTS SECTION 1 1.0 1.1 1.2 1.3 1.4 1.5 1.6 1.7 1.8 1.9 1.10 1.11 SECTION 2 2.0 2.1 2.2 2.3 2.4 2.5 2.6 2.7 2.8 2.9 2.10 2.11 SECTION 3 3.0 3.1 3.2 STUDENTS STUDENT ACCOUNT CREATE AN ACCOUNT ENROLL IN COURSE LOGGING INTO STUDENT ACCOUNT EDIT YOUR PROFILE BASIC COURSE NAVIGATION ASSIGNMENTS QUIZZES DISCUSSION FORUMS MESSAGING CALENDAR / UPCOMING EVENTS GRADES INSTRUCTORS INSTRUCTOR ACCOUNT & COURSE ADMINISTRATION DEFINE INSTRUCTOR ROLE ADMINISTRATION BLOCK ACTIVITIES BLOCK COURSES BLOCK SEARCH FORUMS BLOCK MESSAGING BLOCK UPCOMING EVENTS BLOCK CALENDAR BLOCK PEOPLE BLOCK ADD A RESOURCE ADD AN ACTIVITY SITE ADMINISTRATORS USER ADMINISTRATION MODULE CONFIGURATION ADMINISTRATOR RESOURCES 1.0 Student Account As a student, you have many tools and resources to make learning pleasant and rewarding. This segment of the guide provides an overview of the special student features available. 1.1 Create an Account You must create an online account within the LMS in order to participate in the course. The web address (or URL) provided by your instructor directs you to a universal portal for JBCourseManager. If you are returning to JBCourseManager or your instructor has already created an account for you, log in with your email address and password. If you are new to JBCourseManager, you will need to create an account. On the right hand side of the screen, you will find a text link entitled, “New Account.” Follow these steps to create a new student account: IMPORTANT Items needed for a new account: Username Password Valid Email address Full Name City/Location Country 1. 2. 3. 4. Be sure to click the CREATE MY NEW ACCOUNT button when you have filled in the form Left click on the hyperlink entitled, “New Account.” Complete the form requesting your name, email address, password, and location. Click on the “Create my new account” button. A new page will appear. Click on the “Continue” button. 5. Check your email inbox for a message from the course administrator. 6. Click on the text hyperlink in the confirmation email to activate your account. 7. Once your account is active, you will be directed back to the main page of your course. 1.2 Enroll in the course 1. 2. 3. 4. You will only have to do this once. The first time that you log into JBCourseManager, select the appropriate class. Click on the course name. You then will be directed to enroll in that specific course. To enroll in the course, click on the “Yes” button. 1.3 Logging into a student account Once you have created your student account and enrolled in a course, you will need to log in through the main page of the course. To do this: 1. Type the course URL into your web browser (ex. abc.jbcourse.com). 2. Click on the hyperlink entitled, “Log in,” at the top left of the screen. 3. Enter your email address and password. 1.4 Edit Your Profile Your profile is the online equivalent of introducing yourself on the first day of class. To edit your profile, follow these steps: 1. On the top left of the screen, click on your log in name (blue hyperlink). 2. Click on the hyperlink entitled, “Edit profile.” 3. Add your information; then click on the “Update profile” button. Enter your personal information and click UPDATE PROFILE 4. Your profile is now updated. 1.5 Basic Navigation The online courses are divided into three columns, called blocks. Let’s take a closer look at each block. 1.5.1 Left Navigation Block The Left Navigation Block is divided into four sections: The Administration section allows you to: o Access the grade-book o Edit your personal profile o Change your login password o Drop out of the course The Activities section allows you to: o View all course forums on one page o View all course quizzes on one page o View all course documents and resources on one page My Courses section displays all of the courses that you are enrolled in. The Search Forums section allows you to search all forum entries via keywords. 1.5.2 Center Navigation Block The Center Navigation Block is where you will spend most of your time. It is sometimes referred to as an “active syllabus.” This is where all course documents, web links, assignments, and quizzes are posted. From the above picture, you can see the resources for Chapter 1. Clicking on any blue hyperlink will direct you to the appropriate resource. One unique aspect of the Center Block is the “Jump to” option. This hyperlink provides a rapid way to access any section of the class. This hyperlink also appears in the top right of the screen when viewing a document. 1.5.3 Right Navigation Block This is your personal messaging center. Login/Profile Quick-Link At the top, right hand corner of the screen is the log in portal, which displays who is logged into the course. Clicking on the blue highlighted hyperlink brings up the user’s online profile. Messages This is the course messaging system. New messages are immediately displayed. The number of messages in your inbox and the senders’ names are also displayed. Click on the envelope icon to instantly reply to a message. Upcoming Events Course notifications, deadlines, and news are posted here. Calendar The Calendar allows you to view upcoming course events and keep track of personal events. Global events are site-wide while group events are for specifically assigned groups. Course events are posted by the instructor and pertain solely to course content while user events are your own personal events. Clicking on the proper hyperlink (i.e. Global events, Course events) below the calendar hides those events. Tip: To enter or view an event, click on the appropriate date. The system then prompts you how to proceed. People By clicking on the hyperlink entitled, “Participants,” you can view all registered participants in the course. You also can view their profiles and send them messages. 1.5.4 Breadcrumbs When you open a document or link, a top frame remains on the page. This frame contains a series of links (breadcrumbs) which allow you to rapidly return to the class area. By clicking on the blue hyperlink with the short name for the course (PM101), you return to the main class area. 1.5.5 Frames The LMS utilizes frames when viewing documents, PowerPoint presentations, or visiting external web sites. This allows you the ability to rapidly access the main class area. To do this, simply click on the blue hyperlink with the short course title (PM101). 1.6 Assignments Assignments are graded activities which are required of students throughout a course. There are three types of assignments: 1.6.1 Offline activity This assignment is given when your instructor wants you to complete a task outside of the online Learning Management System (LMS). You will see a description of the assignment, but will not upload any file. Grades are input by your instructor. Simply complete the activity as detailed by your instructor. This type of assignment is usually used in conjunction with a discussion forum or live chat session. 1.6.2 Online text This assignment appears similar to a discussion forum entry. It requires you to enter text in response to a question from your instructor. Grades, comments, and editing are performed online by your instructor. The assignment appears here Assignment due-date appears here Click the EDIT MY SUBMISSION button to enter a reply Enter your text reply to the question Then click the SAVE CHANGES button to send the answer 1.6.3 Upload a single file This is the most common type of assignment. It requires you to create a document (typically in Word format) and upload it to the system. This assignment allows you to upload a single file, of any type. It is a simple three step process: Assignment due-date appears here Step 1 Click BROWSE to find the file you wish to upload Step 2 Double click the file you wish to upload Click UPLOAD THIS FILE to submit the file to your instructor Step 3 1.7 Quizzes Quizzes or examinations are graded assessments added your instructor. Typically, the quiz appears in the Center Block of the course page. However, you can also access all posted quizzes from the Left Activity Block. There are six types of quiz questions: 1. 2. 3. 4. 5. 6. Multiple choice True-False Matching Short answer Calculated Gap text (Cloze) Additionally, there are different parameters that your instructor may set for a given quiz. It is critical that you review all information about the quiz prior to beginning it. Some parameters that your instructor may set include: 1. Specific dates and times that the quiz is available (i.e. May 01, 2008 until May 05, 2008) 2. Specific amount of time that you have to take the quiz (i.e. 45 minutes) 3. If the quiz is password protected. If it is, then the password will be provided to you by your instructor. 4. If the questions and answers are randomized 5. How many attempts you have at taking the quiz 1.7.1 Taking a Quiz To take a quiz, follow these steps: 1. Click on the appropriate quiz. 2. If available, click on the hyperlink entitled, “Attempt Quiz Now.” 3. You might be prompted for a password or receive a pop-up window with further instructions. 4. If your quiz is timed, a clock will appear on the screen to help you keep track of how much time remains. If the clock runs out or you fail to submit a quiz within the allotted time, a zero is given. 5. There are two buttons at the bottom of the quiz: 1. “Save without submitting.” This allows you to save your progress should you lose power or be interrupted. All of your answers are preserved and the quiz is not submitted to your instructor. 2. “Submit all and finish.” This is used to submit your quiz to your instructor for grading. 1.8 Discussion Forums Discussion forums allow for asynchronous (not happening in real-time) conversations to occur. It is similar to posting to a bulletin board and awaiting a response. Instructors may set up several discussion forums for a class. The most typical are: 1. Assignments (this may be called Chapter Review) 2. Course News 3. Social Participating in discussions is critical for your successful distance education experience. The discussion forum is where all student and instructor interaction occurs. In JBCourseManager, the discussion forum links are pinned to the top segment of the Center Block. This allows for quick access to the forums whether you are viewing either all chapters or a single chapter. To use the forums, simply click on the appropriate hyperlink from either the Center or Left Block. To participate in a discussion, click the discussion activity on the course page and then click the "Reply" button. After typing your response, click the "Post to Forum" button. You can now navigate back to the course page or log out. 1.9 Messaging To help foster the online community, messaging is used to facilitate communication between course participants. It can be used for instant messaging between students or to communicate with your instructors. To use this feature: 1. Click on the hyperlink entitled, “Participants” in the People Block. This can be found at lower right-hand corner of the screen. 2. Find the person you wish to message and click on his/her name. 3. Click the “Send Message” button. 4. Type your message and click the “Send Message” button. 5. Your message is now sent. Now you can close out of the messaging window. When receiving a message: The letter icon appears in the Message Center. The number of messages and names of the message senders are listed. 1.10 Calendar / Upcoming Events The Calendar feature displays specific events: Global events: These events are seen by all participants, in all JBCourses. These events are created by the site administrator. Course events: Only enrolled course participants can view these events. These events are created by the course instructor. Group events: Only assigned members of a group can see group-specific events. These events are created by the course instructor. User events: Only you can see these personal events. These events are created by you. To add an event: Click on desired month Click the “New Event” button Select the type of event Enter specific information about the event Click the “Save Changes” button Upcoming Events: This is a summarized view of items pulled directly from calendar and/or activity logs. You can go directly to calendar to learn more about an item. You can add personal events as reminders. 1.11 Grades You can view your grades at any time by clicking on the hyperlink entitled, “Grades,” from the Left Block entitled Administration. Your grades are entered by your instructor or entered automatically when a quiz is completed. 2.0 Instructor Account and Course Administration As an instructor, there are many tools at your disposal to run, customize, and administer tasks for your course. The site administrator will set you up as an instructor within the course. In order to log in to the course, you have three options: Type your Username and Password in the main portal (the URL you’ve been given for your course, i.e., abc.jbcourse.com) and then press the “Login” button. This will take you directly to one of your classes. Located in RIGHT HAND Navigation Block Click on the blue hyper-link entitled, “Login” at the top right corner of your screen. Located in the top RIGHT HAND side of your screen Click on your class name. Located on the LEFT HAND side of your screen Either of the previous two actions brings you to this login screen 2.1 Instructor Role Defined An instructor (or teacher) facilitates the online learning course through student guidance, asynchronous chat, course administration, quiz creation, and the posting of graded assignments. An instructor has editing privileges to alter, add, or delete course content. An instructor can also manually add students to the roster, un-enroll students, and import course materials from other Learning Management Systems (LMS). 2.2 Administration Block The Administration Block is located on the left-hand side of the screen. This gives you quick access to all of the options available to you as an instructor: Turn Editing Off/On – Toggles between having editing options visible or hidden Settings – Allows you to change the look of your course site Edit Profile – Allows you to change your online profile Teachers – Lists all of the instructors of a course Students – Lists all of the students in a course. You can manually enroll or un-enroll students with this feature. Groups – Allows students to work collaboratively with specified users Backup – Allows for data to be stored securely to address recovery issues Restore – Allows you to reinstate course data that was previously backed-up Import Course Data – Allows you to copy content from other same-site based courses Scales – Allows for special grading, usually word-based (Excellent, Good, Average) Grades – Details the grades of all of the students in a course Logs – Reports on all activity within your course. This feature can be set to a specific time frame or show all reports. Files – Allows you to upload files to your course or view existing documents Help – Provides access to the user’s manual Teacher Forum – This is a teacher-only (instructor) discussion forum 2.2.1 Editing Content Located in both the top LEFT and top RIGHT Navigation Blocks Editing is the process by which you can alter, add, or delete content within the course. If you intend to make changes to the layout of course content, then click on the hyperlink entitled “Turn editing on.” This hyperlink will read, “Turn editing off” if the editing option is already on. Once the editing option is on, a set of new icons appear alongside every item that you can edit. This is how the CENTER Navigation Block looks with editing option turned OFF. Notice it appears almost identical to the student view Once you have turned the editing options ON, a series of icons appear next to any item which can be altered You now have the option of adding a resource or an activity; we’ll discuss this a little later in the guide Editing Options With the editing options on, you have several options available to you. We’ll begin with how to manipulate existing content, and then move onto adding blocks, assignments, and quizzes. ICON QUICK REFERENCE GUIDE The RIGHT ARROW allows you to move the link to the right The UP/DOWN ARROWS allow you to move content up or down The HAND allows you to update the resource The X allows you to delete a resource Manipulate Existing Content JBCourseManager is designed to be a complete solution for your Distance Learning needs. We have created all relevant content for you. You really have very little to do in order to begin using the LMS. However, you may want to alter the look, content, or materials. This is very straight-forward and easy to do. Content positioning (right) You can move hyperlinks to the right of their current position by clicking on the RIGHT ARROW. This is useful if you want to center a hyperlink or create a hierarchy of links. Content positioning (up/down) You can re-arrange the order of hyperlinked materials by clicking on the UP/DOWN AROW. This allows you to decide which order materials should be presented. Update content You can update, change text, add a description, or alter the link itself by clicking on the icon which resembles a hand holding a pencil. Delete content If you wish to permanently delete an item from the course, you can do so by clicking on the “X” icon. This only deletes the file from the course itself. If you have deleted a document, the actual file remains on the site, in the FILES segment, but will not display in the course. If you delete an external hyperlink, the information is completely removed. Hide content Selecting the icon shaped like an eyeball allows you to hide content from students. As an instructor, you will see the link, but students will not. This is useful when constructing a resource not ready to be released or when you wish to post a quiz, but not make it visible until it is ready to be taken. Notice the grey link is not as easily visible by the instructor – these Notice the blue links links CANNOT be are easily visible by seen by your students. the instructor – these links CAN be seen by your students. 2.2.2 Settings JBCourseManager is designed to be immediately ready for use. Typically, only course administrators should utilize Settings. Settings allows for the customization of the look, feel, and layout of the entire course, but should not be altered unless absolutely necessary. An overview: There are several fields where the look and feel of the course can be altered. Each field has a built in “help tab” in the shape of a question mark icon ( ). Click on the icon to see a pop-up window with additional information. There are a few fields which we would highly recommend leaving solely to the course administrator: ID number – this field is used to create a number that can be used to interface with other programs. Unless you are highly confident in your ability to integrate programs which require this, leave it blank. Summary – this field is used to update or change the description of the course being offered. Format – this is an important field. There are three different formats for the class: Weekly, Topic, and Social. The Weekly format organizes the class into weeks, with assignments, discussion boards, tests, all residing in a week-by-week block. The Topic format organizes everything by topics (or units); regardless of how long they take. The Social format is built around a forum, which is good for announcements and discussions. While the Weekly and Topic formats look similar, they are organized very differently. All courses from JBCourseManager are based upon the textbooks that they support and are set up in the Topic format. The Weekly format is best suited for those classes which adhere to a regular schedule, without much variation in format, whereas the Topic format is more scalable to those courses where blocks of information may take varying periods of time to cover. Since JBCourseManager is built with all courses set to the Topic format, the remainder of this guide focuses solely on that type of course format. Enrollment duration – this sets the maximum time a student can be registered for your course. For example, if your course is going to run exactly 30 days, you can set the system to automatically un-enroll students after 45 days. Number of weeks/topics – this displays the number of weeks or the number of topics displayed on your class page (for example, Nancy Caroline’s Emergency Care in the Streets is 52 topics/chapters) Group mode – this is the default setting for groups in the course. You have three settings to choose from if you use groups: No groups – if this is set, the class is one big group. Everyone can see everyone. Separate groups – if this is set, each group is separate – the groups cannot see each other or other groups’ postings, assignments, etc. Visible groups – if this is set, students belong to groups, but the groups can see each other. Availability - this option allows you to "hide" your course completely. It will not appear on any course listings, except to teachers of the course and administrators. Even if students try to access the course URL directly, they will not be allowed to enter. Enrollment key – this is the classroom password. If set, no one will be able to access the course without the enrollment key. Guest access – allows you to decide if unregistered guests may view the course content without registering and without an enrollment key. News items to show – sets how many news items can will be displayed. Show grades –this allows students to view their grades on all applicable graded assignments. When you are finished modifying the class settings, click on the “Save changes” button. 2.2.3 Edit Profile In a blended learning environment, you will often meet with students in the traditional setting. Your profile is an online equivalent of introducing yourself to your community of students on the first day of class. To edit your profile, follow these steps: 1. On the top left of the screen, click on your log in name (blue hyperlink). 2. Click on the hyperlink entitled, “Edit Profile.” 3. Add your information; then click on the “Update profile” button. Enter your personal information and click UPDATE PROFILE 4. Your profile is now updated. 2.2.4 Instructors (Teachers) This allows you to see all of the instructors associated with the course. You can select potential instructors or course auditors from the pool of “Potential teachers (Instructors)” by clicking on the hyperlink entitled, “Add teacher,” on the right of the screen. You assign a numeric order to your instructors (order in which instructors appear on course main page), you can hide the identity and activity of an instructor (useful if you want someone to audit the class), and you can determine whether or not an instructor has editing rights. You may also remove someone as an instructor at anytime. Tip: If you are the lead instructor, it is strongly recommended you do not allow editing privileges for all subsequent instructors. To do this, pick the “No” selection from the drop down menu underneath the heading “Editor.” 2.2.5 Students Although the typical method of student registration is to have students register and enroll themselves, you have the ability to add currently registered students to your course. To add a registered student to your course, simply click on the student’s name to highlight it. Click on the LEFT FACING arrow to move the student’s name into the “Enrolled students” box and the student’s name will automatically be saved. 2.2.6 Groups This is useful if you want to divide students into different groups. For example, perhaps you wish to foster small group interaction. Or perhaps you have students from different locations, all taking the same content, but with different instructors. With JBCourseManager, most courses do not require groups to be set up. Due to the design of our courses, it is best to keep all students as one large group, which is the default setting. However, if you wish to divide students into smaller groups, please follow these steps: There are three fields, “People not in a group”, “Groups”, and “Members of selected group” To create groups: Click name in the “People not In a group” field, Click a group from the “Groups” field Click “Add selected to group” The remaining administration of your groups is very straightforward from this same screen. You can edit group settings, delete groups, and move members to different groups as needed. 2.2.7 Backup Usually, this is a task best left for the site administrator to handle. However, if you wish to back-up your materials, you may do so. Once you click the hyperlink entitled “Backup” in the Administration Block, the LMS will provide a step-by-step process on how to proceed. 2.2.8 Restore This task is used to install backed-up files into the course. This is best left to the site administrator. 2.2.9 Import course data This function allows you to import information from other courses on the same LMS. For example, if you are an instructor teaching an EMT-Basic program and wish to pull information from that course into a newly launched EMT-Paramedic program, this is the tool to use. You can search courses and select the appropriate course when found. Once you select a course, you will be prompted to select which items you want to transfer into the new course. You can select all or just a few items. Click the “Continue” button once you have selected the items to transfer. 2.2.10 Scales This option allows you to customize a grading scale. Once you select the proper text link from the Administration Block, you will be directed to a page where you must click the “Add a new scale” button in order to create a scale. Once you have clicked the “Add a new scale” button, you will be presented with the screen to create a custom scale. Enter the following information: Name – this will identify the scale. You can name the scale whatever you like. Scale – this should begin from “lowest” to “highest” mark. All words and phrases MUST be separated by commas Description – this is an optional field. You can add a description to detail the scale. Once you have entered the necessary information, click the “Save changes,” button. The scale is now available to assist in evaluating any resource that can be graded. 2.2.11 Grades When you select the hyperlink entitled, “Grades” from the Administrative Block, you will be presented with all student grades for every resource marked as a graded assignment. You have a few options within this grade-book section: You can sort by the student’s last or first name. You can download all participant grades as an EXCEL spreadsheet by clicking the provided button. You can download all participant grades as a TEXT (txt) file by clicking the provided button. You can set or amend your preferences. To change grade preferences, click on the tab entitled, “Set Preferences.” If the “Advanced Features” button appears, it is strongly recommended that you click it to access those features. Six tabs will appear: “View Grades,” “Set Preferences,” “Set Categories,” “Set Weights,” “Set Grade Letters,” and “Grade Exceptions.” 2.2.11.1 Set Preferences You will be presented with several options under the tab entitled, “Set Preferences,” including: Display Weighted Grades: select either Yes or No from the drop down menu, depending on whether weighted grades are to be used Display Points: you can set this to be viewed by everyone or by instructors only Display Percent: you can set this to be viewed by everyone or by instructors only Display Letter Grade: allows letter grades to be used instead of percentages Letter Grade: Determines how the letter grade is calculated Reprint headers: sets how often the column headings are reprinted (useful for large courses) Show Hidden Items: This applies to instructor views only. It will either show or hide grades. Students will not see any entries on items visible to them. 2.2.11.2 Set Categories The “Set Categories” tab allows instructors to associate a graded assignment with a category. If this has not been set up, it will default to uncategorized. You can also set a “Curve To” grade. Simply enter the grade you would like all assignments to be curved to. For example, if the maximum score was 10 and the curve is set to 8, all students will be graded to a maximum of 8 points rather than 10. “Extra Credit” can be selected as an option for any graded assignment; however, it is not recommended that every assignment be made extra credit because this may skew overall test results for a given category. 2.2.11.3 Set Weights Weight – For every given category (“uncategorized” is the default) you can assign a weight to the overall grade. This is entered in the “weight” field as a percentage. If the total weight for all categories is equal to 100%, the text beneath the “Save Changes” button will be green. If it is not, then it will be red. Drop X Lowest – This is used to drop the X number of lowest grades. For example, if your student turns in 10 graded assignments and the DROP X is set to 3, the grade-book will automatically drop the three lowest grades in its calculation of the student’s overall grade. Bonus Points – This can be used to give additional points to a question without changing the point total for a category. Hidden – If this is selected, it will remove a given category from view and from overall grade calculations. This is most often used to make adjustments once grades have been turned in and posted to the grade-book. 2.2.11.4 Set Grade Letters The above represents the default scoring, which can be adjusted by making the appropriate changes to each field. Click the “Save Changes” button when you are finished making changes. 2.2.11.5 Set Grade Exceptions The “Grade Exceptions” tab allows you to exempt students from grading on any given assignment. This is particularly useful for students who: Previously satisfied the assignment Had an excusable absence from class Merge into another class group Join the course after it has begun There are three data fields which appear in this screen: Included in Grading – all those students being graded on a given assignment are listed here Grade Items – the specific assignment in question; you can set up different exemptions for each individual assignment Excluded from Grading – lists those students exempted from grading To exempt a student from grading: 1. Select the assignment from the middle data field by clicking on it. 2. Click on the student’s name from the left data field, click on the “Exclude from Grading” button. 3. Once the page has automatically refreshed, your selected student will be exempted from grading. 2.2.12 Logs Logs (sometimes referred to as reports) allow you to view student activity within the course. This is especially useful in determining if content has been accessed or to view the IP address of the user. When you click on this hyperlink, you will be presented with two options: Static Log – this option allows you to view all participant (student and fellow instructor) activity. It allows you to search by four parameters: the course you want to search, the participant, the date, and the specific activity. Each is accessed via a drop down menu. Once you have set your parameters, simply click the “Show these logs,” button. Live Log – this option is a hyperlink on the same screen as the static log option. This allows you to open a window which tracks ALL participant activity in ALL areas of the course in realtime (within the last hour from the point it is accessed). This window automatically refreshes itself every 60 seconds to update the information displayed. 2.2.13 Files The “Files” hyperlink allows you to view, add files or folders, delete, and arrange the course documents stored in the LMS. Students do not have access to this area, nor can they see the files uploaded unless they are linked to common areas of the course (see the ADD ACTIVITY section). View Folder Contents – To view the contents of a folder in the Files section, simply click on the desired folder. To Add Content (Files or Folders) – Scroll to the bottom of the Files section and you’ll see two buttons: “Make a folder” and “Upload a file.” Select the proper button and follow the prompts provided. To Delete Content – Click onto the folder where the file resides. Select the toggle button alongside the file name and select “Delete completely” from the drop down menu. Follow the prompts as provided. To Arrange Content – Click the file you wish to move, and then select “Move to another folder” from the drop down menu. Please note: this only refers to the physical location the document will reside -- it does not change the look of the course. The screen will refresh, at which point you must select a destination folder. Click on the folder hyperlink to enter the desired folder and click on the “Move files to here” button. Your file has been successfully moved. This is especially useful when organizing content into a chapterspecific format. 2.2.14 Help This link opens access to the user’s guide and manual. It provides a detailed overview of the system and will your questions. 2.2.15 Teacher Forum This is a discussion forum, just like the student forums, but is specifically designed for instructor access only. Students do not see or have access to this forum. 2.3 Activities Block This Block contains three options: 1. Forums 2. Quizzes 3. Resources The Activities Block is useful for viewing a one-page overview of all items in a given topic. If you would like to view all posted forums, quizzes, or visible resources (those documents posted to the general classroom area). 2.4 Courses Block This Block allows you to see all the courses that you are instructing, with hyperlinks to each course. 2.5 Search Forums Block This Block allows you to search the course discussion forums utilizing keywords. 2.6 Messaging Block This Block is the messaging center for your course. This is a hybrid between an instant messaging service and email. Messages can be sent to others who are online for instant communication and are also stored in the recipient’s inbox to be viewed when the recipient logs in. Any messages sent by students will come into this mailbox. You can view who sent the message, and click on the name to access his or her profile, or click on the envelope icon to view the message. You can view how many messages have been sent, and from whom. To reply, click on the envelope icon. You may also compose a message to any registered participant in the course from this location. To enter the message center and send your own message, click on the MESSAGES link When you click on the hyperlink entitled, “Messages,” you will see your contacts page. If you have not added any contacts, then you may search and add as needed. The Contacts and Search options are self-explanatory; however, the “Settings” tab deserves special attention. SETTINGS TAB The default settings are shown in the example above. As you can see, it is a simple matter to configure your message center to handle incoming messages. You can even request the system to send a copy of the message or all inbound messages to whatever email (external) address you specify. You can choose from plain text or HTML as the format for the email from the drop down menu. Once you have chosen your preferred settings, click the “Save my settings” button. 2.7 Upcoming Events Block This Block allows you to view pending events, based upon your calendar. You have several choices with this feature: 1. You can click on the hyperlink title of the event to read more about it. 2. You can click on any of the hyperlinked dates to view the calendar view of that specific day. 3. You can click the hyperlink entitled, “Go to calendar” to see a monthly view of the calendar. 4. Click the hyperlink entitled, “New Event” to enter a new event. The system will prompt you on how to proceed if you choose this option. 2.8 Calendar Block The Calendar Block shows events occurring within the class. This is a very useful tool, as it can help keep students on track with assignment deadlines. Global Events – events posted for site-wide viewing Group Events – events posted for specific groups to view only Course Events – events posted for course participants (all users) User Events – events posted for the user only (not visible to others) Tip: The current date has a black border around it. If you would like to hide a specific set of events, simply click on the appropriate link to hide just those events. All other events will appear on the calendar. 2.8.1 Create a New Event As an instructor, you can create events specific to groups of students, for the entire class to view or site-wide (if you offer multiple courses through one site) – the interface is very intuitive. Select the type of event, click OK, and the system will prompt you through the steps. 2.9 People Block This Block allows you to view all registered users, enrolled in or instructing, the course. 2.10 Adding Course Content JBCourseManager comes as a ready-made template, with all relevant resources preloaded already installed. This means that you could theoretically roll out the course immediately upon receiving access and registering students. With that said, our LMS is designed to give complete control to you, the instructor. You are free to add new content to each topic as necessary. 2.10.1 Add a Resource “Add a Resource” is a drop down menu located toward the bottom right of each topic section. From this menu you can add a text page, compose a web page, link a file or external web site, display a directory, or insert a label. Once you add a resource, it will appear in the topic section. In the example below, each item listed is either an added resource or activity. You can click the question mark icon next to the menu to get a description of each type of resource. Please Note: The editing function must be on in order to see these options. 2.10.2 Compose a Text Page This type of resource is a simple page written using plain text. 2.10.3 Compose a Web Page This resource allows you to develop a single web page with the provided WYSIWYG HTML editor. The page is stored in the course database, but is best left to the course developer to work with and utilize. 2.10.3 Link to a File or Web Site This is the most common resource you will use. It allows you to link to: Any file you have uploaded into the course files Any web page or site (internal or external sites) Media files The system will prompt you through adding a file, but for quick reference, please refer to the below tutorial of how a PowerPoint file would be added. Select the “Link to a file or web site.” You will be directed to the below page: Enter a name for the resource. This is what will be displayed as a hyperlink in the Topic section. Next, click on the “Choose or upload a file” button Enter a summary description if you like; it will be displayed in the top frame when viewed by students As a default, the system will direct you to the Files segment of your course. This is the area where all of your course documents are housed. Click on the folder where your document is and click on the hyperlink entitled, “Choose.” Finally, click on the “Save changes” button. Your document is now linked to the Topic section. 2.10.4 Display a Directory The directory allows students to view files you specify. You can allow a directory of all uploaded courses files and create sub-directories from your Files area. The Help files are an example of a directory. 2.10.5 Insert a Label Labels are unique. Labels are text embedded into the Topic section, residing alongside other resources. The Chapter Title (i.e. Chapter 1: EMS Systems, Roles, and Responsibilities) is an example of a label. 2.11 Add an Activity This drop down menu is located to the bottom right of each Topic section alongside the “Add a resource” menu. Like the “Resource” menu, the question mark icon provides additional information. You can add seven activities: 1. 2. 3. 4. 5. 6. 7. Assignment Chat Choice Forum Lesson Quiz SCORM/AICC 2.11.1 Add an Assignment Assignments are graded activities required of students throughout the course. You have the option of three different types of assignments. To add an assignment, select “Assignment” from the “Add an activity” drop down menu. You will be directed to the screen shown below. There are nine initial steps to follow. 1. 2. 3. 4. 5. 6. 7. Enter a name in the “Assignment name” field. Enter a detailed description of the specific assignment in the “Summary” field. Select the maximum grade or scale you wish from the “Grade” drop down menu. Select dates from the “Available from” and “Due date” drop down menus. Select “Yes” or “No” from the “Prevent late submissions” drop down menu. Select the type of assignment from the “Assignment type” drop down menu. Select the proper type of group from the “Group mode” drop down menu. If the assignment is intended for the whole class, choose “No groups.” 8. Choose whether or not this assignment should be hidden from the view of students. 9. Click on the “Next>” button. Depending on the type of assignment, you will be directed to a screen to customize the assignment. The system will prompt you through these steps. There are three types of assignments: Offline Assignment – this assignment is given when you wish for the student to complete a task outside of the online Learning Management System (LMS). Students will see a description of the assignment, but will not upload any file. Grades will be input by you in the same fashion as other assignments. Online Task – this assignment is similar to a discussion forum entry. It requires the student to enter text in response to a question asked by you. Grades, comments, and editing can be done online. Upload a Single File – This is the most common form of assignment. It requires the student to create a document (typically in Word format) and upload it to the system for grading. This type of assignment allows each participant to upload a single file, of any type. 2.11.2 Add Chat This allows you to add real-time chat to the classroom. This is a great way to schedule time to “speak” with your entire class when in-person meetings are not feasible. To set up a chat session: 1. Enter a name of the Chat Session (i.e. Mandatory Chat Meeting) in the “Name” field. 2. Add a summary of what will be discussed in the chat session in the “Summary” field. 3. Select the date and time from the drop down menu in the “Next chat time:” drop down menu. 4. In the “Repeat sessions:” drop down menu, you can select to keep this session a one time event, or schedule it to repeat at the same time each day or week. You can also select to keep the sessions hidden from the view of students. 5. The “Save past sessions:” drop down menu allows you to store a log on chat sessions. The default is set for thirty days. Unless you need a log for longer, it is recommended that you leave this setting alone. 6. Select “Yes” or “No” from the “Everyone can view past sessions:” drop down menu. 7. You can opt to set up live chat sessions with specific groups (if previously set up in a group). If this is a class-wide chat, leave the default setting as “No groups.” 8. Select “Show” or “Hide” from the “Visible to students” drop down menu. 9. Click on the “Save changes” button to post the chat session. This session will automatically populate the Calendar as well as the Upcoming Events Block. This is what a chat session will look like: 2.11.3 Add a Choice A Choice is effectively a poll. You can ask a question and provide up to ten responses for the students to choose from. While this feature has similarities to a multiple choice exam, because it only allows for one question at a time, it is best suited for use as a poll only. You can set up the Choice to restrict when the question is available, how many answers are accepted, whether the results are public or private, and if the results are shown as anonymous or not. To create a Choice: 1. 2. 3. 4. 5. Enter a name in the “Choice name:” field. Enter the question in the middle text field. Enter the answer responses in the “Choice” fields. Select the remaining variables (detailed in the example above). Click on the “Save changes” button to post to the class. 2.11.4 Add a Forum Discussion forums allow for asynchronous (not happening in real-time) conversations to occur. It is similar to posting to a bulletin board and awaiting a response. This feature is a critical portion of online learning, as it allows for student interaction with peers and educators alike. Instructors may set up several discussion forums for a class; however, the most typical titles (which are set by the instructor) are: Assignments (may also be called Chapter Review) Course News Social Participating in discussions is critical for a successful experience with distance education. In JBCourseManager, the discussion forum links are pinned to the top segment of the Center Block. This allows for quick access to the forums whether you are viewing all chapters or a single chapter at a time. To use the forums, simply click on the appropriate link from either the Center or Left Block. To participate in a discussion, click the discussion activity on the course page and then click "Reply." After you have typed your response, click the "Post to Forum" button. You can now navigate back to the course page or log out. 2.11.5 Create a Forum While the template supplied to you with JBCourseManager contains a few forums set up already, you might want to add more forums. To create a forum, follow these steps: 1. From the “Add an activity” drop down menu, select “Forum.” This opens the Forum creation interface (see below). 2. Enter a name (i.e. Chapter 1 Wrap-Up Discussions) in the “Forum name” field. 3. Select from the “Forum type” drop down menu. “Standard forum for general use” is the most useful. You can also select: Single Simple Discussion – this is a single topic, all on one page. Each Person Posts One Discussion – this allows students to post one discussion thread only. 4. From the “Can a student post to this forum” drop down menu, select whether all users can post or just instructors. 5. From the “Force everyone to be subscribed” drop down menu, choose whether to force all users to be subscribed to the forum or to allow them to opt out of new post notifications. 6. From the “Read tracking for this forum” drop down menu, choose whether or not you wish to track when posts are read. 7. From the “Maximum attachment size” drop down menu, choose the maximum file size for student uploads. 8. From the “Allow posts to be rated” drop down menus, choose if instructors can provide feedback on the quality of a student’s post. You can use custom created scales (Poor, Satisfactory, Good, Excellent) if you wish. 9. From the “Group mode” drop down menu, choose if the forum is intended for all users of a specific group. 10. From the “Visible to students” drop down menu, determine if the forum is visible or hidden from users. 11. Click on the “Save changes” button to deploy the forum. 2.11.5 Add Quiz Quizzes are graded assessments to evaluate student comprehension of the course materials presented. Quizzes play a critical role in blended learning environments. You have a wide array of tools at your disposal to create, update, deploy, and grade quizzes. Most of the work has already been done for you, as the test bank questions have been preloaded into the LMS and arranged by chapter to make quiz creation quick and easy. You can also import quiz questions in a variety of formats. 2.11.5.1 Quiz Interface The first step in creating a quiz is to access the Quiz Interface. Click on the “Add quiz” option from the “Add an activity” drop down menu. Contained on the same page are a multitude of options to select. To begin, enter a name of the Quiz (i.e. Chapter 1 Quiz) in the “Name” field. The next item is a short, but concise description of the quiz. Next, there are several drop down menus designed to help you quickly create a challenging quiz for your students. Open the quiz – allows you to set the date that the quiz becomes available. Close the quiz – allows you to set the date that the quiz becomes unavailable. Time limit – allows you to select a time limit for the quiz to be taken (i.e. 45 minutes). A clock appears on the student’s screen to help the student keep track of time. Questions per page – you can select how many questions appear on each page of the quiz. Shuffle questions – this will shuffle the order of the questions each time the quiz is accessed. This is used to help reduce the incidence of cheating by making it more difficult for questions to be copied. Shuffle answers – when a quiz is accessed, the answers will be shuffled so that no two quizzes will look the same – despite having the same content. This is useful as a tool to help minimize the incidence of cheating. Attempts allowed – if you would like to use the quiz as an educational exercise, rather than as an assessment, allow students to have multiple attempts at the quiz. Each attempt builds on the last – if you allow students to take multiple attempts at the quiz, selecting “Yes” to this option will keep the correct results from each attempt at the quiz. Selecting “No” will generate a new quiz each time. Grading method – you can choose: Highest grade – will record only the highest score achieved Average grade – will take the overall average of all attempts as the recorded grade First grade – will disregard all other attempts and only record the first attempts score Last grade – will only record the score from the most recent attempt Adaptive mode – allows a student to immediately re-try after giving an incorrect answer. Typically a penalty is applied, so with each attempt a point or percentage of a point is deducted. Apply penalties – if “Adaptive mode” is selected, it is best to choose “Yes” from this field. Decimal points – determines how the assessment grade (percentage) is displayed to students. Student may review – you can allow quiz feedback to students: > Immediately after the attempt at the quiz > While the quiz is still open > Only after the quiz has closed Show quiz in “secure” window – helps provide a bit more security over the quiz, by trying to make copying and cheating more difficult. Require password – you can specify a password to gain entry to the quiz. Require network address – you can specify the IP addresses that are allowed to access the quiz. This is most helpful in the computer lab setting, when students are required to arrive inperson to take exams. Group mode – JBCourseManager does not normally require groups be set up. This setting should be left as “no groups.” If groups have been set up, then you have the option to make the quiz visible to select groups only. Visible to students – As the name implies, this option allows students to either see or not see the quiz. Once you have made all the necessary selections from the initial interface, click on the “Save changes” button. 2.11.5.2 Building a Quiz Courses on JBCourseManager have been built to ease the administrative burden of creating a quiz, with all test bank questions securely uploaded to the system and arranged by chapter. Students do not have access to these questions and you can import your own questions as necessary. The categories have been pre-defined for you, so all you must concern yourself with are the actual quiz questions and populating a given quiz with the desired questions from our installed test bank. Follow these steps to build a quiz: 1. From the drop down menu entitled, “Category,” select the chapter you are creating a quiz for. The chapter specific questions that are already installed will appear. 2. From the selection of available questions, begin to populate the quiz with the questions that you prefer. At this stage, quiz questions would appear beneath the “sort alphabetically” drop menu. For security purposes, this has been intentionally cropped from the example. 3. Icons - there are a few icons used to select quiz questions: Select this icon to move a question into the quiz. Select this icon to preview how the question will appear. Select this question to edit the pre-loaded question. Select this to choose the question and enable the above icons. 4. You also have the option of adding randomly selected questions from the installed test bank by choosing the drop down menu titled “Add ____ random questions.” 5. As you add questions, the system automatically saves your selections. Once you have selected your last question, you can select the “Preview” tab to see the quiz as a student would. Or you can click on the short name link from the top of your window to return to the course. 2.11.5.3 Creating your own quiz questions To create your own quiz questions, access the Quiz panel and select the type of question you would like to create from the drop down menu. For an example, here is a True/False question: First, choose the chapter from the drop down menu entitled, “Category.” Enter the proper information in the following fields. Then click the “Save changes” button to add this question to your test bank. 2.11.5.4 Importing Quiz Questions You can import existing questions into the LMS from: Blackboard WebCt GIFT Aiken AON Course Test Manager XML Examview Hotpot Learnwise Multianswer Qti2 XHTML To import a file, click the hyperlink entitled, “Import questions from file.” This will prompt you to locate and upload your file. Select the file format from the drop down menu and click the “Browse” button to search your network or computer. Upload the selected file into the classroom file structure. 2.11.5.5 Quiz Security Cheating has been an issue for as long as people have gathered to learn. Whether the learning environment is traditional or blended, the potential for cheating exists. There are no fool-proof methods to prevent all cheating, but our LMS has several features to help combat this problem. 1. Show quiz in a “secure” window – this setting helps provide a bit more security over the quiz, by trying to make copying and cheating more difficult. When selected, the following will occur: Javascript is made a requirement The quiz appears in a full-screen window Right clicking (mouse control) is disabled Some keyboard commands (CTRL C and CTRL V) are prevented 2. Require password – you can specify a password for students to use in order to gain entry to the quiz. 3. Require network address – you can specify the IP addresses allowed to access the quiz. This is most helpful in a computer lab setting when students are required to appear inperson to take exams. These methods help to minimize the opportunity to cheat. 2.11.7 Add SCORM/AICC This activity allows you to add a SCORM lesson into the course. SCORM represents a common language among various Learning Management Systems to allow content to function in a variety of LMS settings. If you have a SCORM complaint lesson or module and wish to deploy it within JBCourseManager, you may do so by selecting this activity. Identify the SCORM package in the “Name” field. Provide a summary of the package in the main text field. Click on the “Choose or update a package” button to direct you to the Files section of the course. If the SCORM activity is already uploaded, navigate to the file and click on “Choose.” If you need to upload the files to your classroom, click on the “Upload a file” button. Once a SCORM package is selected, you will be brought back to the SCORM interface window where you can select the following parameters: Grading method o SCO situation (also known as Learning Objects) This method shows the total completed/passed for the activity o Highest Grade Displays highest grade in all learning objects o Average Grade Calculates the average of all scores o Sum Grade All scores are added together Maximum grade – this sets the range of grade between 1 and 100. Auto continue – this selection determines if the SCORM material runs automatically or not, or if the user must take action. Enable preview – this provides the student with an option to view the material (if “Yes” is chosen) with a preview button. The student can then preview the material or utilize the resource in normal mode. Width – determines the width of the SCORM material. Height – determines the height of the SCORM material. 3.0 Site Administrator The site administrator is the primary person who has either requested or been designated as the responsible party for the LMS site content. Typically, the site administrator would also be the course designer. Since JBCourseManager are pre-fabricated with content for immediate use, the site administrator role is significantly reduced. From registering and enrolling students, to assisting with lost passwords, the site administrator using JBCourseManager serves more of manager role rather than a course designer role. This actually serves to allow the site administrator (who in many cases is also an instructor) to actually focus on the course itself -- not the background issues normally associated with a Learning Management System. Most of the information a site administrator would need is contained in segment 2.0. However, there are a few additional duties that will likely fall to the site administrator. Because of the manner in which JBCourseManager courses are set-up, the only Administration link you should concern yourself with is the “Users” link. You are welcome to change your site in any fashion by using the other links available, but Jones & Bartlett will not be able to provide support for any such changes. 3.1 User Administration Sometimes, it is necessary for a site administrator to set up an account for a student. From the main portal, in the Administration Block, select the hyperlink entitled, “Users.” This will open the Admin panel. Click on the hyperlink entitled, “Add a new user,” and follow the system prompts to register a new user. Once registered, click on the hyperlink entitled, “Enroll students” to enter into the Admin menu and enroll the student in a particular class. The main links you will utilize are: Add A New User - this is the form you must complete to add a new user. Simply fill in the fields and select the “Update profile” button to register the student. Edit User Accounts - when you select this option, a page with all registered users to the site will appear. This link is useful for updating student information, email addresses, and passwords. These are all actions a student can take, but you may need to do it for certain students who need some extra help. Find the user account that you need to edit and select the hyperlink entitled, “Edit.” This will bring up the same window as when you were entering the new user. Assign Teachers - this option allows you to identify a registered user as an instructor and determine editing privileges. Assign Admins - this option allows you to identify a registered user as a site administrator. A site administrator can go anywhere on the site and has access to all resources. 3.2 Module Configuration You may be called upon to utilize the hyperlink entitled, “Configuration.” It is highly unlikely that you will need to use this resource or change the default settings. However, in the event that you find yourself needing to access this resource, here is an overview. It is VERY important that you limit yourself to the following link progression only: JBCourseManager » Administration » Configuration » Modules This allows the site administrator to hide or show modules in the classroom. The settings shown in the example above are the default settings employed for all JBCourseManager courses. Support for any changes to the settings shown above would be the site administrator’s responsibility and not the responsibility of Jones and Bartlett Publishers. 3.3 Administrator Resources Site administrators are welcome to contact Jones and Bartlett tech support for content and deployment issues at http://www.jblearning.com/technicalsupport.cfm. JBCourseManager is built upon the Moodle Learning Management System. You may visit www.moodle.org for more information.