1
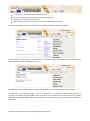
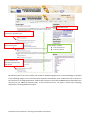
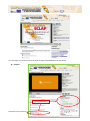
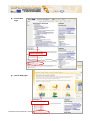
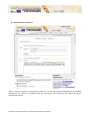
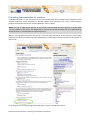
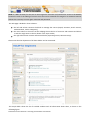
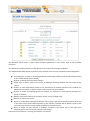
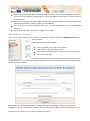
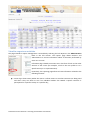
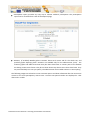
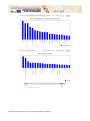
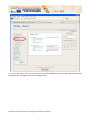
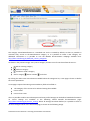
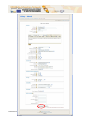
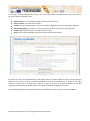
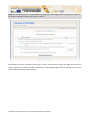
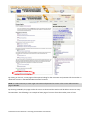
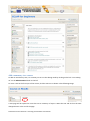
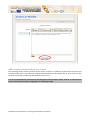
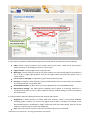
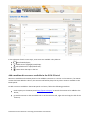
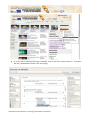
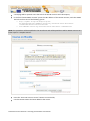
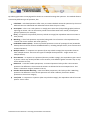
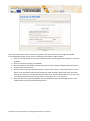
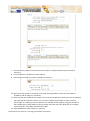
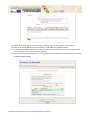
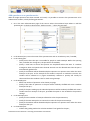
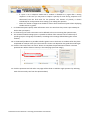
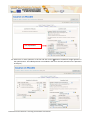
E-learning functionalities in ECLAP BPNET This manual reports basic e-learning functionalities available on the ECLAP BPNET portal (http://bpnet.eclap.eu). These functionalities are available thanks to the integration of the Moodle Learning Management System (LMS) in the ECLAP BPNET. The Moodle integration allows users of the ECLAP social network to publish educational content and to exploit all the advantages provided by the use of a complete and effective tool for creation and management of on-line courses in an integrated manner. The main characteristic of Moodle is in the support of effective pedagogical notions, based on a social constructionist education method, adapted and interpreted with the aim to bring out the pedagogical potentialities in the use of Internet. Complete and updated Moodle documentation is available on the following Moodle webpage: http://docs.moodle.org/en/Main_Page E-learning functionalities for students The ECLAP BPNET home page contains in the right column, a box named e-Learning courses. The e-learning Courses box is visible only to users correctly logged in the portal. The box contains the following links: ECLAP Best Practice Network: e-learning functionalities User Manual All Courses: to see the list of all available courses; All course categories: to see the list of all course categories; All teachers: to see the list of teachers; My e-learning activity: to see the list of all courses followed by the user. The following image shows the view with the list of all the available courses in the portal. If a user selects a course but he is not enrolled to it, a message will be shown below the course description, explaining that the user is unable to access to it. By selecting a course where the user is enrolled in as student, the course structure will be showed. As reported in the following image, a course is structured in a number of topics containing links to resources or activities that the student have to perform. The resources to be viewed can be any content published in the ECLAP BPNET and they are shown in the same manner as any other content published on the portal. ECLAP Best Practice Network: e-learning functionalities User Manual Introductory test Links to any content: video, audio, documents, zipped files, etc. Links to internal and/or external web pages Course topics. Include: Links to resources Links to activities Links to activities: for example, questionnaires and quizzes By selecting a link in the course topics, the content is showed integrated in the course web page, as showed in the following image. This is one of the most important functionality since it allows the user to access to the resources in an integrated manner, without the necessity to exit from the BPNET portal and without the necessity to use additional external tools. In this manner the user can enjoy a much more satisfying experience in an integrated environment. ECLAP Best Practice Network: e-learning functionalities User Manual A course topic can contains links to any kind of resources published on the portal like: playlists: Link to a playlist ECLAP Best Practice Network: e-learning functionalities User Manual internal Web pages Internal Web pages external Web pages: External Web pages ECLAP Best Practice Network: e-learning functionalities User Manual Questionnaires and quizzes: When a student complete a questionnaire submission, he will see the final assigned grade (if available) provided by the system in accordance with the assessment rules defined by the teacher during the questionnaire design. ECLAP Best Practice Network: e-learning functionalities User Manual ECLAP Best Practice Network: e-learning functionalities User Manual E-learning functionalities for teachers In Moodle a teacher is a user with an access control level that allow him to prepare and manage the course material (resources and/or activities), to manage student users enrolled in the course, assess students progress and performance and to access to different activity reports. NOTE: If a user is registered as teacher in one course, this not imply that he is teacher in all the other courses available on the portal. The assignment to a user with the role of teacher has to be performed by the administrator, as described in the following section. When a user registered as teacher accesses to a course in the ECLAP portal, at the end of the course topic list he will see a link that allows him to be readdressed to a web page to edit the resources and activities of that course. By clicking the link, a new web page will be opened to access in the Moodle system. ECLAP Best Practice Network: e-learning functionalities User Manual NOTE: it is NOT necessary for the user to insert again his username and password to access to the Moodle frontend to enter in the editing of a course since the access to Moodle is managed in an automatic manner without the necessity to insert again username and password. The web page is divided in three columns: the left side column contains the blocks to manage the course (People, Activities, Search Forums, Administration, Course categories); the main column in the centre of the webpage shows the list of resources and activities and allows to edit the single items in the list shown in the Topic outline; the right side column contains informative blocks (Upcoming events, Recent Activity). Please note that the disposition of all these blocks can be customized. The People block shows the list of enrolled students with all information about them, as shown in the following figure: ECLAP Best Practice Network: e-learning functionalities User Manual The Activities block shows a report about activities performed in the course with all the available resources. The Search Forums block allows to make queries in the internal forum pages in Moodle. The Administration block allows to perform many activities for the course preparation and management: Turn editing on: to enter in the editing modality to add and/or modify contents and activities shown in the central column (Topic outline); Settings: to define the course main settings; Assign roles: to define roles in the course, by adding or deleting students that will access to the course; Grades: to show information related to the assessment of activities performed by students (for additional information, a specific section in this manual is present below); Groups: to create and manage groups of students, for example to enroll specific activities to a group of students; Backup: to perform a backup of the entire course or only of single topic; Restore: to restore the course; Import: to import data coming from another course (only if the teacher has the rights to do it also in the other course that will be imported). In this manner a teacher will be able to create a new course by using contents and activities yet defined in another course; Reset: to delete all data referred to students enrolled in the course, but at the same time maintaining the course structure, activities and settings. ECLAP Best Practice Network: e-learning functionalities User Manual Reports: this functionality allows teachers and administrators to see reports regarding the activities performer by the students participating to a course (for additional information, a specific section is present below). Questions: to manage and define single questions that will be included in the questionnaires (for additional information, a specific section is present below). Files: to see the list of files included in the course, like for example backup files o other uploaded resources; Profile: the profile of the teacher user logged in the system. Add students to a course A teacher can enroll students in the course by clicking on the Assign roles link the Administration block on the left column. A new page will be opened showing: a list of available roles in the course (Roles) a description of the roles (Description) the number of users enrolled in the course for each role (Users) the name of the users. Please note that the list of roles shown on the Assign roles can be set by the Administrator. In the following image the teacher is able to enroll users only for the roles Non-editing teacher, Student and Guest. By clicking on one of the available roles, a new page is opened, allowing the teacher to add users by assigning to them the selected role. To add a user, the teacher has to select one of the available name on ECLAP Best Practice Network: e-learning functionalities User Manual the right column, press the Add button on the middle page and press the “Assign roles in Course:” to confirm (as shown on the following image). In the Assign roles page the teacher can also remove users for the course and define enrolment starting date and duration. Grades management The teacher can visualize a page reporting an overall view of the grades obtained by each student during the assessment activity. The page can be view by selecting the Grades link in the Administrator block on the left column. The Grader report webpage contains the list of all the students enrolled in the course with a numeric evaluation referred to each questionnaire and a total evaluation referred to the whole course. The last row in that table contains a medium evaluation of activities performed by all enrolled students. In general, grades can be calculated, aggregated and visualized in many different modalities according to settings defined by the teacher. Many activities performed by students can be evaluated, like for example: questionnaires, forums, assignments, etc. and values can be expressed in numeric form, as text in the form of words or phrases, or in a scale or rating system. ECLAP Best Practice Network: e-learning functionalities User Manual Grades can also be used as outcomes and as arbitrary text attributed to each participant in a course. The teacher can organize grades and category of grades, he can import and export grades from a course to another and perform calculations. The following image shows an example of overall report of grades collected after a questionnaire completion. ECLAP Best Practice Network: e-learning functionalities User Manual Detailed information on Grades http://docs.moodle.org/en/Grades are available The following image shows a complex report related to grades. ECLAP Best Practice Network: e-learning functionalities User Manual in officila Moodle documentation: Visualize reports on activities The page related to reports management is accessible by selecting the link Reports in the Administration block in the left column. The reports page allows teachers and administrator to recover information about all activities performed by users into a course. Informative logs related to activities are in the form of links to the other sections of the course (for example, a link to the user profile or to a specific activity or to a questionnaire). Particularly, the reporting page allows to have information related to the following activities: Course logs: show activity within the course. It allows tutors to see what resources are being used and when. They can check to see if an individual student has viewed a specific resource or participated on a specific activity on a specific day.; ECLAP Best Practice Network: e-learning functionalities User Manual Live logs from the past hour, it shows all the activity in the last hour, with a single click; Activity report, it shows all activity in the course, sorted by topic. Each item will be shown with its type and name. In order of appearance, the fields are: resource/activity name, # of times viewed, date last viewed, and elapsed time since last view; ECLAP Best Practice Network: e-learning functionalities User Manual Participation report, provides any easy way to monitor students' participation. The participation report can be accessed from a link off the Reports page; Statistics, (if enabled) Moodle gathers statistics about each course and for the whole site, and produce graphs displaying them. Statistics are available only for the administrator (root). The statistics graphs and tables show how many hits there have been on various parts of the website site during various time frames. They do not show how many distinct users there have been. They are processed daily at a time you specify. The administrator must enable statistics to see anything. The following images are related to course overview reports and show information like the most active courses or the most participatory courses over a certain time period. Results are displayed in a bar chart and in a table. ECLAP Best Practice Network: e-learning functionalities User Manual ECLAP Best Practice Network: e-learning functionalities User Manual How to create a new course E-learning functionalities identifies the following main roles: Website administrator (named root, he has the complete access to all functionalities in the portal); Teacher (is the user that add resources and activities in the course and defines the assessment modalities); Student (is the user that accesses to the course content and assessment questionnaires); Guest. The procedure to create a new course from scratch can be started by the administrator only (root). Only when a new course has been defined, the administrator itself can register one or more teachers to the course. After this the enrolled teacher will be able to add resources and to define activities in the course. The Moodle administration page allow to access to the e-learning platform management and is available at the following link: http://bpnet.eclap.eu/moodle/. When a user accesses to the administration page, he has to insert his username and password and then the main administration webpage is shown allowing the management of the whole e-learning framework (Moodle). ECLAP Best Practice Network: e-learning functionalities User Manual To create a new course, click on the link on the left CoursesAdd/Edit Courses. A new page will be opened showing the list of categories and of all available courses. ECLAP Best Practice Network: e-learning functionalities User Manual The category named Miscellaneous is a standard one and it is created by default, so that it is possible to associate every course to the Miscellaneous category, or it is possible to create a new category. For additional information it is possible to visit the Moodle documentation webpage available here: http://docs.moodle.org/en/Add/edit_course_categories. As shown in the previous image, every course category contains a set of icons that allow the user to: Edit an existing category Delete a category Visualize or hide a category Shift a category above or below on the list By clicking the Add a new course button available below the categories list, a new page is shown to define the course parameters. A new page is opened containing some mandatory fields to be filled-in: The Category of the course to be selected among the available Course name Course short name Also it is possible to add a course description and many useful settings can be defined. Detailed information on course settings are available in the following official Moodle documentation page: http://docs.moodle.org/en/Course_settings. When all settings have been defined, it is possible to click on the Save changes button at the end of the page, as shown in the following image. ECLAP Best Practice Network: e-learning functionalities User Manual ECLAP Best Practice Network: e-learning functionalities User Manual A new page is shown to define users’ roles in the course. Particularly the administrator can enroll users in the course with the following roles: Administrator, can usually do anything on the site, on all courses; Course creator, can create new courses; Teacher, can do anything within a course, including changing the activities and grading students; Non-editing teacher, can teach in courses and grade students, but may not alter activities; Student, generally have fewer privileges within a course; Guest, have minimal privileges and usually cannot enter text anywhere. By clicking on one of the available roles a new page is shown to allow to add users and to assign them the selected role. The list of users potentially qualified to assume the selected role is shoen on the right column. To add a user it is sufficient to select it on the list and to press the Add button so that the username will be shown on the left column list and his role will be assigned in the course. In the following image, the user Michela Paolucci is enrolled as teacher in the course named CM001. ECLAP Best Practice Network: e-learning functionalities User Manual In the following image, users Nicola Mitolo and Paolo Nesi have been enrolled as students in the course named CM001, starting from the 12th November for an unlimited time. When roles have been assigned, it is possible to save the page. An updated page with the report of all assigned roles is shown, as in the following image. ECLAP Best Practice Network: e-learning functionalities User Manual NOTE: for the administrator it is also possible to manage roles and assignments for all the users and for all the course, avoiding to assign roles course by course. By selecting the button “Click here to enter your course” at the end of the page, the page of the course is shown, reporting all activities included in the course. The following image shows an example of new course split in weekly activities (actually empty). ECLAP Best Practice Network: e-learning functionalities User Manual Access to a course as teacher A user enrolled in a course as teacher, can have the access to a course available in the ECLAP BPNET Portal to: define and add activities in a course define and add assessment and evaluation questionnaires visualize reports related to students’ activities. To have the access in a course, the teacher has to be logged in the ECLAP portal and has to click on the link My e-learning activities available in box e-learning Courses on the right column. The page with the list of available courses in which he is enrolled in will be shown. By clicking on the course name on the list, the page listing contents available in the course will be shown. At the end of the page a link to enter in the course editing modality is present (You can modify this course/moodle link), as shown in the following image. ECLAP Best Practice Network: e-learning functionalities User Manual By clicking on the link, a new page will be opened asking for the username and password of the teacher to allow him to enter in the Moodle administration frontend. NOTE: it is NOT necessary to enter again username and password to access in the course administration page in Moodle. By entering in Moodle, the page to edit the course is shown and the teacher will be able to access to many functionalities. The following is an example of main page of a course from the teacher point of view. ECLAP Best Practice Network: e-learning functionalities User Manual Add a summary to a course To add an introductory text, it is necessary to turn on the editing mode by clicking on the link “Turn editing on” on the Administration block on the left. To insert a text in the first topic of the course, click the edit icon as shown in the following image. A new page will be opened to insert the text as summary of topic 0. Write the text and click on the Save changes button at the end of the page. ECLAP Best Practice Network: e-learning functionalities User Manual Add a resource and an activity to a course The main page of the course is dived in section topics. A course is a collection of topics with resources and activities inside. when a new course is created, the administrator or the teacher has to insert resources and activities that will be visualized by the students of the course. It is not recommended to add resources and activities in the first topic. Please, be sure to add resources only in the numered sections, as highlited in the following image. ECLAP Best Practice Network: e-learning functionalities User Manual Do not add resources in the first not numbered section Insert resources only in the numbered sections In each topic it is possible to add the following resources (that will be viewed by the course students): Label: a label is a way to add text to the content area of your course. Labels can be used to give a quick instruction or for telling users what to click on next.; Pagina di testo: a simple page written using plain text; Web page: a resource that has a link in the center column of a course home page for the student to use. It is like a single page document that has the HTML editor tool which the teacher uses to create content.; Link to a File or web page: to upload any type of external electronic file; Directory: to display a whole directory (and its subdirectories) from the course files area. Students can then browse and view all those files.; ECLAP Media Content: to add a link to a re source published on the ECLAP BPNET portal; IMS Content Package: The IMS Content Packaging stores chunks of e-learning material in a standard format which can be re-used in different systems, without having to convert the material into new formats. it is also possible to add the following activities that students will execute: Assignment: it allows teachers to collect work from students, review it and provide feedback including grades. Students can submit any digital content (files), including, for example, wordprocessed documents, spreadsheets, images, audio and video clips. Alternatively, teachers can ask students to type directly an online text assignment; Chat: allows participants to have a real-time synchronous discussion via the web; ECLAP Best Practice Network: e-learning functionalities User Manual Choice: the teacher asks a question and specifies a choice of multiple responses. It can be useful as a quick poll to stimulate thinking about a topic; to allow the class to vote on a direction for the course; or to gather research consent; Database: The database activity module allows the teacher and/or students to build, display and search a bank of record entries about any conceivable topic. The format and structure of these entries can be almost unlimited, including images, files, URLs, numbers and text amongst other things; Feedback: allows you to create and conduct surveys to collect feedback from Students. It is smaller in scope and therefore easier to use than the Questionnaire module, and unlike the Survey tool allows you to write your own questions, rather than choose from a list of pre-written survey instruments; Forum: an activity where students and teachers can exchange ideas by posting comments; Glossary: The Glossary activity allows participants to create and maintain a list of definitions, like a dictionary. The autolinking feature, will highlight any word in the course which is located in the glossary; Lesson: The lesson module presents a series of HTML pages to the student, who is usually asked to make some sort of choice underneath the content area. The choice will send them to a specific page in the Lesson. In a Lesson page's simplest form, the student can select a continue button at the bottom of the page, which will send them to the next page in the Lesson; Quiz: module allows the teacher to design and set quizzes consisting of a large variety of Question types, including multiple choice, true-false, and short answer questions. These questions are kept in the Question bank and can be re-used in multiple quizzes. Quizzes can be configured to allow multiple attempts. Each attempt is automatically marked, and the teacher can choose whether to give feedback and/or show the correct answers. SCORM/AICC: a course activity which allows you (the teacher) to upload any SCORM or AICC package to include in your course. SCORM (Sharable Content Object Reference Model) is a collection of specifications that enable interoperability, accessibility and reusability of web-based learning content. SCORM content can be delivered to learners via any SCORM-compliant Learning Management System (LMS) using the same version of SCORM; Survey: The Survey activity module is a course activity that provides a number of verified survey instruments, including COLLES (Constructivist On-Line Learning Environment Survey) and ATTLS (Attitudes to Thinking and Learning Survey), which have been found useful in assessing and stimulating learning in online environments. Teachers can use these to gather data from their students that will help them learn about their class and reflect on their own teaching; Wiki: A wiki activity is a collection of collaboratively authored web documents. Basically, a wiki page is a web page everyone in your class can create together, right in the browser, without needing to know HTML. A wiki starts with one front page. Each author can add other pages to the wiki by simply creating a link to a page that doesn't exist yet. To add resources in a course, the teacher has to: be logged in the moodle administration frontal page; select the course in list “My courses” accessible in the middle of the mage by clicking the course title; ECLAP Best Practice Network: e-learning functionalities User Manual In the Administration box on the left, select “Turn editing on” to enter in the editing modality (see next image); In each topic in the course two drop-down menu are available. Click the menu Add a resource…, select the resource type to be added in the course among the available, or click on Add an activity… to add for example a questionnaire or a survey, etc. ECLAP Best Practice Network: e-learning functionalities User Manual In the right part of each course topic, some icons are available. They allow to: See all weeks/topics; Make Current (highlight) week/topic; Close/Hide item or Open/Show Item; Move down the topic in the list. Add a multimedia re source available in the ECALP Portal Resources available on the ECLAP portal can be added as resources in a course. In this manner, if an ECLAP content has been added in a lesson, the content itself will be played as any other resource available in the ECLAP portal. To add a resource available in the ECLAP portal in a lesson, follow the following procedure: make a query on the ECLAP portal http://bpnet.eclap.eu/ to search the content to be added to the lesson; go with the mouse on the animated icon or on the resource title, right click and copy the link of the resource; ECLAP Best Practice Network: e-learning functionalities User Manual go to the course administration page in Moodle, click on the menu “Add a resource…” and select the item “ECLAP Media content” (see next image); ECLAP Best Practice Network: e-learning functionalities User Manual a new page will be opened. Insert the title of the ECLAP resource and a description; in the field “ECLAP Media content” paste the URL address of the ECLAP resource, with the AXOID. The link can have one of the following syntax: o o http://bpnet.eclap.eu/drupal/?q=enUS/home&axoid=urn:axmedis:00000:obj:e05155a5-e4c8-4f52-84337f58ee54a102§ion=lastPosted urn:axmedis:00000:obj:e05155a5-e4c8-4f52-8433-7f58ee54a102 NOTE: this procedure will be simplified in the next future and will be possible to add an ECLAP resource in a lesson topic in a simplest manner. Press the “Save and return to course” button to save the link; now the ECLAP content has been added to the course. ECLAP Best Practice Network: e-learning functionalities User Manual NOTE: please note that actually it is not possible to correctly visualize an ECLAP resource by clicking on the resource link in the Moodle administration front page since an error message is visualized in this case. Nevertheless by accessing to the course from the ECLAP BPNET portal and by clicking to the resource link in the lesson, the same content will be correctly visualized. Create a questionnaire To create a questionnaire, it is necessary to define the single questions before and then the questionnaire can be structured by inserting the defined questions. In the left column, in the Administration block the item Questions is available, it allows to define the single questions in many different manner. ECLAP Best Practice Network: e-learning functionalities User Manual By selecting Questions a new page will be shown to create and manage the questions. This module allow to create many different type of questions, like: Calculated – Calculated questions offer a way to create individual numerical questions by the use of wildcards that are substituted with individual values when the quiz is taken; Description – This is not a real question. It simply prints some text (and possibly graphics) without requiring an answer. This can be used to provide some information to be used by a subsequent group of questions, for example; Essay – In response to a question (that may include an image) the respondent writes an answer in essay format; Matching - A list of sub-questions is provided, along with a list of answers. The respondent must "match" the correct answers with each question; Embedded answers (Cloze) – These very flexible questions consist of a passage of text (in Moodle format) that has various answers embedded within it, including multiple choice, short answers and numerical answers; Multiple Choice – In response to a question (that may include a image) the respondent chooses from multiple answers. There are two types of multiple choice questions - single answer and multiple answer; Short Answer – In response to a question (that may include a image), the respondent types a word or phrase. There may several possible correct answers, with different grades. Answers may or may not be sensitive to case; Numerical – From the student perspective, a numerical question looks just like a short-answer question. The difference is that numerical answers are allowed to have an accepted error. This allows a continuous range of answers to be set; Random Short-Answer Matching - From the student perspective, this looks just like a Matching question. The difference is that the sub-questions are drawn randomly from Short Answer questions in the current category; True/False - In response to a question (that may include a image), the respondent selects from two options: True or False. ECLAP Best Practice Network: e-learning functionalities User Manual Select in the drop down menu “Create new question” the type of the activity among the available. In the following example, how to create a multiple choice question will be shown: 1. Select in the drop down menu the item Multiple Choice. A new page will be opened to create the question; 2. Select the question category (if available); 3. Write the question title useful to identify the question (for example: Multiple Choice question 1); 4. write the text of the question; 5. Specify a value to be used as penalty factor in case of error answer. If the penalty factor is more than 0, then the student will lose that proportion of the maximum grade upon each successive attempt. For example, if the default question grade is 10, and the penalty factor is 0.2, then each successive attempt after the first one will incur a penalty of 0.2 x 10 = 2 points. 6. Write the text for the general feedback. General feedback is some text that gets shown to the student after they have attempted the question; ECLAP Best Practice Network: e-learning functionalities User Manual 7. Choose whether students can only select one answer or multiple answers (One or multiple answers?); 8. Choose whether to shuffle the answer options; 9. Select how to number the choices (Number the choices?) 10. Write your first answer in the Choice 1 text field. Inserting HTML into this area also makes it possible to add an image or a sound file; 11. Select a grade percentage for the answer. This is the percentage of the total points for the question that selecting this response is worth. You can select negative percentages as well as positive percentages. So, selecting a correct response in a multiple answer question may give you 50% of the possible points, while selecting a wrong answer may take away 10%. Note that in a multipleanswer question, the grades must add up to 100%; 12. Add a feedback for each response, if you wish; ECLAP Best Practice Network: e-learning functionalities User Manual 13. repeat the points from 10 to 12 for all the possible answers to be included in the question; 14. Click on the button Blanks for 3 more Choices to add additional possible answers; 15. In the Overall Feedback field write the text to be shown For any correct response, For any partially correct response, and For any incorrect response; 16. Click on the button Save changes to save the question. The new question will be shown in list of the available (Question bank). ECLAP Best Practice Network: e-learning functionalities User Manual Add questions to a questionnaire When all single questions have been created and saved, it is possible to structure the questionnaire to be submitted to students, also by defining parameters. 1. Go in the main administration page of the course. Select the numbered topic where to add the questionnaire. In the drop down menu “Add an activity…” select the item Quiz; 2. in the General part, insert the name of the questionnaire and an introductory text, if needed; 3. in the Timing part: o specify times when the quiz is accessible for people to make attempts. Before the opening time, and after the closing time, the quiz will be unavailable; o specify a time limit to ensure that quizzes are completed within that time. If a student manages to cheat and spends more than 60 seconds over the allotted time then the quiz is automatically graded zero. o specify if the student will be allowed multiple responses to a question even within the same attempt at the quiz. So for example if the student's response is marked as incorrect the student will be allowed to try again immediately. However a penalty will usually be subtracted from the students score for each wrong attempt. 4. in the Display part: o define the number of questions to be shown per page; o specify if the order of questions in the quiz will be randomly shuffled each time a student attempts the quiz.; o specify if the parts making up the individual questions will be randomly shuffled each time a student starts an attempt at this quiz, provided the option is also enabled in the question settings. 5. in the Attempts part: o specify the max number of attempts allowed to solve the questionnaire; o specify if the new attempt has to contain the results of the previous attempt; o specify if the student will be allowed multiple responses to a question even within the same attempt at the quiz 6. In the Grades part: o indicate the grading method to calculate student’s final grade for the quiz; ECLAP Best Practice Network: e-learning functionalities User Manual 7. 8. 9. 10. 11. o if a quiz is run in adaptive mode then a student is allowed to try again after a wrong response. In this case you may want to impose a penalty for each wrong response to be subtracted from the final mark for the question. The amount of penalty is chosen individually for each question when setting up or editing the question. o select the number of digits that should be shown after the decimal point when displaying student scores or grades. In the Review options specify what information users can see when they review a quiz attempt or look at the quiz reports; In the Security part some restrictions can be defined to the user accessing the questionnaire; The Common module settings part it is possible to define if the activities can be visible only to specific groups or sub-groups of students, according to the settings defined during the course creation; In the Overall feedback it is possible to define generic text to be shown to students after they have completed an attempt at the quiz. The text that is shown can depend on the grade the student got. Click the “Save and return to course” button to complete the questionnaire creation. The new questionnaire will be shown as activity in the main page (see next image); 12. Click the questionnaire link and a new page will be shown to add the single questions by selecting each of them one-by-one from the Question bank; ECLAP Best Practice Network: e-learning functionalities User Manual List of questions 13. Select one or more questions in the list and click on the << button to add each single question to the questionnaire. The added question are included in the list on the left, below the text “Questions in this quiz”; ECLAP Best Practice Network: e-learning functionalities User Manual 14. Click on “Save changes” button to complete the questionnaire creation. ECLAP Best Practice Network: e-learning functionalities User Manual