1
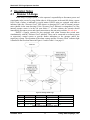
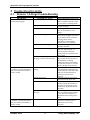
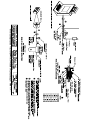
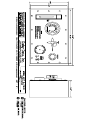
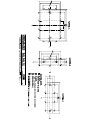
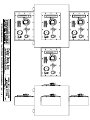
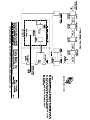
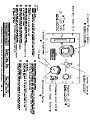
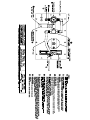
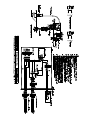
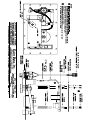
Model 9017 Z/Y-Purge
Interface:
User’s Manual
October 2015
Model 9017 Z/Y-Purge Operator Interface
DISCLAIMER
Daisy Data Displays, Inc. (DAISY) makes no representations or warranties with respect to the
contents or use of this manual, and specifically disclaims any express or implied warranties of
merchantability or fitness for any particular purpose. Further, Daisy Data Displays, Inc. reserves
the right to revise this publication and to make changes to its content, at any time, without
obligation to notify any person or entity of such revisions or changes.
Further, Daisy Data Displays, Inc. makes no representations or warranties with respect to any
DAISY manufactured equipment, and specifically disclaims any express or implied warranties of
merchantability or fitness for any particular purpose. Further, DAISY reserves the right to make
changes to any and all DAISY manufactured equipment, at any time, without obligation to notify
any person or entity of such changes.
FCC WARNING
Computing devices and peripherals manufactured by DAISY generate, use, and can radiate radio
frequency energy, and if not installed and used in accordance with the instructions in this manual
may cause interference to radio communications. Such equipment has been tested and found to
comply with the limits for a Class A computing device pursuant to Subpart J of Part 15 of the
FCC Rules, which are designed to provide reasonable protection against radio interference when
operated in a commercial environment. Operation of this equipment in a residential area is likely
to cause interference, in which case the user - at his own expense - will be required to take
whatever measures may be required to correct the interference.
Some components may not have been manufactured by Daisy Data Displays, Inc. If not, DAISY
has been advised by the manufacturer of the component that the component has been tested and
complies with the Class A computing device limits as described above.
Copyright 2012 Daisy Data Displays, Inc. All rights reserved. No part of this publication may
be reproduced, photocopied, stored on a retrieval system, or transmitted without express prior
written consent.
Daisy Data Displays, Inc.
2850 Lewisberry Road
York Haven, PA 17370 USA
Phone: (717) 932-9999
www.makeitdaisy.com
October 2015 Edition
Manual Revision 2.5
Part Number D011-000002
October 2015
ii
Daisy Data Displays, Inc.
Model 9017 Z/Y-Purge Operator Interface
Limited Warranty and Liability Statement
To the original purchaser, Daisy Data Displays, Inc., hereinafter referred to collectively
as SELLER, warrants each of its manufactured products, and all components therein contained to
be free from defects in materials and/or workmanship for a period of 12 months from the date of
purchase.
Should a malfunction or other indication of defect attributable directly to faulty materials
and/or workmanship occur, Seller will, at its option, and without charge to the customer for labor
and parts, repair or replace the defective product, F.O.B. Seller’s plant, but Seller will not be
responsible for freight from Purchaser to Seller’s plant.
In no event shall Seller be liable for any loss, inconvenience or damage, whether direct,
incidental, consequential or otherwise resulting from abuse, misapplication or modification of
the product, improper or faulty power, damage resulting from repairs or alterations performed by
unauthorized persons, or conditions resulting from any other equipment attached to the product.
Seller assumes no liability for damage occurring in transit due to the product not being
returned in its original shipping material.
This warranty is exclusive and is in lieu of any warranty of merchantability or
fitness for a particular purpose or other warranty of quality whether expressed or implied,
except of title and against patent infringement. Correction of nonconformities, in the manner
and for the period of time provided above, shall constitute fulfillment of all liabilities of the
Seller to the Purchaser with respect to, or arising out of the goods, whether based on contract,
negligence, strict tort or otherwise.
LIMITATION OF LIABILITY: The Seller shall not under any circumstances be liable
for special or consequential damages, such as, but not limited to, damage or loss of other
property or equipment, loss of profits or revenues, cost of capital, cost of purchased or
replacement goods, or claims of customers of Purchaser for service interruptions. The remedies
of the Purchaser set forth herein are exclusive, and the liability of Seller respect to any contract,
or anything done in connection therewith such as the performance or breach thereof, of from the
manufacture, sale, delivery, resale, installation or use of any goods covered by or furnished under
this contract whether arising out of contract, negligence, strict tort or breach of warranty or
otherwise, shall not, except as expressly provided herein, exceed the price of the goods upon
which such liability is based.
This warranty gives you specific legal rights, and you may also have other rights, which
vary from state to state.
Seller makes every effort to provide clear and accurate technical information on the
application of its products in the Operator's Manual, and assumes no liability for misuse of the
information.
October 2015
iii
Daisy Data Displays, Inc.
Model 9017 Z/Y-Purge Operator Interface
TABLE of CONTENTS
Model 9017 Z/Y-Purge ................................................................................................................. 1
User’s Manual ............................................................................................................................... 1
DISCLAIMER....................................................................................................................................................... ii
FCC WARNING ................................................................................................................................................... ii
Limited Warranty and Liability Statement ........................................................................................................... iii
TABLE of CONTENTS ........................................................................................................................................iv
1 Introduction ............................................................................................................................. 1
2 Hazardous Area Safety Methods: Theory of Operation ..................................................... 2
2.1
Division 1: Z/Y-Purge Protection ....................................................................................... 2
3 Pre-Installation Testing .......................................................................................................... 3
3.1
Division 1 Z-Purge Test ...................................................................................................... 3
4 Installation ............................................................................................................................... 5
4.1
Power and Signal Wiring Requirements ............................................................................. 5
4.2
Pack-Seal Connection Instructions ..................................................................................... 6
4.3
Purge Air Line Connection Instructions ............................................................................. 7
4.3.1
For Division 1 Z-Purge Systems Model 9017 .......................................................................................7
5 Start-Up Operation ................................................................................................................. 9
5.1
Division 1 Z/Y-Purge Start-Up Operation .......................................................................... 9
6 Operation Notes .................................................................................................................... 11
6.1
Division 1 Z-Purge ............................................................................................................ 11
7 Customer Service .................................................................................................................. 12
8 Trouble-Shooting Guide ....................................................................................................... 13
8.1
Division 1 Z-Purge Trouble-Shooting .............................................................................. 13
9 Specifications ......................................................................................................................... 15
10
Drawings .......................................................................................................................... 16
October 2015
iv
Daisy Data Displays, Inc.
Model 9017 Z/Y-Purge Operator Interface
1 Introduction
Thank you for selecting a DAISY solution for your hazardous area operator interface
requirements!
This manual describes the general procedures for installing and operating DAISY Z/YPurge systems. The text portion of the manual also includes an overview of the theory behind the
methods used to make electronic systems safe for hazardous areas. Section 9, Specifications, also
contains an overview of system specifications, and Section 10, Drawings, includes mechanical
drawings of each unit.
We are always working to improve our documentation. If you have any suggestions or
requests, please forward them to our sales department at [email protected], or to Daisy Data
Displays, Inc., 2850 Lewisberry Road, York Haven, PA 17370, Attn: User Manual Coordinator.
October 2015
1
Daisy Data Displays, Inc.
Model 9017 Z/Y-Purge Operator Interface
2 Hazardous Area Safety Methods:
Theory of Operation
2.1
Division 1: Z/Y-Purge Protection
The Z-Purge (Model 9017) and the Y-Purge (DAISY Enclosure Mounted) Systems are
Electrically and Pneumatically the same. For the rest of this manual they will refer to as a ZPurge. The I033-000002-03 Printed Circuit Board will be called the ZPA Assembly.
Z-purge systems are used for installing electrical equipment in hazardous areas (see
National Electrical Code articles 500-504 and the NFPA 496, section 2-8).
A Z-purge system provides the protective purge and maintenance of safe gas flow to the
enclosure; the purge system operation and the power and signal connections are controlled by the
operator (as opposed to the automatic control provided by X-purge systems Model 9016). The
purge system includes alarm contacts and a visible indicator to alert the user and possibly an
automated control system in the event of the loss of pressure within the enclosure; that is, a
failure of the protective safe gas flow or of enclosure integrity.
At start-up, the enclosure is purged of any possible flammable materials by applying a
rapid flow of air through the enclosure. Prior standards simply required an exchange of four
volumes of air through the enclosure. However, the standards now require that the volume of air
passed through a given enclosure eliminate any possible flammable concentration of substances
within the enclosure (the minimum of four volumes of exchange still applies). Factory Mutual
Class Number 3620 (section 4.2, page 5) states, “When … concern exists that all compartments
may not be purged, purging tests shall be conducted.” This requires consideration not only of the
airflow and pressure, but also of the enclosure’s shape and the effect of equipment installed
within the enclosure. DAISY’s systems have been fully tested under the supervision of Factory
Mutual to ensure compliance with the standards of FM 3620: 4.2.
After the enclosure has been purged, the operator switches the purge control to the
“operate” setting. At this setting, the air flow rate is reduced to conserve the protective gas while
still maintaining a positive pressure within the enclosure to prevent the entry of flammable
materials. At this time, the operator can apply power to the electronics within the enclosure. In
the event of a loss of protective pressure within the enclosure, the alarm system will indicate the
failure. The operator must then shut off power and signal connections at a safe disconnect
location.
Y-purge systems are used for installing electrical equipment in Division 1 hazardous
areas (see National Electrical Code articles 500-504 and the NFPA 496, section 2-9). Essentially,
the installation of a Y-purge on a DAISY enclosure in a Division 1 area reduces the rating inside
of the enclosure to Division 2. This allows less costly Division 2 electronic equipment to be
safely used in Division 1 areas.
October 2015
2
Daisy Data Displays, Inc.
Model 9017 Z/Y-Purge Operator Interface
3 Pre-Installation Testing
Before installing your system in its final location, you may wish to test it to verify that
the purge system is functioning correctly.
3.1
Division 1 Z-Purge Test
IMPORTANT NOTE: Pre-installation testing should always be conducted in a safe
area.
Equipment Required
• Clean, dry purge air or inert gas supply equipped with local water/oil separator or filter
capable of supplying 150 SCFH at 20 - 100 PSI
• Fittings and tubing for purge air or inert gas supply (0.25” NPT Male to connect to the inlet
of the purge system)
• Local air pressure shutoff valve
Procedure
1. Place the unit in a safe area near a source of the purge gas to be used (compressed air line or
other inert gas source).
2. Through a cord grip or other cable-sealing device, bring AC power into the enclosure. Be
sure that the AC power is off. Connect the AC power temporarily to the Z-purged unit (see
drawing E009 at the end of this manual).
3. Temporarily install a pressure regulator, water/oil separator or filter, shutoff valve, pressure
relief valve, and pressure gauge in the purge air or inert gas line (see drawing P015 at the end
of this manual.).
4. Bleed the purge air or inert gas line to insure that dirt, moisture, and other
contaminants are cleared from the line prior to connecting the line to the unit!
5. Connect the purge gas line to the inlet of the regulator on the Purge Unit.
6. Apply air or inert gas to the enclosure. The enclosure may “swell” slightly as the internal
pressure increases. This is normal and is not a cause for concern. DAISY enclosures are
designed to release excess pressure. DO NOT ATTEMPT TO OPEN THE ENCLOSURE
WHILE IT IS PRESSURIZED!
7. Turn the control valve to PURGE. Look at the flow meter on the front panel to verify that the
flow rate is 150 SCFH. If not, readjust the purge regulator to set the flow to 150 SCFH.
8. If the flow meter does not read 150 SCFH, inspect the enclosure for blockage in the purge
gas lines and take appropriate action to clear the blockage. If blockages are not obvious,
verify that the purge air or inert gas is clean and dry.
9. Slowly turn the control valve to OPERATE. If the control valve is turned rapidly, the
indicator ball in the flow meter may start oscillating. Look at the pressure gauge on the front
panel to be certain that the internal pressure is 1.0” of Water Column. If not, reset the
adjustment on the exhaust assembly on the so that the pressure gauge reads 1.0” of Water
Column.
10. Slowly turn the control valve to PURGE. Make sure that the flow meter reads 150 SCFH. If
not, readjust the regulator for 150 SCFH.
11. Slowly return the control valve to OPERATE and apply power to the enclosure. The
“Pressure Good” LED should be illuminated green. If not, check the internal pressure, it
October 2015
3
Daisy Data Displays, Inc.
Model 9017 Z/Y-Purge Operator Interface
should be between 0.4” and 10.0” of Water Column. The pressure good led must be
illuminated green at this time. If it is not, please consult the factory.
12. If the “Pressure Good” LED is not illuminated green, the internal pressure is below 0.4”
Water Column and the alarm is on. Turn the enclosure power off and repeat steps 2 though 6.
October 2015
4
Daisy Data Displays, Inc.
Model 9017 Z/Y-Purge Operator Interface
4 Installation
4.1
Power and Signal Wiring Requirements
Mounting Location
When mounting, Human Machine Interfaces (HMI) and Purge systems must be positioned to
avoid radiated and induced interference. Do not mount the unit in close proximity to a device
that generates strong radiofrequency interference or electromagnetic interference. HMI and
Purge systems must be also positioned to avoid exposure to excessive heat. Do not mount the
unit in close proximity to a steam line, heated vat or oven.
Gland Plates
Before modifications can be made, Gland Plates must be removed. Please note that metal
shavings are detrimental to electronic systems.
Machining
Only make enclosure penetrations in designated locations. All metal shavings must be collected
and removed.
Wiring Requirements
AC power inputs require dedicated circuits or feeds. Power from lines or circuits shared by
motors, drives, welders, arc furnaces, or inductive lighting is not acceptable. Conduits for HMI
and Purge power should be separated from other conduits to prevent radiated or induced
interference. Devices that produce spikes, surges, and brownouts are detrimental to computers,
and can corrupt data and interfere with purging systems. Do not use a transformer or other
device to step down a three phase circuit to run a HMI or Purge System.
Communication wires and signals should be run in separate conduits and routed away from
power conduits. Providing isolation to prevent emissions from other conduits is essential to data
integrity. Long runs of parallel signal lines can cause “cross-talk” and corrupt data making
communications unreliable or impossible.
DC power should be provided by a dedicated power source. If multiple units must be powered
from a single DC supply, the power cables must be run directly from the unit to the supply.
Chaining power from one unit to the next is unacceptable. Units can interfere with each other by
developing noise due to the resistance of the wires. The filtering is provided by the source or
power supply.
Additional Wiring
It is not permitted to run wiring through the unit that is nonessential to the unit. The cabinet is
not a junction box.
Adding Additional Equipment
Installing additional equipment in units approved for hazardous classed environments violates
the approval of the unit.
October 2015
5
Daisy Data Displays, Inc.
Model 9017 Z/Y-Purge Operator Interface
4.2
Pack-Seal Connection Instructions
A conduit seal is necessary for most equipment enclosures in hazardous areas. For Zpurge, they are always required. Please consult your local code for other instances and full
details.
ALWAYS follow all NEC, NFPA, and local codes when installing conduit and packseals in hazardous areas! It is very important that knowledgeable personnel, familiar with
national and local codes, supervise hazardous area equipment installations.
The sealing compound generally used for pack-seals is an inorganic, chemically setting,
magnesium oxide base material, which develops a slight expansion while hardening into a
porcelain-like body. Sealing Compound is supplied as a powder and need only be mixed with
water to apply. Approximately one ounce of sealing compound is needed per cubic inch of space
to be filled.
The sealing compound powder has a shelf life of six months when stored in unopened,
tightly sealed containers in a dry location at 70°F.
Any equipment accidentally splashed with sealing compound should be cleaned with
soap and water before the sealing compound cures.
Equipment Required
• Four PAC-Seal fittings, 1” NPT or 0.75” NPT for the Z-Purge, or sealing conduits. The PAC
Seal and conduit size selected will depend on the size and number of conductors, which must
be run to the unit. Check the NEC tables (Chapter 9, Table 4) to determine the conduit size
necessary
• Conduit for electrical signals and for electrical power (separate runs), NEC and NFPA
approved for use in hazardous areas
• NEC and NFPA approved flexible conduit if needed for difficult installations
• Fittings as required for permanent conduit installation NEC and NFPA approved for use in
hazardous areas
• Signal cables, power cables, and connectors as required to mate with the equipment within
the enclosure or cast aluminum box
• AC power switch for use in the safe area
Procedure
1. Threaded surfaces and pour locations should be cleaned with soap and water and thoroughly
dried before proceeding.
2. On a Z-purge system, no entryway is provided by DAISY for power and signal conduits.
These entries must be made by the end user. Select a point on the enclosure that matches well
with the location of the incoming conduit. Be careful to ensure that the point you have
selected is free from obstructions within the DAISY enclosure. Being careful to protect the
internal electronics, air pathways, and keyboard surface from flyings and other debris, drill or
punch holes for the installation of the Pack-Seal fitting (1” NPT or 0.75” NPT, depending on
application) in the wall of the enclosure.
3. Install two conduit runs (one signal, one power) between the Z-Purge system and AC power
source (located in a safe area or in an explosion-proof box). See drawing P015 at the end of
this manual.
October 2015
6
Daisy Data Displays, Inc.
Model 9017 Z/Y-Purge Operator Interface
4. Shake the sealing compound powder well before mixing with water. The recommended mix
ratio is 5 parts powder to 1 part clean water, by weight. A 25mL vial of water has been
provided with the compound to meet this ratio. Place 70°F water into a clean mixing
container and gradually add powder to water while mixing. Continue mixing until a uniform
consistency is obtained. Mixing may be done with a slow-speed mixer or by hand with a
spatula. The minimum amount of water (as specified above) should be used as excess water
reduces mechanical strength, increases shrinkage, and delays set time. Failure of the cement
to adhere indicates setting has begun – discard cement, do not attempt to re-temper by adding
more water.
5. The compound may be applied by pouring, casting, or mechanical dispenser. The sealing
compound hardens with an internal chemical-setting action in 18 to 24 hours at ambient
temperature. Working time of the sealing compound when the powder is mixed with water is
approximately 30 minutes at 70°F. If accelerated curing is desired, low temperature oven
drying at 180°F can be used. Do not expose the sealing compound to higher temperatures,
constant water immersion, or steam environments while curing. If high humidity resistance is
required in the cured product, a moisture-resistant lacquer or silicone coating should be
applied to the exposed surfaces.
6. The packing fiber is made from an environmentally safe, non-asbestos material. It is easy to
use and forms a positive dam to hold the compound. The fiber is placed around each
individual wire or cable at both ends of the cavity for horizontal pouring in the PAC Seal so
that the Sealing Compound can encapsulate each completely. For vertical pouring, the
packing fiber need only be placed at one end. See drawing P002 at the end of this manual.
7. We recommend a special blend of lubricants, LUBT-2, for use with threaded joints. This
lubricant is to be used to prevent galling of the pipe threads when threaded into a coupling,
junction box, etc. It insures a quick release and undamaged male and female threads when
parts are disassembled. The thread lubricant is high quality lubricant to be used in
temperatures ranging from -40° to +50° F. It is recommended for use in a hazardous location.
The PAC Seal Compound, packing fiber and LUBT-2 are available from Killark at
http://www.killark.com/.
8. For enhanced reliability of the unit, install an AC line conditioner. AC power lines should be
no smaller than 14 gauge and have a TRUE EARTH GROUND.
4.3
4.3.1
Purge Air Line Connection Instructions
For Division 1 Z-Purge Systems Model 9017
After the unit has been mounted in its final location in the hazardous area, it must be
permanently connected to a purge air or inert gas line and checked for leaks and proper operation
of the purge/pressurization system. Only when its pressure integrity has been established should
electrical signals and power be brought “live” to the unit.
ALWAYS follow all NEC, NFPA, and local codes when installing purge systems in
hazardous areas! It is very important that knowledgeable personnel, familiar with national
and local codes, supervise hazardous area equipment installations.
October 2015
7
Daisy Data Displays, Inc.
Model 9017 Z/Y-Purge Operator Interface
Equipment Required
• Clean, dry purge air or inert gas supply equipped with local water/oil separator or filter
capable of supplying 150 SCFH at 20 - 100 PSI
• Fittings and tubing for purge air or inert gas supply (0.25” NPT Male to connect to the inlet
of the purge system)
• Local air pressure shutoff valve
Procedure
1. Mount the enclosure in the location in which it will be installed. This must be near the source
of air or inert gas to be used for the purge system.
2. Install the pressure regulator, water/oil separator or filter, shutoff valve, pressure relief valve,
and pressure gauge in the purge air or inert gas line (see drawing P015).
3. Bleed the purge air or inert gas line to insure that dirt, moisture, and other
contaminants are cleared from the line prior to connecting the line to the unit!
4. Connect the line to the inlet of the regulator on the Purge Unit.
5. Apply air or inert gas to the enclosure. The enclosure may “swell” slightly as the internal
pressure increases. This is normal and is not a cause for concern. DAISY enclosures are
designed to release excess pressure. DO NOT ATTEMPT TO OPEN THE ENCLOSURE
WHILE IT IS PRESSURIZED!
October 2015
8
Daisy Data Displays, Inc.
Model 9017 Z/Y-Purge Operator Interface
5 Start-Up Operation
5.1
Division 1 Z/Y-Purge Start-Up Operation
1. When the air, signal, and power connections are complete, replace and close all access doors
and covers.
2. Turn the Control valve to PURGE. Look at the Flow Meter on the front panel to verify that
the flow rate is 150 SCFH. If not, readjust the Purge Regulator to set the flow to 150 SCFH.
3. If the Flow Meter does not read 150 SCFH, inspect the enclosure for blockage in the purge
gas lines and take appropriate action to clear the blockage. If blockages are not obvious,
verify that the purge air or inert gas is clean and dry.
4. Slowly turn the Control Valve to OPERATE. If the Control Valve is turned rapidly, the ball
in the Flow Meter may start oscillating. Look at the pressure gauge on the front panel to be
certain that the internal pressure is 1.0” of Water Column. If not, reset the adjustment on the
exhaust assembly on the so that the pressure gauge reads 1.0” of Water Column.
5. Slowly turn the Control Valve to PURGE. Make sure that the Flow Meter reads 150 SCFH.
If not, readjust the regulator for 150 SCFH.
6. The size of your enclosure will determine the purge time, unless you purchased a Z/Y-Purge
on a DAISY Enclosure, then follow the purge time stated on the product label. After purge
cycle, slowly turn the control valve to OPERATE.
TABLE 3-1
Enclosure Size
Purge Time
1 cu. ft.
2 cu. ft.
3 cu. ft.
4 cu. ft.
5 cu. ft.
6 cu. ft.
7 cu. ft.
8 cu. ft.
9 cu. ft.
10 cu. ft.
11 cu. ft.
15 cu. ft.
20 cu. ft.
30 cu. ft.
40 cu. ft.
50 cu. ft.
60 cu. ft.
1 min. 45 sec.
3 min. 15 sec.
5 min.
6 min. 30 sec.
8 min. 15 sec.
9 min. 45 sec
11 min. 15 sec.
13 min.
14 min. 30 sec.
16 min.
17 min. 45 sec
24 min.
32 min.
48 min.
64 min. (1 hr. 4 min.)
80 min. (1 hr. 20 min.)
96 min. (1 hr. 36 min.)
IMPORTANT!
IT IS THE CUSTOMER’S RESPONSIBILITY TO DETERMINE THE
PURGE TIME AND MARK THE ENCLOSURE ACCORDINGLY.
7. Apply power to the enclosure. The Pressure Good LED should be illuminated green. If not,
check the internal pressure: it should be between 0.4” and 10.0” of Water Column. The
October 2015
9
Daisy Data Displays, Inc.
Model 9017 Z/Y-Purge Operator Interface
pressure good led must be illuminated green at this time. If it is not, please consult the
factory.
8. If the Pressure Good LED is not illuminated green, the internal pressure is below 0.4” Water
Column and the Alarm is on. Turn power off to the enclosure and repeat steps 2 though 6.
October 2015
10
Daisy Data Displays, Inc.
Model 9017 Z/Y-Purge Operator Interface
6 Operation Notes
6.1
Division 1 Z-Purge
When using a Z-purge system, it is the operator’s responsibility to disconnect power and
signal paths in the event of a purge failure (that is, if the pressure in the unit falls below a preset
level). Such a failure is indicated by several means. DAISY units are equipped with both an
indicator light (the “Pressure Good” LED shown on drawing P017) and an internal pressure
meter (shown on the same drawing). If the “Pressure Good” indicator is extinguished, or if the
internal pressure meter is in the red zone below 1” of water column, the operator should
immediately disconnect power and signal connections to the unit using switches in a safe area.
DAISY’s Z-purge systems are also equipped with alarm contacts that switch state
simultaneously with the “Pressure Good” indicator. These can be connected to an alarm system
or supervisory control system to provide further indications to the operator and/or the
supervisory system. The operation of the alarm contacts and the “Pressure Good” indicator light
is detailed in the flowchart shown in Figure 6.1 and in Table 6.1 on page 11.
Figure 6.1 Z-Purge Alarm Logic
Power is
Pressure is
NC1 & NC2 are
NO1 & NO2 are
Pressure Good LED
Off
Off
On
On
< 0.4” W.C.
> 0.4” W.C.
< 0.4” W.C.
> 0.4” W.C.
Closed
Closed
Open
Closed
Open
Open
Closed
Open
Off
Off
Off
On
Table 6.1 Z-Purge Alarm and Indicator States
October 2015
11
Daisy Data Displays, Inc.
Model 9017 Z/Y-Purge Operator Interface
7 Customer Service
All Daisy systems pass detailed quality control configuration and inspection before being
shipped. Daisy strives to create the highest quality systems, and chooses top quality parts.
However, like most electronic devices, units may experience issues over time. Should you
experience problems, or have any further inquiries or comments, please contact Daisy’s customer
service department:
Business Phone
Fax
Email
(717)932-9999x222
(717)932-8000
[email protected]
Equipment returned to DAISY for service must be accompanied by a valid return
merchandise authorization (RMA) number. Anything shipped to DAISY without a valid RMA
number will be refused. Please contact customer service for an RMA number; be prepared to
provide model AND serial numbers to help identify your equipment. Typical I.D label
shown below with Serial and Model numbers highlighted.
You may be able to trouble shoot problems yourself. To save time and money, please
consult the trouble-shooting guide in this manual.
October 2015
12
Daisy Data Displays, Inc.
Model 9017 Z/Y-Purge Operator Interface
8 Trouble-Shooting Guide
8.1
Division 1 Z-Purge Trouble-Shooting
PROBLEM
The flow cannot be adjusted up to
150 SCFH during purge
POSSIBLE CAUSE
Improper flow meter reading
Improper regulator adjustment
The purge control is not set to purge
Insufficient air supply
Restrictions in the air supply line
Contamination in the air supply
Restrictions in the purge line from
the purge control into the enclosure
During operation (control valve set
to “Operate”), the internal pressure
does not reach/will not maintain 1”
of water column
The enclosure is not sealed and is
leaking
Insufficient air flow
Pack-Seals are not poured
Exhaust control valve setting
incorrect
During operation (control valve set
to “Operate”), the internal pressure
does not reach/will not maintain 1”
of water column
October 2015
Restrictions in the air connections
13
SUGGESTED SOLUTION
For correct operation, the purge unit
must be mounted vertically so that
the flow meter is vertically plumb
Adjust the air inlet regulator to
increase air supply
Check the position of the control
valve to ensure that it is set to
“Purge”
Check your purge gas supply to
ensure that it can supply 150 SCFH.
If you cannot achieve 150 SCFH,
then purge times must be
recalculated. Contact DAISY
customer service for assistance.
Check your air supply line for
blockages and kinks
Ensure that the purge gas supply is
clean, dry, and free of oil – a
water/oil separator should be
installed near the connection to the
purge control
Ensure that the purge line from the
purge control into the enclosure is
not kinked, has no internal
obstructions, and is unrestricted at
its open end (at least 0.5” from any
object in the path of the air flow)
Ensure that all access doors are
closed and latched. Ensure that all
access panels are closed and sealed.
Make sure no unsealed holes or
openings are present in the
enclosure.
Adjust the regulator on the purge
control to increase the air flow
Pack-Seals must be poured in
conduits entering the enclosure to
prevent air from escaping via the
conduit entry. Ensure that this has
been done.
Adjust the purge control exhaust
valve for a higher internal pressure.
It may take several minutes for
adjustments to this setting to take
effect.
Ensure that the air connection at the
regulator is not kinked, has no
obstructions, and is firmly
connected.
Daisy Data Displays, Inc.
Model 9017 Z/Y-Purge Operator Interface
PROBLEM
The “Pressure Good” indicator does
not light when the unit is powered
POSSIBLE CAUSE
Incorrect power-up sequence
Insufficient internal pressure
Alarm board is not receiving power
Voltage is set incorrectly
October 2015
14
SUGGESTED SOLUTION
Power should only be applied to the
enclosure after the internal pressure
has reached 1” of water column or
higher and when the full purge time
has elapsed
The pressure within the enclosure
must be within the operating (or
“safe”) range. If you are having
trouble maintaining a suitable
pressure, see the previous section of
this trouble-shooting guide.
Ensure that AC power has been
connected to the unit, and that the
power is turned on
Ensure that the 120/240 VAC switch
on the alarm board is set
appropriately for your power source
Daisy Data Displays, Inc.
Model 9017 Z/Y-Purge Operator Interface
9 Specifications
Materials
All materials comply with NEMA 4X standards.
Enclosure and Hardware
Stainless Steel
Mechanical
Purge Controller
6.75”H x 11.50”W x 2.75”D, 9 pounds
Interface Box
7.25”H x 12.25”W x 3.50”D, 5 pounds
See drawing M012 for dimensions.
Environmental
Operating Temperature
Storage Temperature
Relative Humidity
Electrical
Voltage
Power
Division 1 Z-Purge Alarm Relays
Air Requirements
Operating Pressure
Division 1 Z-Purge
October 2015
0° - 50° C
0° - 70° C
10% - 100% RH Non-condensing
120/240 VAC
60/50 Hz
5W Maximum
120 VAC or 30 VDC @ 3A
1” of Water Column
150 SCFH Minimum
20 - 100 PSI Recommended at Inlet
15
Daisy Data Displays, Inc.
Model 9017 Z/Y-Purge Operator Interface
10 Drawings
The following is a list of drawings in the order in which they appear:
Number
Description
Page
P015
Z-Purge Cable & Conduit Entry
20
M014
Z-Purge Dimensions
21
M012
Z-Purge Mounting
22
M017
Z-Purge Mounting Options
23
P016
Z-Purge Block Diagram
24
P017
Z-Purge Front Panel Item Location
25
P018
Z-Purge Rear Panel Item Location
26
P019
Z-Purge Over Pressure Exhaust
27
E009
Z-Purge Alarm Board Connections
28
P020
Z-Purge Alarm Board Mounting
29
October 2015
16
Daisy Data Displays, Inc.