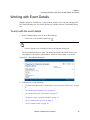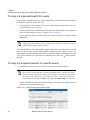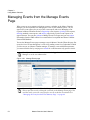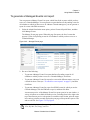
1
EMS Master Calendar
User’s Manual
Version 5.0
Copyright
© 2013. Dean Evans and Associates, Inc., All rights reserved. The
information contained herein is proprietary and confidential and is the
exclusive property of DEA, Inc. It may not be copied, disclosed, used,
distributed, modified, or reproduced, in whole or in part, without the express
written permission of DEA, Inc.
Limit of Liability
DEA, Inc. has used their best effort in preparing this guide. DEA, Inc. makes
no representations or warranties with respect to the accuracy or completeness
of the contents of this guide and specifically disclaims any implied warranties
of merchantability or fitness for a particular purpose. Information in this
document is subject to change without notice and does not represent a
commitment on the part of DEA, Inc. or any of its affiliates.The accuracy and
completeness of the information contained herein and the opinions stated
herein are not guaranteed or warranted to produce any particular results, and
the advice and strategies contained herein may not be suitable for every user.
The software described herein is furnished under a license agreement or a
non-disclosure agreement. The software may be copied or used only in
accordance with the terms of the agreement. It is against the law to copy the
software on any medium except as specifically allowed in the license or the
non-disclosure agreement.
Trademarks
EMS, the EMS logo and EMS Regics are registered trademarks of Dean Evans
& Associates, Inc. Event Management Systems, EMS Enterprise, EMS
Professional, EMS Campus, EMS Workplace, EMS Legal, EMS District, EMS
Master Calendar, and Virtual EMS are trademarks of Dean Evans &
Associates, Inc. Microsoft, Windows and Outlook are registered trademarks
and SQL Server is a trademark of Microsoft Corporation. Lotus Notes and
Domino are registered trademarks of IBM Corporation. Other products,
brands and trademarks are property of their respective owners/companies.
Customer
Support
Customer support is available to organizations that purchase EMS Master
Calendar and that have a current Annual Service Agreement (ASA). Contact
DEA, Inc. at:
Dean Evans and Associates, Inc.
6454 Greenwood Plaza Blvd
Ste 600
Greenwood Village, CO 80111
800-288-4565 (Phone)
303-796-7429 (Fax)
[email protected]
www.dea.com
Table of Contents
Preface ........................................................................................................ 9
Chapter 1: Getting Started with Master Calendar ................................. 13
Opening and Logging in to Master Calendar ................................................................. 15
To log in to Master Calendar ....................................................................................... 15
To log out of Master Calendar ..................................................................................... 16
Master Calendar Home page......................................................................................... 17
Using Hyperlinks on a Master Calendar Page ............................................................... 19
Required Fields and Using Icons to Enter Data............................................................. 21
Lookup icon ................................................................................................................. 22
Calendar Picker icon.................................................................................................... 22
Color Picker icon.......................................................................................................... 23
Time Picker icon .......................................................................................................... 23
Viewing Help Text .......................................................................................................... 24
Chapter 2: Viewing and Working with the Calendar Display and
Events ....................................................................................................... 25
Viewing and Working with the Master Calendar Home Page Display ........................... 27
Announcements and Alerts display ............................................................................. 27
Featured Events display .............................................................................................. 28
Event Title bar.............................................................................................................. 28
Special Dates display .................................................................................................. 29
Calendar display .......................................................................................................... 29
Calendar view............................................................................................................ 30
Calendar Picker ......................................................................................................... 30
Event Timezone......................................................................................................... 32
User Menu ................................................................................................................... 33
Working with Event Details ............................................................................................ 35
Master Calendar User’s Manual
5
To work with the event details...................................................................................... 35
To share and bookmark the event details to various social networking sites ............ 36
To send an email about the event.............................................................................. 36
To send an email to the event contact ....................................................................... 37
To add an event to a personal calendar .................................................................... 37
To set a reminder for an event................................................................................... 37
To view related events ............................................................................................... 38
Searching for Events and Special Dates........................................................................ 39
To carry out a general search for events ..................................................................... 40
To carry out a keyword search for specific events ....................................................... 40
Subscribing to a Calendar .............................................................................................. 42
To subscribe to a calendar........................................................................................... 42
To subscribe using email ........................................................................................... 43
To subscribe using an iCalendar feed ....................................................................... 44
Chapter 3: Using Master Calendar ..........................................................45
Submitting an Event ....................................................................................................... 47
To submit an event....................................................................................................... 47
Managing Events from the Manage Events Page .......................................................... 52
To search for event requests ....................................................................................... 53
To approve pending event requests............................................................................. 54
To reject pending event requests................................................................................. 56
To delete event requests.............................................................................................. 57
To move a rejected event request to an approved status ............................................ 58
To generate a Managed Events List report.................................................................. 59
To request information for an EMS event .................................................................... 61
Managing an Event from the Event Summary Page ...................................................... 64
To edit an event ........................................................................................................... 65
6
Master Calendar User’s Manual
To edit a single date event ........................................................................................ 66
To edit a multi-date event .......................................................................................... 67
To add event dates ...................................................................................................... 68
To cancel event dates.................................................................................................. 69
To cancel all event dates in a single step.................................................................. 69
To cancel individual event dates ............................................................................... 69
To activate an event .................................................................................................... 70
To delete event dates .................................................................................................. 71
To delete all event dates in a single step .................................................................. 71
To delete individual event dates ................................................................................ 71
To copy an event ......................................................................................................... 72
To add the event to your personal email calendar....................................................... 74
To view the event details ............................................................................................. 74
Chapter 4: Managing your Master Calendar Options ........................... 77
Changing your Password............................................................................................... 78
To change your password ........................................................................................... 78
Viewing Event Requests ................................................................................................ 79
To view your event requests........................................................................................ 79
To view your notifications ............................................................................................ 80
Index. . . . . . . . . . . . . . . . . . . . . . . . . . . . . . . . . . . . . . . . . . . . . . . . . . . . . 83
Master Calendar User’s Manual
7
8
Master Calendar User’s Manual
Preface
Welcome to the Master Calendar User’s Manual. The purpose of the Master Calendar
User’s Manual is to answer your questions and guide you through the procedures necessary
for viewing, submitting and managing events in the Master Calendar application efficiently
and effectively.
Using the manual
You will find the Master Calendar User’s Manual easy to use. You can simply look up the
topic that you need in the table of contents or the index. Later, in this Preface, you will find a
brief discussion of each chapter to further assist you in locating the information that you
need.
Special information about the manual
The Master Calendar User’s Manual has a dual purpose design. It can be distributed
electronically and then printed on an as-needed basis, or it can be viewed online in its fully
interactive capacity. If you print the document, for best results, it is recommended that you
print it on a duplex printer; however, single-sided printing will also work. If you view the
document online, a standard set of bookmarks appears in a frame on the left side of the
document window for navigation through the document. For better viewing, decrease the
size of the bookmark frame and use the magnification box to increase the magnification of
the document to your viewing preference.
If you do print the document using a single-sided printer, you might see a single
blank page at the end of some chapters. This blank page has been added solely to
ensure that the next chapter begins on an odd-numbered page. This blank page in
no way indicates that your book is missing information.
Conventions used in the manual
The Master Calendar User’s Manual uses the following conventions:
•
Information that can vary in a command—variable information—is indicated by
alphanumeric characters enclosed in angle brackets; for example, <Calendar Name>.
Do not type the angle brackets when you specify the variable information.
•
A new term, or term that must be emphasized for clarity of procedures, is italicized.
9
Preface
•
Page numbering is “online friendly.” Pages are numbered from 1 to x, starting with the
cover and ending on the last page of the index.
Although numbering begins on the cover page, this number is not visible on the
cover page or front matter pages. Page numbers are visible beginning with the
first page of the table of contents.
•
Master Calendar has been designed using responsive web design. This manual documents
the tabs, fields, menus, and the available functionality from a full browser view. As a
result, the labels that are displayed and the functions that are available on a menu or page
when viewing the application in another device might be different than what is shown in
this manual.
•
Different site themes, which include the locations of Calendar Filters and color schemes,
are available for a Master Calendar site. The theme that has been chosen for the screen
captures in this manual might not be the same as the theme that your Master Calendar site
administrator has chosen for your organization’s site.
•
The main menu can be customized for a Master Calendar site. The menu options that are
shown in the screen captures in this manual might not be the same as the menu options
that your Master Calendar administrator has set up for your organization’s site.
•
This manual is intended for both print and online viewing.
•
If information appears in blue, it is a hyperlink. Table of Contents and Index entries
are also hyperlinks. Click the hyperlink to advance to the referenced information.
Assumptions for the manual
The Master Calendar User’s Manual assumes that:
•
You are familiar with web-based applications and basic web functions and navigational
elements.
•
You are familiar with basic Windows content formatting and layout tools.
Organization of the manual
In addition to this Preface, the Master Calendar User’s Manual contains the following
chapters and appendices:
•
10
Chapter 1, “Getting Started with Master Calendar,” on page 13 details the procedures for
opening and logging in to Master Calendar. It also provides an overview of the major
navigational elements and it also details application features that are common to both a
Master Calendar site administrator and a Master Calendar user.
Master Calendar User’s Manual
•
Chapter 2, “Viewing and Working with the Calendar Display and Events,” on page 25
details the procedures for viewing and working with calendars and the events that are
displayed on the calendars efficiently and effectively.
•
Chapter 3, “Using Master Calendar,” on page 45 details the procedures for viewing,
submitting, and managing events in Master Calendar efficiently and effectively.
Master Calendar User’s Manual
11
Preface
12
Master Calendar User’s Manual
Chapter 1
Getting Started with Master
Calendar
Master Calendar provides instant, online access to a centralized calendar of events that not
only provides date, time and location, but also displays a detailed event description,
directions to the venue, and any other important information you choose to enter. This
chapter details the procedures for opening and logging in to Master Calendar. It also
provides an overview of the major navigational elements and it also details application
features that are common to both a Master Calendar site administrator and a Master Calendar
user.
This chapter covers the following topics:
•
“Opening and Logging in to Master Calendar” on page 15.
•
“Master Calendar Home page” on page 17.
•
“Using Hyperlinks on a Master Calendar Page” on page 19.
•
“Required Fields and Using Icons to Enter Data” on page 21.
13
Chapter 1
Getting Started with Master Calendar
14
Master Calendar User’s Manual
Chapter 1
Getting Started with Master Calendar
Opening and Logging in to Master Calendar
When a guest or a user first opens Master Calendar, or a user logs in to Master Calendar, the
Master Calendar Home page opens. The page that you remain on after logging out of Master
Calendar depends upon the log out option that you select.
To log in to Master Calendar
1. On the Master Calendar Home page, click Login.
The Login dialog box opens. You use this dialog box to enter your User Id and password
to log in to Master Calendar. An option is also present to select a time zone.
Figure 1-1:
Login dialog box
2. Enter your User Id and password.
3. Select a time zone.
The value that you select for time zone is automatically set as the default value for
the time zone for any event that you submit. You can always change this value for
an event.
4. Press ENTER, or click Login.
The Master Calendar Home page remains open. Additional options are displayed on the
User menu to reflect your login and the Calendar Picker is updated with the private
calendars to which you have been granted access. See “Master Calendar Home page” on
page 17. In addition, if you are a Calendar Manager and there are pending events
awaiting approval, a flashing alert icon
is displayed above your user name. Place
your mouse pointer on the icon to open a message that indicates the number of pending
events that require your approval. You can also click this message to open the Manage
Events page to view and work with these pending events. See “Managing Events from
the Manage Events Page” on page 52.
Master Calendar User’s Manual
15
Chapter 1
Getting Started with Master Calendar
To log out of Master Calendar
16
•
If you are on the Master Calendar Home page, then simply click Log Out next to your
User Name. The Master Calendar Home page remains open.
•
If you are on the Add Event page, then simply click Log Out next to your User Name. The
Add Event page remains open.
Master Calendar User’s Manual
Chapter 1
Getting Started with Master Calendar
Master Calendar Home page
When a guest or user first accesses Master Calendar or a user logs in to Master Calendar, the
Home page opens. Different Master Calendar site administrators can set up their Master
Calendar Home pages in different ways. Although there can be variations in the different
layouts, a Master Calendar Home page always has the following components:
See Figure 1-2 on page 18.
•
A dynamically updated display of announcements and/or alerts at the top of the Home
page.
•
A scrolling display of featured events (at the event by event level) below the
announcements/alerts.
•
An Event Title bar below the featured events display that begins, by default, on the
Sunday of the current week. The options on the title bar determine the event display on
the calendar in the Calendar Display area directly below it.
•
A specific calendar, referred to as the default calendar, is always displayed below the
Event Date bar in the Calendar Display area when the Master Calendar Home page first
opens. The default display for the default calendar or any calendar that is displayed in the
Calendar Display area is the Detailed List view (a list of individual summarized event
details) one week at a time, with the week set to the current week.
•
All calendars that have been defined as public are organized by grouping in the Calendar
Picker. Both guests and users can view all public events that have been posted to these
public calendars in the Calendar Display area below the Event Display bar. A guest or
user can view events for both single and multiple calendars. Calendars can be displayed
in the List view or in the Calendar view (events are displayed in calendar date cells).
As a user, if you want to view the events that are posted to the private calendars to
which you have been granted access, then you must log in to Master Calendar.
The Calendar Picker is then updated with these private calendars.
•
For the default List view, a Special Dates indicator is displayed above the list of events.
Any dates that have been designated as Special Dates in Master Calendar are highlighted
in a gray circle. In the Calendar view, Special Dates are denoted with a Star icon
in
the calendar date cell.
•
If your site administrator has defined event types, then events of these types are denoted
by differently colored indicators.
•
An option to display events in the local timezone.
•
After you log into Master Calendar, your User Name is displayed in the upper right corner
of the Home page. A dropdown menu, the User menu, is available for the name.
Master Calendar User’s Manual
17
Chapter 1
Getting Started with Master Calendar
•
A Sidebar is always displayed on the right or left side of the Master Calendar Home page.
Both guests and users can use the options on the Sidebar to search for events and special
dates from the Master Calendar Home page. See “Searching for Events and Special
Dates” on page 39.
Figure 1-2:
Master Calendar Home page example
A dynamically updated display of announcements
and/or alerts
User menu access
Scrolling
display of
featured
events
Event
Title bar
Special
Dates
indicator
Event
Type
indicator
Calendar
Display
area
Local timezone option
Calendar picker
Sidebar
For detailed information about working and viewing with the Home page display,
see “Viewing and Working with the Master Calendar Home Page Display” on
page 27.
18
Master Calendar User’s Manual
Chapter 1
Getting Started with Master Calendar
Using Hyperlinks on a Master Calendar Page
On any Master Calendar page, any item that appears in blue, or is underlined (such as an
event title on a calendar) is a hyperlink. Different links have different purposes. For example,
a link might open a blank email, or a page on which you can view the information for the
selected item. In addition, if the link is for an event, depending on how you are logged in to
the system, you might also be able to edit the information for the selected event and carry out
other actions. If the link is a column header, then you can click the link to sort the displayed
information based on the column header, and then click on the link again to reverse the sort
order.
Figure 1-3:
Example of a hyperlink on a Master Calendar page
Click an event hyperlink to
open an Event popup which
displays information about the
event.
The Calendar Managers hyperlink and an RSS Feeds hyperlink are displayed at the bottom
of every page in Master Calendar.
Figure 1-4:
Calendar Managers and RSS Feeds links at bottom of Master Calendar pages
If you click the Calendar Managers hyperlink, the Calendar Managers page opens. This page
displays all the currently active calendars in Master Calendar and their Calendar Managers
by grouping. Any notes about a calendar are also displayed. The email address for a
Calendar Manager is a hyperlink that you can click to open a blank email that you can fill out
and send directly to the Calendar Manager.
Figure 1-5:
Calendar Managers page
Master Calendar User’s Manual
19
Chapter 1
Getting Started with Master Calendar
If your Master Calendar site administrator has configured RSS feeds, then when you click
the RSS Feeds hyperlink, a list of all currently active RSS feeds opens. Click on the RSS
button below a feed to open the feed and view the information for the feed.
The first time that you click the RSS Feeds link, you might be prompted to
download an RSS feed reader and carry out other activities before you can view a
feed.
Figure 1-6:
Viewing an RSS feed
Click the RSS link to open and
view the information for the
selected RSS feed.
The “Subscribe to the feed” option is always available after you open the feed. By default, all
notifications in all categories sorted by date (most recent date first) are displayed when an
RSS feed first opens. Optionally, you can do one or more of the following:
•
Enter a search string in the Displaying field to search for and display only those
notifications that meet the search criteria.
The search is limited to the exact order of the characters in the string; however,
the search string is not case-sensitive and the search string can be found anywhere
in the search results. For example, the search string “mental” returns
notifications that contain either Departmental or Mental Health Department.
20
•
Sort the notifications for the feed by either Title or Author.
•
Filter the notifications for the feed by category.
Master Calendar User’s Manual
Chapter 1
Getting Started with Master Calendar
Required Fields and Using Icons to Enter Data
A required field is a field into which you must enter data before you can save an addition or
modification in Master Calendar. A required field is denoted by a red asterisk to the right of
it.
Figure 1-7:
Example of a required field
Many fields in Master Calendar, whether required or optional, have an icon next to them. For
some fields with an icon next to them, you can manually enter data into the field, or you can
click the icon next to the field to open a list from which you can select a value to populate the
field. For other fields, your only option is to click the icon next to the field to open a list and
select a value for the field. If you must use an icon to populate a field, then the field is not
blank. Instead, a default value such as “Multiple Selected” or “all” is always displayed in the
field.
Figure 1-8:
Example fields with an icon next to them on a Master Calendar page
For a date field, you can enter the date manually into
the field, or you can click the Calendar Picker icon to
open a calendar and select the date.
For some fields, your only option is to click the icon next
to the field to open a list and select a value for the field.
Each icon is identified by a unique name in Master Calendar. If a procedure in the Master
Calendar Setup Guide or Master Calendar User’s Manual refers to an icon and you are not
certain as to which icon the procedure is referring, then place your mouse pointer on the icon
to display the name of the icon in a tooltip.
Figure 1-9:
Viewing the name of an icon
Four icons—the Lookup icon, the Calendar Picker icon, the Color Picker icon, and the Time
Picker icon—are used repeatedly in Master Calendar and function the same way regardless
of the page on which they are used.
Master Calendar User’s Manual
21
Chapter 1
Getting Started with Master Calendar
Lookup icon
Click the Lookup icon to open a list of from which you can select one or more values to
populate a field. To select all values in a single step, click All. After you make your
selections, click Apply to close the dialog box. If you select more than one value from the
list, but not all values, then the phrase “Multiple Selected” appears in the field after you
make your selections and close the list. If you select all values on the list, then the field is
populated with the phrase “All.”
Figure 1-10:
Example of using the Lookup icon to populate a field
Click the Lookup icon next to a field to open a
list from which you can select values for the
field.
Calendar Picker icon
For any date field in Master Calendar, you can enter manually enter the date, or you can click
the Calendar Picker icon to open the Calendar Tool from which you can select a date for the
field. The Calendar Tool shows the current day’s date when it opens. You can click a date to
select it, you can use the scroll features on the tool to select a different month for a given year
or a different year for a given month, or you can use the dropdown list options to select a
different month and/or year. If you manually enter a date in a date field, you can enter the
date in any month/day/year format—mm/dd/yyyy, m/d/yy, and so on. The application always
displays the date based on the language that is specified for your web browser and you
cannot modify this.
Figure 1-11:
Calendar Tool
Manually enter
a date in a blank
date field.
Scroll backwards
through the
months for a given
year.
Scroll forwards
through the years
for a given month.
Select a different
year.
Select a different
month.
Click a date to select it.
22
Master Calendar User’s Manual
Chapter 1
Getting Started with Master Calendar
Color Picker icon
If you can specify a color for a selected item in Master Calendar, for example, an event label,
then a Color Picker icon appears next to the item. You can manually enter an RGB or HEX
value for the color in the field, you can click the Color Picker icon to open the Color Picker
dialog box and select an RGB color or a Named Color, or you can define a custom color on
the Color slider tab. After you use the Color Picker dialog box to select a color, the dialog
box closes automatically and the Font Color field is populated with the RGB or HEX value
for the selected color.
Figure 1-12:
Color Picker dialog box
Click the Color Picker icon to open the
Color Picker dialog box and select an RGB
color, a Named Color, or on the Color slider
tab, define a custom color, for an item in
Master Calendar.
Time Picker icon
For any time field in Master Calendar, you can click the Time Picker icon to open a list from
which you can select a time for the field. By default, the list shows 15 minute time
increments for a 24 hour period.
Figure 1-13:
Time Picker list
Master Calendar User’s Manual
23
Chapter 1
Getting Started with Master Calendar
Viewing Help Text
Help text is text is organization-specific information or hints to about how to use Master
Calendar. Your Master Calendar site administrator can place help text in one of two ways on
specific pages in Master Calendar:
•
Collapsed behind a Help icon
on a Master Calendar page.
•
Directly on a Master Calendar page.
If your administrator has collapsed the help text for your system behind a Help icon, you
need only to click the Help icon to open a dialog box that displays the help text; otherwise,
when you open a page that contains help text, you can read the text directly on the page.
Figure 1-14:
Collapsed help text
t
Figure 1-15:
24
Help text directly on a page
Master Calendar User’s Manual
Chapter 2
Viewing and Working with the
Calendar Display and Events
This chapter details the procedures for viewing and working with calendars and the events
that are displayed on the calendars efficiently and effectively.
This chapter covers the following topics:
•
“Viewing and Working with the Master Calendar Home Page Display” on page 27.
•
“Working with Event Details” on page 35.
•
“Searching for Events and Special Dates” on page 39.
•
“Subscribing to a Calendar” on page 42.
25
Chapter 2
Viewing and Working with the Calendar Display and Events
26
Master Calendar User’s Manual
Chapter 2
Viewing and Working with the Calendar Display and Events
Viewing and Working with the Master Calendar
Home Page Display
When a guest or user first accesses Master Calendar, or a user logs in to Master Calendar, the
Master Calendar Home page opens. A variety of options are available for viewing and
working with the Master Calendar Home page display and events. See:
•
“Announcements and Alerts display” below.
•
“Featured Events display” on page 28.
•
“Event Title bar” on page 28.
•
“Special Dates display” on page 29.
•
“Calendar display” on page 29.
•
“User Menu” on page 33.
Announcements and Alerts display
A dynamically updated display of announcements and/or alerts is located at the top of the
Home page. To view all the announcements/alerts in a single Announcements dialog box,
click View. (The number of announcements/alerts that will be shown in the single view is
indicated in parenthesis.) Click the Close (x) button to close the dialog box.
Figure 2-16:
Viewing Announcements/Alerts
Master Calendar User’s Manual
27
Chapter 2
Viewing and Working with the Calendar Display and Events
Featured Events display
A scrolling display of featured events (on a feature by feature basis) is located below the
announcements/alerts. To view the information for a specific featured event, click the entry
for the event. To move through the display manually, click the Previous and Next arrows on
the scroll bar. To play or pause the scrolling display, click the Play/Pause buttons. To
expand/collapse the scrolling display, click the Expand/Collapse button.
Figure 2-17:
Viewing Featured Events
Expand/collapse
Featured Events
display.
Pause/play
Featured Events
display.
Manually move
backward through
the display.
To view the information for a specific featured
event, click the entry for the event.
Manually move
forward through
the display.
Event Title bar
An Event Title bar is located below the Featured Events display. The options on the Event
Title bar determine the display of the events on a calendar in the Calendar Display area.
Figure 2-18:
Scroll through
previous dates.
28
Event Display bar display options
Scroll through
upcoming dates.
Set the event display
on the default calendar.
•
If the view is set to Day, then the current day’s date is displayed on the title bar (for
example, Thursday, July 18, 2013) and only the events that occur on the current day’s date
are displayed on the calendars in the Calendar Display area.
•
If the view is set to Week, then the Week of <current day’s date> is displayed on the title
bar (for example, Week of Thursday, July 18, 2013) and only the events that occur for the
current week are displayed on the calendars in the Calendar Display area.
•
If the view is set to Month, then the current month is displayed on the title bar (for
example, July, 2013) and only the events that occur for the current month are displayed
on the calendars in the Calendar Display area.
Master Calendar User’s Manual
Chapter 2
Viewing and Working with the Calendar Display and Events
If the first day of the month does not begin on the default start day of the week,
then the monthly display might include events for the previous month in the
Calendar view.
You can click the Previous and Next buttons on either side of the displayed date to move to
the previous or next date, respectively.
Special Dates display
For the default List view, a Special Dates indicator is displayed above the list of events. Any
dates that have been designated as Special Dates in Master Calendar are highlighted with a
gray circle. Click a Special Date to display the Special title/description. A Star icon
is
displayed next to the title to indicate that the date is a Special date.
Figure 2-19:
Special Dates indicator
Special Date is July 18, 2013. The
title/description is displayed for the
date.
Calendar display
A specific calendar, referred to as the default calendar, is always displayed below the Event
Title bar in the Calendar Display area when the Master Calendar Home page first opens. The
default display for the default calendar is the Detailed List view (a list of individual
summarized event details) one week at a time, with the week set to the current week.
Figure 2-20:
Default calendar, default display (List view, Week display)
Calendar display options - Day, Week, or Month
Event Timezone option
Calendar display
options - List view
(default value) or
Calendar view
Detailed List view
in the Calendar
Display area
Master Calendar User’s Manual
29
Chapter 2
Viewing and Working with the Calendar Display and Events
You can change the view for the calendar in the Calendar Display area, you can choose
which calendars to display in the Calendar Display area, and you can display the event time
based on a different timezone, See:
•
“Calendar view” below.
•
“Calendar Picker” on page 30.
•
“Event Timezone” on page 32.
Calendar view
The default view in the Calendar Display area is the Detailed List view. Click Calendar to
change the calendar display to the Calendar view. The events are displayed by title as
individual entries in calendar date cells. Every event title is a hyperlink that opens the Event
Summary dialog box for the event.
Any combination of List view or Calendar view and Day/Week/Month is allowed.
Note, however, that the different display combinations might display the same
information differently. For example, in the default List view, a Special Dates
indicator is displayed above the list of events. Any dates that have been designated
as Special Dates in Master Calendar are highlighted in a gray circle. In the
Calendar view, Special Dates are denoted with a Star icon
in the calendar date
cell.
Figure 2-21:
Calendar display, Calendar view, Week display with Event Summary dialog
box showing for an event
Calendar Picker
All calendars that have been defined as public are organized by grouping in the Calendar
Picker. Both guests and users can view all public events that have been posted to these public
calendars. A guest or user can view events for both single and multiple calendars.
As a user, if you want to view the events that are posted to the private calendars to
which you have been granted access, then you must log in to Master Calendar.
The Calendar Picker is then updated with these private calendars.
30
Master Calendar User’s Manual
Chapter 2
Viewing and Working with the Calendar Display and Events
•
Click a calendar grouping to display all the calendars in the grouping in the Calendar
Display area. You can select multiple calendar groupings. To display all calendars in all
the groupings in the Calendar Display area, click Check All.
Figure 2-22:
Selecting calendar groupings
To display all events on all calendars in all
groupings, click Check All.
All events on all calendars in the Winter
Sports grouping and the District Events
grouping will be displayed in the Calendar
Display area.
•
To select individual calendars for display, click Expand All. All groupings are expanded
to show all calendars in the groupings. Select the individual calendar or calendars for
which you want to view the events.
Figure 2-23:
Selecting individual calendars
Click Expand All to expand all
groupings that are available to you
in the Calendar Picker, and then
select the calendars to display in
the Calendar Display area.
The Student Organizations
calendar will be displayed in
the Calendar Display area.
The Chamber of Commerce
calendar will be displayed in
the Calendar Display area.
Master Calendar User’s Manual
31
Chapter 2
Viewing and Working with the Calendar Display and Events
Event Timezone
By default, the event times are displayed based on the timezone in which they were created.
The Display as timezone option lets you display the events in your local timezone. Just select
the appropriate timezone on the Display as timezone dropdown list and the event times are
dynamically updated on the display.
Figure 2-24:
Displaying event times in a user’s local timezone
Event created in Mountain timezone.
Event displayed in user’s local timezone.
32
Master Calendar User’s Manual
Chapter 2
Viewing and Working with the Calendar Display and Events
User Menu
After you log into Master Calendar, your User Name is displayed in the upper right corner of
the Home page. A dropdown menu is available for the name. The options that are available
on this User menu depend on whether you are a standard user, a Calendar Manager, or an
administrator user (also referred to as a site administrator).
Figure 2-25:
User menu, Calendar Manager or administrator user
User menu
Option
Admin Panel
Description
Displayed only for Calendar Managers or administrator users. A Calendar
Manager or administrator user must click this option to open the Master Calendar
Manage Events page. The Master Calendar main menu is displayed at the top of
the page. (See Figure 2-26 on page 34.) From this page, you can view all the
calendars to which you have access as a Calendar Manager, and you can access
all the Master Calendar functions and system areas that are available to you
either as a Calendar Manager or as a site administrator.
Note: For Calendar Managers, see “Managing Events from the Manage Events
Page” on page 52.
Calendar
Users or guests can click this option at any time to return to the Master Calendar
Home page.
My Options
Displayed for standard users, Calendar Managers, and site administrators. See
Chapter 4, “Managing your Master Calendar Options,” on page 77.
Submit Event
Opens the Add Event page. Users and guests use this page to submit events to
calendars to which they have been granted access. See “Submitting an Event” on
page 47.
Help
Displayed for standard users, Calendar Managers, and site administrators.
• Contents - Opens the Master Calendar Online Help.
• Knowledge Base - Opens the EMS Support Center Knowledge Base for
Master Calendar.
Master Calendar User’s Manual
33
Chapter 2
Viewing and Working with the Calendar Display and Events
Figure 2-26:
34
Master Calendar Manage Events page with main menu
Master Calendar User’s Manual
Chapter 2
Viewing and Working with the Calendar Display and Events
Working with Event Details
Multiple options are available for working with the details for an event that is displayed in
the Calendar Display area. All of these options are available from the Event Details dialog
box.
To work with the event details
1. In the Calendar Display area, do one of the following:
•
For the List view, click the Expand icon
.
If the List view is set to Detailed List, you can also click More.
•
For the Calendar view, click More in the Event Summary dialog box.
The Event Details dialog box opens. The dialog box displays the details for the event.
This dialog box also has the options that are needed to work with the event details.
Figure 2-27:
Event Details dialog box
2. Continue to any of the following:
•
“To share and bookmark the event details to various social networking sites” on page
36.
•
“To send an email about the event” on page 36.
•
“To send an email to the event contact” on page 37.
•
“To add an event to a personal calendar” on page 37.
•
“To set a reminder for an event” on page 37.
•
“To view related events” on page 38.
Master Calendar User’s Manual
35
Chapter 2
Viewing and Working with the Calendar Display and Events
You can also click the Edit icon
to open the Event Summary page and edit the
event. See “Managing an Event from the Event Summary Page” on page 64.
To share and bookmark the event details to various social
networking sites
•
To like the event on Facebook, click the Facebook Like icon
•
To tweet a link for the event to your followers, click the Twitter icon
•
To publicly recommend the event on Google, click the Google+ icon
•
Click Share to open a popup menu with options for sharing the event details on a
multitude of social networking sites.
Figure 2-28:
.
.
.
Social Networking Sites menu
To send an email about the event
You can email the event information to any number of recipients of your choosing.
1. Click Email.
Master Calendar starts your email program and opens an email that contains the event
information and a link to the event details.
2. Select the recipients and enter the content for the email as you typically would for any
other email, and then send the email.
36
Master Calendar User’s Manual
Chapter 2
Viewing and Working with the Calendar Display and Events
To send an email to the event contact
1. Click the contact’s email address in the Event Details dialog box.
Master Calendar starts your email program and opens an email that contains the event
information and a link to the event details.
2. Select the recipients and enter the content for the email as you typically would for any
other email, and then send the email.
To add an event to a personal calendar
1. Click Add.
The Event Details dialog box is refreshed with a list of personal calendars to which you
can add the event opens—iCal, Google calendar, Yahoo Calendar, and Windows Live.
Figure 2-29:
Personal calendars list
2. Click the appropriate calendar, and then complete the calendar-specific steps to add the
event to the calendar. You can add the event to as many personal calendars as needed.
3. After you have added the event to all the necessary calendars, click the Close button
to close the Personal Calendars list. The Event Details dialog box remains opens.
To set a reminder for an event
When you set a reminder for an event, you will also be notified of any changes to the event.
1. Click Set Reminder.
The Event Details dialog box is refreshed with options for setting a reminder for the
event. The email is set by default to your Master Calendar User Id.
Figure 2-30:
Reminder options
2. Leave the reminder email address as-is, or enter a different address.
Master Calendar User’s Manual
37
Chapter 2
Viewing and Working with the Calendar Display and Events
3. Select the reminder time.
To clear a reminder, set the Remind me time to 0 minutes before the start of the
event.
4. If the event is a single occurrence in a series event, you can click Set Reminder for all
occurrences of this event. If you do not select this option, then the reminder is set only
for this specific occurrence.
5. Click the Set Reminder icon
.
The reminder is set. The Event Details dialog box remains open.
To view related events
If an event is a multi-date, or series event, then you can view the individual occurrences, or
related events, from the Event Details dialog box.
1. Click Related Events.
A list of the related events opens on top of the Event Details dialog box.
Figure 2-31:
List of related events
2. After you have viewed all the related events, click the Close button
Related Events list. The Event Details dialog box remains opens.
38
Master Calendar User’s Manual
to close the
Chapter 2
Viewing and Working with the Calendar Display and Events
Searching for Events and Special Dates
A Sidebar is always displayed on the right or left side of the Master Calendar Home page.
The Sidebar consists of a Calendar Tool, a blank keyword Search field, and an Event Filters
dialog box. If your Master Calendar site contains public facing calendars, then a Calendar
Picker is also available. You use the options on the Sidebar to search for events and special
dates from the Master Calendar Home page. You can carry out a general search for events
and special dates from the Master Calendar Home page, or you can carry out a keyword
search for specific events, and then filter the results to search for special dates.
To search for the events that are posted to the private calendars to which you have
been granted access, you must log in to Master Calendar to update the Calendar
Picker with these private calendars.
Figure 2-32:
Sidebar on the Master Calendar Home page
Calendar Tool
Keyword search field
Calendar PIcker
Event Filters
Master Calendar User’s Manual
39
Chapter 2
Viewing and Working with the Calendar Display and Events
To carry out a general search for events
On the Master Calendar Home page, use any combination of the options that are available on
the Sidebar to search for events. You can:
•
Use the options on the Calendar Tool to select a different date, month, and/or year. See
“Calendar Picker icon” on page 22.
•
Use the options on the Calendar Picker to determine the calendars that are to be displayed
in the Calendar Display area. See “Calendar Picker” on page 30.
•
Use the options on the Events Filter to filter the events by Event Type, Location, and/or
Department.
“Departments” is a default label. Your Master Calendar site administrator can
configure this value to best suit your organization’s needs. For example, the value
might be displayed as “Business Units.”
The Calendar Display area is dynamically updated with all the events that meet your search
criteria. In the List view, a Special Dates indicator is displayed above the list of events. Any
dates that have been designated as Special Dates in Master Calendar are highlighted in a gray
circle. In the Calendar view, Special Dates are denoted with a Star icon
in the calendar
date cell.
To carry out a keyword search for specific events
1. In the blank Search for Events field, enter a search string, and then click Go.
The search from this field is an “or” search, which means that results that contain
not only the search string but also other information can be returned. The string
can be found anywhere in the results - the event title, the event description, and so
on—and it is not case-sensitive. For example, if “ball” is the search string, then
search results can include Football, Little League Baseball, Ballgame, and so on.
All the events that meet the search criteria from the current day’s date going forward are
displayed on the Search Results page.
Figure 2-33:
40
Event keyword Search Results page
Master Calendar User’s Manual
Chapter 2
Viewing and Working with the Calendar Display and Events
2. Do any of the following in any combination to refine the search criteria, and then click
Go.
Option
From/To Dates
Description
• Change the From date and leave the To date blank to search for all
events from the From date going forward.
• Enter a From date and To date to search for all events within the
indicated date range.
Search for Events field
Enter a modified or different search string.
You can select one or both of the following options:
• Use selected filters
• Use the options on the Calendar Picker to determine the calendars
that to be displayed in the Calendar Display area. See “Calendar
Picker icon” on page 22..
• Use the options on the Events Filter to filter the events by Event
Type, Location, and/or Department.
• Use exact match
The search from this field is an “and” search, which means that only the
results that contain all the words in the exact order as in the search
string are returned. The string can be found anywhere in the results - the
event title, the event description, and so on—and it is not case-sensitive.
For example, if “Alumni Festival” is the search string and Use exact
match is not selected, then the search results could include Alumni
Music Festival. If Use exact match is selected, then the search results
could not include Alumni Music Festival.
You can select only one of the following options:
• General events
Selected by default when the search results are first returned. Returns
all the events that meet all the search criteria.
• Special dates
Returns all the special dates that meet all the search criteria.
3. After you have completed the search, you can do any of the following as needed:
•
For a general events search, you can expand the click the Expand icon
for any
search result to open the Event Details dialog box and view the details for the event.
See “Working with Event Details” on page 35..
•
For any general events search or special dates search, click Export to export all the
search results to a comma-separated values (csv) file. The default name that Master
Calendar assigns to the exported data file is Export.csv. You can change the filename
as well as specify the location in which to save the file.
4. To return to the Master Calendar Home page, click Back to Calendar, or on the User
menu, click Calendar.
Master Calendar User’s Manual
41
Chapter 2
Viewing and Working with the Calendar Display and Events
Subscribing to a Calendar
To receive a system-generated email or to have the calendars in your email system
automatically updated when events are added to selected calendars or when events are
modified or canceled for selected calendars, you must subscribe to the calendars.
You can also use the Subscription page to unsubscribe to one or more calendars.
Simply follow the procedure described in “To subscribe to a calendar” below but
instead of clicking Subscribe, click Unsubscribe.
To subscribe to a calendar
1. On the Master Calendar Home page, click Notifications/iCal Feeds.
The Subscription dialog box opens. The calendars to which you can subscribe are
displayed in the Available Calendars list and they are based on their Subscription status
(Off, Authenticated Users, or All Users). Your User Id (the email that you used to sign in
to Master Calendar) is displayed in the Email field. By default, both subscription options
(emails for new events and emails for even changes/cancellations) are selected and
Email is selected as the subscription method.
Figure 2-34:
42
Subscription dialog box
Master Calendar User’s Manual
Chapter 2
Viewing and Working with the Calendar Display and Events
2. Select the calendar or calendars (CTRL-click to select multiple calendars) to which you
are subscribing, and then click the Add button
to move them to the Selected list.
3. Choose your subscription method—Email (the default value) or iCalendar feed.
•
Email—To receive a confirmation email that contains a link that you must click to
activate or edit your subscription. If you select this option, go to “To subscribe using
email.”
•
iCalendar feed—To automatically add the selected calendars to your email program
and subscribe to updates to the calendar. If you select this option, the Email field and
email options are removed from the page. Go to “To subscribe using an iCalendar
feed.”
To subscribe using email
If you subscribe to multiple calendars using email, then you receive only a single
daily digest email.
1. If you are a guest, enter the email that is to be used for your subscription in the Email
field. Optionally, as a user, you can edit this email address if needed.
2. By default, both of the options for email subscriptions are selected. Optionally, clear the
option by which you do not want to receive email notifications.
At least one option must remain selected.
3. Click Subscribe.
A message opens indicating that an email has been sent to the indicated email address
and that you must click on the link in the message to confirm your subscription request.
Figure 2-35:
Subscription message
4. Click Close to close the message and return to the Master Calendar Home page.
Master Calendar User’s Manual
43
Chapter 2
Viewing and Working with the Calendar Display and Events
To subscribe using an iCalendar feed
1. Click Subscribe.
A dialog box opens asking you if you want to allow this website to open a program on
your computer.
2. Click Allow.
A dialog box opens asking you if you want to add this Internet Calendar to your email
program (in this example, Microsoft Outlook) and subscribe to updates.
Figure 2-36:
Dialog box that opens for an iCalendar subscription
3. Optionally, click Advanced to open a Subscriptions dialog box and customize the
settings for your subscription on your email program.
4. Click Yes to add the calendar or calendars to your email program.
44
Master Calendar User’s Manual
Chapter 3
Using Master Calendar
This chapter details the procedures for viewing, submitting, and managing events in Master
Calendar efficiently and effectively.
This chapter covers the following topics:
•
“Submitting an Event” on page 47.
•
“Managing Events from the Manage Events Page” on page 52.
•
“Managing an Event from the Event Summary Page” on page 64.
45
Chapter 3
Using Master Calendar
46
Master Calendar User’s Manual
Chapter 3
Using Master Calendar
Submitting an Event
A guest can submit a request to post an event to a public calender. A Calendar Requester is a
user can submit a request to post an event to a public calendar and to any private calendars to
which they have been granted access. The Calendar Manager can approve or deny the
request. If the Calendar Manager approves the request, the event is posted to the calendar.
After the Calendar Manager approves or denies request, the system automatically generates
an email to the requestor, informing them of the Calendar Manager’s decision. A Calendar
User is a user who can post events directly to a public calendar and to any private calendars
to which they have been granted access without the Calendar Manager’s approval.
To submit an event
1. Do one of the following:
•
On the Master Calendar User menu, click Submit Event.
•
On the Master Calendar Home page, click Add Event.
The Add Event page opens.
Figure 3-37:
Add Event page
Master Calendar User’s Manual
47
Chapter 3
Using Master Calendar
2. The Post Date is the date that the event is to be posted to the selected calendar or
calendars. The default value is the current day’s date. You can leave this value as-is, or
use the Calendar Tool to enter a different date. (See “Calendar Picker icon” on page 22.)
3. Indicate if the event is to be a featured event. (See “Featured Events display” on page
28.)
4. Enter the event information on the Add Event page.
Required fields are marked with a Required icon
. TheMaster Calendar site
administrator sets the required fields on the Add Event page.
Field
Description
Event Info fields
Event Title
The title or name of the event. The event title is always displayed for the
calendar entry in the Calendar Display area and on the Event Details dialog
box.
Event URL
The URL (website address) for the event’s web page.
Event Description
A text description of the event. The event description is displayed on the
Event Details dialog box when a guest or user clicks More to display more
information about the event. On the blank Design tab, enter the needed text
for the event description. Use the formatting options that are available to
select the paragraph style (Normal, Heading 1, and so on), font, font color,
and font size for the description. Optionally, you can also do one or both of
the following:
• Click HTML to open the HTML tab and view the HTML code for the event
description.
• Click Preview to open the Preview tab and view the event description as it
will be displayed in your Master Calender system
Event Contact fields
Contact Name
The name of the contact person for the event. Hidden by default.
Note: If you do not want this information displayed on the Event Details
dialog box, make sure that Hide remains selected.
Contact Email
The email for the contact person for the event. Hidden by default.
Note: If you do not want this information displayed on the Event Details
dialog box, make sure that Hide remains selected.
Contact Phone
The phone number for the contact person for the event. Hidden by default.
Note: If you do not want this information displayed on the Event Details
page, make sure that Hide remains selected.
Event Group - Priority fields
Priority
48
Dropdown list. Available values are High, Medium, and Low. In conjunction
with the event time (All Day or Timed), this variable determines where the
event appears in a calendar display—at the top in a List view or at the top of
the calendar date cell in the Calendar view. For any priority, the order is All
Day Event, and then Timed Event.
Master Calendar User’s Manual
Chapter 3
Using Master Calendar
Field
Calendars
Description
A dropdown list of all public-facing calendars that are currently active in
Master Calendar as well as any active private calendars to which you have
been granted access. You can select a single calendar, or you can click
Select Multiple to open a list from which you can select multiple calendars at
the same time.
Note: The selected calendars are displayed on the Event Details dialog box.
Event Type
The type of event that you are submitting.
Note: The calendar or calendars that you select determine the event types
that available for selection.
Department
The department that is hosting or sponsoring the event.
Note: Department is a default label. Depending on how your Master
Calendar site administrator has configured Master Calendar, you
might see this field labeled something else, for example, “Business
Unit.”
Location fields
Location
The location where the event is to take place. You can manually enter a
location, or you can select a location from a Locations dropdown list.
Room
The sub-location for the event. Displayed only if the selected location has
associated sub-locations.
Note: Room is a default label. Depending on how your Master Calendar site
administrator has configured Master Calendar, you might see this
field labeled something else, for example, “Office.”
Location URL
The URL (website address) for the location’s web page.
Additional Info fields
Displayed if any of the calendars that you selected have associated UDQs. The questions might or
might not be required to submit the event.
Event Dates fields
Single Day
The default value. A one time event.
Recurrence
If the event is a recurring date, click Recurrence to open the Recurrence
Pattern options and the Range of Recurrence options, and specify the
information for the recurring event.
Event Start Date
The date for a single event, or the first date for a recurring event. The default
date is the current day’s date. You can leave the date as-is, or you can use
the Calendar Tool to select a different date. See “Calendar Picker icon” on
page 22.
Master Calendar User’s Manual
49
Chapter 3
Using Master Calendar
5. Indicate whether the event is a timed event or an all day event, and if:
•
The event is a timed event, specify a start time, and then do one of the following:
•
Specify an end time for the same day.
•
Select no end time.
•
Select end time goes into the next day.
The event name is displayed on the calendar and if you:
•
•
Selected an end time, the beginning and end time are also displayed on the
calendar.
•
Selected no end time, only the beginning time is displayed on the calendar.
•
Selected end time goes into the next day, the beginning and end time are
displayed on the calendar, with a Next Day icon displayed next to the ending
time.
The event is an All Day event, you must specify only a date for the event.
The phrase “All Day Event” is displayed above the event name on the calendar.
6. The time zone that is displayed is the time zone that you selected when you logged in to
Master Calendar. Optionally, select a different timezone for the event.
7. Optionally, do one or both of the following:
•
To add an image to the event, click Add Image, and in the Choose File to Upload
dialog box, scroll to and select the image, and then click Open. The phrase
“Uploaded <Image Name> is displayed. The image is displayed on the Event details
dialog box.
The maximum image size is 2 MB. After you attach an image to an event, an
option to Remove the event is always displayed.
•
Add custom fields, email addresses, attachments, and/or tags for the event.
Option
Custom Fields
Description
This tab is opened by default when the Add Event page opens.
• Type—Select the field type. If you select any type other than (Custom Field)
or (Custom Link), then the Field Name is automatically populated with a
default value, but you can always select a different value from a list of preset
field names.
• Field Name—If you select (Custom Field) or (Custom Link) for Type, then
enter a name that describes or provides hints about the information that is to
be entered in the Description field. For example, if the Description field is to
contain information about event parking, then you could enter “Parking Info”
for the field name.
50
Master Calendar User’s Manual
Chapter 3
Using Master Calendar
Option
Description
Note: If you select any value other than (Custom Field) or (Custom Link) for
Type, then the Field Name is automatically populated with the same
value as the selected Type, but you can click the Hint icon
a list of preset custom field hints and select a different value.
to open
Note: If you select (Custom Link) for Type, then the Field Name becomes the
active link for the URL that you specify.
Note: Even if you select (Custom Field) or (Custom Link) for Type, you can
still click the Hint icon
to select from the list of preset values.
• Description field—Enter additional information about the event in this field.
• URL—Displayed only if you select (Custom Link) for Type. Enter the URL
for the website that provides additional information about this event.
Email addresses
A list of email addresses for the event invitees. Separate multiple email
addresses with either commas or semi-colons.
Attachments
A file that is attached to the event. Click Attachments to open the Attachments
tab. Click Attach a file to and in the Choose File to Upload dialog box, scroll to
and select the attachment, and then click Open. The phrase “Uploaded
<Image Name> is displayed.
Note: Your site administrator sets the allowed file formats, the maximum
number of attachments, and the maximum file size. After you add an
attachment, an option to delete the attachment
Tags
is displayed.
An optional identifier that allows for easy searching and retrieval of any events
that are marked with this identifier. Separate multiple tags with either commas
or semi-colons.
8. Optionally, click Save/View Event to open a preview of the event and determine if you
are satisfied with the event request, or if you need to make changes to the request.
9. If present, enter the verification code that is displayed at the bottom of the page.
Your Master Calendar site administrator might have enabled a function that
requires you to enter a code that must be verified before you can submit the event.
10. After you have entered all the information for the event and are satisfied with the entry,
click Finished.
A Confirmation message opens, asking you if you want to add another event.
11. To add another event, click Yes and repeat this entire procedure; otherwise, click No.
The message closes. The system processes your submission and returns you to the
Master Calendar Home page. If you are a Calendar User, then the event is automatically
posted to the selected calendars. If you are a Calendar Requester, then after the Calendar
Manager approves or denies your request, the system automatically generates an email to
you, informing you of the Calendar Manager’s decision. If the Calendar Manager
approves your request, the event is posted to the selected calendars.
Master Calendar User’s Manual
51
Chapter 3
Using Master Calendar
Managing Events from the Manage Events
Page
When a guest or user requests to submit an event to a calendar, as the Master Calendar
manager, you are responsible for managing the event in your calendar system—do you
approve the event request, do you reject the event request, and so on. Managing event
requests in Master Calendar consists of approving event requests, rejecting event requests,
deleting outdated event requests., and moving a previously rejected event request to an
approved status. You can also generate a Manage Events List report and you can request
information from the EMS contact for events that have been pulled into Master Calendar
from an EMS database.
You use the Manage Events page to manage events in Master Calendar. When this page first
opens, the list of events that appears is a list of all pending events for all calendars to which
you have access as a Master Calendar manager. To manage events with different statuses,
you must refine this list by carrying out a search for events that meet only specific criteria.
For all procedures in this section, you must be logged in either as a Calendar
Manager or as the site administrator.
Figure 3-38:
Manage Events page
If you are logged in as the Calendar Manager or as the site administrator, you can
always open the event by clicking the event title on the Manage Events page. You
can then easily review the event specifics as well as edit the event details. See
“Managing an Event from the Event Summary Page” on page 64.
52
Master Calendar User’s Manual
Chapter 3
Using Master Calendar
To search for event requests
1. Under the Admin Panel main menu option, point to Events & Special Dates, and then
click Manage Events.
The Manage Events page opens.
2. Enter the search criteria for the events.
Field
Description
Start Date/End Date
Search for events that occur on or after the indicated start date, on or
before the indicated end date, or within the specified date range. Leave
these fields blank to search for all pending event requests for which you
are the Calendar Manager, regardless of the date.
Keyword
The search string. The search is limited to the exact order of the
characters in the string; however, the search string is not case-sensitive
and the search string can be found in any information that is associated
with the event—the event title, the event description, and so on. For
example, the search string “mental” returns notifications that contain
either Departmental or Mental Health Department.
Calendars
A list of all active calendars to which you have access as Calendar
Manager. By default, all calendars to which you have access are
selected as the search criteria. You can click the Lookup icon to open a
Calendars list and refine the list of calendars to search.
Event Types
A list of all currently active event types in Master Calendar. Click the
Lookup icon to open the Event Types dialog box and select the event
types.
Locations
A list of all currently active event locations in Master Calendar. Click the
Lookup icon to open the Locations dialog box and select the locations.
Rooms
A list of all currently active sub-locations in Master Calendar. Click the
Lookup icon to open the Rooms dialog box and select the room.
Note: “Rooms” is a default label for a sub-location. Depending on how
your Master Calendar site administrator has configured Master
Calendar, you might see this labeled as something else, such as
“Fields,” “Offices,” and so on.
Note: No options are available on the Rooms list and the Lookup icon
is not available unless you have selected a location for which
active rooms have been configured.
Departments
All list of all currently active departments in Master Calendar.
Note: “Department” is a default label. Depending on how your Master
Calendar site administrator has configured Master Calendar, you
might see this labeled as something else, such as “Business
Units” for example.
Pending/Approved/
Rejected
The status of the events for which to search. You can select only one
value.
Master Calendar User’s Manual
53
Chapter 3
Using Master Calendar
3. Click Search.
A list of all events that meets your search criteria appears on the Manage Events page. A
single line runs through any event for which all the event dates have been canceled.
Figure 3-39:
Example of a canceled event
To approve pending event requests
1. Under the Admin Panel main menu option, point to Events & Special Dates, and then
click Manage Events.
The Manage Events page opens.
Figure 3-40:
Manage Events page
2. Optionally, carry out a search for the pending events that you are approving. (See “To
search for event requests” on page 53.)
3. Select the pending events that you are approving.
To select all pending events on the currently opened page for approval in a single
step, select Title. If you have multiple pages of events to approve, you must repeat
this entire process on each page.
54
Master Calendar User’s Manual
Chapter 3
Using Master Calendar
4. Under Actions, click Approve.
A message opens asking you if you are sure that you want to approve all the selected
events.
5. Click OK in the message.
A message opens indicating that all selected events were approved.
6. Click OK in the message.
The events are approved and are removed from the Pending Events list. For each
approved event, an email is automatically generated and sent to the event requestor
informing them that the Calendar Manager has approved their request.
Figure 3-41:
Example of approved event request email
To have Master Calendar automatically generate and send emails indicating the
event status (approved or rejected), your site administrator must have set the
default System Configuration settings for email—name of sender, SMTP server,
and address of sender. If your system is not automatically sending and generating
emails after you approve or reject an event request, work with your site
administrator to ensure that the necessary default settings have been specified.
Master Calendar User’s Manual
55
Chapter 3
Using Master Calendar
To reject pending event requests
1. Under the Admin Panel main menu option, point to Events & Special Dates, and then
click Manage Events.
The Manage Events page opens.
Figure 3-42:
Manage Events page
2. Optionally, carry out a search for the pending events that you are approving. (See “To
search for event requests” on page 53.)
3. Select the pending events that you are reject.
To select all pending events on the currently opened page for rejection in a single
step, select Title. If you have multiple pages of events to reject, you must repeat
this entire process on each page.
4. Under Actions, click Reject.
A Notes dialog box opens. Enter any comments in this dialog box as to why you are
rejecting the event request. These comments are sent automatically to the event requestor
after you complete the rejection process.
5. After you enter the comments, click Send.
A dialog box opens asking you if you are sure if you want to reject all the selected
events.
6. Click OK in the message.
A message opens indicating that all selected events were rejected.
7. Click OK in the message.
The events are rejected and are removed from the Pending events list. For each rejected
request, an email is automatically generated and sent to the event requestor informing
them that the Calendar Manager has rejected their request as well as the reasons for the
rejection. See Figure 3-43 on page 57.
56
Master Calendar User’s Manual
Chapter 3
Using Master Calendar
Figure 3-43:
Example of rejected event request email
To have Master Calendar automatically generate and send emails indicating the
event status (approved or rejected), your site administrator must have set the
default System Configuration settings for email—name of sender, SMTP server,
and address of sender. If your system is not automatically sending and generating
emails after you approve or reject an event request, work with your site
administrator to ensure that the necessary default settings have been specified.
To delete event requests
You can delete an event request of any status - pending, approved, or rejected.
1. Under the Admin Panel main menu option, point to Events & Special Dates, and then
click Manage Events.
The Manage Events page opens.
Figure 3-44:
Manage Events page
2. Optionally, carry out a search for the pending events that you are approving. (See “To
search for event requests” on page 53.)
3. Select the events that you are deleting.
To select all events on the currently opened page for deletion in a single step,
select Title. If you have multiple pages of events to delete, you must repeat this
entire process on each page.
Master Calendar User’s Manual
57
Chapter 3
Using Master Calendar
4. Under Actions, click Delete.
A message opens asking you if you are sure that you want to delete all selected events.
5. Click OK in the message.
A message opens indicating that all selected events were deleted.
6. Click OK in the message.
The appropriate tab (Approved, Reject, or Deleted) is updated to reflect the deletion of
the event requests.
To move a rejected event request to an approved status
If you accidentally reject an event request, you can always move the rejected request to an
approved status.
In this case, an email is NOT automatically generated and sent to the requestor
indicating that their request was approved.
1. Carry out a search for the rejected events that you are approving. (See “To search for
event requests” on page 53.)
Figure 3-45:
Manage Events page, Rejected Event Request
2. Select the rejected events that you are approving.
To select all events on the currently opened page for approval in a single step,
select Title. If you have multiple pages of events to approve, you must repeat this
entire process on each page.
3. Under Actions, click Approve.
A message opens asking you if you are sure that you want to approve all selected events.
4. Click OK in the message.
A message opens indicating that all selected events were approved.
5. Click OK in the message.
The events are approved and are removed from the Rejected Events list. They are now
displayed on the Approved Events list.
58
Master Calendar User’s Manual
Chapter 3
Using Master Calendar
To generate a Managed Events List report
You can generate a Manage Events List report, which lists all the events to which you have
access as a Calendar Manager. You can generate a report that lists all the pending events for
all calendars to which you have access as a Master Calendar manager or you can generate a
report for events with different statuses.
1. Under the Admin Panel main menu option, point to Events & Special Dates, and then
click Manage Events.
The Manage Events page opens. When this page first opens, the list of events that
appears is a list of all pending events for all calendars to which you have access as a
Calendar Manager.
Figure 3-46:
Manage Events page
2. Do one of the following:
•
To generate a Manage Events List report that lists all pending events for all
calendars to which you have access as a Calendar Manager, click Print.
•
To generate a Manage Events List report for events with different statuses, carry out
a search for these events (see “To search for event requests” on page 53), and then
click Print.
•
To generate a Manage Events list report for all EMS events for which you are the
Calendar Manager, click the EMS tab to open it, and then click Print.
An onscreen preview of the Manage Events List report opens in its own window. A
variety of options are available from this preview, including (from left to right at the
top of the onscreen preview) the options to search the report results, print the report
in its entirety, print the currently displayed report page, and export the report to a file
and save the file. See Figure 3-47 on page 60.
PDF is the default format for exporting to a file. Other allowed formats are Xls,
Xlsx, Rtf, Mnt, Text, Image, and Csv.
Master Calendar User’s Manual
59
Chapter 3
Using Master Calendar
Figure 3-47:
60
Onscreen preview for a Manage Events List report
Master Calendar User’s Manual
Chapter 3
Using Master Calendar
To request information for an EMS event
You use the Request Event Info option on the Manage Events page to request information
from the EMS contact for a selected event that has been pulled into Master Calendar from an
EMS database.
1. Under the Admin Panel main menu option, point to Events & Special Dates, and then
click Manage Events.
The Manage Events page opens.
2. Optionally, carry out a search for the pending events that you are approving. (See “To
search for event requests” on page 53.)
3. Click the EMS tab to open it.
This tab shows all the events that have been pulled from an EMS database into Master
Calendar via a connector.
Figure 3-48:
Manage Events page, EMS tab
4. Select the event or events for which you need more information from the EMS contact,
and then under Actions, click Request Event Info.
The Request Event Info dialog box opens.
Figure 3-49:
Request Event Info dialog box
Master Calendar User’s Manual
61
Chapter 3
Using Master Calendar
5. Enter any questions that you would like to request of the EMS contact, and then click
Send.
6. Click OK in the prompt about sending an email to request more information.
7. Click OK in the confirmation message.
The email is sent to the EMS contact for the selected event. The email contains a Fill out
more info link that the EMS contact can click to open an Event Info Request page on
which they can enter or edit the requested information and then submit the information.
This action essentially allows the EMS contact to work directly with the event in Master
Calendar and prevents you from having to manually enter the information that you have
requested from the EMS contact.
62
Figure 3-50:
Email sent to EMS contact
Figure 3-51:
Event Info Request page
Master Calendar User’s Manual
Chapter 3
Using Master Calendar
Depending on how your site administrator has configured Master Calendar, the
following might happen—After the EMS contact modifies the information for the
event, the event request is reset to a Pending status. An automated email is
generated and sent to the Calendar Manager informing the manager of the
modifications by the contact and the status change to “Pending” for the event.
Master Calendar User’s Manual
63
Chapter 3
Using Master Calendar
Managing an Event from the Event Summary
Page
On the Manage Events page, event titles are displayed as hyperlinks. If you click an event
title from the Manage Events page, or the Edit icon
on the Event Details dialog box, the
Event Summary page opens. On the upper half of the page, the Details tab on this page
summarizes the current details for the event. The History tab on this page shows the history
for the event. On the lower half of the page, three tabs show the dates that are associated with
the event.
•
The All tab shows all dates for the event in Master Calendar. (The information that
appears on this tab is the combined information from the Current tab and the Historical
tab.)
•
The Current tab shows recurring dates for the event going forward from the current day’s
date.
•
The Historical tab shows recurring dates that have already posted.
Figure 3-52:
Event Summary page, Details tab
A variety of options are available to you for managing the event from the Event Summary
page, including:
64
•
Editing the event. See “To edit an event” on page 65.
•
Adding event dates. See “To add event dates” on page 68.
•
Deleting event dates. See “To cancel event dates” on page 69.
•
Canceling an event. See “To cancel event dates” on page 69.
•
Copying an event. See “To copy an event” on page 72.
•
Adding an event to the calendars in your personal email program (for example, Microsoft
Outlook.) See “To add the event to your personal email calendar” on page 74.
•
Viewing the event details. See “To view the event details” on page 74.
Master Calendar User’s Manual
Chapter 3
Using Master Calendar
To edit an event
If an event that you are editing was imported into Master Calendar from EMS,
then any information that was originally entered for the event in EMS is not
editable. Only the information that was entered for the event in Master Calendar
(event description, tags, and so on) is editable. If you need to edit information for
the event that was originally entered in EMS, you must edit this information in
EMS, and then reimport the event into Master Calendar from EMS.
Two options are available for editing an event from the Event Summary page. You can use
the Edit Event option, or you can use the Edit option. The information that you can edit is
different for these two options. In addition, you must consider whether you are editing a
single date event, or a multi-date event.
•
If you are editing a single date event, and you:
•
select the Edit Event option, then you can edit the event title, the event post date, the
event contact information, the event group-priority information, the event additional
information, the event timezone, and the event tags. You can also add an image and/
or attachments to the event.
•
select the event date on any of the three tabs (All, Current, or Historical) and then
click Edit, you can edit the event info, the event location, custom fields, and with the
exception of the event timezone, the event times. You also have the option of marking
the event as a featured event or canceling the event.
If you are editing a multi-date event, you can edit either the “top-level” event information
(the main event), or you can edit individual dates for the event (the event occurrences).
When you edit the main event option, the same edits are applied to all the event occurrences.
When you edit an event occurrence, the edits are applicable only for the selected occurrence.
No other event occurrences are affected. Further, any edits that you make to an event
occurrence override the edits that you make to the main event. For example, if you attach an
image at the main event level, then this image is displayed for all event occurrences;
however, you can also attach a unique image for each occurrence of a multi-date event. If
you attach a unique image at the event occurrence level, this image overrides any image that
is attached at the main event level.
•
If you are editing a multi-date event, to edit:
•
the main event, you must select the Edit Event option. You can edit the event title, the
event post date, the event contact information, the event group-priority information,
the event additional information, the event timezone, and the event tags. You can also
add an image and/or attachments to the event.
•
an event occurrence, you must select the event occurrence on any of the three tabs
(All, Current, or Historical), and then click Edit. You can edit the event info, the event
location, custom fields, and with the exception of the event timezone, the event times.
You also have the option of marking the event as a featured event or canceling the
event.
Master Calendar User’s Manual
65
Chapter 3
Using Master Calendar
For both single date events and multi-date events, depending on how your site
administrator has configured Master Calendar, if you edit an event that has
already been approved, the event might be reset to a Pending status, which will
require approval again by the Calendar Manager.
To edit a single date event
1. Click an event title from the Manage Events page, or click the Edit icon
Details dialog box.
on the Event
The Event Summary page opens.
2. Do one of the following:
•
Click Edit Event.
•
Select the event on any of the three tabs, and then click Edit.
The Edit Event page opens populated with the information for that you can edit for the
selected event.
3. Edit the information as needed for the event.
See Step 4 and Step 7 of “To submit an event” on page 47 for the information that
you can edit for an event.
4. Click Save.
5. Do one of the following:
66
•
If you accessed the Event Summary page from the Manage Events page, click Back
to Manage Events to return to the Manage Events page.
•
If you accessed the Event Summary page from a calendar, click Back to Calendar to
return to the event’s calendar.
Master Calendar User’s Manual
Chapter 3
Using Master Calendar
To edit a multi-date event
1. Click an event title from the Manage Events page, or click the Edit icon
Details dialog box.
on the Event
The Event Summary page opens.
2. Do one of the following:
•
If you want to edit the main event, then click Edit Event.
•
If you want to edit an event occurrence, then select the occurrence on any of the
three tabs, and then click Edit.
The Edit Event page opens populated with the information for the main event or the
selected event occurrence.
3. Edit the information as needed for the event.
See Step 4 and Step 7 of “To submit an event” on page 47 for the information that
you can edit for an event.
4. Click Save.
5. Do one of the following:
•
If you accessed the Event Summary page from the Manage Events page, click Back
to Manage Events to return to the Manage Events page.
•
If you accessed the Event Summary page from a calendar, click Back to Calendar to
return to the event’s calendar.
Master Calendar User’s Manual
67
Chapter 3
Using Master Calendar
To add event dates
You use the Add function on the Event Summary page to add more dates, including recurring
dates, to an existing event, whether the event is a single date event or a multi-date event.
When you add more dates to an existing event, you can also modify the event information
and the event location, and with the exception of the event timezone, the event times. You
can also add an image to the event, and you have the option of marking the event as a
featured event.
The Add option is a quick and convenient way of adding more dates to an event
that has recurring dates without having to edit all the information for each event
date.
1. Click an event title from the Manage Events page, or click the Edit icon
Details dialog box.
on the Event
The Event Summary page opens.
2. For either a single date event or a multi-date event, click Add.
3. Modify the information as needed for the event.
See Step 4 and Step 7 of “To submit an event” on page 47 for the information that
you can edit for an event.
4. Click Save.
5. Do one of the following:
68
•
If you accessed the Event Summary page from the Manage Events page, click Back
to Manage Events to return to the Manage Events page.
•
If you accessed the Event Summary page from a calendar, click Back to Calendar to
return to the event’s calendar.
Master Calendar User’s Manual
Chapter 3
Using Master Calendar
To cancel event dates
You can cancel all dates for an event in a single step, or you can cancel dates on an individual
basis. When you cancel an event, the event is no longer active in Master Calendar; however,
the entry is not removed from the Manage Events page or the Event Summary page. On the
Event Summary page, and on the event’s calendar, a single line appears through each event
date that was canceled. If you cancel all the dates for an event, then a single line also runs
through the event on the Manage Events page.
To cancel all event dates in a single step
1. Click an event title from the Manage Events page, or click the Edit icon
Details dialog box.
on the Event
The Event Summary page opens.
2. Click Cancel Event.
A message opens asking you if you are sure that you want to cancel all the selected event
dates.
3. Click OK in the message.
A message opens indicating that all the selected event dates were canceled
4. Click OK in the message.
The Event Summary page is updated to reflect the cancellation of the event dates. None
of the entries is removed from the Event Summary page. Instead, a single line runs
through each event date, indicating that it was canceled.
5. Do one of the following:
•
If you accessed the Event Summary page from the Manage Events page, click Back
to Manage Events to return to the Manage Events page.
•
If you accessed the Event Summary page from a calendar, click Back to Calendar to
return to the event’s calendar.
To cancel individual event dates
1. Click an event title from the Manage Events page, or click the Edit icon
Details dialog box.
on the Event
The Event Summary page opens.
2. Open the tab (All, Current, or Historical) that contains the dates that you are cancelling.
Master Calendar User’s Manual
69
Chapter 3
Using Master Calendar
3. Select the individual dates that you are canceling.
To select all event dates on the currently opened page for cancellation in a single
step, select the blank checkbox next to Actions. If you have multiple pages of event
dates to cancel, you must repeat this entire process on each page.
4. Click Cancel.
A message opens asking you if you are sure that you want to cancel all the selected event
dates.
5. Click OK in the message.
A message opens indicating that the selected event dates were canceled.
6. Click OK in the message.
The tab on the Event Summary page is updated to reflect the cancellation of the event
dates. The entries are not removed from the Event Summary page. Instead, a single line
runs through each event date, indicating that it was canceled.
7. Do one of the following:
•
If you accessed the Event Summary page from the Manage Events page, click Back
to Manage Events to return to the Manage Events page.
•
If you accessed the Event Summary page from a calendar, click Back to Calendar to
return to the event’s calendar.
To activate an event
If all event dates for a scheduled event have been canceled, you can activate all the event
dates in a single step.
You cannot activate individual dates. The Activate function is an “either all or
nothing” function.
1. Click an event title from the Manage Events page, or click the Edit icon
Details dialog box.
on the Event
The Event Summary page opens.
Remember, the event that you are selecting must have all its event dates canceled,
not just some.
2. Click Activate Event.
A message opens asking you if you are sure that you want to activate all the event dates.
70
Master Calendar User’s Manual
Chapter 3
Using Master Calendar
3. Click OK.
The message closes. All previously canceled event dates are returned to an active state.
To delete event dates
Just as with canceling a date, you can delete all dates for an event in a single step, or you can
delete dates on an individual basis; however, unlike canceling a date, a deleted date is
removed from the Manage Events page and the Event Summary page, which means that you
cannot view the entry for the deleted event. If you want to remove all the dates for an event,
but still be able to view the entry for the event, then you must cancel the event dates. See “To
cancel event dates” on page 69.
To delete all event dates in a single step
1. Click an event title from the Manage Events page, or click the Edit icon
Details dialog box.
on the Event
The Event Summary page opens.
2. Select the blank checkbox next to Actions.
3. Click Delete.
A message opens asking you if you are sure that you want to delete all the selected event
dates.
4. Click OK in the message.
A message opens indicating that all the selected event dates were deleted
5. Click OK in the message.
6. Do one of the following:
•
If you accessed the Event Summary page from the Manage Events page, click Back
to Manage Events to return to the Manage Events page.
•
If you accessed the Event Summary page from a calendar, click Back to Calendar to
return to the event’s calendar.
To delete individual event dates
1. Click an event title from the Manage Events page, or click the Edit icon
Details dialog box.
on the Event
The Event Summary page opens.
2. Open the tab (All, Current, or Historical) that contains the dates that you are deleting.
Master Calendar User’s Manual
71
Chapter 3
Using Master Calendar
3. Select the individual dates that you are deleting.
To select all event dates on the currently opened page for deletion in a single step,
select the blank checkbox next to Actions. If you have multiple pages of event dates
to cancel, you must repeat this entire process on each page.
4. Click Delete.
A message opens asking you if you are sure that you want to delete all the selected event
dates.
5. Click OK in the message.
A message opens indicating that the selected event dates were deleted.
6. Click OK in the message.
7. Do one of the following:
•
If you accessed the Event Summary page from the Manage Events page, click Back
to Manage Events to return to the Manage Events page.
•
If you accessed the Event Summary page from a calendar, click Back to Calendar to
return to the event’s calendar.
To copy an event
If you want to duplicate an event to another date, or if a new event contains the same
information as a previously existing event, you do not have to enter all the event information
as new information. Instead, you can use the Copy Event function to copy an existing event.
1. Click an event title from the Manage Events page, or click the Edit icon
Details dialog box.
on the Event
The Event Summary page opens.
2. Click Copy Event.
The Copy Event dialog box opens. The option to Copy this Event is selected by default.
Figure 3-53:
72
Copy Event dialog box
Master Calendar User’s Manual
Chapter 3
Using Master Calendar
3. Do one of the following:
•
To copy the existing event as is, enter a new start date, and then click Copy.
The Copy Event dialog box closes. You return to the Event Summary page. The
newly copied event is displayed on the All tab. (Depending on the new starting date
for the copied event, it might also appear on the Current tab, the Historical tab, or
both.)
•
To copy the event to a new event, select Copy to a New Event, enter a new start date,
and then click Copy. The Copy Event dialog box closes. You return to the Event
Summary page. The new event is loaded to the Event Summary page with a new event
ID. The newly copied event is displayed on the All tab. (Depending on the new
starting date for the copied event, it might also be displayed on the Current tab, the
Historical tab, or both.)
4. Optionally, to include canceled events when you are copying, select Include canceled
events when copying.
5. Click Copy.
The Copy Event dialog box closes. You remain on the Event Summary page with the
newly copied event displayed on the page.
6. Edit the event as needed (see “To edit an event” on page 65); otherwise, do one of the
following:
•
If you accessed the Event Summary page from the Manage Events page, click Back
to Manage Events to return to the Manage Events page.
•
If you accessed the Event Summary page from a calendar, click Back to Calendar to
return to the event’s calendar.
Master Calendar User’s Manual
73
Chapter 3
Using Master Calendar
To add the event to your personal email calendar
1. Click an event title from the Manage Events page, or click the Edit icon
Details dialog box.
on the Event
The Event Summary page opens.
2. Click Download .ics file.
A dialog box opens, asking you if you want to open or save the .ics file.
3. Indicate in this dialog box whether you want to open the file, or save the file.
•
If you indicate that you want to open the downloaded file, after all the data is
downloaded, the file opens automatically in the Calendar view of your personal email
program.
•
If you indicate that you want to save the downloaded file, after all the data is
downloaded, you can save the file to a location of your choice, and then after you
open the file, the event opens in the Calendar view of your personal email program.
4. Do one of the following:
•
If you accessed the Event Summary page from the Manage Events page, click Back
to Manage Events to return to the Manage Events page.
•
If you accessed the Event Summary page from a calendar, click Back to Calendar to
return to the event’s calendar.
To view the event details
You can view the event details for a single date event, or for a selected occurrence of a
multi-date (or series) event.
1. Click an event title from the Manage Events page, or click the Edit icon
Details dialog box.
on the Event
The Event Summary page opens.
2. Under Actions, click the View icon
.
The Event Details dialog box opens. (See Figure 3-54 on page 75.) Although this dialog
box has a different appearance and layout then the Event Details dialog box that opens
for an event from the Calendar Display area, most of the same functions are still
available, including adding the event to a personal calendar, sharing the event to social
networking sites, printing the event details, and so on. (See “Working with Event
Details” on page 35.) You can also click View Link to open a Link dialog box that
displays the actual URL for the event. You can copy and paste this link into the address
field of any browser to go to the event in Master Calendar. (See Figure 3-55 on page 75.)
74
Master Calendar User’s Manual
Chapter 3
Using Master Calendar
Figure 3-54:
Event Details dialog box (from the Event Summary page)
Figure 3-55:
View Link option on Event Details dialog box
Master Calendar User’s Manual
75
Chapter 3
Using Master Calendar
76
Master Calendar User’s Manual
Chapter 4
Managing your Master Calendar
Options
When your site administrator sets you up as a user in a Master Calendar system, you are
supplied with both your User Id and password. You can change your own password, or you
can have your current password emailed to you if you have forgotten it. In addition, you can
view a history of all the event requests that you have submitted, and you can view a summary
of all your calendar subscriptions and reminders, collectively referred to as notifications.
This chapter covers the following topics:
•
“Changing your Password” on page 78.
•
“Viewing Event Requests” on page 79.
77
Chapter 4
Managing your Master Calendar Options
Changing your Password
Two options are available for working with your password. If needed, you can change your
own password, or you can have your current password emailed to you if you have forgotten
it.
To change your password
1. Log in to Master Calendar.
2. On the User menu, under My Options, click Change Password.
The Change Password page opens.
Figure 4-56:
Change Password page
3. In the Old Password field, enter your current password.
The option Email me my password might be displayed at the bottom of the Change
Password page. If you do not remember your current password, then you can click
this option to have your current password emailed to you at the email address that
is associated with your user account.
4. In the New Password field, enter your new password.
No special rules apply to your password.
5. In the Confirm Password field, re-enter your new password exactly as you entered it in
the New Password field.
6. Click Update.
Your new password is saved. The message “Password Saved” is displayed at the top of
the page.
78
Master Calendar User’s Manual
Chapter 4
Managing your Master Calendar Options
Viewing Event Requests
You can view a history of all the event requests that you have submitted, and you can view a
summary of all your calendar subscriptions and reminders, collectively referred to as
notifications.
To view your event requests
1. Log in to Master Calendar.
2. On the User menu, under My Options, click View My Requests.
The View Requests page opens. By default, the Current tab is the opened tab. The
Current tab shows all your event requests going forward from the current day’s date. The
Historical tab shows all your past event requests.
If
Status
The request was approved for all calendars to which you submitted it
Approved
The request was denied for all calendars to which you submitted it
Disapproved
The request has not previously been approved for any calendar, or it was
previously denied for any calendar, and it is currently pending on one or more
calendars
Pending
Figure 4-57:
View Requests page
3. Optionally, you can do one or more of the following to customize the information that
you are viewing to better suit your needs:
•
Click Show Cancelled to also view all canceled events on this page.
•
Click the event title to open the Event Summary page and edit an event request. See
“Managing an Event from the Event Summary Page” on page 64.
•
Enter a complete or partial search string in the Title field, and then click Go to search
for a particular event by title.
The search is limited to the exact order of characters in the search string but the
search is not case-sensitive and the string can appear anywhere in the search
results. For example, if you enter “ball” as your search string, search results can
include Football, Baseball, Ballgame, and so on.
Master Calendar User’s Manual
79
Chapter 4
Managing your Master Calendar Options
•
Click a column header to sort your request based on a particular characteristic (for
example, Event Title or Event Status).
•
If the selected event is one occurrence in a series event, you can click Related Events
to open a list of all the event occurrences for the series. When you are done viewing
the event occurrences, click the Return icon
to close the lis and return to the Event
Details dialog box.
•
Under Actions, click the View Event Details icon
to open the Event Details dialog
box and view the details for the event. See “Working with Event Details” on page 35.
Figure 4-58:
Event Details dialog box
To view your notifications
A notification is one of two types of Master Calendar system-generated emails that you can
receive:
•
Subscriptions—Emails about new, modified, or canceled events for calendars to which
you have subscribed. See “To subscribe to a calendar” on page 42
•
Reminders—Emails that alert you about the start of, or changes to, specific events. See
Add Reminder in “Working with Event Details” on page 35.
1. Log in to Master Calendar.
2. On the User menu, under My Options, click My Notifications.
The My Notifications page opens. By default, the Subscriptions tab is open.
Figure 4-59:
80
My Notifications page, Subscriptions tab
Master Calendar User’s Manual
Chapter 4
Managing your Master Calendar Options
Figure 4-60:
My Notifications page, Reminders tab
3. Optionally, you can do one or more of the following to customize the information that
you are viewing to better suit your needs:
•
Sort your notifications based on a particular characteristic (for example, Event Title).
•
Under Actions, click the Delete icon
or a reminder.
next to a notification to delete a subscription
Master Calendar User’s Manual
81
Chapter 4
Managing your Master Calendar Options
82
Master Calendar User’s Manual
Index
A
event contact
Assumptions for the manual ........ 10
event dates
C
calendar
subscribing to............................ 42
unsubscribe from ...................... 42
unsubscribing from ................... 42
emailing.....................................35
overview of managing from the
Event Summary page................64
adding to a personal calendar...35
Color Picker icon ......................... 23
printing ......................................35
Conventions used in the manual ... 9
Copyright ....................................... 3
sharing and booking to social
networking sites ........................35
E
viewing and working with for an
event from the Calendar Display
area...........................................35
emailing information about........ 79
overview of managing from the
Manage Events page ................52
submitting..................................47
event details
emailing.....................................35
adding to a calendar ................. 79
editing, overview of ...................65
canceling individually ................69
defined ...................................... 47
event
editing a single date event ........66
generating a report for...............59
deleting individually...................71
requesting information for from the
EMS contact ............................. 61
editing a multi-date event ..........67
canceling all for an event in a
single step.................................69
Calendar Requester
EMS event
copying......................................72
adding to an event (single date or
multi-date) .................................68
deleting all for an event in a single
step ...........................................71
Calendar User
adding to your personal email
calendar ....................................74
activating all when canceled for an
event .........................................70
Calendar Picker icon ................... 22
defined ...................................... 47
events
G
guest
defined ......................................47
H
help text
viewing and working with for an
event from the Event Summary
page ..........................................74
event request
defined ......................................24
viewing in Master Calendar.......24
hyperlinks on a Master Calendar
page .............................................19
approving when pending...........54
deleting .....................................57
I
liking on Facebook.................... 79
moving from a rejected status to an
approved status ........................58
publicly recommending on Google
79
reject when pending..................56
see also event icon
searching for .............................53
Calendar Picker.........................22
viewing ......................................79
Color Picker...............................23
searching for ............................. 39
setting a reminder for..........35, 79
sharing details about on social
networking sites ........................ 79
Event Summary page
overview of using to manage
events in Master Calendar ........64
icons
Lookup ......................................22
Time Picker ...............................23
tweeting a link for to your
followers.................................... 79
viewing the URL for .................. 74
EMS Master Calendar User’s Manual
83
L
Lookup icon .................................22
M
Manage Events List report
generating .................................59
Manage Events page
overview of using to manage
events in Master Calendar ........52
Master Calendar Home page
layout of ....................................17
viewing and working with the
display.......................................27
N
notification
viewing ......................................38
reminder
setting for an event....................35
reports
Manage Events List...................59
required fields for entering data ...21
S
search results
exporting ...................................40
social networking sites
sharing and bookmarking event
details to....................................35
special date
searching for from the Master
Calendar Home page ................39
Special information about the
manual ...........................................9
defined ......................................80
notifications
T
viewing ......................................80
Time Picker icon ..........................23
O
U
Organization of the manual..........10
URL
P
viewing for an event ..................74
user
password
changing ...................................78
personal calendar
see Calendar Requestor or
Calendar User
Using the manual ...........................9
adding event details to ..............35
R
related events
defined ......................................38
84
EMS Master Calendar User’s Manual