1
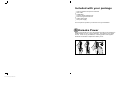
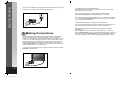
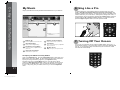
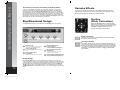
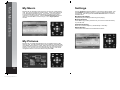
Wireless Karaoke System
User Manual
Oncore Manual proper for B&W inb1 1
07/09/2007 21:42:43
Warnings
On-Key Trademark
On-Key Karaoke is a registered trademark of IVL Audio Incorporated.
FCC Statement
This equipment has been tested and found to comply with the limits for a Class B digital device, pursuant to Part
15 of the FCC Rules. These limits are designed to provide reasonable protection against harmful interference
in a residential installation. This equipment generates, uses and can radiate radio frequency energy, and if not
installed and used in accordance with the instructions, may cause harmful interference to radio communications.
However, there is no guarantee that interference will not occur in a particular installation. If this equipment does
cause harmful interference to radio or television reception, which can be determined by turning the equipment off
and on, the user is encouraged to try to correct the interference by one or more of the following measures:
- Reorient or relocate the receiving antenna.
- Increase the separation between the equipment and the receiver.
- Consult the dealer or an experienced radio/ TV technician for help.
Changes or modifications not expressly approved by the party responsible for compliance could void the user’s
authority to operate the equipment.
Table of Contents
The technology in this product is protected by the following United States patents:
4,688,464 5,301,259 5,428,708 5,567,901 5,641,926 5,986,198 6,046,395
Caution
Not recommended for children under 8 years of age. As with all electric products, precautions should be observed
during handling and use to prevent electric shock.
To be used only with approved AC power adaptor
You can sing like a pro with your new Oncore Wireless Karaoke™ system. Follow the Getting Started instructions
to begin singing to your favorite tunes, and see the Karaoke Features section to add your own effects. Please
retain these instructions for future reference.
Caution
- Adult assembly is required for battery installation and product set-up.
- Input cable is not a toy. Adult set-up and supervision is required.
- Do not wind input cable around player handle.
- Be sure to grasp the plastic jack casing when disconnecting the audio/ video cable. Do not pull on the cables
to disconnect.
To Avoid Battery Leakage:
- Always insert batteries correctly, and follow the battery manufacturer’s instructions
- Do not mix old batteries with new batteries or alkaline, standard (carbon
zinc), or rechargeable (nickel-cadmium) batteries together.
- Always remove weak or dead batteries from the product.
- Remove batteries before storage.
Table of Contents
Getting Your Oncore Started........................................................... 2
Overview Of Oncore Buttons.......................................................... 7
Oncore Karaoke Effects.................................................................. 8
Main Menu Functions....................................................................11
On-Key Studio Software Guide.....................................................15
Frequently Asked Questions / Troubleshooting............................ 23
1
Oncore Manual proper for B&W inb2 2
07/09/2007 21:43:51
Getting Started
Included with your package
1 Oncore wireless microphone and base
1 A/V Cable
1 USB Cable
1 On-Key Studio Software CD
1 Free 5 song download card
1 Quick Start guide
1 AC power supply
For microphone operation you will need: four (4) AA batteries
1. Karaoke Power
Remove the handle cover from the wireless microphone by twisting the
handle bottom 1/4 turn, counter-clockwise. Then pull the cover down
and off. Insert four (4) AA batteries, matching positive and negative
terminals as indicated. Replace the battery cover.
2
Oncore Manual proper for B&W inb3 3
07/09/2007 21:43:52
Frequently Asked Questions
Getting Started
Connect the AC adaptor to the back of the base unit and then plug into a
power source. Check that the power LED illuminates.
I’m getting squealing /feedback.
The karaoke player is too close to your speakers. Move the karaoke
player away from the speakers.
Can I only purchase songs with a credit card?
Yes, www.onkeysongs.com accepts MasterCard, and VISA.
I’ve changed my e-mail address, can I still buy songs?
Yes. Log on to www.onkeysongs.com, edit your account, and update
your e-mail address information.
I can’t download the songs I’ve purchased.
The On-Key Studio application must be installed and running before you
can download songs and transfer them to your karaoke player.
I’m having problems installing my On-Key Studio
Software.
2. Making Connections
See the Help section on the web site. Ensure that your computer is
running Windows 2000 or later. To determine what operating system you
are using, right-click on My Computer and select Properties. See your
Oncore’s packaging for more details regarding systems requirements.
Connect the audio/video cables to the jack at the base of the karaoke
player according to their color (white to white, red to red, yellow to
yellow). Connect the other colored cable plugs to the input jacks on your
TV set (or your VCR/ DVD player if your TV does not have direct video
input), again matching the color of the plug to the color of the input jack.
The yellow jack connects to Video In, and the white and red jacks to
Left and Right Audio In. You may also connect the red and white audio
cables to the inputs on your home stereo.
If you are using a duet microphone, insert its cable into the jack marked
Duet Mic on the base unit.
3
Oncore Manual proper for B&W inb4 4
24
07/09/2007 21:43:53
3. Power Up
We’ve compiled the following list of frequently asked questions and
answers to help you in case you run into difficulties. An updated list
of frequently asked questions can be found on our website,
www.onkeysongs.com.
Press the Power button on the microphone keypad to turn the karaoke
player on. Check that the power LED illuminates. Turn on your TV (and
VCR/DVD if used). You must then put your TV or VCR/DVD player
into Aux or Line In mode. The TV will show the Main Menu and a list of
sub-menus.
Getting Started
Frequently Asked Questions
Troubleshooting FAQs
I’ve connected the Oncore base unit to the input of my
TV, and turned on the TV, but nothing happens.
You have to set your TV to receive Aux Input. Connect and turn on your
karaoke player then press the Input or Aux button on your TV or its
remote control until the karaoke player screen is displayed on your TV. If
your remote control does not have either of these buttons, you may find
the Aux Input Select by turning the channel below channel 2. Please
refer to the instructions that came with your TV.
The microphone’s power keeps shutting off.
Your batteries need replacing. Replace them matching the positive and
negative markings with the positive and negative terminals.
The microphone’s signal keeps cutting out repeatedly.
The microphone is likely caught in a cycle of roaming for channels. In
the settings menu, set your channel scanning to manual. Then try other
channels yourself for the best signal.
The microphone/keypad’s remote signal isn’t being
picked up.
4. Selecting a Song
Try changing channels or changing the position of your microphone.
The My Karaoke menu is selected by default - press OK or the Right
navigation button to access. Pressing the Up or Down navigation
buttons will move the selector up or down one song.
The volume (both music and voice) is too loud/soft.
Use the volume control on your TV to change the overall volume.
I can’t hear my voice over the music/I can’t hear the
music over my voice.
Press the Volume button on the microphone. Microphone, background
music, or reverb volume can be accessed by scrolling with the Up/Down
navigation buttons. To raise the volume press the Right navigation
button; to lower, press the Left.
The karaoke player isn’t picking up my voice.
Hold the microphone closer to your mouth, so that the microphone will
pick up your voice and not other sounds.
23
Oncore Manual proper for B&W inb5 5
4
07/09/2007 21:43:54
On-Key Studio Software Guide
Getting Started
You may also select the song you wish to play by entering its
numeric code. If you make a mistake entering the number, use the
left navigation button to clear the last digit . Once you have entered a
valid code, press OK and the song will begin.
Drop-Down Menus
On-Key Studio always displays 3 drop-down menus along the top of each
screen. Use them to print your song list, get help, register a new player, or
change settings.
Settings
You can adjust the default settings of On-Key Studio by going to the Tools
menu and selecting Settings. You can choose to always or never:
Replace existing songs when transferring new ones
Delete recordings from your SD memory card after they are stored in
On-Key Studio
B
A
C
B
5. Song Play
D
Press OK to begin playback of the selected song. Lyrics are displayed
on the TV and highlighted to indicate when they should be sung. You
can pause and resume song play by pressing the Pause button. Press
the Stop button to stop the song and return to the My Karaoke menu.
5
Oncore Manual proper for B&W inb6 6
A
File Menu
B
Tools Menu
Print your song list or exit the program from this
menu.
Register a new player or change settings.
C
Help Menu
D
Settings Dialogue Box
Get access to various support resources,
connect to the On-Key website, and check for
updates.
Choose what to do with recordings on your SD
card after importing, and whether or not to replace
existing songs when transferring new ones.
22
07/09/2007 21:43:56
6. Sing Like a Pro
Import your MP3s to On-Key Studio and transfer them to your Oncore.
To get the best from your karaoke player it needs to hear your voice
clearly. Hold the microphone about an inch from your mouth, with
the player upright when singing. Overall volume can be controlled by the
volume control on your TV or stereo. Microphone, background music, or
reverb volume can be accessed by pressing the Volume button and then
scrolling with the Up or Down navigation buttons. To raise the volume
press the Right navigation button; to lower press the Left.
C
B
D
G
A
A
My Music Tab
B
Import Music Button
C
Add All Songs to Card Button
D
Access the My Music menu from other menus.
Imports your MP3s to My Music library.
Copies all songs from your My Music library to
your SD card.
Getting Started
On-Key Studio Software Guide
My Music
E
1”
F
E
My Music on SD Card Playlist
F
Arrow Button
G
My Music Library
Displays all MP3s currently on your SD card.
Copies only the selected songs in your My Music
library to your SD card.
Displays the songs in your computer’s karaoke
library.
7. Turning Off Your Oncore
To turn off your karaoke player hold the power button down for 1-3
seconds then release. Once the player powers down the LED light will
turn off. If your karaoke player is inactive beyond 10 minutes, it will
turn itself off automatically.
Remove All Songs Button
Deletes all MP3s on your SD card.
To Import your MP3s to On-Key Studio:
Click on the My Music tab. Click the Import Music button and select your
MP3 song(s), then click Open. On-Key Studio will take a few moments to
import your songs before they appear in your My Music library.
Transfer songs from your My Music library to your SD card by either
clicking the Add All Songs to Card button or by selecting the songs and
then clicking the Arrow button. Put your SD card back into your Oncore
to play or sing along with your MP3s, found on your Oncore’s My Music
menu.
21
Oncore Manual proper for B&W inb7 7
6
07/09/2007 21:43:58
Press this button to access
pitch correction, scoring, and
voice-assist features.
Echo
Press this button to activate spatial
effects. Press the button again to move
through the different options.
On-Key Studio Software Guide
Buttons
On-Key
(Pitch Correction)
Import CD+G
Converts your CD+G library for use on your Oncore player.
Voice Effects
Press this button to activate voice shifting.
Press the button again to move through the
various options.
B
OK
Use this button to begin song play or to
activate a selected menu item.
A
Navigation Buttons
Use the Up, Down, Left and Right buttons
to navigate through various menu options
and control levels.
Context-Sensitive Buttons
Key
Use the Key button to access key control.
Use the Up and Down navigation buttons to
raise or lower the key of the song.
D
C
(Four Circled buttons) Use these buttons for
various functions that are displayed with each
menu, such as Page Up, Page Down, Back, etc.
A
Import CD+G Tab
B
Select All Button
Access the Import CD+G menu from other
menus.
Selects all songs on CD+G disk to be imported.
C
Reading Speed
D
Import Button
Allows you to set the disc’s reading speed.
Imports the selected CD+G track(s) to your
karaoke library.
Volume
Use this button to access microphone(s),
background music, and reverb volume. Use
the Up/Down navigation buttons to select.
Record
Press the Record button to start recording
your performance at any time.
Power
7
Oncore Manual proper for B&W inb8 8
Channel
Press this button to turn your karaoke player
on. Hold it down to turn the player off.
Use this button to
manually scroll through
various channels if your
player’s remote control
connection stops working
or crackles.
Number
Use these buttons to select a song by
numeric code.
To add your CD+Gs to your karaoke library:
Click on the Import CD+G tab. Place your CD+G into your computer’s CD
Drive. Select the drive that the CD+G is in and click Next in the CD+G
Import Wizard. Please wait while the application gathers song/artist
information. Select the CD+G songs that you would like to import and
then click the Import Tracks button. On-Key Studio will take a few
moments to import and compress the audio. Once this is finished, the My
Karaoke library will appear and display your CD+Gs.
Transfer these songs to your Oncore the same way you would standard
karaoke songs (see My Karaoke directions).
Most CD drives support CD+Gs. For a full list of drives that support
CD+Gs, see the support section of onkeysongs.com.
20
07/09/2007 21:44:00
Insert your SD memory card into your computer’s SD slot, or into an SD
memory card reader/writer (which should be connected to the USB port of
your computer). Click the Import Recordings button and your recordings
will be displayed as they are being copied to On-Key Studio. Once imported,
you may wish to export these recordings to MP3 format if, for example, you’d
like to make a CD or send your recording to someone. To do this, select the
recording(s) you’d like to export and click the Export Recordings button. Your
MP3 file(s) can be found in the folder you export to.
Choose karaoke songs to purchase from the On-Key online song library.
C
E
D
F
B
A
Buy Songs Tab
Search for and purchase songs from the online
karaoke library at www.onkeysongs.com.
B
Download Songs Tab
C
Download Purchased
Songs Button
Access the Download Songs menu from other
menus.
Download songs once they’ve been purchased.
Karaoke Effects
Your Oncore Karaoke System has many features that can correct or
change the sound of your voice, and even rate your singing accuracy.
Refer to this section for directions for these features.
On-Key
(Pitch Correction)
Buy/Download Songs
A
Karaoke Effects
On-Key Studio Software Guide
To transfer your Oncore recordings to On-Key Studio:
Press the On-Key button to activate automatic pitch correction. Your voice will sound
perfect! Press this button repeatedly or hit
the Down navigation button to move
through the options shown below.
Pitch Correction
The pitch of your voice is automatically corrected to match
the melody line in the song.
Scoring Function
D
Download Most Recent
Purchase Option
Choose to download most recently purchased
songs not yet downloaded (default option).
E
This option allows you to score your singing performance. A
numeric score appears on the screen while you are singing.
Your score goes up or down depending on how well you sing.
Your singing is rated according to the accuracy of your pitch
and timing. This function is great for singing contests with
your friends!
Re-Download All Purchased
Songs Option
Re-download all purchased songs to the
computer you are currently using.
F
Get Incomplete Downloads Option
Get songs that failed to download correctly due to
internet connection issues, server glitches, etc.
To Buy Songs:
19
Oncore Manual proper for B&W inb9 9
Click the Buy Songs tab. On-Key Studio will then allow you to search our
online song library. Pick out your favourite songs using the song searching tips
to help guide you. Follow the checkout prompts to purchase your songs. Then
return to the On-Key Studio software application and click on the Download
Songs button to get your purchased songs. Once downloading is complete,
the My Karaoke menu will appear so that you can transfer songs onto your SD
card.
8
07/09/2007 21:44:02
Press this button to activate spatial effects.
Spatial effects change the “room” you are
in by changing the virtual space around
your voice. Press this button repeatedly
or hit the Down navigation button to move
through the options shown below.
On-Key Studio Software Guide
Karaoke Effects
Reverb
(Echo Button)
To transfer your karaoke library to your Oncore:
Insert your SD memory card into your computer’s SD slot, or into an SD
memory card reader/writer (which should be connected to the USB port
of your computer). To transfer your entire karaoke library, simply click the
Add All Songs to Card button. You may prefer instead to select only the
song(s) that you wish to transfer, followed by clicking the Arrow button
to copy them to your SD card (click the View button for options to drag or
double-click songs). Your songs are now available to play by sliding the
SD memory card into the disk slot on your Oncore!
My Recordings
Room
Use this menu to import, export, and manage of all of your recorded
Oncore performances.
Sound like you’re singing in a bigger room.
Small Room
B
Sing in the shower without getting wet.
C
D
E
Hall
No lineups, no tickets - you’re the star!
A
Stadium
Your fans will be doing the “wave.”
F
Canyon
Practice your yodel.
A
9
Oncore Manual proper for B&W inb10 10
My Recordings Tab
Access the My Recordings menu from other
menus.
B
Import Recordings Button
C
Import Options Button
Import recordings made with your Oncore which
are stored on your SD card.
Choose if you’d like your recordings to be
deleted from your SD card upon importing.
D
Export Options Button
E
Export Recordings Button
F
Playback Control Bar
Choose if you’d like to include artist and/or
description in exported file name.
Converts the selected recording(s) to MP3
format and copies it to a folder on your computer.
Allows you to control playback.
18
07/09/2007 21:44:03
Karaoke Effects
On-Key Studio Software Guide
Party Effects
(FX Button)
Advanced Mode Features
By clicking the Advanced Mode button on the Quick Links menu, you
can use the full range of On-Key Studio’s features. The following is a list of
these features and how to use them.
Press this button to sound like someone
else. Press this button repeatedly or hit the
Down navigation button to move through
the options shown below.
My Karaoke
Use this menu to manage your karaoke library and arrange or search for
songs by artist, title, etc. You can also transfer songs to your SD card for
use with your Oncore, or print song lists.
Male
Lowers the pitch and changes the timbre of your voice. This
effect sounds great on kids’ voices too!
D
E
C
A
Female
Raises the pitch and changes the timbre of your voice.
Reach those high notes you never thought you could!
B
F
Robot
The same cool effect used in some of today’s most popular
songs.
H
G
Deepen
Makes your voice richer and fuller.
Lighten
Gives your voice an airy feel.
A
B
C
D
17
Oncore Manual proper for B&W inb11 11
My Karaoke Tab
Access the My Karaoke menu from other
menus.
View Button
Select the category of songs you want to display
(All Songs, CD+Gs, Recent Downloads, etc.)
and search your list for songs by artist or title.
E
Remove All Songs Button
F
Songs on SD Card Playlist
G
Arrow Button
H
My Karaoke Library
Add All Songs to Card Button
Copies all karaoke songs in your computer to
your SD card.
Doubling
Provides the perfect blend of virtual backup singers.
Print Button
Print a list of your karaoke songs by artist and
title.
Deletes all songs on your SD card.
Displays all songs currently on your SD card.
Copies only the selected songs in your computer’s
library to your SD card.
Displays the songs in your computer’s karaoke
library.
Male Duet
Copies your voice and lowers the pitch. The lower voice is
added to your own to make you sound like you’re singing with
a male partner.
Female Duet
Copies your voice and raises the pitch. The higher voice is
then added to your own to make you sound like you’re singing
with a female partner.
10
07/09/2007 21:44:04
Scroll through the following Main Menu options by pressing the Up or
Down navigation buttons and then OK. The four Context-Sensitive
buttons can be used to exit or edit menus. Because their functions vary
depending on which menu is being used, refer to the bottom right corner of
each menu, which indicates the function of each of these buttons.
On-Key Studio Software Guide
Main Menu Functions
Main Menu Functions
On-Key Studio Start-Up Menu:
Quick Links
By default the Quick Links menu is displayed when you open On-Key
Studio. This menu displays the software’s main functions, and is where
you access all other menus including advanced features. For details on
the menu buttons displayed below, refer to the Advanced Mode section
of this manual.
B
A
C
D
My Karaoke
Displays a listing of all your karaoke songs in alphabetical order either by
title or by artist - press the Stop button to alternate between both. Navigate
through your list with the Up/Down navigation buttons. Press the OK
button to play your song and begin singing. You may also select the song
you wish to play by entering its numeric code (the number at the bottom
of the screen). If you make a mistake entering the number, use the Left
navigation button to clear the last digit. Once you have entered a valid
code, press OK and the song will begin. Context-Sensitive buttons allow
you to return to the Main Menu, add songs to your reserve list, or view
parts of song lists that span more than one screen.
F
A
Quick Links Tab
B
Buy Songs Online Button
C
11
Oncore Manual proper for B&W inb12 12
E
Access the Quick Links menu from other menus.
Buy songs at onkeysongs.com. Once your
songs are purchased, you will need to download
them.
Download/Transfer Songs Button
Download purchased songs and transfer them
to your SD card.
D
CD+G Import Wizard
E
Advanced Mode
F
Converts your CD+G library for use on your
Oncore Player.
Use the full range of On-Key Studio’s features,
and manage My Karaoke, My Recodings, and
My Music playlists (see next page).
Start-Up Menu Preference
Choose between Quick Links and Advanced
Mode as your default menu for when On-Key
Studio opens.
16
07/09/2007 21:44:06
Place the On-Key Studio CD into your computer’s CD Drive. Follow the
installation prompts from your PC. If your computer doesn’t recognize
the software immediately, open your CD Drive folder and search for the
On-Key Studio icon. When you double-click on the icon, the installation
will begin. The software is set to update automatically.
Main Menu Functions
On-Key Studio Software Guide
Installing On-Key
Studio onto your PC
My Recordings
Displays all of your recorded songs in the order they were performed.
Select a recording title and press the OK button to play back your
performance. Hit the Stop button to exit back to the My Recordings menu.
Use the Context-Sensitive buttons to return to the Main Menu, delete
recordings, or as a Page Up/Down function.
Reserve List
Important Step after
Installation!
You must initialize an SD memory card with your Oncore before
it will be recognized by the On-Key Studio Software. Simply insert
the SD memory card into the disk slot on your Oncore wireless karaoke
player. Wait for the light on the base to flash 3 times. Your SD memory
card is now ready to use with your Oncore karaoke player.
15
Oncore Manual proper for B&W inb13 13
You can mark any song in the My Karaoke menu as reserved by pressing
the bottom left Context-Sensitive button. This places that song onto the
reserve list. When hosting a party you can go through a pre-set reserve list
of songs. Once a song is over or stopped, an updated list will appear without
the former song, and the next song on the list will begin when you press the
OK button. Use the Context-Sensitive buttons to return to the Main Menu,
remove songs, or as a Page Up/Down function.
12
07/09/2007 21:44:08
Settings
Displays all non-karaoke music stored on your Oncore or SD memory
card. The Oncore doubles as an MP3 player. Listen and organize all
your uploaded non-karaoke songs. If you wish, you can sing along
to your favorite MP3 tunes with all effects, but without lyrics, pitch
correction or scoring features. Use the Context-Sensitive buttons to
return to the Main Menu, reserve songs, or as a Page Up/Down
function.
Use the Up/Down navigation buttons to access the options below. Use
the Left/Right navigation buttons to choose a setting (indicated by an
orange box). Use the upper left Context-Sensitive button to return to
the Main Menu.
Main Menu Functions
Main Menu Functions
My Music
Background Images
Display background images while songs are playing.
Built-In Pictures
Press OK to copy built-in pictures from your Oncore’s internal memory
to your SD card.
Channel Scanning
Roam for a channel frequency automatically or manually.
About Oncore
View system information and serial/model numbers.
My Pictures
Displays all your digital photographs from your digital camera or SD
memory card. The SD card slot in the Oncore base is compatible with
most digital camera memory cards. Either use this feature as a picture
viewer or select a picture as a background for your next performance.
This way, you can view your own pictures while singing. Use all four
navigation buttons to move the selector and press OK.
13
Oncore Manual proper for B&W inb14 14
14
07/09/2007 21:44:10