1
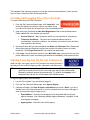
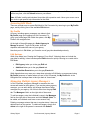
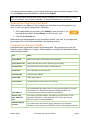
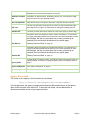
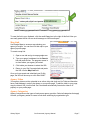
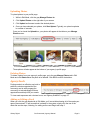
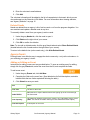
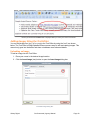
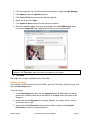
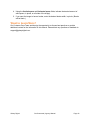
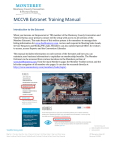
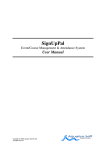
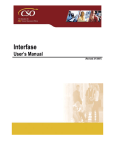
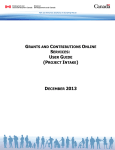
Agency Managers’ User Manual Updated September 2014 Table of Contents Introduction ................................................................................................................................ 1 Organization of This Manual ...................................................................................................... 1 The Navigation Bar .................................................................................................................... 1 Creating and Logging Into a User Account ................................................................................. 2 Signing Your Agency Up for Get Connected .............................................................................. 2 About Edit Mode ........................................................................................................................ 3 Accessing Edit Mode .............................................................................................................. 4 My Profile ............................................................................................................................ 4 Edit Buttons ........................................................................................................................ 4 Managing Multiple Agency Managers ..................................................................................... 4 Viewing the Progress of Your Work ........................................................................................ 5 Creating Your Agency’s Profile ............................................................................................... 5 Agency Direct Link .............................................................................................................. 6 Map Link ............................................................................................................................. 7 Agency Video ...................................................................................................................... 7 Agency Categories.............................................................................................................. 7 Agency Logo ....................................................................................................................... 8 Profile Page Photos ................................................................................................................ 8 Uploading Photos................................................................................................................ 9 Deleting Photos................................................................................................................... 9 Agency Needs ........................................................................................................................ 9 Adding or Editing a Need .................................................................................................... 9 Cloning a Need ..................................................................................................................12 Adding Volunteer Responses to a Need ............................................................................12 Deleted Needs ...................................................................................................................13 Agency Events ......................................................................................................................13 Adding or Editing an Event .................................................................................................13 Cloning an Event................................................................................................................15 Deleting Events ..................................................................................................................15 Agency Statistics ...................................................................................................................15 Volunteer Hours ....................................................................................................................15 Adding Volunteer Hours .....................................................................................................15 Approving and Declining Volunteer Hours ..........................................................................16 i The Text Editor .........................................................................................................................16 Pasting Text from Word .........................................................................................................18 Working with Hyperlinks ........................................................................................................19 Adding Images Using the Text Editor ....................................................................................20 Uploading an Image ...........................................................................................................20 Editing an Image ................................................................................................................21 Want to Learn More? ................................................................................................................22 ii Introduction Congratulations! Your agency has been invited to join the website Get Connected, powered by Galaxy Digital. The purpose of the Get Connected platform is to help you tell your agency’s story. More directly, it’s about connecting members of your community to each other so that problems are solved, a helping hand is there when needed, and the right relationships are formed to bring about truly positive action. Using Get Connected is easy. Once you’ve set up your agency page, you can begin posting needs, creating events, featuring videos, and displaying photos. More important, your agency can begin generating interest and engagement with individuals in your community. NOTES: This manual uses images from Get Connected’s default design. If your site is customdesigned, your screen may not match the ones shown here. The functionality, however, remains the same. This manual covers only the standard Get Connected platform. It does not cover Advanced Events, Disaster Response, or Service Learning. Organization of This Manual After introducing you to the Get Connected screen and showing you how to log in and set up an agency, this manual dives into the wonderful world of Edit mode—where you’ll spend much of your time as an agency manager. You’ll learn how to create an agency profile, post needs, announce events, and approve and track volunteer hours. Next, this manual focuses on the Text Editor and how you can use it to dress up your agency’s profile and incorporate images, hyperlinks, and more into your agency’s needs and events. So let’s get started! The Navigation Bar The Navigation Bar is visible on all screens in Get Connected. Depending on your site’s degree of customization, you may or may not have all of the items included on the navigation bar below. Standard “Look” of a Get Connected Navigation Bar (circled in red) Galaxy Digital Get Connected | Agency Manual Page 1 The Navigation Bar’s primary purpose is to help site visitors browse efficiently. Users can also log in or log out using links from the Navigation Bar. Creating and Logging Into a User Account To create a user account in Get Connected: 1. From the Get Connected home page, click Login/Join. Your screen will display two columns: one for new users to sign up, and one for users who already have a Get Connected account. 2. (new users only) Complete the New User Registration fields in the left-hand column. Fields marked with a red asterisk are required. Areas of Interest – Mark all areas in which you are interested in volunteering Terms and Conditions – The terms and conditions address issues of confidentiality; information collection, use, sharing, and control; links to and from other websites; and security. 3. (all users) Ensure that you have completed the Name and Password fields. (Passwords should be at least six characters long and can consist of numbers, letters, and other characters. Click Forgot Password? if you need a new password.) 4. Click Login. You will be taken directly to your My Profile page, where you can view your profile, add a photo, mark volunteering preferences and availability, and browse the site. Signing Your Agency Up for Get Connected When you sign your agency up for Get Connected, the email you enter is the one you’ll use to edit the agency profile, add needs, and add events. TIP An agency should only have one Get Connected account. Before registering, it’s a good idea to search the site first to ensure that your agency has not been bulkimported or manually entered by someone else. (To search, click Agency in the Navigation Bar and use one of the search tools available there.) To sign an agency up for Get Connected. 1. Log out of the system if you are already logged in. 2. From the Get Connected home page, click Agency Signup. 3. Complete all fields in the User & Agency Information form shown. (Note: If you don’t already have a Get Connected account, you’ll be required to set one up on this page in order to successfully sign the agency up.) Email Address – Enter the email address to be associated with the primary agency manager. (See “Managing Multiple Agency Managers” on page 4 to add more agency managers.) Agency Name – Enter the name of the agency. Galaxy Digital Get Connected | Agency Manual Page 2 Agency Address, City, State, Zip Code – Enter the agency’s address. (NOTE: This address will be visible on your profile page. To change or remove it from the profile page, see “Creating Your Agency’s Profile” on page 5.) (if applicable) Enter your First Name and Last Name into the respective fields. (if applicable) Create a Password of at least six characters. Numbers and other non-alphabetical symbols are accepted but not required. 4. Click Submit Now. Now that you’ve signed your agency up, you are free to log in as an individual user and customize your agency page, add needs, and post events your agency will be hosting. Note: Your agency registration may require approval by a site administrator before it can be made public on the site. You can still work on your agency’s page, but none of your work will be made public on the site until an admin has approved it. About Edit Mode Edit mode is indicated by a row of gray tabs just under the navigation bar. The standard Get Connected platform features the following seven tabs in Edit mode: Preview –View your agency’s profile page as a visitor to the site would see it. Edit – Edit your agency’s profile page; add additional agency managers Photos – Add (or delete) photos to your profile page. Needs – Post a new need and manage existing ones. Events – Post a new event and manage existing ones. Stats – View statistical information that Get Connected stores for your site. Time Tracking – Enter and manage volunteer hours Galaxy Digital Get Connected | Agency Manual Page 3 Important! Before moving from one tab to another, you must save your work. To save your work at any time, click the Submit button on your screen. Note: All fields in edit mode include a blue circle with a question mark. Hover your cursor over a blue circle to get specific help information for that field. Accessing Edit Mode There are several ways to access Edit Mode in Get Connected: by returning to your My Profile page, and by clicking one of the available Edit buttons. My Profile All users, including agency managers, are taken to their My Profile page upon logging into Get Connected. To get to your profile page from within the system, click My Profile in the navigation bar. At the right of the profile pages is a Select Agency to Manage dropdown. To get to Edit mode, click this dropdown and select the name of your agency. Now that you’re in Edit Mode, you’ll see the row of gray tabs described previously. Edit Buttons While View Mode (see “Viewing the Progress of Your Work”, following) does not include the gray tabs for editing, it does include special Edit buttons for quickly returning to a certain tab in Edit Mode: Edit Agency takes you to the gray Edit tab. Add Need takes you to the gray Needs tab. Create New Event takes you to the gray Events tab. While these buttons may save you a step when returning to Edit Mode, we recommend using My Profile because, no matter where you are in Get Connected, the My Profile link in the Navigation Bar is always there to take you back to “home base.” Managing Multiple Agency Managers In Get Connected, an agency manager is someone who can access edit mode for their agency. If you are the primary agency manager, you can add, delete, and change the status of other managers for your agency. All of this is done from the gray Edit tab. The Managers field is on the right side of the screen. To add a manager, enter the individual’s name in the Managers field on the right side of the screen and click Submit. (Note: To be added, an individual must have a user account first.) Deleting a manager returns that user to regular status; it does not delete them from the system. To delete a manager, simply click delete to the right of the person’s name and click Submit. Galaxy Digital Get Connected | Agency Manual Page 4 If you are the primary manager, you can assign that primary status to another manager. To do so, click Primary under the individual’s name and click Submit. Note: Once you have made another person primary manager, you will not be able to reassign yourself as primary. Only a primary manager—or a system administrator—can do this. Viewing the Progress of Your Work When working on your agency in Get Connected, you can check to see the progress of your work. To view your agency’s page while in Edit Mode: 1. On the page where you’re working, click Submit to save your work. If you leave the screen without clicking Submit, you will lose your work. 2. Click the gray Preview tab. Note that the gray tabs disappear and you are taken to a basic “user view” of your page (with the exception of the “Edit” buttons described in the following section). Creating Your Agency’s Profile Field descriptions are grouped by type in the following table. This grouping may or may not reflect the order of fields on your screen. Fields marked by an asterisk are described in further detail following the table. Field Notes Agency Name Name of your agency; auto-filled by Get Connected Agency Direct Link* Unique URL that, when clicked, will bring up your agency. Contact Person First and last names of the agency’s contact person Contact Title Title of the agency’s contact person Facebook Page Facebook page address Twitter Page Twitter page address Phone Number The public phone number used by your agency FAX Number The public FAX number used by your agency Email Address The email address your agency uses to receive general questions, requests for information, etc. Because this address is displayed publicly, we recommend against entering a personal email address. Address, City, State, Zip/Postal Code Your agency’s physical address; auto-filled by Get Connected. You can replace the information in these fields with a P.O. Box to prevent your agency’s location from being published. Additional Agency Contacts Galaxy Digital If you want people other than the agency managers to get automatic notification of need responses and RSVPs, enter the email addresses of those Get Connected | Agency Manual Page 5 people here. Separate addresses with a comma and a space. These addresses are not publicized anywhere on the site. Additional Location Info Information on branch offices, landmarks, parking, etc., that someone might need in order to find your physical location. Hours of Operation Days and hours you are open for business; no specific format is required. Map Link* The link you enter here will be shown as a link to a map on the profile page. See “Map Link” on page 7 for instructions on finding and inserting the link. Website URL The URL you enter here will be shown as a link on the agency’s profile page. Information about your agency’s mission, vision, and history. For instructions on copying and pasting Word text into this field, see “Note: Depending on your site’s design, the text you enter here may or may not show up as identical to the text that will be shown on your profile page. Who We Are* Pasting Text from Word” on page 18. Information about your agency’s programs and services. For instructions on copying and pasting Word text into this field, see “Note: Depending on your site’s design, the text you enter here may or may not show up as identical to the text that will be shown on your profile page. What We Do* Pasting Text from Word” on page 18. Agency Video A video about your agency’s work, generally produced by the agency itself or a national partner. For more on posting an agency video, see Agency Video on page 7. Agency Categories* See “Agency Categories” on page 7. Agency Logo* See “Agency Logo” on page 8. Agency Direct Link The format of your agency’s Get Connect link is as follows: http://(YourSite’sURL)/agencies/(YourAgencyName) In the image below, the agency manager has entered an abbreviated version of the agency name as the final part of the direct link. To keep the link simple, use an abbreviation or otherwise shortened version of your agency’s name. Galaxy Digital Get Connected | Agency Manual Page 6 To save the link to your clipboard, click the small Copy icon to the right of this field. Now you can easily paste the link into an email message or social media post. Map Link Use Google Maps to access a map showing your agency’s location. You can then link this map to your agency’s profile page. To create a map link: 1. Open a new tab and go to maps.google.com. 2. Type your agency’s address into the Search bar and press ENTER. The program zooms in to show where your agency is located. 3. Click inside your browser to select the URL. 4. Return to your Get Connected tab and paste the URL into the Map Link field. Once you have saved and submitted your Profile page, the URL will show up as a link titled “MAP.” Agency Video Your agency video must be uploaded to an online video site (such as YouTube) and therefore have a web address in order to be shown on your profile page. To add the video to your page, copy the video’s URL into this field. Get Connected automatically formats the video to fit properly on your profile page. Agency Categories Agency categories are the types of services an agency provides. Select all categories that apply to make your agency easier for users to find when searching by organization type. Galaxy Digital Get Connected | Agency Manual Page 7 All selected categories appear in the filter list. All organization services selected in Agency Categories (left) appear in a list to the left of the filter. In the figures above, agencies have selected Adult Day Service, Agriculture, and Arts & Culture, but no agencies have yet selected AIDS/HIV, Abuse, Adult Education, etc. Once you have selected a category, it appears beneath the Agency Categories field. To delete a selected category, click the X next to the category name. You’ll be asked to click OK to confirm the deletion. Agency Logo A logo can make your agency immediately recognizable in a list on Get Connected. The logo is also one of the most visible elements of your agency’s profile page. The logo must be an image file (.jpg, .gif, or .png). Get Connected automatically resizes your logo for optimal viewing. To add your agency’s logo: 1. Click Choose File under the Agency Logo heading. 2. Browse to and select the logo file, similar to how you would browse and select a file to attach to an email. 3. Click Open. Once you have clicked Submit, the logo will appear on the profile page. Profile Page Photos You can add up to twelve photos to your profile page. For the site visitor, photos appear at the bottom of the page. Galaxy Digital Get Connected | Agency Manual Page 8 Uploading Photos To upload photos to your profile page: 1. While in Edit Mode, click the gray Manage Photos tab. 2. Click Upload Photos on the right side of your screen. 3. Click Upload and browse to select the desired photos. 4. Once you have selected your photos, click Start Upload. Typically, an upload completes in a matter of seconds. Once you’ve closed the Upload box, your photos will appear in the table on your Manage Photos screen. Those photos will also appear at the bottom of your agency’s profile page. Deleting Photos To delete a photo from your agency’s profile page, go to the gray Manage Photos tab in Edit Mode and click Delete below the photo to be deleted. Click OK to confirm the deletion. Agency Needs Posting needs is an effective way both to publicize volunteer opportunities the community and to easily engage the community to take advantage of those opportunities and help fulfill your needs. To view need responses and volunteer hours, see “Agency Statistics” on page 15. Adding or Editing a Need When you click the gray Needs tab in Edit Mode, you’ll see a table showing all of the needs your agency has entered. To edit a need that is already in the system, simply click the row of the need and see the steps, following, for adding a new need. Begin with step 2. Galaxy Digital Get Connected | Agency Manual Page 9 To add a new need in Get Connected: 1. Under the gray Needs tab in Edit Mode, click Add New. 2. Complete all required and applicable fields, as described below. 3. Click Submit to save your work. Field Notes Need Title (required) Enter a clear, descriptive title for the need. (Tip: “Volunteers Needed!” is not a clear, descriptive title.) Need Body Describe the need. If training or background checks are required, this field is a good place to include that information. Age Requirements If applicable, select the minimum age requirement from the dropdown list. Zip Code Enter the zip code where the need is located. If the need will be met across multiple zip codes, simply enter the most central zip code. Allow Team Registration? Indicate whether you want to allow volunteers to sign up as teams. Primary Need Type and Need Type Categories* From the respective dropdown lists, select the applicable need type and categories. For more information on these topics, see “Primary Need Types” and “Need Type Categories,” following this table. Need Duration Select the applicable option. See _____ for more information on these options. Response Notification Emails You will see the email addresses you entered as additional agency contacts when completing your agency’s profile (see “Creating Your Agency’s Profile” on page 5). Clear the check boxes of any contact who should not receive a notice whenever someone responds to a need. Add the email address of anyone else who should be notified. Primary Need Types Get Connected divides needs into four types: volunteer activities, advocacy opportunities, inkind needs, and employment. Each type consists of numerous categories. Some are listed in the table below. (Note: Depending on your site’s level of customization, you may or may not see all types listed here.) Primary Need Type Description Volunteer Activities Opportunities to volunteer time and effort toward fulfilling the need. Type categories include cleaning, clerical work, financial coaching, meal preparation/service, and tutoring. Advocacy Opportunities Opportunities to serve as a representative and advocate of the agency. Type categories include serving on a board, writing elected officials, participating in a community forum, and attending public meetings. Galaxy Digital Get Connected | Agency Manual Page 10 Employment Opportunities to work with the agency as an intern or employee on a full- or part-time basis. Type categories address job types (clerical, executive, etc.) and degrees (part-time, seasonal, etc.). In-kind Needs Opportunities to donate goods in lieu of money. Type categories include healthcare equipment, office furniture, bedding, and school supplies. Need Type Categories Under the umbrella of each need type are various need categories. The need type categories you select from the Need Type Categories dropdown list will show up in the filter list when a user clicks the Needs navigation link. Selected need type categories appear in the Filter Need Type list on the Needs screen in Get Connected. NOTES: You must select a Primary Need Type before selecting Need Type Categories. There is no limit to the number of categories you can select, so choose as many categories as apply to your agency’s need in order to be more visible in organization type searches. Selected categories appear beneath the Agency Categories field. Delete a selection by clicking the X next to it. Click OK to confirm the deletion. Need Duration Use the Need Duration field to indicate the duration of time that the need exists. Select from the following choices: Is Ongoing – Need is ongoing throughout the year. (examples: literacy tutors; dog walkers) Runs Until – Need ends on a certain date. (examples: clothes drive; holiday drives) Happens On – Select for volunteer opportunities that occur on a certain date. (examples: one-day Habitat for Humanity effort; road races) Galaxy Digital Get Connected | Agency Manual Page 11 Tip: If you select Is Ongoing, you will receive an email after ninety days, informing you that the need may need to be updated or removed if no longer applicable. To get a reminder sooner, select Runs Until and enter a closer date. You can always update the need before it expires. Cloning a Need Get Connected’s Clone Need feature can save time and effort when two or more needs are nearly identical—for example, if the same need will be present at multiple times or multiple places. Once you’ve created a copy of a need, you can make the small changes desired, and then save the copy as a new need. To clone a need: 1. While in Edit Mode, open the need you wish to clone. 2. Click Clone This Need on the right side of your screen, and a new, identical need is created. The title will be the same as that of the old need with the addition of the word “copy” in parentheses. 3. Edit the Need Title as desired, making sure to remove the parenthetical “copy” from it. 4. Make any additional changes needed to the other elements of the need description. 5. Click Submit. The need is now saved as a separate need from the original. TIP: Make the difference between the cloned needs clear in the Need Title. For example, you might have “School Supply Collection: Uptown” and “School Supply Collection: Downtown.” Adding Volunteer Responses to a Need Typically, a volunteer will respond to a need by clicking the Respond to Need button on the page of the need. As an agency manager, however, you can manually add a need response on behalf of a volunteer, NOTE: Need responses cannot be added for individuals who do not have Get Connected accounts. To add volunteer response hours to a need: 1. Click the gray Needs tabs to access the main Needs page. 2. Scroll down (if necessary) to the yellow box below the table of needs. 3. Select the need in question from the Need dropdown. Galaxy Digital Get Connected | Agency Manual Page 12 4. Enter the volunteer’s email address. 5. Click Add. The volunteer information will be added to the list of respondents to that need, which you can view and export on the Stats tab in Edit Mode. For more information about viewing statistics, see “Agency Statistics” on page 15. Deleted Needs Needs are deleted from an agency’s list of active needs—not from the program altogether. You can reactivate and update a deleted need at any time. To manually delete a need from your agency’s active needs: 1. Under the gray Needs tab, click the need to open it. 2. Click Delete on the right side of your screen. 3. Click OK to confirm the deletion. Note: To view old or deleted needs, click the gray Needs tab and select Show Deleted Needs (located below the list of needs and on the right side of your screen). To return to the default view (active needs only), click Hide Deleted Needs. Agency Events Posting events is an effective way to engage the whole community—not just the volunteers—in your realizing your agency’s vision. Adding or Editing an Event Instructions for adding a new event are provided below. To open an existing event for editing, simply click the gray Events tab, select the event from the list, and complete the fields. To add a new event: 1. Under the gray Events tab, click Add New. 2. Complete the fields on the event form. (See table below for field descriptions; asterisks indicate fields that are further explained following the table.) 3. Click Submit to save your work. Field Notes Event Title The title for the event. Enable RSVPs* Mark this box to require RSVPs from those signing up for the event through Get Connected. Event Capacity* The maximum capacity for the event, if there is one. Otherwise, keep it at zero. (Note: This field is not visible unless you have selected the RSVP option.) Event Description A description of the event. Galaxy Digital Get Connected | Agency Manual Page 13 (Note: You can download an image of the event flyer into this box. See “The Text Editor” on page16.) The starting and ending dates and times. For an all-day event, select All Day Event. Start and End Date/Time (Note: The date/time you enter should refer to the date and time of the event, not the date and time you want it to be publicized on Get Connected.) Categories* Applicable categories; your selections will make your event easier to find in a search. See “Event Categories” (page 15). Event Contact Enter the contact person’s name and any other contact information you wish to make public on this page. Event Location Type the name of the place where the event will be held. Address, City, State, Zip Enter the full address of the event location. Event RSVPs and Event Capacity Get Connected’s RSVP feature allows a user to respond easily to an event. If a user indicates that they will attend, two email notifications are sent out: An email to the user, confirming the event information An email to the agency manager, informing them it of the RSVP When you opt to enable RSVPs, the Event Capacity text box appears. While this box is good to use for events that have a limited capacity, it’s a good idea to use it for other events as well. If capacity is unlimited, enter 0 (zero) or leave the field blank. When the RSVP capacity has already been met and someone tries to sign up for your event, they will get a message that the event is full. Their RSVP will be changed to “Maybe,” and an email will be sent to the agency manager, informing them of the individual’s interest in the event. Galaxy Digital Get Connected | Agency Manual Page 14 Event Categories The event categories you select will help a user find you in a search. For example, if a user does a search on familyfriendly events and you selected Family Friendly as one of your event’s categories, then your event will show up in the resulting list of family-friendly events. Cloning an Event Get Connected’s Clone Event feature operates exactly like the Clone Need feature described on page 11. For information on how to clone a need or event, see “Cloning a Need” on page 12. This feature can save you time and effort when two or more events are nearly identical—for example, if the same basic event occurs at multiple times or places. Once you’ve created a copy of an event, you can make the small changes desired, and then save the copy as a new event. Deleting Events Events are deleted from an agency’s list of active events—not from the program altogether. You can reactivate and update a deleted event at any time. To delete an event from your agency’s list of active events: 1. Under the gray Events tab, click on the event to be deleted. The information form is displayed. 2. Click Delete on the right side of your screen. 3. Click OK to confirm the deletion. Agency Statistics Get Connected keeps track of various data on your site. Click the gray Stats tab to view the following: The number of fans your agency has The number of times your agency has been view during a selected date range A list of approved volunteer hours during a selected date range A list of the need responses made during a selected date range To select a date range, choose the Start Date and End Date from the respective dropdowns. Volunteer Hours Use the gray Time Tracking tab to add volunteer hours or to approve or reject hours entered by a volunteer. Adding Volunteer Hours You can add specific volunteer hours for Get Connected users. You can also add hours anonymously for volunteers who don’t have Get Connected accounts. Galaxy Digital Get Connected | Agency Manual Page 15 To add volunteer hours for someone who volunteered for your agency: 1. Under the gray Time Tracking tab, select the applicable need from the Need dropdown. 2. Enter the Email Address the volunteer uses for his or her Get Connected account. (NOTE: To enter hours for an anonymous volunteer, leave this field blank.) 3. Enter the Date the hours were earned. 4. Enter the number of Hours being logged, and the number of Miles driven to the volunteer site. Use decimal places as necessary. Approving and Declining Volunteer Hours Before you can approve a volunteer’s hours, the volunteer must respond to a need and submit his or her hours related to that need (via the user’s My Profile page). As the agency manager, you will receive an email notifying you that hours need to be approved. To approve (or decline) volunteer hours: 1. Go to the gray Time Tracking tab in Edit Mode. You will see a list of need responses, along with Approve and Decline links in the table shown. 2. Click the applicable links to approve or reject hours. All approved needs are available for viewing under the gray Stats tab. The Text Editor The Text Editor is easily recognizable as a light-blue box with various icons across the top of it. Also known as the WYSIWYG Editor, It is, essentially, a text box with added bells and whistles. You’ll use this tool to enter information where formatting can be important, such as providing “Who We Are” and “What We Do” information under Edit Profile and adding a new need or event. Galaxy Digital Get Connected | Agency Manual Page 16 Various icons across the top enable you to change the appearance of your text, add images, and more. You can also consult the table below the more commonly used functions. Icon Description Text effects: Bold, Italics, Underline, or Strikethrough (Strikethrough) Justification: Left, Center, Right, or Full Horizontal line. Click to insert a horizontal line that reaches from the left margin to the right margin. Remove formatting of selected text. Click this button to toggle to full screen mode; click it again to return to the smaller screen. Change the size of the font being used. Check spelling. Cut, copy, and paste buttons. For more information on these, see “Note: Depending on your site’s design, the text you enter here may or may not show up as identical to the text that will be shown on your profile page. Pasting Text from Word” following this table. Search and replace. Click the binoculars to search; click the next button to run a search-and-replace. Click the applicable button for a bulleted or numbered list. Set off a paragraph to the right, back to the left, or as a block quote. Undo and redo. Enter a web link. See Working with Hyperlinks on page 19 for more information. Galaxy Digital Get Connected | Agency Manual Page 17 Upload or edit an image. See Uploading an Image and Editing an Image, starting on page 20, for more information. Highlight selected text. Open the HTML source editor. Add a table. (Tables only) Add a row or column to a table. (Tables only) Insert or delete a row. (Tables only) Insert or delete a column. (Tables only) Merge or split table cells. Change the appearance of the text. (Custom sites only) Text styles include Normal, Heading, and Subheading. Note: Depending on your site’s design, the text you enter here may or may not show up as identical to the text that will be shown on your profile page. Pasting Text from Word Use the Paste from Word button when pasting text from a Microsoft Word document into the Text Editor. The purpose of Paste from Word is to remove any unnecessary, back-end formatting present in your Word text before you copy it into the Text Editor. To paste text from Word into the Get Connected Text Editor: 1. In the Word document, select the text you want to copy. 2. Paste the text to your clipboard by pressing CTRL+V or selecting Copy from your rightclick menu. Galaxy Digital Get Connected | Agency Manual Page 18 3. In the Get Connected Text Editor, click the Paste from Word icon to open the Paste from Word dialog box. 4. Copy the text into the Paste from Word dialog box by pressing CTRL+C or selecting Paste from your right-click menu. 5. Click Insert. The text now appears in the Text Editor. While Paste from Word may not be able to preserve text that you have formatted heavily in Word, it does preserve basic formatting, such as bold text, italics, underlining, and bulleted or numbered lists. To remove all formatting (recommended if you are pasting from the Web), click the Paste as Plain Text button shown here. The Paste from Word dialog box opens when you click the Paste from Word button. Working with Hyperlinks The Insert/Edit Link button is used to add links to your text. You can link to another page in Get Connected (such as a related need or event), or you can link to another website entirely. To add a link, you must first copy the link itself onto your clipboard. Next, take the steps below: 1. In the Text Editor, select the text you want to serve as the link. (The Insert/Edit Link button is not activated until you’ve selected text.) 2. Click the Insert/Edit Link button to open the dialog box for adding a link. By default, the General tab is shown. Under the General Properties heading: Paste the link into the URL/Link field. Enter the name of the link into the Name field. This is the text that will pop up when someone hovers their cursor over the link. TIP: To have the link open in a new tab when clicked, select _blank in the Target dropdown. 3. Click Insert. Your selected text will now be shown as a link (typically blue and underlined). Galaxy Digital Get Connected | Agency Manual Page 19 The text you entered in the Name field is displayed when you hover your cursor over the link. Adding Images Using the Text Editor You can add image files (.jpg, .gif, or .png) to the Text Editor by using the “tree” icon shown below. The Text Editor’s image uploader offers numerous ways to edit and catalog images. This manual only goes into the basics and does not address more advanced details. Uploading an Image To add an image into the Text Editor: 1. Place your cursor in the desired image location. 2. Click the Insert Image (tree) button to open the Insert Image dialog box. Insert/Edit Image Dialog Box Galaxy Digital Get Connected | Agency Manual Page 20 3. Click the Image URL icon (circled in previous screenshot) to open the Image Manager. 4. Click Upload to open the Upload dialog box. 5. Click Choose Files and browse to the desired image file. 6. Select the file and click Open. 7. Click Upload to Server and wait for the upload to complete. 8. Select the uploaded image. The image now appears in the Insert/Edit Image dialog box, and the Image URL field is populated with the link to the image location. Note: The Image Description is for internal use and for browsers when the user is visually impaired. The Title appear when the cursor is hovered over the image. 9. Click Insert. The image has now been uploaded into the Text Editor. Editing an Image If your image is already uploaded to the Text Editor, open the Text Editor, select the image, and click the Insert Image button. To edit an image: 1. In the Insert Image dialog box, click the Appearance tab. All fields under this tab are optional. All selections made will be summarized in the Style field at the bottom of the dialog box. 2. Indicate the desired Alignment for the image (baseline, top, middle, bottom, text top, text bottom, left, or right) 3. Indicate the desired Dimensions (make image smaller or larger; mark Constrain Proportions to preserve image proportions.) Galaxy Digital Get Connected | Agency Manual Page 21 4. Using the Vertical space and Horizontal space fields, indicate the desired amount of white space, in pixels, on all sides of the image) 5. If you want the image to have a border, enter the desired border width, in pixels. (Border will be black.) Want to Learn More? Our Customer Care Team would enjoy the opportunity to discuss best practices or provide additional context for the information in this manual. Please direct any questions or feedback to [email protected]. Galaxy Digital Get Connected | Agency Manual Page 22