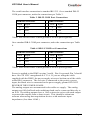
1
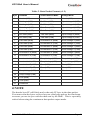
VG700AA User’s Manual
VG700AA(DMU-FOG-AUTO)
Rev. A, September 2002
Document 7430-0074-01
©2002-2003 Crossbow Technology, Inc. All rights reserved. Information
in this document is subject to change without notice.
Crossbow and SoftSensor are registered trademarks and DMU is a
trademark of Crossbow Technology, Inc. Other product and trade names
are trademarks or registered trademarks of their respective holders.
VG700AA User’s Manual
Table of Contents
1
Introduction.........................................................................1
1.1
1.2
2
Quick Start ..........................................................................3
2.1
2.1.1
2.1.2
3
GyroView Software ................................................................................3
GyroView Computer Requirements ...................................................3
Install GyroView................................................................................3
2.2
2.3
Connections..............................................................................................3
Setup GyroView......................................................................................4
2.4
Take Measurements ................................................................................4
DMU Details ........................................................................6
3.1
3.2
DMU Coordinate System.......................................................................6
Connections..............................................................................................7
3.3
3.4
Interface ..................................................................................................10
Measurement Modes.............................................................................10
3.4.1
3.4.2
3.4.3
3.5
3.5.1
Voltage Mode ..................................................................................10
Scaled Sensor Mode ........................................................................10
Angle Mode......................................................................................11
Commands..............................................................................................12
Command List..................................................................................13
3.6
3.7
Data Packet Format...............................................................................16
Timing.....................................................................................................18
3.8
3.9
Temperature Sensor..............................................................................18
Analog Output .......................................................................................19
3.9.1
3.9.2
3.9.3
3.9.4
3.10
4
The DMU™ Series Motion and Attitude Sensing Units..................1
Package Contents ....................................................................................1
“Raw” Accelerometer Voltage........................................................19
Scaled Accelerometer Voltage.........................................................20
Scaled Rate Sensor Voltage.............................................................20
Stabilized Pitch and Roll Voltages ..................................................21
Adaptive-T Algorithm (installed at Crossbow factory)..................21
DMU Operating Tips .........................................................22
4.1
4.2
The “Zero” Command..........................................................................22
The Erection Rate..................................................................................22
Doc.# 7430-0074-01 Rev .A
Page i
VG700AA User’s Manual
5
4.3
4.4
Mounting the DMU ..............................................................................23
DMU Start Up Procedure ....................................................................24
4.5
4.6
Advanced Strategies for Adjusting the Erection Rate ....................24
Adapted Flight Profile T-Setting ........................................................25
Appendix A. Mechanical Specifications ..............................27
5.1
6
VG700AA Outline Drawing ...............................................................27
Appendix B. DMU Output Quick Reference ......................28
6.1
Analog Output Conversion..................................................................28
6.2
Digital Output Conversion...................................................................29
7
Appendix C. DMU Command Quick Reference .................30
8
Appendix D. VG700AA-202 Analog Outputs .....................31
8.1
8.2
9
Model VG700AA-202 Connector Pin Out .......................................31
Model VG700AA-202 Analog Output Conversion........................32
Appendix E. Warranty and Support Information..............33
9.1
Customer Service ..................................................................................33
9.2
9.3
Contact Directory ..................................................................................33
Return Procedure...................................................................................33
9.3.1
9.3.2
9.3.3
9.3.4
9.3.5
Authorization ...................................................................................33
Identification and Protection...........................................................34
Sealing the Container ......................................................................34
Marking...........................................................................................34
Return Shipping Address.................................................................34
9.4
Warranty.................................................................................................34
Page ii
Doc.# 7430-0074-01 Rev.A
VG700AA User’s Manual
About this Manual
The following annotations have been used to provide additional
information.
X NOTE
Note provides additional information about the topic.
þ EXAMPLE
Examples are given throughout the manual to help the reader understand the
terminology.
P IMPORTANT
This symbol defines items that have significant meaning to the user
M WARNING
The user should pay particular attention to this symbol. It means there is a
chance that physical harm could happen to either the person or the
equipment.
The following paragraph heading formatting is used in this manual:
1 Heading 1
1.1 Heading 2
1.1.1 Heading 3
Normal
Doc.# 7430-0074-01 Rev .A
Page iii
VG700AA User’s Manual
Page iv
Doc.# 7430-0074-01 Rev.A
VG700AA User’s Manual
1
Introduction
1.1 The DMU™ Series Motion and Attitude Sensing Units
This manual explains the use of VG700AA. The VG700AA is a Crossbow
Technology Dynamic Measurement Unit (DMU) designed for automotive
testing and measurements.
The VG700AA is a six-axis measurement system designed to measure
linear acceleration along three orthogonal axes and rotation rates around
three orthogonal axes. This device uses three accelerometers and three
angular rate sensors to make a complete measurement of the dynamics of
your system.
In addition, it is designed to provide stabilized pitch and roll in dynamic
environments. The VG700AA is the solid state equivalent of a vertical
gyro/artificial horizon display.
The VG700AA has the unique ability to use the stabilized angle information
to translate the acceleration measurement fromthe DMU body frame to the
local earth level frame. This removes the effect of tilt and gravity from the
accelerations reported.
The DMU series units are low power, fast turn on, reliable and accurate
solutions for a wide variety of stabilization and measurement applications.
All DMU products have both an analog output and an RS-232 serial link.
Data may be requested via the serial link as a single measurement or
streamed continuously. The analog outputs are fully signal conditioned and
may be connected directly to a data acquisition device.
The Crossbow DMUs employ on board digital processing to provide
application-specific outputs and to compensate for deterministic error
sources within the unit. The DMUs accomplish these tasks with an analog
to digital converter and a high performance Digital Signal Processor.
The VG700AA uses three micro electro-mechanical machined (MEMS)
accelerometers and three fiber optic gyro (FOG) angular rate sensors. The
three MEMS accelerometers are surface micro-machined silicon devices
that use differential capacitance to sense acceleration. These solid state
MEMS sensors are responsive and reliable. The FOG rate sensors provide
angular rate measurements that are more accurate and subject to less drift
than the silicon based rate sensors.
1.2 Package Contents
In addition to your DMU sensor product you should have:
•
1 CD with GyroView Software
Doc.# 7430-0074-01 Rev.A
Page 1
VG700AA User’s Manual
GyroView will allow you to immediately view the outputs of the
DMU on a PC running Microsoft® Windows™. You can also
download this software from Crossbow’s web site at
http://www.xbow.com.
•
1 Digital Signal Cable.
This links the DMU directly to a serial port. Only the transmit,
receive, power, and ground channels are used. The analog outputs
are not connected.
•
1 DMU Calibration Sheet
The Digital Calibration Sheets contains the custom offset and
sensitivity information for your DMU. The calibration sheet is not
needed for normal operation as the DMU has an internal EEPROM
to store its calibration data. However, this information is useful
when developing your own software to correctly scale the output
data. Save this page!
•
1 DMU Users Manual
This contains helpful hints on programming, installation, valuable
digital interface information including data packet formats and
conversion factors.
Page 2
Doc.# 7430-0074-01 Rev.A
VG700AA User’s Manual
2
Quick Start
2.1 GyroView Software
Crossbow includes GyroView software to allow you to use the DMU right
out of the box and the evaluation is straightforward. Install the GyroView
software, connect the DMU to your serial port, apply power to your unit and
start taking measurements.
2.1.1
GyroView Computer Requirements
The following are minimum capabilities that your computer should have to
run GyroView successfully:
•
CPU: Pentium-class
•
RAM Memory: 32MB minimum, 64MB recommended
•
Hard Drive Free Memory: 15MB
•
Operating System: Windows 95, 98, NT4, 2000
2.1.2
Install GyroView
To install GyroView in your computer:
1. Insert the CD “Support Tools” in the CD-ROM drive.
2.
3.
Find the GyroView folder. Double click on the setup file.
Follow the setup wizard instructions. You will install GyroView
and a LabView 6 Runtime Engine. You will need both these
applications.
If you have any problems or questions, you may contact Crossbow directly.
2.2 Connections
The DMU is shipped with a cable to connect the DMU to a Serial port of
the PC.
1.
2.
3.
Connect the 15-pin end of the digital signal cable to the port on the
DMU.
Connect the 9-pin end of the cable to the serial port of your
computer.
The additional black and red wires on the cable supply power to
the DMU. Match red to (+) power and black to (-) ground. The
input voltage can range from 10 - 30 VDC at 0.75 A. See the
specifications sheet for the VG700AA for details.
Doc.# 7430-0074-01 Rev.A
Page 3
VG700AA User’s Manual
M WARNING
Do not reverse the power leads! Applying the wrong power to the DMU
can damage the unit; Crossbow is not responsible for resulting damage to
the unit.
X NOTE
The analog outputs from the DMU are unconnected in this cable.
2.3
Setup GyroView
With the DMU connected to your PC serial port and powered, open the
GyroView software.
1. GyroView should automatically detect the DMU and display the
serial number and firmware version if it is connected.
2. If GyroView does not connect, check that you have the correct
COM port selected. You find this under the “DMU” menu.
3.
4.
5.
Select the type of display you want under the menu item
“Windows”. Graph displays a real time graph of all the DMU
data; FFT displays a fast-fourier transform of the data; Navigation
shows an artificial horizon display.
You can log data to a file by entering a data file name. You can
select the rate at which data is saved to disk.
If the status indicator says, “Connected”, you’re ready to go. If
the status indicator doesn’t say connected, check the connections
between the DMU and the computer; check the power; check the
serial COM port assignment on your computer.
2.4 Take Measurements
Once you have configured GyroView to work with your DMU, pick what
kind of measurement you wish to see. “Graph” will show you the output
you choose as a strip-chart type graph of value vs. time. “FFT” will show
you a real-time fast Fourier transform of the output you choose.
“Navigation” will show an artificial horizon and the stabilized pitch and roll
output of the DMU.
Let the DMU warm up for 30 seconds when you first turn it on. You should
zero the rate sensors when you first use the DMU. Set the DMU down in a
stable place. On the main control panel, enter a value into the “zero avg
time” box. “3” will work well. Click the “Z” button. This measures the
rate sensor bias and sets the rate sensor outputs to zero. The zeroing
command turns on the high pass filter rate bias estimation that takes
approximately 3 minutes. The DMU needs to be held still (motionless)
Page 4
Doc.# 7430-0074-01 Rev.A
VG700AA User’s Manual
during zeroing operation. The “zero” command is discussed more in “The
‘Zero’ Command” section. Now you’re ready to use the DMU!
Doc.# 7430-0074-01 Rev.A
Page 5
VG700AA User’s Manual
3
DMU Details
3.1 DMU Coordinate System
The DMU will have a sticker on one face illustrating the DMU coordinate
system. With the connector facing you, and the mounting plate down, the
axes are defined as:
X-axis – from face with connector through the DMU.
Y-axis – along the face with connector from left to right.
Z-axis – along the face with the connector from top to bottom.
The axes form an orthogonal right-handed coordinate system. An
acceleration is positive when it is oriented towards the positive side of the
coordinate axis. For example, with the DMU sitting on a level table, it will
measure zero g along the x- and y-axes and -1 g along the z-axis. If you
slide the DMU forward, this is an increase in velocity along the positive
direction of the x-axis; so this is a positive acceleration, and the DMU will
report a positive acceleration. On some models, the acceleration reported
will be in the DMU body frame, and in some models the acceleration
reported will be in the earth-level coordinate frame. On some models, the
definition of positive acceleration is the opposite of the above. See the table
below to reference the available output options for the acceleration.
The angular rate sensors are aligned with these same axes. The rate sensors
measure angular rotation rate around a given axis. The rate measurements
are labeled by the appropriate axis. The direction of a positive rotation is
defined by the right-hand rule. With the thumb of your right hand pointing
along the axis in a positive direction, your fingers curl around in the
positive rotation direction. For example, if the DMU is sitting on a level
surface and you rotate it clockwise on that surface, this will be a positive
rotation around the z-axis. The x- and y-axis rate sensors would measure
zero angular rate, and the z-axis sensor would measure a positive angular
rate.
Pitch is defined positive for a positive rotation around the y-axis (pitch up).
Roll is defined as positive for a positive rotation around the x-axis (roll
right).
The angles are defined as standard Euler angles using a 3-2-1 system. To
rotate from the body frame to an earth-level frame, roll first, then pitch, and
then yaw.
The VG700AA coordinate definition is consistent with the SAE J670e
convention on vehicle coordinate systems. See Table 1.
Page 6
Doc.# 7430-0074-01 Rev.A
VG700AA User’s Manual
Table 1. VG700AA Submodel Definitions of Acceleration Output
Submodel
3.2
Acceleration
Frame
Coordinate Sign
(positive = SAE)
-201
Earth
+
-202
DMU Body
+
Connections
VG700AA has a male DB-15 connector. The signals are as shown in Table
2. All analog outputs are fully buffered and are designed to interface
directly to data acquisition equipment. See “Analog Output” for details.
X NOTE
See Appendix D for the correct pin out for Model VG700AA-202.
Doc.# 7430-0074-01 Rev.A
Page 7
VG700AA User’s Manual
Table 2. DMU Connector Pin Out
Models VG700AA-201
Pin
Signal
1
RS-232 Transmit Data
2
RS-232 Receive Data
3
Positive Power Input (+)
4
Ground
5
X-axis accelerometer Analog voltage1
6
Y-axis accelerometer Analog voltage1
7
Z-axis accelerometer Analog voltage1
8
X-axis scaled accelerometer level frame analog voltage2
9
Y-axis scaled accelerometer level frame analog voltage2
10
Yaw rate analog voltage3
11
NC – factory use only
12
Roll angle analog voltage4
13
Pitch angle analog voltage4
14
Z-axis scaled accelerometer level frame analog voltage2
15
NC – factory use only
Notes:
1. The accelerometer analog voltage outputs are the raw sensor output.
These outputs are taken from the output of the accelerometers.
2. The accelerometer analog output voltages are scaled to represent g’s.
The acceleration data is transformed from body coordinates to the earth
level frame coordinates. These outputs are created by a D/A converter.
3. The yaw rate sensor analog voltage output is scaled to represent °/s.
This output is created by a D/A converter.
4. The pitch and roll angle analog outputs are scaled to represent degrees.
These outputs are created by a D/A converter.
Page 8
Doc.# 7430-0074-01 Rev.A
VG700AA User’s Manual
The serial interface connection is standard RS-232. On a standard DB-25
COM port connector, make the connections per Table 3.
Table 3. DB-25 COM Port Connections
COM Port Connector
Pin #
Signal
DMU Connector
Pin #
Signal
2
TxD
2
RxD
3
RxD
1
TxD
7
GND*
4
GND*
*Note: Pin 4 on the DMU is data ground as well as power ground.
On a standard DB-9 COM port connector, make the connections per Table
4.
Table 4. DB-9 COM Port Connections
COM Port Connector
Pin #
Signal
DMU Connector
Pin #
Signal
2
RxD
1
TxD
3
TxD
2
RxD
5
GND*
4
GND*
*Note: Pin 4 on the DMU is data ground as well as power ground.
Power is applied to the DMU on pins 3 and 4. Pin 4 is ground; Pin 3 should
have 10 to 30 VDC unregulated at 0.75 A. If you are using the cable
supplied with the DMU, the power supply wires are broken out of the cable
at the DB-9 connector. The red wire is connected to the positive power
input; the black wire is connected to the power supply ground. DO NOT
REVERSE THE POWER LEADS.
The analog outputs are unconnected in the cable we supply. The analog
outputs are fully buffered and conditioned and can be connected directly to
an A/D. The analog outputs have a 1 kΩ resistor in series with each output
to protect the outputs from a short circuit. This should be taken into
account when using data acquisition devices with moderate input
impedances (less than 10 kΩ.)
Doc.# 7430-0074-01 Rev.A
Page 9
VG700AA User’s Manual
3.3 Interface
The serial interface is standard RS-232, 38400 baud, 8 data bits, 1 start bit,
1 stop bit, no parity, and no flow control.
Crossbow will supply DMU communication software examples written in
LabView. Source code for the DMU serial interface can be obtained via the
web at http://www.xbow.com. The source code has a .vi file format and
requires a National Instruments LabView 5.0 license to use.
3.4
Measurement Modes
The VG700AA is designed to operate as a vertical gyro; however, you can
also use it as a six-axis sensor. The VG700AA can be set to operate in one
of three modes: voltage mode, scaled sensor mode, or angle (VG) mode.
The DMU must be in VG mode to output the acceleration data in the earth
level reference frame. The measurement mode selects the information that
is sent in the data packet over the RS-232 interface. See “Data Packet
Format” for the actual structure of the data packet in each mode.
3.4.1
Voltage Mode
In voltage mode, the analog sensors are sampled and converted to digital
data with 1 mV resolution. The digital data represents the direct output of
the sensors. The data is 12-bit, unsigned. The value for each sensor is sent
as 2 bytes in the data packet over the serial interface. A single data packet
can be requested using a serial poll command or the DMU can be set to
continuously output data packets to the host.
The voltage data is scaled as:
voltage = data*(5 V)/212 ,
where voltage is the voltage measured at the sensor, and data is the value
of the unsigned 16-bit integer in the data packet. Note that although the
data is sent as 16-bit integers, the data has a resolution of only 12 bits.
The DMU rate sensor and angle analog outputs are not enabled in this
mode. Only the linear accelerometer analog output on pins 5 – 7 will be
enabled because these signals are taken directly from the accelerometers.
See the “Analog Output” section for a complete description of the analog
outputs.
3.4.2
Scaled Sensor Mode
In scaled sensor mode, the analog sensors are sampled, converted to digital
data, temperature compensated, and scaled to engineering units. The digital
data represents the actual value of the quantities measured. A calibration
table for each sensor is stored in the DMU non-volatile memory. A single
data packet can be requested using a serial poll command or the DMU can
be set to continuously output data packets to the host. The data is sent as
Page 10
Doc.# 7430-0074-01 Rev.A
VG700AA User’s Manual
signed 16-bit 2’s complement integers. In this mode, the DMU operates as
a six-axis measurement system.
The scaled sensor analog outputs are enabled in this mode. Note that
stabilized pitch and roll angles are not available in scaled sensor mode. See
the “Analog Output” section for a complete description of the analog
outputs.
To convert the acceleration data into G’s, use the following conversion:
accel = data*(GR * 1.5)/215
where accel is the actual measured acceleration in G’s, data is the digital
data sent by the DMU, and GR is the G Range for your DMU. (The data is
scaled so that1 G = 9.80 m s -2 .) The G range of your DMU is the range of
accelerations your DMU will measure. For example, if your DMU uses a ±2
G accelerometer, then the G range is 2.
To convert the angular rate data into degrees per second, use the following
conversion:
rate = data*(RR*1.5)/215
where rate is the actual measured angular rate in °/sec, data is the digital
data sent by the DMU, and RR is the Angular rate Range of your DMU.
The angular rate range of your DMU is the range of angular rates your
DMU will measure.
X NOTE
RR is 200 for all VG700AAs.
3.4.3
Angle Mode
In angle mode, the DMU will act as a vertical gyro, and output the
stabilized pitch and roll angles along with the angular rate and acceleration
information. The angular rate and acceleration values are calculated as
described in the scaled sensor mode.
The DMU analog outputs are enabled in this mode, including stabilized
pitch and roll angles. See the “Analog Output” section for a complete
description of the analog outputs.
In angle mode, the DMU uses the angular rate sensors to integrate over your
rotational motion and find the actual pitch and roll angles. The DMU uses
the accelerometers to correct for the drift in the rate sensors. This is the
modern equivalent of an analog vertical gyro that used a plumb bob in a
feedback loop to keep the gyro axis stabilized to vertical. The DMU takes
advantage of the rate gyros’ sensitivity to quick motions to maintain an
accurate orientation when accelerations would otherwise throw off the
accelerometers' measurement of the DMU orientation relative to gravity.
Doc.# 7430-0074-01 Rev.A
Page 11
VG700AA User’s Manual
The DMU uses the accelerometers to provide long term stability to keep the
rate gyro drift in check.
The DMU gives you control over the weighting between the accelerometers
and rate gyros through a parameter called the “erection rate.” This term is
derived from analog vertical gyros, and refers to the rate at which the
system can pull the gyro spin axis back to vertical as measured by gravity.
With a small erection rate, you are depending more on the rate gyros than
the accelerometers; with a large erection rate, you are forcing the rate gyros
to follow the accelerometer measurement of vertical more closely. In
general, for dynamic measurements, you will want a low erection rate. But
the erection rate should always be greater than the drift rate of the rate
gyros. The erection rate is discussed in section 4.2 in more detail.
The VG700AA outputs the pitch and roll angles in the digital data packet in
angle mode. To convert the digital data to angle, use the following relation:
angle = data*(SCALE)/215
where angle is the actual angle in degrees (either pitch or roll), data is the
signed integer data output in the data packet, and SCALE is a constant.
SCALE = 180° for roll and pitch.
With the VG700AA–201, in angle mode, the acceleration measurements
will be rotated into the earth level coordinate frame. This is the acceleration
that would have been measured if the DMU was kept level relative to the
gravity. The DMU uses its pitch and roll angle measurement to translate
the acceleration between the DMU body frame and the level frame. You
can check this by graphing the acceleration output and slowly tilting the
DMU. You will see that the X- and Y- axis components of acceleration
remain near zero, while the Z-axis component stays at 1 g.
If you have a VG700AA–202, the acceleration measurement will always be
reported in the DMU body coordinate frame. The DMU will output the
actual acceleration measured along each coordinate axis. You can check
this by graphing the acceleration output and slowly tilting the DMU. You
will see that the X- or Y- axis component of acceleration will go towards 1
g (depending on which axis you tilt the unit), while the Z-axis component
goes to 0 g.
3.5 Commands
The VG700AA has a simple command structure. You send a command
consisting of one or two bytes to the DMU over the RS-232 interface and
the DMU will execute the command.
X NOTE
The DMU commands are case sensitive!
Page 12
Doc.# 7430-0074-01 Rev.A
VG700AA User’s Manual
GyroView is a very good tool to use when debugging your own software.
GyroView formulates the proper command structures and sends them over
the RS-232 interface. You can use GyroView to verify that the DMU is
functioning correctly. GyroView does not use any commands that are not
listed here.
3.5.1
Command List
Command
Ping
Character(s) Sent
R
Response
H
Description
Pings DMU to verify communications
Command
Voltage Mode
Character(s) Sent
r
Response
R
Description
Changes measurement type to Voltage Mode.
DMU outputs raw sensor voltage in the data
packet.
Command
Scaled Mode
Character(s) Sent
c
Response
C
Description
Changes measurement type to Scaled Mode.
DMU outputs measurements in scaled
engineering units.
Command
Angle Mode
Character(s) Sent
a
Response
A
Description
Changes measurement type to Angle (VG) Mode.
DMU calculates stabilized pitch and roll. Also
outputs sensor measurements in scaled
engineering units.
Doc.# 7430-0074-01 Rev.A
Page 13
VG700AA User’s Manual
Command
Polled Mode
Character(s) Sent
P
Response
none
Description
Changes data output mode to Polled Mode.
DMU will output a single data packet when it
receives a "G" command.
Command
Continuous Mode
Character(s) Sent
C
Response
Data Packets
Description
Changes data output mode to Continuous Mode.
DMU will immediately start to output data
packets in continuous mode. Data rate will
depend on the measurement type the DMU is
implementing (Raw, Scaled, or Angle). Sending
a "G" will return DMU to Polled Mode.
Command
Request Data
Character(s) Sent
G
Response
Data Packet
Description
"G" requests a single data packet. DMU will
respond with a data packet. The format of the
data packet will change with the measurement
mode (Raw, Scaled, or Angle). Sending the
DMU a "G" while it is in Continuous Mode will
place the DMU in Polled Mode.
Command
Set Erection Rate
Character(s) Sent
T<x>
Response
none
Description
The T command sets the vertical gyro erection
rate. The argument of the command <x> is a
single binary byte that represents the value you
want to set as the erection rate. The units are in
degrees per minute. For example, if you wanted
Page 14
Doc.# 7430-0074-01 Rev.A
VG700AA User’s Manual
to set the erection rate to 50 deg/min, you would
send the command T<50>, which in hex would
be 54 32.
Command
Calibrate Rate Sensor Bias
Character(s) Sent
z<x>
Response
Z
Description
Measure the bias on each rate sensor and set as
the new zero. The DMU should be still
(motionless) during the zeroing process. The
argument of the command <x> is a single binary
byte that the DMU ignores and is part of the
legacy code, any single byte character can be
sent. The zeroing command turns on the highpass filter rate estimation that takes
approximately 3 minutes.
Command
Query DMU Version
Character(s) Sent
v
Response
ASCII string
Description
This queries the DMU firmware and will tell you
the DMU type and firmware version. The
response is an ASCII string. The exact string
will vary according to the DMU type and
version.
Command
Query Serial Number
Character(s) Sent
S
Response
Serial number packet
Description
This queries the DMU for its serial number. The
DMU will respond with a serial number data
packet that consists of a header byte (FF), the
serial number in 4 bytes, and a checksum byte.
The serial number bytes should be interpreted as
a 32-bit unsigned integer. For example, the serial
number 9911750 would be sent as the four bytes
00 97 3D C6.
Doc.# 7430-0074-01 Rev.A
Page 15
VG700AA User’s Manual
3.6 Data Packet Format
In general, the digital data representing each measurement is sent as a 16-bit
number (two bytes). The data is sent MSB first then LSB.
In voltage mode, the data is sent as unsigned integers to represent the range
0 – 5 V.
In scaled and angle mode, the data generally represents a quantity that can
be positive or negative. These numbers are sent as a 16-bit signed integer in
2's complement format. The data is sent as two bytes, MSB first then LSB.
In scaled and angle mode, the timer information and temperature sensor
voltage are sent as unsigned integers.
The order of data sent will depend on the selected operating mode of the
DMU.
Each data packet will begin with a header byte (255) and end with a
checksum. The checksum is calculated in the following manner:
1.
2.
3.
Sum all packet contents except header and checksum.
Divide the sum by 256.
The remainder should equal the checksum.
Table 5 shows the data packet format for each mode.
Page 16
Doc.# 7430-0074-01 Rev.A
VG700AA User’s Manual
Table 5. Data Packet Format (v1.2)
Byte
VG Mode
Scaled Sensor Mode
Voltage Mode
0
Header (255)
Header (255)
Header (255)
1
Roll Angle (MSB)
Roll Rate (MSB)
Gyro Voltage X (MSB)
2
Roll Angle (LSB)
Roll Rate (LSB)
Gyro Voltage X (LSB)
3
Pitch Angle (MSB)
Pitch Rate (MSB)
Gyro Voltage Y (MSB)
4
Pitch Angle (LSB)
Pitch Rate (LSB)
Gyro Voltage Y (LSB)
5
Roll Rate (MSB)
Yaw Rate (MSB)
Gyro Voltage Z (MSB)
6
Roll Rate (LSB)
Yaw Rate (LSB)
Gyro Voltage Z (LSB)
7
Pitch Rate (MSB)
Acceleration X (MSB)
Accel Voltage X (MSB)
8
Pitch Rate (LSB)
Acceleration X (LSB)
Accel Voltage X (LSB)
9
Yaw Rate (MSB)
Acceleration Y (MSB)
Accel Voltage Y (MSB)
10
Yaw Rate (LSB)
Acceleration Y (LSB)
Accel Voltage Y (LSB)
11
Acceleration X (MSB)
Acceleration Z (MSB)
Accel Voltage Z (MSB)
12
Acceleration X (LSB)
Acceleration Z (LSB)
Accel Voltage Z (LSB)
13
Acceleration Y (MSB)
Temp Voltage (MSB)
Temp Voltage (MSB)
14
Acceleration Y (LSB)
Temp Voltage (LSB)
Temp Voltage (LSB)
15
Acceleration Z (MSB)
Time (MSB)
Time (MSB)
16
Acceleration Z (LSB)
Time (LSB)
Time (LSB)
17
Temp Voltage (MSB)
Checksum
Checksum
18
Temp Voltage (LSB)
19
Time (MSB)
20
Time (LSB)
21
Checksum
X NOTE
The header byte FF will likely not be the only FF byte in the data packet.
You must count the bytes received at your serial port and use the checksum
to ensure you are in sync with the data sent by the DMU. This is especially
critical when using the continuous data packet output mode.
Doc.# 7430-0074-01 Rev.A
Page 17
VG700AA User’s Manual
3.7 Timing
In some applications, using the DMU’s digital output requires a precise
understanding of the internal timing of the device. The processor internal to
the DMU runs in a loop - collecting data from the sensors, processing the
data, and then collecting more data. The data is reported to the user through
a parallel process. In continuous mode, the system processor activity is
repeatable and accurate timing information can be derived based purely on
the overall loop rate.
The unit goes through three processes in one data cycle. First, the sensors
are sampled. Second, the unit processes the data for output. After
processing the data, the DMU will make another measurement while
presenting the current measurement for output. Third, the unit actually
transfers the data out; either over the RS-232 port, or onto the analog
outputs.
In the case of the analog output, the data is presented immediately on the
analog output pins after the data processing step is over. In the case of the
digital data, the data is transferred only if the previous data packet is
cleared.
A time tag is attached to each data packet. The time tag is simply the value
of a free running counter at the time the A/D channels are sampled. The
clock counts down from 65,535 to 0, and a single tick corresponds to 0.79
microseconds. The timer rolls over approximately every 50 milliseconds.
3.8
Temperature Sensor
The DMU has an onboard temperature sensor. The temperature sensor is
used to monitor the internal temperature of the DMU to allow for
temperature calibration of the sensors. The sensor is specified to be
accurate within ±2% over the DMU temperature operating range. The
DMU reads and outputs the temperature sensor voltage in the digital data
packet with 12-bit precision.
The temperature sensor voltage is sent in the data packet scaled as:
Vtemp (V) = data * 5/4096,
where data is the 16-bit unsigned integer sent as the temperature
information in the data packet. (The DMU uses two full bytes to express
the data, but it is really scaled to 12 bits.)
Calculate the temperature with the following calibration:
T (°C) = 44.4 (°C/V) * (Vtemp (V) – 1.375 V),
where Vtemp is the temperature sensor voltage sent in the DMU data packet.
Page 18
Doc.# 7430-0074-01 Rev.A
VG700AA User’s Manual
The DMU temperature sensor is internal to the DMU, and is not intended to
measure the ambient temperature. The internal temperature of the DMU
may be as much as 15°C higher than the ambient temperature.
3.9
Analog Output
X NOTE
See Appendix D for the correct pin out for Model VG700AA-202.
The DMU provides six fully conditioned analog outputs in scaled mode –
three accelerometer voltages and three rate sensor voltages. In angle mode,
the scaled accelerometer voltages are replaced with the pitch and roll analog
voltages. In all modes, the raw accelerometer sensor output is also
available. The analog signals can be connected directly to an A/D or other
data acquisition device without further buffering. The analog outputs all
have a 1 kΩ resistor in series to protect against short circuits. This should
be taken into account when using data acquisition systems with moderate
input impedances (10 kΩ.) The circuit diagram for the raw accelerometer
outputs (Pin 5, 6 and 7) is shown below:
The DMU must be set to scaled sensor mode or angle mode to enable the
scaled analog signals.
3.9.1
“Raw” Accelerometer Voltage
The analog outputs from the accelerometers are taken directly from the
sensor through a buffer. They are “raw” in the sense that they do not
represent a calculated or calibrated value. You will need the zero bias point
and scale factor given on the DMU calibration sheet to turn the analog
voltage into an acceleration measurement.
To find the acceleration in G’s, use the following conversion:
accel (G) = (Vout(V) – bias(V))*sensitivity(G/V),
where accel is the actual acceleration measured, Vout is the voltage at the
analog output, bias is the zero-G bias voltage, and sensitivity is the scale
factor in units G/volts.
Doc.# 7430-0074-01 Rev.A
Page 19
VG700AA User’s Manual
For example, if the x-axis of your accelerometer has a zero-G bias of 2.512
V, a sensitivity of 1.01 G/V, and you measure 2.632 V at the analog output,
the actual acceleration is (2.632 V – 2.512 V)*1.01 G/V = 0.121 G. The
"raw" accelerometer voltages will always be available on pins 5- 7.
3.9.2
Scaled Accelerometer Voltage
In scaled mode, the DMU will create scaled analog accelerometer voltages
on pins 12 – 14. In scaled mode, these accelerations will always be in the
DMU body frame. These analog voltages reflect any calibration or
correction the DMU applies to the accelerometer data. The analog voltage
is created by an internal D/A converter using the digital data available to the
DSP. The data is scaled to the range ±4.096 V with 12-bit resolution. You
do not need to use the calibration data that came with the DMU to use these
outputs – the DMU is already applying the calibration stored in its
EEPROM to the data.
To find the acceleration in G’s, use the following conversion:
accel (G) = GR * 1.5 * Vout(V) / 4.096 V,
where accel is the actual acceleration measured, Vout is the voltage at the
analog output and GR is the G range of your sensors. The G range is listed
on the calibration sheet. For example, if your DMU has ±2 G
accelerometers, GR is 2.
In angle mode, the X, Y, and Z acceleration measurements will be output on
pins 8, 9 and 14. For model – 201, the acceleration reported will be in the
earth level frame; for model –202 the acceleration reported will be in the
DMU body frame.
3.9.3
Scaled Rate Sensor Voltage
The DMU will output analog voltages representing the rate sensor
measurement on pins 8 – 10 in scaled sensor mode. In angle mode, only the
yaw rate sensor will be output, on pin 10.
The analog outputs for the angular rate signals are not taken directly from
the rate sensors; they are created by a D/A converter internal to the DMU.
The output range is ±4.096V with 12-bit resolution. The analog data will
represent the actual measured quantities, in engineering units, not the actual
voltage at the sensor output. To convert the analog output to a sensor value
use the following relation:
rate = RR *1.5 * Vout (V) / 4.096 V,
where rate is the actual measured rate in units °/s, RR is the angular rate
range of your sensor and Vout is the measured voltage at the analog output.
Page 20
Doc.# 7430-0074-01 Rev.A
VG700AA User’s Manual
X NOTE
RR is 200 for all VG700AAs.
3.9.4
Stabilized Pitch and Roll Voltages
In angle mode, the DMU outputs the stabilized pitch and roll angle analog
voltages on pins 12 and 13. The analog pitch and roll outputs are created by
the DMU internal D/A. The voltage output will be in the range ±4.096 V
with 12-bit resolution. The output is scaled so that full scale is 90° for both
roll and pitch. To convert the voltage to an actual angle, use the following
conversion:
angle = 900 * Vout (V) / 4.096 V
where angle is the actual pitch or roll angle in degrees, and Vout is the
analog pitch or roll voltage measured.
3.10 Adaptive-T Algorithm (installed at Crossbow factory)
There is no one optimal erection rate for all environments. A high erection
rate is better when you are closer to a static situation, and a low erection rate
is better when you are in a dynamic situation. Crossbow has developed an
algorithm to automatically switch the erection rate (the T parameter) based
on the dynamics measured by the DMU. This algorithm is referred to as
adaptive-T and is implemented as default at the factory. An overview of the
algorithm is presented below; note that the user still has a certain amount of
control over the adaptive-T function.
When the unit is powered up and initialized, and the adaptive-T-Setting
feature has been chosen, the unit will default to adaptively tune the
T-Setting between a maximum T-Setting of 20, and a minimum T-Setting
of 0. The user has the ability to change the effect of the adaptive T function
through the T-Setting command as follows:
The user selected T-Setting sets the upper end of the adaptive T algorithm,
which then tunes the T-Setting between a T-Setting of 0 and the chosen TSetting by scaling the setting based on sensed accelerations and the yaw
gyro measure of the turn rate. For instance, during large accelerations
(high-G maneuvers) or fast turns, the T-setting will be set to a value of 0,
and during low accelerations and straight motion the T-Setting will be set to
the value chosen by the user. In this way the T-Setting chosen controls the
maximum T-Setting that the algorithm will use. While the adaptive-T
algorithm offers a hands-off approach to the T-Setting problem, some
control over the algorithm is still allowed. The user should still evaluate the
performance of the algorithm in each application to achieve the best results.
Doc.# 7430-0074-01 Rev.A
Page 21
VG700AA User’s Manual
4
DMU Operating Tips
4.1 The “Zero” Command
The “z<x>” command is used to zero the angular rate sensor biases. This
command does not “zero” the angle output! This should be an essential part
of your strategy in using the DMU effectively. Stabilized pitch and roll
angles are calculated by integrating the output of the angular rate sensors.
Rate sensors are subject to small offsets in the angular rate measurement. A
constant offset error in angular rate will integrate into an error in angle that
increases linearly with time resulting in angular drift. The VG700AA uses
accelerometers to correct the calculated angle, but in a dynamic situation,
the accelerometers will be an inaccurate indication of the angle due to
motional accelerations. The DMU rate sensors should therefore be zeroed
to maintain the best accuracy.
Zeroing the rate sensors allows you to use a smaller value for the erection
rate (T-Setting), which gives you better performance in dynamic
environments.
The rate sensors need to be zeroed more often when subject to large shocks
or extremes of temperature.
The DMU unit should be still (motionless) during the zeroing process, but
need not be level. You should let the DMU warm-up for 5 minutes before
issuing the zero command. Zeroing the DMU turns on the high-pass filter
rate bias estimation that takes approximately 3 minutes. The zeroing
command does not level the stabilized angle output.
Remember that the DMU does not store the rate sensor zero calibration in
non-volatile memory. If you cycle power to the DMU, it loses the zero
calibration. Ideally, you would issue the zero command every time you
power on the DMU. Also ideally, you would let the DMU warm up for 5
minutes before zeroing the rate sensors.
If you find that the DMU zeroing algorithm does not work well in your
particular application, please contact Crossbow to discuss possible options.
4.2
The Erection Rate
The erection rate parameter controls the weighting between the rate gyro
sensors and the accelerometers. This is the rate at which the direction of
vertical as measured by integrating the rate gyros is forced to agree with the
direction of vertical as measured by the accelerometers. The erection rate is
specified in degrees per minute. The erection rate must be higher than the
drift rate of the rate gyros, or the calculated angles will drift off with
increasing error. If the erection rate is too high, however, the calculated
angles will be forced to follow the accelerometers too closely. This will
lead to inaccuracies when the unit is under dynamic conditions.
Page 22
Doc.# 7430-0074-01 Rev.A
VG700AA User’s Manual
One way to start is to set the erection rate about twice as fast as the worst
rate gyro drift rate. This is appropriate for a dynamic environment, when
the unit will be under significant acceleration. Estimate the drift rate by
looking at the offset on the rate gyro output. Use the zero command first to
zero the rate gyros. The rate gyro output is in degrees per second; the
erection rate is set in degrees per minute. So take the rate gyro offset;
multiply by 60 to turn it into degrees per minute; multiply by two and use
this as a starting value for the erection rate. As an example, if the rate
sensor offset is 0.1 degrees per second, we would set the erection rate to 0.1
x 60 x 2 = 12. The stabilized pitch and roll output will be responsive to
actual rotations, and relatively insensitive to linear accelerations.
You can set the T-Setting in a qualitative way using GyroView. Graph the
pitch and roll. Zero the rate sensors. Start with the T-Setting at about 100.
Lower the T-Setting in increments of 10 – 20 until the roll and/or pitch
starts to drift. When the angle outputs start to drift, the T-Setting is just a
bit lower than the rate sensor offset. Increase the T-Setting by about 5 each
time. This should keep the angle outputs stable.
If you expect the DMU to be subject to changing temperatures, or to have to
operate for long periods without re-zeroing, you should increase the
T-Setting further. You may have to experiment to find the best erection rate
for your situation.
If the DMU is used in a less dynamic environment, the erection rate can be
set much higher. The DMU angles will stabilize quicker to the gravity
vector. So if the motion is slow, or if you sit in one position for a long time,
then you should probably use a high erection rate.
A more advanced approach to the erection rate would take advantage of
both regimes of operation. Use a low erection rate when the unit is subject
to dynamic motion; use a high erection rate when the unit is relatively
stable. You can use the DMU itself to distinguish between the two cases by
looking for changes in the accelerometer outputs. For example, in an
airplane, you could use a low erection rate when the airplane executes a
banked turn; and a high erection rate (100+) when the plane is flying
straight and level.
Unfortunately, there is no single ideal erection rate for all applications. We
can suggest a starting point based on past experience with similar
applications, but you should be prepared to experiment some in the
beginning to find the best setup for your DMU in your application.
4.3
Mounting the DMU
The DMU should be mounted as close to the center of gravity (CG) of your
system as possible. This will minimize any “lever effect”. If it is not
mounted at the center of gravity, then rotations around the center of gravity
Doc.# 7430-0074-01 Rev.A
Page 23
VG700AA User’s Manual
will cause the DMU accelerometers to measure acceleration proportional to
the product of the angular rate squared and the distance between the DMU
and the CG.
The DMU will measure rotations around the axes of its sensors. The DMU
sensors are aligned with the DMU case. You should align the DMU case as
closely as possible with the axes you define in your system. Errors in
alignment will contribute directly into errors in measured acceleration and
rotation relative to your system axes. The sides of the DMU case are used
as reference surfaces for aligning the DMU sensor axes with your system.
The DMU should be isolated from vibration if possible. Vibration will
make the accelerometer readings noisy, and can therefore affect the angle
calculations. In addition, if the magnitude of the vibration exceeds the
range of the accelerometer, the accelerometer output can saturate. This can
cause errors in the accelerometer output.
The DMU case is not weather proof. You should protect the DMU from
moisture and dust.
þ EXAMPLE
4.4 DMU Start Up Procedure
As an example, look at how the DMU might be used in a car. Assume a
VG700AA is mounted in an automobile and will be used to record the
vehicle’s attitude during a drive. The test will be about 1 hour long. The
VG700AA is mounted near the CG of the vehicle, and is connected to a
laptop serial port during the test.
1.
Turn on power to the DMU and let it warm up 5 – 10 minutes.
Power can be on to all electronics, but the car engine should be off
if it causes vibration to the DMU.
2.
3.
Zero the rate sensors. The engine is off, so there is no vibration.
Change the T-Setting. After zeroing, you should be able to set the
T-Setting in the range 5 – 10 for a VG700AA.
4.
5.
6.
Start the engine.
Start data collection.
Proceed with test.
4.5 Advanced Strategies for Adjusting the Erection Rate
The DMU attitude estimation algorithm is divided into two separate entities.
Gyro angular rate information is integrated in time to propagate the DMU
body attitude with respect to the tangent plane. If the initial attitude of the
vehicle was known exactly and if the gyros provided perfect readings then
this integration process would suffice. However, the initial state is seldom
Page 24
Doc.# 7430-0074-01 Rev.A
VG700AA User’s Manual
known to great precision, especially a vehicle's attitude, and the gyros
usually provide corrupted data. Rate gyro bias, bias drift, misalignment,
acceleration (g-sensitive), nonlinear (square term), and scale factor errors
will be present in the angular rate measurements. The largest error is
typically associated with the bias and bias drift terms. Without a correction
algorithm and separate independent sensors, the attitude estimation
algorithm would diverge off the true trajectory. Accelerometers provide the
separate measurements, which help keep the attitude estimates on track.
The correction algorithm involves deriving an estimate of the roll and pitch
angle from the accelerometer’s gravity reference, comparing this estimate to
the gyro propagated quaternion Euler angles, and providing a linear
feedback gain to the quaternion propagation to take out the errors observed
from the gyro angular rate measurements. The correction feedback is also
referred to as the “erection rate” implying that the attitude errors are erected
out by moving the estimated orientation more towards the absolute attitude
measurements derived from the accelerometer measurements. It is also
given the name T-Setting to describe the user interface which allows the
user to command the DMU to use a desired erection rate. Sensed dynamic
accelerations can introduce error into the accelerometer absolute attitude
reference. The angle calculation algorithm has no way of knowing whether
the sensed acceleration change is being caused by an attitude tilt change in
the gravity vector, or from external translational accelerations.
For this reason a user selectable erection rate is available which allows for
the possibility of a rapidly maneuvering mission. There is a tradeoff
between how much error in the gyros the algorithm can overcome with a
low erection setting, compared to the errors induced from having a high
erection rate while experiencing large maneuvering accelerations. The gyro
zeroing command is useful in maintaining the gyro bias errors down to a
minimum, which allows a lower T-Setting to be used during the mission. It
must be noted that for the zeroing command to work properly, there must
no external disturbance to the unit (engine noise, wind disturbance, etc.) and
it would be advised to perform a gyro zeroing in the initial phase of the
mission when only electrical power is available. If the user has knowledge
of the intensity of upcoming maneuvers or complete control of the flight
profile, and can maintain constant serial communications with the DMU
unit, then an adapted erection setting profile can be developed. An example
follows.
þ EXAMPLE
4.6
1.
Adapted Flight Profile T-Setting
Vehicle electric power is applied to the DMU while the vehicle is
out of external disturbances (within the hanger for instance).
Doc.# 7430-0074-01 Rev.A
Page 25
VG700AA User’s Manual
2.
Following a warm-up period, (10 minutes should suffice) a gyrozeroing command is sent to the unit to average out the gyro biases.
3.
Send a T-setting command to set the erection rate at a high setting
(T-setting = 100), which should remove any initial attitude errors
or drifts.
4.
5.
Engine turn-on and rollout onto the runway.
Maneuver 1 (Takeoff and climb to desired altitude) – set the
erection rate to a low setting (T-setting = 7).
6.
Maneuver 2 (1st Coast Phase) – set the erection rate to a high
setting (T-setting=100).
Maneuver 3 (45 degree heading change) – set the erection rate to a
low setting (T-setting = 7).
Maneuver 4 (2nd Coast Phase) – set the erection rate to a high
setting (T-setting=100).
7.
8.
9.
Maneuver 5 (180 degree turn and altitude change – very fast 20
second maneuver) – set the erection rate to an even lower setting
since the maneuver is short and the dynamics are large (T-setting =
4).
10. Maneuver 6 (3rd Coast Phase) – set the erection rate to a very high
setting to remove any gyro saturation or acceleration saturation
from the previous high dynamic maneuver (T-setting=150), and
then set the erection rate back to a high setting (T-setting=100).
11. Maneuver 7 (Altitude descent and landing) – set the erection rate
to a low setting (T-setting = 7).
12. Maneuver 8 (Runway taxi and stop) – set the erection rate to a high
setting (T-setting = 100).
The profile above can be used as an example to produce an adapted erection
rate profile to achieve the best possible performance from the DMU. A
constant erection rate would not allow the DMU to perform as well because
of the highly dynamic environment. A high erection rate would result in
very large errors during the high acceleration maneuvers; a low erection rate
might not recover from a large gyro bias drift or saturation of the rate
sensors because of very large dynamics. Since every flight profile is
different, this approach necessitates careful erection rate profile planning. If
enough care is taken, active control of the erection rate will provide the best
performance.
Page 26
Doc.# 7430-0074-01 Rev.A
VG700AA User’s Manual
5
5.1
Appendix A. Mechanical Specifications
VG700AA Outline Drawing
Doc.# 7430-0074-01 Rev.A
Page 27
VG700AA User’s Manual
6
Appendix B. DMU Output Quick Reference
GR is the G-range of the accelerometers. For example, if your DMU has
±2 G accelerometers, GR = 2.
RR is the rate range of the rate sensors. RR = 200 for all VG700AAs.
6.1
Analog Output Conversion
X NOTE
See Appendix D for the Analog Output Conversion for Model
VG700AA-202.
Accelerometer (Raw output)
Use sensitivity, offset from
calibration sheet. Output is raw
sensor voltage.
Rate Sensor (Scaled Mode Only)
Pin 5
Pin 6
Pin 7
Pin 8
Pin 9
Pin 10
X axis accelerometer, raw
Y axis accelerometer, raw
Z axis accelerometer, raw
Accelerometer (Scaled Mode only)
Accel (G) =
Vout (V) * GR * 1.5/4.096
Pin 12
Pin 13
X axis accelerometer
Y axis accelerometer
Pin 14
Z axis accelerometer
Rate (°/s) =
Vout(V) * RR * 1.5/4.096
Roll rate sensor
Pitch rate sensor
Yaw rate sensor
Rate Sensor (Angle Mode Only)
Rate (°/s) =
Vout(V) * RR * 1.5/4.096
Pin 10 Yaw rate sensor
Roll rate and Pitch rate not available
in Angle Mode
Accelerometer (Angle Mode only)
Roll, Pitch (Angle Mode only)
Accel (G) =
Vout (V) * GR * 1.5/4.096
Pin 8
X axis accelerometer
Angle (°) = Vout (V) * 90/4.096
Pin 12
Roll Angle
Pin 9
Pin 14
Pin 13
Pitch Angle
Page 28
Y axis accelerometer
Z axis accelerometer
Doc.# 7430-0074-01 Rev.A
VG700AA User’s Manual
6.2 Digital Output Conversion
Data is sent as 16-bit signed integer for all but Temperature. Temperature
sensor data is sent as unsigned integer.
Roll, Pitch (Angle Mode)
Acceleration
Accel (G) = data * GR * 1.5/215
Angle (°) = data * 180/215
Rate
Temperature
Rate (°/s) = data * RR * 1.5/2
Doc.# 7430-0074-01 Rev.A
15
Temperature (°C) =
[(data * 5/4.096) – 1.375]*44.44
Page 29
VG700AA User’s Manual
7
Appendix C. DMU Command Quick Reference
Command
(ASCII)
Response
Description
R
H
Ping: Pings DMU to verify communications.
r
R
Change to Voltage Mode.
c
C
Change to Scaled Sensor Mode.
a
A
Change to Angle Mode (VG Mode).
P
None
Change to polled mode. Data packets sent when a G
is received by the DMU.
C
None
Change to continuous data transmit mode. Data
packets streamed continuously. Packet rate is
dependent on operating mode. Sending "G" stops
data transmission.
G
Data
Packet
Get Data: Requests a packet of data from the DMU.
Data format depends on operating mode.
T <0-255>*
None
2-byte command sequence that changes the vertical
gyro erection rate.
z <0-255>*
Z
Calibrate and set zero bias for rate s ensors by
averaging over time. The argument of the command
<x> is a single binary byte that the DMU ignores and
is part of the legacy code, any single byte character
can be sent. Unit should be still during zeroing.
S
ASCII
String
Query DMU serial number. Returns serial number as
32 bit binary number.
v
ASCII
String
Query DMU version ID string. Returns ASCII string.
*Note: argument of command is sent as a single hex byte, not as an ASCII
character.
Page 30
Doc.# 7430-0074-01 Rev.A
VG700AA User’s Manual
8
8.1
Appendix D. VG700AA-202 Analog Outputs
Model VG700AA-202 Connector Pin Out
Pin
Signal
1
RS-232 Transmit Data
2
RS-232 Receive Data
3
Positive Power Input (+)
4
Ground
5
X-axis accelerometer Analog voltage1
6
Y-axis accelerometer Analog voltage1
7
Z-axis accelerometer Analog voltage1
8
Roll rate analog voltage2
9
Pitch rate analog voltage2
10
Yaw rate analog voltage2
11
NC – factory use only
12
Roll angle analog voltage3
13
Pitch angle analog voltage3
14
NC – factory use only
15
NC – factory use only
Notes:
1. The accelerometer analog voltage outputs are the raw sensor output.
These outputs are taken from the output of the accelerometers.
2. The rate sensor analog voltage output is scaled to represent °/s. This
output is created by a D/A converter.
3. The pitch and roll angle analog outputs are scaled to represent degrees.
These outputs are created by a D/A converter.
Doc.# 7430-0074-01 Rev.A
Page 31
VG700AA User’s Manual
8.2
Model VG700AA-202 Analog Output Conversion
GR is the G-range of the accelerometers. For example, if your DMU has
±2 G accelerometers, GR = 2.
RR is the rate range of the rate sensors. RR = 260 for all VG700AAs.
Accelerometer (Raw output)
Use sensitivity, offset from
calibration sheet. Output is raw
sensor voltage.
Rate Sensor (Scaled Mode Only)
Pin 5
X axis accelerometer, raw
Rate (°/s) =
Vout(V) * RR * 1.5/4.096
Pin 8
Roll rate sensor
Pin 6
Pin 7
Y axis accelerometer, raw
Z axis accelerometer, raw
Pin 9
Pin 10
Pitch rate sensor
Yaw rate sensor
Accelerometer (Scaled Mode only)
Accel (G) =
Vout (V) * GR * 1.5/4.096
Pin 12
Pin 13
Pin 14
X axis accelerometer
Y axis accelerometer
Z axis accelerometer
Rate Sensor (Angle Mode only)
Roll, Pitch (Angle Mode only)
Accel (G) =
Vout (V) * RR * 1.5/4.096
Pin 8
Roll rate sensor
Pin 9
Pitch rate sensor
Angle (°) = Vout (V) * 90/4.096
Pin 10
Page 32
Pin 12
Pin 13
Roll Angle
Pitch Angle
Yaw rate sensor
Doc.# 7430-0074-01 Rev.A
VG700AA User’s Manual
9
Appendix E. Warranty and Support
Information
9.1 Customer Service
As a Crossbow Technology customer you have access to product support
services, which include:
9.2
•
Single -point return service
•
Web-based support service
•
Same day troubleshooting assistance
•
Worldwide Crossbow representation
•
Onsite and factory training available
•
Preventative maintenance and repair programs
•
Installation assistance available
Contact Directory
Japan: 06-6489-5868 email: [email protected]
9.3
Return Procedure
9.3.1
Authorization
Before returning any equipment, please contact Crossbow to obtain a
Returned Material Authorization number (RMA).
Be ready to provide the following information when requesting a RMA:
•
Name
•
Address
•
Telephone, Fax, Email
•
Equipment Model Number
•
Equipment Serial Number
•
Installation Date
•
Failure Date
•
Fault Description
•
Will it connect to GyroView?
Doc.# 7430-0074-01 Rev.A
Page 33
VG700AA User’s Manual
9.3.2
Identification and Protection
If the equipment is to be shipped to Crossbow for service or repair, please
attach a tag TO THE EQUIPMENT, as well as the shipping container(s),
identifying the owner. Also indicate the service or repair required, the
problems encountered, and other information considered valuable to the
service facility such as the list of information provided to request the RMA
number.
Place the equipment in the original shipping container(s), making sure there
is adequate packing around all sides of the equipment. If the original
shipping containers were discarded, use heavy boxes with adequate padding
and protection.
9.3.3
Sealing the Container
Seal the shipping container(s) with heavy tape or metal bands strong enough
to handle the weight of the equipment and the container.
9.3.4
Marking
Please write the words, “FRAGILE, DELICATE INSTRUMENT” in
several places on the outside of the shipping container(s). In all
correspondence, please refer to the equipment by the model number, the
serial number, and the RMA number.
9.3.5
Return Shipping
: A New unit warranty in Japan is 6 month. Consult Silicon Sensing Sys Japan
at [email protected] or phone 06-6489-5868.
Page 34
Doc.# 7430-0074-01 Rev.A
Crossbow Technology, Inc.
41 E. Daggett Drive
San Jose, CA 95134
Phone: 408.965.3300
Fax: 408.324.4840
Email: [email protected]
Website: www.xbow.com


![AHRS500GA-[] Installation Manual](http://vs1.manualzilla.com/store/data/006905118_1-255802b8c53d7a0ed3b3c39a208d614c-150x150.png)