1
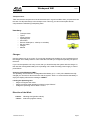
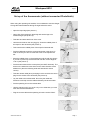
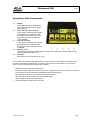
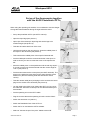
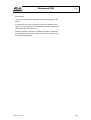
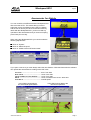
Windspeed WS1
English
Windspeed WS1
Page 2
Windspeed WS1
The anemometer “Windspeed WS1” is a high precision measuring
instrument. Handle this device always with care.
The ALGE Windspeed WS1 is built equal as the Windmaster 2000
plus. Out of this reason all homolugations for the Windmaster 2000
are also valid for the Windspeed WS1.
Important Information:
☞ Use the charger only in dry rooms. If you use the operating unit outside, you cannot use
the charger. In this case you must charge the operating unit prior to the event.
☞ The anemometer must be used only by a competent person!
☞ If you have more than one anemometer Windspeed WS1 you must not mix the wind tube.
Each device has it´s calibrated wind tube. Operating unit and wind tube has always the
same serial number.
☞ Keep children away from the anemometer. They could damage it.
☞ Store the anemometer only in dry and temporized rooms.
☞ Clean the anemometer only with soapsuds. Never use solvents for cleaning.
☞ You can prevent many repairments by correct fixing of the anemometer.
To fix the anemometer is very important. Most of the repairments are due to fall over. This
may be caused by squalls or due to human carelessness. Here you can get some
information about how you can prevent such accidents:
☞ Make a barrier around the anemometer (wind tube). The barrier
prevents from damages and wrong measurements due to
person standing in front of the tube.
☞ You can fix the legs of the tripod with tent peg (see picture).
☞ You can bind a weight at the tripod and stabilize it.
☞ There is the possibility that an athlete destroys the remote cable by stepping on it with the
spikes. Inform the athletes about this risk by an announcement of the speaker.
Version:E-99-09-12
Page 2
Windspeed WS1
Page 3
Transport Case:
Take care that the components of the anemometer are in a good condition when you pack them into
the case. Put all parts always in the transport case. This way you cannot loose parts and all
components are safe during transporting them.
Inventory:
☞
☞
☞
☞
☞
☞
☞
☞
☞
Transport Case
Tripod
Center Column
Operating Unit
Wind Tube
Remote Cable (60 m, rolled up on a holder)
RS 232 Cable
Charger
Manual
Operating Unit
Wind Tube
Charger:
Use the charger only in dry rooms. If you use the operating unit outside you are not allowed to use
the charger out of safety reasons. In this case take care that you charge the operating unit prier to
the event.
If you use the operation unit in dry rooms, than you should backup the system with the charger. In
this case the rechargeable battery in the operating unit is used as backup power supply in case of
power failure.
Charging of the Windspeed WS1:
The operating unit has a built in rechargeable NiCd battery (6 V, 1.2 Ah). If the batteries are fully
charged you can work for about 30 hours with the system. About 1 to 2 hours before the battery is
empty the display will show the message <LOBAT>.
Loading the Operating Unit:
☞ Plug the charger at the mains
☞ Plug the charger at the operating unit were it says “RS 232”.
☞ Charge the operating unit for about 14 hours
Direction of the Wind:
+ values:
- values:
following wind (positive values)
heat wind (negative values)
Version:E-99-09-12
Page 3
Windspeed WS1
Page 4
Set up of the Anemometer (without connected Photofinish)
When using the operating unit outside, it is not allowed to use the charger.
Charge the internal batteries during the night before the event.
☞ Open the tripod legs (see picture 1).
☞ Open clips of the telescopic tripod leg and set the legs to its
maximal length (see picture 2).
☞ Take the wind tube careful out of the case.
Picture 1
☞ Hold the wind tube on the carrying grip. Screw the middle piece of
the tripod on the wind tube (see picture 3).
☞ Take care that the middle piece of the tripod is fastened well.
☞ Put the middle piece with the screwed wind tube in the tripod. In
order to do this you have to rotate the screw of the tripod to the
left.
☞ Move the middle piece on the tripod down until the red ring stops it.
If you set it up this way the anemometer has the correct height of
1.22 m (see picture 4).
Picture 2
☞ Put the anemometer at the correct place (see IAAF rule book). The
arrow on the wind tube must show into the same direction as the
athletes run (then the following wind and heat wind is shown
correct).
☞ Take the remote cable (60 m) and plug it at the end with the corner
plug into the socket of the wind tube (see picture 5).
☞ Lay the cable to the referee table. Do not lay the cable taut.
Someone could trip over the cable and destroy the anemometer.
Picture 3
☞ Put the operating unit on the referee table.
☞ Use the charger only if you are in a dry room. Otherwise you must
work with the internal batteries.
☞ Plug the remote cable at the operating unit at the socket ”Wind”
Picture 4
Picture 5
Version:E-99-09-12
Page 4
Windspeed WS1
Page 5
Operating of the Anemometer
1 ....... Normal
It measures always the wind speed
(every second). This mode is active
before the race.
2 ....... 100 m / 200 m / 75 m / 80 m H
In this mode it measures the average
wind speed over 10 Sekunds. Use
this mode for all sprints of 75 m and
longer (except 100 m Hurdles and
110 m Hurdles).
3 ....... 110 m H / 100 m H
In this mode it measures the average
wind speed over 13 Sekunds. Use
this mode for 100 m Hurdles and 110
m Hurdles.
4 ....... Sprung / <75 m
In this mode it measures the average wind speed over 5 Sekunds. Use this mode for long
jump and all sprints below 75 m.
5 ....... ON / OFF
Device Switch to turn the device on or off.
If you have the anemometer Windspeed WS1 conected with the ALGE Photofinish OPTIc you do
not need to operate the anemometer. The OPTIc does control the anemometer. If you have no
OPTIc you have to operate the anemometer manually.
☞ Switch the anemometer with switch (5) on.
☞ Press at the start of the race the correct key (2 to 4, depending on the race distance). Press the
key at a 200 m race not before the first athlete reach the home stetch.
☞ Now the display shows a count down time (measuring time).
☞ After the end of the count down it shows the wind speed.
☞ After reading the wind speed press key (1).
☞ The anemometer is ready for the next race.
Version:E-99-09-12
Page 5
Windspeed WS1
Page 6
Set up of the Anemometer together
with the ALGE Photofinish OPTIc
When using the operating unit outside, it is not allowed to use the charger.
Charge the internal batteries during the night before the event.
☞ Set up the photofinish OPTIc (see OPTIc manual):
☞ Open the tripod legs (see picture 1).
☞ Open clips of the telescopic tripod leg and set the legs to its
maximal length (see picture 2).
Picture 1
☞ Take the wind tube careful out of the case.
☞ Hold the wind tube on the carrying grip. Screw the middle piece of
the tripod on the wind tube (see picture 3).
☞ Take care that the middle piece of the tripod is fastened well.
☞ Put the middle piece with the screwed wind tube in the tripod. In
order to do this you have to rotate the screw of the tripod to the
left.
Picture 2
☞ Move the middle piece on the tripod down until the red ring stops it.
If you set it up this way the anemometer has the correct height of
1.22 m (see picture 4).
☞ Put the anemometer at the correct place (see IAAF rule book). The
arrow on the wind tube must show into the same direction as the
athletes run (then the following wind and heat wind is shown
correct).
Picture 3
☞ Take the remote cable (60 m) and plug it at the end with the corner
plug into the socket of the wind tube (see picture 5).
☞ Lay the cable to the timing room (where the OPTIc is). Do not lay
the cable taut. Someone could trip over the cable and destroy the
anemometer.
☞ Put the operating unit on the OPTIc table.
☞ Plug the remote cable at the operating unit at the socket ”Wind”.
Picture 4
☞ Switch the anemomer on (switch 1)
☞ Switch the Distribution Box of the OPTIc on.
☞ Switch the PC on and start the OPTIc software.
☞ Select at ”Choose the sport” the point ”Athletic with ALGE
Version:E-99-09-12
Picture 5
Page 6
Windspeed WS1
Page 7
anemometer”.
☞ The OPTIc must show the message ”Anemometer ready” on the
screen.
☞ For each race you have to input the correct race distance at the
OPTIc. You must input the correct distance carefully, otherwise it
will measure the wind not correct.
☞ The wind speed is measured completely automatic. It wind data
are automatically stored in the OPTIc and it prints it together with
the result list and pictures.
Version:E-99-09-12
Page 7
Windspeed WS1
Page 8
Anemometer for Athletic
You can control the ALGE Anemometer Windspeed WS1
direct form the OPTIc. This means that you have to
adjust the correct race distance in the OPTIc software
and the rest is done by the OPTIc and anemometer by
itself. With the Windspeed WS 1 you do not need any
operation of the anemometer and you need one helping
person less per race day.
When using the Windspeed WS1 you need to make the
following adjustments:
☛ Click on ”System”
☛ Click on ”Select the sport”
☛ Click on ”Athletic with ALGE anemometer”
If you open a new race you must always select the race distance. With this information the software
can operate the anemometer according to the IAAF rules.
0 to 75 m ............................................. 5 sec. from start
80 to 100 m ......................................... 10 sec. form start
100 m hurdles to 110 m hurdles ....... 13 sec. from start
200 m .................................................. 10 sec, measures start 10 sec. after start
over 200 m ......................................... no wind speed
In this field it shows always
the actual wind speed before
the race
Version:E-99-09-12
In this field it shows always the
official wind speed for
the race
Page 8
Windspeed WS1
Version:E-99-09-12
Page 9
Page 9
Windspeed WS1
Version:E-99-09-12
Page 10
Page 10
Windspeed WS1
Version:E-99-09-12
Page 11
Page 11
Windspeed WS1
Version:E-99-09-12
Page 12
Page 12
Windspeed WS1
Version:E-99-09-12
Page 13
Page 13
Windspeed WS1
Version:E-99-09-12
Page 14
Page 14
Windspeed WS1
Version:E-99-09-12
Page 15
Page 15


![English [2012v1]](http://vs1.manualzilla.com/store/data/005666127_1-015c2c1b906ab908850f1f1f8721a849-150x150.png)
![English [2012v1]](http://vs1.manualzilla.com/store/data/005770981_1-8c196de42073f8db3e58cd387e9490be-150x150.png)