1
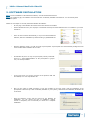
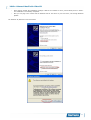
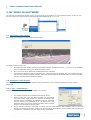
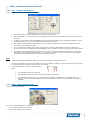
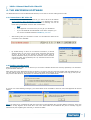
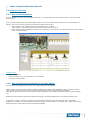
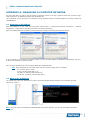
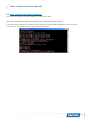
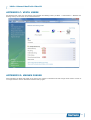
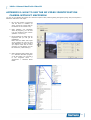
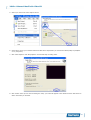
Manual MacFinish VideoID Version: 2012v1 Table of Contents PREFACE......................................................................................................2 1. HARDWARE SETUP..................................................................................3 1.1. Complete setup...........................................................................................................3 1.2. Simplified setup..........................................................................................................3 2. SOFTWARE INSTALLATION .....................................................................4 3. MF VIDEO ID SOFTWARE.........................................................................6 3.1. Overview of the screen................................................................................................6 3.2. Overview of the menu's...............................................................................................6 3.2.1. File → Preferences.................................................................................................6 3.2.2. File → Camera Properties.......................................................................................7 3.2.3. Help → About MF Video ID......................................................................................7 4. THE MACFINISH SOFTWARE....................................................................8 4.1 Connection to MF Video ID............................................................................................8 4.2 Reading out the image..................................................................................................8 4.3 Using the video file.......................................................................................................9 4.3.1. How to identify athletes.........................................................................................9 4.3.2. How to adjust some properties of the video image ...................................................9 APPENDIX A: MANAGING A COMPUTER NETWORK....................................10 A.1 Assigning an IP Address..............................................................................................10 A.2 What is my IP Address................................................................................................10 A.3 Can I connect to the other computers...........................................................................11 APPENDIX B: SHARED FOLDERS................................................................12 B.1 What about Permissions..............................................................................................12 APPENDIX C: VISTA USERS.......................................................................13 APPENDIX D: KNOWN ISSUES...................................................................13 APPENDIX E: HOW TO USE THE MF VIDEO IDENTIFICATION CAMERA WITHOUT MACFINISH...............................................................................14 www.timetronics.be TimeTronics NV Lammerdries-Oost 23B B-2250, Belgium Tel +32 (0)14 23 19 11 Fax +32 (0)14 23 20 24 VAT BE0440 224 404 HR Turnhout 64540 KBC Bank 414-4191871-52 SWIFT : KREDBE22 IBAN : BE64 4144 1918 7152 2012v1 Manual MacFinish VideoID PREFACE Welcome to the "MacFinish VideoID" user manual. May we recommend you to gently leaf through the entire manual first, just to have an initial idea of how the book is structured. As we cannot possibly explain all details simultaneously, this might help you a bit in understanding and tracing things back. Of course, the table of contents will also help you in doing so. Please note that all pictures are examples, the delivered version can be different than shown in this manual please inform yourself before purchase. If you, after reading this document, have any further question regarding the operation or service of this or any other TimeTronics equipment, please contact your local distributor or TimeTronics directly, by email: [email protected], or call us at +32 (0) 14 23 19 11 Please also contact us if you have any remarks or advise regarding this user manual: [email protected]. Good luck with MacFinish VideoID and thank you for your confidence in the TimeTronics products and services. The editors. © Copyright 2012 TimeTronics. All rights reserved. TimeTronics Lammerdries 23b B-2250 Olen Belgium Tel.: +32 (0) 14 23 19 11 Disclaimer Under no circumstances shall TimeTronics be liable for any loss, damage or expense suffered or incurred with respect to any defective product. In no event shall TimeTronics be liable for any incidental or consequential damages that you may suffer directly or indirectly from use of any product. Windows, Windows XP and Windows VISTA are registered trademarks of Microsoft Corporation. 2 2012v1 Manual MacFinish VideoID 1. HARDWARE SETUP 1.1. Complete setup In a complete setup, your system contains the following parts: · MacFinish Ethernet + PC (not included in VideoID -configuration · Samsung Q1 (or an other portable computer) · MFVideo ID camera · An Ethernet hub Connect your MacFinish pc and camera to the Ethernet hub. Place the Samsung Q1 and the MFVideo ID camera on the desired place. We recommend you place it some meters behind the finish line on the inside of the track. Connect the Samsung Q1 (or another portable pc) to the Ethernet hub (using a long UTP CAT5 cable from the central hub to the inside of the track); be sure your computer network (consisting of at least two pc’s, namely the MacFinish pc and the Samsung Q1) is managed right. If you don’t need to be connected to another network, we recommend you use static IP addresses. Connect the MFVideo ID camera to the Samsung Q1 using the USB cable. Note: For more detailed information concerning the setup of your computer network, see Appendix A: Managing a computer network. 1.2. Simplified setup In a simplified setup, you don’t use the Samsung Q1 (or another portable pc) for the MFVideo ID software, but you use the same computer for MacFinish as for MFVideo ID. This allows you to eliminate the need for a computer network, but the distance between the MacFinish pc and the identification camera is limited. Note: With use of the standard USB cable, the distance between MacFinish pc and identification camera is limited to 5m. But you can extend this to 15m using our USB extension cables (for more information: contact us at [email protected]). 3 2012v1 Manual MacFinish VideoID 2. SOFTWARE INSTALLATION Note: For the installation of the MacFinish software, consult the MacFinish manual. Note: On a Samsung Q1, the software and camera drivers are already installed at TimeTronics. You can directly start using the system. Follow the next steps to correctly install the MFVideo ID software. • Do not plug-in the MFVideo ID camera before the software is installed. • Put the MFVideo ID cd in your cd player or download and unzip the latest software form our website to your local hard drive. • If the cd does not start automatically, or if you have downloaded the software, start the installation by double-clicking TT_INSTALLER.exe. • After the Welcome screen, you will see a list of prerequisites. A prerequisite is a small software package that has to be installed before MFVideo ID can work. • For MFVideo ID, there is only one prerequisite, namely “Microsoft Visual C++ 2005 Redistributable”. If the prerequisite is greyed out, it is already installed. • In the next screen you get the overview of the products that will be installed, here it is only MFVideo ID. • Now you are ready to install everything. If you click “Install” on the next screen, first the installation of the prerequisite is launched (if it was not already installed on your system), afterwards the installation of MFVideo ID is launched. • After the Welcome screen and the licence for the MFVideo ID installation, you can choose the type of installation (Typical, Custom or Complete). We recommend you choose for a complete installation. 4 2012v1 Manual MacFinish VideoID • After clicking “Install” the installation will begin. Wait for the installer to do it’s job and finally click on “Finish”. The installation is successfully completed. • Now you can plug-in the camera and let Windows look for the driver on your hard drive, not through Windows Update. For Windows XP, follow the next screenshots. 5 2012v1 Manual MacFinish VideoID 3. MF VIDEO ID SOFTWARE You can start the software by double-clicking on the shortcut on the desktop, or in the startmenu folder, or else you can find the program at C:\Program Files\TimeTronics\MFVideo ID\MFVideo ID 1.1.0.0.exe. 3.1. Overview of the screen After starting the software, you will see the following screen. The fields you should notice are: 1. The TCP/IP port the software is listening to (default 2000 but will increase to 2001, … if the port is not available). This is an important setting in the MacFinish software later. 2. Here you can see the IP address of the MacFinish that is connected. 3. These pictures indicate the state the MacFinish is in. The pictures are not clickable; they are controlled through the connection with the MacFinish software. Remember that the MFVideo ID software does not need an operator; it is fully controlled by the MacFinish software. 3.2. Overview of the menu's There are three menus in the MFVideo ID software: File->Preferences…, File->Camera Properties… and Help->About MFVideoID… 3.2.1. File → Preferences... These are some general preferences of the software, an overview: 1. The number of frames to record before and after an arrival. 2. Where to store the video files while recording (we recommend you choose Local). If you choose local, the files are stored on the computer where the MFVideo ID software is running, otherwise they are stored on the MacFinish pc. If you choose local, your video files will be more fluent, because the saving of the recorded image is not influenced by network traffic. 3. The file format in which the video files are stored. You can choose between MFV (MacFinish Video) or AVI. We strongly recommend to use MFV, because the file size will be approximately 4 times smaller than AVI files and conversion to a standard format can always be done afterwards. 6 2012v1 Manual MacFinish VideoID 3.2.2. File → Camera Properties... In this window, you can see the settings for the camera. 1. The exposure time in tenths of milliseconds (10 means 1 millisecond). 2. Colour calibration: you can influence the general gain and the gain for every colour apart (red, two times green and blue). 3. By clicking on the button “Auto White Balance” the camera will take one shot and calculate the different values for the gains for you. If you are not satisfied with the result, click again. 4. The width and the height of the window can be set in software; the maximum values are 1280x1024. These values have to be multiples of eight. 5. You can select the framerate of the video you take. We recommend values between 15 and 30 frames per second. Less: than you might miss some fast athletes; more: the file size will be too large, which leads to delays. 6. The position of the subwindow can be controlled. If you don ‘t take the full 1280x1024 pixels (we recommend something between 504x320 and 800x600), you can move the window of vision of your camera. The button in the middle is to center the subwindow, which gives the best results. Note: • All these settings take immediate effect; you can see the changes in the preview screen. • Because this software is often used on tablet pc’s, the user interface is what it is. It can take some time to get used to, but afterwards you will agree that it is very user-friendly. • In most input fields, you can see three different parts: 1. It is possible to type a number here. 2. By clicking the arrow up or down, the value increases or decreases. 3. If you click and hold the mouse (or pointer) down, a slidebar will appear. If you hold the mouse (or pointer) and move over the slidebar, the value will increase or decrease and the slidebar will be filled or emptied. 3.2.3. Help → About MF Video ID You will see the next window: There are two important items in this screen: 1. The software version you are using. 2. The serial number of your camera. 7 2012v1 Manual MacFinish VideoID 4. THE MACFINISH SOFTWARE The MacFinish has to link to the MFVideo ID software, so we have to do some settings here as well. 4.1 Connection to MF Video ID • To connect from MacFinish to MFVideo ID, you have to fill in the IP address of the computer where MFVideo ID is running (e.g. Samsung Q1) and the port number on which the MFVideo ID software is listening. You can do these setting in MacFinish via menu File->Preferences… Note: • Read Appendix A.2 to learn how you can get your IP address. • If you use MacFinish and MFVideoID on the same computer, you can use the localhost IP address 127.0.0.1, port 2000. • After clicking “OK”, the connection is made. You can follow the status of the connection in the statusbar. • By double-clicking on “Error on an ethernet connection”, a window appears where you can see if it is the video connection that causes an error. If you click on the symbol to the right of the video IP address, MacFinish will try to renew the connection. If the connection can not be made, the symbol stays as it is, otherwise it will turn into a green check symbol. 4.2 Reading out the image After the connection is made, you can work as you are used to. MFVideo ID does not need any operations; it is controlled by the MacFinish software. After saving the image, MacFinish will ask you whether you want to copy the video file together with the MacFinish file, or you just want to use it once. If you choose to copy it, this takes some seconds. If you choose not to copy it, than you can only use the video file once. Afterwards it is not linked anymore to your MacFinish file. If you get one of the following messages, your shared folder is not accessible or does not exist. Read Appendix B: Shared folders. Note: the video file is a separate file with the same name as the MacFinish file, but with different extension. Those two files have to stay together. If the video file is not in the same folder as the MacFinish file (due to manually copy the MacFinish file, but forgetting the video file), it will not be visible. 8 2012v1 Manual MacFinish VideoID 4.3 Using the video file 4.3.1. How to identify athletes If you move with the mouse over the photofinish image, you will notice that the video image moves to. The times in both files or linked. So if you click to add the time to the result table, the shot you see in the video screen will be the one of the athlete you point to. It is easy to read his number and choose that number from the list. • • • If the number is not readable, there are several options you could do. If the number is too small, just click on the video screen and it will zoom in. If the number is better readable in a previous or a next shot, you can move in the video file by (look at the numbers in the screenshot below): Possible actions: 1. Moving the slider 2. Use the buttons to go one shot further or one shot back 3. Play the whole video file 4.3.2. How to adjust some properties of the video image You can adjust three properties of the video file, offset, brightness and contrast. Offset means a number of milliseconds time difference between the place in the photofinish image you point to and the shot you will see in the video file. This can be both positive (video is later than photofinish) as negative. This offset is useful when you notice the numbers of the athletes are more visible some distance before or after the finish line. Brightness and contrast are well known properties of images. The default brightness is 0, the default contrast is 100. To adjust these values, change the number in one of the three boxes above the video file (from left to right offset – brightness - contrast). You can change these values by typing in another number, or by clicking the “v” after the numbers, holding down the mouse and move over the slider that appears. 9 2012v1 Manual MacFinish VideoID APPENDIX A: MANAGING A COMPUTER NETWORK We don’t claim this is a guide in how to manage a computer network. It is only a guide for those who just start using a small network for use MacFinish together with of MFVideo ID. The screenshots you see are taken on a computer running Windows XP SP2. For Windows VISTA it is similar, but take not off APPENDIX C. A.1 Assigning an IP Address Open the properties of your Local Area Connection (Control Panel -> Network and Internet Connections -> Network Connections -> right click on Local Area Connection and choose Properties). Open the TCP/IP properties by selecting “Internet Protocol (TCP/IP)” and clicking the Properties button. If your computer is not connected to a bigger network, you can not select “Obtain an IP address automatically”. You have to fill in an IP address you chose yourself. Fill in a unique IP address for every computer (MacFinish and MFVideo ID). Note: the IP addresses you use should come from one of these ranges (don‘t mix ranges). X is a number from 1 to 255. 10.X.X.X (Subnet mask 255.0.0.0) 192.168.X. X (Subnet mask 255.255.0.0) 172.16.100. X (Subnet mask 255.255.255.0) A.2 What is my IP Address The easiest way to get your IP address is to open a Command Prompt window and type in the command “ipconfig” followed by <enter>. Note: when you want to use MacFinish and MFVideoID on the same computer, you can use the localhost IP address 127.0.0.1. 10 2012v1 Manual MacFinish VideoID A.3 Can I connect to the other computers To see if you can connect to the other computers, you can “ping” to them. Type in the Command Prompt window the command “ping + IP address of remote computer”. In the picture below I tested if my computer was connected to the computers with IP addresses 172.16.100.19 and 172.16.100.200. The first connection was OK, the seconds one failed. 11 2012v1 Manual MacFinish VideoID APPENDIX B: SHARED FOLDERS As you have read before, MacFinish and MFVideo ID use a shared folder to exchange the video file. The name of the shared folder is MFVideoFiles. Depending of your settings (see 4.2.1 - 2) this folder has to be on the MFVideo ID computer (local) or on the MacFinish computer (remote). We recommend that you check the shared folder before you start recording MacFinish images. If the setting 4.2.1 – 2 is local, open a Windows Explorer window on the MacFinish computer and open the folder “IP address of MFVideo ID\MFVideoFiles”. Try to create a new document here. In the example below the IP address of the MFVideo ID computer was 172.16.100.18. If you don’t succeed in creating a new file, you have to change permissions (on the MFVideo ID computer) [or read the note below]. By installing MFVideo ID, the shared folder is automatically made for you in C:\Program Files\TimeTronics\MFVideoFiles. If you want to store the temporary video files on the MacFinish computer, you have to make the shared folder there yourself (setting 4.2.1 – 2 is remote). Note: when you experience difficulties to access the folder from one computer to the other, it might be useful to use Windows standard shared folder. Just copy the MFVideoFiles folder in “My Shared Documents” and be sure it is still know as \\ip-adres\MFVideoFiles (enable sharing on the MFVideoFiles folder). The folder will now automatically get the securityand user-settings of the standard shared documents folder. B.1 What about Permissions If you get the error described in 5.2, the MacFinish computer had not the rights to copy files in the shared folder. To change these rights, right-click on the MFVideoFiles folder (on the MFVideo ID computer) and select Properties. Choose the “Sharing” tab and be sure “Share this folder” is enabled. Click on “Permissions” and add “Everyone” by clicking “Add”, typing in “Everyone” and clicking “Check names”. Give everyone full control. Note: If you keep on having problems in Windows VISTA with permissions, try to copy the MFVideoFiles folder to the folder “Public” (standard shared folder). The folder MFVideoFiles will inherit all default sharing and security properties of the “Public” folder. But make sure that the folder is shared itself too, so it is known as \\IP-address\MFVideoFiles and not as \\IP-address\Public\MFVideoFiles. 12 2012v1 Manual MacFinish VideoID APPENDIX C: VISTA USERS On Windows Vista, make sure the settings of the Network and Sharing Center (via Start -> Control Panel -> Network and Sharing Center) are as shown in the screenshot below. APPENDIX D: KNOWN ISSUES When adjusting the width and height of the camera, the camera is sometimes not fast enough which leads to a crash or no images from the camera. Restart the software and try again. 13 2012v1 Manual MacFinish VideoID APPENDIX E: HOW TO USE THE MF VIDEO IDENTIFICATION CAMERA WITHOUT MACFINISH You can use our MFVideo ID camera as a camera to capture video, without getting the signals (ready, start, arrival) from a MacFinish. Follow the next steps: 1. Be sure the camera is connected and the driver is installed (to check, look if the orange LED on the bottom of the camera is on). 2. Open MFVideo (our MacFinish Video ID program), you can find it on the desktop of the mini-PC (MFVideo 1.0.0.5.exe). 3. Do the settings you want, click on Properties and you will get all possibilities. Notice that the width and height of the window can only be used with MacFinish, in other words if you capture video with an other program you will always use the full resolution (1280x1024 px). 4. Open Windows Movie Maker (this is a standard Windows program on XP and Vista). You can find it in the Programs Menu -> Accessories -> Windows Movie Maker. 14 2012v1 Manual MacFinish VideoID 5. Select your camera as Video Capture Device 6. Chose where to put your recorded videos and with what compression (we recommend “Best quality for playback on my computer”). 7. Click “Start Capture” and “Stop Capture” to start and stop recording video. 8. Click “Finish” when you are done recording the video, your video will appear in the collection and is also stored on disk in the folder you selected. 15 2012v1 Manual MacFinish VideoID © Copyright 2012 TimeTronics. All rights reserved. TimeTronics Lammerdries 23b B-2250 Olen Belgium Tel. : +32 (0) 14 23 19 11 Fax : +32 (0) 14 23 20 24 16


![English [2012v1]](http://vs1.manualzilla.com/store/data/005947215_1-83afe423bc1815c8427a220bc0eb1bc7-150x150.png)
![English [2014v1]](http://vs1.manualzilla.com/store/data/005775879_1-a83e57144a66539570f80a48a6e80397-150x150.png)
![English [2012v1]](http://vs1.manualzilla.com/store/data/005857990_1-ba5aca9850e0a37c2eb2dd5a5d355973-150x150.png)
![English [2012v1]](http://vs1.manualzilla.com/store/data/005994732_1-5b50c16b769d7d14a751f578cdbfd574-150x150.png)
![English [2012v1]](http://vs1.manualzilla.com/store/data/005666127_1-015c2c1b906ab908850f1f1f8721a849-150x150.png)

![English [2015v1]](http://vs1.manualzilla.com/store/data/005829431_1-1fdc30543d444fb0915a40c3aab945a8-150x150.png)