1
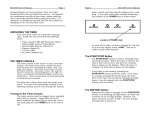
RP-210
Automatic Rope Barrier
User's Manual
FarmTek
FarmTek, Inc.
5113 Heritage Ave.
Sachse, TX 75048
(214) 495-6529
(800) 755-6529
RP-210 Automatic Rope Barrier User's Manual
Congratulations on your purchase! Your new
Automatic Rope Barrier should provide years of
trouble-free service. The RP-210 Automatic
Rope Barrier is an option for the MD-300
Timer. Please read the MD-300 Electronic Timer
User's Manual and become familiar with normal
operation of the timer before attempting to use
the Automatic Rope Barrier. Allow plenty of
time for initial installation and test of the Automatic Rope Barrier before using it at your
first event.
INTRODUCTION
For timing roping events, the RP-210 Automatic
Rope Barrier is a convenient option for the MD300 Electronic Timer. The RP-210 eliminates
cumbersome barrier release mechanisms by
automatically releasing the barrier and starting
the timer when the steer breaks an invisible infrared light beam.
Here's how it works
• The MD-300 Electric Eyes are set up in the
arena to form an invisible score line that
the steer runs through to start the timer.
The eyes are set as far in front of the release chute as desired.
• When the steer breaks the infrared light
beam, the timer automatically resets to
zero and starts timing. In addition, the
timer automatically releases the rope barrier in front of the rider--no more fooling
with neck ropes, wands, or other barrier
release mechanisms!
• Once the timer is started, further interruptions of the infrared light beam are ignored until after the timer has been manually stopped. This allows the steer's beam
to extend across the riders boxes if desired.
• When the judge lowers the flag, the timer
operator stops timing by pressing the
STOP key on the MD-300 Timer console.
The rider's final time is displayed.
• The timer is now ready for the next rider.
Equipment Provided
• Automatic barrier release.
• 125 foot cable to connect the barrier release to the MD-300 Timer (can be extended in 125 foot increments with the
standard MD-300 extension cord, part
number OE-225).
©1994 FarmTek, Inc.
BARRIER RELEASE INSTALLATION
The automatic barrier release provided with the
RP-210 Automatic Rope Barrier should be
mounted to the front of the rider's box as illustrated on the following page. To mount the
barrier release, remove the flat rear plate from
the barrier release and sandwich the fence of
the rider's box between the mounting plate and
the barrier release. Tighten the mounting
screws and nuts to secure the barrier release to
the fence. The power cord exiting from the barrier release must be plugged into a 110 volt
outlet to operate.
To pull and secure the barrier, simply push the
ring of the barrier into the latch mechanism at
the bottom of the barrier release. This action
allows the pin from the solenoid to drop into
place and lock the latch mechanism. If the pin
from the solenoid does not drop freely, manually pull it down to secure the latch. Occasional
lubrication of moving parts--especially where
the solenoid pin slides through the support just
above the latch mechanism--ensures free
movement of the solenoid pin (use a spray lubricant such as WD-40). When the timer activates the barrier release, the solenoid pin pulls
up, releasing the barrier ring from the latch.
PREPARATION FOR USE
Before attempting to use the Automatic Rope
Barrier, completely familiarize yourself with operation of the MD-300 Timer. This manual assumes knowledge of MD-300 Timer operation.
Once the barrier release is attached to the rider's box, follow these steps to ready the Automatic Rope Barrier for operation.
MD-300 Timer Console Set Up
When the MD-300 Timer console is first turned
on, the barrel racing event type is automatically
selected. To use the MD-300 and RP-210 Automatic Rope Barrier for roping events, the
"Rope 1" event type must be selected. Follow
the procedure detailed in the Timer Setup - Selecting Event Type section of the MD-300 Electronic Timer User's Manual, to select the "Rope
1" event type. Note: If you would prefer to have
the "Rope 1" event type automatically selected
whenever the MD-300 Timer console is turned
on, you can change this. Contact FarmTek for
assistance.
Page 1
RP-210 Automatic Rope Barrier User's Manual
Barrier Release
Barrier
Front View of Rider's Box
Steer (Calf) Electric Eye Set Up
Place the MD-300 electric eyes on opposite
sides of the steer chute to form an invisible
score line at the desired distance in front of the
chute. Adjust the height of the electric eyes to
ensure the beam is broken by the steer's body-not its legs. Following are two possibilities for
locating the electric eyes to form the score line.
1) You can mount the eyes just a few feet
apart at the end of a runway or tunnel
which forces the steer through the eyes.
The 1/4 - 20 thread in the bottom of the
electric eyes is a convenient way to mount
each eye. Note: Never screw more than
about 1/4" of thread into the electric
eyes or severe damage can occur!
2) The electric eyes can be mounted on the
tripods such that the beam between the
eyes extends across the rider's boxes as
well as the steer release chute. (Once the
beam has been broken by the steer, further interruptions of the beam are ignored.) With this placement, the steer
can run free when released--as they do
when using a neck rope--rather than
forcing them down a tunnel. To protect
the tripods and eyes from damage, they
can be housed inside a cage or barrel with
cutouts for the light beam, or placed completely outside the arena.
After placement of the electric eyes in the
arena, turn on the Transmitter electric eye and
connect the 125 foot cable between the Receiver
electric eye and the RECEIVER jack on the timer
©1994 FarmTek, Inc.
console. Verify alignment of the electric eyes as
outlined in the Timer Setup - Checking Electric
Eye Alignment section of the MD-300 Electronic
Timer User's Manual.
Automatic Rope Barrier Set Up
NOTE! DO NOT PERFORM THIS STEP UNTIL
AFTER THE ROPE 1 EVENT TYPE IS SELECTED ON THE MD-300 TIMER CONSOLE!
Otherwise, the solenoid in the barrier release
will be constantly on and could be damaged.
Plug one end of the 125 foot cable provided
with the Automatic Rope Barrier into the HORN
jack on the rear of the timer console. Plug the
other end into the short cable from the barrier
release using the male-to-male cable coupler
provided. The 125 foot cable provided with the
Automatic Rope Barrier is interchangeable with
the cable provided with the MD-300 Timer.
AUTOMATIC ROPE BARRIER OPERATION
Once set up, the Automatic Rope Barrier is
simple to operate. When the calf breaks the
beam, the timer automatically resets to zero,
begins timing, and releases the barrier. When
the judge lowers his flag, the timer operator
stops the time by pressing the START/STOP key
on the MD-300 Timer console. Until the operator has manually stopped the timer, further
breaks of the beam are ignored (e.g., when the
rider breaks the beam following the steer.)
Page 2