1
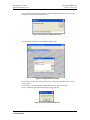
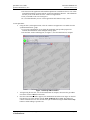
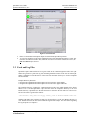
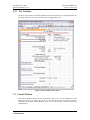
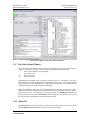
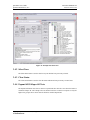
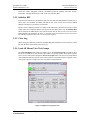
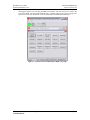
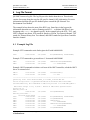
QP-OHCI Users Guide
Quantum Parametrics, LLC
Document #RM000-302
Version v1r0 5/31/05
QP-OHCI User Guide
Version v1r0
May 31, 2005
Quantum Parametrics
1715 Smoke Ridge Dr.
Colorado Springs, CO 80919
Phone: 719-592-1394
Fax: 719-264-7819
Email: [email protected]
Copyright Quantum Parametrics, all rights reserved
Confidential Data
Page 1
QP-OHCI Users Guide
Quantum Parametrics, LLC
i.
Revision History
Revision
v0r0
v1r0
ii.
Date
9/26/04
5/31/05
Description
Initial Internal Release
Final Release
Reference Documents
Document #
IEEE-1394-1995
IEEE-1394a-2000
OHCI 1.0
OHCI 1.1
iii.
Document #RM000-302
Version v1r0 5/31/05
Title
IEEE Std 1394-1995, IEEE Standard for a High
Performance Serial Bus
IEEE Std 1394a-2000, IEEE Standard for a High
Performance Serial Bus—Amendment 1
1394 Open Host Controller Interface Specification
Release 1.0
1394 Open Host Controller Interface Specification
Release 1.1
Author
IEEE
IEEE
Promoters of 1394 Open HCI
Promoters of 1394 Open HCI
Table of Contents
QP-OHCI User Guide ......................................................................................................... 1
1
Introduction................................................................................................................. 4
1.1
OHCI Test Overview .......................................................................................... 4
2
Requirements and Installation..................................................................................... 6
2.1
Hardware and Software Requirements ............................................................... 6
2.2
Software Installation ........................................................................................... 6
2.3
How to Contact Quantum Parametrics LLC....................................................... 7
3 User Interface.............................................................................................................. 8
3.1
Starting and Exiting ............................................................................................ 8
3.2
Excel and Log Files .......................................................................................... 12
3.2.1
Test Variables ........................................................................................... 13
3.3
Console Window............................................................................................... 13
3.4
Test Select Status Window ............................................................................... 14
3.4.1
Select All................................................................................................... 14
3.4.2
Select None ............................................................................................... 15
3.4.3
Clear Status ............................................................................................... 15
3.4.4
Expand All/Collapse All Tests.................................................................. 15
3.4.5
Run Selected Tests.................................................................................... 16
3.4.6
Skip Test ................................................................................................... 16
3.4.7
Stop Tests.................................................................................................. 16
3.5
Control Window................................................................................................ 16
3.5.1
Find Nodes ................................................................................................ 16
3.5.2
Initialize HW............................................................................................. 17
3.5.3
Close Log .................................................................................................. 17
Copyright Quantum Parametrics, all rights reserved
Confidential Data
Page 2
QP-OHCI Users Guide
Quantum Parametrics, LLC
Document #RM000-302
Version v1r0 5/31/05
3.5.4
Load All Menus/View Test Groups.......................................................... 17
4 Log File Format ........................................................................................................ 19
4.1
Example Log File.............................................................................................. 19
Copyright Quantum Parametrics, all rights reserved
Confidential Data
Page 3
QP-OHCI Users Guide
Quantum Parametrics, LLC
Document #RM000-302
Version v1r0 5/31/05
1 Introduction
Quantum Parametrics’ OHCI Test Application (QP-OHCI) implements the 1394 OHCI Test
Specification. Developed by Quantum Parametrics QP-OHCI provides an in-depth low-level
verification of IEEE-1394 Open HCI link layer controllers with PCI host bus interface.
QP-OHCI test corresponds directly to the 1394 OHCI Test Specification. This document makes no
attempt to replicate the 1394 OHCI Test Specification. The 1394 OHCI Test Specification should
be consulted to better understand each test. To make this easy QP-OHCI test IDs directly
correspond to the test IDs found in the 1394 OHCI Test Specification.
QP-OHCI provides low-level tests for all aspects of 1394 OHCI. From register tests through
stressful testing of all DMA engines, QP-OHCI is an excellent tool for OHCI silicon makers and
system integrators.
QP-OHCI is built on Quantum Parametrics’ (QP) proven QP-NT technology. Utilizing the OHCI
specific channel (plugin) the test creates all the test scenarios specified by the OHCI Test
Specification (except for those designated as Bench Test).
1.1 OHCI Test Overview
To successfully execute the OHCI test, two devices running QP-OHCI are required. The Device
Under Test (DUT) is the node initiating the test (tests have been selected in the Test Select Menu
and the ‘Run Selected Tests’ button has been pressed). The Tester Device (TD) is the other device
with QP-OHCI loaded, the GO button has been pressed but no test is explicitly initiated by the
user. Often a 1394 bus analyzer is needed to help diagnose issues found during the test. A typical
test configuration is shown below.
DUT
Tester
QP-OHCI Application
tests selected and
running
QP-OHCI Application
running but no test
selected
Figure 1: Typical Test Topology.
The QP-OHCI test automatically determines the DUT and Tester through a discovery process. The
discovery process is automatically executed when either the Find Remote ANodes Test Select
menu item is selected or the Find Nodes button is selected. If more than one QP-OHCI Tester
device is present, the first one found is automatically selected and used for testing. Before a test is
started the “OHCI Integrated result.xls” spreadsheet should be updated with DUT specific
information. The changes should only be made to the Test Variables sheet.
Copyright Quantum Parametrics, all rights reserved
Confidential Data
Page 4
QP-OHCI Users Guide
Quantum Parametrics, LLC
Document #RM000-302
Version v1r0 5/31/05
In general each OHCI test is autonomous. Each test starts with the OHCI hardware and driver in a
known state, test conditions are added, and then the test is run. At the end of each test OHCI
hardware and driver are put back to a known state.
Because of the complexity and low level nature of the OHCI test a particular test may have a hard
failure before a test completes and the clean-up process takes place. In this case the Initialize HW
button (found on the Main Menu in the Control window) may be used to issue a soft reset to the
OHCI hardware and reinitialize the driver. A 1394 bus reset is then issued as the soft reset clears
the Node IDs register therefore a new set of self-ids is required.
The Load All Menus button loads all available tests to the Test Select Menu. It should be noted
that there are hundreds of tests therefore QP created a test groups options which allows specific
tests to be load. This is done through the View Test Groups button. The View Test Groups button
causes additional buttons to appear in the Control window. These buttons represent groups of
tests. Selecting the Register Test and Self_ID DMA Tests buttons will cause these test to load to
the Test Select Menu. All other enabled buttons cause a further break down of the test group.
When leaving the OHCI test prematurely the Close Log button should be used to flush any cached
log data that hasn’t been written to the log file yet.
Copyright Quantum Parametrics, all rights reserved
Confidential Data
Page 5
QP-OHCI Users Guide
Quantum Parametrics, LLC
Document #RM000-302
Version v1r0 5/31/05
2 Requirements and Installation
Quantum Parametrics’ OHCI Test Application (QP-OHCI) implements the OHCI Test
Specification.
2.1 Hardware and Software Requirements
QP-OHCI executes on the IBM PC compatible family of computers with a 500MHz Pentium III
class processor or greater. Currently QP-1394TSA requires the use of Windows XP. QP-NT also
requires the use of Microsoft Excel to generate a report form.
2.2 Software Installation
1.
This installation requires any version of Win-XP to be installed on the target PC.
2.
If previous version of “OHCI Test Application” is present on the target system first perform an
un-install of the “OHCI Test Application” using the Win-XP “Add or Remove Programs”
application from the Control Panel. See note in below*.
o To enter Control Panel select start | Control Panel | Add or Remove Programs. If the start
menu is in the classic setting then select start | settings | Control Panel | Add or Remove
Programs.
3.
Don't plug in the provided USB key until asked to do so
4.
Insert the “OHCI Test Application” CD. If the target computer is configured for Autorun from CD
media the setup and installation will begin automatically
4.1 If autorun is not enabled
o If autorun is not enabled on your computer you can start setup by going to Windows
Explorer and right clicking on the installation CD drive icon and selecting ‘autoplay’ from
the drop down menu. This will automatically run the installation.
5.
Follow all prompts
5.1 If multiple OHCI devices are detected, the QPInstaller will prompt for a device selection after the
“OHCI Test Application” installation completes. Select the OHCI device that you want to install
the driver for and click ‘OK’.
6.
Enter key and product authorization codes as explained below.
*Note:
If the “OHCI Test Application” is earlier than v1.0.0.0 you will be requested to restart your
computer at the end of the application and driver installation process. You do not need to take the
CD out of the computer before restarting.
o Once the computer is restarted you will need to start the QPInstaller.exe utility manually.
This is done by going to Windows Explorer and selecting the installation CD drive icon and
double clicking the file ‘QPInstaller’.
o Select the “Install QPTnt Driver” operation option. If multiple devices are present select
the device that you want to install drivers for. Click the “OK” button to begin the driver
installation.
Copyright Quantum Parametrics, all rights reserved
Confidential Data
Page 6
QP-OHCI Users Guide
Quantum Parametrics, LLC
Document #RM000-302
Version v1r0 5/31/05
2.3 How to Contact Quantum Parametrics LLC
Quantum Parametrics LLC may be contacted by phone at:
(719)592-1394 (USA) or by email at:
[email protected] or visit our web site at:
www.quantumparametrics.com
Copyright Quantum Parametrics, all rights reserved
Confidential Data
Page 7
QP-OHCI Users Guide
Quantum Parametrics, LLC
Document #RM000-302
Version v1r0 5/31/05
3 User Interface
QP-OHCI consists of five primary windows: Quantum Parametrics’ Total Test Executor
environment, QP-NT Executor, Test Select, Control, and Console. The Quantum Parametrics’
Total Test Executor environment window is the home (main window) for QP-OHCI. The QP-NT
Executor window executes the commands given to it by the test scripts. To run QP-OHCI the QPNT Executor window must remain open during any script code execution. The Test Select and
Console windows reside in the Total Test Executor environment window and comprise the OHCI
Test Suite Application interface to the user. Buttons in the Control panel are programmed to
specific functions relating to the control of the OHCI tests.
QP-OHCI requires Microsoft Excel to log test results in the OHCI Integrated results form. QPOHCI also generates a log file containing detailed accounts of the test.
3.1 Starting and Exiting
*** Important Note ***
Before starting QP-OHCI make sure all 1394 devices are disconnected from the Tester computer.
If devices are connected, please disconnect them, quit QP-OHCI and restart QP-OHCI.
Initial startup of QP-OHCI:
1. Using the Start | All Programs menu, select the “OHCI Test” executable from the “Quantum
Parametrics” group.
• The application will ask you to insert the USB key
• When the USB key is plugged in for the first time a “Found New Hardware” dialog box
will appear. This will install the software for the Crypto USB key device.
• Next, it will prompt you for the Key code and authorization codes with the following
screen.
Figure 2: Product/Feature Codes entire.
Copyright Quantum Parametrics, all rights reserved
Confidential Data
Page 8
QP-OHCI Users Guide
Quantum Parametrics, LLC
Document #RM000-302
Version v1r0 5/31/05
• Enter the 8 digit code that is on the USB key in the Key Code box as shown below.
Figure 3: Key Code entry, code is found on USB key.
Copyright Quantum Parametrics, all rights reserved
Confidential Data
Page 9
QP-OHCI Users Guide
Quantum Parametrics, LLC
Document #RM000-302
Version v1r0 5/31/05
• Next, click the Add Code button and enter the first Product Authorization code (from the
included code sheet that came with the key)
Figure 4: Product Code Authorization entry.
• Use the Add Code button for each additional product code.
Figure 5: Authorization Code listing.
• If you make a mistake, just select the incorrectly entered code, then click Remove Code,
and try again.
• After the key code and all product authorization codes are entered, click OK.
• Next, you should see the following message pop up, click OK
Figure 6: Correct installation indication.
Copyright Quantum Parametrics, all rights reserved
Confidential Data
Page 10
QP-OHCI Users Guide
Quantum Parametrics, LLC
Document #RM000-302
Version v1r0 5/31/05
• The first run of the application will install the QPTntVdrv virtual device driver. You will be
prompted through this operation with the “Found New Hardware Wizard”. This installation
will only occur on the initial run of the “OHCI Test Application.”
• Next you should see the screen in Figure 6
• It is recommended that you now exit the application and continue at step 2, below
To start QP-OHCI:
2. Using the Start | All Programs menu, select the “OHCI Test Application” executable from the
“Quantum Parametrics” group.
• A test project initialization occurs during the application start-up and a progress bar
indicates the initialization status during the start-up phase.
• The Executor window should appear (see Figure 7) once the initialization is complete.
Figure 7: Initial QP-OHCI Window.
3.
4.
To begin using the test suite, wait for the initialization to complete, then select the green GO
icon on the toolbar or Run from the menu.
Once the Control Panel window appears, test initialization and selection can begin. To load all
tests into the Test Select window click the Load All Menus button. Note: The OHCI Test
consists of hundreds of tests. For first time tests QP recommends using the View Test Groups
button to enable loading of specific tests.
Copyright Quantum Parametrics, all rights reserved
Confidential Data
Page 11
QP-OHCI Users Guide
Quantum Parametrics, LLC
Document #RM000-302
Version v1r0 5/31/05
Figure 8: Control Panel.
5.
6.
Please see the Product Description chapter for detail about QP-OHCI operation.
To exit select the X box in the upper right-hand corner of the Quantum Parametrics’s Total Test
Executor environment window. Also, when the Test Select or Console windows are active, the
File menu Exit maybe selected.
3.2 Excel and Log Files
QP-OHCI requires Microsoft Excel to log test results in the ‘OHCI Integrated results’ form. QPOHCI also generates a plain-text log file containing detailed accounts of the test run. When QPOHCI is installed two sub-directories of the Total Test Executor directory are created: Template
and Test Results.
Example Directory Structure:
C:\Program Files\Quantum Parametrics\QP Total Test Executor App\Template
C:\Program Files\Quantum Parametrics\QP Total Test Executor App\Test Results
The Template directory contains the ‘OHCI Integrated results’ form which should not be edited.
When a test is executed QP-OHCI copies the form from the Templates directory to the Test
Results directory. QP-OHCI uses the date and time to customize the file name for each test run.
The new file name is generated as follows:
…\Test Results\ OHCI_<date in m-d-yyyy format>_<time in hh-mm-ss-AM/PM format>.xls
Similarly QP-OHCI also generates an empty log file and places it in the Test Results directory as
well. The date and time are also used to make the log file name unique. For more details regarding
the log file please see Chapter 4.
Copyright Quantum Parametrics, all rights reserved
Confidential Data
Page 12
QP-OHCI Users Guide
Quantum Parametrics, LLC
Document #RM000-302
Version v1r0 5/31/05
3.2.1 Test Variables
The Excel report form also contains important test variables that must me configured before the
test begins. Failure to do so may cause some tests to inappropriately fail.
Figure 9: Test Variables sheet in Excel.
3.3 Console Window
The Console Window informs the user of the details of the test. The same information is also
placed into the log file. During the course of a test the operator may be asked to reference
information found in the Console Window. Figure 10 shows an example Console and Test Select
Status Window.
Copyright Quantum Parametrics, all rights reserved
Confidential Data
Page 13
QP-OHCI Users Guide
Quantum Parametrics, LLC
Document #RM000-302
Version v1r0 5/31/05
Figure 10: Example Console and Test Select Windows.
3.4 Test Select Status Window
The Test Select Status Window shows the progress and high-level status as the test sequence
progresses. Icon boxes to the left of each item provide the following status indications:
‘?’
Test verdict is unknown or not applicable
‘√’
Test verdict is Pass
‘X’
Test verdict is Fail
‘T’
Testing in progress
Name/high-level description of the tests appear as nodes in the tree. Checkboxes to the left of
each item allow for enabling/disabling tests individually and as groups. Note that the program
may initialize the tree in a collapsed mode – simply double-click the root node to expand the tree.
Double-clicking a leaf node will run that test immediately.
Before executing most OHCI tests it is recommended that an associated Tester Device (TD) is
found. The QP-OHCI test automatically determines the DUT and TD through a discovery process.
The discovery process is automatically executed when either the Find Remote ANodes Test
Select menu item is selected or the Find Nodes button is selected. If more than one TD is present
the first one found is automatically selected and used for testing.
3.4.1 Select All
The Select All button selects all of the tests found in the current test menu. After the selection is
made the Run Selected Tests button is used to execute the selected tests.
Copyright Quantum Parametrics, all rights reserved
Confidential Data
Page 14
QP-OHCI Users Guide
Quantum Parametrics, LLC
Document #RM000-302
Version v1r0 5/31/05
Figure 11: Example Test Select tree.
3.4.2 Select None
The Select None button is used to deselect any test that has been previously selected.
3.4.3 Clear Status
The Clear Status button is used to clear the status indications from previously executed tests.
3.4.4 Expand All/Collapse All Tests
The Expand All button cause the test menu to expand and show all leafs. Once done the button is
renamed Collapse All. The Collapse All Tests button causes the test menu to compress so only the
highest test group is shown. Once done the button is renamed Expand All.
Copyright Quantum Parametrics, all rights reserved
Confidential Data
Page 15
QP-OHCI Users Guide
Quantum Parametrics, LLC
Document #RM000-302
Version v1r0 5/31/05
Figure 12: Initial collapsed state –click label to expand
3.4.5 Run Selected Tests
The Run Selected Tests button starts the execution of any tests selected in the Test Select Menu.
3.4.6 Skip Test
The Skip Test button is used to skip (not execute) the next test.
3.4.7 Stop Tests
The Stop Tests button stops the execution of all tests.
3.5 Control Window
The Control window is central to the execution of all tests. From the Control window the user can
load tests to the Test Select Menu window. The user can also close the log file, find the test node,
and initialize hardware.
3.5.1 Find Nodes
The QP-OHCI test automatically determines the DUT and Tester through a discovery process. The
discovery process is automatically executed when either the Find Remote ANodes Test Select
menu item is selected or the Find Nodes button is selected. If more than one QP-OHCI Tester
device is present the first one found is automatically selected and used for testing. Before a test is
Copyright Quantum Parametrics, all rights reserved
Confidential Data
Page 16
QP-OHCI Users Guide
Quantum Parametrics, LLC
Document #RM000-302
Version v1r0 5/31/05
started the “OHCI Integrated result.xls” spreadsheet should be updated with DUT specific
information. Changes should only be made to the Test Variables sheet.
3.5.2 Initialize HW
In general each OHCI test is autonomous. Each test starts with the OHCI hardware and driver in a
known state, test conditions are added, and then the test is run. At the end of each test OHCI
hardware and driver are put back to a known state.
Because of the complexity and low level nature of the OHCI test a particular test may have a hard
failure before a test completes and the clean-up process takes place. In this case the Initialize HW
button (found at the Main Menu in the Control window) may be used to issue a soft reset to the
OHCI hardware and reinitialize the driver. A 1394 bus reset is then issued as the soft reset clears
the Node IDs register therefore a new set of self-ids is required.
3.5.3 Close Log
When leaving the OHCI test prematurely the Close Log button should be used to flush any cached
log data that hasn’t been written to the log file yet.
3.5.4 Load All Menus/View Test Groups
The Load All Menus button loads all available tests to the Test Select Menu. It should be noted
that there are hundreds of tests therefore QP created a test groups options which allows specific
tests to be load. This is done through the View Test Groups button. The View Test Groups button
causes additional buttons to appear in the Control window. These buttons represent groups of tests
(each group represents a chapter from the 1394 OHCI Test Specification).
Figure 13: Highest level group of tests.
Copyright Quantum Parametrics, all rights reserved
Confidential Data
Page 17
QP-OHCI Users Guide
Quantum Parametrics, LLC
Document #RM000-302
Version v1r0 5/31/05
Selecting the Register Test and Self_ID DMA Tests buttons will cause these test to load to the
Test Select Menu. All other enabled buttons cause a further break down of the test group. The
picture below shows the breakdown of the Asynchronous Transmit Request DMA tests.
Figure 14: Asynchronous Transmit Request DMA test groups.
Copyright Quantum Parametrics, all rights reserved
Confidential Data
Page 18
QP-OHCI Users Guide
Quantum Parametrics, LLC
Document #RM000-302
Version v1r0 5/31/05
4 Log File Format
QP-OHCI creates a log file. The log file provides details about the test. These details
consist of message about the test plus QP specific channel (API) information. For more
information about the QP specific channels please consult the QP-Network Test
Environment User Manual.
The example below shows the start of the RG11 test. Some lines in the log provide
information about the test, such as, Running test RG11… or Initiate Soft Reset. Lines
beginning with <name>: are channel specific. In the example below the STP:, TNT:, and
OHCI: channels are shown. STP stands for Simple or Silicon Test Protocol channel, TNT
stands for Thirteen Ninety-four Test channel, and OHCI stands for Open Host Controller
Interface channel.
4.1 Example Log File
Example: STP command to write link register 0x50 with 0x00010000.
STP:
2:09:59 PM
5/17/2005
wlr(0x00000050, 0x00010000)
Example: TNT command to get result item 1. It returned 0x00C00000
TNT:
TNT:
2:10:00 PM
2:10:00 PM
5/17/2005
5/17/2005
cmdresultitem(0x00000001)
---> 0x00C00000
Example: OHCI command to initiate a soft reset of the OHCI controller, reload the OHCI
driver. It returned a 0x1.
OHCI:
OHCI:
2:10:38 PM
2:10:38 PM
5/17/2005
5/17/2005
initializehw()
---> 0x1
----------------------------------------------------------------------QP-NT Log file: Test Results\OHCI_5-17-2005_2-09-39-PM.txt
Source Script file: C:\Quantum Parametrics\Products\OHCI Test\OHCI
Current\OHCI Proj Rel Candidate 1\OHCI Project Rel 1.0\code\OHCI_Main.c
OHCI Test Script 1.0.0, 5/6/05 - Based on OHCI Test Specification
Draft 0.9.73
Running test: 41
STP:
2:09:47 PM
5/17/2005
snit(0x00000003)
Running test RG11...
Initiate Soft Reset
STP:
2:09:59 PM
5/17/2005
wlr(0x00000050, 0x00010000)
STP:
2:10:00 PM
5/17/2005
rlr(0x00000050)
TNT:
2:10:00 PM
5/17/2005
cmdresult()
TNT:
2:10:00 PM
5/17/2005
---> 0x00000002
TNT:
2:10:00 PM
5/17/2005
cmdresultitem(0x00000001)
TNT:
2:10:00 PM
5/17/2005
---> 0x00C00000
STP:
2:10:01 PM
5/17/2005
rlr(0x00000000)
Copyright Quantum Parametrics, all rights reserved
Confidential Data
Page 19
QP-OHCI Users Guide
Quantum Parametrics, LLC
TNT:
2:10:01 PM
5/17/2005
TNT:
2:10:01 PM
5/17/2005
TNT:
2:10:02 PM
5/17/2005
TNT:
2:10:02 PM
5/17/2005
OHCI:
2:10:02 PM
5/17/2005
OHCI:
2:10:03 PM
5/17/2005
Version_Register Value after SoftReset
Running test RG12...
STP:
2:10:18 PM
5/17/2005
TNT:
2:10:19 PM
5/17/2005
TNT:
2:10:19 PM
5/17/2005
TNT:
2:10:19 PM
5/17/2005
TNT:
2:10:19 PM
5/17/2005
Read: 00010010
Wrote: 01FE00EF
STP:
2:10:22 PM
5/17/2005
STP:
2:10:22 PM
5/17/2005
TNT:
2:10:22 PM
5/17/2005
TNT:
2:10:22 PM
5/17/2005
TNT:
2:10:23 PM
5/17/2005
TNT:
2:10:23 PM
5/17/2005
Read: 00010010
Version_Register ReadOnly Fields test:
OHCI:
2:10:38 PM
5/17/2005
OHCI:
2:10:38 PM
5/17/2005
TNT:
2:10:38 PM
5/17/2005
TNT:
2:10:38 PM
5/17/2005
TNT:
2:10:39 PM
5/17/2005
TNT:
2:10:39 PM
5/17/2005
TNT:
2:10:40 PM
5/17/2005
TNT:
2:10:40 PM
5/17/2005
Copyright Quantum Parametrics, all rights reserved
Confidential Data
Document #RM000-302
Version v1r0 5/31/05
cmdresult()
---> 0x00000002
cmdresultitem(0x00000001)
---> 0x00010010
initializehw()
---> 0x1
test: FAILED
rlr(0x00000000)
cmdresult()
---> 0x00000002
cmdresultitem(0x00000001)
---> 0x00010010
wlr(0x00000000, 0x01FE00EF)
rlr(0x00000000)
cmdresult()
---> 0x00000002
cmdresultitem(0x00000001)
---> 0x00010010
PASSED
initializehw()
---> 0x1
InitiateBusReset()
---> 0x0
getbusgeneration()
---> 0x00000001
getsnitmode()
---> 0x00000003
Page 20