1
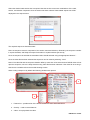
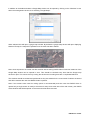
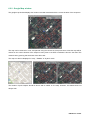
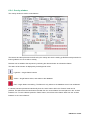
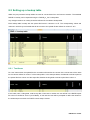
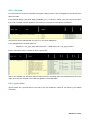
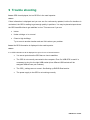
RAPID User Manual August 2014 <<Insert image here>> Document description About iRAP The International Road Assessment Programme (iRAP) is a charity dedicated to saving lives through safer roads. iRAP works in partnership with government and non-government organisations to: inspect high-risk roads and develop Star Ratings and Safer Roads Investment Plans provide training, technology and support that will build and sustain national, regional and local capability track road safety performance so that funding agencies can assess the benefits of their investments. Road Assessment Programmes (RAP) are now active in more than 50 countries throughout Europe, Asia Pacific, North, Central and South America and Africa. iRAP is financially supported by the FIA Foundation for the Automobile and Society. Projects receive support from the World Bank Global Road Safety Facility, automobile associations, regional development banks and donors. National governments, automobile clubs and associations, charities, the motor industry and institutions such as the European Commission also support RAPs in the developed world and encourage the transfer of research and technology to iRAP. In addition, many individuals donate their time and expertise to support iRAP. For more information For more information on using the iRAP online software, contact: James Bradford iRAP Engineering Manager [email protected]. +44 1256 345 598 (GMT+0) To find out more about the programme, visit www.irap.org. You can also subscribe to ‘WrapUp’, the iRAP e-newsletter, by sending a message to [email protected]. © International Road Assessment Programme (iRAP) 2010 iRAP technology including protocols, processes and brands may not be altered or used in any way without the express written agreement of iRAP. iRAP is a not-for-profit organisation registered in England & Wales under company number 05476000. Registered Office: 60 Trafalgar Square, London, WC2N 5DS. RAPID user manual Version Version Update June 2012 Document created Feb 2013 Addition of RAPID hardware section June 2013 Addition of example data links August 2014 Further guidance provided, updated for iRAP V3 model, section on usage and development added Contents 1 2 RAPID Introduction ............................................................................................................................... 5 1.1 Usage of RAPID .............................................................................................................................. 5 1.2 Development of RAPID.................................................................................................................... 5 1.3 System requirements....................................................................................................................... 5 RAPID Hardware .................................................................................................................................. 6 2.1 Computer ........................................................................................................................................ 6 2.2 Camera ........................................................................................................................................... 6 2.3 USB GPS receiver ........................................................................................................................... 6 3 RAPID Installation ................................................................................................................................ 7 4 RAPID Administrator............................................................................................................................. 8 5 6 7 4.1 Creating an inspection database...................................................................................................... 8 4.2 Managing an inspection database.................................................................................................. 11 4.3 Exporting an inspection database .................................................................................................. 11 RAPID Road....................................................................................................................................... 12 5.1 Setting up RAPID Road ................................................................................................................. 12 5.2 On Road data collection ................................................................................................................ 13 5.3 Managing video files ...................................................................................................................... 17 RAPID Video ...................................................................................................................................... 18 6.1 Starting a sequence....................................................................................................................... 18 6.2 Coding a sequence........................................................................................................................ 21 6.3 Completing a sequence ................................................................................................................. 25 Setting up RAPID overlays ................................................................................................................. 26 RAPID user manual 8 9 7.1 Overlay.xml ................................................................................................................................... 26 7.2 Icons ............................................................................................................................................. 29 Converting an export file to a iRAP upload file..................................................................................... 30 8.1 Data conversion overview .............................................................................................................. 30 8.2 Setting up a lookup table ............................................................................................................... 33 Trouble shooting................................................................................................................................. 35 RAPID user manual 1 RAPID Introduction RAPID is a portable inspection system for collecting iRAP Star Rating data. It is designed to be small enough to be flown into a country as luggage and utilise “off the shelf” or open access hardware and software components. RAPID is only recommended for pilot / demonstration and corridor project level inspections. For larger and network level inspections it is recommended that more sophisticated inspection system is used. RAPID was developed by SWECO position, with join rights to its use and intellectual property are held by iRAP and SWECO position. RAPID is divided into three separate pieces of software: 1. RAPID Administration – is used to create, manage and export inspection databases 2. RAPID Road – is used to collect road data (GPS and video) and includes the functionality to code attributes whilst on the road survey. 3. RAPID Video – is used to code video data and review coding data. Following road coding data can be exported from RAPID Administration, converted in the iRAP upload file format and uploaded to ViDA the iRAP online Star Rating software (http://vida.irap.org) 1.1 Usage of RAPID RAPID can be provided free-of-charge for non-commercial use. Those wishing to undertake iRAPspecification inspections commercially should apply for accreditation (refer to Star Rating Inspection System Accreditation Specification and Record, available at: http://downloads.irap.org/docs/RAP-SR-2- 3_Inspection_System_Accreditation_Specification_and_Record.pdf). 1.2 Development of RAPID The RAPID system is relatively simple and would benefit from a number of improvements. If you are interested in helping us further develop RAPID, please contact: [email protected]. 1.3 System requirements RAPID Administrator, RAPID Road and RAPID Video require at least: Windows XP with service pack 2 (RAPID Road only operates under Windows XP) Minimum of 1 USB port 2Ghz processor 2Gb RAM 300 Meg available space on the hard disk drive for RAPID and prerequisite software, RAPID user manual 2 RAPID Hardware RAPID is designed to flexible in the hardware required to operate it. Therefore there are a numerous different hardware combinations that are possible. The details below are items of hardware that have been used successfully. 2.1 Computer RAPID Road is used to collect the location data in parallel to the camera collecting the video. Therefore it is recommended that a laptop is used. Since the RAPID Road will be operated by a passenger in a moving vehicle it is strongly recommended that either a laptop with a touch sensitive screen or using a laptop with an additional touch sensitive screen connected is used. RAPID Administrator and RAPID Video can operated on a separate computer to RAPID Road. For RAPID Video it is strongly recommended that a computer with two monitors is utilised. 2.2 Camera The type of camera used for RAPID is very flexible, the requirements for RAPID Video is that the video is a MPEG2 and should be no wider than 720 pixels. However, cameras with different formats and higher resolution can be used and the video converted to the require format and resolution. Using this approach adds another stage to the data collection process and that more storage space is required, but is also means that a high quality video is collected and could be used in future. Super video converter (http://www.erightsoft.com/SUPER.html) has been used successfully to convert video files suitable for RAPID Video. Sony HDR-SR8E – suggest using Sony VCL-ES06 (wide angle lens) in conjunction with this camera. Sony HDR-SR12E - suggest using Sony VCL- HG0737C (wide angle lens) in conjunction with this camera. GoPro Hero 2 (motorsport edition) – suggest using a wifi backpack and a polarized lens. GoPro Hero 3 (motorsport edition) – suggest using a polarized lens. GoPro Hero 3+ (motorsport edition) – suggest using a polarized lens. 2.3 USB GPS receiver The primary requirement for the USB GPS receiver is that it must have a SiRFstarIII ™ chipset. The receivers that have been successful used are: Navibe GM720 Navilock NL-302U http://www.navilock.de/produkte/F_778_GPS_61422/merkmale.html Holux GR-213 http://www.holux.com/JCore/en/products/products_content.jsp?pno=127 RAPID user manual 3 RAPID Installation The steps you will need to go through are: 1. Install .net framework (v3.5 or later for Windows XP, v4 or later for Windows 7) .net framework 3.5 can found at: http://www.microsoft.com/en-us/download/details.aspx?id=21 .net framework 4 can be found at: http://www.microsoft.com/en-us/download/details.aspx?id=17851 2. Install DirectX SDK DirectX SDK June 2010 can be found at: http://www.microsoft.com/enus/download/details.aspx?id=6812 3. Install LeadTools MPEG-2 Video Decoder – this has to be purchased from Leadtools (typical cost is US$10). For test purposes a copy of the MPEG-2 Video Decoder can be found at: https://www.dropbox.com/s/c30j0uxox02vl20/MPEG2-codec.zip 4. Download and unzip RAPID software to an appropriate location on your hard drive The RAPID software can be found at: https://www.dropbox.com/s/bn12pek3xl4btvn/RAPID-software.zip 5. The following steps are not required, but have been found to be helpful: a. From the RAPID-Admin folder create a shortcut for “RAPID_Administration.exe” b. From the RAPID-Road folder create a shortcut for “RAPID-Road.exe” c. From the RAPID-Video folder create a shortcut for “RAPID-Video.exe” d. For each short cut - right click, select properties, on shortcut tab select change icon, select browse, select icon from appropriate folder for the short cut e. Move the short cuts to the desktop 6. Download and unzip the standard iRAP V3 Star Rating overlays and icons. It is suggested that the overlays and icon folder are store with the folder each inspection database is stored in. The iRAP V3 Star Rating overlays and icons can be found at: https://www.dropbox.com/s/8jw3siqhbx63279/RAPID_Overlays.zip 7. Install and setup the USB GPS drivers. Note: when installing the GPS driver typically the driver should be installed before the GPS is connected to the computer. 8. Use the short cuts to access each component of RAPID A test dataset for the RAPID video can be found at: https://www.dropbox.com/s/mgzudjqx8wneow2/RAPID_Example_data.zip RAPID user manual 4 RAPID Administrator RAPID Administrator is used to create manage and export inspection databases. Before creating an inspection database, the structure RAPID uses for inspection should be understood: An inspection is made up of roads – for example A404 or M1 Roads are divided into sections - for example A404 junction 1 to junction 2 or M1 Luton to Milton Keynes. Road sections are made up of sequences – sequences are individual inspection lengths, typically they have a duration of 30 to 45 minutes (however, they can be shorter if required). It should be noted that sequences are generated on demand by RAPID Road, this means that they cannot be defined in RAPID Administrator. It is recommended that sequences should not have a duration longer than 30 minutes, since it RAPID loses GPS signal then it is likely that the data being collected will be corrupted (and not recoverable), therefore the sequence will need to be started again. 4.1 Creating an inspection database Upon starting RAPID Administrator you will be presented with the following screen: Define the inspection database name in “Inspection” textbox. Select “New” This will open a “Save As” dialog box, use this to define the inspection database file name and location to store it, It is recommended that a folder is setup to store the inspection database, overlay files, icons folder and inspection video files in. RAPID user manual Once the inspection database has been created the “Inspection” textbox will be updated with the address of the inspection database. Select the “Roads” tab. This looks like: The name of each of the roads to be inspected should be written into the “Road Information” – “Name” textbox and then select “new”. Once a road has been added it will appear in the “Roads” box: To update a road (i.e. correct a spelling mistake), the road should be selected in the “Road” box, the name can then be edited in the “Road Information” – “Name” textbox, following this “Update” should be selected to write the change to the inspection database. To delete a road the road should be selected in the “Road” box and “Delete” should be selected. Note, it is recommended that the delete function is not used after any road data has been collected. Once the roads have been defined sections can be assigned to them. Select the “Sections” tab: RAPID user manual Each of the roads can be selected from the “Road” drop down box. Each section has a start position and end position associated with it. The start position is defined in the “Start position description” textbox, likewise the “End position description” textbox is used to define the end position. Once the start and end positions have been entered select “New”. Once the section has been written to the inspection database it will appear in the “Sections” box. In addition the end position is inserted into the start position ready for the next section. Note: when sections are added to the inspection database a mirror section in the reverse direction is also added to the database to enable sections to be inspected in both directions if required. However, only the forward is displayed for each section in the “Sections” box, since the forwards and backward sections are twinned. The process for updating or deleting sections is the same as for roads. RAPID user manual 4.2 Managing an inspection database Upon starting RAPID Administrator select “Load”. This will present an “Open” dialog box, use this to select the inspection database file that you want to manage. Once the inspection database has been created the “Inspection” textbox will be updated with the address of the inspection database. Roads and sections can be added, updated or delete from the inspection database using the relevant buttons on the “Roads” and “Sections” tabs. Note, it is recommended that the delete function for either roads or sections is not used after any road data has been collected, since you risk permanently deleting data. 4.3 Exporting an inspection database Upon starting RAPID Administrator select “Load”. This will present an “Open” dialog box, use this to select the inspection database file that you want to export. Once the inspection database has been created the “Inspection” textbox will be updated with the address of the inspection database. Select the “Export” tab: The relevant overlay file should be selected for the inspection database to be exported relative to. Select browse and then select the relevant overlay file using the “Open” dialog box. Note: when using both a road and video overlay to collect data the video overlay that contains all of the buttons should be used for export. Once the overlay has been selected the desired road section and associated sequence should be selected. Select “Export”, this will open a “Save as” dialog box, this can be used to save the export .csv file for the sequence. RAPID user manual 5 RAPID Road 5.1 Setting up RAPID Road RAPID Road requires a GPS signal before it can collect road survey data. Once the USB GPS has been installed it will be assigned a Com port by the computer. RAPID Road needs to be setup to know what Com port the GPS is attached to. To do this firstly establish what Com port the GPS is attached to. Typically this is done by opening “Control panel”, opening “System”, open “Device manager”, the GPS should be listed within the Com ports section. Select “Properties”, select the “Details” tab, this will display the Com port and the data rate. To set the Com port for RAPID Road, the file AppSettings.xml should be opened in notepad (or similar xml compatible editor). Within this file the following line should be updated to the relevant Com port: <add key="GPS_PORT" value="COM6"/> The other GPS settings in AppSettings.xml should also be reviewed (i.e. baud, databits and stopbits). If the GPS is correctly recognised the time, latitude and longitude should be present in the bottom right of the RAPID Road overlay window. If no GPS is present either the GPS has not acquired a signal or RAPID Road is unable to establish a connection with the GPS (if the GPS antenna has a clear view of the sky you would expect a signal to be acquired within 5mins of being connected). Note: typically when a USB GPS is connected to a different USB port a different Com port is assigned to it, therefore, it is recommended that the same USB port is used each time RAPID Road is used. Note: it is recommended that a data rate of 4800 bps is used for the GPS. Note: currently RAPID Road only seems to be able to establish a connection with the USB GPS within Windows XP. This means that computers used for road surveys are required to have Windows XP, however, RAPID Video (and RAPID Administrator) can be used with Windows XP and later versions. RAPID user manual 5.2 On Road data collection 5.2.1 Starting a sequence Upon starting RAPID Road you will presented with the management window: To load a RAPID Road sequence you will need to “Browse..” and select the following items: Overlay file – this is an .xml file that defines what buttons are available, what icon is assigned to each button and where they are located. Icon folder – this is the folder which should include all the icons that will be used on the buttons. Database – this is the inspection database. Once the inspection database has been opened the “Section” box will be populated with the road sections.: The required road section should be selected and “Load” selected. Note: “Load” will not be available until all three items and a road section are defined. RAPID user manual When “Load” has been overlay and feature list windows will be opened: Once a GPS position has been acquired it will be displayed in the “Current Positioning Data” area, and the “fix” checkbox will be checked: If a GPS position has not been acquired, but RAPID Road and the GPS are communicating correctly then the start button will be deactivated, however the time should still appear in the “Current Positioning Data” area. If no time information is displayed then the RAPID Road and the GPS are not communicating correctly, see the trouble shooting area for further guidance. When carrying out a road survey it is recommended that more than 5 satellites are visible (displayed in “# of Sats” textbox). If the number of satellites falls below this level when collecting data it is recommended that very short section lengths are used (until the number increase) to reduce the amount of data that is lost if the GPS location is lost. Note: a know issue with RAPID Road is that when GPS signal is lost there is a high risk that the sequence can be corrupted, therefore it is recommended that sequences should be kept below 30 minutes to reduce the amount of data lost. RAPID user manual To start a new survey sequence press the “Start” button. Once the “Start” button has been pressed the “Confirm Start Inspection Sequence” dialog box will open advising to start the video recording at the same time as starting RAPID Road recording: When the “Start” button is pressed RAPID Road will start recording GPS data, and buttons pressed in the overlay. 5.2.2 Coding - Recording features On the overlay there are two types of buttons: 1. Length feature buttons – within the standard overlays these are coloured light blue 2. Point feature buttons – within the standard overlays these are coloured medium blue Length features are features that start a time in the sequence and end at another time, whereas point features occur at a single time in the sequence. For example a safety barrier is a length feature and an intersection is a point feature. To record a point feature the relevant button should be pressed, the button will flash yellow momentarily, and the feature will be recorded at the relevant time in the feature list window. Press To record a point feature the relevant button should be pressed, this will active the start point for the feature and the button will turn red. To set the end point of the feature the button should be pressed again and it will return to its original colour. Press Press RAPID user manual If a point feature is being recorded and a different one is required (if the features are in the same group) the new feature can be selected and first one will be deselected. Press Press If a button has been pressed unintentionally then the “undo” button within the “Controls” area can be pressed. This will remove the last feature recorded from the “recent feature” box and place it in the “undone features” box. To redo a feature press the “Redo” button, this will move the feature back from the “undone features” to the “recent feature”. Undo Redo Note: do not close the overlay window, the window will automatically be closed as when the sequence is ended as described in the next section. If the overlay window is closed you will be unable to stop RAPID Road recording, and so you will have to close RAPID Road using task manager and you will lose the current sequence. 5.2.3 Ending a sequence To stop a sequence all active buttons should be press to inactivate them, this is done so that the feature being record has an end time assigned to it. If no end time is assigned to a feature then it is not written to the database. Once all the buttons are inactive the “Stop” button should be pressed. This will open the “Confirm Stop Inspection Sequence” dialog box. “Stop” should be pressed at the same time as the camera is stopped. RAPID user manual Once “Stop” has been pressed in the “Confirm Stop Inspection Sequence” dialog box the RAPID Road will stop recording GPS data, and buttons pressed in the overlay. If another sequence for the road section is to be recorded then the “Start” button can be pressed again. This will start another sequence recording associated with the same road section. If a different road or section is to be recorded or no more sequences are to be recorded, then the management window must be selected (typically it is brought to the front by clicking on it in the operating systems taskbar). Once the window is visible “End” should be select. This enables a different road or section to be selected, or for the window to be closed and hence exit RAPID Road. Note: do not select “End” in the management window before you have stopped the sequence recording. This could damage the data recorded for the sequence. 5.3 Managing video files It is recommended that an inspection log is used during the inspection. The inspection log should document: Road name Section name Sequence number – note sequence numbers is assigned consecutively based on inspection order. Date Start and end time for each sequence Person coding Status of the video file Video file name The inspection log will speed up the process of matching sequence data with video data within RAPID Video. It is also advisable that video data is backed up every day, and that the video files checked and the names are recorded during this process. RAPID user manual 6 RAPID Video 6.1 Starting a sequence Upon starting RAPID Video you will presented with the management window: To load a sequence for coding you will need to “Browse..” and select the following items: Overlay file – this is an .xml file that defines what buttons are available, what icon is assigned to each button and where they are located. Icon folder – this is the folder which should include all the icons that will be used on the buttons. Database – this is the inspection database. Once the inspection database has been opened the “Section” box will be populated with the road sections. RAPID user manual Select the desired road section that is required. Note the section names are combinations of the road, section, and direction inspected. Once the section has been selected it associated sequences will be displayed in the sequence box. The required sequence should be select. Note: the sequence name is composed of, the section name and direction, followed by the sequence number in square brackets, and finally the sequence duration in square brackets [hh:mm:ss]. Once the sequence is selected the associated video should selected using the appropriate “Browse..”. Once the video file has been selected the sequence can be coded by selecting “Load”. Note: if the video file and the sequence duration differ by more than a few seconds then RAPID video will not open the sequence, since it is likely that the wrong video file has been selected. If the video file is too long ir short due to a mistake refer to the trouble shooting section. When coding a sequence by default the following windows are opened: 1 2 3 1. Feature list – provides a list of the feature recorded at their associated times 2. Overlay – used to record features 3. Video – this plays back the video. RAPID user manual In addition to the default windows a Google Map window can be opened by clicking on the “Windows” menu within the management window, then selecting “Google Maps”: When selected this will open a google map window. By default the google map window will open displaying Northern Europe, the map will be updated once the video has been started. Note: when sequences are coded one after another without exiting RAPID Video numerous instances of the Google Map window can be opened in error. This should be checked every time that the Google map window is open. This can be done by moving the window and checking there are no duplicated behind it. The windows should be resized and positioned so they are suitable for the current task. Positions are stored and will be restored the next time RAPID Video is opened. Note: if two screens were used for coding (which is recommended) and then next time RAPID Video is opened only a single screen is used (or the screen is setup to be other side of the main screen), the RAPID Video windows will still be opened on the screen that has been removed. RAPID user manual 6.2 Coding a sequence A sequence is coded by playing back the video and recoding the features. The play back of the sequence is controlled using the video window and the features are recorded using the overlay window. 6.2.1 Video window The play back is controlled in the Video window by using the buttons at the bottom of the window Play - starts the video playing, once playing the play button is replace by pause Paused - pauses the video. This is useful for coding multiple features that same point Fast Forward – increases the speed of video play back. The quality of play back in fast forward is dependent on performance of the computer running RAPID Video. Stop – this stops the play back of the video and returns the video to the start. Step backwards – steps the video backwards one second. Step forwards – steps the video forwards one second Skip to end – skips the video to the end of the sequence. This button is useful if a feature is relevant to a whole sequence. In addition to the playback controls the video window includes a time display and a slider bar. The time display provides the current position in the sequence and the total duration of the sequence. The slider bar enables the user to skip to a different location in the sequence by dragging the slider, the marks below the slider indicate minutes within the sequence. Note: the codec used for RAPID Video is budget version, this means that the there can be an increased amount of interlacing present in the video compared to standard media player. The codec is also limited to MPEG2 videos (ideally the Sony version). RAPID user manual 6.2.2 Google Map window The google map window displays the location recorded associated with the current location of the sequence. The map can be zoomed in or out, and panned using the controls in the top left corner. Note the map will be centred on the current location of the sequence every time a new GPS coordinate is found in the data. This means that any panning that has been done will be lost. The map can also be displayed in “map”, “Satellite” or “Hybrid” mode. The location of point objects should be shown with a marker on the map. However, this feature does not always work. RAPID user manual 6.2.3 Feature list window The feature list window displays the features that have been recorded in the database. The feature list will index through the features based on the current location in the sequence. As the location for a feature is reached the feature will be highlighted in the list. Double clicking on a feature within the feature list will move the sequence location to the start location for the feature. Features can be deleted from the feature list using the red crossing in the top left of the window. However, this facility should be used sparingly and with caution, since it permanently deletes features. Multiple features can be deleted at the same time by holding down ctrl and selecting the desired features. By default the feature list just displays the feature name. It is recommended that the Start and Duration of the features is displayed. This can be done by right clicking in the grey area to the right of “Feature”, in the menu that appears select both “Start” and “Duration”. Typical issues that can be corrected with the feature list are: Length features with no duration Multiple point features of the same type a one location Note: within the feature list length features will have a start and duration, whereas point features will only have a start (since point features are not assigned a duration). Note: the descriptions assigned to each button will have an effect on what is names are displayed in the feature list, and hence how useful the feature list is. Therefore, it is recommended that when overlays are created that appropriate descriptions area used for the buttons. RAPID user manual 6.2.4 Overlay window The overlay window is used to code features. The buttons and their placement is defined by the overlay.xml see the setting up RAPID overlays section for further guidance on how to edit an overlay. Features can be added to the sequence by selecting the relevant button to activate the feature. The status of each button is displayed by its background colour: Light blue – length feature inactive Yellow – length feature active, and written to the database Red – length feature overwriting. The feature is only written to the database once it has unselected. If a button has been pressed unintentionally then the “undo” button within the “Controls” area can be pressed. This will remove the last feature recorded from the “recent feature” box and place it in the “undone features” box. To redo a feature press the “Redo” button, this will move the feature back from the “undone features” to the “recent feature”. RAPID user manual Undo Redo Note: the location of point features are not displayed in by the background colour changing to red. The oly way to review the location of a point feature is to use the feature list. Note: when coding it is possible to skip around the sequence using the slider bar in the video window. However, a feature cannot have an end location that is before its start location. If this is attempted an error message will be displayed. 6.3 Completing a sequence Once the coding for a sequence is complete any buttons that are still active need to be deactivated (so that they are written to the database). Following this the management window must be selected (typically it is brought to the front by clicking on it in the operating systems taskbar). Select “End” within the management window. RAPID user manual 7 Setting up RAPID overlays Within RAPID overlays files are .xml files that define the layout of the Overlay window. 7.1 Overlay.xml The following sections cover the different sections of the overlay.xml file. Note: it is recommended that a tidy .xml should be created since this helps when the file is edited. For example the button areas and groups can be ordered as they appear on the overlay, tabs should be used so that the each of the button area/ button variables line up. 7.1.1 File header The overlay.xml file should be started with: <?xml version="1.0" encoding="utf-8"?> <buttons> And ended with: </buttons> 7.1.2 Definition of buttons This is contained in the code: <standard_values> <button_size x="40" y="40" /> <button_color p="LightSteelBlue" pc="Gold" c="Lavender" ca="Crimson" /> </standard_values> button_size defines the size of all the buttons button_colour defines the button colour for, “p” point features, “pc” point features clicked, “c” length features, and “ca” active length features. The colours defined need to be according to an unknown naming conversion, therefore experimentation with colour names is suggested if changes to the colours is required. RAPID user manual 7.1.3 Definition of button areas Button areas are areas on the overlay window to which buttons can be assigned. All the button areas should be arranged together in the file as: <button_areas> <button_area... <button_area... </button_areas> The structure of each button area should be: <button_area id="Curvature" loc_x="10" loc_y="510" width="290" height="70" description="Curvature" /> id defines the name of the area, this name is used when defining which area each button is assigned to. The id should not include spaces. loc_x defines where in the on the overlay window the button area should placed (in the x axis). loc_x is the number of pixels the left edge of the button area is relative to the left edge of the overlay window. loc_y defines where in the on the overlay window the button area should placed (in the y axis). loc_y is the number of pixels the top edge of the button area is relative to the top edge of the overlay window. width defines the total width of the button area in pixels. height defines the total height of the button area in pixels, note the height refers to the button area frame and does not include the description. description is the label that is included at the top left of the button area. Unfortunately there is no way to define the font size of the description. 7.1.4 Button groups Button groups are used to define groups of buttons. This means that when an inspection sequence is exported all the buttons within a group will be exported in a single column within the .csv file. All the button groups should be arranged together in the file as: <button_groups> <button_group.... <button_group.... RAPID user manual </button_groups> The structure of each button group should be: <button_group id="Curvature" desc="Curvature" area="Curvature" type="CA"> <button id....... /> <button id....... /> <button id....... /> <button id....... /> </button_group> id defines name of the button group. desc defines decription of the button group, this will be used as the column title within the export .csv file and the name that appears in the feature list for RAPID Road and RAPID Video. area defines which of the button areas the group should be placed in. All buttons within a group are placed in the same button area. type defines if the buttons in the group are “P” point or “CA” length features. All buttons within a group need to be the same type. Note: multiple button groups can be placed into the same button area. 7.1.5 Buttons Buttons are used to interface with the user. The structure of each button should be: <button id="Curve_straight" desc="Curve_straight" loc_x="5" loc_y="25" /> button id defines the name of the button. There needs to be a corresponding .giff for each button in the folder with the same name as the button id. desc defines the description of the button, this used as the value that is reported for the button within the export.csv file. loc_x defines the placement of the button within the button area (in the x axis). Loc_y defines the placement of the button within the button area (in the y axis). 7.1.6 Attribute groups Attribute groups are used to create a link between buttons. The effects of attribute groups is unknown. All the attribute groups should be arranged together in the file as: <attribute_groups> <attribute_group..... <attribute_group..... RAPID user manual </attribute_groups> The structure of each attribute group should be: <attribute_group id="Turn_lane"> <attribute_button id="Int_type_turnlane" /> <button id="Int_type_4leg" /> </attribute_group> id defines the name of the attribute group. attribute_button id defines the primary button id that the attribute should be associated with. button id defines the secondary button id the attribute group should be associated with. 7.2 Icons For each button defined in the overlay.xml file there should be a corresponding .giff icon file in the icon folder. For example the file Curve_straight.giff should be in the icon folder for the button: <button id="Curve_straight" desc="Curve_straight" loc_x="5" loc_y="25" /> When creating buttons the following should be considered: Icons should be created with transparent backgrounds so that when the button is selected the change in colour is obvious. Buttons should be created with the intended size in mind. Lots of detail will be lost on a small button Buttons should be clear, easy to distinguish from one another and their means should be obvious. Buttons should be consistent across a group It is recommended that minimal text is used on the buttons, since it will be hard to read if when it is small. RAPID user manual 8 Converting an export file to a iRAP upload file A RAPID export file can be converted to an iRAP upload file using the iRAP pre-processor (version 3.03 or later). The pre-processor can be downloaded from: https://dl.dropboxusercontent.com/u/30884138/iRAP_Star_Rating_preprocessor.zip 8.1 Data conversion overview The steps you will need to go through are: 1. Save each RAPID export file as an excel file. 2. Open the iRAP pre-processor a. Enable macros within the pre-processor 3. Select “Run iRAP Pre-processor” (or use the hot key Ctrl + Shift + p) 4. This will open the main window, this is used to set up the conversion process RAPID user manual a. Select the File name using “Open File” b. Specify the row to start converting from c. Select the worksheet to create the upload file in d. If no upload worksheet exists one can be created entering the desired name and using the “Add Sheet” button e. Select the worksheet the RAPID export data is in f. Select the desired lookup table. One of the later sections will cover setting up a lookup table g. Within the tabbed section at the bottom select the “Specials” tab h. Select “Convert RAPID” (on the “Specials” tab) RAPID user manual 5. You will be presented with RAPID convert setup, this will be used to define settings for the sequence to convert. If a column number has been set in the look up table, his will displayed in the setup window, otherwise a value can be set for the whole sequence a. Road name, section name, coder name, road survey date and coding data are used set the value for the whole sequence b. The Earth’s radius is used to establish 100m lengths. It should be noted that the earth radius varies between 6353 to 6384km depending on location. This value can be varied to get a better 100m spacing for the sequence location. c. The start row for the conversion can be altered within the setup d. If the video file name is defined, it will be added to the time at the start of each 100m within the image reference column for the upload file. 6. Select “Proceed” 7. The pre-processor will inform you when the conversion process is finished 8. Save the RAPID export file. 9. Copy the iRAP upload file and save as .csv file for uploading. RAPID user manual 8.2 Setting up a lookup table Within the pre-processor lookup tables are used to convert data from one format to another. The standard RAPID V3 overlay can be exported using the “RAPID_to_V3c” lookup table. Any changes made to an overlay should be reflected in the relevant lookup table. Each lookup table is setup with the upload file format in columns A to E. The corresponding values and columns in which they are located that will be convert to the upload file are defined in columns F to P. 8.2.1 Text items For “text” items within the upload file the conversion will transfer the content of the cell at start of the 100m for the column defined in column F of the lookup table. In the example below, the latitude would be copied to the upload file from column 2 of the export file, likewise the longitude would be copied from column 3. If the coder name, coding date, road survey date, road name or section are not refined in th e RAPID export file column F should be set to 0 (or left blank), in this case the user will be prompted to define the values for the whole sequence within the “RAPID convert setup” window. RAPID user manual 8.2.2 List items For “list” items the conversion will select the highest category from the list of categories for the relevant rows within the 100m. In the example below, if the value “Right_Roadside_0_to_1” is found in column 18 of the rows for the 100m, then code 1 is written into the upload file, if this value is not found the next value is checked for. This process can be extended with the use of “or” and “and” statements. In the example below, the third check is if: Column 24 = “Int_type_4leg” AND column 25 = “”AND column 26 = “Int_type_turnlane” If this is found then code 7 is written to into the upload file. Note: in the example you will notice that the codes are not in numerical order, this is because they are in risk order, since they are checked in the order they appear in the lookup table. 8.2.3 Ignore items “Ignore” items are a special case of “list” items, they are treated the same as “list” items by the RAPID convention. RAPID user manual 9 Trouble shooting Issue: GPS time displayed, but no GPS fix in the road inspector. Action: If time information is displayed and you can see it’s continuously updated, but the fix checkbox is unchecked, the GPS is waiting to get enough quality in positions. You may be placed at spot where the GPS has difficulties to get satellites in view. This can occur if you are: Indoor Under a bridge, or in a tunnel Close to high buildings Try to move to another location and see if this solves your problem. Issue: No GPS information is displayed in the road inspector. Action: If no GPS information at all is displayed it may be for one of several reasons: You are at spot where the GPS has no view to satellites. The GPS is not correctly connected to the computer. Even if a USB GPS is used it is necessary to plug it to the right USB socket (since different USB sockets will be assigned different com pot numbers). The GPS_ settings are not correct. See Setting up RAPID Road section The power supply to the GPS is not working correctly RAPID user manual