1
ns
tio
C
or
al
-i
So
lu
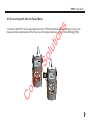
GRANDWAY Optical Testing Instruments
English Version
User Manual
ns
tio
lu
FHP FHS FHM FHA FHV VLS series
C
or
al
-i
So
User Manual
Shanghai Grandway Telecom Tech.Co.,Ltd
www.grandway.com.cn
or
al
-i
tio
lu
So
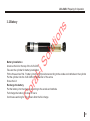
Safety Information
Power Supply
FHP2 Optical Power Meter
FHS2 Multi-wavelength Laser Source
FHP1 Mini Optical Power Meter
FHS1 Mini Dual-wavelength Laser Source
FHM2 Optical Multimeter(Optical Loss Test Set)
FHA2 Variable Optical Attenuator
FHV1A Visual Fault Locator
VLS-5 Visible Laser Source
Maintenance
Warranty
ns
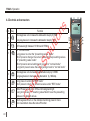
Contents
C
Welcom to our website
www.grandway.com.cn
1
2
4
17
30
42
52
75
87
97
103
104
Safety Information
ns
Safety Information
tio
Warnings!
lu
Never look directly into optical output ports when the laser source is emitting. The Laser output
of FHS and FHM are Class I. Invisible laser beam may damage your eyes.
So
Do not short-circuit the terminal of AC adapter / charger and the batteries. Excessive
electrical current may result in personal injury due to fumes, electric shock or equipment
damage.
al
-i
Connect DC power cord with the equipment and wall socket properly. While inserting the DC
plug, make sure there is no dust or dirt on the terminals and both plugs are fully seated.
Incomplete engagement may cause fuming, electric shock or equipment damage and may
result in personal injury.
C
or
Do not operate the equipment near hot objects, in hot environments, in dusty/ humid
atmosphere or when condensation is present on the equipment. This may result in electric
shock , product malfunction or poor performance.
1
Power Supply
Power Supply
1. Discharged batteries
So
lu
tio
ns
There is a battery indicator on the screen to show the remaining charge. There are four possibilities
the indicator may show, full, with 2 blacks, with 1 black and empty. If an empty battery indicator
flashes it means the power is almost out, and that is when you should recharge the batteries by
connect the AC adapter with the instrument. If the discharged batteries reach their limitations after
long-time use, please replace them with new ones. To replace the batteries, please remove the
battery plate on the back of instrument with a screwdriver.
al
-i
When the battery charge is extremely low to supply the necessary power, the instrument will
automatically switched off.
Note: 1 The AC indicator is not displaying when power is supplied by battery.
2 To eliminate the possibility of acid leakage, please take out the battery if the unit is not used for
a long time.
2. AC operation
C
or
If the instrument is mainly used at one location, e.g. in a laboratory or test department, the AC adapter
can be used to power it instead of batteries. There is a DC input jack on the bottom side of the F2HP
instrument When the AC adapter is plugged in, the AC Indicator on the LCD will be displayed.
Note: 1 When AC adaptor is used, make sure do not place un-rechargeable batteries inside.
2 Make sure that local AC voltage is in the range of our operating voltage. E.g. Input:AC 100240V,50-60Hz.
2
Power Supply
ns
3. Power Supply for FHP1 and FHS1 series.
1888
nm
lu
nm
So
1888
tio
There are battery indicator and power plug on the screen to show the power supply. When you use the
DC 5v charger, there is no battery indicator on the screen. When you disconnect the DC 5v charger,
the adapter indicator will disappear on the screen.
1888
nm
or
nm
C
1888
al
-i
When you use the battery, the battery indicator on the screen will show the remaining charge. An
empty battery indicator means the power is almost out. When the battery charge is extremely low to
supply the necessary power, the instrument will be automatically switched off after several beeps of
the buzzer. Please change the battery or recharge it
3
ns
tio
lu
C
or
al
-i
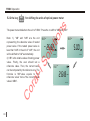
Optical Power Meter
So
User's Guide to the FHP2
4
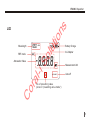
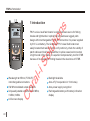
1 Introduction
FH
nm
-.8.8.8.8
1kHz
2kHz
lu
REF
270Hz
So
AUTO-OFF
>2s PERM
FHP2A02
C
or
OPTICAL POWER METER
al
-i
>2s SET
FH
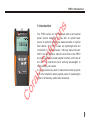
The FHP2 series are full featured palm sized optical
power meters designed for use with an optical laser
source to perform optical loss measurements on optical
fiber cables. The FHP2 series are lightweight and are
controlled by microprocessor. Utilizing state-of-the-art
SMT in its manufacture, optical connections to the FHP2
are made via the universal adapter interface on the top of
the unit. The instrument has 6 working wavelengths to
totally satisfy your needs.
It can be extensively used in telecommunication projects
and other situations where optical power of wavelengths
close to infrared ray needs to be measured.
tio
1888
FHP2 series
ns
FHP2 / Introduction
5
FHP2 / Specifications
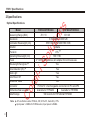
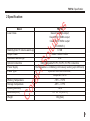
2 Specifications
So
lu
tio
FHP2A02/FHP2A04
FHP2B02/FHP2B04
-70~+10
-50~+26
0.01dB/dBm; 0.0001uW
850/1300/1310/1490/1550/1625
InGaAs
1
±5%
700~1700
2*1.2V Ni-MH batteries; AC adapter for continuous use
Yes
Yes
Yes
Yes
Yes
FC/SC/ST interchangeable connectors for PC and APC
Available for FHP2A04
Available for FHP2B04
999 records for FHP2A04 & FHP2B04
Note
1
2
6
C
or
al
-i
Model
Measuring Range (dBm)
Resolution
Calibration Wavelength (nm)
Detector
Precision
Operating Wavelength (nm)
Power
2
Wavelength Recognize
2
Tone Detection (Hz)
Back Light
Auto Power Off
Reference Value
Connector
USB and software support
Data Storage
ns
Optical Specifications
±5% is effective under 1550nm, CW, 23℃±3℃, humidity≤70%
Input power >-30dBm for FHP2A series; Input power>-20dBm
ns
FHP2 / Specifications
tio
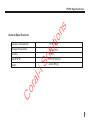
General Specifications
Operation Temperature
lu
-10 oC~+50 oC
Storage Temperature
-20 oC~+70 oC
Humidity
So
< 90%
160*76*45(mm)
Size(H*W*D)
about 265(g)
C
or
al
-i
Weight
7
FHP2 / Preparing for Operation
3 Preparing for Operation
ns
Unpacking the instrument
tio
Packing material
We suggest that you keep the original packing material. Using the original packing material is your
guarantee of protecting the instrument during transit.
So
lu
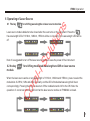
Checking the package contents
The standard accessories of FHP2 are as follows:
Main unit
User's Guide
Quality Check Report
2*1.2-volt Ni-MH Batteries
Carrying Case
AC Adapter
Connectors(Interchangeable FC ,SC ,ST connectors )
C
or
al
-i
Checking for damage in transit
After unpacking the instrument, check to see whether it was damaged in transit. This is particularly
likely if the outer casing is clearly damaged. If there is damage, do not attempt to operate the
instrument or to repair it without authorization. Doing so can cause further damage and you may lose
your warranty qualification.
8
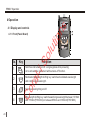
FHP / Operation
4 Operation
ns
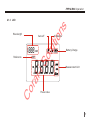
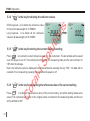
4.1 Display and controls
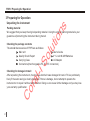
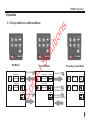
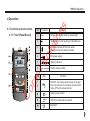
4.1.1 Keypad
tio
The FHP2 keypad is used to access a wide range of instrument functions.
FHP2A/B02
nm
1kHz
2kHz
Switches instrument on / off. Long keypress while powering on
to activate the instrument without Auto-off function.
2
Selects measurement wavelength in sequence of
850nm,1300nm 1310nm, 1490nm,1550nm and 1625nm.
3
Switches measurement unit among dBm,dB and mw.
-.8.8.8.8
AUTO-O FF
Function
1
REF
270Hz
Key
So
1888
FHP2 series
lu
NO.
FH
>2 s SE T
5
FHP2A02
OPTICAL POWER METER
Short keypress to display reference level of present test
wavelength. Long keypress to set a new reference level of
present test wavelength.
or
4
5
C
FH
al
-i
>2 s PE RM
Switches backlighting on / off.
9
ns
FHP2 / Operation
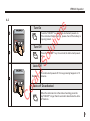
FHP2A/B04
LPM-4
series
FHP2 series
1
Switches instrument on / off. Long keypress while powering on
to activate the instrument without Auto-off function.
2
Selects measurement wavelength in sequence of 850/1300/1310/
1490/1550/1625nm and to activate auto-wavelength recognition(TWIN).
3
Switches measurement unit among dBm,dB and mw.
nm
-.8.8.8.8
Function
lu
FF HH
1888
Key
tio
NO.
2kHz
AUTO-O FF
6
5
FH
FHP2A04
4
Short keypress to display reference level of present test wavelength.
Long keypress to set a new reference level of present test wavelength.
C
or
5
6
10
Long keypress for 2s to store the current test value; short
keypress to display the record.
al
-i
1kHz
So
REF
270Hz
Switches backlighting on / off.
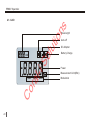
FHP2 / Operation
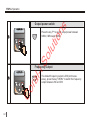
4.1.2 Back
ns
Connector(FC/PC, SC/PC, ST/PC optional)
FH
tio
FF HH
1888
LPM-4
series
FHP2 series
1888
nm
-.8.8.8.8
REF
270Hz
1kHz
2kHz
270Hz
1kHz
2kHz
So
lu
AUTO- OF F
FHP2A04
al
-i
FH
FHP2 series
nm
-.8.8.8.8
REF
USB interface
AUTO- OF F
>2 s PE RM
>2 s SE T
FH
FHP2A02
OP TI CA L POW ER M ET ER
Recharge LED
C
US B
or
Recharge LED
DC Input Jack
DC Input Tack
AC Adapter LED
AC Adapter LED
Recharge LED lights up when recharging the batteries.
AC Adapter LED lights up when recharging finishes
11
FHP2 / Operation
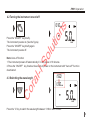
ns
4.1.3 LCD
tio
Wavelength
Reference
nm
-.8.8.8.8
REF
270H z
Frequency
al
-i
1kH z
2kH z
or
TW IN
C
Auto-wavelength recognition
12
Battery Charge
So
1888
lu
AC Adapter
Power
AUTO-OFF
Auto-off
Measurement Unit
FHP2 / Operation
4.2 Turning the instrument on and off
-.8.8.8.8
REF
270Hz
1kHz
2kHz
AUTO-O FF
tio
ns
Press the “ON/OFF” key briefly.
The instrument powers on, and backlighting switches on.
Please check the battery capacity if it fails.
Press the “ON/OFF” key briefly again.
The instrument powers off, and backlighting switches off.
FH
Note: Auto-off function
1. The instrument powers off automatically if no keypress in 10 minutes.
2. Press the “ON/OFF” key for about 2 seconds to power on the instrument with “Auto-off” function
deactivated.
4.3 Setting the wavelength
So
lu
FHP2A04
1625
1550
al
-i
Press the “λ” key repeatedly until the desired wavelength is
1300
850
displayed. You can select from six optional wavelengths: 850nm,
1300nm, 1310nm, 1490nm,1550nm,1625nm.
The instrument defaults to the wavelength which the user set in the last test.
or
4.4 Turning on the wavelength recognition function-- “
TWIN” function
C
Long keypress
is to activate the auto-wavelength recognition
and the "TWIN" will show on the LCD. Short keypress
is to
close the "TWIN".
When used with the FHS2 Series optical laser source, the
wavelength will shift automatically according to the output
wavelength of the laser source
1490
13 1 0
nm
- 2 0.0 0
AUTO-OFF
13 10
13 10
nm
- 25.98
- 25.98
AU TO- OF F
nm
TWIN
AU TO- OF F
13
FHP2 / Operation
4.5 Switching measurement mode
1310
- 2 5.0 8
tio
1. Press the “REF” key to display the stored reference valuel
for the current wavelength and a sign of “REF” will be
displayed on the screen to indicate that it is a reference value.
The displayed value only lasts 1 second.
1888
nm
-.8.8.8.8
REF
270Hz
So
al
-i
2. Press and hold the “REF” key over 2 seconds to store the
presently measured value as the new reference value for the
current wavelength. During the process the “REF” sign flashes
twice on the screen and buzzer sound is heard. Once the new
reference level is set, the FHP2 switches to the dB
measurement mode. The displayed value only lasts 1 second.
Note: 1.Long keypress
for over 2 seconds, the unit will be
shifted to "dB" automatically.
2.When the input laser power is modulated laser source,
it will affect the setting of REF value. Please guarantee the
input laser source is CW laser when setting REF value.
or
AU TO- OF F
AUTO -O FF
lu
4.6 Setting reference value
C
nm
2 0.0 0
ns
There are three measurement units you can choose by
pressing the “dBm/dB/mW” key repeatedly, dB, dBm,mW.
14
1310
nm
1kHz
2kHz
AUTO-O FF
1310
nm
- 2 0.0 0
REF
AUTO-OFF
short
keypress
1310
nm
0 5.8 8
AUTO-OFF
FHP2 / Operation
1310
nm
- 5.0
1310
nm
- 5.0
tio
Press the backlighting key.
Backlighting switches on.
Press the backlighting key again.
Backlighting switches off.
ns
4.7 Switching backlighting of the LCD on and off
AUTO-OFF
lu
4.8 Frequency detecting
So
If the tested wavelength is carrying a tone of 270Hz, 1kHz, or 2kHz,
the respective frequency indicates on the screen
AUTO-OFF
13 1 0
1kHz
nm
- 2 0.0 0
AUTO-OFF
al
-i
4.9 The overflow of the measured power value
1310
nm
C
or
If the measured power value is too high, the LCD screen will display “HI”.
If the measured power value is too low, the LCD screen will display “LO”.
AUTO-OFF
1310
nm
L0
AUTO-OFF
15
FHP2 / Operation
4.10 The storage of the current test value( For FHP2A04 and FHP2B04)
tio
ns
Press
key over 2s, the SAVE flashes on the screen once with the sounds of the buzzer. It
indicates the setting is finished. It will display the stored value and the serial number of the storage.
Then, the FHP2A will return to the test state automatically.
key, it will display the latest record.
Press
key, it will browse the forward records.
Press
key, it will browse the afterward records.
al
-i
+
key, it will delete all the records.
C
or
Press
So
Press
16
nm
-.8.8.8.8
REF
270Hz
1kHz
2kHz
AUTO-O FF
lu
4.11 Check the storage records( For FHP2A04 and FHP2B04)
1888
FH
FHP2A04
ns
tio
lu
So
User's Guide to the FHS2 Series
C
or
al
-i
Multi-wavelength Laser Source
17
ns
FHS2 / Introduction
1 Introduction
1888
LPM-4
series
FHS2 series
tio
FF HH
The FHS2 laser source offers excellent stability,
portability and facile adjustments for accurate optical
fiber testing. Single output connector serves multiwavelengths--850nm,1300nm 1310nm,1490nm, 1550nm.
nm
2kHz
SINGLE
TWIN
AUTO-OFF
So
1kHz
lu
-.8.8.8.8
270Hz
FHS2 can be used to test single mode optical fiber of long
distance and local network. Also it can work with optical
power meter to measure the loss of optical fiber.
TWIN
CW/Hz
>2 s PE RM
ON
OFF
FHS2
LASER SOURCE
C
or
al
-i
FH
18
FHS2 / Specifications
2 Specifications
Model
1
1310&1550±20nm
Long term Stability( 15min)
2
2
al
-i
Short term Stability( 8hr )
CW output power
C
or
Modulated Wavelength
Available Connector
So
Spectral Width
Power
FHS2T01
850&1300±20nm
1310&1490&1550±20nm
lu
Laser
FHS2D03
tio
FHS2D02
Output wavelength(nm)
NOTE:
ns
Optical Specifications
Class Ι
3nm typical value
±0.05dB@1300,1310
±0.1dB@850,1490nm
±0.2dB@850,1490nm
±0.1dB@1300,1310,1550nm
-5.0dBm±1dB
270Hz,1kHz,2kHz
FC/PC,SC/PC,ST/PC interchangeable connectors
(APC is avaiable at the time of ordering)
2 units of AA rechargeable battaries
1
±5% is effective under 1550nm, CW, 23℃±3℃, humidity≤70%
2
25 min preheat @ 25℃
19
FHS2 / Specifications
ns
General Specifications
-10 oC~+50 oC
Storage Temperature
-20 oC~+70 oC
Humidity
<90%
Size(H×W×D)
160mm×76mm×45mm
Weight
About 0.26 kg(including batteries)
al
-i
So
lu
tio
Operation Temperature
C
or
NOTE: Please be aware that Grandway will not be responsible for the damage caused by customer's
improper usage of AC power supply, especially when the instrument is working by internal batteries. The
working hours of instrument might show a difference under a different circumstances and batteries
status
20
FHS2 / Preparing for Operation
3 Preparing for Operation
ns
Unpacking the instrument
lu
Main unit(including battery)
Quality Check Report
DC 6V Adapter
So
Checking the package contents
The standard accessories of FHS2 are as follows:
tio
Packing material
We suggest that you keep the original packing material. Using the original packing material is your
guarantee of protecting the instrument during transit.
Carrying Case
User's Guide
Connectors(FC/PC,SC/PC,ST/PC)
C
or
al
-i
Checking for damage in transit
After unpacking the instrument, check to see whether it was damaged in transit. This is particularly
likely if the outer casing is clearly damaged. If there is damage, do not attempt to operate the
instrument or to repair it without authorization. Doing so can cause further damage and you may
lose your warranty qualification.
21
FHS2 / Operation
4 Operation
TWIN
ns
4.1 Display and controls
CW/Hz
>2 s PE RM
ON
OFF
4.1.1 Front(Panel Board)
tio
Key
Function
1
So
Wavelength Shifting Key: Switches working wavelength.
Modulated Wavelength Shifting Key: Switches modulated
wavelength and continuous wavelength.
CW/Hz
al
-i
2
Output Power Increase and Decrease: Increase or decrease output
power by 0.1dB and the adjustable range is ±3dB.
C
5
TWIN
>2s PERM
6
22
ON
OFF
SINGLE: Auto-wavelength recognition is off.
TWIN: Auto-wavelength recognition is on.
or
3
4
FHS2D02
LASER SOURCE
lu
No.
FH
Switches backlighting on/off.
Switches Instrument on/off. Long keypress while powering on to
activate the instrument without Auto-off function.
FHS2 / Operation
ns
4.1.2 Back & top
So
lu
tio
Connector (FC/PC,SC/PC,ST/PC)
C
or
al
-i
Battery Plate
(including 2 units of AA recharging batteries)
DC 6v power input
23
FHS2 / Operation
ns
4.1.3 LCD
tio
Wavelength
lu
DC Adapter
1888 date
2kH z
C
SINGLE
TWIN
.8.8.8.8
al
-i
1kH z
or
270H z
So
nm
24
AUTO-OFF
Battery Charge
Modulation
Power
Measurement Unit(dBm)
Auto-wavelength Recognition
Auto-off
FHS2 / Operation
4.2 Turning the instrument on and off
13 10
nm
ns
>2s PERM
ON
OFF
tio
.8.5.5.0
al
-i
So
lu
Press the “ON/OFF” key briefly.
The instrument powers on.(See the figure)
Press the “ON/OFF” key briefly again.
SINGLE
The instrument powers off.
AUTO-OFF
Note: Auto-off function
1 The instrument powers off automatically if no key press in 10 minutes.
2 Press the “ON/OFF” key for about 2 seconds to power on the instrument with "Auto-off" function
deactivated.
1550
13 10
or
4.3 Switching the wavelength
.8.5.5.0
C
Press the “λ” Key to switch the wavelength
between13100nm,1550nm for FHS2D02,850nm,1300nm
for FHS2D03,1310nm,1490nm and 1550nm for FHS2T01.
nm
SINGLE
AUTO-OFF
25
FHS2 / Operation
4.4 Frequency Output
13 10
nm
ns
CW/Hz
1
TWIN
al
-i
4.5 Auto-wavelength Recognition
lu
1kHz
So
The instrument defaults to CW when it switches on.
When it is set to CW, there is no frequency on
display.
Press the "CW/Hz" Key to select the output among
270Hz, 1kHz and 2kHz.
CW
.8.5.5.0
tio
2kHz
270Hz
SINGLE
AUTO-OFF
1."CW" is not displayed on the LCD
Press the "TWIN" Key to turn on and off the auto-wavelength recognition function.
C
or
Note:1). It is suggested to turn off the "TWIN" code when you do not use it. The optical power output of laser
source will be fluctuated.
2). The function of "TWIN" and Modulation cannot work together. When the "TWIN" is on, modulation of laser
source module is closed automatically.
3). Wavelength will be shifted automatically according to the recognition when the "TWIN" of power meter
module is on. In another word, the modulated signal of 270Hz, 1kHz and 2kHz cannot be recognized and
received at the moment.
26
FHS2 / Operation
tio
ns
4.6 Switching backlighting of the LCD on and off
nm
al
-i
- 5.0
So
13 10
lu
Press the backlighting Key to switch the backlighting of the LCD on and off.
SINGLE
nm
- 5.0
SINGLE
AUTO-OFF
C
or
AUTO-OFF
13 10
27
FHS2 / Operation
tio
ns
4.7 Setting the output power
lu
Press the “
” key to to increase the output power. The measurement range is from -2 dBm to -8
dBm. Each time you press it , the value increases by 0.1 dBm.
1310
So
Press the “
” key to decrease the output power. The measurement range is from -2 dBm to -8
dBm. Each time you press it, the value decreases by 0.1 dBm.
1310
nm
al
-i
.8.5.5.0
SINGLE
nm
.8.5.4.9
SINGLE
or
AUTO-OFF
nm
1310
C
1310
AUTO-OFF
.8.5.5.0
SINGLE
.8.5.5.1
SINGLE
AUTO-OFF
28
nm
AUTO-OFF
FHS2 / Operation
ns
4.8 Connecting with Optical Power Meter
270Hz
1kHz
2kHz
FHS2 series
nm
-.8.8.8.8
So
FH
1888
lu
tio
It can work with optical power meter to measure the loss of optical fiber accurately.
AUTO- OF F
FF HH
al
-i
TWIN
CW/Hz
>2 s PE RM
ON
OFF
C
or
FH
1888
LPM-4
series
FHP2 series
nm
-.8.8.8.8
REF
270Hz
1kHz
2kHz
AUTO- OF F
FHS2
LA SE R SO UR CE
FH
FHP2A04
29
ns
tio
lu
C
or
al
-i
Mini Optical Power Meter
So
User's Guide to the FHP1A/B02
30
FHP1A/B02 / Introduction
ns
1 Introduction
FHP1 series
tio
The FHP1 series are full featured mini sized optical power meters
designed for use with an optical laser source to perform optical loss
measurements on optical fiber cables.
Utilizing state-of-the-art SMT in its manufacture, optical connections to
the FHP1 are made via the universal adapter interface on the top of the
unit. The instrument has 6 working wavelengths to totally satisfy your
needs. It can be extensively used in telecommunication projects and
other situations where optical power of wavelengths close to infrared
ray needs to be measured.
1888 nm
REF
lu
-.8.8.8.8
>2s PERM
ON
OFF
So
dBm/
dB/mw
>2s SET
REF
TM
al
-i
FHP1A02
C
or
Main Features:
Small size with light weight, saving power and easy to carry
Supply with linear and logarithmic optical power display
31
FHP1A/B02 / Specifications
2 Specifications
ns
Optical Specifications
FHP1A02
850/1300/1310 /1490/1550/1625
Detector Type
InGaAs
Connector
lu
FC/PC SC/PC ST/PC Universal
Accuracy
± 0.35dB±10nW
So
Resolution
Linearity
Auto Power Off
al
-i
Back Light
Reference Value
Measuring Range(dBm)
Data Storage
or
USB Interface
0.01dB
±5%
Yes
Yes
Yes
-40 to +23
-60 to +3
N/A
N/A
N/A
N/A
C
Wavelength Recognize
Tone Detection (Hz)
Note:
32
FHP1B02
tio
Calibrated Wavelength (nm)
Valid at 1550nm, CW,23±3℃, Relative Humidity ≤70%, with an FC connector.
FHP1A/B02 / Specifications
tio
ns
General Specifications
-10 oC to +50 oC
Storage Temperature
-20 oC to +70 oC
lu
Operating Temperature
Power Supply
1pcs*Li-ion Battery; 5V AC/DC Adaptor
Dimension (mm)
So
115L*62W*30H
140g
C
or
al
-i
Net Weight
33
FHP1A/B02/ Preparing for Operation
3 Preparing for Operation
ns
Unpacking the instrument
lu
tio
Packing material
We suggest you keep the original packing material. Using the original packing material is your
guarantee of protecting the instrument during transit.
al
-i
So
Checking the package contents
The standard accessories of FHP1 are as follows:
Main Unit
User's Guide
Carrying Case
1pcs of Li-ion Battery
5V AC/DC Adapter
Quality Check Report
FC/PC, SC/PC,ST/PC Interchangeable Connectors
C
or
Checking for damage in transit
After unpacking the instrument, check to see whether it was damaged in transit. This is particularly
likely if the outer casing is clearly damaged. If there is damage, do not attempt to operate the
instrument or to repair it without authorization. Doing so can cause further damage and you may lose
your warranty qualification.
34
FHP1A/B02 / Operation
4 Operation
ns
4 .1 Display and controls
4.1.1 Keypad
tio
The FHP1 keypad is used to access a wide range of instrument functions.
lu
NO. Key
FHP1 series
ON
OFF
REF
-.8.8.8.8
S w i t c h e s i n s t r u m e n t o n / o ff . L o n g k e y p r e s s o v e r 2 s e c o n d s
while powering on is to activate the instrument without Auto-off function.
So
>2s PERM
1
1888 nm
Function
Short keypress to display reference level of present test wavelength.
Long keypress to set a new reference level of present test wavelength.
2
ON
OFF
dBm/
dB/mw
3
>2s SET
REF
5
al
-i
>2s PERM
dBm/
dB/mw
Selects measurement wavelengths.
>2s SET
TM
REF
Switches measurement units among dBm, dB and mw.
or
4
5
Switches backlighting on/off.
C
FHP1A02
35
FHP1A/B02 / Operation
ns
4.1.2 Back
tio
Connector interchangeable FC/PC,
SC/PC, ST/PC
FHP1 series
1888 nm
REF
ON
OFF
dBm/
dB/mw
>2s SET
REF
So
>2s PERM
lu
-.8.8.8.8
TM
C
or
al
-i
FHP1A02
36
DC 5V
DC Input Jack
FHP1A/B02 / Operation
Wavelength
ns
4.1.3 LCD
Auto-off
REF
tio
So
Reference
lu
1888 nm
AC Adapter
Measurement Unit
Power value
C
or
al
-i
-.8.8.8.8
Battery Charge
37
FHP1A/B02 / Operation
ns
4.2 Turning the instrument on and off
lu
tio
4.2.1. Press the "ON/OFF" key briefly.
The instrument powers on, and backlighting switches on with the short beeper of
the buzzer.
Please check the battery capacity and the connection of the battery in the battery
plate if it fails.
al
-i
So
4.2.2. Press the "ON/OFF" key briefly again.
The instrument powers off, and backlighting switches off with the short beeper of
the buzzer. When the battery capacity indicator flashes on the LCD, please
recharge the battery or change new batteries. Otherwise, the instrument will be
damaged by the shortage of the power.
C
or
4.2.3. Turn on/off the auto-off function
The instrument powers off automatically if no keypress in 10 minutes.
Press the "ON/OFF" key for about 2 seconds to deactivate the auto-off function
and the indicator will be disappear on the LCD.
The instrument will be power off if the battery capacity is too low to support the
operation.
38
1888 nm
REF
-.8.8.8.8
>2s PERM
ON
OFF
dBm/
dB/m w
>2s SET
REF
1888 nm
REF
-.8.8.8.8
1888 nm
REF
-.8.8.8.8
>2s PERM
ON
OFF
dBm/
dB/m w
FHP1A/B02 / Operation
850
1625
1490
1550 nm
tio
13 1 0
lu
.
4.4 Setting and checking reference level
1300
ns
4.3 Setting the wavelength
Press the "λ" key repeatedly until the desired wavelength is
displayed. You can select from six possible wavelengths:
850nm, 1300nm, 1310nm, 1490nm, 1550nm and 1550nm.
The instrument defaults to the wavelength of 1550nm.
1888 nm
REF
-.8.8.8.8
or
al
-i
So
4.4.1. Setting the reference level
Press and hold the "REF" key over 2 seconds to store the presently
measured value as the new reference level for the current
wavelength. Once the new reference level is set, the LCD displays
0.00dB with the beeper of the buzzer and the FHP1 switches to the
dB measurement mode.
4.4.2. Checking the reference level
Press the "REF" key to display the stored reference level for the
current wavelength and a sign of "REF" will be displayed on the LCD
to indicate that it is a reference value. The displayed value only lasts
1 seconds. The instrument switches to the dB measurement mode.
Note: 1.Long keypress
for over 2 seconds, the unit will be
shifted to "dB" automatically.
2.When the input laser power is modulated laser source, it will
affect the setting of REF value. Please guarantee the input laser
source is CW laser when setting REF value.
- 2 0.0 0
>2s PERM
ON
OFF
dBm/
dB/mw
>2s SET
REF
13 10
REF
nm
- 20.00
short
keypress
nm
13
10 nm
1888
REF
REF
-.8.8.8.8
05.88
C
REF
>2s PERM
ON
OFF
dBm/
dB/mw
>2s SET
REF
39
FHP1A/B02 / Operation
4.5 Switching measurement mode
1888
13
10 nm
1888
13
10 nm
25.08
-.8.8.8.8
ON
OFF
dBm/
dB/m w
>2s PERM
ON
OFF
dBm/
dB/m w
>2s SET
>2s SET
REF
REF
lu
4.6 The overflow of the measured power value
>2s PERM
tio
Press the "dBm/dB/mw" key, you can select three
measurement modes: dBm for the power value, dB for the
relative value and the mw logarithmic value.
20.00
-.8.8.8.8
REF
ns
REF
So
If the measured power value is higher than the highest value of the measuring
range,the LCD screen will display "HI".
If the measured power value is lower than the lowest value of the measuring
range,the LCD screen will display "LO".
13 10
nm
13 10
nm
al
-i
L0
or
4.7 Switching backlighting of the LCD on and off
C
Press the backlighting key.
Backlighting switches on.
Press the backlighting key again.
Backlighting switches off.
40
1888 nm
REF
-.8.8.8.8
1888 nm
REF
-.8.8.8.8
FHP1A/B02 / Operation
ns
4.8 Connection with the optial laser source
lu
tio
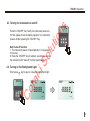
Connecting with FHS1D series dual-wavelength laser source, FHP1A02 optical power meter can
make accurate measurement of the fiber loss at the largest distance of more than250km(@1550).
On-the-spot measurement will differ with the working wavelength, fiber attenuation and the testing
environment.
So
FHS1 series
1888 nm
-.8.8.8.8
270Hz
1kHz
2kHz
>2 s PE RM
ON
OFF
CW
Hz
FHP1 series
al
-i
1888 nm
TM
REF
-.8.8.8.8
FHS1D02
>2 s PE RM
ON
OFF
dBm/
dB/mw
>2 s SE T
REF
TM
FHP1A02
C
or
DUAL LASER SOURCE
41
ns
tio
lu
So
User's Guide to the FHS1D02/03
C
or
al
-i
Dual-wavelength Laser Source
42
ns
FHS1 / Introduction
1 Introduction
The FHS1D series mini-sized dual-wavelength laser sources offer
excellent stability and portability for accurate fiber optic testing.
Single output port provides stable laser power at dual-wavelength.
The compact unit operates in either continuous wave (CW) mode or
modulated mode. A low battery indicator reminds the user of
replacing the battery.
tio
FHS1 series
2kHz
So
1kHz
Main Features:
Single output, providing with CW and modulation of 270Hz, 1kHz
and 2kHz
Supply with backlighting, recharging battery, LCD screen and autooff at the low-battery capacity
al
-i
TM
or
270 Hz
C
-
lu
nm
43
FHS1 / Specifications
2 Specifications
Optical Specifications
Output wavelength (nm)
FHS -1D03
ns
FHS -1D02
1
1310 & 1550
850 & 1300
Emitter Type
tio
LD
Connector
FC/PC
2
Short Term(15minutes):<0.1dB
Central Wavelength
1310+/-20nm & 1550+/-20nm
Output Frequency (Hz)
Output Power
General Specifications
al
-i
Auto Power-off
or
Operating Temperature
Storage Temperature
C
Power supply
So
Spectral Width
Back-light
Long Term(5Hours or above):<0.2dB
lu
Output Stability
Dimension (mm)
5nm
270,1K,2K
-5dBm
Yes
Yes
-10 oC to +50 oC
-20 oC to +70 oC
1pcs*Li-ion Battery;5V AC/DC Adaptor
115L*65W*30H
Net Weight
NOTE:
44
1
±5% is effective under 1550nm, CW, 23℃±3℃, humidity≤70%
2
25 min preheat @ 25℃)
140g
FHS1 / Preparing for Operation
3 Preparing for Operation
ns
Unpacking the instrument
lu
tio
Packing material
We suggest you keep the original packing material. Using the original packing material is your
guarantee of protecting the instrument during transit.
Carrying Case
User's Guide
FC/PC(ST/PC, SC/PC optional)
al
-i
So
Checking the package contents
The standard accessories of FHS1D02/03 are as follows:
Main unit(including battery)
Quality Check Report
DC 5V charger
C
or
Checking for damage in transit
After unpacking the instrument, check to see whether it was damaged in transit. This is particularly
likely if the outer casing is clearly damaged. If there is damage, do not attempt to operate the
instrument or to repair it without authorization. Doing so can cause further damage and you may lose
your warranty qualification.
45
FHS1 / Operation
FHS1 series
4 Operation
nm
ns
-
4.1 Display and controls
1kHz
2kHz
TM
Function
Switches instrument on/off. Long keypress while powering
on to activate the instrument without auto-off function.
2
Modulated wavelength shifting key: switches modulated wavelength
and continuous wavelength.
3
al
-i
1
Switches backlighting on/off.
C
4
46
Key
or
No.
So
lu
tio
4.1.1 Front(Panel Board)
270H z
Wavelength shifting key: switches working wavelength between 1310nm
and 1550nm(FHS1D02) or between 850nm and 1300nm(FHS1D03).
FHS1 / Operation
ns
4.1.2 Back & top
So
lu
tio
FC/PC Connector(SC/PC, ST/PC optional)
C
or
al
-i
Battery Plate
(including Li-ion battery)
DC 5v power input
47
FHS1 / Operation
ns
4.1.3 LCD
lu
tio
Wavelength
al
-i
270Hz
1kHz
C
or
-
So
nm
48
2kHz
Auto-off
DC Adapter
Battery Charge
Power
Measurement Unit(dBm)
Modulation
FHS1 / Operation
4.2 Turning the instrument on and off
ns
13 10 nm
tio
.8.5.5.0
2k Hz
So
lu
Press the “ON/OFF” key briefly.
The instrument powers on.(See the figure)
Press the “ON/OFF” key briefly again.
The instrument powers off.
al
-i
Note: Auto-off function
1 The instrument powers off automatically if no key press in 10 minutes.
2 Press the “ON/OFF” key for about 2 seconds to power on the instrument with "Auto-off" function
deactivated.
C
or
4.3 Switching the wavelength
1550
13 10 nm
.8.5.5.0
2k Hz
Press the “λ” Key to switch the wavelength between 1310nm and 1550nm.
49
FHS1 / Operation
4.4 Frequency Output
tio
ns
13 10 nm
.8.5.5.0
27 0H z
1k Hz
2k Hz
1."CW" is not displayed on the LCD
So
lu
The instrument defaults to CW when it switch on. When it is
set to CW, there is no frequency on display.
Press the "CW/Hz" Key to select the output among 270Hz,
1kHz and 2kHz.
al
-i
4.5 Switching backlighting of the LCD on and off
C
13 10 nm
or
Press the backlighting Key to switch the backlighting of the LCD on and off.
- 5.0
2kHz
50
13 10 nm
- 5.0
2kHz
FHS1 / Operation
ns
4.6 Connecting with Optical Power Meter
FHS1 series
1888 nm
So
lu
tio
Connecting with FHP1 series optical power meter, FHS1D series dual-wavelength laser source can
make accurate measurement of the fiber loss at the largest distance of more than 250km(@1550).
-.8.8.8.8
270Hz
1kHz
2kHz
FHP1 series
>2 s PE RM
al
-i
ON
OFF
CW
Hz
TM
1888 nm
REF
-.8.8.8.8
FHS1D02
>2 s PE RM
ON
OFF
dBm/
dB/mw
>2 s SE T
REF
TM
FHP1A02
C
or
DUAL LASER SOURCE
51
ns
tio
lu
So
User's Guide to the FHM2 Series
C
or
al
-i
Optical Multimeter(Optical Loss Test Set)
52
ns
FHM2/ Introduction
FHM2 series
nm
-.8.8.8.8
REF
SINGLE
TWIN
SAVE
888
1310 1490 1550
LD
AUTO-OFF
270
TWIN
PD
1K
2K
CW/Hz
>2 s SE T
DE LE TE
>2 s SAVE
1.1 General Description
mw
uw
lu
270Hz
1kHz
2kHz
dBm/
dB/mW
REF
>2 s PE RM
FHM2A02
C
or
OPTICAL MULTI-METER
al
-i
LOAD
FH
The FHM series optical loss test set combines a
power meter and a three- wavelength laser
source, for optical fiber network installation and
maintenance. With the large capacity of data
storage, it’s very convenient for field testing and
transferring the test results to PC through USB
interface.
So
1888
tio
1 Introduction
FH
53
FHM2 / Introduction
1.2 Main Features
1.3 Typical Application
al
-i
So
lu
tio
ns
Three wavelengths (1310nm, 1490nm and 1550nm) combine in one port;
The output of laser source stables at -5dBm;
Laser source supplies CW and modulated 270Hz, 1KHz, 2KHz output;
Laser source transmits wavelength recognition code;
Optical power meter displays linearity and logarithmic optical power values;
Automatic shifting of measurements in optical power meter;
Automatic wavelength recognition and shifting to the measured wavelength in optical power meter;
Storage of 999 sets of tested data in optical power meter;
Screen backlight;
Rechargeable batteries;
LCD displayer supplies;
Auto- off at low voltage;
Auto-off after 10-min no operation(default);
Display of battery capacity;
Auto shut off of charging
C
or
Transmitter optical power measurements( dBm and W)
Fiber-link loss testing (dB)
Componet/ Device insertion loss testing( dB)
Fiber indentifications with 270 Hz, 1 KHz, 2 KHz signals
Fiber intallation and maintenance applications
FTTx: testing of passive optical networks.
54
FHM2 / Specifications
2 Specifications
Power
Meter
Connector
850/1300/1310/1490/1550/1625
Interchangeable FC/SC/ST for PC/APC
Data storage(items)
tio
999
Ref. Value
Yes
dB / dBm / mW /uW
lu
Display Units
Display precision(dB)
1
So
Accuracy
Wavelength Recognition
Tone Detection
Output Power
C
Stability Long-term(8h)
Stability Short-term (15min)
Wavelength Recognizing Code
Note
1
2
± 5%±1nW
1310/1490/1550
2
270 Hz / 1KHz / 2KHz
2
-50 to +26
1310/1490/1550
Interchangeable FC/SC/ST for PC(APC can be taitored at time of ordering)
or
Source Connector
Modulation frequencies
0.01
-70 to +10
Measuring Range(dBm)
Output wavelength (nm)
al
-i
Laser
FHM2B02
ns
FHM2A02
Calibration wavelength(nm)
270/1K/2K Hz
-5dBm±0.5dB
±0.1dB@1310/1550nm; ±0.2dB@1490nm
±0.05dB@1310/1550nm ; ±0.1dB@1490nm
Yes
±5% is effective under 1550nm, CW, 23℃±3℃, humidity≤70%
Input power >-30dBm
55
FHM2 / Specifications
ns
General Specification
tio
Auto Power off
2pcs *NiHM 1.2V, 2000mAh; AC/DC Adaptor
Power Supply
USB
lu
PC interface
> 100 Hours (laser off)
Battery Life
-20°C~+70°C
So
Storage Temperature
-10°C~+50°C
Operating Temperature
<90% (Non-condensing)
Relative Humidity
168L×76W×43H
al
-i
Dimension (mm)
1
C
1 Including battery weight
or
Weight (Gram)
56
310
FHM2 / Preparing for Operation
3 Preparing for Operation
ns
Unpacking the instrument
tio
Packing material
We suggest you keep the original packing material. Using the original packing material is your
guarantee of protecting the instrument during transit.
al
-i
So
lu
Checking the package contents
The standard accessories of FHM2A02 are as follows:
Main unit(including batteries)
User's Guide
Quality Check Report
Carrying Bag
USB Connecting Cable
PC software
Charger/AC Adaptor
Interchangeable FC,SC,ST connectors for both power meter & laser sourse.
C
or
Checking for damage in transit
After unpacking the instrument, check to see whether it was damaged in transit. This is particularly
likely if the outer casing is clearly damaged. If there is damage, do not attempt to operate the
instrument or to repair it without authorization. Doing so can cause further damage and you may lose
your warranty qualification.
57
FHM2 / Operation
4 Getting Started
1310 1490 1550
4.1 Introduction of Display, controls panel
58
270
1K
2K
REF
10
>2s PERM
FHM2A02
OPTICAL MULTI-METER
lu
FH
LED display of wavelength display on laser source
LED display of modulated wavelength display of laser source
LD
Wavelength shift key on laser source
4
TWIN
Switch on/ off the auto-recognition code of laser source and power meter
5
CW/Hz
al
-i
3
Modulated frequency and CW shift Key on laser source
DELETE
6
PD
Wavelength shift on optical power meter; in “LOAD” mode, it is to delete the value.
7
dBm/
dB/mW
Unit-shifting key of optical power meter and page-up key in “LOAD” mode
>2s SET
8
REF
>2s SAVE
9
LOAD
Reference value setting key on optical power meter and display current reference value
Load and storage of optical power value
Background light key and page-down key in “LOAD” mode
10
>2s PERM
11
11
LOAD
or
Power Meter
[
2
1310 1490 1550
Description
dBm/
dB/mW
C
Laser Source
[
1
Key
>2s SAVE
2K
>2s SET
DELETE
PD
1K
CW/Hz
So
NO.
tio
Keypad
The FHM2A keypad can be divided into two parts, one is used
to control light source and the other is used to access a wide
range of functions of power meter.
270
TWIN
ns
LD
ON/OFF key, long-keypress for over 2 seconds to close the auto-off function
FH
lu
nm
So
1888
FHM2 series
-.8.8.8.8
REF
al
-i
270Hz
1kHz
2kHz
SAVE
888
mw
uw
10
11
12
AUTO-OFF
C
or
SINGLE
TWIN
tio
ns
FHM2 / Operation
59
FHM2 / Operation
LED
LD
1310nm, 1490nm and 1550nm output port(laser source output port)
2
850/1300/1310/
1490/1550/1625nm
Current wavelength tested by the optical power meter
3
REF
Reference value in the optical power meter
lu
tio
1
4
60
Description
ns
NO.
Modulated frequencies identified by optical power meter
6
SAVE
7
PD
Number of the current data in the storage of the optical power meter
Input port of optical power meter(optical power meter input port)
al
-i
888
SINGLE: Auto-wavelength recognition of laser source and optical power meter is off.
TWIN: auto-wavelength recognition of laser source and optical power meter is on.
So
5
SINGLE
TWIN
State of the USB connection
9
External power supplier indicator
10
Signal of battery capacity. Please make the charge when
flashes to show the insufficient
battery capacity.The system shut off automatically when the battery capacity is not enough.
mw uw
12
AUTO-OFF
Display of value unit.
C
11
or
8
AUTO-OFF indicator. AUTO-OFF defaults to turn on when the equipment is on.
FHM2 / Operation
output of laser source
(Interchangeable FC/PC, SC/PC,
ST/PC connector)
Battery plate
( two units of AA batteries)
C
or
al
-i
So
lu
tio
ns
Input of optical power meter
(Interchangeable FC/PC, SC/PC,
ST/PC connector)
61
FHM2 / Operation
4.2 USB interface
tio
ns
You can use the USB interface to connect the instrument with a PC and download the stored data.
There is a socket on the bottom side of the instrument right beside the DC input jack and the USB
cable supplied can be used to connect it to the USB interface of a PC. When the USB cable is
connected, the indicator on the LCD will be displayed.
So
lu
USB interface
al
-i
4.3 Turning the instrument on and off
C
or
Press the “ON/OFF” key briefly.
The instrument powers on, and backlighting switches on.
Please check the battery capacity if it fails.
Press the “ON/OFF” key briefly again.
The instrument powers off, and backlighting switches off.
62
DC Input Jack
FHM2 / Operation
ns
4.4 Activating the Automatic shutdown function
nm
or
- 5.0
AUTO-OFF
So
1310
nm
- 5.0
AUTO-OFF
C
1310
al
-i
Press the backlighting key.
Backlighting switches on.
Press the backlighting key again.
Backlighting switches off.
lu
4.5 Switching backlighting of the LCD on and off
tio
The instrument powers off automatically if no keypress in 10 minutes.Press the “ON/OFF” key for
about 2 seconds to power on the instrument with “Auto-off” function deactivated.
63
FHM2 / Operation
ns
5 Measuring the optical power or loss. ( Operation of power meter)
LD
270
1K
2K
TWIN
CW/Hz
dBm/
dB/mW
REF
1310 1490 1550
LD
>2s SET
DELETE
PD
REF
>2s SET
>2s
GEN DATA
DELETE
>2S STEP=10
PAGE UP
STEP=1
LOAD REF
LOAD
64
PAGE DOWN
STEP=1
C
>2S SETP=10
EXIT LOAD
or
>2S DEL ALL
LAST PAGE
FH
Key definition in Testing Mode
LD WAVE
TWIN
PD WAVE
dB/dBm/MW
>2S SAVE
LOAD
CW/HZ
Press REF
, and operate other
keys in 2 seconds to retain "REF"
mode, otherwise, it will go back to
"Testing Mode"
dBm/
dB/mW
REF
>2s SET
>2s PERM
FHM2A02
OPTICAL MULTI-METER
>2S DEF ALL
DEFAUTL
-5dBm
>2S CLR ALL
>2S SET
REF
ON/OFF
2K
Key definition in Ref. Setting Mode
to cancle setting
CLEAR
"0 dBm"
>2S STEP=1dB
UP
STEP=0.1dB
REF SAVE
>2S STEP=1dB
>2S PER
LIGHT
1K
CW/Hz
LOAD
FHM2A02
LOAD
270
TWIN
DELETE
PD
OPTICAL MULTI-METER
al
-i
Key definition in History Data Mode
LD
>2s SAVE
So
FH
FHM2A02
OPTICAL MULTI-METER
1310 1490 1550
>2s PERM
LOAD
FH
2K
dBm/
dB/mW
>2s SAVE
LOAD
1K
CW/Hz
DELETE
PD
>2s PERM
>2s SAVE
270
TWIN
lu
1310 1490 1550
tio
5.1 definition of the keys indifferent Mode
REF
to save setting
DOWN
STEP=0.1dB
REF EXIT
FHM2 / Operation
5.2 Operating inTesting mode
for shifting the wavelengths on power meter module.
tio
5.2.1 The key
ns
DELETE
PD
DELETE
850
1300
13 10
nm
- 25.82
AUTO-OFF
or
al
-i
So
lu
Press the PD
to shift among the six wavelengths of 1490nm, 1550nm, 1625nm, 850nm, 1300nm
and 1310nm and the corresponding LED will be on. The instrument defaults to 1310nm when it firstly
turned on.
1625
1550
1490
C
Note: the power meter defaults to auto-recognize the modulated signal of 270Hz, 1kHz and 2kHz and
display the signal on the LCD. If the signal is CW, it will not display modulated signal on the LCD.
65
FHM2 / Operation
dBm/
dB/mW
for shifting the units of optical power meter
ns
5.2.2 the key
13 10
nm
al
-i
or
C
66
13 10
- 25.82
AUTO-OFF
13 10
nm
5.00
lu
So
Note: 1). "dB" and "mW" are the unit
representing the absolute value of tested
power value. If the tested power value is
less than 1mW in the unit of "mW", the unit
will be shifted to "uW" automatically.
2) "dB" is the relative value of testing power
value. Firstly, the user should set a
reference value. Then, the current value
can be compared by the reference one. The
formula is "dB"value equals to "the
reference value" minus "the current power
value in dBm".
tio
The power meter defaults to the unit of "dBm". Press the to shift to "dB" and "mW".
AUTO-OFF
nm
2.6 18
uw
AUTO-OFF
FHM2 / Operation
>2s SET
5.2.3 The key
for setting reference value on optical power meter
REF
nm
tio
REF
ns
The reference value defaults to 0.00dBm on optical power meter module. Long keypress the key for
over 2 seconds, the instrument will set the current optical
power value as the reference. Short keypress the key is to 13 10
13 10
Long
keypress
read the current reference value. The instrument will
return to the testing state after two seconds without
operation. If there's operation, the instrument will shift to
the reference editting state. Please refer to the Second
Part of operation.
Note: 1.Long keypress
for over 2 seconds, the unit will be shifted to "dB" automatically.
2.When the input laser power is modulated laser source, it will affect the setting of REF value.
Please guarantee the input laser source is CW laser when setting REF value.
- 25.82
nm
>2 s SE T
REF
0.00
AUTO-OFF
So
lu
AUTO-OFF
REF
>2s SAVE
LOAD
for loading and storing the optical power values
al
-i
5.2.4 The key
C
or
Long keypress the "load" is to store the current values including the wavelength, values, modulation,
states and units being tested. It will list and show the number of the current value from "001" to "999"
on the LCD.
Short keypress the key is to check the stored data. The
detailed description refers to the Part three of operation 13 10
13 10
enter into the "load" mode("history mode). Press the
"load" key again to exit the "history records" mode.
nm
nm
2kHz
- 25.82
AUTO-OFF
2kHz
- 25.82
SAVE
00 1
AUTO-OFF
67
FHM2 / Operation
5.3 Operating in Ref. Setting mode
dBm/
dB/mW
" is the key for increasing the reference value
lu
5.3.1 "
tio
ns
Short keypress the key of "REF" is to check the reference value in the current wavelength. If there is
no operation, the instrument will return to the testing state automatically after two seconds. If there is
any keypress like following operation, the instrument will enter the editting state of reference.
13 10
So
Short keypress is to increase the current reference value for 0.1dB.
13 10
nm
REF
REF
- 25.72
al
-i
- 25.82
nm
AUTO-OFF
AUTO-OFF
13 10
or
Long keypress is to increase the current reference value for 1dB.
nm
C
REF
- 25.82
AUTO-OFF
68
13 10
nm
REF
- 24.82
AUTO-OFF
FHM2 / Operation
" is the key for decreasing the reference value.
13 10
nm
REF
- 25.82
13 10
nm
So
REF
LD
- 25.82
- 25.92
AUTO-OFF
13 10
nm
REF
- 26.82
AUTO-OFF
AUTO-OFF
" is the key for setting the reference value to the default one
al
-i
5.3.3 "
nm
REF
AUTO-OFF
lu
Long keypress is to decrease the reference value for
1dB in the current wavelength.
13 10
ns
Short keypress is to decrease the reference value for
0.1dB in the current wavelength.
tio
5.3.2 "
or
Short keypress is to set the reference value in the current wavelength to "-5dBm".
Long keypress is to set all the reference values in all
nm
13 10
wavelengths to "-5dBm".
C
Note: Setting the reference value to "-5dBm" is to work
with the output "-5dBm" of the laser source. Then it
can test the attenuation of the circuit.
REF
- 25.82
AUTO-OFF
13 10
nm
REF
- 5.00
AUTO-OFF
69
FHM2 / Operation
DELETE
" is the key for deleting the reference value
Short keypress is to delete the reference value
in the current wavelength to "0.00dBm".
Long keypress is to delete all the reference
values in all wavelengths to "0.00dBm".
13 10
nm
ns
PD
REF
- 25.82
tio
5.3.4 "
13 10
nm
REF
0.00
AUTO-OFF
>2s SET
REF
" is the key for storing the current reference setting
lu
5.3.5 "
AUTO-OFF
>2s SET
al
-i
So
Press REF
is to store the current reference setting in the instrument. The stored data will be saved
even the power is cut off. The instrument will return to the measuring state and the unit will return to
"dB" after the storage.
Note: the reference value is displayed but not saved before pressing the key "Ref" . No data will be
restored if it is not saved by pressing the key before the power is off.
>2s PERM
>2s PERM
" is the key for discarding the reference value of the current setting
or
5.3.6 "
C
Press
is to discard the reference value of the current setting, and all the setting data are not
saved. The instrument will return to the original state. It will back to the measuring state and the unit
will be shifted to "dB".
70
FHM2 / Operation
5.4 Operating in History Data mode
dBm/
dB/mW
is to page up for checking the data numbered from 001 to 999
- 25.82
SAVE
0 16
1550
270Hz
nm
- 22.05
AUTO-OFF
SAVE
0 17
AUTO-OFF
is to down the page for checking the data numbered from 001 to 999
al
-i
5.4.2 Press
nm
So
dBm/
dB/mW
13 10
lu
e.g. The current value is saved as number 001, short
keypress is to check the stored value numbered 999,
long keypress for over 2 seconds is to check the
stored value numbered 990. Note: if the data are
saved less than 10 pieces, long keypressing the
will make the instrument shift to the last data stored.
tio
5.4.1 Press
ns
Short keypress is to check the stored data and enter into the checking state.
13 10
850
nm
- 25.82
SAVE
0 16
AUTO-OFF
1KH z
nm
- 32.64
SAVE
0 15
AUTO-OFF
C
or
e.g. The current value is saved as number 001, short
keypress is to check the stored value numbered 002,
long keypress for over 2 seconds is to check the
stored value numbered 011.
Note: if the data are saved less than 10 pieces, long
keypressing the
will make the instrument shift
to the very first data stored.
71
FHM2 / Operation
>2s PERM
5.4.3
is the key for checking the last stored data
>2s PERM
, you can check the last stored data directly.
ns
Press the
>2s SET
REF
is the key for checking the reference value of current stored data
So
>2s SET
DELETE
5.4.5
PD
13 10
nm
- 25.82
lu
If the unit of the stored data is "dB", there must be the
reference value corresponding to the stored data.
Press REF is to check that reference value. If the
value is not "dB", it displays "----" on the LCD, which
means there are no reference.
tio
5.4.4
SAVE
0 16
AUTO-OFF
13 10
nm
REF
2.09
SAVE
0 16
AUTO-OFF
is the key for deleting the stored data
al
-i
DELETE
Short keypress the PD is to delete the current stored data displayed on the LCD. Then, the next
piece of stored data will be displayed on the LCD. If the data deleted is the only data being saved in
the storage, the instrument will return to the measuring state.
Long keypress the PD
is to delete all the stored data and the instrument will return to the measuring
state.
>2s SAVE
5.4.6
LOAD
C
or
DELETE
is the key for exiting the History Data mode
>2s SAVE
Press
72
LOAD
is to exit the history data mode and back to the measuring state.
FHM2 / Operation
6 Operating of Laser Source
LD
for shifting wavelengths on laser source module.
ns
6.1 The key
270
270
1K
2K
1310 1490 1550
1310 1490 1550
2K
270
270
1K
1K
2K
2K
So
1310 1490 1550
1K
lu
1310 1490 1550
tio
Laser source module defaults to be closed when the user turns on the equipment. Press the LD
,
the wavelength LED of 1310nm, 1490nm, 1550nm will be on circularily or the wavelength LED will be
off.
Note: It is suggested to turn off the laser source module to save the power of the instrument.
CW/Hz
for shifting modulated wavelength and CW on laser source
al
-i
6.2 the key
module.
C
or
When the laser source works on any wavelength of 1310nm, 1490nm and 1550nm, press to select the
modulation of 270Hz, 1kHz and 2kHz circularily and the LED of modulated wavelength will be on
correspondingly. Pressing the key can also turn off the modulation and shift to the CW. Note: the
operation of cannot work in the condition that the laser source module on FHM2A02 is closed.
1310 1490 1550
270
1K
2K
1310 1490 1550
270
1K
2K
1310 1490 1550
270
1K
2K
1310 1490 1550
270
1K
2K
73
FHM2 / Operation
ns
6.3 The key TWIN for switching on or off the auto-recognition code of laser source
and power meter
13 10
nm
So
- 25.82
AUTO-OFF
nm
- 25.82
lu
13 10
tio
The auto-recognition and shifting of wavelength can be realized if the FH series intruments are used.
Press is to turn on the auto-recognition code and "TWIN" will be displayed on the LCD. Press again is
to turn off the code.
TWIN
AUTO-OFF
C
or
al
-i
Note: 1). the code of "TWIN" is on or off at the same time in the laser source and power meter modules
of the FHM2A02.
2). It is suggested to turn off the "TWIN" code when you don't use it. The output of laser source will be
fluctuated.
3). The function of "TWIN" and Modulation cannot work together. When the "TWIN" is on, modulation
of laser source module is closed automatically.
4). Wavelength will be shifted automatically according to the recognition when the "TWIN" of power
meter module is on. In another word, the modulated signal of 270Hz, 1kHz and 2kHz cannot be
recognized and received at the moment.
74
ns
tio
lu
Variable Optical Attenuator
C
or
al
-i
So
User's Guide to the FHA2S01/02
75
1888
LPM-4
series
FHA2 series
The FHA2S series digital variable optical attenuator
is a compact,portable instrument widely used in fiber
link certification and routine maintenance as well as
in lab environment.
nm
lu
FH
FH
tio
1 Introduction
So
-.8.8.8.8
Features
Dual-wavelengths calibration
Adjustable attenuation
Screen backlight
Charging supplies
LCD supplies
Accurate and quick adjusting the attenuation by key-press
Auto-off at low voltage
Auto-off within 10 mins no-operation(default)
Power supply identification
Battery capacity display
C
or
al
-i
AUTO-OFF
76
ns
FHA2S / Introduction
FHA2S / Specifications
2 Specifications
Optical Specifications
FHA2S02
ns
FHA2S01
Model
Working Wavelengths
Attenuation Range 1
Μax Input Power
Linearity
Accuracy 1
1310nm/1550nm
0~60dB
tio
0~80dB
24dBm
≤0.3dB
0.2dB @3~20dB
0.5dB @ 20~50dB
1.0dB@50~60 dB
So
lu
0.2dB @3~30dB
0.5dB @ 30~60dB
1.0dB@60~80 dB
Insert ion Loss
Return Loss
Working time
Fiber Type
Connector
-10˚C to 50˚C
-20˚C to 60˚C
0%~95% (non-condensing)
160L*76W*45H(nm)
360g(Battery included)
or
General Specifications
al
-i
<3dB
>50dB(PC) >60dB(ΑPC)
>10hours(2*size AA)
SMF 9/125μm
Interchangeable FC/PC, SC/PC, ST/PC connectors.
(FC/APC, SC/APC is available at time of ordering)
C
Operating temperature
Storage temperature
Relative humidity
Dimension
Weight
Note:
1
Valid at 1550nm, CW, 23±3 ˚C ,Reliable humidity≤70%, with FC/PC connector.
77
FHA2S / Preparing for Operation
ns
3 Preparing for Operation
Unpacking the instrument
al
-i
So
Checking the package contents
The standard accessories of FHA2S are as follows:
Main unit
Quality Check Report
FC/SC/ST Connectors
AC/DC Adapter/Charger
lu
tio
Packing material
We suggest you keep the original packing material. Using the original packing material is your
guarantee of protecting the instrument during transit.
User's Guide
Carrying Case
Battery
C
or
Checking for damage in transit
After unpacking the instrument, check to see whether it was damaged in transit. This is particularly likely
if the outer casing is clearly damaged. If there is damage, do not attempt to operate the instrument or to
repair it without authorization. Doing so can cause further damage and you may lose your warranty
qualification.
78
FHA2S / Operation
4 Operation
>2s 1dB
>2s MSET
>2s 1dB
>2s MSET
>2s PERM
>2s 1dB
>2s MSET
>2s REFSET
>2s 1dB
>2s PERM
FH
FHA2S01
FHA2S01
So
FH
>2s REFSET
tio
>2s 1dB
>2s REFSET
lu
>2s 1dB
ns
4.1 The key definitions indifferent Modes
FIBER ATTENUATOR
Ref Mode
FIBER ATTENUATOR
al
-i
Long Press
up
STEP=0.05dB
>2s STEP=1dB
>2s REFSET
FH
Long Press
up
STEP=0.05dB
Pre value
>2s DEFAULT
>2s STEP=1dB
DOWN
STEP=0.05dB
Long Press
C
>2s PERM
or
>2s STEP=1dB
FHA2S01
FIBER ATTENUATOR
Presetting value Mode
Normal Mode
>2s STEP=1dB
>2s PERM
DOWN
STEP=0.05dB
Long Press
to save the setting
M
next value
>2s PERM
>2s PERM
Short Press
to cancel the setting
79
FHA2S / Operation
4.2 Controls and connectors
FH
FH
2
Shift wavelength between 1310nm and 1550nm
In "normal mode":
Long press to enter the "presetting values mode".
Short press to change the current value into the presetting values.
In "presetting value mode":
Short press to cancel setting and go back to "normal mode";
Long term press to save the setting and go back to "normal mode"
80
al
-i
5
Long press to enter the "REF mode"
Short press to check the reference value under "REF mode".
or
Shot-keypress is to d ecrease the attenuation step by 0.05dB.
Long-keypress is to decrease the attenuation by 1dB/step.
Short Press to Turn on or off the LCD background light
Long term press in "Presetting value Mode" to set the presetting
values into default values.
C
7
AUTO-OFF
Long-keypress is to increase the attenuation step by 1dB.
4
6
-.8.8.8.8
Shot-keypress is to i ncrease the attenuation step by 0.05dB.
So
3
Function
LPM-4
series
FHA2 series
nm
tio
1
Key
lu
NO.
ns
1888
Short keypress to turn on the instrument and long press for more
than 2 seconds to close the Auto-off function.
6
7
FH
ns
FHA2S / Operation
1550
REF mode
REF
nm
lu
Wavelength
tio
LCD
So
-.8.8.8.8
5
AUTO-OFF
AC Adapter
Measurement Unit
Auto-off
No. of presetting value
(show in "presetting value mode")
C
or
al
-i
Attenuation Value
Battery Charge
81
FHA2S / Operation
ns
Back
Optical Output Interface
Battery Plate
C
or
al
-i
So
lu
tio
Optical Input Interface
82
DC 6V Input
FHA2S / Operation
4.3 Turning the Instrument on and off
ns
-.8.8.8.8
AUTO-O FF
tio
Press the "ON/OFF" Key briefly, the instrument powers on.
If it fails, please check the battery capacity. The instrument
powers off after pressing the "ON/OFF" Key.
Short press
al
-i
4.4 Turning on the Background Light
So
lu
Note: Auto-off function
1. The instrument powers off automatically if no keypress in
10 minutes.
2. Press the "ON/OFF" key for about 2 seconds to power on
the instrument with "Auto-off" function deactivated.
key to open or close the background light.
-.8.8.8.8
1888
nm
or
AUTO-O FF
C
-.8.8.8.8
AUTO-OFF
1888
nm
-.8.8.8.8
AUTO-OFF
83
FHA2S / Operation
4.5 Operation in "Normal Mode"
ns
1550
4.5.1 Setting the wavelength
nm
.8.5.5.0
AUTO-OFF
lu
Short keypress the
key, you can shift the wavelength
between 1310nm and 1550nm and the wavelength indicator
will change accordingly. The attenuation value will not
change when the wavelengths are shifted.
tio
13 10
4.5.2 Setting the Attenuation Value
al
-i
So
You can press
or
key to adjust the attenuation
value. Short-keypress is to increase or decrease the value
of 0.05dB/step; Long-keypress is to increase or decrease
the value of 1dB/step.
1550
or
C
Long keypress
(>2 seconds)
84
1550
AUTO-O FF
1550
nm
Short keypress
10.00
nm
1 0.00
10. 05
AUTO-OFF
AUTO-OFF
1550
nm
1 0.00
AUTO-OFF
nm
1 1.00
AUTO-OFF
FHA2S / Operation
4.6 Operating in "Ref Mode"
-.8.8.8.8
13 10
AUTO-O FF
tio
(>2s) in "Normal Mode" to enter the "REF Mode".
(>2s) in "Ref Mode" tol exit the "REF Mode"
nm
13 10
nm
REF
0.00
So
10.00
lu
Long-keypress
Long-keypress
ns
4.6.1 Entering "Ref Mode" and exit "Ref Mode"
AUTO-OFF
Short-keypress the key
4.6.3
al
-i
4.6.2 Check the current REF value
AUTO-OFF
to check the reference value under "REF"mode
1550
Change attenuation value in REF mode
Short keypress
C
or
You can press
or
key to adjust the attenuation
value. Short-keypress is to increase or decrease the value
of 0.05dB/step; Long-keypress is to increase or decrease
the value of 1dB/step.
1550
nm
REF
1 0.00
nm
REF
AUTO-OFF
1550
Long keypress
(>2 seconds)
AUTO-OFF
1550
nm
REF
1 0.00
AUTO-OFF
10. 05
nm
REF
1 1.00
AUTO-OFF
85
FHA2S / Operation
4.7 Operation in "Presetting values modes"
4.7.1 Entering "Presetting values Mode" and exit "Presetting values Mode"
13 10
13 10
nm
5
nm
press
10.00
So
4.7.2 Choosing the presetting value.
Press
or
to choose the presetting value,
and long press
key to save the current
value as the new value for the presetting value
. FHA2 can set nine presetting values for each
wavelength. In the screen, there is a number to
indicator the number of the presetting number.
tio
ns
(>2 seconds) in "Normal Mode" to enter the "Presetting values Mode".
(>2 seconds) to save the setting and exit "Presetting values Mode" .
(<2 seconds) to cancel the setting and exit "Presetting values Mode".
18.00
lu
Long-keypress
Long-keypress
Short-keypress
6
AUTO-OFF
AUTO-OFF
al
-i
4.7.3 Setting presetting values into nine "DEFAULT" values.
or
Long-keypress
, it will change the nine presetting values into the nine "DEFAULT" values.
,which are 0dB,20dB, 30dB, 40dB, 50dB, 60dB.70dB 80dB(70dB and 80dB is not including in
FHS2S02)
C
No. of
previous value
DEFAULT value
86
1
2
0dB 10dB
3
4
5
6
7
8
20dB 30dB 40dB 50dB 60dB 70dB
9
80dB
ns
tio
lu
So
User's Guide to the FHV1A
C
or
al
-i
Visual Fault Locator
87
FHV1A / Introduction
1 Introduction
ns
FHV1 series
nm
2Hz
270Hz
1kHz
FHV1 series visual fault locator is visible red laser source for finding
breaks and tight bends in optical fibers.It features a rugged, palm
design with interchangeable FC,SC,ST connectors. It is power supplied
by 3.6V Li-on battery. The Grandway FHV1 visual fault locator can
easily locates the breaks in LANs, verify continuity, check the validity of
patch cables and look for cracked fiber in splice cases,bad connectors
or tight bends in fiber cable. It is a perfect complementary tool for OTDR
because of its capability of finding breaks in the dead zone of OTDR.
2kHz
So
lu
tio
-
TM
FHV1A
VISUAL LASER SOURCE
al
-i
特 点:
C
or
Wavelength at 650nm, FC/SC/ST
interchangeable connectors
CW/2Hz modulated output available
Unique adjustable output function:0dBm,
+3dBm,+8dBm.
LCD screen display
88
Backlight Available
Auto-off (if no operation in 10 minutes)
Auto-power supply recognition
Rechargeable battery with battery indication
display
FHV1A / Specification
ns
2 Specification:
Model
FHV1A
Class 2 for 0dBm output;
Class 3R for +3dBm output;
Class 3B for +8dBm output
(IEC 60825-1)
Stability(After 15 minutes warm-up)
0.1dB
Output Power
0dBm/+3dBm/+8dBm
Modulated Wavelength
2Hz
Optical Connectors
Interchangeable FC/PC, SC/PC, ST/PC connectors
Power Supply
Rechargeable Li-on Battery(continuously working up to 20 hours)
Power Type
Input:AC 100V-240V 50/60Hz ,
Output:DC 5V/1A
Working Temperature
-10ºC -- +50ºC
Storage Temperature
-20ºC -- +70ºC
Working Humidity
<90%
Dimension(mm)
115 * 65 * 27(L*W*H)
Weight
140g (Net)
C
or
al
-i
So
lu
tio
Laser Class
89
FHV1A / Preparing for Operation
ns
3 Preparing for Operation
tio
Unpacking the instrument
lu
Packing material
We suggest you keep the original packing material. Using the original packing material is your
guarantee of protecting the instrument during transit.
al
-i
So
Checking the package contents
The standard accessories of FHV1A are as follows:
Main unit
3.6V Li-on battery
Quality Check Report
User's Guide
Carrying Case
Interchangeable FC,SC,ST
connectors
C
or
Checking for damage in transit
After unpacking the instrument, check to see whether it was damaged in transit. This is particularly
likely if the outer casing is clearly damaged. If there is damage, do not attempt to operate the
instrument or to repair it without authorization. Doing so can cause further damage and you may
lose your warranty qualification.
90
FHV1A / Operation
NO
4.1.1 Front (Panel Board)
1
Indicator
Display the current working wavelength
650nm
Display the current working modulated tone
2
3
lu
Activate the Auto-off function when
the instrument is in working status.
4
-
5
2Hz
Output value(dBm)
al
-i
6
So
FHV1 series
nm
TM
FHV1A
C
VISUAL LASER SOURCE
or
NO
Meaning
tio
4.1 Controls and connectors
ns
4 Operation
AC power supply
Battery indicator
Output display in dBm
Key
Function
ON/OFF,.If pressing down the key for longer
than 2 seconds,the unit will be turned on with
"auto-off" function deactivated.
Output power switch
CW/2 Hz modulated tone switch
Backlight
91
FHV1A / Operation
4.1.2 Back
lu
tio
ns
interchangeable FC/PC,SC/PC,ST/PC adapters
C
or
al
-i
So
Battery panel(Rechargeable Li-on battery inside)
DC pin for power supply(DC5V)
Standard Accessories:Carrying case,Manual,Battery,Power adapter
92
interchangeable FC/PC,SC/PC,ST/PC adapters
FHV1A / Operation
-
ns
4.2
Turn On
2Hz
270Hz
1kHz
2kHz
lu
Turn Off
tio
Press the "ON/OFF" key briefly,the instrument powers on.
If the instrument fails to turn on, please check if the battery is
properly placed.
270Hz
1kHz
2kHz
Default
The instrument powers off if no key pressing happens in 10
minutes.
Auto-off Deactivated
or
2Hz
al
-i
Auto-Off
C
-
So
Press the "ON/OFF" key >2 seconds,the instrument powers
off.
When the instrument is in the state of working,press the
key"ON/OFF" longer than 2 seconds to deactivate the Autooff function.
93
FHV1A / Operation
Output power switch
2H z
27 0H z
1k Hz
ns
-
2k Hz
Frequency Output
2H z
27 0H z
1k Hz
al
-i
-
So
lu
tio
Press the key "P" to switch output power between
0dBm,+3dBm and +8dBm.
2k Hz
C
or
The default frequency output is CW(continuous
wave), press the key "CW/Hz" to switch the frequency
output between 2Hz and CW.
94
FHV1A / Operation
Backlight
2H z
27 0H z
1kH z
ns
-
2k Hz
So
lu
tio
Press this key to turn on and turn off the back light.
Auto-power recognition
nm
270Hz
1kHz
2kHz
The instrument may able to recognize whether it is working by AC or
DC power supply and shows the corresponding logo on the screen.
2Hz
270Hz
1kHz
C
nm
-
al
-i
2Hz
It displays the charging flash when the instrument is pluged in AC
power supply.The indicator will show the electric quantity of a battery
when the instrument is using battery for power supply.The instrument
may fail to be turned on if battery capability is too low.
or
-
2kHz
95
FHV1A / Operation
or
On&off failure
Connector unfitted
Humid environment
Magnetic field environment
Metal dust environment
Humid environment
Keypad short circuit
al
-i
Error display
lu
Low battery
On&off disorder
Inaccurate measuremen Contaminated connector
Recommended solution
Plug in battery or AC
Charge battery
Re-install battery
(Still doesn't work)
Charge battery or use AC power supply
Swab the dust by using an alcohol-impregnated
thin cotton swab
Re-install the connector
Try later while it is not too humid
Stay far away from magnetic field
May cause damage on mainboard
Try later while it is not too humid
Replace keypad
tio
Possible Cause
No power input
Battery exhausted
Reverse-installed battery
So
Malfunction Type
Failure to turn on/off
ns
4.3 Trouble shooting:
Remarks
DIY Available
DIY Available
DIY Available
Return to factory
DIY Available
DIY Available
DIY Available
DIY Available
DIY Available
Return to factory
DIY Available
Return to factory
C
Warm advice:This test instrument is available for single-mode optical fiber measurement only.
96
ns
tio
lu
Visible Laser Source
C
or
al
-i
So
User's Guide to the VLS-5A/B
97
VLS-5A/B / Introduction
ns
1 Introduction
So
lu
tio
The VLS-5A/B is compact but powerful visible fault locator designed
troubleshoot on fiber optic cables. Light generated by these units will
escape from sharp bends and breaks in jacketed or bare fibers, as
well as poorly mated connectors. Thus they can identify faults in fiber
optic jumper cables, distribution frames, patch panels, and splice
trays. The VLS-5A/B locates faults visually by creating a bright red
glow at the exact location of the fault on singlemode or multimode
fibers. The VLS-5A/B is powered by three No. 7 batteries.
C
or
al
-i
Features:
• Solid and compact, easy to carry
• Superpower output( VLS-5A>=7mW)
98
VLS-5A/B / Specification
Model
tio
ns
2 Specifications
VLS-5A
Operating wavelength
lu
Output Power 1
Modulation frequencies
Power Supply
Operating Temperature
>1mW
10 @2Hz
2Hz/CW
Three units of No. 7 battery
So
>7mW
Battery Life(Hours)
-10℃~+50℃
al
-i
Storage Temperature
Operating Humidity
or
Dimension (mm)
Net Weight
VLS-5B
650nm±10nm
-20℃~+70℃
<90%(Non-condensing)
Ф27*150
150g
C
1. @CW,23±3℃,RH≤70%,with FC connector
99
VLS-5A/B / Preparing for Operation
ns
3 Preparing for Operation
tio
3.1 Unpacking the instrument
lu
Packing material
We suggest you keep the original packing material. Using the original packing material is your
guarantee of protecting the instrument during transit.
al
-i
So
Checking the package contents
The standard accessories of VLS-5A/B are as follows:
FC/PC connector
Manual
Battery Recharger
Carrying Case
Battery
C
or
Checking for damage in transit
After unpacking the instrument, check to see whether it was damaged in transit. This is particularly
likely if the outer casing is clearly damaged. If there is damage, do not attempt to operate the instrument
or to repair it without authorization. Doing so can cause further damage and you may lose your warranty
qualification.
100
VLS-5A/B / Preparing for Operation
So
lu
tio
ns
3.2 Battery
C
or
al
-i
Battery Installation
Unscrew the lid on the top of the VLS-5A/B
Take out the cylinder for battery installation
Fit the three units of No. 7 battery into the right position according to the anode and cathode on the cylinder
Put the cylinder into the VLS-5A/B in the direction of the arrow
Screw the lid
Recharge the battery
Put the battery into the charger according to the anode and cathode
Full charge the battery for about 8 hours
Continuous working for 3 to 4 hours after the full-charge
101
VLS-5A/B / Operation
lu
tio
ns
4 Operation
102
al
-i
So
2Hz/CW switch
Key
1
Power Switch
2
2Hz/CW Switch
C
or
No.
Power switch
Function
Press the power switch button to turn on or off the instrument .
Press the button to switch between 2Hz frequency and Continuous Wave.
Maintenance
ns
Maintenance
C
or
al
-i
So
lu
tio
Please disconnect the DC adapter/charger and cover the protective
dust cap once you finish using.
It is a good idea to clean the connector and the instrument when they
get dirty through use. Optical cleaning pads and anhydrous alcohol
is recommended. And please be careful not to get the detergent
inside the instrument.
To ensure the measurement accuracy, please send the instrument to
Grandway Service Center for calibration once a year.
103
Warranty
ns
Warranty
lu
tio
Three Years Limited Warranty
Grandway products are warranted against the defective components and workmanship for a period of
three years from the date of delivery to the original customer. Any product found to be defective within
the warranty period would be returned to Grandway authorized service center for repair, replacement
or calibration.
al
-i
So
Exclusions
The warranty on your equipment shall not apply to defects resulting from the following:
Unauthorized repair or modification including battery replacement
Misuse, negligence, or accident
C
or
Returning Product
To return product, you may contact Grandway to obtain additional information if necessary. To serve
you better, please specify the reasons for the return.
All delivery and mails should be sent to the following address:
104
ns
Warranty
lu
tio
Shanghai Grandway Telecom Tech. Co., Ltd.
Customer Service
Add:6F, Xin'an building No. 99 Tianzhou Road
Shanghai, 200233 P.R. China
So
Contact Us
C
or
al
-i
Tel:
+86-21-54451260/61/62/63
Fax:
+86-21-54451266
E-mail:
[email protected]
Website: www.grandway.com.cn
NOTE: Specifications, terms and conditions are subject to change without notice.
©Copyright 2008 Grandway. All rights reserved.
Grandway and its logo are trademarks of Grandway.
Printed in China.
105
al
-i
or
C
tio
lu
So
ns