1
Grove - 80cm Infrared
Proximity Sensor
User Manual
Release date:
2015/9/22
Version:
1.0
Wiki: http://www.seeedstudio.com/wiki/index.php?title=Twig_-_80cm_Infrared_Proximity_Sensor_v0.9
Bazaar:
http://www.seeedstudio.com/depot/Grove-80cm-Infrared-
Proximity-Sensor-p-788.html?cPath=25_31
1
Document Revision History
Revision
Date
Author
Description
1.0
Sep 22, 2015
Loovee
Create file
2
Contents
Document Revision History ·········································································2
1. Introduction ·······················································································2
2. Features ····························································································3
3. Application Ideas ·················································································4
4. Specification ······················································································5
5. Usage ······························································································6
5.1
5.2
6.
7.
With Arduino ························································································6
With Raspberry Pi ··················································································8
Reference ·························································································10
Resources ·························································································11
3
Disclaimer
For physical injuries and possessions loss caused by those reasons which are not related to
product quality, such as operating without following manual guide, natural disasters or force
majeure, we take no responsibility for that.
Under the supervision of Seeed Technology Inc., this manual has been compiled and published
which covered the latest product description and specification. The content of this manual is
subject to change without notice.
Copyright
The design of this product (including software) and its accessories is under tutelage of laws. Any
action to violate relevant right of our product will be penalized through law. Please consciously
observe relevant local laws in the use of this product.
1
1. Introduction
The 80cm Infrared Proximity Sensor is a General Purpose Type Distance Measuring Sensor. This
sensor SharpGP2Y0A21YK, boasts a small package and very low current consumption, takes a
continuous distance reading and returns a corresponding analog voltage with a range of 10cm (4")
to 80cm (30"). Can be used in TVs, personal computers, cars and so on.
2
2. Features
Easy to use
Wide supply voltage range: 2.5V–7V
Grove Interface
3
3. Application Ideas
Waterdrop conservation
Toys
Robotics
4
4. Specification
Item
Minimum
Typical
Maximum
Working Voltage
2.5V
5V
7V
Analog Output
0.25V
0.4V
0.5V
Current
-
33mA
50mA
5
5. Usage
5.1
With Arduino
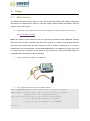
The Infrared Proximity sensor is easy to use. The relationship between the voltage reading and
the distance as shown below. When we read the voltage, which indicate the distance from the
object in front to this sensor.
Connect the 3-pin connector to the sensor, and connect the 4-pin connector to the A1 port of
the Grove-Base Shield
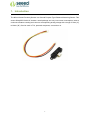
Note: This sensor is quite small and use a tiny connector called the Japan Solderless Terminal
(JST) connector. These connectors have three wires: ground, vcc, and the output signal. Because
this sensor fire continuously and don't need any clock to initiate a reading cycle, it is easy to
interface with any microcontroller. For the Arduino&Seeeduino, we prepared a 4-pin to 3-pin wire
to convert the 3-pin connecter on the sensor to 4-pin connecter on the Grove Base Shield, to
compatible with the Seeeduino Grove interface.
Connect Arduino/Seeeduino via a USB cable.
Copy and paste code below to a new Arduino sketch.
#define IR_PROXIMITY_SENSOR A1 // Analog input pin that
is attached to the sensor
#define ADC_REF 5//reference voltage of ADC is 5v.If the Vcc switch on the Seeeduino
//board switches to 3V3, the ADC_REF should be 3.3
float voltage;//the sensor voltage, you can calculate or find the distance
// to the reflective object according to the figures
//on page 4 or page 5 of the datasheet of the GP2Y0A21YK.
void setup()
{
6
// initialise serial communications at 9600 bps:
Serial.begin(9600);
}
void loop()
{
voltage = getVoltage();
Serial.print("sensor voltage
= " );
Serial.print(voltage);
// wait 500 milliseconds before the next loop
delay(500);
}
/****************************************************************************/
/*Function: Get voltage from the sensor pin that is connected with analog pin*/
/*Parameter:-void
*/
/*Return: -float,the voltage of the analog pin
*/
float getVoltage()
{
int sensor_value;
int sum;
// read the analog in value:
for (int i = 0;i < 20;i ++)//Continuous sampling 20 times
{
sensor_value = analogRead(IR_PROXIMITY_SENSOR);
sum += sensor_value;
}
sensor_value = sum / 20;
float voltage;
voltage = (float)sensor_value*ADC_REF/1024;
return voltage;
}
Upload the code, please click here if you do not know how to upload.
Open the Serial Monitor, you can get the voltage. you can calculate or find the distance to the
reflective object according to the below figures.
7
Note: Because of some basic trigonometry within the triangle from the emitter to reflection spot to
receiver, the output of the detector is non-linear with respect to the distance being measured.
5.2
With Raspberry Pi
1. You should have got a raspberry pi and a grovepi or grovepi+.
2. You should have completed configuring the development enviroment, otherwise follow here.
3. Connection
Plug the sensor to grovepi socket D4 by using a grove cable.
4. Navigate to the demos' directory:
cd yourpath/GrovePi/Software/Python/
To see the code
nano grove_infrared_distance_interrupt.py
# "Ctrl+x" to exit #
import time
import grovepi
# Connect the Grove Infrared Distance Interrupt Sensor to digital port D4
# SIG,NC,VCC,GND
sensor = 4
grovepi.pinMode(sensor,"INPUT")
8
while True:
try:
# Sensor returns LOW and onboard LED lights up when the
# received infrared light intensity exceeds the calibrated level
if grovepi.digitalRead(sensor) == 0:
print "found something"
else:
print "nothing"
time.sleep(.5)
except IOError:
print "Error"
5. Run the demo.
sudo python grove_infrared_distance_interrupt.py
9
6. Reference
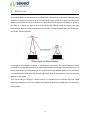
This new rangers use triangulation and a small linear CCD array to compute the distance and/or
presence of objects in the field of view. The basic idea is this: a pulse of IR light is emitted by the
emitter. This light travels out in the field of view and either hits an object or just keeps on going. In
the case of no object, the light is never reflected and the reading shows no object. If the light
reflects off an object, it returns to the detector and creates a triangle between the point of reflection,
the emitter, and the detector.
The angles in this triangle vary based on the distance to the object. The receiver portion of these
new detectors is actually a precision lens that transmits the reflected light onto various portions of
the enclosed linear CCD array based on the angle of the triangle described above. The CCD array
can then determine what angle the reflected light came back at and therefore, it can calculate the
distance to the object.
This new method of ranging is almost immune to interference from ambient light and offers
amazing indifference to the color of object being detected. Detecting a black wall in full sunlight is
now possible.
10
7. Resources
GP2Y0A21YK datasheet
11