1
avast! antivirus Home Edition 4.8 – User Guide
avast! antivirus
Home Edition 4.8
User Guide
1
avast! antivirus Home Edition 4.8 – User Guide
CONTENTS
Introduction ...................................................................................................................... 4
About ALWIL Software a.s. .............................................................................................. 4
Further help ...................................................................................................................... 4
Threats to your computer ................................................................................................ 5
What is a virus? ........................................................................................................ 5
What is spyware? ..................................................................................................... 5
What are rootkits? .................................................................................................... 5
Key features of avast! antivirus ...................................................................................... 6
Antivirus kernel ......................................................................................................... 6
Resident protection (or “on-access” protection) ..................................................... 7
Built-in anti-spyware technology ............................................................................. 7
Built-in anti-rootkit technology ................................................................................ 7
Strong self-protection .............................................................................................. 7
Automatic updates ................................................................................................... 7
Virus Chest ................................................................................................................ 8
System integration ................................................................................................... 8
Integrated avast! Virus Cleaner ............................................................................... 8
Command-line scanner (Professional Edition only) ............................................... 9
Script blocker (Professional Edition only).............................................................. 9
PUSH updates (Professional Edition only) ............................................................ 9
Enhanced user interface (Professional Edition only) ............................................ 9
System requirements ..................................................................................................... 10
How to install avast! antivirus Home Edition ............................................................... 11
Getting started ............................................................................................................... 16
Password protection ...................................................................................................... 17
How to register for a License Key ................................................................................. 18
Inserting the License Key ............................................................................................... 19
Basics of using avast! antivirus ..................................................................................... 20
Resident (“on-access”) Protection .......................................................................... 20
How to run a manual virus scan – the Simple User Interface .............................. 24
Selecting the areas to be manually scanned ..................................................... 26
Setting the scan sensitivity and running the scan ............................................ 28
Running a scan and processing the result ......................................................... 29
Changing the appearance of the Simple User Interface ....................................... 30
What to do if a virus is found ................................................................................ 32
Results of last scan ................................................................................................ 36
Advanced features ......................................................................................................... 37
Setting automatic updates .................................................................................... 37
How to schedule a Boot-time scan ........................................................................ 38
Excluding files from scanning ................................................................................. 40
How to create a report of the scan results ........................................................... 41
Alerts ....................................................................................................................... 44
SMTP ....................................................................................................................... 45
Searching the Virus Database ................................................................................ 46
Working with files in the Virus Chest ..................................................................... 48
The Log Viewer ....................................................................................................... 50
Resident Protection settings ......................................................................................... 52
Other avast! settings ..................................................................................................... 65
2
avast! antivirus Home Edition 4.8 – User Guide
Common settings .................................................................................................... 65
Explorer extension .............................................................................................. 65
Appearance ............................................................................................................. 66
Confirmations .......................................................................................................... 66
Changing the program language ............................................................................ 68
Sounds .................................................................................................................... 69
Update (Connections) ............................................................................................. 70
Troubleshooting ...................................................................................................... 71
How to activate the avast! antivirus screen saver ....................................................... 73
How to upgrade to Professional Edition ....................................................................... 78
How to uninstall avast! antivirus ................................................................................... 79
3
avast! antivirus Home Edition 4.8 – User Guide
Introduction
Welcome to avast! antivirus Home Edition version 4.8.
avast! antivirus is a collection of award winning, high-end technologies that work in
perfect synergy, having one common goal: to protect your system and valuable data
against computer viruses. It represents a best-in-class solution for any Windowsbased workstation.
avast! antivirus incorporates anti-spyware technology, certified by West Coast Lab’s
Checkmark process, as well as anti-rootkit and strong self-protection capabilities to
ensure that your valuable data and programs are always protected.
About ALWIL Software a.s.
Since 1988, ALWIL Software has produced antivirus products that have been
developed into the multi-award winning avast! antivirus product line, making avast!
one of the most mature and tested products on the antivirus market.
Headquartered in Prague, in the Czech Republic, ALWIL Software develops and
markets avast! antivirus products that protect every major operating system and
every major type of vulnerable device. Further details about the company and its
products can be found on our website, www.avast.com.
avast!® is a registered trademark in the United States of America and other countries
and is used under exclusive license to ALWIL Software a.s.
Further help
If you experience any difficulties with your avast! antivirus program, which you are
unable to resolve after reading this manual, you may find the answer in the Support
Center of our website at http://support.avast.com
•
In the Knowledgebase section you can quickly find answers to some of
the most frequently asked questions
•
Alternatively, you can take advantage of the avast! Support Forums. Here
you can interact with other users of avast! who may have experienced the
same problem and may already have discovered the solution. You will need
to register to use the forum but this is a very quick and simple process. To
register to use the forum, go to http://forum.avast.com/
If you are still unable to resolve your query, you can “Submit a ticket” to our support
team. Again, you will need to register to do this and when writing to us, please make
sure to include as much information as possible.
4
avast! antivirus Home Edition 4.8 – User Guide
Threats to your computer
Viruses, spyware, rootkits and all forms of malicious software are collectively known
as malware (short for malicious software); malware is also sometimes referred to as
“badware”.
What is a virus?
A computer virus is a piece of software, usually malicious in nature, which is used to
spread itself or other such software from computer to computer. Viruses themselves
may cause system damage, loss of valuable data, or can be used to install spyware,
rootkits or other malware onto a vulnerable system.
A key way to prevent infection is to have an up-to-date antivirus solution installed on
all computers in a network, and to make sure that all of the latest security patches
for the computer operating system are installed. Users should also make sure that
they can trust the source of software they are downloading from the internet, as
many malware types are installed along with other legitimate-looking software.
What is spyware?
Spyware is software installed on a computer system that is designed to collect
information about the computer user often without their consent or knowledge. This
information may result in so-called identity theft, or theft of valuable information
(such as bank or credit card details) or proprietary business data.
These days, much of the current spyware is developed by organized crime rings,
rather than opportunistic lone individuals and is installed by a virus or another form
of malware.
What are rootkits?
Rootkits are programs that install on your system, while keeping themselves, their
processes, services and registry keys hidden, to stay invisible from the user. They
represent a substantial security risk on home and company networks and are
notoriously difficult to find and remove.
Rootkits themselves are normally deployed via another malware infection (such as a
Trojan, for instance), and it is therefore highly recommended that computer users
have an up-to-date antivirus / anti-spyware system installed and running on their PC.
One such system is avast! antivirus 4.8.
5
avast! antivirus Home Edition 4.8 – User Guide
Key features of avast! antivirus
avast! is the multi-award winning antivirus product line from ALWIL Software a.s.,
which is ICSA Labs certified, and Checkmark certified (for both antivirus and antimalware). avast! antivirus regularly receives the Virus Bulletin 100% award, for
detection of 100% of in-the-wild viruses, and is a repeated winner of the Secure
Computing Award.
avast! antivirus is in use in over 50 million homes and offices worldwide; it is
specifically engineered to have low system requirements and to update both itself
and the virus definitions automatically.
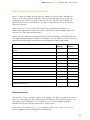
avast! antivirus represents a collection of high-end technologies created to give you
unrivaled protection against all forms of malware. The key features of avast! antivirus
Home Edition and Professional Edition are compared and described below.
Key features
Home
Edition
Yes
Professional
Edition
Yes
Yes
Yes
Built in anti-spyware
Yes
Yes
Built in rootkit detection
Yes
Yes
Strong self protection
Yes
Yes
Automatic incremental updates
Yes
Yes
Virus chest for storage of suspicious files
Yes
Yes
System integration
Yes
Yes
Integrated virus cleaner
Yes
Yes
Antivirus kernel based on high performance antivirus
engine
Strong resident protection
Command line scanner
No
Yes
Script blocker
No
Yes
PUSH updates
No
Yes
Enhanced user interface and ability to create and
schedule defined tasks
No
Yes
Antivirus kernel
The antivirus kernel is the basic core of the program. The latest version of the avast!
antivirus kernel combines outstanding detection abilities with high performance. You
can expect 100% detection of “in-the-wild” viruses (viruses already spreading
between users) and excellent detection of Trojan horses.
The kernel is certified by ICSA Labs; it frequently takes part in the tests of Virus
Bulletin magazine, often yielding the VB100 award.
6
avast! antivirus Home Edition 4.8 – User Guide
Resident protection (or “on-access” protection)
Resident protection (the real-time protection of the computer system), is one of the
most important features of an antivirus program today. Avast! resident protection is
a combination of several parts or “resident modules” that are able to detect a virus
before it has any chance to infect your computer.
Built-in anti-spyware technology
Avast! antivirus now has built-in anti-spyware technology, which is certified by the
West Coast Labs Checkmark certification process and offers even greater protection
of your valuable data and programs.
Built-in anti-rootkit technology
Anti-rootkit technology based on the class-leading GMER technology is also built into
the program as standard. If a rootkit is discovered, it is initially disabled and then, if it
can be safely removed without affecting the performance of the computer, it is
removed. avast! antivirus includes a virus database which can be automatically
updated to provide continuous protection against rootkits.
Strong self-protection
Some viruses may attempt to switch off a computer's antivirus software. To protect
your computer even against the latest threats that may try to disable your security
protection, avast! has best-in-class strong self-protection built in. This is based on
the multi-award winning avast! antivirus technology and provides an extra layer of
security to ensure your data and programs are always protected.
Automatic updates
Automatic updates are another key need in virus protection. Both the virus database
and the program itself can be updated automatically. The updates are incremental,
with only new or missing data downloaded, reducing the transfer time significantly.
The typical size of a virus database update is tens of KB while program updates are
typically not more than hundreds of KB.
If your Internet connection is continuous (such as an always-on broadband
connection), then updates are performed completely automatically at fixed time
intervals. If you connect to the Internet only occasionally, avast! monitors your
connection and tries to perform the update when you are online. This feature is
described further on page 37.
7
avast! antivirus Home Edition 4.8 – User Guide
Virus Chest
The Virus Chest can be thought of as a folder on your disk drive, having special
properties that make it a safe, isolated place suitable for storing potentially harmful
files. You can work with the files in the Chest, though with some security restrictions.
The main properties of the Virus Chest are complete isolation from the rest of the
operating system. No outside process, such as a virus, may access the files inside,
and the fact that the files inside the Chest may not be run means there is no danger
in storing viruses there. For more information, see page 48.
System integration
Avast! antivirus is fully integrated into your system. The Explorer Extension enables a
scan to be started directly by clicking a folder or a file with your right mouse button
and selecting the corresponding choice from the drop-down menu.
A special screen-saver is also provided, which when active, also performs virus
scanning. Avast! antivirus works together with your favorite screen-saver, so you
don't have to change your personal settings to use it. To set up the avast! antivirus
screen saver, see
page 73.
In 32-bit versions of Windows NT/2000/XP/Vista, it is also possible to run a “boottime scan” which allows you to carry out a scan while the system is starting up and
before a virus can be activated. This is useful if you suspect your computer may
already have been infected by a virus.
Integrated avast! Virus Cleaner
avast! antivirus is essentially designed to protect your computer against infection by
a virus or other form of malware. Its primary function is prevention rather than cure.
However, it now incorporates a special Virus Cleaner which is capable of removing
some of the more common viruses from infected computers. Unfortunately, the
number of viruses in circulation is growing constantly and in the event that your
computer becomes infected by a virus which cannot be removed by the Virus Cleaner,
it may be necessary to seek expert assistance.
More information about the Virus Cleaner can be found on our web site,
www.avast.com.
8
avast! antivirus Home Edition 4.8 – User Guide
Command-line scanner (Professional Edition only)
For experienced users, the Professional Edition features a command-line scanner. The
ashCmd program uses exactly the same scanning kernel as avast! so the results are
exactly the same. Scanning is carried out in the command line using a range of
parameters and switches, and a special STDIN/STDOUT mode is available. This
module is intended to be used in BATCH programs and its output is the same as the
output from the Enhanced User Interface tasks (including the report files).
Script blocker (Professional Edition only)
The built-in script blocker is a module that protects your computer against script
viruses hidden inside web pages. Such scripts are normally harmless as the programs
that run them prevent them from accessing any files. However, there may be a
security gap in a browser that could be exploited by a virus, which could result in your
computer being infected. avast! therefore checks the web pages that you visit for
any scripts that could potentially be dangerous.
PUSH updates (Professional Edition only)
A special feature of the Professional Edition is PUSH updates. It is a dramatic change
in the philosophy of updates. Usually, every installed program checks occasionally for
new version availability. PUSH updates, however, are initialized by our server; they
result in your computer quickly responding and performing the necessary update. The
system is based on the SMTP protocol (as used for e-mail messages). The update
itself is controlled by the avast! resident e-mail clients (MS Outlook and Internet
Mail).The whole system is protected by asymmetric ciphers and is resistant to
unauthorized misuse.
Enhanced user interface (Professional Edition only)
avast! antivirus Professional Edition includes an enhanced user interface where it is
possible to create special “tasks” which can be scheduled to run at a specified time in
the future or on a regular basis e.g. daily, weekly or monthly. Whenever a task is run,
a new “Session” is created in which the scan results are stored and can later be
viewed. Unlike the default simple interface, when working in the enhanced user
interface, it is possible to specify in advance what action should be taken if a virus is
detected. For example, you can arrange that the program immediately tries to repair
any infected files. It is also possible to specify an alternative action if the first action
is unsuccessful. For example, if a file cannot be repaired, it can be automatically
moved to the virus chest.
9
avast! antivirus Home Edition 4.8 – User Guide
System requirements
The hardware configurations described below represent the minimum recommended
system specification for that operating system.
For a computer running Windows® 95/98/Me:
486 Processor, 32MB RAM and 100MB of free hard disk space.
For a computer running Windows® NT® 4.0:
486 Processor, 24MB RAM and 100MB of free hard disk space and Service Pack 3 (or
higher) installed
For a computer running Windows® 2000/XP® Workstation (Not Server):
Pentium class Processor, 64MB RAM (128MB recommended) and 100 MB of free
hard disk space
For a computer running Windows® XP® 64-bit Edition:
An AMD Athlon64, Opteron or Intel EM64T-enabled Pentium 4 / Xeon processor,
128MB RAM (256MB recommended) and 100 MB of free hard disk space
For a computer running Windows® Vista:
Pentium 4 processor, 512MB RAM and 100 MB of free hard disk space
The program itself requires about 60 MB of hard disk space; the remainder of the
recommended space is reserved for the virus recovery database file and its index, and
the installation files.
A functional MS Internet Explorer 4 or higher is required for the program to work.
This product cannot be installed on a server operating system (Windows
NT/2000/2003 Server families).
Note : various problems can arise as a result of installing more than one security
product on the same computer. If you have installed other security software, it is
recommended that this is uninstalled before you try to install avast!
10
avast! antivirus Home Edition 4.8 – User Guide
How to install avast! antivirus Home Edition
This section describes how to download and install avast! antivirus Home Edition on
your computer and how to install your license key into the software once the
download and installation process has been completed. The screens shown in the
following pages are as they appear in Windows XP and may differ slightly in other
versions of Windows.
avast! antivirus Home Edition can be downloaded free of charge from
www.avast.com.
It is strongly recommended that all other Windows programs are closed before
beginning the download.
Click on “Download” then “Download programs” and then select the version to be
downloaded. Note, avast! Home Edition is available only for non-commercial home
use.
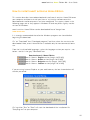
From the list of available languages, select the language version you require – see
below – and click the grey “Download” box.
Download avast! 4 Home Edition
avast! 4 Home - English version (length 18.25 MB)
avast! 4 Home - Arabic version (length 18.05 MB)
avast! 4 Home - Bulgarian version (length 18.09 MB)
avast! 4 Home - Catalan version (length 18.34 MB)
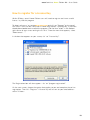
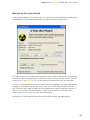
If you are using Internet Explorer as your web browser, the box shown below will
then be presented:
Clicking either “Run” or “Save” will start the download of the installation file
“Setupeng.exe” to your computer.
11
avast! antivirus Home Edition 4.8 – User Guide
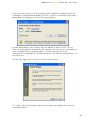
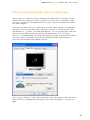
If you want avast! antivirus to be installed on your computer immediately after the
installation file has been downloaded, click “Run”. Once the installation file has been
downloaded, the following screen will then be displayed:
In other web browsers, you may only have the option to “Save” the file. Clicking
“Save” will download the software to your computer but it will not be installed at this
time. To complete the installation process it will be necessary to run the
“Setupeng.exe” installation file so remember where it has been saved! Double click on
the file to run it.
Clicking “Run” again will take you to the avast! Setup screen:
Click “Next” and the installation wizard will then guide you through the rest of the
installation process.
12
avast! antivirus Home Edition 4.8 – User Guide
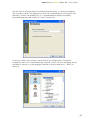
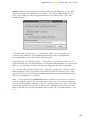
First you will be asked to read about the minimum system requirements and then to
confirm you agree to the end-user license conditions – see the next two screens
below.
To continue, it is necessary to click on “I agree” then “Next”.
13
avast! antivirus Home Edition 4.8 – User Guide
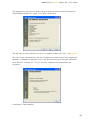
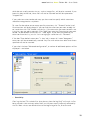
You will then be asked to confirm the destination directory, i.e. where the program
files should be saved. The program will select this automatically or will create a new
directory if it does not already exist. It is recommended to accept the default
destination directory and simply click “Next” to continue.
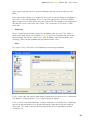
In the next screen, you will be asked to confirm the configuration. The options
suitable for most users are automatically selected. Unless you wish to change any of
the default settings, e.g. the language selection, you only need to click “Next” to
continue.
14
avast! antivirus Home Edition 4.8 – User Guide
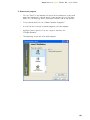
The program will then confirm what is to be installed and where and the amount of
required and available disk space. Click “Next” to continue.
You will then be asked whether you wish to schedule a boot-time scan – see page 38.
The final screen should confirm that the installation has been successfully completed,
however, to complete the process fully it will be necessary to re-start your computer.
With “Restart” selected, click “Finish” and your computer will automatically be
restarted.
Installation is now complete.
15
avast! antivirus Home Edition 4.8 – User Guide
Getting started
When your computer restarts, the following screen will be displayed and you should
see a blue “a-ball” icon in the bottom right corner of your computer screen:
While avast! antivirus Home Edition is free for non-commercial home use, if you wish
to use it after the 60 day trial period it will be necessary to register with Avast and
to obtain a license key (free of charge) which must be inserted into the program.
Therefore, the first time you run the program, the following screen will be displayed:
It is not necessary to insert a license key straight away. If you wish to run the
program for up to 60 days without applying for a license key, simply click on “Demo”.
However, you can apply for a license key now by clicking on “program registration”
and following the procedure described in the next section.
16
avast! antivirus Home Edition 4.8 – User Guide
Once you have selected to run the Demo version, this box will not appear the next
time you run the program. However, you can apply for a license key at any time – see
the next page “How to register for a License Key”
After 60 days, if a license key has not been inserted, the following warning may
appear in the bottom right corner of your computer screen:
The following message will also be displayed whenever you start the program:
Clicking “OK” will result in the Registration box being presented. The procedure for
obtaining and inserting a license key is described in the following pages.
Password protection
By right clicking on the blue “a-ball” in the bottom right corner of the screen and
selecting “Set/change password” you can create a password to protect your antivirus
program against unauthorized changes.
17
avast! antivirus Home Edition 4.8 – User Guide
How to register for a License Key
Within 60 days, avast! Home Edition users will need to register and insert a valid
license key into the program.
To obtain a license key, go to www.avast.com and click on “Support” at the top of
the screen. Then click on “FREE avast! Home Registration”. Alternatively, if you have
already downloaded and installed the program, find the blue “a-ball” in the bottom
right corner of your screen and right click on it. From the menu that appears, select
“About avast! …”
In the box that appears on your screen, click on “License Key”.
The Registration box will then appear – click on “program registration”.
On the next screen, choose the option that applies to you and complete the on-line
registration. Then click “Register”. A license key will be sent to your email address
within 24 hours.
18
avast! antivirus Home Edition 4.8 – User Guide
Inserting the License Key
Once you receive your license key (sent via email to the address specified during the
purchase/registration process), it must then be inserted into the program. This will
enable the program to be automatically updated and will prevent any further license
key warnings.
Note – the avast! program must be downloaded and installed before the license
key can be inserted.
To see a video tutorial showing how to insert the license key without starting the
program, click here or go to www.avast.com and click on “Support” at the top of the
screen. From the menu below, click on “Technical Support”. Then find the heading
“Instructions video” in the bottom left corner of the screen and click on “How to
insert activation key”.
Alternatively, follow the steps described below.
1. Highlight the registration key in the e-mail that you received from Avast! To do
this, move the on-screen cursor so that it is immediately to the left of the first
letter of the registration key. Click the left mouse button and with the left
button still depressed, move the mouse to the right until the whole key is
highlighted. Release the left mouse button then move the mouse to position
the cursor over the highlighted license key. Click the right mouse button, and
from the menu, select “Copy”.
2. Right-click the blue “a-ball” icon in the bottom right corner of your screen and
then left click "About avast!"
3. Left click the "License" button in the lower right corner.
4. Position the cursor in the license key box, click the right mouse button and
from the list of menu options select “Paste”. The license key is now entered.
5. Click “OK”. The program can now continue to be used for 12 months from the
end of the 60-day Demo period. At the end of that time, it will be necessary
simply to apply for and insert a new license key.
19
avast! antivirus Home Edition 4.8 – User Guide
Basics of using avast! antivirus
avast! antivirus provides protection against all types of malware and contains
powerful “resident protection”, also commonly referred to as “on-access” protection
as it checks files at the moment they are accessed.
Normally the resident protection provides all the protection you need to prevent your
computer from being infected by a virus. Once the program has been downloaded,
the resident protection runs continuously in the background and monitors all parts of
your computer’s activity. However, if the resident protection is turned off for any
reason, or if it has been inactive for any period of time, it is possible to perform a
retrospective manual scan (otherwise known as an “on-demand” scan) of all the files
on your computer.
avast! antivirus also includes a special screen saver that constantly scans your
computer for viruses when it is switched on but not currently in use.
Resident (“on-access”) Protection
This part of the program continuously monitors the entire computer and all running
programs to detect any suspicious activities (e.g. a virus), thus preventing any
damage to the files on your computer. It runs completely independently (it activates
automatically when you start your computer) and if everything is OK, you won't even
notice it is running.
The blue “a-ball” icon in the bottom right corner of the computer screen, next to the
clock, shows the current status of the resident protection. Normally the presence of
the blue “a-ball” indicates that the resident protection is installed and is actively
protecting your computer. If the “a-ball” has a red line through it, the protection is
currently inactive and your computer is not protected. If it has a grey appearance, it
means the protection has been paused – see next page.
The resident protection settings are accessed by left-clicking the blue “a-ball” in the
bottom right corner of the screen, or right clicking and selecting “On-access
protection control”.
20
avast! antivirus Home Edition 4.8 – User Guide
The following screen will then be displayed:
On this screen you can temporarily suspend the resident protection by clicking
“Pause”, or “Terminate”. Here, both options have the same effect. However, the
resident protection will be automatically reactivated next time your computer is
restarted. This is simply a safeguard to make sure that your computer is not left
accidentally unprotected.
You can also adjust the sensitivity of the resident protection, by clicking on the line
either side of the cursor to change the sensitivity to “Normal” or “High”. However, the
resident protection actually comprises several different modules or “providers”, each
of which is designed to protect a different part of your computer – see the next
page. Any changes that you make on this screen will apply to all of the resident
protection modules together.
21
avast! antivirus Home Edition 4.8 – User Guide
The resident protection is made up of the following modules or “providers”:
Instant Messaging checks the files downloaded by instant messaging or “chat”
programs such as ICQ and MSN Messenger and many others. While instant messages
themselves do not pose any serious security risks in terms of viruses, today's IM
applications are far from being just chatting tools: most of them also allow the
sharing of files - which can quite easily lead to virus infections, if not properly
monitored.
Internet Mail checks incoming and outgoing email messages processed by clients
other than MS Outlook and MS Exchange, such as Outlook Express, Eudora etc.
Network Shield provides protection from internet worms such as Blaster, Sasser etc.
This is only available on NT-based systems (Windows NT/2000/XP/Vista).
Outlook/Exchange checks incoming and outgoing e-mail messages processed by MS
Outlook or MS Exchange and will stop any messages containing a potential virus
from being accepted or sent.
P2P Shield checks files downloaded by common P2P (file sharing) programs such as
Kazaa etc.
Script Blocking (Professional Edition only) checks the scripts in any web pages that
you look at to prevent any infection due to vulnerabilities in your web browser.
The Standard Shield checks the programs being run and documents that are opened.
It will prevent an infected program from being started or an infected document from
being opened thereby preventing a virus from being activated and causing any
damage.
Web Shield protects your computer from viruses while using the internet (browsing,
downloading files etc) and can also block access to specific web pages. If you
download an infected file, the Standard Shield will prevent it from being started and
causing any damage. However, the Web Shield will detect the virus even earlier during the download of the file, providing even stronger protection. The Web Shield is
compatible with all major web browsers, including Microsoft Internet Explorer,
FireFox, Mozilla and Opera. Due to a unique feature called "Intelligent Stream
Scanning" which enables downloaded files to be scanned almost in real-time, its
impact on browsing speed is almost negligible.
22
avast! antivirus Home Edition 4.8 – User Guide
It is possible to adjust the sensitivity of each module separately. To set the
sensitivity individually for each module, or to pause or terminate a specific module,
click on “Details…” The screen will then be expanded as follows:
In the expanded box, the individual modules are shown in the panel down the left
hand side. The sensitivity of each module can be set by clicking on the relevant
module on the left hand side, then clicking on the line to the left or right of the slider.
In this box it is also possible to suspend the individual parts of the resident
protection, either temporarily or permanently, by clicking on “Pause” or “Terminate”. If
you click “Pause”, the relevant module will be automatically reactivated next time you
restart your computer. If you select “Terminate”, the program will ask you whether
you want that particular module to remain turned off indefinitely, or whether it
should resume after the next computer restart - see page 66. If you click “Yes”, that
particular module will remain deactivated, even after restarting your computer, until
you manually activate it again.
There are a range of additional options that can be selected for each module, for
example, it is possible to specify the types of files that should be scanned. These
additional options are accessed by clicking “Customize” and are described on page 52
– Resident Protection settings.
23
avast! antivirus Home Edition 4.8 – User Guide
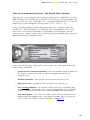
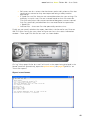
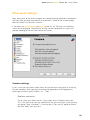
How to run a manual virus scan – the Simple User Interface
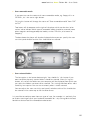
When you first run the program, you will be presented with the image of a silver/grey
radio/CD player which contains all of the controls for defining, running and processing
the results of a virus scan - see below. This is the default appearance or “skin” of the
program (this can be changed by selecting other “skins” – see page 30).
Initially, the player appears behind a box containing the “5 key points to get you
started”. Click “More information” to read more, then “Home page to return to the
main screen. The relevant information is summarized in the next pages. You can
return to these key points again at any time by accessing the options menu (see next
page) and selecting “Introductory Help”.
In the centre of the player, slightly offset to the right, is a screen which shows the
current status information:
•
Current version of the virus database – the virus database contains details of
all currently known viruses and is used by the program to identify any
suspicious files.
•
Resident protection – here you can see the current sensitivity level.
•
Date of last scan – the date on which a manual scan was last run
•
Virus recovery database – this contains details of the files installed on your
computer and is used to repair them if they are damaged by a virus. The date
shown is the date on which the virus recovery database was last updated.
•
Automatic updates – this shows the update status relating to both the virus
database and the program itself – to change the update status, click on the
current status on the right side of the window - see page 37.
24
avast! antivirus Home Edition 4.8 – User Guide
Either side of the display screen can be seen three control buttons:
•
Top left - this button will open the Virus Chest. For information about
working with files in the virus chest, see page 48.
•
Center left – Clicking on this button will result in a bar being displayed with a
slider that can be used to change the sensitivity of the Resident Protection.
Click on the slider and move it to the left or right to decrease or increase the
sensitivity. Note - changing the sensitivity level here will affect all of the
resident protection modules. To adjust the modules individually, see page 23.
•
Bottom left – clicking this button or clicking on the current status in the
display window will update the Virus Database.
The Virus Database can also be updated by right clicking on the blue “i-ball”
icon in the bottom right corner of your computer screen, and selecting one of
the options to “Generate VRDB”.
•
The three buttons to the right are used to define the areas to be scanned –
any combination of local hard drives, removable media (floppy disks, CDs etc)
and selected folders – see the next page.
•
START button – click this button to begin or resume scanning the selected
area(s). This button then changes to a PAUSE button.
•
PAUSE button – clicking this button will temporarily stop the scanning.
•
STOP button. Click this button to terminate the scan.
•
EJECT - Clicking the arrow-up button in the top left corner of the player will
reveal the OPTIONS MENU. The options menu can also be accessed by rightclicking your mouse with the cursor positioned anywhere over the player.
When using the program without a “skin” (see page 30), the menu options are
accessed by clicking on “Tools” or “Settings” at the top of the screen.
Some menu options can be accessed without starting the program, by rightclicking on the blue “a-ball” in the bottom right corner of the computer screen.
All of the menu options are described further in this user guide.
25
avast! antivirus Home Edition 4.8 – User Guide
Selecting the areas to be manually scanned
Before you start scanning, you have to choose which files you want to scan.
•
Scan local drives
If you simply want to scan everything on your computer (all files on all hard disks),
click the button top right. The screen with the status information is now replaced
with a new screen – see below. To return to the status information, right click on
the player and select “Status information”.
On the screen, you will now see the line “Scan local drives” and the status has
changed from “Off” to “On”.
You will also see another box has appeared above the player. This can be used to
set the sensitivity of the scan. By left clicking on the slider and holding your
mouse button down, you can move the slider to the left to reduce the sensitivity,
or to the right, which will increase the sensitivity. In this box, you can also select
whether you want archive files to be scanned. These options are described further
in the next section.
26
avast! antivirus Home Edition 4.8 – User Guide
•
Scan removable media
If you want to scan the content of some removable media, e.g. floppy disks or
CD/DVDs, click the centre right button.
Clicking this button will change the status of “Scan removable media” from “Off”
to “On”.
Two boxes will also appear to the right of the player which can be checked or
unchecked to indicate which type of removable media should be scanned (some
other magnetic and magneto-optical media, such as ZIP disks, also count as
floppies).
The box above the player will also be displayed where you can specify the scan
sensitivity and whether archive files should also be scanned.
•
Scan selected folders
The last option is the button bottom right. You should click this button if you
want to define that only certain folders should be scanned. After clicking this
button, a list of all the folders on your computer will be displayed from which you
can select the folders you want to be scanned. This setting therefore offers most
flexibility, but requires the user to set exactly what is to be scanned.
You can adjust the scan sensitivity and specify whether archive files should also
be scanned in the same way as for the other areas.
It is possible to combine more than one type of scan, for example it is perfectly fine
to initiate scanning of all of your hard and removable disks by clicking both the local
hard drives button and the removable media button
27
avast! antivirus Home Edition 4.8 – User Guide
Setting the scan sensitivity and running the scan
When defining the area(s) to be scanned, you can also set the sensitivity of the scan
and whether or not the program will scan the contents of archive files i.e. files with
filenames ending in .zip, .rar, ace, .acj etc. To include these files, first select which
areas you want to scan (see above) then click the checkbox in the “scan archive files”
box that appears above the player. The sensitivity of the scan determines how
thorough the scan will be. The sensitivity is set by moving the slider to the left or
right. You can choose between three predefined levels.
•
Quick Scan. This scan, as its name suggests, is quite fast as the files are
examined according to their filenames, and only those which are considered
potentially dangerous are actually scanned. This type of scan can sometimes
lead to some files that contain viruses being missed, however it is usually
sufficient.
•
Normal Scan. In this type of scan, the files are analyzed based on their
content (not on their names, as in the Quick Scan). However, only the
"dangerous" parts of the files are tested, not the entire files. This type of scan
can also lead to a virus not being detected, however it is much more effective
than the Quick Scan.
•
Thorough Scan. In this type of scan all files are scanned in their entirety, and
checked for all infections listed in the database. This type of scan has the
highest reliability, but takes much longer to run than a Quick or Normal scan.
After selecting the scanning options, all you have to do is start the test. To do this,
click the Play button (right-looking arrow) on the left side of the player.
Alternative Method
You can also define the area(s) to be scanned by opening the options menu and
clicking on “Start scan” and then “Select scan area”. Once you have selected the area
to be scanned, you can also specify whether archive files should be included by
selecting “Scan archive files”.
By clicking on “Select scan level” you can also specify whether the scan should be a
Quick Scan, a Normal Scan, or a Thorough Scan as described above.
28
avast! antivirus Home Edition 4.8 – User Guide
Running a scan and processing the result
After clicking the Play button, or selecting “Start Scan Enter” in the options menu,
the program starts to scan the selected areas. This process can take quite a long
time, depending on the number and size of tested files and the speed of your
computer. Remember that although the Thorough Scan option takes the most time,
this is the most effective.
Once the program has started, you can work with other files or programs on your
computer even though the scan is in progress. To do this, it is recommended to
minimize the avast! program so that it is running in the background. Otherwise, you
may find that your computer becomes very slow (scanning for viruses is quite a
demanding task). To send the scan to the background, just click on the minimize
button ( _ ) in the top right corner of the player while the scan is running and it will
disappear from the screen. To bring it back, simply click on the “avast!” box which you
will find in the horizontal bar at the bottom of the screen.
When the scan has finished, and if no viruses were detected during the scan, the
player window displays the basic scan information, such as the number of scanned
folders and files, the run-time etc.
If any viruses are found, the program will ask you what to do with the infected file(s).
There are a number of options, e.g. to move the file to the Virus Chest, to delete it,
to rename or move it, or, if it's possible, even to repair it. You can also simply keep
the file intact, however, this option may result in the virus spreading further and
causing damage. These options are described further in the section “What to do if a
virus is found”.
29
avast! antivirus Home Edition 4.8 – User Guide
Changing the appearance of the Simple User Interface
It is possible to change the appearance of the program by selecting a different
program skin. Three distinct skins (appearances) are offered as standard and others
can be downloaded from the Internet if required – right click on the avast! player and
from the options menu, click on “Select skins” and then on the “Get more skins….”
link. Alternatively, if you wish to use the program without any skin, select “Settings”
from the menu options, then uncheck the “Enable skins for Simple User Interface”
checkbox. Next time you start the program, the options will be displayed in their
basic format. To restore the skin, click on “Settings, then click on “Settings” again,
and finally re-check the “Enable skins for simple user interface” checkbox. The skin
will be restored next time you start the program.
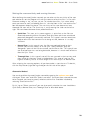
Appearance of the simple user interface without any skin:
The area(s) t be scanned and the type of scan are then set by checking the
appropriate boxes. If you want to scan only specific folders, checking the “Folders”
box will open a new window listing all of the folders on your computer. To select a
folder, just check the appropriate box and it will appear in the “Selected paths” box
above.
30
avast! antivirus Home Edition 4.8 – User Guide
You can adjust the scan sensitivity by moving the slider to the required position and
if you want archive files to be included in the scan, click “Test archives”.
After you have started to run the scan, you can continue to use your computer for
other tasks by clicking on “Go to Background”.
You can also adjust the sensitivity of the resident protection by clicking on “Settings”
and then on “Resident Protection”. You can use the slider to change the sensitivity to
“Standard” or “High” or you can turn the resident protection off completely, by
clicking on the line under “Disabled”. However, as described previously, any changes
you make here will apply equally to all of the resident protection modules. To adjust
the sensitivity of the modules individually, see page 23.
You can access other features such as the Virus Chest and the Virus Database by
clicking on “Tools” and selecting the required option from the options available.
These, and all the other features, are described in detail later in this user guide.
The current status information is presented in the lower half of the screen and this is
described in the previous section.
31
avast! antivirus Home Edition 4.8 – User Guide
What to do if a virus is found
If the program detects a suspicious file, the scan will be interrupted at that point and
the following screen will be displayed asking how you want to deal with it:
Clicking on continue will mean that no action is taken now in relation to the identified
file and this will be reported at the end of the scan in the list of scan results with no
action taken – see page 36. Clicking on stop will terminate the scan at that point.
If a virus is detected by one of the resident protection modules e.g. when attempting
to open an infected file, or by the screensaver, the screen will be slightly different –
the “Continue” and “Stop” buttons will be replaced by a single “No action” button. If
you click this button so that no action is taken at this time, the infected file will
remain where it is but the virus will not be activated.
Alternatively, if you want to take action now, there are four possible options.
32
avast! antivirus Home Edition 4.8 – User Guide
Option 1: Move the affected file to another folder on your computer. At the same
time, you will have the opportunity to rename it. Clicking on “Move/Rename” will
result in the following screen being displayed with the “Move file(s)” check box
already checked.
In the white part of the screen, it is possible to specify where you want the
suspicious file moved to. The program automatically selects an appropriate
destination folder, or you can specify a different one.
If you also check the “Rename file(s)….” checkbox, this will add the extension “.vir”
onto the end of the file name to identify it as a potentially dangerous file so that you
don’t run it accidentally, thereby infecting your computer and causing damage.
If it is not possible to move the file at this moment e.g. because it is being used by
another program, checking the box “Force moving locked or used file(s) on system
startup” will result in the file being moved automatically to the selected destination
next time the computer is restarted.
Note – in the event that a system file becomes infected i.e. a file which is used to
run a key program, moving the file might result in an error next time your computer
tries to run the program. However, if the file is moved to the Virus Chest, it will be in
a protected quarantine area where it cannot cause damage to your other files and
where it can possibly be repaired before moving it back to its original location – see
page 8
33
avast! antivirus Home Edition 4.8 – User Guide
Option 2: Delete the file – clicking “Delete” will result in the following screen:
Depending on which version of Windows you are using, there are two ways in which
the file may be deleted.
• Delete file(s) to recycle bin
this will move the file(s) to the recycle bin but will not permanently delete them. They
may therefore be restored later. This option may not be available in some versions of
Windows.
•
Delete file(s) permanently
this will remove the file(s) from your computer permanently without any possibility to
restore them later. However, this will only delete the infected file. Some viruses
install new files on your computer and if these files do not themselves contain a
virus, they will not be detected as suspicious. While these files will take up space on
your computer, they should not present any security risk.
If a virus is detected which can be completely removed by the built-in virus cleaner,
including removing new files created by the virus, an additional button – “Completely
remove the virus from the system” - will appear in the virus warning box. If this
option is available, it is recommended to use it.
If it is not possible to delete the file at this moment e.g. because it is being used by
another program, checking the box “If necessary, delete file(s) at the next system
startup” will result in the file being automatically deleted next time the computer is
restarted. Then click on “Delete’ again to confirm the deletion.
Note – in the event that a system file becomes infected i.e. a file which is used to
run a key program, deleting the file might result in an error next time your computer
tries to run the program. Before deleting the file, you should therefore be quite sure
that the infected file is not a system file, or that you are able to replace it with a
clean file e.g. from a backup. If you are not sure, it is recommended to move the file
to the Virus Chest. Here it will be in a protected quarantine area where it cannot
cause further damage to your other files and where it can possibly be repaired before
moving it back to its original location – see page 8
34
avast! antivirus Home Edition 4.8 – User Guide
Option 3: Repair the file.
Clicking on “Repair” will result in the following screen being presented:
If you click on “Repair” again, the program will attempt to restore the affected file to
its original state.
In order to repair a file, the program will refer to the Virus Recovery Database. If
there is sufficient information about the program in the Database, there is a good
chance that it can be repaired. Note – only files that have been physically changed by
a virus can be repaired. If new files have been created, these will remain unless they
can be removed by the virus cleaner – see Option 2.
If there is no information in the Database, repair may still be possible but full
recovery is less certain. It is therefore very important that the Database is
continuously updated – to update the Virus Recovery Database, right-click on the “iball” in the bottom right corner of your computer screen and select one of the
options to “Generate VRDB”. The Database will then be updated with details of any
new programs installed on your computer since the last update.
Option 4: The RECOMMENDED OPTION is to move the file to the Virus Chest.
Note – in the event that a system file becomes infected i.e. a file which is used to
run a key program, moving the file might result in an error next time your computer
tries to run the program. However, if the file is moved to the Virus Chest, it will be in
a protected quarantine area where it cannot cause damage to your other files and
where it can possibly be repaired before moving it back to its original location – see
page 8
35
avast! antivirus Home Edition 4.8 – User Guide
Results of last scan
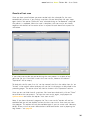
Once you have specified how you want to deal with the selected file, the scan
automatically resumes. If any further suspicious file are identified, the scan stops
again (unless the option “Delete All” was selected during an “on-demand” scan) and
the process is repeated. When the scan is complete, the scan results are shown
together with details of the action taken in respect of each identified suspect filesee below.
If you chose not to take any action during the scan process in respect of any
particular file, this file will be listed in the scan results, however the column
“Operation” will be empty.
To deal with the file now, first click on the name of the file in the table, then click on
“Action” in the top-left corner and you will see the list of options as described in the
preceding pages. The action taken will then be shown in the “Operation” column.
Once you are satisfied that all suspicious files have been dealt with, click on “Close”
to terminate the scan process. To view the scan results again, simply open the
options menu and select the option “Last scan results”.
Note: If you close the avast! program, the “Last scan results” option will not be
available and you will not be able to view the last scan results next time you start
the program. This option will only be available again if you run a new scan. However,
details of any viruses or errors detected are saved and can be seen by opening the
Log Viewer – see page 50
36
avast! antivirus Home Edition 4.8 – User Guide
Advanced features
Setting automatic updates
Any anti-virus program is only as good as its database of known virus definitions,
which is why it is important to regularly update both the program and the virus
database.
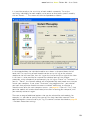
You can select whether the program and the virus database are updated
automatically or manually, or only following notification that an update is available
from avast! To change the status, you can either click on the current status (e.g.
“Database only”) in the avast player screen, or simply open the options menu (see
page 25), select “Program settings”, then “Update (basic)”. Then just click on the
desired status for each of the virus database and the program (see below).
Click “OK” and the status in the player window will be updated as follows:
•
•
•
•
ON if “Automatic” is selected for both the virus database and the program
PROGRAM ONLY if “Automatic” is selected only for the program
DATABASE ONLY if “Automatic” is selected only for the virus database
OFF if “Automatic” is not selected for either the program or the virus
database
To manually update either the program or the virus database, access the options
menu (see page 25) and select the option “Updating”.
•
•
To update the virus database, select iAVS Update
To update the avast! program, select Program Update
37
avast! antivirus Home Edition 4.8 – User Guide
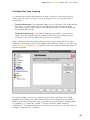
How to schedule a Boot-time scan
(32 bit versions of Windows NT/2000/XP/Vista only)
It is possible to schedule a scan to be carried out automatically when the computer
restarts, i.e. when it “boots-up” before the actual operating system is active. This is
useful if you suspect that a virus may have installed on your computer as it will
enable the virus to be detected before it is activated and therefore before it has had
a chance to do any damage.
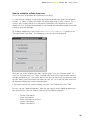
To schedule a boot-time scan, access the options menu (see page 25) and click on
“Schedule Boot Time Scan”. The following screen will then be displayed:
Here you can select whether you want to scan all disks or just selected areas. To
scan just selected areas, click “Scan selected path” and either type the path name in
the box provided or click the square box to the right to search for the area you want
to scan. When you find the area you want to scan, click on it and the path name will
be copied automatically into the provided box.
If you want archive files to be included, just check the “Scan archive files” box.
By checking the “Advanced options” box, you can specify what should be done with
any infected files. You can choose from any of the following options:
•
•
•
•
•
Delete infected file
Move infected file
Move infected file to Chest
Ignore infected file
Repair infected file
38
avast! antivirus Home Edition 4.8 – User Guide
Selecting “Move infected file” will result in any suspicious files being moved to the
folder C:/Program Files\Alwil Software\Avast4\DATA\moved. The extension “.vir” will
also be added to the end of the filename to identify it as a suspicious file so that you
don’t run it accidentally, thereby infecting your computer and causing damage to your
files.
If you choose any of the options to Delete or Move infected files, you will be asked
to confirm what you want to do with any infected system files.
System files are files that are used by your computer to run your programs and
deleting or moving them could have serious consequences. You are therefore asked
to confirm whether you wish to:
•
•
Allow delete or move, or
Ignore delete or move for system files
Selecting “Ignore delete or move” will prevent any potential operational problems,
however, your computer will still be at risk from the potential infection. The
recommended action is therefore to move all suspicious files to the virus chest where
they can subsequently be dealt with in a protected quarantine area. Once moved to
the virus chest, they cannot cause damage to your other files. You can then deal with
the affected files as described on page 42, e.g. they can be deleted, if you are sure it
is safe to do so, they can be moved back to their original location, or they can simply
be stored there until you decide what to do.
Once you have confirmed how any infected files should be dealt with, click “Schedule”
and the following message will appear:
Click “Yes” to restart your computer and run the boot-time scan now, or click “No”
and the scan will be carried out automatically next time you restart your computer.
39
avast! antivirus Home Edition 4.8 – User Guide
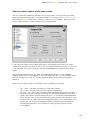
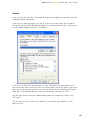
Excluding files from scanning
It is possible to exclude some locations, or even single files, from testing, which
means they will not be tested for viruses during any scan. This may be useful in
several cases:
•
To avoid false alarms. If the program reports a virus infection in a file and you are
sure that it is a false alarm, you can exclude the file from testing and avoid
further false alarms. Please inform Alwil Software of any such files in order that
the problem can be fixed.
•
To speed up processing. If you have a folder on your hard disk that contains
images only, for example, you can exclude it from testing by adding it to the
exclusions list, which will reduce the time spent on scanning.
Keep in mind that these exclusions affect all future scans, except for the resident
protection. To exclude certain files or folders from scanning, simply click on “Settings”
in the options menu (see page 25) then on “Exclusions” and the following screen will
then be displayed:
To exclude a folder or a file, click browse and then check the folder or file to be
excluded. Alternatively, click “Add” and manually type the location of the relevant
folder or file into the Exclusions box. If you want to exclude a folder, including all of
its subfolders, it is necessary to add “\*” to the end of the folder name e.g.
C:\Windows\*. To remove a folder or a file from the exclusions list, click on it once to
highlight it, and then click “Remove”
40
avast! antivirus Home Edition 4.8 – User Guide
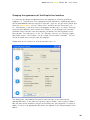
How to create a report of the scan results
You can create a permanent record of the result of each scan by creating a report
which you can then view later. To create a report, first access the options menu as
described on page 25 and select “Settings”. Next click on “Reports” and in the next
screen, check the box “Create report file” as shown below.
If you want to create a new report after each scan and you don’t want to keep a
record of all the previous scan results, check the box “Overwrite existing”. If this box
is not checked, the results of each scan will be added onto the end of the previous
report.
You can also choose where you want the report to be saved – in the standard
program folder, which the program assigns automatically, or in a new location which
you can specify by clicking on “Custom program folder” and entering the folder
location.
Next, you can specify what information will be included in the report:
•
•
•
•
Task start – the date and time the scan was started
Task stop – the date and time the scan was completed
OK files – files that were scanned without detecting anything suspicious. If
all local drives are scanned, checking this box would produce a very long
report, possibly of several thousand lines. It is therefore recommended to
check this box only if you intend to carry out a limited scan and only if you
actually want all clean files to be reported as well as any problematic files.
Hard errors arise when the program detects something that would not
normally be expected. These are errors that generally require further
investigation.
41
avast! antivirus Home Edition 4.8 – User Guide
•
•
•
Soft errors are less serious than hard errors and usually relate to files that
could not be scanned as they were open and being used by another
application.
Skipped files are files that are not scanned based on the scan settings. For
example, in a quick scan, files are scanned based on their file extension.
Files with extensions that are not considered dangerous are not scanned.
Any files specifically excluded from the scan would also be reported as
skipped files.
Infected files – these are files that potentially contain a virus
Finally you can specify whether the report should be in the form of a text file or an
XML file. After running the scan, there will be a new line in the status information
window – “View report file for the last scan” as shown below.
Clicking “View report file for last scan” will result in the report being displayed in the
format specified. Alternatively, open the options menu (see page 25) and click on
“View scan reports”
Report in text format:
42
avast! antivirus Home Edition 4.8 – User Guide
Report in XML format
The reports for previous scans are stored in the standard program folder or in the
custom program folder specified when creating the report – see previous page.
If you specified Text format and did not check the “Overwrite existing” box, you will
also be able to see the previous reports whenever you view the report after running a
new scan.
If you do not want any further reports to be created, just go to “Report file” in the
options menu (see page 25) and uncheck the “Create report file” box.
43
avast! antivirus Home Edition 4.8 – User Guide
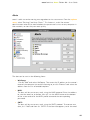
Alerts
avast! is able to send a warning message about a virus occurrence. From the options
menu, select “Settings” and then “Alerts”. This feature is useful for network
administrators who will be notified about the presence of a virus on any computer in
their network, so that they can react quickly.
The alert can be sent in the following forms:
•
WinPopup.
Click on “Add” and select WinPopup. Then enter the IP address or the network
name of the computer to send the warning to, or click “Browse” and select the
address from the list of available options.
•
MAPI.
The alert will be sent as an e-mail, using the MAPI protocol. Enter the address
to send the email to, as before, then click on the MAPI button at the bottom
of the screen and enter the MAPI profile name and the corresponding
password.
•
SMTP.
The alert will be sent as an e-mail, using the SMTP protocol. To create a new
alert, click “Add” and then click SMTP. In the box that appears, enter the email
44
avast! antivirus Home Edition 4.8 – User Guide
address of the person to send the alert to. It is also necessary to specify
certain other settings – see the next section “SMTP”.
•
Printers.
The alert will be sent to the specified printer. Click on “Add” and then “Printer”,
then click “Browse” and select the printer from the available options.
•
ICQ.
The alert will be sent as an ICQ message. Enter the ICQ number of the person
to send the warning to.
•
Windows Messenger.
Enter the e-mail address that the alert recipient uses to login to the Windows
Messenger service.
To create a new alert, click on “Add” and select the type of alert required, then enter
the required details as described above. Once an alert has been created, a message
will be sent to the defined recipient whenever a suspicious file is detected.
To edit or delete an alert that has been created, click on it to highlight it, then click
“Edit” or “Remove”.
Clicking on “Test” will result in a test message being sent to the selected address
while clicking on “Test all” will send a test message to all the alert recipients in the
list.
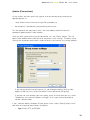
SMTP
By clicking on SMTP in the list on the left side of the screen, you can specify your
SMTP server parameters. avast! uses these settings to send e-mail messages,
especially when:
•
•
•
Sending warning messages (Alerts) when a virus has been found.
Sending files from the Chest to ALWIL Software.
Sending avast! crash reports to ALWIL Software.
You should enter the following information:
•
•
•
Server address - the address of the outgoing e-mail server (e.g.
smtp.server.com or 192.168.1.25).
Port - the port number (the default is 25).
From address - address of the sender ("From").
If the SMTP server requires authentication when logging on, you should also check
the box and enter the username and password.
45
avast! antivirus Home Edition 4.8 – User Guide
Searching the Virus Database
The virus database contains detailed information about all known viruses and is used
by the program to identify any potential infections.
To access the virus database, open the options menu (see page 25) and click on
“Virus database”. The following screen will be displayed:
The viruses in the list can be searched for by many parameters. If you know the name
of the virus, just type the name in the box and click the Search button. If you know
only part of the name, you can type “?” in place of an unknown character (letter or
number) or “*" in place of several unknown characters.
Example: Suppose you are searching for the “Klez” virus. Its actual name in the
database is Win32:Klez-H [Wrm]. You should therefore type: *klez*. All viruses
containing the word "klez" will then be found.
To narrow the search, you can also use the check-boxes next to each virus feature.
To search on a particular feature, check the box by clicking it twice. Clicking on any
check box once, so that it changes to a grey box means it must not have that
feature. If any box is left unchecked but blue/green in color, it means it doesn’t
matter whether the virus has that feature or not.
46
avast! antivirus Home Edition 4.8 – User Guide
Searchable virus features:
•
Virus is on the “In the wild” list (ITW)
The virus is on the list of viruses widespread among users all over the world.
•
Worm only (Worm)
This is a special type of virus which does not infect files directly, but performs
other undesirable actions such as spreading itself via e-mail, stealing
passwords etc.
•
Macro virus (Macro)
This type of virus uses the macro language especially of Microsoft products
(e.g. Word, Excel).
•
Can be repaired (Rep)
Files infected by these viruses can be repaired by the avast! program and
restored to their original state before infection.
•
Take special care when removing (Care)
For these viruses, it is necessary to follow special steps when removing them
(otherwise even greater damage can be done than would be caused by the
virus itself!).
•
Boot sector infector (Boot)
This type of virus infects the boot sector of a hard disk or diskette.
•
MBR sector infector (MBR)
This type of virus infects the master boot sector of a hard disk.
•
COM infector (COM)
This type of virus infects executable files with a “.com” extension.
•
EXE infector (EXE)
This type of virus infects executable files with a “.exe” extension.
•
Stays memory resident (RES)
These viruses stay in the computer’s RAM memory and infect files when they
are started.
47
avast! antivirus Home Edition 4.8 – User Guide
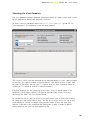
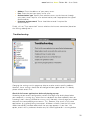
Working with files in the Virus Chest
The Virus Chest can be accessed directly from the options menu. As a result of its
unique properties, the virus chest is effectively a “quarantine” area, which can
therefore be used for the following purposes:
•
Storing viruses.
If avast! finds a virus and you decide not to delete it for some reason, you will
be offered the option of moving it to the Chest. With the virus in the Chest,
you can be sure that it will not be run by accident.
•
Storing suspicious files.
The Chest is useful for storing any suspicious files for later analysis.
•
Backup of system files.
During the installation, copies of some critical system files are stored in the
Chest, under the "System files" category (see below). If the main system files
become infected by a virus, the copies can be restored from the Chest to their
original location.
48
avast! antivirus Home Edition 4.8 – User Guide
Right clicking on any file will produce the following options. Alternatively left click a
file to highlight it, then either click on the corresponding icon at the top of the screen
or click “File” and select the required option (Note: If you double-click a file, you will
not run it - its properties will be displayed instead. This is a safety measure to
further protect you from an accidental infection from within the Chest):
•
Refresh all files
Select this option if you want to make sure you are looking at the complete
list of files. The program refreshes the list automatically but you can use this
option if you do not want to wait.
•
Add file.
You can add files to the "User files" category only.
•
Delete file.
If you select this option the file will be deleted irreversibly, i.e. files are not
simply moved to the recycle bin! Before deleting any file, you sure be sure
that it is not a system file. Deleting a system file could have quite serious
consequences.
•
Restore file.
The file will be restored to its original location and at the same time removed
from the Chest.
•
Extract file.
The file will be copied to the selected folder.
•
Scan file.
The file will be scanned for viruses.
•
Show file properties.
The file properties are displayed; it is possible to add a comment to the file.
•
Send Email to ALWIL Software.
The selected file will be sent (by e-mail) to ALWIL Software. You should use
this option in special cases only - e.g. if you suspect the program has
incorrectly identified a file as a virus. Do not forget to include as much
information as possible – e.g. the reason you are sending the file, the version
of your virus database, etc. Doing this will improve the service that we provide
to you
By clicking on “Program” and “Settings” and then on “Chest” you can adjust the
maximum permitted size of the Chest and thus the maximum amount of space it
takes up on your computer. You can also specify the maximum size of any individual
file that should be sent to the Chest.
49
avast! antivirus Home Edition 4.8 – User Guide
The Log Viewer
After any scan, avast! antivirus creates several log files where information about any
errors or suspicious files is stored. Information about installations and updates of the
program and the virus database can also be found there. To view these logs, just
select “Log Viewer” from the options menu (see page 25).
The information stored in the log files is divided into the following categories:
Info
Just information, everything is OK.
Notice
Important information, everything is OK. Includes information about
program and database updates.
Warning
An error has occurred or a virus has been identified, but the program
can work or fix the problem.
Error
An error has occurred, the program cannot work.
Critical error
A critical program error, the program will be terminated.
Alert
There is a possible risk to the whole computer.
Emergency
Dangerous for the whole computer (security, deleting system files).
By clicking on “Settings” and then “Logging”, you can adjust the maximum size of
each file in the log.
Within the Log Viewer, it is possible to search for specific records, to filter the
records according to specific criteria, or to export the records to another location.
Find a record
1.
2.
3.
4.
press down the “CTRL” and “F” keys together, or
click on “Edit” in the top left corner of the screen and then on “Find”, or
click on the magnifying glass in the top left corner of the screen, or
right-click on the list of records and then click “Find” in the presented menu
A box will appear where you can type all or part of the name of the record that you
want to find. If you know the exact name, checking the box “Match whole word only”
will ensure only exact matches are listed. Similarly, if you only want to search for
records using upper case or lower case letters, check the box “Match case”. Clicking
“Up” or “Down” will determine whether the records are listed in ascending or
descending order.
50
avast! antivirus Home Edition 4.8 – User Guide
Then click “Find Next”. The first record will be displayed. Any other records that
match the entered name can be found by pressing clicking “Find Next”, until no more
records can be found.
.
Filter the list of records. This is used to narrow down a long list of records to a
shorter list of records that fulfil certain criteria e.g. a specific keyword or part of a
word.
1.
2.
3.
4.
press down the “CTRL” and “R” keys together, or
click on “Edit” in the top left corner of the screen and then on “Filter”, or
click on the yellow funnel in the top left corner of the screen, or
right-click on the list of records and then click “Filter” in the presented menu
A box will then appear in which you can specify the filter criteria:
Include
Enter a keyword or part of a word that should be included in the records to be
displayed. You can use wildcards i.e. you can type * in place of any letters that
you don’t know. Multiple keywords must be separated by a semicolon (;).
Exclude
Enter a keyword or part of a word that must not be included in the records to
be displayed.
Time range
Here you can define the start and end of the period for which you would like
the records to be displayed.
Select defined lines
If this option is selected, the records that match the defined criteria will
simply be highlighted in the list.
Show only defined lines (hide the rest)
If this option is selected, only the records that match the defined criteria will
be displayed. The other records will not be visible. This is useful if the original
list is very long.
Sort records
Clicking any of the column headings will sort the records into ascending or
descending order according to the information in that column. Clicking the
column heading again will return the list to the original order.
Export records
Found or filtered records, or the whole list of records can be exported and
saved as a new file. To export found or filtered records, select the option
“Export selected lines” or click on the left green arrow in the top right corner
of the screen. To export the whole list, select “Export current list” or click on
the right green arrow. In the newly displayed window, choose the destination
folder for the exported file and type the new file name, then click “Save”.
51
avast! antivirus Home Edition 4.8 – User Guide
Resident Protection settings
1. Instant Messaging
Programs
Here you can specify for which IM programs the files should be scanned. If you
are using Windows 95/98/ME and you wish to protect the Trillian program,
you need to enter the path to its configuration file, talk.ini (you can use the
Browse button for this). Some programs can be protected only if you are using
Windows NT, 2000, XP, 2003, Vista or 2008.
2. Internet Mail
On the pages “POP”, “SMTP”, “IMAP” and “NNTP” you can specify whether inbound
and/or outbound email and news is scanned. If a virus is detected, a warning will be
inserted into the relevant message. You can also specify that a note is inserted into
clean messages confirming they are free of any virus infection.
Redirect
This page makes it possible to set up transparent e-mail scanning. Any emails
that pass through the specified ports will be scanned for viruses. This feature
is available only on NT-based operating systems (Windows
NT/2000/XP/2003/Vista/2008).
•
Redirected ports.
The default ports are the standard port numbers for the four basic e-mail
protocols: If you use a different port (or ports) they should be entered
here. Multiple values should be separated by commas.
•
Ignored addresses.
Here you can enter the addresses of mail servers or specific ports that you
want to exclude from scanning. This feature may be useful when you want
avast! to scan only messages to or from a particular account (and ignore
the rest). For example, if you enter smtp.server.com, avast! will not scan
the outgoing (SMTP) messages for the corresponding account.
•
Ignore local communication.
This option should normally be checked. If it is unchecked, avast! will scan
even local communication (which is usually safe), which may slow down
your computer slightly. Note: Do not enter any port numbers other than
52
avast! antivirus Home Edition 4.8 – User Guide
those you really use for e-mail traffic. Otherwise, unexpected problems
might occur.
Advanced
•
Show detailed info on performed action.
If this box is checked, information about the files currently being tested
will be displayed in the bottom right corner of the screen.
•
Silent mode.
If the box “Silent mode” is checked any infected files will be dealt with
automatically according to the following rules:
•
If “with general answer Yes (OK)” is selected, any infected file
attached to an email will be automatically deleted.
•
If the second option “with general answer No (Cancel)” is selected
any infected file will be automatically moved to the virus chest.
If this box is left unchecked, the normal virus alert screen will be displayed,
asking how you want to deal with the infected file.
•
Timeout for Internet communication.
This is the time in seconds to wait for a reply from the mail server. You can
further specify whether the connection should be closed if a reply is not
received in this time or whether you should be asked for confirmation first.
•
Show tray icon when scanning mail
If this box is checked, a small icon will be displayed in the system tray in
the bottom right corner of your computer screen to indicate a scan is in
progress.
Heuristics
avast! can not only scan inbound mail for known viruses, but it can also check
messages using heuristic analysis and possibly reveal a virus that is not yet
present in the virus database. You can modify the settings of the heuristic
analysis on this page.
•
Sensitivity - Low.
•
Basic attachments check.
Attachments are verified according to their name and if an
attachment's name contains two extensions, e.g. "Patch.jpg.exe", it will
be treated as potentially dangerous. avast! also checks whether the
53
avast! antivirus Home Edition 4.8 – User Guide
attachment extension corresponds to the actual file type e.g. whether
the file "Pamela.jpg" is a picture, as you might expect, or a renamed
COM file
•
•
Sensitivity – Medium (in addition to the above).
•
•
•
Check whitespaces sequence.
Some viruses add a number of spaces (or other non-displayable, "white"
characters) to the end of a file extension, followed by a second, real
extension that is dangerous. Due to the length of the file name, the
user may not see the second extension however heuristic analysis can
uncover this trick. The default permitted number of consecutive
whitespaces is five. If there are more than five, a warning message will
be displayed.
Thorough check of attachments.
As well as the basic attachments check, a warning will also be
displayed if the attachment has a simple executable extension (EXE,
COM, BAT etc.). Not all such files are dangerous and this level of
sensitivity will therefore generate more false positive alerts than the
basic attachments check.
Sensitivity - High. (in addition to the above)
•
HTML part check.
Some viruses can exploit bugs in some mail programs (especially
unsecured MS Outlook and Outlook Express) that make it possible to
start the virus merely by viewing the message in the preview pane.
avast! checks whether the HTML code of the message contains a tag
enabling such a trick. If it does, a warning message is displayed.
•
Outbound messages - Time period check.
Most viruses are spread by e-mail and send themselves to addresses
stored in the Windows address book. Within a very short period of
time, messages are sent to a large number of addresses, with the
same subject and/or attachment. avast! monitors the number of
messages in a given period of time and can also check the subject
and/or the attachments. These parameters can all be set on the
Heuristics (Advanced) page.
•
Outbound messages - Mass messages.
Viruses can also spread by sending themselves in just one message to
many recipients. avast! therefore monitors the total number of
message recipients. The permissible number of total recipients can be
set on the Heuristics (Advanced) page.
Sensitivity - Custom
54
avast! antivirus Home Edition 4.8 – User Guide
By clicking “Customize” you can select which of the above components of
the heuristic analysis you want to be used.
You can additionally select a “Subject structure check”. If this is selected,
e-mail subject headers will be checked for large numbers of nonsensical
characters e.g. if the subject contains the sequence "<?*&$^*(^%#$%*_()", a
warning will be displayed.
•
Permitted URLs
By clicking on “Permitted URLs”, you can define any URLs that are
considered safe, which will then be ignored by the heuristic analysis. To
add a URL, click on “Add” then manually type the name of the URL. To
remove a URL, click on it once to highlight it, then click “Remove”
•
Silent Mode
On this page, you can also specify what action should be taken if an
infected message is detected.
Heuristics (Advanced)
This page allows you to modify the heuristic analysis settings for outgoing
mail. The settings are used only when the "Heuristic" sensitivity is set to high
or custom (and they can be changed only with custom sensitivity set).
•
Checked time.
avast! will count the outgoing messages during the given time. The default
settings are 5 messages in 30 seconds. It means that if more than 5
messages are sent within half a minute, having the same subject and/or
containing the same attachment, a warning will be displayed.
•
Warning count.
This is the number of messages allowed without any warning, where the
messages have the same subject and/or contain the same attachment.
When this number is exceeded, a warning is displayed.
•
Check subject.
If this is set, mass messages will be identified according to the email
subject.
•
Check attachments.
If this is set, mass messages will be identified according to the
attachment.
55
avast! antivirus Home Edition 4.8 – User Guide
•
Absolute count.
This is the total maximum number of message recipients, i.e. the
addresses in the fields To, Carbon Copy (CC) and Blind Carbon Copy (BCC),
set to 10 by default, which if exceeded, will result in a warning being
displayed.
3. Network Shield
The Network Shield protects your computer from Internet worm attacks. It works
similarly to a firewall, although it is not a substitute for one.
Settings
•
Show warning messages
If this box is checked, a message will appear in the bottom right corner of
the screen whenever an internet worm attack is detected.
•
Logging
If this box is checked, the history of worm attacks will be recorded and
displayed on the next page.
Last attacks
On this page, the last 10 network worm attacks will be displayed, if the
“Logging” box was checked on the previous page. This will include the date
and time of the attack, the type of attack and the IP address and port from
where it originated
4. Outlook/Exchange
Scanner
Here you can specify what type of messages should be scanned and whether
the message bodies should be scanned as well as the attachments.
Inbound mail
Here you can specify what should be done if an infected inbound message is
detected, for example, it can be delivered, discarded (deleted), or redirected to
a different email folder. You can also specify whether a note should be
inserted into clean and/or infected messages, and the format of the note i.e.
TXT or HTML. Any infected files attached to or contained in a message are
dealt with according to the settings on the “Virus storing” and “Advanced”
pages.
56
avast! antivirus Home Edition 4.8 – User Guide
Outbound mail
Here you can specify whether a note should be inserted into clean messages,
and the format of the note, as above. Infected messages will not be sent at
all. You can also specify that attachments should be scanned at the time they
are attached rather than when they are sent.
Signatures
By using signatures, it is possible to heavily reduce the number of messages
that need to be scanned. The signatures are small "stamps" that are attached
to uninfected messages to confirm they are virus-free. Every signature
contains the date and time of the scan.
The signatures of the MS Outlook/Exchange provider are fully compatible with
those of e.g. avast! Exchange Server Edition. Therefore, messages tested by
the Exchange Server provider will not be tested again by the
Outlook/Exchange provider, resulting in a faster transfer time.
•
Insert signatures into clean messages.
This should be checked if you want signatures to be added to clean messages.
•
Always trust signed messages.
If this box is checked, correctly signed messages will always be trusted and
will not be scanned, no matter how old the signature is (unless the box
"Always ignore signatures older than current virus database" is checked).
•
Trust signatures only up to.
Here you can set the maximum age of signatures to trust. The value set here
could be masked by the option "Always ignore signatures older than current
virus database" - see below.
•
Ignore all signatures (no trust).
If this box is checked, all messages will be scanned irrespective of whether or
not they contain a valid signature.
•
Always ignore signatures older than current virus database.
If this box is checked, messages that have a valid signature will be checked, if
the signature is older than the current virus database. This might be useful, as
a message might contain a new virus which was added to the virus database
after the original scan. If the message was trusted, it would not be scanned
and the virus would not be detected.
57
avast! antivirus Home Edition 4.8 – User Guide
Virus storing
On this screen, you can specify that a copy of an infected attachment is saved
to a specific folder on your computer’s hard disk. You can use the Browse
button to locate and select the required folder. If you check the box “overwrite
existing files”, any file with the same name will be replaced by the new file.
Advanced
•
Silent mode
Checking this box will result in any infected files being moved automatically
to the virus chest. If this box is not checked, the normal virus alert screen
will be displayed asking how you want to deal with the infected file.
•
Show detailed information on performed action
If this box is checked, information about the files currently being tested
will be displayed in the bottom right corner of the screen.
•
Show tray icon when scanning mail
If this box is checked, a small icon will be displayed in the system tray in
the bottom right corner of your computer screen to indicate a scan is in
progress.
•
Show splash screen when the provider is loading
If this box is checked, the avast! splash screen will be displayed whenever
the email provider is launched.
Finally, if you enter your MAPI profile and password, these will be used to
display your email folder structure when you click the Browse button on the
Inbound Mail page.
Heuristics
The settings on this page are the same as for Internet Mail
Heuristics (Advanced)
The settings on this page are the same as for Internet Mail, but with two
additional settings:
58
avast! antivirus Home Edition 4.8 – User Guide
•
Relative count
This is the permitted number of recipients of a single message expressed
as a percentage of the total number of addresses in the email address
book. If this percentage is exceeded, a warning message will be displayed.
•
Minimal count
This is the minimum number of actual recipients, corresponding to the
relative count, below which the warning will not be displayed. In other
words, if the relative count is exceeded, the warning will not be displayed
if the actual number of recipients is less than the minimal count. Example:
Relative count = 20%, Minimal count = 10. If the number of address is 40
and a message is sent to 9 recipients, the relative count will be exceeded
but the warning will not be displayed as the actual number is less than the
minimal count.
5. P2P Shield
Programs
On this page you can specify the programs for which received files should be
scanned. Some programs can only be protected in Windows NT, 2000, XP,
2003, Vista or 2008.
6. The Standard Shield
Scanner (Basic)
On this page you can define what should be scanned by this module. It is
recommended that all the boxes on this page should be checked, which will
enable detection of the most common types of virus.
Scanner (Advanced)
On this page, you can specify other files to be scanned according to their
extension, either when they are opened, or when they are created or modified.
•
Scan files on open.
The extensions of the additional files to be scanned should be separated
by a comma. You can use the wildcard "?" (e.g. if you want all .htm and
.html opened files to be scanned, enter either "htm”, “html" or use the
wildcard - "ht?"; in the latter case, however, all files with extensions
starting with "ht", such as "htt", will be scanned).
59
avast! antivirus Home Edition 4.8 – User Guide
•
Always scan WSH-script files.
This option ensures that all script files (Windows Scripting Host) will be
tested.
•
Do not scan system libraries.
Trusted system libraries will not be scanned on opening, only a quick
check will be performed to validate the authenticity. This option may
speed up the system start a little.
•
Scan created/modified files.
If this box is checked, files will be scanned at the moment they are created
or modified. You can further specify whether this should be applied to:
•
All files, or
•
Only files with selected extensions
If the “Default extension set” box is checked, only those files with extensions
that are generally considered "dangerous" will be scanned – click “Show” to
see the list of default extensions. You can also specify additional extensions
to be scanned.
Blocker
On this page, you can specify that particular operations are blocked for files
with specific extensions. This can be applied to the “Default extension set” –
click “Show” to see the list of default extensions, but you can also specify
additional extensions for which the operations should be blocked.
You can then further specify the operations that should be blocked for the
given file types i.e. opening, renaming, deleting, or reformatting.
Finally you can specify what should be done if an operation is one that should
be blocked, but avast! is unable to obtain confirmation i.e. whether the
operation should be allowed or denied.
Advanced
•
Show detailed info on performed action
If this box is checked, information about the files currently being tested
will be displayed in the bottom right corner of the screen.
60
avast! antivirus Home Edition 4.8 – User Guide
•
Silent Mode
If the box “Silent mode” is checked any infected files will be dealt with
automatically according to the following rules:
>
If “with general answer Yes (OK)” is selected, no action will be taken
in relation to the infected file.
>
If the second option “with general answer No (Cancel)” is selected
any infected file will be automatically moved to the virus chest.
If this box is left unchecked, the normal virus alert screen will be displayed,
asking how you want to deal with the infected file.
Finally, you can specify specific locations that should not be scanned by this
particular module. Note that locations that have been excluded from scanning
by all modules are not shown in this list.
61
avast! antivirus Home Edition 4.8 – User Guide
7. The Web Shield
The Web Shield works as a local proxy server. On NT-based operating systems
(Windows NT/2000/XP/2003/Vista/2008) the protection is completely transparent
and it is not usually necessary to adjust any of the normal settings. If you are using
Windows 95/98/ME however, it is necessary to change the settings in Internet
Options - in particular, the address and port of the local proxy as follows:
If using a local area network (LAN):
If using a dial-up connection (modem):
Start Internet Explorer.
Start Internet Explorer.
Select Tools then Internet Options... from
the main menu.
Select Tools then Internet Options... from
the main menu.
Switch to the Connections page
Switch to the Connections page.
Click on the LAN Settings
Select your dial-up connection from the
list and click on “Settings”.
Check the option “Use a proxy server for
your LAN”
Check the option “Use a proxy server for
this connection”.
Write “localhost” in the Address field
(alternatively, you can enter IP address
127.0.0.1, which is the same as
localhost).
Enter 12080 in the Port field.
Write “localhost” in the Address field
(alternatively, you can enter IP address
127.0.0.1, which is the same as
localhost).
Enter 12080 in the Port field.
Confirm by clicking OK.
Confirm by clicking OK
Note: If you use multiple connections, it is necessary to set the address and port of
the local proxy for each connection separately.
Basic
•
Enable web scanning
By unchecking this box, you can turn off the web scanning feature without
affecting the URL blocking, which will remain active
•
Use intelligent stream scanning
If this box is checked, files that are downloaded are scanned almost in real
time. The pieces of data are scanned as soon as they arrive - and the next
parts are downloaded only when the previous parts are verified to be virus-
62
avast! antivirus Home Edition 4.8 – User Guide
free. If this feature is disabled, the whole files will be downloaded to a
temporary folder first, and then scanned.
The other options on this page are not available on Windows 95, 98, and
Millennium:
•
Redirected HTTP port(s).
This setting is important if you use some kind of proxy server to access
the Internet and you want to scan the communication between the server
and your computer. If you connect to a proxy server using e.g. port 3128,
enter this number into the box. Otherwise, avast! will expect the
communication to take place on port 80 (default) and everything else will
be ignored. Note: Do not enter any other ports than HTTP (such as the
ports for ICQ, DC++, etc.). Multiple port numbers should be separated with
commas.
•
Ignored addresses.
Here you should enter server names or IP addresses that will not be
redirected to the Web Shield. Multiple addresses should be separated by
commas.
•
Ignore local communication.
If this box is checked, all local communication - i.e. communication between
the programs running on your computer, will be ignored.
Web scanning
On this page, you can specify which files should be scanned when they are
downloaded from the internet. You can specify that all files should be
scanned, or just those with particular extensions. If you choose the latter, you
should enter the extensions of files to be scanned, separated by commas. You
can also enter the MIME types of files that should be scanned. In both cases,
wildcards can be used.
Exceptions
Here you can specify objects that will not be scanned by Web Shield. This may
be useful when downloading a large number of files from a single (trusted!)
location
•
URLs to exclude
Use the Add button to enter the URL addresses that should be ignored. If
you want to block a single page only, it is necessary to enter the full path
e.g. if you add http://www.yahoo.com/index.html, only the page index.html
will be excluded from scanning. If you enter http://www.yahoo.com/*,
63
avast! antivirus Home Edition 4.8 – User Guide
however, no pages starting with http://www.yahoo.com will be scanned.
Similarly, if you want a particular file type to be excluded from scanning,
e.g. files with a “.txt” extension, simply enter *.txt.
•
MIME Types to exclude
Here you can specify MIME types/subtypes to be excluded from scanning.
URL Blocking
The Web Shield can also be used to block access to certain web pages. It is
turned off by default, however, it can be used to prevent access to
“unsuitable” web pages (e.g.containing pornography, illegal software, etc.). If
such a blocked page is requested from the web browser, a message will
appear announcing that access to the page has been blocked by avast!
antivirus.
The box “Enable URL blocking” must first be checked and you can then enter
the addresses to be blocked by clicking the “Add” button and then entering
the relevant URL. Wildcards (i.e. ? and *) can be used, for example, if you
enter http://www.penthouse.com/*, no pages starting with
http://www.penthouse.com will be displayed.
Entered URL addresses will be completed according to the following rules:
If the address does not begin with http:// or wildcards * or ?, avast! adds the
prefix http:// to the beginning of the address and adds an asterisk to the end.
So, if you enter www.yahoo.com, it will be modified to
http://www.yahoo.com*.
Advanced
•
Show detailed info on performed action
If this box is checked, information about the files currently being tested
will be displayed in the bottom right corner of the screen.
•
Silent mode
If this box is checked, the connection will be terminated whenever a virus
is found
64
avast! antivirus Home Edition 4.8 – User Guide
Other avast! settings
Many other parts of the avast! program are capable of being modified in accordance
with your own personal requirements or preferences. Some of these have already
been described in the previous sections.
If you open the options menu (see page 25) and click on “Settings” the following
screen will be displayed. The different settings can be changed by clicking on the
relevant heading on the left hand side of the screen:
Common settings
In this screen you can specify what checks are carried when starting up or switching
off your computer. Here you can also change the appearance of the program by
checking or unchecking the “Enable skins…” box.
Explorer extension
The last four checkboxes on this screen relate to the “Explorer extension”.
This is the facility to scan any individual file by right-clicking on it and selecting
the option “Scan <filename>”. If the last box is checked, this option will have
the blue “a-ball” icon next to it.
65
avast! antivirus Home Edition 4.8 – User Guide
Appearance
By clicking on “Appearance” you can specify whether the avast! icon – the blue “aball” – is shown in the bottom right corner of the screen and also whether it is
animated (rotates) while a scan is being carried out.
You can add a translucent effect to the appearance of the avast! player. These
changes will become effective after you restart your computer.
Confirmations
This screen enables you to determine whether or not you are asked for confirmation
when you select certain actions and also whether or not you receive confirmation
messages after certain actions have been carried out.
The confirmation queries are a safety feature of avast! antivirus to enable you to
cancel an action that is selected by mistake.
If you do not wish to receive any particular confirmation message or query, simply deselect it by unchecking the appropriate checkbox. However, if a confirmation query is
unchecked, the relevant action will be carried out as soon as the corresponding action
is selected without the opportunity to cancel it.
The following confirmations/queries are enabled as standard, but can be turned off
by unchecking the relevant checkbox:
•
Ask before closing Simple User Interface when a scan is running
If the program is closed while a scan is in progress, the scan will be
automatically terminated at that point
•
Ask whether to persist changing resident provider status
This message will appear if you decide to “Terminate” any of the separate
resident protection modules – see page 23. If you answer “Yes”, the particular
module will remain disabled until you manually reactivate it. If you answer
“No”, it will be reactivated the next time you restart your computer.
•
Ask before stopping the on-access protection
This message will appear if you decide to “Terminate” the resident (or onaccess) protection as a whole – see page 20. If you answer “Yes”, the resident
protection will be disabled, but it will be automatically reactivated the next
time you restart your computer.
•
Ask before deleting files from Chest
If this box is checked, the program will always ask for confirmation before
deleting any files. This is to prevent any files from being deleted accidentally
•
Message when results were successfully processed
66
avast! antivirus Home Edition 4.8 – User Guide
This confirms that any action that you selected in relation to any files reported
by the program e.g. delete, move the file to virus chest etc has been
completed
•
Message when error occurred during results processing
This tells you that the action you selected in relation to a file reported by the
program could not be carried out.
•
Message when old VPS file is used
This is to warn you that the virus database is not up to date. To ensure your
system is fully protected, the virus database should be regularly updated - see
page 37.
•
Program BETA version warning
This message is to warn you that the version of the program you are using is
still in its testing stage.
•
Show message when error report successfully sent
•
Show status window in virus chest even if action completed ok
If this box is checked you will receive a message to confirm the action you
selected was successfully processed.
•
Message when ok results are enabled during task configuration
This applies to the creation of tasks, which is only available in avast! 4
Professional Edition. If this box is checked and “OK results” are selected, it
means that even uninfected files will be reported.
•
Deletion of file(s) with dangerous extension
This is a warning that it may not be safe to delete the specified file as the file
type is one that normally contains important data.
67
avast! antivirus Home Edition 4.8 – User Guide
Changing the program language
Clicking on “Language” will result in the following screen being displayed:
If the required language is then shown as “available” in the box on the right, click on
it to select it, and then click “OK”. You will then need to close the program and the
next time you start it, the language will be changed.
If the required language is not shown as “available”, click on “To install additional
languages….” below the box, then check the box next to the language you require.
Click “Next” and the additional program files will be installed. When complete, click
“Finish”
You can now select the required language as described above.
68
avast! antivirus Home Edition 4.8 – User Guide
Sounds
In this screen, you can adjust the audio settings of the program or you can switch off
the audio sounds completely.
If you click on “Settings” again, this will take you to a screen where you can adjust
the sound settings for all Windows programs. In the bottom half of the screen, there
is a box called “Program events” – see below.
If you click on the blue arrow-down on the right side, about half way down the list,
you will find the avast! antivirus events to which sounds can be assigned. If you want
to assign a new sound to an event, click on the relevant event and then on “Browse”.
From the list of available options, select the sound you want and click “OK”.
You will then return to the box shown above where you should click “Apply” then
“OK” again.
This will take you back to the main “Sounds” screen where you should click “OK”
again to finish.
69
avast! antivirus Home Edition 4.8 – User Guide
Update (Connections)
On the screen, you can specify the type of internet connection by checking the
appropriate box i.e.
•
I only connect to the Internet using a dial-up modem, or
•
My computer is permanently connected to the Internet
This will optimize the way avast! checks for new updates and will make the
automatic update process more reliable.
Once you have specified the type of connection, click the “Proxy” button. This will
open a new window where you can enter the proxy server settings. The proxy server
settings are important when avast! needs to access the Internet, e.g. during updates.
If you connect directly to the internet (i.e. not through a proxy), which usually
applies to dial-up users, select the option “Direct connection (no proxy)”
If you are not sure whether you use a proxy server, or which one you use, select
“Autodetect (use Internet Explorer settings)”, or ask your Internet provider or
network administrator.
If you know the address and port of your proxy server, select “Specify proxy server”
and enter the required proxy details as follows:
• Type. Either HTTP or SOCKS4
70
avast! antivirus Home Edition 4.8 – User Guide
•
•
•
•
Address. Enter the address of your proxy server.
Port. Enter the port your proxy server uses.
Authentication type. Specify here whether access to the Internet through
your proxy server requires user authentication, and if appropriate the type of
authentication.
Username and password. These should be entered if required for
authentication.
Finally, click on “Test connection” to test whether the Internet connection (based on
the settings above) works.
Troubleshooting
Changing the settings on this page may help to resolve certain specific problems.
However, these settings should not be changed without good reason. If in doubt,
please contact avast! first.
Check for full-screen applications before displaying pop-ups.
According to your avast! configuration, various messages may be displayed when
your computer is running (e.g., when the virus database has been updated, when an
incoming e-mail is being scanned for viruses, etc.). Normally, the messages are shown
whenever the corresponding event occurs. This, however, may result in full-screen
applications (e.g. games) being interrupted - Windows switches from the full-screen
mode into ordinary window mode when the message appears. If you check this
option, avast! will try to detect whether any full-screen application is running before
71
avast! antivirus Home Edition 4.8 – User Guide
it displays any message; if an active full-screen application is found, avast! will not
display the message.
Delay loading of avast! services after other system services.
The avast! antivirus service is usually started quite early in the boot process.
Occasionally, this may cause problems when starting other system services - which
could be manifested e.g. as temporary freezing (for a few seconds or minutes) of the
system shortly after it is started. This option makes it possible to delay starting of
the avast! antivirus service until after the usual system services are fully loaded.
Disable rootkit scan on system startup.
avast! scans for rootkits whenever you start the operating system. Check this box if
you want to disable this kind of scan.
Disable raw disk access in avast! boot-time scan.
During the boot-time scan, avast! uses a special disk access method that allows the
antivirus to detect even viruses that hide their files. Here you can turn this feature
off - avast! will use the usual disk access method.
Disable avast! self-defense module.
Some viruses are able to switch off antivirus software by terminating its processes,
deleting its critical files or modifying them. avast! contains self-defense features that
prevent these attacks by blocking the dangerous operations. To disable this selfdefense module, check this box.
Skip checking of digital signatures of infected files.
To prevent false positive alerts, avast! checks infected files for digital signatures. If a
file is detected as infected, but it also contains a valid digital signature of a trusted
authority (e.g. Microsoft), it is most likely a false positive - and avast! will ignore this
(false) detection. Checking this box will disable the additional check - avast! will
report all infections it finds.
72
avast! antivirus Home Edition 4.8 – User Guide
How to activate the avast! antivirus screen saver
Avast! antivirus is able to scan your computer for potential virus infections during
periods when the computer is not in use and the screen saver is activated. During
this time, a small box is displayed within the screen saver which informs you about
the scan’s progress.
To turn on the avast! antivirus screen saver, click the “Start” button in the bottom
left corner of your screen and select “Settings”. Next click on “Control panel” and
then double click “Display”. In the box that appears, click on “Screen saver” and then
on the first blue down-arrow to reveal the available options. Click on “avast!
antivirus”. In the box below, you can also change the number of minutes after which
the screen saver is activated, using the blue up/down arrows, and whether it is
necessary to enter your password to continue.
By clicking on “Settings” in this screen, you can select the normal screen saver within
which the avast! message box advising the scan status will appear – see the next
page.
73
avast! antivirus Home Edition 4.8 – User Guide
If you want your computer to be scanned for viruses whenever the screen saver is
activated, check the box “Scan for viruses”. If this box is not checked, the screen
saver will function only as a normal screen saver.
Checking the box “Loop scanning” will ensure that the scan is started over again once
all of the defined areas have been scanned.
Changing the window movement speed will affect how frequently position of the
scan progress box changes on the screen.
Clicking on “Settings” again will enable you to adjust the normal screen saver
settings.
By clicking on “Areas” you can specify which areas of your computer should be
scanned. The areas to be scanned automatically include “All hard disks”. If you don’t
want all hard disks to be scanned, delete this by clicking on it and then clicking
“Remove”. You can then specify the areas to be scanned by clicking on “Browse” and
selecting the required area(s) by checking the appropriate boxes. By clicking “Add”
you can select from a number of pre-defined areas.
Once you have selected the area(s) to be scanned, click on “Types” to specify which
files should be scanned. Files can be recognized as suspicious depending on their
content, which is more thorough and therefore slower, or based on their name
extension.
If you select a content based scan, you can specify that all files should be scanned by
checking the box “Scan all files”. If you check this box, it means that even those files
74
avast! antivirus Home Edition 4.8 – User Guide
which do not usually contain viruses, such as image files, will also be scanned. If you
leave this box unchecked, these files will not be scanned and will be reported as
“skipped files”.
If you select an extension based scan, you then need to specify which extensions
should be recognized as suspicious.
To scan files based on one or more specific extensions, click “Browse” and a list of
file extensions will be displayed. If you can find the extension you want to add, click
on it and then click “OK” to add it to the list. If the extension you want to add is not
in the list, you can add it manually. Click “Add” then type the file extension you want
to add. To add another extension, click “Add” again. If you want to remove a file
extension from the list, just click on it to highlight it and then click “Remove”.
If the box “Scan default extensions” is checked, it means all known “dangerous”
extensions will be automatically scanned. Any files with extensions other than those
specified will not be scanned.
If you check the box “Advanced configuration”, a number of additional options will be
displayed – see below.
•
Sensitivity
Checking the box “Test whole files (may be very slow for big files)” will result in files
being tested in their entirety rather than just the parts most frequently affected by
viruses. Most viruses are found either at the beginning of a file, or at the end.
75
avast! antivirus Home Edition 4.8 – User Guide
Checking this box will result in a more thorough scan but will also slow the scan
down.
Checking the box “Ignore virus targeting” will result in the files being tested against
all viruses in the virus database. If this is not checked, the files will be tested only
against those viruses that affect the given type of file. For example, the program will
not look for viruses that infect files with a “.exe” extension in files with a “.com”
extension.
•
Exclusions
Here it is possible to exclude certain files or folders from the scan. This works in
exactly the same way as described on page 40, with the exception that exclusions
set here apply only to this specific task. Files or folders that are excluded in the
“Settings” menu will be automatically excluded from all scans.
•
Virus
Clicking on “Virus” will result in the following screen being displayed:
In this screen, you can specify what action should be taken when a virus is detected.
The default is “choose action”. This is the “Interactive” option.
If this is left as the selected action, it means whenever a suspicious file is detected,
you will be presented with a list of possible options from which you will need to
select one. This means you can specify what action to take individually for each
suspicious file.
76
avast! antivirus Home Edition 4.8 – User Guide
Clicking on “Choose action” will reveal the options that will be presented whenever a
suspicious file is detected, i.e. Delete, Repair, Move to Chest, Move/Rename, or Stop.
Only the options that are checked will be presented as available options. If any
option is unchecked, it will not be presented as an available option when a suspicious
file is detected. These options are all described on page 32 in the section “What to
do if a virus is found”.
Selecting this action will result in the scan being suspended if a virus is detected until
you have specified what action to take. Therefore, it is recommended to select one or
more of the other actions, such as moving the file to the virus chest.
To select a different action, click on “Remove last word”. The default action will then
be deleted and the six possible actions will now be highlighted in the centre of the
screen. Clicking on any one of them will insert that action into the box above. This
action will then be applied to all suspicious files that are detected. To remove it,
simply click again on “Remove last word”.
The first four actions are described in detail on page 32. Clicking “Interactive” will reinsert “choose action”. Clicking stop will simply stop the scan as soon as a suspicious
file is detected.
It is possible to specify more than one action using the “And” button. For example,
you can specify that any infected files are repaired and moved to another location by
clicking “Repair” then “And” and then “”Move/Rename”.
You can also specify any alternative actions that should be taken if the first selected
action fails. For example, you could select “Repair” as the preferred action, but by
then clicking on “If failed” and “Move to Chest” you can ensure that any files that
cannot be repaired are moved to the virus chest – see page 48 .
Note – if you select “Delete”, you will further be able to specify whether the file
should be deleted permanently (default action), or simply moved to the recycle bin. If
you select “Delete file(s) permanently”, you will also be able to specify whether the
file(s) should be deleted the next time the computer is restarted if they cannot be
deleted now, by checking the box “If necessary, delete file(s) at the next system
start”.
•
Packers
On this page you can specify which archive files are tested during the scan. The
default setting is self-extracting executables only. You can specify that additional
archives should be processed, although this will slow the scan down. Check the “All
packers” option if you want all archive files that can be scanned to be tested.
•
Alerts
Alerts can be either general alerts, which will be sent whenever a virus is detected, or
they can be generated only when a virus is detected by the screensaver. The alerts
that can be linked to the screensaver are shown in the “available alerts” box.
77
avast! antivirus Home Edition 4.8 – User Guide
General alerts are created by clicking on “Settings” and “Alerts” as described on page
44, however, alerts that have been created in this way cannot be linked to the
screensaver.
If the alert you wish to add is shown here, click on it to highlight it, then click on the
“” button. This will move the alert into the “Used alerts” box, which means it is now
linked to the screensaver.
If the alert you want to add is not shown, click on “New” to create a new alert.
You can assign a name to the alert, for example a name that connects it with the
screensaver and you can add other information in the “Comment” box. The alert is
then created in exactly the same way as described on page 44.
Once you have created the new alert, click OK and it will be automatically placed in
the “Used alerts” box.
To remove an alert from the “Used alerts” box, click on it to highlight it, then click on
the “” button, which will move it back to the “available alerts” box.
To change or delete an alert, highlight it and click “Modify” or “Delete”.
If you need to create an SMTP alert, don’t forget to also enter the SMTP details by
clicking on “Settings” and “SMTP”.
Note that alerts linked to the screensaver, will only be sent if a virus is detected by
the screensaver. They will not be sent if the virus is detected by a different module.
If you want an alert to be sent whenever a virus is detected by any module, you
should create a general alert as described on page 44.
To confirm all of the settings, click “OK”, then click on “Apply” and then “OK” again.
Now, the next time the screen saver is activated, it will also be carrying out virus
scanning.
How to upgrade to Professional Edition
Upgrading from Home Edition to Professional Edition is very simple.
You don’t need to uninstall the current version of the program and no additional
download is required. You just need to purchase the Professional Edition, obtain the
license key and insert it into your current program. The additional components will
then be downloaded automatically and your program will be upgraded to Professional
Edition immediately.
A license key can be purchased for 12, 24, or 36 months - just go to www.avast.com
and click on “Purchase”.
78
avast! antivirus Home Edition 4.8 – User Guide
How to uninstall avast! antivirus
Some viruses are designed to switch off a computer’s antivirus software. Therefore
avast! antivirus is now protected by a strong self-defense (SD) module that prevents
it from being changed or deleted by such viruses. However, a consequence of this is
that other valid programs may also find it more difficult to change or delete avast!
antivirus compared to previous versions. In order to properly remove the avast!
antivirus program, it is essential to follow the correct procedure.
Before attempting to uninstall avast! antivirus, it is recommended to close any other
applications that you might have running on your computer. To uninstall the avast!
antivirus program, the recommended procedure is as follows.
1. Turn off the Self Defense
•
Right click on the blue “a-ball” icon in the bottom right corner of your
computer screen and from the menu options, select “Program settings”.
•
Click on “Troubleshooting” on the left side and the screen will change
as shown below
•
Now check the box “Disable avast! self-defense module” and click “OK”
•
The self-defense is now switched off.
79
avast! antivirus Home Edition 4.8 – User Guide
2. Remove the program
•
Click on “Start” in the bottom left corner of the computer screen and
open your computer’s control panel. If you cannot see it in the Start
Menu, click on Settings and it should be listed as one of the options.
•
In the control panel click on “Add or Remove Programs”.
•
A list of all the currently installed programs will then appear.
•
Highlight “avast! antivirus” by clicking on it and then click
“Change/Remove”
•
The following screen will then be displayed:
80
avast! antivirus Home Edition 4.8 – User Guide
Click on “Uninstall” so that it is highlighted and then on “Next”
The program will now be uninstalled, following which the following screen will be
displayed:
To complete the uninstall process, it is necessary to restart the computer. With
“Restart” selected, click on “Finish” and your computer will be automatically
restarted.
81