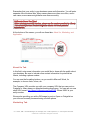
1
All rights protected © 2015 Colliborate / E-Global Interactive This manual is for your private you, distributing or sharing this information is prohibited. O = Owner, GM = General Manager, M = Manager, SS = Shift Supervisor, E = Tax Preparer & Waver Colliborate © 2009-2015 All Rights Protected TABLE OF CONTENTS GENERAL INFORMATION............................................................................................. 4 BROWSER .................................................................................................................... 4 GETTING STARTED ........................................................................................................ 4 COLLIBORATE SAVES YOU TIME! .................................................................................... 4 LOGGING IN .................................................................................................................. 4 EMPLOYEE POSITIONS/TITLES ....................................................................................... 5 OVERVIEW OF PORTAL ............................................................................................... 6 SETTING UP YOUR ENTITY .......................................................................................... 9 EDITING YOUR ENTITY INFORMATION ............................................................................. 9 About Us Tab ........................................................................................................ 10 Marketing Tab ....................................................................................................... 10 Application Tab ...................................................................................................... 11 OWNER INFORMATION ................................................................................................. 12 ENTERING OFFICE INFORMATION ................................................................................. 13 ENTITY SETTINGS ....................................................................................................... 15 COMPANY PAGE ......................................................................................................... 19 ONLINE APPLICATION .................................................................................................. 19 EMPLOYEES ................................................................................................................ 22 ACTIVE EMPLOYEES .................................................................................................... 22 Editing an Employee’s Information ........................................................................ 22 Availability ............................................................................................................. 24 Status .................................................................................................................... 25 Human Resource................................................................................................... 25 Application ............................................................................................................. 26 Notes ..................................................................................................................... 26 TEMP EMPLOYEES ...................................................................................................... 26 Reviewing Applications .......................................................................................... 27 PAST EMPLOYEES ....................................................................................................... 27 MULTIPLE ENTRY ........................................................................................................ 28 INSTRUCTORS ............................................................................................................. 29 YOUR SCHEDULE ....................................................................................................... 30 PROJECTIONS ............................................................................................................. 30 CREATE SCHEDULE ..................................................................................................... 31 PUBLISHING SCHEDULES ............................................................................................. 33 TIME CLOCK ............................................................................................................... 35 TIME CARD ................................................................................................................. 36 TAX SCHOOL .............................................................................................................. 38 TO DO LIST .................................................................................................................. 40 OFFICE TASKS ............................................................................................................ 40 MY TASKS .................................................................................................................. 42 INFORMATION LOG SHARING ................................................................................... 44 INFORMATION LOG ...................................................................................................... 44 CREATING INFO LOG ENTRY ........................................................................................ 45 ARCHIVES ................................................................................................................... 45 CATEGORY ................................................................................................................. 45 O = Owner, GM = General Manager, M = Manager, SS = Shift Supervisor, E = Tax Preparer & Waver Colliborate © 2009-2015 All Rights Protected FILE SHARING SETUP .................................................................................................. 46 FILE SHARING ............................................................................................................. 50 INVENTORY ................................................................................................................. 51 REQUEST PRODUCTS .................................................................................................. 51 ARCHIVED REQUESTS ................................................................................................. 52 HARDWARE INVENTORY ............................................................................................... 52 Adding a Hardware Inventory ................................................................................ 53 RETIRED INVENTORY ................................................................................................... 53 TIME OFF ..................................................................................................................... 54 TIME-OFF REQUEST .................................................................................................... 54 APPROVED ................................................................................................................. 55 NOT APPROVED .......................................................................................................... 55 REPORTS ..................................................................................................................... 56 O = Owner, GM = General Manager, M = Manager, SS = Shift Supervisor, E = Tax Preparer & Waver Colliborate © 2009-2015 All Rights Protected GENERAL INFORMATION Browser For best accessibility, we recommend that you view and use Colliborate in the following browsers: Google Chrome or Mozilla Firefox. IE browsers use various backend technologies that may cause conflicts in certain areas. Please let us know if you encounter them and we will work to address them. Getting Started Colliborate is intended to centralize your day-to-day tasks you do in ONE easy location. Take your time in setting up your entity and office(s) information. It may take a while, but it will be worth it and save you time in the end! The Colliborate User Manual will guide you in the process of getting your information set up, which will put you on the track to becoming more efficient and productive in your business! Colliborate Saves You Time! Throughout this manual, you will notice special sections in which we highlight special tips about saving time. You will learn techniques and ways to manage your business and save yourself precious energy and time! Logging In Go to the main web page, at www.colliborate.com. Enter your username and password in the blue Login box. O = Owner, GM = General Manager, M = Manager, SS = Shift Supervisor, E = Tax Preparer & Waver Colliborate © 2009-2015 All Rights Protected Employee Positions/Titles Owner – O (which is really an administrator) General Manager – GM Manager – M Shift Supervisor – SS All other employee positions – E These are the default system access rights groups. O = Owner, GM = General Manager, M = Manager, SS = Shift Supervisor, E = Tax Preparer & Waver Colliborate © 2009-2015 All Rights Protected OVERVIEW OF PORTAL After you log in to Colliborate, you will see the Portal landing page, which is the main page and central location of the site. By default, your portal page will contain little information as no information has yet been entered. Once you set up your account, your Portal landing page will look something like this: Here is an overview of the different sections of the Portal landing page. It is useful to understand what these features are before you set up your account. O = Owner, GM = General Manager, M = Manager, SS = Shift Supervisor, E = Tax Preparer & Waver Colliborate © 2009-2015 All Rights Protected A - Office (drop down menu): The Office drop down menu allows you to have a quick view for the information pertaining to the office you select. All items in this page will be unique to this office except for the Information Log area (this is shared for your entire entity). GM, M, SS and E will only see offices they are assigned to. B - Camera: The Camera icon provides O (by default) with a quick link to your Camera security system (if you have one setup over your network/internet). It will appear for the if the camera URL information is entered under the Entity Information (shown in a later step.) You can also allow GM & M to see this icon under the Entity>Settings area. C - Time Clock: This icon provides access to O (by default) to see who’s clocked in for the day. You can also update individuals’ clocked In/Out time on this page. The GM and M are also provided with access to this area by default, but you can limit this feature when setting up your M/GM under employee information. D- Important Phone Numbers: This is an area that ALL employees will have access to. This will allow you to share important phone numbers (like Tax Support, Tech Support, etc.) to your employees. You can also give access to M/GM to add/edit this information under the Entity>Settings area. E - Quick Links: This is an area that ALL employees will have access to. This will allow you to share important links (like ZeeNet, IRS Error Codes, Where’s My Refund, etc.) to your employees. You can also give access to M/GM to add/edit this information under the Entity>Settings area. F - Time Card: Time Card icon allows you and every employee to view their clocked-in hours. It will be visible unless owners disable this option under the Entity>Settings area (shown in a later step.) G - Time Clock (Clock In / Clock Out): Time Clock button allows employees to clock-in and out for hours worked. It is available on an office-by-office basis. You can define your office’s time-zone as O = Owner, GM = General Manager, M = Manager, SS = Shift Supervisor, E = Tax Preparer & Waver Colliborate © 2009-2015 All Rights Protected well activate the Time Clock feature for each office under Entity>Office Info (shown in a later step.) H - Schedule: The Schedule table provides you with Today’s schedule for the selected office. I - Information Logs: The Information Logs will show you the topics/headlines of items that are shared across your entire entity (all stores will see this information). New items are bolded and highlighted with the icon for emphasis. J - Office Tasks: This feature allows an O, GM, as well as an M to assign a task to a specific office (assigned offices). All Employees will see the tasks, but only M, GM and O can complete the tasks by checking the box. K - My Tasks: My Tasks will show personally assigned tasks, no one else will see this information beside the user. New – all employees can get tasks assigned to them. O, GM and M can assign tasks - to office, groups and/or individual employee(s). L - Requested Time Off: The Requested Time Off feature will show 3 recent names of people requesting time off for the selected office. M - Requested Product(s): Requested Product(s) will show 3 recent requested products for the office. N - User Name: Clicking on the user name, takes the user to their profile information. O – Logout: To ensure integrity of data, make sure to logout when you are done using Colliborate. System will time out (automatically log out) by default after 1 hour. O = Owner, GM = General Manager, M = Manager, SS = Shift Supervisor, E = Tax Preparer & Waver Colliborate © 2009-2015 All Rights Protected SETTING UP YOUR ENTITY This section will explain how to define information about your business (Entity), various administrators (Owners), store locations (office info), as well as general settings and configurations for your Colliborate account (Settings). Editing Your Entity Information When you log in to Colliborate, click on “Entity” in the top menu bar, then on “Entity Info.” Click on your business name to edit your information. Only the GM will be able to see the Entity info sub navigation link. You will be taken to the following screen, where you can enter/update the pertinent information about your entity. O = Owner, GM = General Manager, M = Manager, SS = Shift Supervisor, E = Tax Preparer & Waver Colliborate © 2009-2015 All Rights Protected Remember that your entity is your business name and information. You will enter separate office locations later. Many owners have more than one office, and in rare cases, some owners might have more than one entity. At the bottom of the screen, you will see three tabs: About Us, Marketing, and Application. About Us Tab In this field, enter some information you would like to share with the public about your business. Be sure to include some contact information for potential tax clients, including a phone number. You can use the formatting buttons, as you would in Microsoft Word, for example, to choose fonts, colors, etc. The Company URL provides you with your company URL that you can post on Craigslist or other areas you advertise seeking employees. You can use our new short URL format: http://www.Colliborate.com/co/XXXX. Where XXXX is your entity number. We are also providing you with a QR image to post on flyers on CraigsList so your info can be easily accessed using a mobile phone. Marketing Tab O = Owner, GM = General Manager, M = Manager, SS = Shift Supervisor, E = Tax Preparer & Waver Colliborate © 2009-2015 All Rights Protected In the Marketing section, you can include other social media profiles you may have for your business. If you click on the Marketing Tab, you will see the following: The first question asks if you want your company email address to appear on your public page (mentioned earlier). Select the “Yes” or “No” radio. Next, you can enter your URLs for Facebook, Google+, Twitter LinkedIn and YouTube, if you have these accounts. Make sure to enter the complete URL beginning with http:// or https://. Don’t have a Facebook or Twitter account for your stores? Not a problem: You do not have to have any of these items; the system will automatically know if you leave them blank. Your company page will reflect the information you enter and place a corresponding icon for each social networking service you provide. Application Tab In this section, you can write an introduction to the job application for potential employees. You will see the following: O = Owner, GM = General Manager, M = Manager, SS = Shift Supervisor, E = Tax Preparer & Waver Colliborate © 2009-2015 All Rights Protected In the first box, enter the text that you want to appear in as an introduction to potential individuals applying for a job with your entity. You can customize the online application introduction page to note what are seeking in terms of positions as well as personalities, etc. In the second box, write the text for a thank-you note potential employees will receive when they submit an application online. This should include a general thank you message, a time-line to follow up and perhaps contact information in case an applicant wants to make a call. It’s totally up to you what you place here. Owner Information Click on the Owner Info sub navigation link. By default, you will see the main owner that was created during the sign up process. O = Owner, GM = General Manager, M = Manager, SS = Shift Supervisor, E = Tax Preparer & Waver Colliborate © 2009-2015 All Rights Protected You can edit this information at any time by clicking on the Name in the top right cornet. You can also add additional owners by clicking on the Add Owner button. Keep in mind all added owners must have a unique email address and a unique username (you can use either to login). The owner information (name, phone # & email address) will ONLY appear to GM and M. Employees will not be able to see the Owner Info link at all maintain the chain of command of who sees what. Entering Office Information Click on “Entity,” then on “Office Info” sub navigation link. Again, you will see the default information that you set up when you signed up. GM can Edit/Delete office information for offices they are assigned to. M can only see the list of offices they are assigned to (they will not be able to Edit/Delete information). GM/M can use the link icon to link directly to the online job application to allow walk-in applicants to apply on the spot. O = Owner, GM = General Manager, M = Manager, SS = Shift Supervisor, E = Tax Preparer & Waver Colliborate © 2009-2015 All Rights Protected If you have additional offices, you can add them by clicking on the “Add Office” button. You can edit your existing office by simply clicking on the office name. New to Colliborate v2.5 - To hide this office information from the Company page, check this box. Select your entity from the drop down menu. Make sure the office number listed is the appropriate LTS number provided by Liberty. This will ensure that the number is unique in the system, as well as ensure future integration with Liberty. Enter an office location/name; this will appear in the drop down menu as well as be referenced in all related areas to the office. Try to make it meaningful and short. This will make it more readable in various areas throughout Colliborate. You can even use the LTS number, name of town, street crossing etc. O = Owner, GM = General Manager, M = Manager, SS = Shift Supervisor, E = Tax Preparer & Waver Colliborate © 2009-2015 All Rights Protected Tips for Setting up Your Offices For Product Request Email – This is the email address where all need now Product Requests (under Inventory) emails will be sent to. If a GM is assigned to the store, they will also receive these email requests. We have noticed the Liberty’s email addresses have issues receiving emails – you may want access your email directly from Liberty an mark the emails as safe so they are not seen as spam. Camera URL – If you have a video camera system in your office, you can enter the address here. This will show the Camera icon on the Portal page for the O by default. As an O, you can change your settings to show this for GM and/or M (will be shown in Settings section). Most camera systems require that you use IE browser to work, this is a requirement of your camera system and has nothing to do with Colliborate. Time Zone – Select your Time Zone and select whether you want to Activate Time-Clock for this particular office or not. Each office will need the TimeClock feature activated if you want to use the Clock In/Out system throughout your Entity (not required – you can active desired offices). Job Posting URL – You can use the Job Posting URL noted here on Craigslist or other areas you post seeking employees. Keep in mind that you can also use the Company URL (which also has a Job Posting link/icon) if you want to provide more company info in your online postings. This is the link that is shown to GM/M in office list view discussed earlier. Entity Settings The entity information will only appear to the O and GM. Both will be able to update the settings as needed. Colliborate v2.5 offers enhanced modules and features under Settings. O = Owner, GM = General Manager, M = Manager, SS = Shift Supervisor, E = Tax Preparer & Waver Colliborate © 2009-2015 All Rights Protected New to Colliborate - you can now Integrate File/Folder management with BOX.com. We recommend using Monday start date O = Owner, GM = General Manager, M = Manager, SS = Shift Supervisor, E = Tax Preparer & Waver Colliborate © 2009-2015 All Rights Protected Employees Updating Hours of Availability By default you do not want employees to update their own hours. Make sure that the “Enable Hours of Availability Update for All Employees” is set to “No.” Employee Title Labels The Update Employee Title labels are defaulted to “No.” If you would like to change the default labels to something that works better for you and your business, then select “Yes.” Make sure you put a New Label for all listed items, even if you are keeping the same label. Camera Enabling If you entered a URL for your camera under the Office(s), you can enable the option for GM and M to see the camera icons on the portal page here. If you only want owners to see the camera icon, do not mark either. Show Projections You can now enter projections information provided by Liberty into Colliborate. By default, only the O can do this, however you can allow the GM/M to access this information and see on schedule. Allow Add Quick Links You can now add a list of quick links to share with you entire staff. By default, only the O can do this, however you can allow the GM/M to add links that all staff will see. Allow Add Important #’s You can now add a list of important phones numbers to share with you entire staff. By default, only the O can do this, however you can allow the GM/M to add number that all staff will see. O = Owner, GM = General Manager, M = Manager, SS = Shift Supervisor, E = Tax Preparer & Waver Colliborate © 2009-2015 All Rights Protected Time Card The Show Time Card option allows you to decide if you want your employees to see their clocked-in hours. The default is “Yes”, however you can disable the icon on the Portal page by selecting “No.” File Sharing The File Sharing option allows you to integrate BOX.com with Colliborate to share files or folders with specific user groups. More Information later on how to setup/activate this feature. Show Employee Names Sorted Here you can decide how you want the employee names to appear on Employee pages and reports area. Time Clock Options Here you can define overtime hours (for calculation used in Clock In Clock Out Report). You can also define Auto Time Deduction (if desired). Some states require breaks after defined number of hours (let’s say ½ hour break after 6 hours). You can do this automatically be selecting 6 from the Auto Deduction After menu and selecting 30 minutes from the Deduct menu. All the math will be calculated for you on the report now. Start Week On You can now start your schedule on Sunday or Monday. This will also reflect all information following the start date O = Owner, GM = General Manager, M = Manager, SS = Shift Supervisor, E = Tax Preparer & Waver Colliborate © 2009-2015 All Rights Protected Company Page When you use your company URL - http://www.Colliborate.com/co/xxxxx, where xxxxx is your entity number. User will see your introduction, icons that you made available for contact or social media, your office list, Google Map as well as a Job application link. Online Application The preferred way to make your life simple is for employees or potential employees to enter the information by applying for employment. You can share your company page URL or Job application URL (already discussed) on Craigslist or other websites customized URL for your business with personalized messages. O = Owner, GM = General Manager, M = Manager, SS = Shift Supervisor, E = Tax Preparer & Waver Colliborate © 2009-2015 All Rights Protected Upon entering the code, which is used to minimize spam, the applicants will see the customized application O = Owner, GM = General Manager, M = Manager, SS = Shift Supervisor, E = Tax Preparer & Waver Colliborate © 2009-2015 All Rights Protected Notice that your Entity and Office numbers are listed. The customized Positions will appear (if used) as well as offices for your business. Upon clicking the Apply button, the customized thank you page (which you already set up) will appear. Employees and potential employees can also apply on by going to www.Colliborate.com. At the very bottom of the page (this will only appear prior to login – if you are logged in, you will need to log out to see the apply link); they will need to click on the Apply link as shown: When they click the apply button, however, the application is not customized and the applicant will need to have the Entity and Office numbers to apply to your business. The Entity/Office info is required for two main reasons. First, this will help the system identify you as the recipient for this application. This way, this information will be saved in your Temp employee list. The second main reason is the reduction of spam as the public does not have this information and they will not be able to make a submission without this information. O = Owner, GM = General Manager, M = Manager, SS = Shift Supervisor, E = Tax Preparer & Waver Colliborate © 2009-2015 All Rights Protected EMPLOYEES In this section, you will be able to manage all of your employees’ information, schedules of availability and even track employee applications through Colliborate. Active Employees By default, this will be blank when you first log in to Colliborate. You will need to enter all of your employees here (ideally you want to have employees/potential employees apply through the application process). Employees can only see other employees in offices they are assigned to. They can see name, phone and email address. Employees can also update their own profile information (such as address and phone number, etc). In Colliborate, all current employees are shown under the Active sub navigation. The entire list of employees will appear on one page. The Office drop down menu will show you a list of all of your offices as well as an option to see All Offices, which will show you all the employees at all the offices at one time. There are a number of ways to enter employees into Colliborate. In this screen, you would click on the Add Employee button. Editing an Employee’s Information You can click on an employee name to edit it. Owners will have access to edit all employee information. GM assigned to an office can also edit all employee O = Owner, GM = General Manager, M = Manager, SS = Shift Supervisor, E = Tax Preparer & Waver Colliborate © 2009-2015 All Rights Protected information. Mangers can edit all employee information except the Human Resources tab (to be discussed later) for assigned office(s). Job Positions For Position, the drop down menu will show either the default labels or your customized labels you defined under the Entity > Settings page. Time Clock Access setting will give you the option to take away the Time Clock editing feature for GM and M. The screenshot below illustrates this: Employees’ Email Addresses You can select the Active status if you have an employee with a valid (and unique) email address. For employees without an email address select the O = Owner, GM = General Manager, M = Manager, SS = Shift Supervisor, E = Tax Preparer & Waver Colliborate © 2009-2015 All Rights Protected “Active no email” option from the Employee Status drop down menu. This is usually used for wavers who have no email addresses. If you select Active and complete all the information, the employee will receive an email providing them with their username and password and they will now have access to Colliborate. Under the Main tab, you can enter a Username for your employees. Keep in mind that the username must be unique on Colliborate (not just your entity). Feel free to enter the PTIN and State Certification information. Assigning Employees Assign your employee to one or more offices by selection the appropriate checkbox. This will place the employee on the schedule for the selected office(s). The employee will not see all information pertaining to the office as well. Availability On the Availability tab, you will see the hours of availability for an Employee. O, GM and M can update this information. The Employee can only update this if they are explicitly given this option under Entity>Settings (discussed earlier). If you make changes, make sure you click the Save button. O = Owner, GM = General Manager, M = Manager, SS = Shift Supervisor, E = Tax Preparer & Waver Colliborate © 2009-2015 All Rights Protected Status This area will allow you to organize and track information about each employee from PTIN/State Certification info to annual tracking of information for training and P%P attendance/completion, CE completion, which tax problem they completed a well if they are IRS Certified. Human Resource The Human Resource tab allows O and GM to enter all pertinent information about employment and pay rate. Keeping an accurate record of hiring date, pay rate/increases, bonus info, and exemptions will give you a more accurate record for future reports (to be discussed later). M can only see the table of information already entered; they cannot enter values on this tab. O = Owner, GM = General Manager, M = Manager, SS = Shift Supervisor, E = Tax Preparer & Waver Colliborate © 2009-2015 All Rights Protected Application The Application tab will show information entered by the Employee (if they applied online). Only the Employee can enter information on this tab. Notes The Notes tab can be used to enter evaluation remarks for the employee. This can be used for both positive and negative remarks. An M can post Notes about an E in their office; a GM can post Notes about M and E that are assigned to. Employees cannot see notes about themselves. A hierarchy is used in who sees this information. You can mark the comments with Thumbs up or down. Temp Employees Temp Employees appear here by being entered into the system in one of two ways: 1) A name appears through the online application. All applications appear here by default. The list will show the application date and bolded icon to stand out. O = Owner, GM = General Manager, M = Manager, SS = Shift Supervisor, E = Tax Preparer & Waver Colliborate © 2009-2015 All Rights Protected 2) You can also enter employees using the Multiple Entry page (to be shown later). Using either method, the information will appear here, but the applicants will not have any access to the system. Reviewing Applications Click on the names to review the applications and see if you are interested in interviewing the applicant. Once you decide if you want to hire them or not, take the necessary action. If you are not interested in them, click the Delete icon to remove them for your system. This will keep your list clean as well as keep space for entries in your system. By default, you can have 2 x (twice) the number of entries under Temp as your Plan Active employee number. So if you have a 50 active employee plan, you can have 100 entries under the Temp page. If you choose to hire the employee, simply click on the name to edit and, from the Employee Status drop down menu, select Active or Active no email to activate the employee, complete the missing info and that’s it. The employee becomes active. If you selected Active and entered their email address, the employee will receive an email notification with their login information. Past Employees You can archive employees (from Active page) and they will appear on the Past Employees page shown below O = Owner, GM = General Manager, M = Manager, SS = Shift Supervisor, E = Tax Preparer & Waver Colliborate © 2009-2015 All Rights Protected This will allow you to retain all employee information (entered in the system). You can also archive employees if you do not want them to have access to the system. When you are ready to hire them again for next season, simply click on the corresponding Activate checkbox and the employee will appear back on the Active page. Multiple Entry This is a quick way to enter up to 10 employee names at one time. All names entered here will be defaulted to a Temp account. You will then need to update the information and add additional information as necessary. It is far less work for you to have people apply and enter their own information. O, GM and M can enter names in this area. Keep in mind that you can only have 2x (twice) the number of active employees for your plan entered for Temp. Therefore, make sure you delete undesired employees or activate employees to ensure you have the space for future entries/applicants. This page will be removed in the future as it is no longer needed. O = Owner, GM = General Manager, M = Manager, SS = Shift Supervisor, E = Tax Preparer & Waver Colliborate © 2009-2015 All Rights Protected Instructors You can setup your tax school classes and students information here. The first step is to setup instructors. An instructor must be an existing employee (position doesn’t matter), so make sure you add the instructor as an active employee first. From this screen, you will see a drop down menu with all of your employees. Select a name from the drop down menu. Repeat the process to enter all of your instructors then click the Save button. Once instructor(s) are added, you can setup your Tax School classes (discussed later). O = Owner, GM = General Manager, M = Manager, SS = Shift Supervisor, E = Tax Preparer & Waver Colliborate © 2009-2015 All Rights Protected YOUR SCHEDULE The Schedule area will allow your employees to see their weekly work schedules. All of your employees can access this tab and view the current published schedule(s). You no longer have to call your employees to give them this information. Schedule now can begin on Sunday or Monday (see settings instructions provided earlier). If an employee is assigned to multiple offices, they will see a drop-down menu for the associated offices. You can print or generate and Excel file by clicking on the icons on the top right side of screen. Projections You can enter the information into the projection page for each office using the Projections email send by Liberty. This information will be reflected on the schedule when creating a schedule and hovering over the date. You can give the GM/M access to updating this under Entity > Settings. O = Owner, GM = General Manager, M = Manager, SS = Shift Supervisor, E = Tax Preparer & Waver Colliborate © 2009-2015 All Rights Protected Create Schedule O, GM and M will see the Create Schedule sub navigation. The list of offices that will appear will be those to which the GM and M are assigned. You will see the following: Click on your office Create / Edit button. You will get a page similar to the following: Clicking on an employee name or the icon will expand the entry for the employee so you can enter their hours as shown below: O = Owner, GM = General Manager, M = Manager, SS = Shift Supervisor, E = Tax Preparer & Waver Colliborate © 2009-2015 All Rights Protected Notice that you can enter 2 different shifts per employee. Also, you can enter the hours free style by enter 12p (for 12:00 pm) and 215p (for 2:15 pm). Make sure what you type in free style is updated to reflect the hours you actually need. To save you more time and give you more power, click on the and you will get the multiple day entry as shown below: Entering a start and end time allow you to enter the hours for multiple days at the same time. If you check Monday through Friday for example, the hours you enter will appear as such on the schedule. In the example above, notice we also checked On Call for Friday (must select the Friday box as well). This will make the Friday date an on call date only, so the employee will not be scheduled, but they’ll see that they are schedule to be on call (on as needed basis). Notice the yellow background for Friday and how there is no total for the hours (since employee is not scheduled). O = Owner, GM = General Manager, M = Manager, SS = Shift Supervisor, E = Tax Preparer & Waver Colliborate © 2009-2015 All Rights Protected The only way to enter On Call hours is to use the Quick Add. To get rid of this information, you have to delete the entries for both start and end times and tab out to next cell, the yellow background will then disappear. Hovering over date will show you the projection entered for the noted date. If no information is entered for projections, nothing will happen when you hover over the date. You will only be able to have this info during the Tax Season (JanuaryApril). You can perform the copy and clear features on the entire row. To copy an entire row of information to an employee, click on the row icon. Finally, you can clear the entire page by clicking on the in the top right corner. You can also copy the entire schedule from the previous week by clicking on the icon in the top right corner. The system will automatically recognize if an approved time off is already in the system and it will notify you of these dates on the page. You will not be allowed to schedule employees on approved days off. You can modify the schedule as often as you need to; the information is automatically saved. Publishing Schedules Only the O and GM can publish the schedule. This gives them the opportunity to have a final look before moving the schedule Live so all employees can see it. O = Owner, GM = General Manager, M = Manager, SS = Shift Supervisor, E = Tax Preparer & Waver Colliborate © 2009-2015 All Rights Protected When you select the checkbox, two things happen: 1. The schedule gets published so all employees will be able to see it 2. An email goes out to all employees (with email address) that have hours on the schedule for the published week. If you need to modify the hours for a published schedule, you must first unpublish it, then modify the hours. You can then republish the schedule. This will send out another email to all employees on the schedule. The employees will be able to see the schedule (similar to below but without the link under the 6:00 pm). The link will only appear to O, GM and Manager. If the manager (GM or O) want the employee to come in on an On Call hours/day, the manager will need to contact the employee and let them know when they would need to come in. The manager would then click on the 6:00 pm link and they’ll see the following: O = Owner, GM = General Manager, M = Manager, SS = Shift Supervisor, E = Tax Preparer & Waver Colliborate © 2009-2015 All Rights Protected Enter the Start/End Time and click Activate, you will see the following: Click OK to validate the time and the information will appear on the published schedule. Time Clock O, GM and M by default will see the Time Clock link. You can take away the Time Clock access from GM and M under the Employee account page by selecting No for Time clock access (discussed earlier). By default, the Time Clock page will show the names of all clocked in/out employees for the date (icon from Portal page discussed earlier). Time Clock allows the O, GM and M to update information for employees that forgot to clock in or clock out. You now see the employee’s scheduled as well. O = Owner, GM = General Manager, M = Manager, SS = Shift Supervisor, E = Tax Preparer & Waver Colliborate © 2009-2015 All Rights Protected Select the employee on the left hand side to see their hours for the week. To add previous date hours or start time for the day, click on the icon. Select the date of missing hours. Then select the time from the drop down menu (as shown below) Notice that Colliborate now allows you to clock out on the next day. Simply select Clock Out Date option Tomorrow and Clock Out Time. Hours will be added as part of current date. Click the Add button, to save the information. The employee will have the Clock In time registered in the system and they can Clock Out on the Portal page. Note that all entries for time using the Time Clock area will appear in Red on the Clock In Clock Out Detailed report (to be shown later). This will help you see if this feature is being abused by M, GM entering a lot of information manually vs. E clocking in and out. Time Card Owners have the option to activate this feature or disable it under the Entity>Settings area. Time Card allows employees to see their Clocked In/Out hours. On the Portal page, employees can click on the icon to see their hours, or they can click on the Time Card link on the Schedule page. Employees will see the Time Card page which will show the following: O = Owner, GM = General Manager, M = Manager, SS = Shift Supervisor, E = Tax Preparer & Waver Colliborate © 2009-2015 All Rights Protected O = Owner, GM = General Manager, M = Manager, SS = Shift Supervisor, E = Tax Preparer & Waver Colliborate © 2009-2015 All Rights Protected Tax School This is a new feature and is still in Beta, please provide us with feedback to improve for the upcoming season. To create a class, simply click the Add Class button Enter your class information… The instructor should be already created from the Employee navigation. You can create any time/date combinations (there is no validation for what’s entered), you can also select the number of quizzes you want the system to track for you Clicking on the Class Name will allow you to edit the class information. Clicking on the icon will allow you to enter student names and contact information. O = Owner, GM = General Manager, M = Manager, SS = Shift Supervisor, E = Tax Preparer & Waver Colliborate © 2009-2015 All Rights Protected You can enter as many students as you need. You can enter name, phone or an email address. You can update the information at any time by simply clicking on the name. It will allow you to edit/update the information. To add a new name, simply click on the plus icon. Click Save so save the information. To enter/track attendance and grades, click on the will see the following: icon for the class. You The instructor will be able to enter this information as well as M, GM and O. Make sure to Save any information entered. You can always export this information to Excel. O = Owner, GM = General Manager, M = Manager, SS = Shift Supervisor, E = Tax Preparer & Waver Colliborate © 2009-2015 All Rights Protected TO DO LIST Office Tasks The To Do List tab is an area that helps keep your employees focused on your goals. You can place your priorities for the week here. You can also place the Liberty / AD’s Top 10 things to focus on and place them here. This way, your employees will see them every time they access the system. O, GM and M can assign tasks to the offices, groups as well as individuals. To add a task, just click the Assign Task button, you will see the page below You can make the selection if this task is for All Offices or specific offices. Enter a Task subject and description then select your priority. A date range allows you to O = Owner, GM = General Manager, M = Manager, SS = Shift Supervisor, E = Tax Preparer & Waver Colliborate © 2009-2015 All Rights Protected show the information for a specific period of time, after which the task will be moved to the Archived Tasks area. An O, GM and M can also complete the task by checking the box. The item will then immediately appear in the Archived Tasks area. You can also select the Group radio which will allow you to target specific groups for your task assignment. Notice you will see the list of default groups, make the selections as needed and click on the >> icon to assign the group(s). The remaining pieces are the same. Finally, you can create individual task by clicking on the Individual radio. Simply select the employees that you want to assign the task to. When you assign a task it will appear under My Tasks area. O = Owner, GM = General Manager, M = Manager, SS = Shift Supervisor, E = Tax Preparer & Waver Colliborate © 2009-2015 All Rights Protected My Tasks My Tasks area is designated for a personal To Do List as well for all assigned tasks. In this case the owner created a task to 2 employees. Clicking on the Task will provide the task details as shown here The two employees (in this case) will see the task on their Portal page as shown here.. O = Owner, GM = General Manager, M = Manager, SS = Shift Supervisor, E = Tax Preparer & Waver Colliborate © 2009-2015 All Rights Protected The employee will navigate to the task and enter notes and then click on the Start Task button to indicate that they began the task. This will notify the assigner of task. The Employee can also complete the task by clicking on the Mark Task Complete button. To close this screen and go back, click the Done button. If the Completed button was clicked, the task for this employee will appear under the My Archived Tasks. This is what the assigner of the task will see Notice the updated comments, with time, date and who update it. Also notice that employee “ss, Mark” is highlighted in yellow giving further indication that they completed their task. This will allow you to track a specific task for all employees in one view. O = Owner, GM = General Manager, M = Manager, SS = Shift Supervisor, E = Tax Preparer & Waver Colliborate © 2009-2015 All Rights Protected INFORMATION LOG SHARING The Info Log area is an ideal place to share valuable information with your employees (across all of entity). All employees can view this area as well as add Info as well as comments. Information Log The information can fall in one of many categories: federal, state, liberty, bank or create your own. This information can provide instructions to specific situations that you encountered, specific tax information, provide procedures for your operations or processes. Comments can also be added to update the information as necessary (maybe a solution was found, a better process, etc). You will have a quick view with all the information log items. You can see the Title, date it was Created, Comments made, Category, Last Update as well as priority. You can also sort the information by Headline, Created, Category and Priority. Only the O and GM will be able to Archive or Delete content. A new feature to duplicate existing entries was created using the icon. This allows the reuse of prior year info log items with current time stamp. This will make it easier to view reports for items for current tax season. O = Owner, GM = General Manager, M = Manager, SS = Shift Supervisor, E = Tax Preparer & Waver Colliborate © 2009-2015 All Rights Protected Creating Info Log Entry Click on the Add info button, you will see the following Simple select a Category, Priority, Headline and then enter the information you want in the Issue area. You can format the information easily with the tool bar provided. Hit Add when you are done. Archives This area will show all archives info Log items. Category O = Owner, GM = General Manager, M = Manager, SS = Shift Supervisor, E = Tax Preparer & Waver Colliborate © 2009-2015 All Rights Protected Create categories that suit your needs. Only the O and GM will see the Category area. Simply click on Category sub navigation; you will see the list of existing categories as follows: You can add your own Category by simple clicking the Add Category button at the bottom of the page. You will see the following window: Once you click the Add button, you can change the order of items that will appear in the Info Log area (when adding Info Log items). You can also delete any newly added Category as long as no items already exist under them. You cannot delete the default system categories. File Sharing Setup You will need to create a Free or Paid Box.com Account. Once you create it, you will need to follow these steps to enable BOX integration with Colliborate. Go to https://developers.box.com/, you will see the following screen: O = Owner, GM = General Manager, M = Manager, SS = Shift Supervisor, E = Tax Preparer & Waver Colliborate © 2009-2015 All Rights Protected Click on the Log In link in the top right corner, you will see the following screen: Enter your username and password and click Log In. Click on the Get Started button. O = Owner, GM = General Manager, M = Manager, SS = Shift Supervisor, E = Tax Preparer & Waver Colliborate © 2009-2015 All Rights Protected Enter a unique name (use your entity and business name – no spaces.) then click Create Applications. You will see the following screen: O = Owner, GM = General Manager, M = Manager, SS = Shift Supervisor, E = Tax Preparer & Waver Colliborate © 2009-2015 All Rights Protected Click on the Configure your application button and you will see the following screen: You will need specific information on two lines to enter into Colliborate settings page. Here’s a close up on those two lines: O = Owner, GM = General Manager, M = Manager, SS = Shift Supervisor, E = Tax Preparer & Waver Colliborate © 2009-2015 All Rights Protected Copy and paste the information into Entity Setting Area: Save the settings and you are done. File Sharing Now that you are setup, you can share files and/or folder with your target users. Enter a Label that you want the group to see (this is based on the role the user has, such as GM, M, Tax Preparer, etc), from Box, copy the share link and paste in the Box URL field. Select the group(s) that you want to have access to the file and or folder. Use the Ctrl Button if you have more than one group to select. Finally click the Share button. This is now added and it becomes a link for users to access the file and/or folder you added. O = Owner, GM = General Manager, M = Manager, SS = Shift Supervisor, E = Tax Preparer & Waver Colliborate © 2009-2015 All Rights Protected INVENTORY The Inventory tab can be used to request products as well as track hardware inventory in your office(s). Request Products One of the biggest challenges in an office for an owner is the non-ending calls. From asking about schedules to products that ran out in the store, etc. This area will help centralize product request and in effect, end the phone calls for these products. No more sticky notes, emails and calls. Just say, put it on Colliborate. An O, GM, M and a SS can request products for assigned stores. Product info and details can be provided as well. The priority for each product will determine how this information is disseminated. If Need Now is selected, an email will automatically be sent to the Owner (at entity email) and the GM (for specific store). If Normal or “7+ days” is selected, then the item will remain on the Requested Product page. Both the GM assigned to the store as well the person assigned under the Office settings for Product Requests will receive an email with the details of what’s requested and who made the request. Once a product is received O, GM, M or the SS can check the Done checkbox for the Product indicating that the request has been fulfilled. This moves the Product to the Archived Requests page. O = Owner, GM = General Manager, M = Manager, SS = Shift Supervisor, E = Tax Preparer & Waver Colliborate © 2009-2015 All Rights Protected You can make multiple product requests on the same page. You can also note the quantity for each request. Archived Requests This simply shows the entire product request list that has been fulfilled for your offices. Received date is noted on the page. Hardware Inventory This is a great area to track your electronics hardware at your office(s). You will see the entire list of Hardware at an office O = Owner, GM = General Manager, M = Manager, SS = Shift Supervisor, E = Tax Preparer & Waver Colliborate © 2009-2015 All Rights Protected If you get a product request for a printer for example and you were not given specifics, you can easily check which printer cartridge/toner you will need to order. If your hardware is no longer in use, you can select the Retire check box. This will place the item under the Retired Inventory page. This info can be pulled in the Reports area which can help you in depreciating the products for your taxes. Adding a Hardware Inventory Click on Add Inventory button, you will get the following: This will allow you to enter all the pertinent information for your hardware. This info can be very helpful in case you need to replace a product and you are not in the store or if theft occurs and you need to produce Serial Numbers and detailed information about stolen products Retired Inventory This is where the entire retired hardware list will appear. O = Owner, GM = General Manager, M = Manager, SS = Shift Supervisor, E = Tax Preparer & Waver Colliborate © 2009-2015 All Rights Protected TIME OFF The Time Off tab allows employees to request time off and the opportunity to include specific details, such as reasons why the leave is necessary. The O, GM and Manager will see the list of all staff associated with assigned office(s). Other employees will only see their own requests as well as the status if it is pending, approved or denied. Time-Off Request The O, GM and M can approve such a request. Once a request is approved or denied, an email will be sent to employee to notify them of the status of the request. The person making the schedule will also be alerted if they erroneously attempted to schedule the employee on their approved-off date. The system will not allow you to schedule an employee with an approved day off. To make a request, click on the Make Request button O = Owner, GM = General Manager, M = Manager, SS = Shift Supervisor, E = Tax Preparer & Waver Colliborate © 2009-2015 All Rights Protected You can now make multi-office and multi-day requests. This will eliminate the need to have multiple individual requests (especially if an employee works at multiple offices). Each manager (GM or O) would have to approve the Time-Off Request independently to make sure all are aware of the time off request. Approved The O, GM and manager will see the list of all approved requests on this page. Employees will see their own approved requests only. Not Approved The O, GM and manager will see the list of all non-approved requests as well as all lapsed request (where no action was taken) on this page. Employees will see their own denied requests only. O = Owner, GM = General Manager, M = Manager, SS = Shift Supervisor, E = Tax Preparer & Waver Colliborate © 2009-2015 All Rights Protected Reports You can access various reports to access information. Notice there are two Time Clock reports. The first is for data for Clock In Clock Out prior to December 20, 2014. The new report Time Clock (12/20/14 forward) will allow capturing data for Clocking In/Out after midnight. Time Clock Report Select the Time Clock report to obtain clocked in/out hours. Select the Office(s), date range and Type of report you want. The Summary report provides quick information about hours clocked in and compare them to schedules hours for each user. The Detailed report is used to make sure your employees clocked in/out and they did so from the office. This is O = Owner, GM = General Manager, M = Manager, SS = Shift Supervisor, E = Tax Preparer & Waver Colliborate © 2009-2015 All Rights Protected done by comparing the IP address to the rest of the staff. A different IP address will let you know that the employee clocked in either from their home or mobile device and not from the office. The accountant report is used to calculate the hours worked for your employees to share with your accountant for payroll purposes. Notice that you can change the Accountant report to show All employees or filter to specific group to understand your cost per group. O = Owner, GM = General Manager, M = Manager, SS = Shift Supervisor, E = Tax Preparer & Waver Colliborate © 2009-2015 All Rights Protected