1
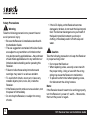
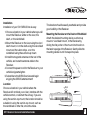
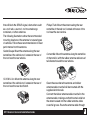
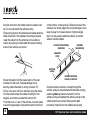
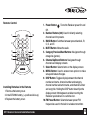
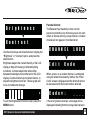
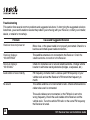
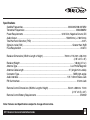
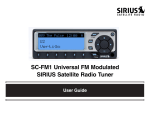
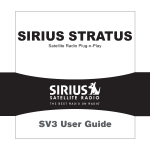
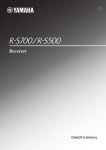
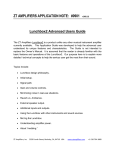
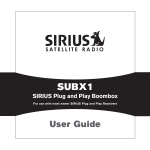
SV1 SIRIUS One
SIRIUS Satellite Radio Plug and Play
User and Installation Guide
CONGRATULATIONS! Your new SV1 SIRIUS One SIRIUS® Satellite Radio Plug and Play Receiver lets you
enjoy SIRIUS Satellite Radio’s digital entertainment in your vehicle, home, or boat. Use this guide to
familiarize yourself with all of SV1’s features and capabilities. For the latest information about this and other
SIRIUS products, please visit http://www.siriusradio.com.
Table of Contents
Safety Precautions ........................................................... 4
FCC Warning .................................................................... 5
Cleaning the Receiver ....................................................... 5
Package Contents ............................................................ 6
Installation ....................................................................... 7
Location ....................................................................... 7
Mounting the Receiver on the Dash or Windshield ...... 7
Installing the Magnetic Antenna .................................. 8
Connecting the Receiver ............................................. 11
Activating your SIRIUS Subscription ......................... 12
SV1 SIRIUS One Receiver Basic Operation .............. 14
Remote Control .......................................................... 15
Installing Batteries in the Remote ........................... 15
Changing Channels .................................................... 16
Display Button (DISP) ............................................... 16
2
Selecting Channels Directly ......................................
Advanced Features ......................................................
Channel Presets (BAND) ...........................................
Storing Channel Presets .........................................
Using Channel Presets ...........................................
Searching for a Channel Preset (P.TUNE Mode) .......
FM Preset Button ......................................................
Menu Options ................................................................
SIRIUS ID ...................................................................
FM Transmitter ..........................................................
FM Presets .............................................................
FM On/Off ...............................................................
Display Options .........................................................
Parental Control .........................................................
Lock/Unlock ............................................................
17
18
18
18
18
19
19
20
21
21
21
22
22
23
24
SV1 Receiver User and Installation Guide
Table of Contents (continued)
Edit Code ................................................................
Audio Level .................................................................
Signal Level ................................................................
Factory Default ..........................................................
Troubleshooting ...............................................................
Specifications ..................................................................
12 MONTH LIMITED WARRANTY ..................................
25
26
26
27
30
31
32
© 2005 SIRIUS Satellite Radio Inc.
® “SIRIUS,” the SIRIUS dog logo, channel names and logos
are trademarks of SIRIUS Satellite Radio Inc. “NFL” and the
NFL Shield logo, and the NFL Sunday Drive name and logo
are registered trademarks of the National Football League.
“NHL” and the NHL Shield are registered trademarks of the
National Hockey League. “NBA” and the NBA silhouette logo
are registered trademarks of NBA Properties Inc. Velcro is a
registered trademark of Velcro Industries B.V. All other
trademarks, service marks and logos are the property of their
respective owners. All Rights Reserved.
SV1 Receiver User and Installation Guide
3
Safety Precautions
Warning
Take the following precautions to prevent fire and
avoid personal injury:
• Be sure the Receiver is installed as described in
the Installation Guide.
• The use suggestions contained in this User Guide
are subject to any restrictions or limitations that
may be imposed by applicable law—the purchaser
should check applicable law for any restrictions or
limitations before installing and/or operating this
Receiver.
• Failure to follow these safety instructions and
warnings may result in a serious accident.
• To avoid short circuits, never put or leave any
metallic objects (coins, tools, etc.) inside the
Receiver.
• If the Receiver emits smoke or unusual odors, turn
the power off immediately.
• Do not drop the Receiver, or subject it to strong
shocks.
4
• If the LCD display on the Receiver becomes
damaged or broken, do not touch the liquid crystal
fluid. The fluid can be dangerous to your health. If
the liquid crystal fluid contacts your body or
clothing, immediately wash it off with soap and
water.
Caution
Take the following precautions to keep the Receiver
in proper working order:
• Do not open the Receiver.
• When replacing a fuse, use only a new one with
the proper rating. Using a fuse with the wrong
rating may cause the Receiver to malfunction.
• To prevent a short circuit when replacing a fuse,
first disconnect the wiring harness.
Note:
If the Receiver doesn’t seem to be working properly,
turn the Receiver’s power off, wait 5 – 10 seconds,
then turn the power on again.
SV1 Receiver User and Installation Guide
FCC Warning
This equipment may generate or use radio
frequency energy. Changes or modifications to this
equipment may cause harmful interference unless
the modifications are expressly approved in this
User Guide. The user could lose the authority to
operate this equipment if an unauthorized change or
modification is made.
Note:
This equipment has been tested and found to
comply with Part 15 of the FCC Rules. These
rules are designed to provide reasonable
protection against harmful interference. This
equipment may cause harmful interference to
radio communications if it is not installed and
used in accordance with these instructions.
However, there is no guarantee that interference
will not occur in a particular installation. If this
equipment does cause harmful interference to
radio reception, which can be determined by
turning the equipment off and on, the user is
encouraged to try to correct the interference by one of
more of the following measures:
SV1 Receiver User and Installation Guide
• Reorient or relocate the receiving antenna.
• Increase the separation between the other
equipment and the Receiver.
• Connect the other equipment to a different circuit
from that to which the Receiver is connected.
• Consult the dealer or an experienced radio
technician for help.
Warning
Do not operate the Receiver in a way that might
divert your attention from driving safely. As a driver,
you alone are responsible for safely operating your
vehicle in accordance with traffic safety laws at all
times.
Cleaning the Receiver
If the Receiver becomes dirty, turn its power off and
wipe it clean with a soft dry cloth. Do not use hard
cloths, paint thinner, alcohol, or other volatile
solvents to clean the Receiver. These may cause
damage to the plastic or remove indicator
characters.
5
BAND
1
Alcohol Swab and
Velcro® Strips
(T
it
kn o clea
ow
n
pr
ior n / un a su
rf
to
ap know ace
plyi n
of
ng emul any
ad
he sion
sive s
s.)
SV1 SIRIUS One
Receiver
Su
rfa
ce
Cle Pre
an para
ing
K tion
Package Contents
The following items are packaged with the SV1 SIRIUS One. Check the package to be all of the items are
included. If any of the items are missing, please contact the retailer where you purchased the product.
DISP
2
3
4
5
Suction Cup Mount
1
2
3
4
5
6
7
8
BAND
0
MUTE
CH
CAT
SEL
9
DISP
MENU
CAT
SIRIUS One
Remote Control
CH
Visor/Dash Mount
Magnetic Antenna
Cigarette Lighter
Power Cord
Rubber Antenna
Cable Cover/Tail
& Adhesive Strip
6
SV1 SIRIUS One
SIRIUS Satellite Radio Plug and Play
User Guide
User and Installation Guide
SV1 Receiver User and Installation Guide
Installation
Installation of your SV1 SIRIUS One is easy:
1. Choose a location in your vehicle where you will
mount the Receiver, either on the visor, the
dash, or the windshield.
2. Mount the Receiver on the visor using the visor/
dash mount, or on the dash using the visor/dash
mount and the velcro strips, or on the
windshield using the suction cup mount.
3. Install the magnetic antenna on the roof of the
vehicle, and route the antenna cable to the
Receiver.
4. Connect the power cord for the Receiver to your
vehicle’s cigarette lighter.
5. Subscribe to the SIRIUS service and begin
enjoying the SIRIUS entertainment!
Location
Choose a location in your vehicle where the
Receiver will not block your vision, interfere with the
vehicle controls, or obstruct the air bag. If you are
using the suction cup mount, the location should be
suitable for using the suction cup mount, such as
the windshield or other flat, smooth surface.
SV1 Receiver User and Installation Guide
The location should be easily reachable and provide
good visibility of the Receiver.
Mounting the Receiver on the Dash or Windshield
Attach the desired mounting device, suction cup
mount or visor/dash mount, to the Receiver by
sliding the flat portion of the mount into the slot on
the back top edge of the Receiver. Gently slide the
mounting device in until it snaps into place.
SNAP
SNAP
7
Depending upon your mounting choice, use the
velcro strips to mount the Receiver to the dash, or, if
you are using the suction cup mount, lightly moisten
the surface of the suction cups which face the
windshield (or other surface) and press the suction
cups to the mounting surface.
Mounting the Receiver on a Visor
When the Sirius One SV1 is mounted on a visor, it
should be mounted in an upside-down orientation for
best visibility of the display screen.
Attach the visor mount to the Receiver in the
orientation shown by sliding the flat portion of the
dash/visor mount into the slot on the back top edge
of the Receiver. Gently slide the mount into the
Receiver until it snaps into place.
SNAP
8
Install the Receiver on the visor as shown by sliding
the clip portion of the mount onto the visor.
020 Octane
When the Receiver is initially powered on, the
display may be upside-down. To change the
orientation of the display, press and hold the DISP
button. The Receiver will remember the display
setting.
Installing the Magnetic Antenna
The optimum mounting location for the antenna is
on the roof of the vehicle, with a minimum
unobstructed area of 12 inches by 12 inches, and
exactly 6½ inches from the rear roof edge of the
vehicle (the length of the rubber antenna cable
cover/tail). It is important to avoid any obstructions
SV1 Receiver User and Installation Guide
that will block the SIRIUS signal, obstructions such
as a roof rack, a sunroof, roof mounted cargo
containers, or other antennas.
The following illustrations show the recommended
mounting locations of the antenna for several types
of vehicles. Follow these recommendations for best
performance from the antenna.
Sedan/Coupe: Mount the antenna along the rear
centerline of the vehicle roof, located at the rear of
the roof near the rear window.
SUV/Mini-Van: Mount the antenna along the rear
centerline of the vehicle roof, located at the rear of
the roof near the rear door/hatch.
SV1 Receiver User and Installation Guide
Pickup Truck: Mount the antenna along the rear
centerline of the cab roof, located at the rear of the
roof near the rear window.
Convertible: Mount the antenna along the centerline
of the trunk lid, with the rubber antenna cable cover/
tail directed toward the rear window.
Clean the area where the antenna and rubber
antenna cable cover/tail will be mounted with the
supplied alcohol swab.
Connect the rubber antenna cable cover/tail to the
antenna cable, making sure that the strain-relief on
the antenna seats into the rubber antenna cable
cover/tail groove. Route the antenna cable through
9
the wire channel in the rubber antenna cable cover/
tail. Do not yet attach the adhesive strip.
Temporarily position the antenna and rubber antenna
cable cover/tail in the selected mounting area and
route the cable from the antenna to the vehicle’s
interior by tucking it underneath the rubber molding
around rear window, as shown.
of the vehicle, to the receiver. Take care not pull the
cable across sharp edges that could damage it, and
keep it away from areas where it might entangle
feet. Coil any excess antenna cable in a location
where it can be hidden.
PROTECTIVE MATERIAL
(RED SIDE)
ANTENNA
(UNDERSIDE)
ADHESIVE
STRIP
ANTENNA
CABLE
Route the cable from the lowest point of the rear
window into the trunk. Take advantage of any
existing cable channels or wiring conduits. For
SUVs, mini-vans & 5-door vehicles, bring the cable
into the vehicle under the rubber molding for the
tailgate, and continue under the interior trim.
From the trunk, or rear of the vehicle, route the cable
around the passenger compartment and to the front
10
RUBBER ANTENNA
CABLE COVER/TAIL
Once the antenna cable is routed through the
vehicle, and you are satisfied with the cable routing,
peel the yellow protective material from the
adhesive strip and adhere the adhesive strip to the
rubber antenna cover/tail. Next peel the red
protective material from the adhesive strip and
SV1 Receiver User and Installation Guide
press the rubber antenna cable cover/tail firmly into
place on the vehicle.
Double check that the location of the antenna and
rubber antenna cable cover/tail are correct, and
continue to press firmly down on rubber antenna
cable cover/tail for another 30 seconds.
Note: At room temperature (68 degrees), maximum
adhesion usually occurs within 72 hours. During this
period, avoid car washes and other contact with the
antenna and rubber antenna cable cover/tail.
RUBBER ANTENNA
CABLE COVER/TAIL
Connecting the Receiver
Connect the antenna and cigarette lighter power
adapter to the Receiver to complete the installation.
The illustration below shows the location of the
antenna and power connectors on the Receiver.
Plug the cigarette lighter power adapter cord into
your vehicle’s cigarette lighter, and turn the Receiver
On by pressing the power button. Once you have
verified that Receiver has powered on, you can
proceed with activating your SIRIUS subscription.
AUDIO
OUT
ANT
DC
IN
AUDIO OUT FM OUT
DC IN
ANTENNA FM
OUT
VEHICLE
MOUNTING SURFACE
SV1 Receiver User and Installation Guide
11
Activating your SIRIUS Subscription
Before you can listen to the SIRIUS service, you
need to subscribe to the SIRIUS Satellite Radio
service.
1. Be sure that the Receiver is correctly installed
and that the antenna is oriented to receive the
SIRIUS signal.
2. Press the power button to turn Receiver On.
After displaying the SIRIUS logo, the Receiver
will update the SIRIUS channel line up. The
display will show, “UPDATING CHANNELS” and
show the status of the update.
U P D
C H s
X X %
Wait until the channel updates have completed
before pressing any buttons on the Receiver.
3. Once the channels have been updated, the
display will change to “Call 1-888-539-SIRIUS to
Subscribe” and will place you in SIRIUS Satellite
Radio’s Preview Channel, channel 184.
You will not be able to tune to any other
12
channels until you activate your SIRIUS
subscription.
C a l l
1 - 8 8 8 - 5
4. To listen to the audio from your Receiver, you will
need to tune the FM radio in your vehicle and the
FM transmitter in the Receiver to the same FM
frequency. The FM transmitter in the Receiver
defaults to 88.1 MHz, so you can begin by tuning
your FM radio to 88.1 MHz. If there is an FM station
broadcasting on that frequency, you will have to
search for a quiet frequency to use. Refer to the
section titled, FM Transmitter in this User
Manual for instructions on how to tune the FM
transmitter to other FM frequencies.
5. Press and hold the SELECT button on SV1 or
press and release the MENU button on the
remote control to display the SIRIUS ID menu
option. Press and release SELECT again to
display your Receiver’s unique 12-digit SIRIUS
SV1 Receiver User and Installation Guide
ID number (SID). You may also access the SID
by tuning to channel 000 by using the channel
up/down buttons on SV1 or the remote control.
(This SID number is also available on the SV1
packaging.) Write the SID number down in the
space provided at the end of this manual.
1 1 2 2 3 3 4 4 5 5 6 6
6. Have your credit card handy and contact SIRIUS
on the Internet at:
https://activate.siriusradio.com/
and follow the prompts to activate your
subscription. You can also call SIRIUS toll-free
at:
1-888-539-SIRIUS (1-888-539-7474)
7. When you have successfully subscribed to the
SIRIUS service, and the Receiver has been
updated with your subscription information,
“UPDATED” will be followed by “PRESS A KEY”.
SV1 Receiver User and Installation Guide
U P D A T E D
P R E SS
A
KE Y
To continue, press any key on the Receiver.
The installation of your Receiver is now complete,
and you are ready to begin enjoying SIRIUS Satellite
Radio’s digital entertainment!
13
SV1 SIRIUS One Receiver Basic Operation
9
4.
5.
1
8
7
2
6
3
BAND
1
DISP
2
3
4
5
4
1. POWER Button
: Turns the Receiver’s power
On and Off.
2. Channel Up/Down Buttons: Navigates through
channels and display screens.
3. BAND Button (P.Tune): Pressing and releasing
switches between the five preset banks (A, B, C, D
and E), which hold five presets each. Pressing and
holding enables “Preset Tune Mode”, which allows
14
6.
5
7.
8.
9.
for viewing and listening of stored presets with the
channel up/down buttons.
Preset Number Buttons (1-5): Sets and selects
preset channels. Also used to directly tune
channels by entering the channel number.
DISP (Display) Button: Toggles display between
the channel number and name, channel number
and category, channel number and artist name,
and channel number and song title. Holding the
DISP button down flips the display screen 180
degrees to enable mounting the Receiver upside
down on a vehicle visor.
Category Previous/Next Buttons: Navigates
through the category (genre) list screen which
displays SIRIUS channel categories.
Select Button: Selects items displayed on the
screen and accesses the setup menu.
FM Preset Button: Selects between preset FM
frequencies used for the built-in wireless
transmitter. Pressing and holding the FM Preset
button will access the list of FM presets where you
can change them.
Mounting Release Button: This button releases
the mount which is connected to the Receiver.
SV1 Receiver User and Installation Guide
Remote Control
1
10
2
3
4
5
6
7
8
9
3
BAND
0
DISP
9
4
5
MUTE
CH
MENU
8
5
1
2
CAT
SEL
CAT
CH
6
7
Installing Batteries in the Remote
1. Remove the battery cover.
2. Install CR2032 battery. (+ positive side is up)
3. Replace the battery cover.
SV1 Receiver User and Installation Guide
1. Power Button
: Turns the Receiver power On and
Off.
2. Number Buttons (0-9): Used for directly selecting
channels and for presets.
3. BAND Button: Switches between preset bands A , B,
C, D, and E.
4. MUTE Button: Mutes the audio.
5. Category Previous/Next Buttons: Navigates through
categories (genres).
6. Channel Up/Down Buttons: Navigates through
channels and display screens.
7. Select Button: Selects items on the display screen.
8. MENU Button: Used to access menu options to make
setup and feature changes.
9. DISP Button: Toggles display between the channel
number and name, channel number and category,
channel number and artist name, and channel number
and song title. Holding the DISP button down flips the
display screen 180 degrees to enable mounting the
Receiver upside down on a vehicle visor.
10. FM Preset Button: Selects between preset FM
frequencies used for the built-in wireless transmitter.
15
After you have successfully activated your SIRIUS
subscription, and the Receiver has received the
subscription information from the SIRIUS signal, the
default display screen will be displayed.
P O P [ 1 5 ]
When the Receiver is powered On, the previously
selected channel will automatically begin playing,
and the channel name of the current channel will be
displayed.
Pressing the category previous or next button will
cause the Receiver to display a listing of the
previous or next channel category.
Use the channel up/down buttons to display a
channel within a category and press the select
button to tune to the channel. When a new channel
is selected, the display will revert to the default
display screen for the new channel.
Changing Channels
Pressing the channel up or down button will cause
the Receiver to immediately tune to the next or
previous channel.
Pressing the category previous or next button will
cause the receiver to display a list of the channels in
the current category. Use the channel up and down
buttons to navigate through the list.
Display Button (DISP)
Momentarily pressing and releasing the DISP
(Display) button while the default screen is
displayed causes the Receiver to sequence the
display between the channel number and channel
name, channel number and category name, channel
number and artist name, and channel number and
song title.
1 8 4
16
P r e v i e w
SV1 Receiver User and Installation Guide
0 1 4
C l s V i n y l
0 1 4
R o c k
0 1 4
A l i c e
0 1 4
S c h o o l ' s
C o
Note: If you are viewing a sports category channel
list (NFL®, NBA®, NHL®, or College), pressing and
releasing the DISP button will instead toggle
between the team names and the current score of
any live play-by-play game.
Use the category previous and next buttons to scroll
through the music and entertainment categories,
SV1 Receiver User and Installation Guide
and the channel up and down buttons to scroll
through the available channels in each category to
find the channel to which you want to listen.
When you have found the channel you wish to listen
to, press the select button to tune to the channel.
The new channel will begin playing and the display
will revert to the default display screen for the new
channel.
Pressing and holding the DISP button for 1 second
will cause the Receiver to flip the display screen 180
degrees to enable mounting the Receiver upside
down on a vehicle visor.
Selecting Channels Directly
A channel may be directly selected by entering the
channel number using 0-9 buttons on the remote
control.
To enter a channel number, momentarily press and
release the select button. At the display prompt,
enter the three digit channel number.
C H #
:
_ _ _
17
Advanced Features
Channel Presets (BAND)
You can store up to 30 of your favorite channels as
presets for quick recall access. The preset channels
are stored in 5 bands, A, B, C, D, E, and F each
containing 5 channel presets, and are numbered 1
to 5. The 5 channel presets in each band are
accessed by pressing the appropriate number (1 to
5) on the Receiver. A momentary press and release
of the BAND button cycles through the 5 preset
bands (A, B, C, D, E, and F).
Storing Channel Presets
To store a favorite channel as a preset, do the
following:
1. Momentarily press and release the BAND
button until the desired preset band, A, B, C, D,
E, or F, is displayed.
2. Tune the Receiver to the channel you wish to
store as a preset. (See the section, Basic
Operation for specific instructions for tuning to a
channel.)
3. Press and hold for 1 second the numbered
18
preset button in which you wish to store your
favorite channel. The band and preset number
will then be displayed to confirm that the
channel has been stored.
0 1 4
A 1
S a v e d
Note: If the preset button already has a channel
stored in it, the preset will be replaced by the newly
stored channel.
Using Channel Presets
Press and release the BAND button to cycle
between the preset bands until the preset band you
want is displayed.
The 5 preset channels in the active band can then
be selected by momentarily pressing and releasing
the 1 through 5 buttons.
When you have chosen a preset channel, the band
and preset number will be displayed.
A 1
SV1 Receiver User and Installation Guide
Searching for a Channel Preset (P.TUNE Mode)
To quickly search through all of your presets in the
P.TUNE mode, do the following:
1. Press and hold the BAND button for
approximately 1 second to enter the P.TUNE
mode. “Preset Tuning Mode” will momentarily be
displayed and the preset number will be
displayed to indicate the Receiver is in the
Preset Tune Mode.
P . T u n e
A 1
M o d e
C l s V i n y l
2. Use the channel up and down buttons to move
up or down through your channel presets and
immediately tune to each channel. Channel
presets are grouped and displayed by bank and
preset number, i.e., A1, A2...B1, B2, etc. Empty
SV1 Receiver User and Installation Guide
presets are not displayed.
3. To exit the P.TUNE mode, press and hold the
BAND button for approximately 1 second, until
the default display screen is displayed.
FM Preset Button
The Receiver has a special button called the FM
Preset button, which is identified by the
icon.
When the FM Preset button is pressed, the
Receiver turns on the built-in FM transmitter and
begins transmitting on the next frequency from the
FM frequency preset list. A screen will be displayed
for 3 seconds showing the currently selected FM
frequency. When the FM transmitter is turned on, an
FM radio tuned to the same FM frequency will
receive the currently tuned SIRIUS broadcast.
F M - 1
8 8 . 1
Each subsequent press of the FM Preset button
advances to the next preset in the FM frequency
preset list. By using the FM Preset button, a quiet
FM frequency may be quickly tuned.
19
If no FM frequencies have been preset when the FM
Preset button is pressed, the Receiver will default to
a frequency of 88.1 MHz.
Pressing and holding the FM Preset button will
display the list of FM presets. Use the channel up
and down buttons to browse through the list.
F M - 1
8 8 . 1
to select an FM frequency and press the select
button. The preset will now display the new FM
frequency. To select the preset, press the MENU
button.
You may also change the FM presets by using the
FM Presets menu option of the Receiver. (Refer to
the FM Transmitter section in the Menu Options
section of this manual for instructions on
programming the FM presets list.)
Menu Options
F M - 2
9 1 . 5
F M - 5
1 0 3 . 9
If you want to change the FM frequency of a preset,
press the select button to choose the preset when it
is displayed. Use the channel up and down buttons
20
To enter the Menu Options page of the Receiver,
press and hold the select button, or press the
MENU button on the remote control. The menu
options will be then displayed.
To select a menu option, use the channel up and
down buttons to display the option you wish to
adjust, and press the select button. If a selection
is not made within 10 seconds, the Receiver will
exit the menu options mode, and revert to the last
active display mode.
To exit menu options, or any of the other menu
option screens, repeatedly press and release the
SV1 Receiver User and Installation Guide
MENU key on the remote control until you are
returned to the default display screen.
The following sections explain each of the menu
options in the order in which they are displayed on
the Menu Options screen.
S I R I U S
I D
SIRIUS ID
This option displays your 12 digit Sirius ID (SID)
number. The SID is unique to every Receiver and
is required to activate your service. It is
recommended that you write this number in the
space provided on the last page of this user
guide. No adjustments are allowed in this mode.
To exit the Sirius ID menu, press the MENU button.
F M
T R A N S M I T
FM Transmitter
The FM Transmitter feature allows you to create a
SV1 Receiver User and Installation Guide
preset list of 5 suitable FM frequencies which can
then be accessed by using the FM Preset button.
This option also allows you to turn the FM
transmitter On and Off.
F M
P R E S E T S
F M
O n / O f f
FM Presets
To create or add to a list of FM preset frequencies,
do the following:
1. Using the channel up and down buttons,
display the “FM PRESETS” menu item and
press the select button. You will then enter a
list of FM presets. (You may also enter this list
by pressing and holding the FM Preset
button.)
21
F M - 1
8 8 . 1
2. Using the channel up and down buttons, display
the FM preset you wish to set (or change) and
press the select button. You will then enter a list
of FM frequencies, beginning with the currently
selected FM frequency for the preset.
8 8 . 1
FM On/Off
To turn the Receiver’s FM transmitter On or Off, use
the channel up and down buttons to display the “FM
On/Off” menu item and press the select button.
F M
O N
F M
O F F
M H z
3. Use your FM radio to locate quiet FM
frequencies where there is no interference
from adjacent FM stations. These are the
frequencies which should be added to the FM
presets list.
4. Using the channel up and down buttons,
display the frequency you wish to select for
the preset and press the select button. The
FM frequency will then be stored in the preset.
5. You may then continue to select FM
frequencies for other presets using the same
22
steps. To exit the FM Presets menu, press the
MENU button.
Use the channel up and down buttons to display “FM
On” or “FM Off”, and press the select button.
To exit the FM On/Off menu, press the MENU
button.
Display Options
The Receiver’s display screen can be adjusted for
brightness and contrast using the Display Options
menu option.
SV1 Receiver User and Installation Guide
Parental Control
The Receiver has the ability to lock out with
password protection any channels you do not want
others to access without your permission. A locked
channel will not appear in the channel list.
B r i g h t n e s s
C o n t r a s t
Use the channel up and down buttons to display the
“Brightness” or “Contrast” option, and press the
select button.
Brightness adjusts the overall intensity of the LCD
display to help with viewing in different lighting
conditions. Contrast adjusts the relationship
between the background and the text on the LCD
display. Use the channel up and down buttons, to
adjust the brightness/contrast. The bar graph will
move to indicate the change.
-
+
To exit the Brightness/Contrast screen, press the
MENU button.
SV1 Receiver User and Installation Guide
C H A N N E L
E d i t
L O C K
C o d e
When access to a locked channel is attempted
using the direct channel entry method, the “Enter
Code” screen is displayed and the channel cannot
be accessed until the correct code is entered.
C o d e # :
_ _ _ _
If the wrong code is entered, a message will be
displayed indicating that the wrong code has been
23
entered.
W r o n g
digit code and press the select button to
continue.
C o d e
Lock/Unlock
To lock or unlock a channel, do the following:
1. Use the channel up and down buttons to display
the “Lock/Unlock” menu choice, and press the
select button.
2. If this is the first time that Parental Control is
being used, you will be prompted to create and
enter a four digit numerical code. This code can
be any four digit number from 0000 to 9999.
N e w# :
_ _ _ _
If you should exit this prompt without entering a
code, you will be prompted to set a code next
time you enter the Lock/Unlock option.
3. If a code has been previously set, a “Enter
Code” prompt will be displayed. Enter your four
24
C o d e # :
_ _ _ _
4. When the correct code has been entered, a you
will enter a list of channels. Use the channel up
and down buttons to navigate to the channel you
wish to lock or unlock, and press the select
button. A previously locked channel will have the
lock icon displayed to the right of the channel
number.
0 1 2
S p i r i t
5. To lock or unlock a channels, use the channel up
and down buttons to display a channel, and press
the select button.
If you are locking a channel, the word “Lock” will be
displayed to the right of the channel name. If you
are unlocking a channel, the word “Lock” will be
removed from the right of the channel name.
SV1 Receiver User and Installation Guide
To exit the Parental Control menu, press the MENU
button.
Edit Code
This setting allows you to change a previously
selected Parental Control code.
The first time the Edit Code setting is accessed
you will be prompted to enter a four digit code.
This code can be any four digit number from 0000
to 9999.
N e w# :
_ _ _ _
If you should exit this prompt without entering a
code, you will be prompted to set a code the next
time you enter the Edit Code option.
To change the Parental Control code, do the
following:
1. Use the channel up and down buttons to display
the “Edit Code” menu option, and press the
select button.
2. At the prompt, enter the four digit Parental
Control code.
SV1 Receiver User and Installation Guide
C o d e # :
_ _ _ _
3. If you did not enter the correct code, a message
will be displayed alerting you that the wrong
code was entered, and you will be prompted
again to enter the code.
W r o n g
C o d e
4. If the correct code was entered, the “New Code”
prompt will appear. Enter the new Parental
Control code.
N e w# :
_ _ _ _
If you have forgotten your Parental
Control code, call SIRIUS
Customer Service for help.
25
5. You will then be prompted to confirm the new
code by entering it again.
C O N F I RM : _ _ _ _
6. If you confirmed the correct code, the lock code
is now changed and a confirmation screen is
displayed. If you entered the wrong code at the
confirmation prompt, a screen will be displayed
to alert you that you have entered the wrong
code, and you will have to repeat the process
again.
N o w
C h a n g e d
To exit the Parental Control menu, press the MENU
button.
down buttons to change the audio level. The bar
graph will move to indicate the change.
-
+
To exit the Audio Level menu, press the MENU
button.
Signal Level
The Signal Level display screen provides a visual
display of the strength of the SIRIUS signal from
the satellite antenna and also from terrestrial
(ground) transmitters.
To display the Signal Level screen, do the
following:
1. Use channel up and down buttons to display the
“Signal Level ” menu option, and press the
select button.
Audio Level
The Audio Level menu option adjusts the level of the
audio output of the Receiver.
To adjust the audio level, use the channel up and
26
SV1 Receiver User and Installation Guide
S A T
-
+
T E R
-
+
2. The satellite signal strength screen will be
displayed. Using the channel up and down
buttons, you can display the terrestrial signal
strength screen.
3. A 6 segment horizontal bar graph will be
displayed with a “-“ sign to the left and a “+” sign
to the right. The SAT screen indicates the
satellite signal strength while TER screen
indicates the terrestrial signal strength, if a
terrestrial signal is available.
To exit the Signal Level menu, press the MENU
button.
Factory Default
The Factory Default option will restore most every
feature of the Receiver to the original factory
SV1 Receiver User and Installation Guide
settings. The following is a list of all features
affected by the Factory Default option:
• All Presets are cleared
• Receiver set to Normal Tuning Mode
• Display brightness set to 50%
• Display Contrast set to 50%
• FM Transmitter set to On
• FM Frequency set to 88.1 MHz
Note that the Parental Control feature is not
affected by the Factory Default option. If a code
has been set for the Parental Control feature, the
code will not be reset by the Factory Default feature,
preventing someone from circumventing the
Parental Control feature. Channels which have been
locked will remain locked. To activate the Factory
Default feature, and restore the features of the
Receiver to the factory defaults, do the following:
1. Use the channel up and down buttons to display
the “Factory Default” menu option, and press
the select button.
2. Use the channel up and down buttons to display
“Yes” to restore all settings to the settings from
the factory, or display “No” to leave them as-is
27
4. If Yes is chosen, the Receiver will revert to the
original factory settings.
and return to the Menu Options menu.
R e s e t ?
R e s e t ?
Y
N
3. If “Yes” is chosen, a confirmation is displayed.
Use the channel up and down buttons to display
“Yes” to restore all settings to the settings from
the factory, or display “No” to leave them as-is
and return to the Menu Options menu.
S u r e ?
Y
S u r e ?
N
28
R e s t o r i n g
5. When the Factory Default is complete, the
Receiver will display “Call 1-888-539-SIRIUS to
Subscribe”, the preview channel. The Receiver is
still subscribed to the SIRIUS service.
SV1 Receiver User and Installation Guide
SV1 Receiver User and Installation Guide
29
Troubleshooting
This section lists several common problems and suggested solutions. If, after trying the suggested solutions
listed here, you are still unable to resolve the problem you’re having with your Receiver, contact your installer,
dealer, or retailer for more help.
Problem
Cause and Suggested Solution
Receiver does not power on
Blown fuse, or the power cable is not properly connected. Check for a
bad fuse and check power cable connection.
Receiver displays:
“NO ANTENNA”
The satellite antenna is not connected to the Receiver. Check the
satellite antenna connection to the Receiver.
Receiver displays:
“NO SIGNAL”
Check for obstacles over or around satellite antenna. Change vehicle
location to eliminate nearby obstacles (bridges, overpasses, etc.)
Audio static or loss of clarity
FM frequency contains static. Locate a quiet FM frequency on your
vehicle radio and set the Receiver’s FM transmitter frequency to
match.
The vehicle antenna is not connected to radio. Check vehicle antenna
cable to be sure it is connected.
No sound
The audio cables are not connected, or the FM radio is set to the
wrong frequency. Check the audio cables at the Receiver and the
vehicle radio. Tune the vehicle FM radio to the same FM frequency
the Receiver is tuned.
30
SV1 Receiver User and Installation Guide
Specifications
Satellite Frequencies ............................................................................................. 2322.293/2330.207 MHz
Terrestrial Frequencies ......................................................................................................... 2326.250MHz
Power Requirements ............................................................................... 9-16 Volts, Negative Ground, DC
Audio Output ..................................................................................................... 550mVrms (+/- 50mVrms)
Total Harmonic Distortion (THD) ....................................................................................................... <0.2%
Signal-to-noise (S/N) ...................................................................................................... Greater than 73dB
Fuse Requirement ......................................................................................................................... 2A ATC
Receiver Dimensions (Width x Length x Height) ........................................... 70mm x 113.2mm x 20.2mm
(2.8” x 4.5” x .8”)
Receiver Weight ................................................................................................................ 146.0g (4.7 oz.)
Antenna Type ............................................................................................................. Low Profile Magnetic
Antenna Cable Length ............................................................................................ 21’ (single micro-cable)
Connector Type ............................................................................................................... SMB (right-angle)
Audio Interface .................................................................................................... 1/8” / 3.5mm Stereo Jack
FM Out Interface ..................................................................................................................... 2.5mm Jack
Remote Control Dimensions (Width x Length x Height) ........................................ 54mm x 90mm x 11mm
(2.13” x 3.5” x .43”)
Remote Control Battery Requirements .......................................................................................... CR2032
Note: Features and Specifications subject to change without notice.
SV1 Receiver User and Installation Guide
31
12 MONTH LIMITED WARRANTY
SIRIUS Satellite Radio Inc. (the “Company”) warrants to the original retail purchaser of this product that should this product or any part
thereof, under normal use and conditions, be proven defective in material or workmanship within 12 months from the date of original
purchase, such defect(s) will be repaired or replaced with new or reconditioned product (at the Company’s option) without charge for
parts and repair labor. To obtain repair or replacement within the terms of this Warranty, the product is to be delivered with proof of
warranty coverage (e.g. dated bill of sale), specification of defect(s), transportation prepaid, to the location shown below under
WARRANTY RETURN.
This Warranty does not extend to the elimination of externally generated static or noise, to correction of antenna problems,
to costs incurred for installation, removal or reinstallation of the product, or to damage to tapes, compact discs, speakers,
accessories, or vehicle electrical systems.
This Warranty does not apply to any product or part thereof which, in the opinion of the Company, has suffered or been
damaged through alteration, improper installation, mishandling, misuse, neglect, accident, or by removal or defacement of
the factory serial number/bar code label(s). THE EXTENT OF THE COMPANY’S LIABILITY UNDER THIS WARRANTY IS
LIMITED TO THE REPAIR OR REPLACEMENT PROVIDED ABOVE AND, IN NO EVENT, SHALL THE COMPANY’S
LIABILITY EXCEED THE PURCHASE PRICE PAID BY PURCHASER FOR THE PRODUCT.
This Warranty is in lieu of all other express warranties or liabilities. ANY IMPLIED WARRANTIES, INCLUDING ANY IMPLIED
WARRANTY OF MERCHANTABILITY, SHALL BE LIMITED TO THE DURATION OF THIS WRITTEN WARRANTY. ANY
ACTION FOR BREACH OF ANY WARRANTY HEREUNDER INCLUDING ANY IMPLIED WARRANTY OF MERCHANTABILITY
MUST BE BROUGHT WITHIN A PERIOD OF 48 MONTHS FROM DATE OF ORIGINAL PURCHASE. IN NO CASE SHALL
THE COMPANY BE LIABLE FOR ANY CONSEQUENTIAL OR INCIDENTAL DAMAGES FOR BREACH OF THIS OR ANY
OTHER WARRANTY, EXPRESS OR IMPLIED, WHATSOEVER. No person or representative is authorized to assume for the
Company any liability other than expressed herein in connection with the sale of this product. Some states do not allow
limitations on how long an implied warranty lasts or the exclusion or limitation of incidental or consequential damage so the
above limitations or exclusions may not apply to you. This Warranty gives you specific legal rights and you may also have
other rights which vary from state to state.
WARRANTY RETURN: To obtain repair or replacement within the terms of this Warranty, please return product to an
authorized retailer or call Product Support at 1-800-869-5590; proof of purchase and description of defect are required.
Products to be returned to an approved warranty station must be shipped freight prepaid.
32
SV1 Receiver User and Installation Guide
Notes:
SV1 Receiver User and Installation Guide
33
Notes:
34
SV1 Receiver User and Installation Guide
Please record the SIRIUS ID (SID) in the space provided below:
SIRIUS ID:
SIRIUS Customer Service: 1-888-539-7474
SIRIUS Product Support: 1-800-869-5590
[email protected]
SV1 Receiver User and Installation Guide
35
SIRIUS Satellite Radio Inc.
1221 Avenue of the Americas
New York, NY 10020
1-888-539-7474
www.sirius.com
SV1 (121205a)