1
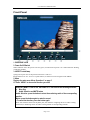
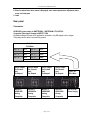
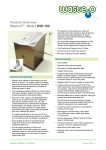
User Manual for RMS4342-HSC
RMS4342 LCD Monitor
USER MANUAL
Product Overview
The 2U rack mounted RMS4342-HSC represents new trend in LCD monitor for broadcast and
professional video applications. It has 480X272 high resolution, anti-glare TFT screens with
full digital signal processing. HD-SDI, SD-SDI and analog composite video standards are
accepted of this model. All video formats are scaled to fit on screen in the highest quality
using full digital processing, precision scaling and Gamma correction to produce the best
images available.
Operational Setup
1. Unpack the RMS4342 and accompanying power supply. Physically inspect for any damage
that may have occurred during shipping. Should there be any damage, immediately contact
OSEE DIGITAL TECHNOLOGY LTD at +86-010-62968823
2. After inspection, install in your desired location of a standard EIA 19-inch equipment rack.
Adequate ventilation is required when installed to prevent possible damage to the RMS4342
internal components.
3. Connect required cables for signal input and output. Please note that power must be
applied to the RMS4342 for all outputs to be activated. All BNC connectors should be rated for
75Ω.
4. Plug the power supply into the A.C. source
5. Attach power connection from power supply to the back of the unit.
6. Fasten the power protect accessory.
7. Turn on each screen of the RMS4342 by depressing the power switch located on the front
of the unit.
Page 1 of 7
User Manual for RMS4342-HSC
Front Panel
1. EARPHONE JACK
2. Power On/Off Switch
When indicator above the power switch in green, it indicates that power is on. When indicator flashing,
it indicates standby.
3. ASPECT button/lamp
Change the aspect ratio of the picture between 4:3 and 16:9.
4. The function of “F1” serves as a quick-button; its function can be assigned in the MENU.
5. Menu
Displays the main menu. Menu Operations” on page 5
6/7 Press “MENU” to choose the function you need.
When the “MENU” is not in use, the button of 6/7 can achieve the following functions:
6. Blue Only
7. Audio Selection and MUTE button
Audio Selection: press the button to select the monitoring audio of the corresponding
monitor.
Mutes: press the button again to mute the sound
• To cancel the function, press the button again.
Note: four monitors share one earphone jack, the indicator in lighting shows its audio is being
monitored, in flickering shows its audio is being muted of corresponding monitor.
Page 2 of 7
User Manual for RMS4342-HSC
8. Enter the menu items when menu is displayed, enter instant parameters adjustment when
menu isn’t displayed.
9. Label
Rear panel
Connectors
HDSDI/SDI inputs comply to SMPTE259M,SMPTE292M / ITU-R BT601
Composite Video Inputs comply to SMPTE-170M
All Outputs Require Power to be applied for activation, only SDI signal can be output.
Tally lamps active when connected to ground
Tally IN
DB-9 Male
Pin
1
CH1-R
Pin
6
CH1-G
Pin
2
CH2-R
Pin
7
CH2-G
Pin
3
CH3-R
Pin
8
CH3-G
Pin
4
CH4-R
Pin
9
CH4-G
Pin
5
GND
Active Output
Re-Clocked
And
Re-Shaped
Active Output
Re-Clocked
And
Re-Shaped
Active Output
Re-Clocked
And
Re-Shaped
Active Output
Re-Clocked
And
Re-Shaped
Monitor 4
HDSDI/SDI/
Analog
Composite
Monitor 3
HDSDI/SDI/
Analog
Composite
Monitor 2
HDSDI/SDI/
Analog
Composite
Monitor1
HDSDI/SDI/
Analog
Composite
Page 3 of 7
TALLY IN
DB-9 Male
12V DC from
Power Supply
User Manual for RMS4342-HSC
Instructions on Monitor Display Status
Specifications
Number of Screens
4
Display (Viewing Area)
4.3” diagonal (3.74”H × 2.10”V) (95.04mm x 53.46mm)
Viewing Angles
160°H x160° V
Screen Colors (Bit Depth)
16.7M (24 Bit)
Resolution (Dots)
480H × 270V
Dot Pitch
0.1125 mm (W) x 0.1095mm (H)
Contrast Ratio
400 :1
Pixel Response
<30ms typical
Dimensions
19”W x 3.5”H x 2.2”D (48.6cm x 88.9cm x 56cm)
Power Consumption
12VDC/10 watts. – (3.8 Amps max –CE & UL complied supply included)
Operating Temperature
0° C to 60° C
System
NTSC/PAL auto recognition
Inputs
HD-SDI / SD-SDI/ Analog Composite (BNC)
Active Outputs
HDSDI /SD-SDI re-clocked output(BNC)
Note:Specifications are subject to change without notice.
Page 4 of 7
User Manual for RMS4342-HSC
RMS4342
Menu Description
item
parameters
value
VIDIO
BRIGHTNESS
Typ. 128, range: 0~255
CONTRAST
Typ. 128, range: 0~255
SATURATION
Typ. 128, range: 0~255
SHARPNESS
Typ. 128, range: 0~255
HUE
Typ. 128, range: 0~255
TEST LEV
-20db/-18db
HEADPHONE
ON, OFF
AUDIO MON
MET 1, MET 2, MET 3, MET 4
VOLUME
-90db
AUDIO
MET 1 TYPE,
MET 3 TYPE,
MET 2 TYPE,
MET 4 TYPE
VU,PK,VU+PK,NONE
MET 1-L SRC
CH1~CH16
MET 1-R SRC
CH1~CH16
MET 2-L SRC
CH1~CH16
MET 2-R SRC
CH1~CH16
MET 3-L SRC
CH1~CH16
MET 3-R SRC
CH1~CH16
MET 4-L SRC
CH1~CH16
MET 4-R SRC
CH1~CH16
AREA
2.35:1, 1.85:1, 15:9, 14:9, 13:9, 4:3, OFF
SAFE MARKER
ON, OFF
CENTER
ON, OFF
90%, 80%
ON, OFF
ZOOM
ZOOM
NORMAL, UNDER SCAN
H/V DELAY
H/V DELAY
H/V, V, H, OFF
STATES INDICATION
STD DISP
AUTO OFF, ON,OFF
TC DISP, UMD DISP
ON, OFF
TC POS
TOP, BOTTOM
UMD POS
TOP, BOTTOM
UMD COLOR
RED, GREEN, YELLOW, WHITE
UMD
an input of up to characters (including alphbet, digits
and some symbols) is all owned
DEFAULT
UNSET, SET
F1
H/V DELAY, UNDER SCAN, OSD CONTROL,
COLORBAR, PHONE SOURCE, AREA MARKER,
SAFE MARKER
OSD CONTROL
ON, OFF
COLOR BAR
DISABLE
MARKER
CONFIG
Page 5 of 7
User Manual for RMS4342-HSC
Quick Button Specification
1
ENTER
When MENU is not used, you can press ENTER to regulate the following parameters: AUDIO
MON, VOLUME, BRIGHTNESS, CONTRAST, SATURATION, SHARPNESS, HUE.
Press ENTER seven times, parameters will revolve. You can get the exact value combined with
buttons of ∧(up)or ∨(down).
AUDIO MON: Have four options of MET1, MET2, MET3 and MET4. When MET1 is selected,
the first audio source will be monitored. Likewise, if you select other MET, the corresponding
audio source will be monitored.
VOLUME(音量): Used to regulate the volume. Range: -30~0dB, the maximum: 0dB.
BRIGHTNESS(亮度): Used to regulate the brightness, range: -116~139, the typical: 0.
CONTRAST(对比度): Used to regulate the contrast of image, range: -128~127, the typical: 0.
SATURATION(饱和度): Used to regulate the saturation of image, range: -128~127, the typical: 0.
SHARPNESS(视觉敏锐度): Used to regulate the sharpness of image, range: 0~15, the typical: 0.
HUE(色调): Used to regulate the hue of image, range: -32~31, the typical: 0.
Note: regulate the option DEFAULT of sub-MENU CONFIG in the MENU, make DEFAULT at
SET, and you can reset the following parameters of BRIGHTNESS, CONTRAST, SATURATION,
SHARPNESS, HUE to zero.
2 F1
Set steps: press MENU, combined with buttons of ∧(up)or ∨(down), you can find CONFIG in
the sub-MENU, also combined with buttons of ∧(up)or ∨(down), and you will find F1.
F1 can be used as quick-button, and has seven options. When you choose one option, for example,
if you have already set F1 at H/V DELAY, you can press F1 directly to realize each function of H/V
DELAY, and need not set in the MENU. Of course you can set F1 at other option accordingly.
The function of F1 can be set in the MENU. The options are the following: H/V DELAY, UNDER
SCAN, OSD CONTROL, COLOR BAR, AUDIO MON, AREA MARKER and SAFE MARKER.
And each option will be specified as follows.
H/V DELAY:H/V, V, H, OFF. Function: horizontal blank, vertical blank, horizontal/vertical blank,
or no blank.
UNDER SCAN: Display 100%/95% Image.
OSD CONTROL: Display TC code, UMD code and audio meter or not.
COLOR BAR: Display COLOR BAR or not.
PHONE SOURCE: Monitor one audio source of four audio sources.
Page 6 of 7
User Manual for RMS4342-HSC
AREA MARKER: Images show with one scale of 2.35:1, 1.85:1, 15:9, 14:9, 13:9, 4:3 or OFF.
SAFE MARKER: Display CENTER mark, 90% mark and 80% mark or not.
Note: Please set F1 to meet your actual requirement. For example, if you often use H/V DELAY,
you’d better set F1 at H/V DELAY.
3
MENU
When you want to change the value of a parameter, you may use MENU, and you can follow four
steps.
¾ Step 1:
Press MENU, and you can enter the main MENU.
¾ Step 2:
Press buttons of ∧(up)or ∨(down) to choose a option, and when you get one, press ENTER, and
you can enter the sub-MENU.
¾ Step 3:
Press buttons of ∧(up)or ∨(down) to choose a parameter, then press ENTER, and press ∧ or ∨
to acquire the exact value.
¾ Step 4:
Press MENU to return. You can follow the same step to set other parameters.
In a word, when you set a parameter, the buttons of ENTER,MENU,∧ and ∨ will be used
frequently. The function of each button is listed below.
ENTER: Enter the sub-menu
MENU: Return to the super-menu
∧(up)or ∨(down): Switch the options in the same menu or set the value of a parameter.
Page 7 of 7