1
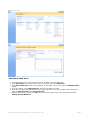
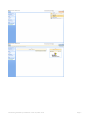
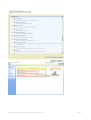
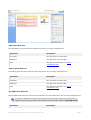
AN71 - Sharepoint JIRA Connector : User Manual 1.1
This page last changed on Jun 22, 2009 by patrick.li.
• JIRA Configuration
° Enable JIRA Remote API Calls
•
° Configure JIRA Base URL
• SharePoint Configuration
° SharePoint Connector License
•
° SharePoint Web Parts
°
- JIRA Filters Web Part
- JIRA Projects Web Part
- My JIRA Issues Web Part
JIRA Configuration
In order for SharePoint to communicate with JIRA, there are a few configuration options need to be set at
JIRA's end. The sections below outline the necessary steps required to configure JIRA.
Enable JIRA Remote API Calls
1.
2.
3.
4.
5.
Login JIRA as a member of the jira-administrators group.
Browse to Administration -> General Configuration.
Click on Edit Configuration.
Enable Accept remote API calls option.
Save the configuration.
Configure JIRA Base URL
1.
2.
3.
4.
Login JIRA as a member of the jira-administrators group.
Browse to Administration -> General Configuration.
Click on Edit Configuration.
Make sure that the Base URL setting has been configured correctly to reflect your JIRA instance
URL.
5. Save the configuration.
SharePoint Configuration
Once the SharePoint JIRA Connector has been installed onto SharePoint (please refer to the installation
manual), SharePoint would need to be configured to communicate with JIRA. The sections below outline
the necessary steps required by SharePoint.
SharePoint Connector License
1. Login SharePoint as a user with permission to configure the site collection with the connector
installed.
2. Browse to Site Settings for the site collection.
3. Click on SharePoint JIRA connector license under Site Collection Administration.
4. Paste in the license key in the text box and click OK. The license details section should display your
license information.
Document generated by Confluence on Jun 22, 2009 15:30
Page 1
SharePoint Web Parts
1. Login SharePoint as a user with permission to configure and add web parts.
2. Click Site Action at top right hand corner of the page and select Edit Page.
3. Click Add a Web Part at the desired position on the page. This will bring up the Add Web Parts
dialog.
4. From the dialog, under Miscellaneous, select the web parts to add.
5. Once the web parts are added by following the steps above, you may configure the web parts on
both the Shared View and/or Personal View.
6. Edit the web part by clicking the Edit menu at the top right corner of the web part and select
Modify Shared Web Part.
Document generated by Confluence on Jun 22, 2009 15:30
Page 2
Document generated by Confluence on Jun 22, 2009 15:30
Page 3
Document generated by Confluence on Jun 22, 2009 15:30
Page 4
JIRA Filters Web Part
The JIRA Filters web part shows all visible filters for the currently configured user.
Parameter
Description
Username
The username to access JIRA.
Password
The password to access JIRA.
URL
The URL to access JIRA. e.g. http://
jira.atlassian.com
JIRA Projects Web Part
The JIRA Projects web part shows all visible projects for the currently configured user.
Parameter
Description
Username
The username to access JIRA.
Password
The password to access JIRA.
URL
The URL to access JIRA. e.g. http://
jira.atlassian.com
My JIRA Issues Web Part
The My JIRA Issues web part shows all issues that are currently assigned to the currently configured user.
In order for SharePoint to retrieve a list of JIRA issues that are assigned to a given user, a
JIRA filter must be created first. The default name for the filter should be My JIRA Issues.
Parameter
Document generated by Confluence on Jun 22, 2009 15:30
Description
Page 5
Username
The username to access JIRA.
Password
The password to access JIRA.
URL
The URL to access JIRA. e.g. http://
jira.atlassian.com
Filter
The name of the filter that will be used to get the
list of issues. Name of the filter is case sensitive.
Document generated by Confluence on Jun 22, 2009 15:30
Page 6