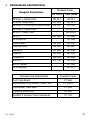
1
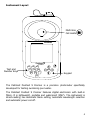
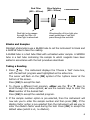
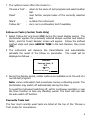
1 Z-INST 9 PREM 1 2 3 4 5 6 Table of Contents GENERAL INFORMATION ............................................................................................... 3 Instrument Layout ................................................................................................................... 4 BACKGROUND INFORMATION ....................................................................................... 5 Introduction to Colorimetric Measurement ................................................................................ 5 Blanks and Samples ................................................................................................................. 6 Taking a Reading .................................................................................................................... 6 Follow on Tests (Certain Tests Only) ........................................................................................ 8 Care and Maintenance ........................................................................................................... 10 System - Quick Start .............................................................................................................. 11 Chlorine Testing Ranges ........................................................................................................ 12 Water Balance Options .......................................................................................................... 12 TEST METHODS ............................................................................................................ 13 ....................................................................................................... 13 Test 1 .............................................................................................. 13 .................................................................................................... 14 ............................................................................................ 14 ................................................................................................................ 15 ................................................................................................................... 15 .................................................................................................................. 15 .............................................................................................................. 16 Test 7 ............................................................................................... 16 ............................................................................................... 17 ...................................................................................................... 17 ..................................................................................................................... 18 AL DISSOLVED SOLIDS .................................................................................. 18 ................................................................................. 19 ................................................................................. 19 INSTRUMENT OPERATION ........................................................................................... 21 System - Full Options............................................................................................................. 21 Replacing the Batteries .......................................................................................................... 23 Cleaning the Optics ............................................................................................................... 23 Service Requirement.............................................................................................................. 23 Error Messages ..................................................................................................................... 24 Guarantee ............................................................................................................................. 24 Check Standards ................................................................................................................... 24 Features and Technical Specification ...................................................................................... 25 Power Supply ........................................................................................................................ 27 TROUBLESHOOTING .................................................................................................... 28 Sample Collection .................................................................................................................. 28 Diluting the Sample ............................................................................................................... 28 Chlorine ................................................................................................................................ 29 pH ........................................................................................................................................ 30 Alkalinity ............................................................................................................................... 30 Ozone ................................................................................................................................... 30 Cyanuric Acid ........................................................................................................................ 30 Calcium Hardness .................................................................................................................. 31 Iron LR ................................................................................................................................. 31 REORDERING INFORMATION ...................................................................................... 32 2 1 GENERAL INFORMATION Thank you for purchasing this Palintest product. Palintest instruments and reagents are renowned as being simple to use, whilst providing rapid and reliable results for the testing of water. Our instruments are of the highest quality and fully waterproof. Palintest’s experience, built-up over the last 50 years, is the reason why our instruments and reagents are used in laboratories, treatment plants, leisure facilities and industrial premises throughout the world. Our products are packaged carefully and the product should reach you in the state it left our factory; if this product has reached you in a state that is less than satisfactory, please contact the transportation company. This booklet describes the best way to use Palintest products, and provides instructions for the range of water tests that can be performed using this instrument. Palintest instruments are calibrated for Palintest reagents. To guarantee the high accuracy and performance that our instruments give, you must ensure that only Palintest reagents are used with Palintest instruments. Failure to do so can lead to erroneous results. 3 Instrument Layout Multi-Size Cell Holder Palintest® 1 Test and Number Keys Pooltest 9 3 2 Cl2F Cl2F 4 6 5 PHMB O3 Premier Br2 pH 7 8 Alk Cal 9 CNA 0 %T OK Keypad The Palintest Pooltest 9 Premier is a precision photometer specifically developed for testing swimming pool water. The Palintest Pooltest 9 Premier features digital electronics with built-in filters. It is lightweight, portable and waterproof (IP67). The instrument is direct-reading, has automatic blank setting, automatic wavelength selection and automatic power cut-off. 4 2 BACKGROUND INFORMATION Introduction to Colorimetric Measurement Palintest methods are based on measuring the intensity of colours produced by Palintest reagents and using Palintest photometers to measure that intensity of colour. This method is called colorimetry and can be defined as any technique used to evaluate an unknown colour in reference to known colours. To avoid subjective measurement between test samples and colour standards, a photometer can be used for quantitative measurement of the amount of coloured light absorbed by a sample (with reagents added) in reference to an untreated sample (blank). White light is made up of many different wavelengths of visible light. A photometer transmits a white light beam through an optical filter which permits only one particular band of wavelength of light to pass to the photodetector where it is measured. The difference in the amount of coloured light transmitted by a colourless sample (blank) and the amount of coloured light transmitted by a coloured sample is a measurement of the amount of coloured light absorbed by the sample. The use of filters improves the sensitivity of this process and choice of the correct optical filter (and therefore the correct wavelength) of light is important. It is interesting to note that the filter that gives the most sensitive calibration for a test factor is the complementary colour of the test sample. For example, the chlorine test produces a pink colour proportional to the chlorine concentration in the sample (the greater the chlorine concentration, the darker the pink colour). In this case, a green filter gives the greatest sensitivity as a pinkish-red solution absorbs mostly green light. Palintest photometers calculate and then display the test results directly in milligrams per litre (mg/l) of the test factor, by comparing the amount of absorbed light to the calibration data programmed into the instrument. 5 Red Filter (625 – 635nm) Blue Solution (450 - 500nm) Photodetector Incident Light Red light only passes through the filter. All other light is absorbed. Wavelengths of blue light plus small quantities of red light pass through the solution. Blanks and Samples Palintest photometers use a BLANK tube to set the instrument to blank and a SAMPLE tube to take the reading. A BLANK tube is a test tube filled with untreated water sample. A SAMPLE tube is a test tube containing the sample to which reagents have been added in accordance with the test procedure described. Taking a Reading 1 Press key. The instrument displays the ‘Choose a Test’ menu box, with the last test program used highlighted as the active line. The cursor will flash on the [OK] symbol of the ‘options menu' at the bottom of the screen. Press [OK] to accept this test. 2 To choose a different test program, either use the or keys to scroll through the menu options, or use the numeric keys to enter the Phot number of the desired test. Press [OK] to accept the selected program. 3 If the sample number option is pre-selected, then the instrument will now ask you to enter the sample number and then press [OK]. If the dilution factor option is pre-selected then the instrument will ask you to enter the dilution factor used during the test. Press [OK] to accept the default value (which is x1, no dilution). 6 4 The following display will now appear :Test 001 Chlorine-Free / 5 Insert Blank OK Choose a Test Place a BLANK TUBE in the test chamber, then press [OK]. NOTE: The instrument is designed to hold the blank setting as long as the instrument is switched on. If the instrument is in continuous use mode, it is advisable to re-blank between tests. 5 The instrument will determine the blank transmittance, and after a few seconds the following display will appear :Test 001 Chlorine-Free / 5 Insert Sample OK Blank - Choose a Test - Timer Place SAMPLE TUBE in the test chamber, then press [OK]. 6 The instrument will determine the transmittance, compare with the stored calibration data and display the result :Test 001 Chlorine-Free/5 1.00 mg/l Cl 2 The following symbols indicate the result is out of test range :Result is higher than range > > Result is lower than range < < 7 7 The ‘options menu' offers the choice to :‘Choose a Test’ - return to the menu of test programs and select another test ‘Read’ - read further sample tubes of the currently selected test ‘Blank’ - re-blank the instrument ‘Follow-On’ - carry out a continuation test if available. Follow on Tests (Certain Tests Only) 1 Select ‘Follow-On’ and press [OK] during the result display period. The photometer applies the previously entered sample number and dilution factor, and the ‘Insert Sample’ screen will appear. Follow the defined method steps and place SAMPLE TUBE in the test chamber, then press [OK]. 2 The instrument will measure the transmittance and automatically calculate the result of the follow on parameter. The result will be displayed as follows :Test 002 Chlorine-Total / 5 1.5 mg/l 0 Cl 2 Choose a Test Read Blank 3 During the display period, similar options are available as at the end of a normal test program. Note: some continuation test procedures involve a standing period. The photometer may switch off automatically during this time. To avoid the instrument switching off, set for continuous operation or use the timer function to time any standing period. The timer will over-ride the auto switch off function. Favourite Tests List The four most recently used tests are listed at the top of the 'Choose a Test' screen for convenience. 8 Expressing Different Chemical Forms If the test result can be expressed in different chemical forms, the chemical symbol will have flashing and to indicate this. Use the or keys to step through the options available. Note that the log stores the result in the standard form. Reading in Transmittance When taking a reading in Transmittance mode, use the or keys to step through the wavelengths, after the result is taken, until the required wavelength is reached. Timer The photometer features a countdown timer with alarm as an aid to carrying out test procedures. The timer can be accessed at any time by selecting ‘Timer’ from the ‘Options’ menu. The following display will appear :Timer 00:00 EXIT Key in the time required in minutes and seconds, maximum 29 minutes and 59 seconds, using the numerical keys, then select ‘START’ to start the timer. Use the and keys to reposition the cursor and re-enter the time if it is keyed in incorrectly. The timer will count down, giving an audible alarm at the end of the timed period. Press [OK] to stop the alarm. During the timer countdown period, an ‘Options’ menu is available :Stop - to abort the timing operation, or stop the alarm at the end of the timed period Exit - to return to the program screen to take readings. The timer will continue to run and give an audible alarm at the end of the period. Exit - to return to the program screen with the timer counting down on and screen - the instrument will automatically take a reading at the end Read of the timed period - no alarm will sound. 9 Care and Maintenance Your Palintest direct-reading photometer is designed to give long and troublefree operation. To ensure you get the best out of this photometer, please read these instructions carefully and follow the procedures recommended. The photometer is suitable for use in both the plant room or for portable use at the waterside. It is sturdy and robust but should always be regarded as a scientific instrument. Treat it in the same way that you would a watch or a camera. It is waterproof (IP67 rated) but careless use will almost certainly result in damage or reduce the life of the instrument. Here are 10 hints on keeping the photometer clean, free from contamination and in good working order :1 Prepare your workplace before use. Make sure that you have enough space to work with the photometer and with the reagent systems. 2 Do not pour out samples or prepare the tests directly over the instrument. Remember to cap the tube before reading in the instrument. 3 Always cap the test tubes after preparing the blank and test sample. 4 Wipe test tubes on a clean tissue to remove drips or condensation before placing in the photometer. 5 Do not leave tubes standing in the photometer test chamber. Remove the tubes immediately after each test. 6 Immediately wipe up any drips or spillages onto the instrument or into the test chamber with a clean tissue. 7 Keep the instrument clean. Clean the test chamber regularly using a moistened tissue or cotton bud. 8 Keep the instrument away from all chemicals and cleaning materials. Do not place the instrument on top of chemical drums or barrels. 9 Keep the instrument in a clean, dry place when it is not in use. Keep it on a clean, dry bench away from chemicals, place it in a storage cupboard or keep it in a carrying case. 10 Keep the carrying case (where supplied) in a clean, dry condition. Make sure that any solutions which have spilled or drained into the carrying case are dried up before the case is closed up and the instrument is put away. 10 Adjusting Your Instrument Settings System - Quick Start When the instrument is first used, the SYSTEM mode should be used to set the preferred operating options : Use the and keys to scroll through the features Use the and keys to select the options Press [OK] to accept the selections and return to PHOTOMETER mode Select the language required from English, French, German, Spanish, Italian or Turkish Select the display units required from mg/l or ppm Select the chlorine test range required from DPD Range 0 – 5 or 0 – 10 ppm (see Page 12) Set the sample number option to ‘On’ to allow the entry of a sample number during normal photometer operation Set the sample increment option to ‘On’ to automatically increase the sample number Set the dilution factor to ‘On’ or ‘Off’. If the dilution factor option is set to ‘On’, the instrument will allow the entry of a numerical factor which will be used in the calculation of the result to be displayed on the instrument Select the preferred date format. The date may be shown in either Date/Month/Year or Month/Date/Year To change the date and time, select the date and time line then key in correct setting using the numeric keys. To correct an error, use the and keys to move the cursor then key in the correct data : Select your temperature units of preference. 11 Chlorine Testing Ranges The Pooltest 9 Premier features a new range of chlorine testing, allowing the measurement of free and total chlorine up to 10 mg/l (ppm) without the need for sample dilution. The instrument may be set up to use DPD No 1 and DPD No 3 tablets for the standard 0 - 5 mg/l chlorine range, or alternatively may be set to use DPD-XF and DPD-XT tablets for the new Palintest Chlorine/10 extended range. A simple menu selection in the system menu allows the user to choose the range required. Water Balance Options Water Balance data allows pool operators to assess the corrosive and scale potential of the pool water. The Pooltest 9 Premier features two different methods for determining Water Balance. A simple menu selection in the system menu allows the user to choose the method they prefer. For simplified water balance testing (ie not requiring measurement of TDS or temperature) use the Palintest Balanced Water Index. The most common (and more complex) method for determining water balance is the Langelier Index which requires the measurement of TDS and temperature. This data is manually entered into the photometer using the keypad. 12 3 TEST METHODS To Select the Test Each test is identified by a separate program number or shortcut key. Program numbers are shown in test instruction sheets supplied with the instrument. These follow on tests have their own program number for reference purposes although direct access to these programs is restricted. We strongly recommend that before attempting to do any tests, ensure you read ‘Blanks and Samples’ and the ‘Care and Maintenance’ sections in Section 2. Option 1: Range 0 - 5.00 mg/l (ppm) Method: DPD Colourless - Red 1 Rinse test tube with sample leaving two or three drops in the tube. 2 Add one DPD No1 tablet, crush tablet and then fill the test tube with sample to the 10 ml mark. Mix to dissolve tablet and ensure any remaining particles have settled. 3 Take photometer reading immediately, as result may drift on standing. Ensure the display shows the Chlorine-Free/5 test is selected. 4 Retain test solution if the Total Chlorine follow on test is required. Reagents: DPD No 1 Reorder Code: AP 011 (XF) Option 2: Range 0 - 10.0 mg/l (ppm) Method: DPD-XF Colourless - Red 1 Rinse test tube with sample leaving two or three drops in the tube. 2 Add one DPD-XF tablet, crush tablet and then fill the test tube with sample to the 10 ml mark. Mix to dissolve tablet and ensure any remaining particles have settled. 3 Take photometer reading immediately, as result may drift on standing. Ensure the display shows the Chlorine-Free/10 test is selected. 4 Retain test solution if the Total Chlorine follow on test is required. Reagents: DPD0-XF Re-Order Code: AP 013 13 Option 1: Range 0 - 5.00 mg/l (ppm) Method: DPD Colourless - Red Carry out this test on the solution remaining from the Free Chlorine/5 test. 1 If any shock treatment chemicals have been added to the pool, add one DPD Oxystop tablet, crush and mix to dissolve. Stand for one minute before proceeding. This will prevent a response caused by the shock treatment chemicals. 2 Add one DPD No 3 tablet, crush and mix to dissolve. 3 Stand for two minutes. 4 Take photometer reading. Ensure the display shows the Chlorine-Total/5 test is selected. Reagents: DPD No 3 Re-Order Code: AP 031/1 (XT) Option 2: Range 0 - 10.0 mg/l (ppm) Method: DPD-XT Colourless - Red 1 Carry out this test on the solution remaining from the Free Chlorine test. 2 If any shock treatment chemicals have been added to the pool, add one DPD Oxystop tablet, crush and mix to dissolve. Stand for one minute before proceeding. This will prevent a response caused by the shock treatment chemicals. 3 Add one DPD-XT tablet, crush and mix to dissolve. 4 Stand for two minutes. 5 Take photometer reading. Ensure display shows the Chlorine-Total/10 test is selected. NB: To obtain COMBINED CHLORINE residual subtract Free Chlorine result from Total Chlorine result :ie Combined Chlorine = Total Chlorine - Free Chlorine Reagents: DPD-XT Re-Order Code: AP 033/1 14 Range 0 - 10.00 mg/l (ppm) Method: DPD Colourless - Red 1 Rinse test tube with sample leaving two to three drops in the tube. 2 Add one DPD No1 tablet, crush tablet and then fill the test tube with sample to the 10 ml mark. Mix to dissolve tablet and ensure any remaining particles have settled. 3 Take photometer reading immediately, as result may drift on standing. Reagents: DPD No 1 Re-Order Code: AP 011 Range 0 - 2.00 mg/l (ppm) Method: DPD Colourless - Red 1 Rinse test tube with sample leaving two to three drops in the tube. 2 Add one DPD No 4 tablet, crush tablet and then fill the test tube with sample to the 10 ml mark. Mix to dissolve tablet and ensure any remaining particles have settled. 3 Take photometer reading immediately. NB: The ozone test also responds to chlorine and bromine. Pools using 'ozone with chlorine' treatment systems, or other combined treatments, require a special testing procedure (see Section 5). Reagents: DPD No 4 Re-Order Code: AP 056 Range 0 - 5.00 mg/l (ppm) Method: Biquinoline Colourless - Purple FREE COPPER Use this test for pools treated by copper/silver ion generators or treated with uncomplexed forms of copper such as copper sulphate. 1 Fill test tube with sample to the 10 ml mark. 2 Add one Coppercol No 1 tablet, crush and mix to dissolve. 3 Take photometer reading. Reagents: Coppercol No 1 Re-Order Code: AP 187 15 TOTAL COPPER Use this test for pools treated with chelated or complexed forms of copper. Typically these compounds are used as algicides or winterising treatments. 1 Fill test tube with sample to the 10 ml mark. 2 Add one Coppercol No 1 tablet and one Coppercol No 2 tablet, crush and mix to dissolve. 3 Take photometer reading. Reagents: Coppercol No 1 and No 2 Re-Order Code: AP 186 Range 6.8 - 8.4 Method: Phenol Red Yellow - Red 1 Fill test tube with sample to the 10 ml mark. 2 Add one Phenol Red tablet, crush and mix to dissolve. 3 Take photometer reading. Reagents: Phenol Red Re-Order Code: AP 130 (TOTAL) Range 0 - 500 mg/l (ppm) Method: Acid & Indicator Yellow - Green - Blue 1 Fill test tube with sample to the 10ml mark. 2 Add one Alkaphot tablet, crush thoroughly and mix. Ensure all of the particles have dissolved completely. 3 Allow to stand for one minute. 4 Take photometer reading. Reagents: Alkaphot Re-Order Code: AP 188 16 Range 0 - 500 mg/l (ppm) Method: Murexide Indicator Violet - Orange Use Test 8 for fresh water swimming pools. Press key twice within two seconds to access Test 88 for salt-water pools. 1 Fill test tube with sample to the 10 ml mark. 2 Add one Calcicol No 1 tablet, crush and mix to dissolve. 3 Add one Calcicol No 2 tablet, crush and mix to dissolve. 4 Stand for two minutes. 5 Take photometer reading. Reagents: Calcicol No 1 and No 2 Re-Order Code: AP 252 Range 0 - 200 mg/l (ppm) Method: Melamine (Turbidity) Clear - Cloudy Use this test for chlorine-treated pools stabilized with cyanuric acid or using 'stabilised chlorine' donors. Cyanuric acid is commonly referred to as 'Chlorine Stabiliser' or 'Pool Conditioner'. 1 Fill test tube with sample to the 10 ml mark. 2 Add one Cyanuric Acid tablet. DO NOT CRUSH IT. Alllow to disintegrate for at least two minutes. A cloudy solution indicates the presence of cyanuric acid. 3 Crush any remaining undissolved tablet, mix and then take photometer reading. It is essential that the light cap is used when carrying out this test under strong or variable lighting conditions. Reagents: Cyanuric Acid Re-Order Code: AP 087 17 Range 0 - 1.00 mg/l (ppm) Method: PPST Colourless - Pink 1 Fill test tube with sample to the 10 ml mark. 2 Add one Iron LR tablet, crush and mix to dissolve. 3 Stand for one minute. 4 Take photometer reading. Reagents: Iron LR Re-Order Code: AP155 Range 0 - 10,000 mg/l TDS Sensor (Optional Accessory) 1 Remove transparent protective cap from the end of the TDS Sensor. Turn on the sensor. 2 Pour 10-20 ml of pool water into the transparent cap. 3 Dip the sensor into the water in the container. 4 Note the reading on the sensor display. Multiply this result by 100. The result obtained represents the TDS content of the pool water in mg/l (ppm). 5 Remove the sensor, rinse probe in clean water. Switch off and replace cap. 6 For calibration of your TDS sensor, use the instructions provided with the sensor. 18 To determine Water Balance Index using the Pooltest 9 Premier, three tests must be prepared and read using the Water balance test program : Alkalinity (Alkaphot), Calcium Hardness (Calcicol) and pH (Phenol Red) tests are required. Prepare the test solutions and proceed as follows :1 Select Test 77 by pressing Alkalinity key twice. 2 Carry out alkalinity test then select ‘Follow on’ from the OPTIONS menu at the results screen. 3 Carry out the calcium hardness test then select ‘Follow-on’ from the OPTIONS menu at the results screen. 4 Carry out the pH test then select ‘Follow-on’ from the OPTIONS menu at the results screen. 5 The Water Balance Index is calculated and is displayed. Consult the chart on Page 20 for guidance. NOTE: If any of the tests are out of range, the procedure is ended. If an incorrect reading is taken part-way through the procedure, insert the correct tube then select ‘Read’ from the OPTIONS menu. The new reading will replace the former incorrect value in the Water Balance Calculation: To determine Water Balance Index using the Pooltest 9 Premier, five tests must be prepared and read using the Water balance test program : Alkalinity (Alkaphot), Calcium Hardness (Calcicol) and pH (Phenol Red), TDS and temperature tests are required. Prepare the test solutions and proceed as follows :1 Select Test 77 by pressing Alkalinity key twice. 2 Carry out alkalinity test then select ‘Follow on’ from the OPTIONS menu at the results screen. 3 Carry out the calcium hardness test then select ‘Follow-on’ from the OPTIONS menu at the results screen. 4 Carry out the pH test then select ‘Follow-on’ from the OPTIONS menu at the results screen. 19 5 Manually enter the TDS reading (in mg/l or ppm) taken using the numbers displayed on the keypad. screen is correct. Select ‘OK’ when the figure on 6 Manually enter the temperature using the numbers displayed on the keypad. 7 The Langelier Index is calculated and is displayed. Consult the chart below for guidance. NOTE: If any of the tests are out of range, the procedure is ended. If an incorrect reading is taken part-way through the procedure, insert the correct tube then select ‘Read’ from the OPTIONS menu. The new reading will replace the former incorrect value in the Water Balance Calculation : LANGELIER PALINTEST Index Water Balance Condition Index < -1.5 Corrosive <9.6 -0.6 to -1.5 Corrosive 9.6 to 10.5 -0.1 to -0.5 Corrosive 10.6 to10.9 0.0 0.1 to 0.5 0.6 to 1.5 >1.6 Ideal Balance Scale Forming Scale Forming Scale Forming 11.0 to11.2 11.3 to11.6 11.7 to12.6 >12.7 Water Recommendation Balance Condition Highly Increase pH to 7.5 – 7.8. Corrosive Increase Calcium Hardness to at least 50 mg/l. Increase Corrosive Total Alkalinity to 100 mg/l or higher as necessary. Retest Water Balance. Acceptable Retest water regularly. Balance Ideal No action required. Balance Acceptable Retest water regularly. Balance Scale Decrease pH to 7.2 - 7.5. Forming Decrease Total Alkalinity to 150 mg/l or lower as Highly necessary. Retest water Scale balance. Forming Note: Always keep the pH, Total Alkalinity and Calcium Hardness levels within the limits recommended in pool operating instructions and chemical suppliers' recommendations. Seek specialist advice if corrosion or scale formation is still apparent even though the water is shown to be in a balanced condition. 20 4 INSTRUMENT OPERATION System - Full Options The Pooltest 9 Premier features a wide range of options which may be explored at leisure to get the best from the instrument. View Log The photometer has an internal memory which can hold up to 100 test results. Once the memory is full, each new result overwrites the oldest entry. Select ‘View Log’ to view stored results on screen. The and keys may be used to scroll through the list of stored results. The ‘Options’ menu offers several choices. Select ‘Clear’ to empty the memory. Confirmation is requested to avoid accidentally erasing the data. Select ‘Exit’ to return to SYSTEM mode. Select ‘Download’ to transmit stored data to a PC. Back Light The graphical display features a backlight to enhance the display contrast this may be switched off to conserve power. Language Options The photometer can be operated in a number of different languages. When a particular language is selected, the test names and operating commands will appear in that language. Certain tests and unit options are provided in accordance with the conventions of particular countries and are only available when the photometer is switched to the language concerned. Select the language required from English, French, German, Spanish, Italian or Turkish. Units The photometer offers the choice of result expressed in mg/l or ppm. 21 Locking System Mode Settings It is possible to 'lock’ the system settings so that these cannot be tampered with or altered accidentally during use. This is important, for example, where it is necessary to verify that tests have actually been carried out at a particular time or date, or where procedures always require the use of a sample number or dilution factor. The instructions for locking the settings are not included in this manual, these are provided to registered Palintest distributors. If the photometer SYSTEM mode settings appear to be locked, refer in the first instance to your local distributor. Time-Out As a power-saving measure, in normal use, the photometer automatically switches off five minutes after the last key is pressed. The photometer may be switched to ‘Long’ time-out which allows 15 minutes before shut-down or ‘Off’ which allows continuous use. This is particularly useful when powering the instrument through the USB interface. USB The USB interface allows communication between the instrument and a PC. There is a choice of two operating modes – Hard Drive and COM Port. In Hard Drive mode, the instrument appears as a removable hard drive when connected to a PC. No additional software is required on computers running Windows 2000, ME or XP. A driver to use this option with Windows 98SE is available from your local distributor. In COM Port mode, the instrument behaves as if connected to the PC serial port via RS232. This allows backwards compatibility with software written for earlier models of Palintest instruments. In this mode, the PC requires installation of a USB virtual COM Port driver, available from your local distributor. See the section on ‘Interface Connections and Data Memory’ overleaf for full instructions. Water Balance Toggle between the Palintest Balanced Water Index and the Langelier Index. 22 Temperature Toggle between Farenheit (oF) and Centigrade (oC) – of particular importance when using the Langelier Index. Replacing the Batteries The battery compartment in the base of the instrument is secured by four screws. To replace the batteries, remove the cover and install the batteries, observing the correct polarity as indicated. Use three of the same brand x 1.5V 'AA’ alkaline batteries or equivalent. To avoid corrosion damage through leakage, remove batteries from the instrument if it is to be stored or left unused for a long period of time. Cleaning the Optics Any build-up of dirt or deposits may interrupt light transmission and affect readings. To clean the optics, undo the two screws to remove the optics base plate. Gently clean the internal surfaces of the optics with a soft, non-abrasive cloth. Deposits may be removed with a slightly dampened cotton bud. Replace the optics base plate and re-fasten the screws. The photometer is fitted with long-life light sources and contains no userserviceable components. If the instrument requires servicing or repair, this can be arranged through our Technical Services Department. Service Requirement Servicing of photometer instruments is essential to ensure optimum performance. To arrange a service of the instrument, contact Palintest Technical Services Department or the distributor who supplied the instrument. The Palintest standard photometer service includes cleaning of the optical assembly, replacement of any worn parts and checking/ recalibration of the instrument. 23 Error Messages The photometer will display an error message in the unlikely even of malfunction. These error messages are mainly designed to assist service staff in diagnosing instrument faults. In the event of an error message appearing on the photometer display, contact your local distributor. Error messages are coded 7 and 9 and both relate to blanking the instrument. In the first instance, the user should check the operating technique and sample clarity. If these are in order, then these errors indicate a fault in the optics :- Error 7 indicates too much light – remove the instrument from bright light and use the light cap. Error 9 indicates not enough light – follow ‘Cleaning the Optics’ routine. Photometer Upgrade It is now possible to upgrade the photometer with new test calibrations using a computer system. This will ensure that users can always keep the instrument up-to-date with the latest tests. Updates for the photometer can be supplied on request via your local distributor. No special computer software is required. Full instructions will be supplied with the upgrade data. Guarantee Palintest photometers are guaranteed for a period of two years from the date of purchase, excluding accidental damage or damage caused by unauthorised repair or misuse. The guarantee specifically excludes damage caused by water or by ingress of chemical solutions. Should repair be necessary, contact your local distributor quoting the serial number shown on the back of the instrument. This guarantee does not affect your statutory rights. Check Standards Check standards are traceable solutions that can be used to validate the performance of your photometer. The materials used to manufacture the check standards are stable and therefore the check standards give a known transmittance value (%T) at a given wavelength. Palintest recommends that check standards are purchased with your photometer to enable periodical checks to be carried out on your instrument. 24 Features and Technical Specification Application For application in swimming pool and spa testing using Palintest tablet reagent systems Instrument Type Single-beam colorimeter with built-in colour filters and pre-programmed test calibrations Peak Wavelengths 495 5nm, 555 5nm and 570 5nm Range 1 - 100%T Accuracy 1%T Display Large graphic display with option of backlight. Language Test identification and prompts in English, French, German, Spanish, Italian or Turkish Chlorine Test Options Selection of 0 – 5 or 0 – 10 ppm ranges Water Balance Options Palintest BW Index of Langelier Index Timer Clock and timer feature to log test results and audible alarm for timing test procedure Units Direct-reading of test results in mg/l or ppm User Selectable Options 10 digit sample number entry, dilution factor, time/ date, date format, system lock, temperature and rounding of results Date Format Date format selectable month/day/ year Zeroing Automatic zeroing on blank tube and hold blank facility for series of tests. Continuation test facility without the need for reblanking Internal Memory Stores 100 previous readings with option to view logged results on screen, or download to computer USB Interface USB 1.1 full-speed, bus-powered device. Software selectable between either emulation of a removable hard-drive or emulation of a serial device connected via a virtual COM port Power 3 x 1.5V ‘AA’ alkaline batteries or via USB interface. Power management system with variable length auto switch-off or 'continuous' operation Size 250 x 150 x 70 mm as day/month/year or 25 Weight 960g Test Tubes For tablet reagents - 10 ml glass test tubes, 20 mm OD (PT 595) Cell Holder Multi-size tube holder accepts test tubes from 12 – 20 mm OD and centres the tube for optimum optical performance. Interface Connections and Data Memory Stored data can be accessed by recall to the screen (see ‘View Log’). Alternatively, data can be accessed using a PC : Connect the instrument to the computer via the USB port, using any suitable USB cable, eg PT 746 Turn the instrument ON and select SYSTEM mode from the ‘Options’ menu. Scroll to ‘USB’ and select either ‘Hard Drive’ or ‘COM Port’. ‘Hard Drive’ – Once this option is selected, simply turning the instrument ON while it is connected to a PC will cause an extra hard drive containing the instrument files to appear on the PC. The log of test results is in text file – ‘7500_LOG.txt’. The other files shown on screen contain calibration and operating systems for use when upgrading the instrument and should be ignored. The log file can be copied from the instrument by dragging between windows and once copied can be opened with many text editors, word processors or spreadsheet programs. Note that deleting this file from the instrument hard drive window will clear the data from the instrument memory. ‘COM Port’ – Once this option is selected, data can be downloaded from the instrument to the PC : Open the ‘Virtual COM Port – HyperTerminal’ window on the computer In the instrument SYSTEM mode, scroll to ‘View Log’ and select ‘Download’. The data from the log will appear on the PC screen and can be transferred to Windows’ applications or printed as required. 26 ‘Unplugged’ – Note that the ‘Hard Drive’ or ‘Com Port’ may only be selected while the instrument is being powered via its USB port. If the instrument is running on batteries, and is not connected to either a PC or a PT745 external power supply, the ‘Unplugged ‘ will be displayed instead of either ‘Hard Drive’ or ‘COM Port’. Power Supply The photometer is designed to operate on alkaline batteries. The photometer features a battery indicator – see ‘System Mode’ functions. A minimum voltage of 3.0V is needed to operate the photometer. In addition to the above feature, a battery-warning message will appear automatically on the display when the battery voltage becomes low. The batteries should be replaced as soon as possible after the warning message appears. 27 5 TROUBLESHOOTING Sample Collection Take pool water samples from below the water surface. Collect in a clean plastic bottle and fill to the neck so as to avoid unnecessary airspace. The free chlorine, bromine or ozone levels may drop during sample storage. Other parameters such as pH and alkalinity can also change. Samples should therefore be tested as soon as possible after sample collection. Diluting the Sample When the test result is outside the concentration range of the test, the photometer will display the > > symbol. In such cases, it is necessary to dilute the pool water and repeat the test. If the result is close to the top of the scale (eg chlorine above 4 mg/l on Chlorine-Free/5 or ChlorineTotal/5 range, calcium hardness above 300 mg/l or cyanuric acid above 150 mg/l) and a more accurate result is required, a dilution may be used to increase the sensitivity of the test :1 Take a Dilution Tube (PT 512) and fill to the x2 mark with pool water. Make-up to the ‘Deionised Water’ mark with deionised water. Replace the tube cap and mix. 2 Carry out the test on the diluted sample in a 10 ml test tube as per the normal test instructions. 3 Take the photometer reading in the normal manner. 4 Multiply the test result display be x2 to find the concentration in the original pool water sample. Samples may be diluted to a greater extent if necessary. Use the dilution factor appropriate to the dilution used. Note: it is not possible to dilute samples in the pH test, or when working in transmittance. It is very important to specify Palintest Photometer Grade tablets when ordering replacement reagents for this instrument. Using an alternative grade of tablet may lead to a turbid sample which in turn leads to inaccurate results. 28 Chlorine Note that a too high chlorine level (>8 mg/l) can cause bleaching of the pink coloration formed in the DPD test and give a false negative or low result (this doesn’t occur with DPD-XF and XT reagents). If a colourless or weakly coloured test solution is obtained when chlorine is known to be present, check for the possibility of bleaching by repeating the test on a sample diluted with chlorine-free water. Very high levels of calcium hardness (>1000 mg/l as CaCO3) may lead to turbidity when performing the test. If this occurs, you need to add one EDTA (AT 090) tablet to your sample prior to adding your DPD tablet. Non-chlorine shock dosing treatments for swimming pools are widely used to support chlorine treated pools. Chemicals containing monopotassium persulphate (MPS) are used to oxidise organic contaminants in the water and regenerate free chlorine from chloramines. Typical products are Oxybrite, Oxysure and Purolyte Plus. Excess MPS reacts in the DPD test. It does not affect the free chlorine result with DPD No 1, but raises the DPD No 3 reading, thus yielding a false high result for combined chlorine. Unwary pool operators may add further shock dose at this point, and this further raises the false total chlorine result. Palintest’s DPD Oxystop has been developed to prevent this problem. The DPD Oxystop tablet should be added after the DPD No 1 Free Chlorine test result has been read and before the DPD No 3 tablet is added. The tablet must be thoroughly crushed and mixed well into the solution, and allowed a one-minute stand before proceeding with the DPD No 3 tablet. Thus, Oxystop suppresses the response from MPS and allow accurate measurements of free and total chlorine on non chlorine shock dosed pool waters. The DPD Oxystop tablet may also be used in exactly the same way with the DPD-XF and DPD-XT tablets. To assess the level of non-chlorine shock dose chemicals in the pool, request supplementary instructions Phot.7.2.AUTO. 29 pH Ionic strength, temperature and other water factors will have an effect on pH readings. This test has been calibrated for conditions most likely to be encountered in a typical swimming pool. The colour range of the phenol red test is yellow, through orange, to red. The formation of an intense purple coloration shows that the indicator has been affected by high chlorine or bromine residuals. In such cases the result should be disregarded. Alkalinity The Alkaphot test contains an organic acid titrant to neutralise the total alkalinity in the sample. This acid is finely sieved during manufacturing to aid solubility, but the tablet requires thorough crushing and mixing to ensure full dissolution of the active ingredient. The test should be allowed to stand for one minute after mixing. If a thin yellow layer is observed at the bottom of the tube, the test should be thoroughly remixed before measurement. Ozone Ozone, free and combined chlorine and bromine residuals all react with DPD 4 reagent to produce a pink colour, proportional to the concentration present in the sample. Glycine destroys ozone in the sample and the colour produced in the DPD test then corresponds to the chlorine and bromine only. The ozone content is thus obtained by the difference between the test readings with and without glycine. Cyanuric Acid Allow the tablet to disintegrate slowly, for at least two minutes, before crushing any remaining tablet. This encourages the development of an even, fine turbidity and enhances reproducibility of results. The range of the cyanuric acid (CNA) test is 2 - 200 mg/l. Higher levels can be tested by first diluting the sample with mains or deionised water and then applying the appropriate dilution factor. Palintest’s Dilution Tube (PT 512), which is available as an optional extra, should be used for the dilution. 30 Calcium Hardness The expression of hardness results sometimes causes confusion. It is normal practice to express the results of hardness tests as mg/l CaCO3 (calcium carbonate). This is merely a convention to allow the comparison of different results and does not necessarily indicate that the hardness is present in the water in this form. Results may also be expressed in literature as mg/l Ca. The instrument will not do this calculation automatically but to convert mg/l CaCO3 to mg/l Ca multiply by 0.4. In seawater, the calibration of the test is different. A dedicated calibration program is provided on the pool photometers, specifically for use in seawater pools. Iron LR The test colour development will normally be complete within one minute. Continued colour development indicates the presence of more strongly bound iron complexes in the water. In such cases the test solution should be stood for 15 minutes until colour development is complete. Bromine For most purposes it is sufficient to simply measure the total bromine residual (using DPD No 1 tablets) since both free and combined bromine are active disinfectants. Note that a too high bromine level (above 20 mg/l) can cause bleaching of the pink colouration formed in the DPD test and give a false negative or low result. If a colourless or weakly coloured test solution is obtained when bromine is known to be present, check for the possibility of bleaching by repeating the test on a sample diluted with bromine/chlorine-free water. 31 6 REORDERING INFORMATION Reagent Description Product Code 50 Tests 250 Tests DPD No 1 Tablet Pack PM 011 AP 011 DPD-XF Tablet Pack PM 013 AP 013 DPD No 1 + DPD No 3 Tablet Pack PM 031 AP 031 DPD No 3 Tablet Pack - AP 031/1 DPD-XT Tablet Pack - AP 033/1 PM 056 AP 056 DPD Glycine - AT 056 Phenol Red PM 130 AP 130 Cyanuric Acid PM 087 AP 087 PM 188 AP 188 Calcicol PM 252 AP 252 Coppercol PM 186 AP 186 Iron LR PM 155 AP 155 EDTA Tablets - AT 090 DPD Oxystop - AP 017 DPD 4 Alkaphot Accessories Description Test Tube Brush Replacement Photometer Tubes (x5) Product Code PT 663 PT 595/5 Photometer Tube Rack PT 545 Crushing Rods (x10) PT 502 Pooltest 9 Premier Check Standards PT 791 V1: 11/10 32