1
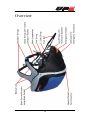
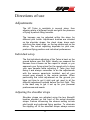
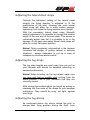
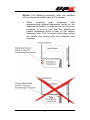
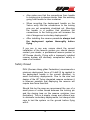
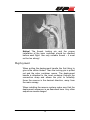
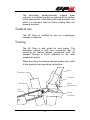
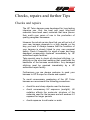
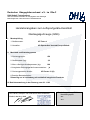
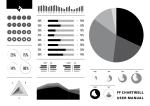
User Manual
UP Teton
1
UP Teton
User Manual
Version 1.0
Valid from production year 2003
Date: 01.03.2004
2
The data and statements contained within this manual may be
changed without prior notice. No part of these documents may be
copied or transmitted for any purpose in any manner or by any
means, either electronic or mechanical, without explicit written
permission from Ultralite Products Europe.
© 1995-2004 Ultralite Products Europe
3
Table of contents
WELCOME IN OUR TEAM ..........................................................6
SAFETY INSTRUCTIONS .............................................................7
TECHNICAL DESCRIPTION .......................................................8
GENERAL.........................................................................................8
TECHNICAL SPECIFICATIONS ...........................................................9
OVERVIEW....................................................................................10
DIRECTIONS OF USE..................................................................11
ADJUSTMENTS ...............................................................................11
Individual setup ........................................................................11
Adjusting the shoulder straps ...................................................11
Adjusting the chest strap ..........................................................12
Adjusting the lateral chest straps .............................................13
Adjusting the leg straps ............................................................13
Adjusting the leg stirrup ...........................................................13
INSTALLING THE RESERVE PARACHUTE .........................................15
Installing the reserve in the harness.........................................15
Using a front container ............................................................15
Installing the reserve in the integrated reserve container .......16
Safety thread.............................................................................18
Deployment...............................................................................19
COMPATIBILITY .............................................................................20
AIRBAGS ........................................................................................20
Mounting the airbags ...............................................................20
TANDEM USE .................................................................................21
TOWING.........................................................................................21
PARAGLIDER COMPATIBILITY ........................................................22
4
CHECKS, REPAIRS AND FURTHER TIPS..............................23
CHECKS AND REPAIRS....................................................................23
Maintenance and control..........................................................24
Cleaning ...................................................................................24
Packing and checking reserve parachutes ...............................24
Sending the UP Teton and other UP products .........................25
FURTHER INFO ...............................................................................25
UP HOMEPAGE ............................................................................26
ATTACHEMENTS ........................................................................27
5
Welcome in our team
Congratulations on the purchase of your new UP
Teton harness. With the UP Teton you have chosen a
harness that represents the maximum in safety,
comfort, functionality and quality in our sport.
Please take a little time to complete and send the
reply card found in the back of this manual. This way
we can keep you informed of all new products and
developments at UP, as well as any technical
information about the UP Teton.
We would also be delighted to hear any feedback you
have concerning the harness. It is only through your
feedback that we can continue to develop world-class
paragliders that appeal to the majority of pilots.
If you have any questions regarding your harness or
auxiliary equipment please ask your local dealer or
feel free to contact us here at UP directly.
Your UP Europe Team
6
Safety instructions
Paragliding is an extremely demanding sport requiring
the highest levels of attention, judgement, maturity,
and self-discipline. Due to the inherent risks in flying,
no warranty of any kind can be made against
accidents, injury, equipment failure, and/or death. This
harness is not covered by product liability insurance.
Do not use it unless you are personally willing to
assume all risks inherent in the sport of paragliding
and all responsibility for any property damage, injury,
or death, which may result from use of this paraglider.
Please read this owner's manual thoroughly before
your first flight with the UP Teton so that you are fully
acquainted with your new harness. This manual gives
you information on the entire specific and general
flying characteristics of the UP Teton. It is important to
note the following points:
•
At the time of delivery the UP Teton conforms to
German Hang Gliding Association (DHV)
requirements (see certification information later in
this manual)
•
Any changes being made outside the permitted
range of adjustment invalidate any and all claims
under the warranty
•
Using this harness is exclusively at the risk of the
user; the manufacturer or distributor assumes no
responsibility for accidents occurring while using it.
•
The pilot assumes total responsibility for the use
of the harness. Before each flight the pilot must
perform a mandatory check of the condition of the
harness.
•
It is assumed that the pilot is in possession of the
necessary qualifications and that provisions of any
relevant laws are observed
7
•
When reselling the harness please make sure you
also give this manual to the new owner. The
manual is an integrated part of the harness and is
required to keep its certification.
Technical description
General
The Teton paraglider harness was developed for pilots
seeking a sleek, modern harness enabling among
other things a greater freedom of movement during
launch and landing. A new harness suspension
system developed especially for the UP Teton allows a
comfortable seated position for thermalling combined
with the opportunity to recline to a very efficient supine
position for long transitions and gliding accelerated
into a headwind. When flying the Teton supine the
pilot’s drag is reduced by up to 30% (tested in
cooperation with the Porche Enginereering Group in a
wind tunnel) to the benefit of min. sink and glide angle.
A brief summary of the constructive particularities of
the UP Teton:
•
Special
seated/supine
suspension
system
allowing the pilot to assume both a seated position
(for thermalling, launching and landing) as well as
an aerodynamically more efficient supine position
(for gliding and accelerated gliding)
•
Ergonomically shaped back
numerous adjustment options
•
New reserve parachute container under the seat
•
“Cobra Compact©”
safety
clip-in system
eliminating the risk of falling out due to un-buckled
leg straps
8
support
with
•
Built-in 12cm foam filled airbag
•
Spacious and aerodynamically shaped rear pocket
•
Multiple function leg stirrup for relaxing flights and
for moving between the seated and the supine
position
•
Lateral fairing
•
Optional placement of the reserve parachute in
the built-in container or in a front container
Technical specifications
Maximum pilot weight: 100kgs
DHV approved back protection:
The back protection used in the Teton was developed
specifically for this harness. It consists of two separate
entities, one standard 12cm foam-filled airbag and one
wedge-shaped separate airbag. Both units must be in
place for the Teton to conform to it’s certified
configuration.
Karabiners
Powerfly© automatic steel, AustrAlpin
Weight:
63 g
Load strength:
23 kN
Buckles
Cobra, AustriAlpin
Empty weight (without airbags and karabiners)
UP Teton L:
3,5kgs
UP Teton M:
3,3kgs
9
Overview
10
Directions of use
Adjustments
The UP Teton is available in several sizes, thus
allowing pilots of different height and girth the pleasure
of flying a perfect-fitting harness.
The harness can be adjusted within the sizes for
different pilot builds. Adjustment buckles are situated
on the shoulder straps, the chest strap, down each
side from the chest strap, on the leg straps and on the
stirrup. The actual adjusting depends on pilot size,
preferred flying position and individual preferences
Individual setup
The first individual adjusting of the Teton is best on the
ground before your first flight. Ideally you suspend the
harness from a beam via two ropes or straps, or you
approach your flying school for the opportunity to hang
your new harness while adjusting it. Take your time
doing it and always remember to do the adjustments
with the reserve parachute installed, and all your
normal gear stowed in the various pockets. When
performing this initial adjustment on the ground you
have got time to get it right and get used to all the
different adjustment options before the first flight. This
is the ideal way to get it set up for your personal
preferences and needs.
Adjusting the shoulder straps
Shoulder straps are adjusted using the two Kamet©
buckles situated on the front of the actual shoulder
straps. Factors influencing the chosen setting include
pilot height and preferred flying position. To eliminate
the slipping off of the shoulder straps always ensure
11
that the connection strap between the two shoulder
straps is fastened.
When properly adjusted the shoulder straps should sit
snug but not tight against the shoulders. The
integrated elastic band will maintain snugness even
when the straps are not under load, thus eliminating
the risk of slipping out due to loose straps.
Adjusting the chest strap
The chest-strap setting is reset every time you put on
your harness and should be adjusted according to
personal preferences. A fully open chest strap will
allow for very efficient weightshift steering, a tighter
setting will feel more stable in the air. We recommend
a relatively tight setting in the beginning or until you
are familiar with the very efficient weight shifting
characteristics of your new harness.
The UP Teton comes equipped with the Cobra
Compact® safety click-in system. The T-buckle used
to fasten the chest strap is connected to a strap
coming from beneath the seat plate. This system
effectively eliminates the risk of slipping out of the
harness in flight due to unfastened leg straps.
Notice! When buckling up the Cobra Compact® chest
strap components you must hear an audible click
coming from each of the buckles as you connect them.
Cobra buckles are very difficult or impossible to open
when under load.
Finally adjust the strap lengths to your personal
preferences by pulling or releasing the strap ends.
Remember that the tighter the chest strap the less
your wing will react to weight shifting. In turbulence the
movement of the canopy will also be less noticeable.
Notice! A very tight chest strap will increase the risk of
twists in extreme situations!
12
Adjusting the lateral chest straps
Through the individual setting of the lateral chest
strap(s) the flying position is adjusted to fit the
preferences of the pilot. Opening the main lateral
chest strap will allow for a more supine posture,
tightening it will make the flying position more upright.
With the secondary lateral chest strap (Kamet®
buckle) adjustment it is possible to change the relative
height of the rear end of the seat plate. This serves to
individually adjust how flat it is possible to lie in the
harness. A fully open secondary lateral chest strap will
allow for a very flat supine position.
Notice! Flying completely outstretched in the harness
increases the danger of getting twisted in extreme
situations - always remember to curl up in case of
collapses to minimize lateral inertia!
Adjusting the leg straps
The leg strap lengths are reset every time you put on
your harness and should be adjusted according to
personal preferences.
Notice! When buckling up the leg straps make sure
you hear and feel an audible click coming from the
actual buckles. This is your indication that they are
correctly closed.
After closing the buckles adjust the length by pulling or
releasing the free ends of the straps to your personal
preference. They should be snug, not tight, against
your thigh.
Adjusting the leg stirrup
As mentioned above the stirrup allows the pilot to
change their flying position during the flight, from
13
seated to supine and back again. Pushing against the
stirrup with the feet will change the geometry of the
harness by lifting up the rear end of the seat plate,
thereby lifting the pilots hips and inducing a more
reclined supine position. Pushing the accelerator will
have the same effect, but with the stirrup you can
chose to fly in the more efficient supine position even
when not on speed bar.
Notice! Flying completely outstretched in the harness
increases the danger of getting twisted in extreme
situations - always remember to curl up in case of
collapses to minimize lateral inertia!
When installing the reserve parachute in the
integrated container under the seat (as opposed to
when using a front container) it is important to avoid
linking the stirrup and the speed bar/accelerator
together, as this could obstruct the release of the
stirrup when the reserve parachute is deployed (for
further reference see the chapter “installing the
reserve parachute”).
14
Installing the reserve parachute
The UP Teton is built to accept the installation of most
common reserve systems available on the market,
with a few exceptions!
Notice! Using an unsuitable reserve system, or
installing a proper system wrongly will seriously
compromise your safety in the event of an emergency
situation!
Should you have questions or doubts regarding the
suitability or installation of your reserve system in
connection with the UP Teton we strongly recommend
that you contact your dealer or UP Europe directly
Installing the reserve in the harness
The harness reserve bridles are attached to the
shoulder straps. To connect these bridles to the
reserve bridle we recommend using the “loop-through
handshake” knot. This is also the loop knot to use for
attaching the deployment handle to the reserve inner
container.
Notice! Use only the original deployment handle
supplied with the UP Teton. Using any other handle
could compromise the functioning of the system!
Using a front container
The UP front container is well suited for use with the
Teton harness. Attach the container by connecting the
two elastic bands situated on the back of the front
container to the main karabiners. Then wrap the two
Velcro flaps around the main load-bearing straps
running down from the main attachment points. The
UP front container is designed to open easily on the
15
left side (click lock and Velcro) to facilitate getting in
and out of the harness.
The harness reserve bridles run through a Velcro
guide on the right side of the front container. Excess
reserve bridle is stored at the bottom of the front
container in the form of neat S-loops.
When using the UP Teton harness with a frontmounted reserve container you can install the optional
extra baggage pocket in the integrated reserve
container’s place. This means more space for ballast
or other equipment that you need when on a flying trip.
Installing the reserve in the integrated reserve
container
The integrated reserve container is located under the
seat plate. Six closing flaps provide unrestricted
deployment and optional left/right placement of the
deployment handle.
Notice! When moving the deployment handle from
one side to the other be sure to turn the leg stirrup as
well!
The reserve deployment handle has a 25cm long stiff
plastic wire protruding. This wire serves to disconnect
one side of the leg stirrup when the reserve parachute
is deployed, thereby eliminating the risk of entangling
during deployment. When installing the reserve take
care to also install the stirrup-release mechanism and
test it before flying the harness. We also recommend
making this connection part of your pre-flight checking
routine.
Excess reserve bridle is stored inside the reserve
container alongside the inner container. Store it in
neat “S” bends!
16
Notice! The following directions must be complied
with to ensure the functionality of the system:
•
When
installing
inner
containers
with
asymmetrically located attachment points for the
deployment handle it is important to turn the inner
container in such a way that the deployment
handle attachment point is near to the chosen
deploying side. This to ensure that when pulling
the handle the locking pins are released (see
drawing).
17
•
Also make sure that the connections from handle
to locking pins is always shorter than the webbing
going from handle to inner container
•
When mounting the deployment handle on the
Velcro verify that the connections to the locking
pins are not completely stretched out. Mounting
the handle in a position that stretches the
connections to the locking pins will increase the
risk of dangerous involuntary deployments!
•
After installing the reserve parachute always test
the deployment system thoroughly before
flying.
If you are in any way unsure about the correct
installation of the reserve system you should always
contact your dealer, a professional reserve packer or
UP Europe directly. Flying with a improperly installed
reserve system will seriously compromise safety in
case of an incident.
Safety thread
DHV (German Hang glider Federation) recommends a
minimum deployment force of 5 daN (5 kg applied to
the deployment handle in the correct direction), to
avoid involuntary deployments. Due to the size and
design of the UP Teton integrated reserve container it
is however possible that deploying the reserve will
require less force than that.
Should this be the case we recommend the use of a
small piece of cotton thread between the locking pin
and the closing loop on the reserve container (see
illustration). This is a simple, cheap and efficient way
to eliminate involuntary deployments, but always take
care to test the system on the ground before flying
with it.
18
Notice! The thread, locking pin and the proper
installation of the inner container should be checked
before each flight. Use only suitable thread – it must
not be too strong!
Deployment
When pulling the deployment handle the first thing to
give is the cotton thread. Then the locking pin is pulled
out and the outer container opens. The deployment
handle is attached to the inner container through the
connection strap and allows the pilot to forcefully
throw the reserve in the desired direction, away from
the main canopy.
When installing the reserve system make sure that the
deployment sequence is as described here. Any other
sequence means danger!
19
Compatibility
The installation of the integrated reserve container and
the installation of a reserve parachute therein should
be approved by the manufacturer of the harness or
reserve parachute. This to ensure that the
configuration works properly and that all installations
have been carried out correctly.
After each packing a test release should be done in
order to guarantee the normal function of the
emergency parachute. The deployment of the
emergency parachute must be feasible from each
possible flight position.
Airbags
The UP Teton uses an airbag/foam protector system
specifically designed for this harness. The harness is
only DHV certified when both protectors are mounted
and in place. With the airbag/foam protectors in place
the harness passed the DHV 15G shock-absorption
test with ease.
Furthermore the design of the airbag/foam protector
system has an aerodynamic function in that it reduces
the harness/pilot drag in flight considerably.
Mounting the airbags
The UP Teton has two separate bags for the
airbag/foam protectors. The primary foam filled airbag
is installed through a zippered opening at the bottom
of the harness. To facilitate installation a further zipper
has been built in, running vertically down the middle of
the back inside the back compartment. To install the
airbag, open both zippers and slide it into place. Make
sure you close both zippers again afterwards.
20
The secondary aerodynamically shaped foam
protector is installed through an opening at the bottom
of the back pocket. After sliding the foam protector into
place it is important that the Velcro closing flaps are
properly secured.
Tandem use
The UP Teton is certified for use as a passenger
harness in tandems.
Towing
The UP Teton is well suited for solo towing. The
illustration shows a safe and convenient way of
mounting the towline release mechanism onto the
harness through a P-link attached to the main
suspension points.
When mounting the towline release system also refer
to the system’s own operating instructions.
R iser
S ho u lder S trap
C arab in e
C hest Strap
M ain
S uspen sio n
To w
R elease
S crew
C arab in e
21
Notice! Mounting the towline release system
incorrectly could seriously compromise pilot safety!
Paraglider compatibility
The DHV has stipulated no restrictions in terms of
paragliders compatible with the UP Teton harness.
The harness is certified in the “GH” category.
22
Checks, repairs and further Tips
Checks and repairs
The UP Teton harness was developed for long-lasting
intensive use. Only the best and most long-lived
materials have been used, materials that have proven
their worth over years of use in the production of
quality paraglider harnesses.
However the actual service time that you will get out of
your new harness depends to a high degree on the
way you treat it! Always beware that the condition of
your harness is closely linked to your own personal
safety. Check it frequently for signs of wear and have
damaged components replaced immediately by UP
authorised repair facilities.
Take special care to check all structural stitching, i.e.
stitching on the structural webbing that constitutes the
backbone of the harness construction. Any damaged
stitching must be repaired immediately by a UP
authorised repair facility.
Furthermore you are always welcome to send your
harness to UP Europe for checks and repairs!
To avoid unnecessary weakening of the UP Teton
harness we recommend the following precautions:
•
Avoid fire and sharp objects near the harness
•
Avoid unnecessary UV exposure (sunlight). UV
radiation affects the molecular structure of the
materials used for the harness and will weaken it if
exposed for longer periods
•
Avoid exposure to salt water or acids
23
Maintenance and control
The UP Teton harness is maintenance free. Quality in
the manufacturing and the use of the best materials
available all combine to make this product last long.
Regular and frequent checks will guarantee longlasting and unhindered performance.
Cleaning
Never use strong cleaning solvents when cleaning
your harness. Only lukewarm water and, for difficult
spots, a mild soap solution. Avoid contact between the
soap solution and structural stitching – only use on
non-structural parts.
Packing and checking reserve parachutes
Please remember that only by regularly re-packing
your reserve parachute it’s perfect functioning can be
guaranteed. As with the paraglider, the reserve should
be checked every second year by the manufacturer.
Adhere to the packing intervals stipulated by the
manufacturer of the reserve system.
UP Europe offers a complete service package for
reserve systems; checking, packing and installation in
the harness, all performed by certified packers. We
also repair UP Profile reserve parachutes.
24
Sending the UP Teton and other UP products
The best way to send your paraglider, rescue
parachute, harness etc. to our service team is in a box
via post or UPS. Enclose a note of what requires
doing (2 Year Check, repair, repack etc.) and also
your daytime contact details. We will return your
equipment either by post or UPS. Please indicate
preferred method of payment (either bank cheque or
C o d)/
Should you require any further information about the
services we offer, please contact us at the address
and phone number below. We are also able to give
you information about your nearest Authorised Service
Centre, as well as other manufacturers who are
authorised to check and repair UP gliders and
equipment.
UP Europe GmbH
-Abteilung ServiceAltjoch 19A
82431 Kochel am See
Germany
Email: [email protected]
Service Phone: +49 (0) 88 51-92 92 40
Fax: +49 (0) 88 51-92 92 60
Further info
Any modifications to the UP Teton harness will
invalidate the product guarantee. If you fly often in a
salty environment the ageing may be accelerated. We
suggest having you harness checked more frequently
if this is the case.
25
UP Homepage
The UP Homepage gives you information about
latest news and products from UP. You will find
technical information and accessories for your
Sherpa 2, as well as many useful things that
necessary for flying.
the
any
UP
are
Beside paragliders, harnesses and flying equipment
you will also find the new “Skywear” collection with the
latest flying garments and the “News” section, which
will keep you updated with all activities around UP.
www.up-europe.com
26
Attachements
Reply Card................................................................... 28
DHV certificate UP Teton............................................ 30
27
Reply card
Detach card along the perforation and send it to UP Europe!
Surname: ________________________________________
First name:_______________________________________
Address:_________________________________________
________________________________________________
________________________________________________
Phone: __________________________________________
Fax: ____________________________________________
Email: __________________________________________
UP Teton serial number: ____________________________
bought at:________________________________________
UP Teton checked by: ______________________________
________________________________________________
My current flying qualification: ______________________
hours:___________________________________________
Paragliding learnt at: _______________________________
Ultralite Products Europe GmbH
Altjoch 19 A
D-82431 Kochel am See
Deutscher Hängegleiterverband e.V. im DAeC
DHV/OeAeC-Technikreferat
LBA-anerkannte Prüfstelle für Hängegleiter und Gleitsegel
Beauftragter der österreichischen Luftfahrtbehörde
Herstellerangaben zum Luftsportgeräte-Kennblatt
Gleitsegelgurtzeuge (GSG)
I.
Musterprüfung
1. Gerätemuster:
UP Teton L
2. Hersteller:
UP Sportartikel Vertrieb Europa GmbH
II. Merkmale und Betriebsgrenzen
1. Gurtzeuggruppe:
GH
2. Gerätemasse (kg):
3,3
3. Max. zulässiges Anhängemasse (kg):
100
4. Integrierter Rettungsgeräte-Aussencontainer:
5. Gurtzeugprotektor-Muster:
ja
UP Protec 12 (S)
6 Sonstige Besonderheiten:
Zulassung nur in Verbindung mit zusätzlich integrierten Protektor
III. Betriebsanweisung in der Fassung vom: 01.11.03
Ort, Datum, Stempel und Unterschrift des Herstellers:
Kochel, den 03.11.2003
Bearbeitungsvermerk DHV:
Kennblatt geprüft
am:
von:
UP EUROPE GmbH Altjoch 19 A
Tel. +49 (0) 88 51-92 92-0
E-mail: [email protected]
82431 Kochel a. S. / Germany Fax: +49 (0) 88 51-92 92-60 www.up-europe.com