1
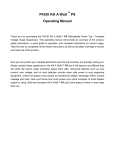
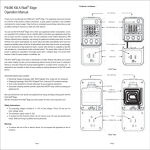
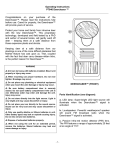
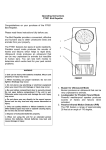
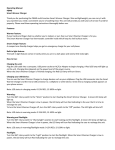
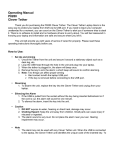
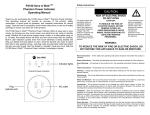
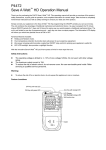
Kill A Watt™ EZ
....................................................................................
Operation Manual
P4460
KILL A WATT EZ
TM
P.F.
Elapsed Time
Cost
$
Rate
Volt Hz
Amp %
Watt KWH
VA Hour
Total Year Month Week Day Hour
MENU
UP
DOWN
RESET
SET
Thank you for purchasing the P4460 Kill A Watt™ EZ Power Meter.
This operating manual will provide an overview of the product, safety
instructions, a quick guide to operation, and complete instructions for
correct usage. Take the time to completely review these instructions as
well as all safety warnings to ensure your best use of the product.
The P4460 Kill A Watt™ EZ is an easy to use consumer power meter
allowing the user to accurately measure power consumption of household appliances and to determine the actual cost of power consumed.
The unit will also project, in real time, the cost of continued use of the
appliance in time periods of Hour, Day, Week, Month, and Year. The
P4460 features a precise circuit which provides very accurate results.
Voltage and current are measured using true RMS methods. Total
consumed power is displayed in Kilowatt-hours (KWH). It is easy to
use with a large display and simple 5-button interface. The unit is safe
as it features ETL listing and over-current protection.
Meter Display
KILL A WATT EZ
TM
P.F.
Time/Cost
Function Unit
Elapsed Time
Cost
$
Rate
Volt Hz
Amp %
Watt KWH
Measurement Unit
VA Hour
Total Year Month Week Day Hour
Down Control Key
Menu Select Key
Set Rate Key
MENU
Up Control Key
UP
DOWN
RESET
SET
Reset Key
AC Power Output
CAUTION
RISK OF ELECTRIC
SHOCK
DO NOT OPEN
The lightning flash with
arrowhead, within an
equilateral triangle, is
intended to alert the user
to the presence of
uninsulated “dangerous
voltage” within the
product’s enclosure that
may be of sufficient
magnitude to constitute a
risk of electric shock to
persons.
CAUTION:
TO REDUCE THE RISK OF
ELECTRIC SHOCK, DO NOT
REMOVE COVER. NO
USER-SERVICEABLE PARTS
INSIDE. REFER SERVICING
TO QUALIFIED SERVICE
PERSONNEL.
The exclamation point
within an equilateral
triangle is intended to
alert the user to the
presence of important
operating and
maintenance instructions
in the literature
accompanying the
appliance.
WARNING:
TO REDUCE THE RISK OF FIRE OR ELECTRIC SHOCK, DO
NOT EXPOSE THIS APPLIANCE TO RAIN OR MOISTURE.
Read Instructions – All the safety and operating instructions should be read before the
product is operated.
Retain Instructions – The safety and operating instructions should be retained for future reference.
Heed Warnings – All warnings on the product and in the operating instructions should be
adhered to.
Follow Instructions – All operating and use instructions should be followed.
Cleaning – Unplug this product from the wall outlet before cleaning. Do not use liquid cleaners
or aerosol cleaners.
Attachments – Do not use attachments not recommended by the product manufacturer as
they may cause hazards.
Water and Moisture – Do not use this product near water – for example, near a bath tub,
wash bowl, kitchen sink, or laundry tub; in a wet basement; or near a swimming pool and
the like.
Accessories – Do not place this product on an unstable cart, stand, tripod, bracket, or table.
The product may fall, causing serious injury to a child or adult, and serious damage to the
product. Any mounting of the product should follow the manufacturer’s instructions.
Ventilation – Slots and openings in the cabinet are provided for ventilation and to ensure
reliable operation of the product and to protect it from overheating, and these openings (if any)
must not be blocked or covered. The openings (if any) should never be blocked by placing
the product on a bed, sofa, rug, or other similar surface. This product should not be placed in
a built-in installation such as a bookcase or rack unless proper ventilation is provided or the
manufacturer’s instructions have been adhered to.
Power Sources – This product should be operated only from the type of power source
indicated on the marking label. If you are not sure of the type of power supply to your home,
consult your product dealer or local power company. For products intended to operate from
battery power, or other sources, refer to the operating instructions.
Grounding or Polarization – This product may be equipped with a polarized alternating-current line plug (a plug having one blade wider than the other).
This plug will fit into the power outlet only one way. This is a safety feature. If you are unable
to insert the plug fully into the outlet, try reversing the plug. If the plug should still fail to fit,
contact your electrician to replace your obsolete outlet. Do not defeat the safety purpose of the
polarized plug.
Power-Cord Protection – Power-supply cords should be routed so that they are not likely to
be walked on or pinched by items placed upon or against them, paying particular attention to
cords at plugs, convenience receptacles, and the point where they exit from the product.
Lightning – For added protection for this product during a lightning storm, or when it is left
unattended and unused for long periods of time, unplug it from the wall outlet. This will prevent
damage to the product due to lightning and power-line surges.
Overloading – Do not overload wall outlets, extension cords, or integral convenience receptacles as this can result in a risk of fire or electric shock.
Object and Liquid Entry – Never push objects of any kind into this product through openings
(if any) as they may touch dangerous voltage points or short-out parts that could result in a fire
or electric shock. Never spill liquid of any kind on the product.
Servicing – Do not attempt to service this product yourself as opening or removing covers
may expose you to dangerous voltage or other hazards. Refer all servicing to qualified
service personnel.
Damage Requiring Service – Unplug this product from the wall outlet and refer servicing to
qualified service personnel under the following conditions:
- When the power-supply cord or plug is damaged.
- If liquid has been spilled, or objects have fallen into the product.
- If the product has been exposed to rain or water.
- If the product does not operate normally by following the operating instructions. Adjust
only those controls that are covered by the operating instructions as an improper adjustment of other controls may result in damage and will often require extensive work by a
qualified technician to restore the product to its normal operation.
- If the product has been dropped or damaged in any way.
- When the product exhibits a distinct change in performance – this indicates a need
for service.
Replacement Parts – When replacement parts are required, be sure the service technician
has used replacement parts specified by the manufacturer or have the same characteristics as
the original part. Unauthorized substitutions may result in fire, electric shock, or other hazards.
Safety Check – Upon completion of any service or repairs to this product, ask the service technician to perform safety checks to determine that the product is in proper operating condition.
Heat – The product should be situated away from heat sources such as radiators, heat registers, stoves, or other products that produce heat.
Quick Start Guide:
Use these quick start instructions to get up and running in just a few
minutes. Be sure to review all the operating instructions later to ensure
full enjoyment of the product.
1. Connect the Kill A Watt™ EZ unit to the outlet and the appliance
to the unit
2.
Press and hold the RESET key on the unit until “rESt” appears.
3.
Press and hold the SET rate key until “Rate” is displayed and the
currently set rate flashes.
4.
Press the UP and DOWN key to set your desired rate. For example, if your utility charges you 10.6 cents per KWH, set the rate
until the unit displays $0.106.
5.
Press the SET key again. “SAVE” will appear briefly in the display.
6.
To display the actual cost of power consumed or projected cost,
press the MENU key until “Cost” is displayed in the LCD.
7.
Pressing the UP and DOWN key will cycle through the cost
projection periods. For example if the display indicates $2.34 and
“Month”, the unit is projecting that the attached appliance will
consume $2.34 worth of electricity in one month.
8.
To display the power measurements press the MENU key until
“Volt” is displayed on the LCD.
9.
To cycle through the various measurements press the UP and
DOWN key as desired. The measurement unit currently selected
will be indicated in the display.
10. To display the total consumed power in Kilowatt-Hours, press the
MENU key until “KWH” is indicated in the display.
11. Review the complete operating instructions to familiarize yourself
with all features.
Installation:
1. Remove the protective film (if any) covering the LCD meter display by pulling
the tab marked “REMOVE BEFORE USE”.
2. Turn off the appliance and remove the power cord from the outlet. Connect the
Kill A Watt™ EZ unit to the outlet and the appliance to the unit. If the outlet is
in an inconvenient location first connect a quality extension cord that is rated
for the application.
3. Turn the appliance back on and confirm normal operation. If the appliance
does not function, please recheck your installation.
4. Press and hold the RESET key on the unit. After a few seconds, “rESt” will
appear momentarily on the LCD. Release the RESET key. This indicates that
previous measurements have been deleted and that the total accumulated
KWH, Elapsed Time and Cost measurements have been reset to zero.
Rate setting:
1. To accurately calculate the actual cost of electricity consumed and to project
future costs, first you must set your local utility’s electric rate into the unit. The
rate is typically charged as dollars (or cents) per kilowatt-hour (KWH). You can
find this rate on your last utility bill or you can contact the utility’s customer
service department to determine your rate. Some utilities charge two or more
rates depending on consumption, time of day, or season. Use the rate that
more closely reflects your actual use patterns, or average the two rates to suit
your needs.
2. Press and hold the SET rate key on the unit. “Rate” will be displayed and the
currently set rate will flash.
3. Press the UP and DOWN key to set your desired rate. If you hold the UP or
DOWN key, the displayed rate will rapidly change. The range of settings is
from $0.000 to $9.999. For example, if your utility charges you 10.6 cents per
KWH, set the rate until the unit displays $0.106.
4. Press the SET key again. “SAVE” will appear briefly in the display as the
desired rate is set. The unit will return to the Measurements mode.
Cost display:
1. To display the actual cost of power consumed or projected cost, press the
MENU key until “Cost” is displayed in the LCD.
2. Initially the actual total cost will appear. “Total” will be displayed. This dollar
amount represents the total cost of power consumed by the attached appli-
ance since the last reset. This cost is calculated based on the total consumed
power in KWH and the utility rate that you have set.
3. Don’t be surprised if the total cost display is 0.00 initially. It will take some time
to accumulate cost.
4. Pressing the UP and DOWN key will cycle through the cost projection periods.
“Hour”, “Day”, “Week”, “Month”, and “Year” will display on the LCD to indicate
the selected period. The numeric display will indicate the projected cost to
run the attached appliance for the selected period. For example if the display
indicates $2.34 and “Month”, the unit is projecting that the attached appliance
will consume $2.34 worth of electricity at the programmed rate in one month.
5. These projections are based on real time and historical measurements of actual consumption of the attached appliance. The longer the appliance remains
attached to the unit, the more accurate the projection will be. This is especially
true for appliances that cycle on and off. Examples include refrigerators, televisions, etc. Measurements conducted over long periods will accurately reflect
true usage of the appliance. For example if a television is used 4 hours a day,
it is important to measure the 20 hours a day the appliance is not in use to get
a true projection of the cost.
6. For an appliance that cycles on and off, the projections cannot be accurate until the unit has measured some full on and off cycles. Otherwise the projection
will be skewed. For example, if a connected television is powered on and you
reset the Kill A Watt™ EZ, the unit will begin measuring the power consumption of a powered television. The only data available to the unit is power
consumption when the television is turned on. Initial projections of cost will
be high as the unit has not had the opportunity to measure power consumption during the off cycle. If you observe the cost projection while the television
is turned off, you will see it decline over time. After the unit has been able to
measure several typical use cycles, the cost projections will settle to an accurate projection based on real usage.
7. For a device that is never turned off (e.g. a computer server) the cost projections will take less time to settle. You can observe accurate cost projections
within minutes. It is still best to let the unit measure power consumption over
an extended period. There can be power consumption variations even in
devices that are never turned off.
Measurement display:
1. To display the various available power measurements press the MENU key
until “Volt” is displayed on the LCD. In the Measurement display mode, the
LCD can display meter readings such as Volts, Current, Watts, Frequency,
Power Factor, and VA.
2. To cycle through the various measurements press the UP and DOWN key
as desired. The measurement unit currently selected will be indicated in the
display.
3. Volts are displayed in Volts (true RMS), Current is displayed in Amps (true
RMS), Watts are displayed in active power Watts, VA is displayed in apparent
power VA (VA=Vrms*Arms), Frequency is displayed in Hertz (Hz), Power Factor (P.F.) is displayed as (Watts/Vrms*Arms).
Rate display:
1. To display the current programmed rate used in cost calculations, press the
MENU key until “Rate” is indicated in the display.
2. The current programmed rate is displayed in dollars and cents. For example a
programmed rate of 10.6 cents per KWH will be displayed as $0.106.
3. To change the programmed rate, please refer to the section on “Rate setting”.
Kilowatt-Hour display:
1. To display the total consumed power in Kilowatt-Hours, press the MENU key
until “KWH” is indicated in the display.
2. Consumption will be displayed in Kilowatt-Hours (from 0.01 KWH to 9999
KWH). As KWH accumulate, the decimal point in the display will shift to accommodate a full reading.
3. To reset the accumulated KWH measurement, press and hold the RESET key
on the unit. After a few seconds, “rESt” will appear momentarily on the LCD.
Release the RESET key. This indicates that previous measurements have
been deleted and that the total accumulated KWH, Elapsed Time and Cost
measurements have been reset to zero.
Elapsed Time display:
1. To display the total elapsed time that the Kill A Watt™ EZ has been connected
to power since the last reset, press the MENU key until “Elapsed Time” is
indicated in the display.
2. Time will initially be displayed as Hours:Minutes (from 00:00) and then switch
to Hours only (to 9999) to accommodate a full reading.
3. To reset the elapsed time measurement, press and hold the RESET key on
the unit. After a few seconds, “rESt” will appear momentarily on the LCD.
Release the RESET key. This indicates that previous measurements have
been deleted and that the total accumulated KWH, Elapsed Time and Cost
measurements have been reset to zero.
Retained measurements:
1. When power to the Kill A Watt™ EZ is interrupted, the display will go blank
and the unit will stop measuring consumption and elapsed time. However all
accumulated measurements including KWH, Elapsed Time, and actual total
cost will be retained.
2. This allows the user to take measurements anywhere and relocate the unit to
a more convenient location to read the display. When the unit is plugged back
in, the display will become active and the accumulated data can be retrieved
by using the keys. Data should be retrieved immediately as the Elapsed Time
counter will restart and potentially skew the data as time with no load elapses.
3. To reset the accumulated measurements, press and hold the RESET key
on the unit. After a few seconds, “rESt” will appear momentarily on the LCD.
Release the RESET key. This indicates that previous measurements have
been deleted and that the total accumulated KWH, Elapsed Time and Cost
measurements have been reset to zero.
Specifications:
Function
Range
Typ.
Accuracy
Max.
RMS Voltage
85-125 Vrms
0.2%
1%
RMS Current
0.00~15.00 Arms
0.3%
1%
Active Power
0~1875 Watt
0.5%
2%
Apparent Power
0~1875 VA
0.5%
2%
Line Frequency
47.0~63 Hz
0.1 Hz
2%
0.00~1.00
0.01
0.03
0.00~9999 KWH
0.5%
Power Factor
Power Quantity
Time Quantity
Display Update
Power Consumption
00:00~9999
2%
30ppm
1 Sec
-
10 Wmax
-
Typical: V=90V~125V, A=0.2A~15A
P3 INTERNATIONAL CORPORATION
LIMITED WARRANTY
P3 INTERNATIONAL CORPORATION (“P3”) warrants to the original retail purchaser only, that
its product is free from defects in material or workmanship under the condition of normal use and
service for a period of six (6) months from the date of purchase. In the event that a defect, malfunction or failure occurs or is discovered during the warranty period, P3 will repair or replace at its
option the product or component part(s) which shall appear in the reasonable judgment of P3 to be
defective or not to factory specifications. A product requiring service is to be returned to P3 along
with the sales receipt or other proof of purchase acceptable to P3 and a statement describing the
defect or malfunction. All transportation costs shall be borne by the owner and the risk of loss shall
be upon the party initiating the transportation. All items repaired or replaced thereunder shall be
subjected to the same limited warranty for a period of six (6) months from the day P3 ships the
repaired or replaced product. The warranty does not apply to any product that has been subject to
misuse, tampering, neglect, or accident or as a result of unauthorized alterations or repairs to the
product. This warranty is void if the serial number (if any) has been removed, altered, or defaced.
This warranty is in lieu of all warranties expressed or implied, including the implied warranties of
merchantability and fitness for a particular purpose which are expressly excluded or disclaimed.
P3 shall not be responsible for consequential, incidental or other damages, and P3 expressly
excludes and disclaims liability for any damages resulting from the use, operation, improper application, malfunction or defeat of any P3 product covered by this limited warranty. P3's obligation is
strictly and exclusively limited to the replacement or repair of any defective product or component
part(s). Some states do not allow the exclusion or limitation of incidental or consequential damages, so the above limitation or exclusion may not apply to you. P3 does not assume or authorize
anyone to assume for it any other obligation whatsoever. Some states do not allow limitation on
how long an implied warranty lasts, so the above limitations may not apply to you. It is the owner/
user's responsibility to comply with local, state, or federal regulations, if any, that may pertain to P3
products or their use. This warranty gives you specific legal rights, and you may also have other
rights which vary from state to state.
If you experience difficulty in the operation of your unit, or if your unit requires repair please
contact:
P3 INTERNATIONAL CORPORATION
TECHNICAL SUPPORT
Tel: 212-741-7289
Fax: 212-741-2288
Email: [email protected]
Rev. 0307