1
P4490 Kill A Watt® Edge
Operation Manual
Thank you for purchasing the P4490 Kill A Watt® Edge. This operating manual will provide
an overview of the product, safety instructions, a quick guide to operation, and complete
instructions for correct usage. Take the time to completely review these instructions as well
as safety warnings to ensure your best use of the product.
You can use the Kill A Watt® Edge unit to check your appliances electric consumption, cost to
run, equivalent CO2 emissions, and as a standby killer to shut down your appliances when they
are not used, and are in standby mode. The unit combines human motion detection by PIR
(Passive Infrared) sensor detection, and sensing the appliance’s standby power level, to control
the flow of AC power automatically. AC power will be provided automatically when users are
present and standby power will be cut off automatically when they leave the room to save energy,
save CO2 emissions to help protect the earth. A power killer function is available so that the
unit operates as a conventional motion-activated switch. The power killer mode will shut off
power to appliances regardless of standby power after a settable delay. The power killer
function is ideal for space heaters, humidifiers, etc.
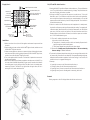
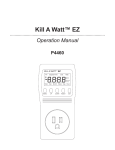
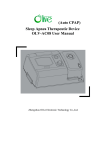
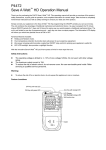
Feature Locations :
ON / OFF Key
PIR Sensor
PIR and Display Unit
4.5-foot tethered Cord
Socket
Outlet Unit
The Kill A Watt® Edge is also easy to read thanks to a tether feature that allows you to perch
your meter nearby the item you are measuring without having to bend over or unplug the
device to view data. Keep the housing mated together in a single unit for compact use – or
separate the two modules to allow for easy reading or precise placement of the PIR motion
sensor.
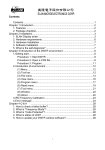
ON / OFF Key
Advanced features also included :
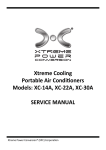
Front View
Monitoring Voltage, Amperage, Watt, KWH, Elapsed Time, Costs and CO2 emissions.
Displaying Amperage, Watt, KWH, Elapsed Time, Costs and CO2 emissions savings.
Over current protection to provide safe power to your expensive equipment.
Zero power crossing switches provide a spike free ON/OFF relay control to prolong your
appliances life.
Now you’ll know how much power your appliances are using, and begin saving power with the
Kill A Watt® Edge.
With the innovative Kill A Watt® Edge you’ll have peace of mind in more ways than one.
Cord cover
PIR and
Display Unit
4.5-foot tethered Cord
Safety Instructions :
The operating voltage is limited to +/- 10% of Line voltage 110Vac. Do not use it in
other voltage rating.
The maximum output current is 15A.
To reduce the risk of electric shock, do not remove cover. No user-serviceable parts
inside. Refer servicing to qualified service personnel.
Plug
Outlet Unit
Warning :
To reduce the risk of fire or electric shock, do not expose this appliance to rain or
moisture.
Rear View
Page 1
Page 2
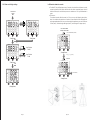
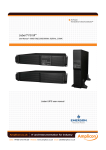
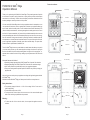
ON, OFF and PIR detect function :
Display Panel :
ON/OFF key with LED indicator
Year, Month and Day icon
Cost mode icon
And unit ($)
Unit for CO2 mode (Lb & Kg)
Unit for Watts mode (W)
CO2 mode icon
Save mode icon
Meter unit icon.
Elapsed time icon
Setting adjustment
Increase button
indicator
CO 2
CO2 button
$
Meter
Cost button
Meter button
Standby Killer icon:
Standby : enabled
Flash: power off
Setting adjustment
decrease button
indicator
PIR Motion icon:
Steady: No motion
Flash: Motion detected
Installation:
1. Before connection to the unit, turn off the appliance and remove the power cord from
the outlet.
2. Plug the appliance’s power cord into the Kill A Watt® Edge unit socket, and then connect
the Kill A Watt® Edge into the outlet.
3. If there are many appliances, please use a power strip, plug all the appliance’s power
cords into power strip’s sockets and plug the power strip into Kill A Watt® Edge socket,
and then connect the Kill A Watt® Edge into the outlet.
4. Turn on the appliance within 10 seconds. This time limit is important to ensure correct
standby power detection.
5. Now the Kill A Watt ® Edge will measure appliance standby power, the ON/OFF key
on the top of the Kill A Watt® Edge will flash in green once per second, which indicates
the standby power is being measured. After 30 to 40 seconds, the standby power
measuring is finished. The ON/OFF key’s light will be solid green. Now, the unit is
working and in PIR motion detection mode.
1. Pressing the ON/OFF key will turn off power to the outlet at once. The key will illuminate
in red. The unit will continue to measure power (e.g. Voltage, Time) and the function
keys and LCD display will continue to operate.
2. Pressing the ON/OFF key again will turn power on to outlet at once. The key will
illuminate in green. The unit features a spike-free switch function which activates at
zero-crossing and will present clean power to your connected appliance. The unit will
measure power and the function keys and LCD display will operate. The unit will be in
PIR motion detection mode.
3. If there is no motion in the PIR effective area, and the appliance is in standby mode,
the unit will cut off power according to off power delay time setting. For example, with
a 30 minute setting, after 30 minutes, the unit will shut down power, the LED will flash
green every 3 seconds, and the unit will be in PIR motion detection mode. When
somebody moves into the effective PIR area, the unit will turn power on to outlet at
once. The LED will illuminate in green.
3.1 There are 3 conditions that must be true to cut off power:
A, No motion in the PIR effective area,
B, The appliance is in standby condition, and the unit standby off power level is
larger than appliance instant standby power,
C, The off power delayed time setting value must have elapsed.
3.2 Please refer to Standby power,Off power delayed time and PIR sensor detecting
distance settings for detailed information.
4. The shorter the off power delayed time setting, the more energy will be saved but the
AC power on/off cycles will occur more frequently. The appropriate setting for off power
delayed time will be to balance appliance use and save energy. 1 hour for office, 30
minutes for home, is a suggested starting point.
5. Summary:
4.1
4.2
4.3
4.4
green light = power on, and PIR motion detect function on.
red light = power off, and PIR motion detect function off.
green light every 3 second = power off, and PIR motion detect function on.
green light every second = standby power is measuring, don’t touch.
Remark :
Flashing segments on the LCD display indicate that this item can be re-set.
Page 3
Page 4
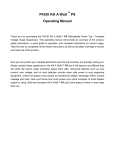
Cost mode : pressing the center “Cost” ($) key.
The CO2 mode display can include CO2, Total, Day, Month, Year, SAVE, and Lb/Kg.
Repeated presses will change displays.
“*” indicates there will be no display in the Power Kill mode.
Key
CO 2
CO 2
NO
YES
Elap
Time
Enter Sensor
+
Rate Total Year Month Day
W
Lb
Kg
$
CO 2
SAVE
+
Standby
CO 2
*
Enter Sensor
Kwh
SAVE
NO
YES
Elap
Time
+
$
CO 2
SAVE
Enter Sensor
Kwh
SAVE
NO
YES
Elap
Time
+
CO 2
〈Change Screen〉
W
Lb
Kg
CO 2
SAVE
Elap
Time
+
Standby
CO 2
Enter Sensor
+
Standby
Enter Sensor
NO
SAVE
+
SAVE
Elap
Time
NO
YES
h
m
+
Standby
CO 2
〈Change Screen〉
Enter Sensor
Press
$
Press
$
Page 5
Rate Total Year Month Day
W
Lb
Kg
CO 2
NO
YES
Elap
Time
CO 2
*
W
Lb
Kg
$
CO 2
Kwh
SAVE
NO
YES
Elap
Time
SAVE
W
Lb
Kg
Elap
Time
NO
YES
h
m
+
Standby
CO 2
*
+
Enter Sensor
NO
Meter
$
Rate Total Year Month Day
SAVE
W
Lb
Kg
CO 2
Kwh
SAVE
NO
YES
Elap
Time
Meter
$
Standby
mW V
s Hr A
$
mW V
s Hr A
Enter Sensor
Kwh
h
m
CO 2
Rate Total Year Month Day
Kwh
Meter
$
Press
CO 2
$
mW V
s Hr A
NO
〈Change Screen〉
SAVE
CO 2
Enter Sensor
Rate Total Year Month Day
Press
CO 2
W
Lb
Kg
mW V
s Hr A
SAVE
Meter
$
Standby
CO 2
mW V
s Hr A
Enter Sensor
Kwh
h
m
+
〈Change Screen〉
Meter
$
〈Change Screen〉
Standby
Meter
$
Press
CO 2
$
YES
NO
〈Change Screen〉
CO 2
h
m
Enter Sensor
$
SAVE
W
Lb
Kg
Elap
Time
mW V
s Hr A
SAVE
Kwh
Rate Total Year Month Day
Rate Total Year Month Day
SAVE
*
Meter
$
Standby
CO 2
mW V
s Hr A
SAVE
Meter
$
CO 2
Meter
$
Enter Sensor
+
Press
CO 2
mW V
s Hr A
$
mW V
s Hr A
-
YES
*
Kwh
h
m
YES
h
m
Press
$
Rate Total Year Month Day
$
SAVE
Elap
Time
Kwh
h
m
Press
CO 2
CO 2
〈Change Screen〉
Press
$
SAVE
Standby
YES
Elap
Time
〈Change Screen〉
Kwh
h
m
NO
W
Lb
Kg
CO 2
W
Lb
Kg
$
Meter
$
NO
Rate Total Year Month Day
SAVE
CO 2
mW V
s Hr A
-
CO 2
*
SAVE
〈Change Screen〉
$
Meter
$
Kwh
Rate Total Year Month Day
mW V
s Hr A
Enter Sensor
CO 2
Meter
$
Press
$
W
Lb
Kg
Standby
Standby
CO 2
Rate Total Year Month Day
+
Enter Sensor
W
Lb
Kg
$
mW V
s Hr A
SAVE
〈Change Screen〉
SAVE
YES
Standby
Rate Total Year Month Day
SAVE
Press
CO 2
Kwh
h
m
Press
$
h
m
+
YES
*
〈Change Screen〉
W
Lb
Kg
$
〈Change Screen〉
Elap
Time
h
m
CO 2
Rate Total Year Month Day
SAVE
Meter
$
NO
Elap
Time
Meter
$
CO 2
mW V
s Hr A
-
YES
Enter Sensor
SAVE
Press
$
SAVE
h
m
mW V
s Hr A
CO 2
〈Change Screen〉
Press
$
Elap
Time
Standby
CO 2
Meter
$
〈Change Screen〉
Kwh
h
m
-
Standby
SAVE
-
+
CO 2
Kwh
mW V
s Hr A
-
YES
h
m
-
Elap
Time
$
W
Lb
Kg
$
-
SAVE
SAVE
W
Lb
Kg
Kwh
h
m
+
Standby
CO 2
mW V
s Hr A
Enter Sensor
-
CO 2
Rate Total Year Month Day
Rate Total Year Month Day
SAVE
-
$
*
-
W
Lb
Kg
-
Power ON reset
Rate Total Year Month Day
SAVE
-
Key
$
-
-
CO 2 mode : pressing the left “CO 2” key.
The Cost mode display can include $, Total, Day, Month, Year and SAVE. Repeated
presses will change displays.
LCD display default will show Total cost ($) and W (Watts).
“*” indicates there will be no display in the Power Kill mode.
-
Meter
$
〈Change Screen〉
〈Change Screen〉
Press
CO 2
Press
CO 2
Page 6
NO
$ Rate setting :
Meter mode :
The Meter mode display includes W, V, A, Kwh, Elapsed Time and SAVE. Repeated
presses will change displays.
Press and Hold
3 Second
$
Key
Meter
Rate Total Year Month Day
SAVE
W
Lb
Kg
$
Rate Total Year Month Day
CO 2
Meter
$
〈Change Screen〉
Rate Total Year Month Day
W
Lb
Kg
$
+
Standby
CO 2
Enter Sensor
SAVE
NO
YES
h
m
+
CO 2
Rate Total Year Month Day
W
Lb
Kg
$
SAVE
Standby
CO 2
Enter Sensor
Kwh
SAVE
Elap
Time
NO
YES
+
CO 2
CO2
+
Standby
CO 2
Enter Sensor
-
YES
Kwh
mW V
s Hr A
h
m
Meter
$
〈Change Screen〉
Press
Meter
Enter Sensor
NO
NO
Meter
$
CO 2
W
Lb
Kg
CO2
SAVE
Elap
Time
Standby
CO 2
Standby
CO 2
Kwh
h
m
+
+
Yes
mW V
s Hr A
Enter Sensor
Meter
$
〈Change Screen〉
Press
Meter
mW V
s Hr A
Enter Sensor
$
〈Flash Screen〉
CO 2
SAVE
Press YES
Elap
Time
Yes
No
+
Meter
Standby
CO 2
Rate Total Year Month Day
$
CO2
SAVE
h
m
Standby
CO 2
Enter Sensor
$
Enter Sensor
$
〈Flash Screen〉
No
Meter
Rate Total Year Month Day
SAVE
W
Lb
Kg
+
mW V
s Hr A
Press
Enter
SAVE
YES
Kwh
h
m
Press
Enter
NO
Elap
Time
W
Lb
Kg
$
CO2
Kwh
mW V
s Hr A
SAVE
NO
YES
Elap
Time
Meter
Kwh
h
m
+
Standby
CO 2
〈Change Screen〉
Page 7
W
Lb
Kg
$
Kwh
h
m
Rate Total Year Month Day
SAVE
W
Lb
Kg
Elap
Time
$
Press NO
Rate Total Year Month Day
SAVE
SAVE
SAVE
YES
Press and Hold
3 Second
$ , CO 2
$
Rate Total Year Month Day
W
Lb
Kg
NO
Meter
$
mW V
s Hr A
〈Change Screen〉
Rate Total Year Month Day
Enter Sensor
〈Change Screen〉
Press
Meter
$
Elap
Time
Standby
Standby
mW V
s Hr A
Kwh
h
m
Press
Meter
SAVE
+
CO 2
W
Lb
Kg
$
〈Change Screen〉
SAVE
YES
Kwh
h
m
Reset (Clear) :
CO2
Meter
$
Elap
Time
Meter
$
SAVE
mW V
s Hr A
-
+
SAVE
Rate Total Year Month Day
CO2
W
Lb
Kg
CO 2
NO
Press
Meter
SAVE
YES
Rate Total Year Month Day
〈Change Screen〉
Press
Meter
h
m
Standby
Cost Rate
-0.001
NO
Meter
SAVE
Kwh
mW V
s Hr A
Enter Sensor
Press
Press
Enter
W
Lb
Kg
Elap
Time
$
〈Flash Screen〉
$
$
〈Change Screen〉
Elap
Time
CO 2
Enter Sensor
Standby
Meter
$
Press
Meter
CO2
Meter
$
NO
mW V
s Hr A
〈Change Screen〉
SAVE
Kwh
mW V
s Hr A
-
YES
+
Enter Sensor
+
YES
Rate Total Year Month Day
CO2
h
m
h
m
Standby
CO 2
Meter
$
Press
Meter
SAVE
Elap
Time
YES
〈Change Screen〉
Press
Meter
SAVE
NO
Kwh
mW V
s Hr A
Kwh
h
m
-
+
Enter Sensor
Elap
Time
Elap
Time
Cost Rate
+0.001
Enter Sensor
$
mW V
s Hr
A
-
CO 2
h
m
Standby
SAVE
-
Standby
YES
CO2
Kwh
mW V
s Hr A
SAVE
W
Lb
Kg
$
-
+
NO
Elap
Time
SAVE
Press +
-
h
m
Enter Sensor
-
YES
SAVE
-
Elap
Time
Kwh
mW V
s Hr A
CO2
-
SAVE
W
Lb
Kg
$
-
CO2
SAVE
-
W
Lb
Kg
$
-
SAVE
Rate Total Year Month Day
-
Rate Total Year Month Day
CO 2
-
Meter
〈Change Screen〉
Page 8
NO
in PIR motion detection mode. :
CO2 Rate and Lb/Kg setting :
Press and Hold
3 Second
CO 2
$
CO 2
SAVE
+
Standby
CO 2
SAVE
Press
CO 2
Enter Sensor
SAVE
NO
YES
Elap
Time
Meter
$
W
Lb
Kg
$
Kwh
mW V
s Hr A
-
YES
h
m
+
+
Standby
CO 2
Press
Enter
CO 2
SAVE
Kwh
h
m
CO 2
Enter Sensor
-
+
mW V
s Hr A
Press
Press
+
-
W
Lb
Kg
$
Standby
Meter
PIR Function Enabled
Standby Function Enable
NO
(Green LED Flashes every 3 seconds)
Rate Total Year Month Day
SAVE
CO2
NO
Kg-CO2 Rate
+0.001
Kwh
h
m
+
YES
Standby
CO2
mW V
s Hr A
Enter Sensor
Meter
$
Kg-CO2 Rate
-0.001
When Motion Detected
Power ON
Rate Total Year Month Day
〈Flash Screen〉
SAVE
W
Lb
Kg
$
Press
Enter
CO2
SAVE
Elap
Time
SAVE
W
Lb
Kg
$
CO 2
SAVE
Kwh
h
m
+
Standby
CO 2
Enter Sensor
$
+
Standby
CO2
mW V
s Hr A
-
YES
YES
Kwh
h
m
mW V
s Hr A
Enter Sensor
$
-
Rate Total Year Month Day
Elap
Time
NO
〈Change Screen〉
Meter
$
W
Lb
Kg
$
Elap
Time
SAVE
YES
$
mW V
s Hr A
SAVE
Rate Total Year Month Day
Elap
Time
Enter Sensor
〈Flash Screen〉
〈Flash Screen〉
Kwh
h
m
-
Elap
Time
Rate Total Year Month Day
Press
-
W
Lb
Kg
-
Rate Total Year Month Day
SAVE
The ON/OFF key will flash green every 3 seconds; the unit will turn off power to outlet,
and also activate the PIR motion detection function. When somebody moves into the
effective PIR area, the unit will turn power on to outletat once. The key will illuminate in
green.
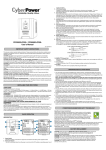
PIR sensor :
The motion detection effective area is a 3-D zone as per the following description,
when it is not blocked by machines or furniture. Please install the PIR and display unit
at the appropriate place which can cover thoroughly the appliances use area. Distances:
15 feet (max.), horizontal angle: 40 degree (max.), vertical angle: 70 degree (max.).
NO
Meter
〈Change Screen〉
NO
Meter
〈Change Screen〉
Page 9
Page 10
(PIR icon Flashes)
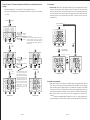
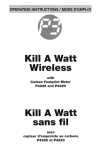
Standby kill mode : Standby power, Off power delayed time and PIR sensor
detecting distances setting :
Standby power : Off, 0.1W to 1980W.
Off power delayed time : 10 seconds to 2 hours, default is 10 minutes.
PIR sensor detecting distances : Off (disable PIR function), 1 foot to 15 feet, default
is 15 feet.
W
Lb
Kg
$
CO 2
SAVE
Elap
Time
YES
+ Standby
Enter Sensor
Elap
Time
YES
NO
h
m
+ Standby
CO2
Meter
Kwh
mW V
s Hr A
Enter Sensor
$
SAVE
Elap
Time
YES
NO
+ Standby
CO 2
To Standby Kill Mode
Setting
To Power Kill Mode
Setting
NO
Press Key
+
Select Range
10,20,30,40,50 sec;
01 ~ 59
min;
hour
01, 02
Press Key
Less time
delay
1. Off power delay time. Default is 10 minutes.
2. The shorter the off power delayed time , more energy will
More time be sa ved, but the AC powe r on /off cyc les will occur more
frequently. The app ropriate setting for off power delayed
delay
time will be to bal ance a pplian ce use and save energy . 1
hour for office, 30 minutes for home, is a suggested starting
point.
Meter
$
〈Flash Screen〉
Press
Enter
Meter
Press
Enter
Press
Enter
mW V
s Hr A
Enter Sensor
〈Flash Screen〉
〈Flash Screen〉
Kwh
h
m
Rate Total Year Month Day
Rate Total Year Month Day
SAVE
W
Lb
Kg
$
CO 2
SAVE
Elap
Time
YES
Kwh
h
m
+ Standby
CO 2
mW V
s Hr A
Enter Sensor
NO
Meter
$
〈Flash Screen〉
Press
Enter
Rate Total Year Month Day
SAVE
W
Lb
Kg
$
CO 2
SAVE
Elap
Time
YES
Kwh
h
m
+ Standby
CO 2
Enter Sensor
$
mW V
s Hr A
-
$
CO2
SAVE
W
Lb
Kg
CO 2
NO
SAVE
Press Key
+
Select Range
Sensitivity
OFF, 1-15 Ft
Press Key
CO 2
Less range
More range
SAVE
Elap
Time
+ Standby
CO 2
mW V
s Hr A
Enter Sensor
Meter
$
Press
Enter
Rate Total Year Month Day
SAVE
W
Lb
Kg
$
CO 2
SAVE
Elap
Time
YES
Kwh
h
m
+ Standby
Enter Sensor
$
mW V
s Hr A
NO
Meter
〈Change Screen〉
Page 12
NO
〈Flash Screen〉
CO 2
Meter
Kwh
h
m
YES
Default is 15 feet.
OFF = Disable PIR function: the unit
will cut power ac cording to S tandby
off power level and off power
delayed time conditions only. After
off power delayed time setting value ,
the unit will cut power when the
appliance is in standby condition ,
The LED flashes green every 3
seconds, and the unit will not
activate the PIR motion sensor
function and will not turn on power
again even when somebody moves
into the PIR effective area . It is NOT
recommended to disable the PIR
function.
〈Change Screen〉
Page 11
W
Lb
Kg
$
-
CO2
Enter Sensor
W
Lb
Kg
$
$
-
+ Standby
Select Standby Kill Mode or
Power Kill Mode
Rate Total Year Month Day
SAVE
Rate Total Year Month Day
SAVE
-
h
m
-
YES
Kwh
mW V
s Hr A
Meter
$
-
Elap
Time
Press Key
+
-
CO2
SAVE
The low er LCD displ ays the appliance’s instan t standb y power .
10.6W in this example.
NO
〈Flash Screen〉
-
W
Lb
Kg
mW V
s Hr A
+
+0.1 W
Range
OFF, 0.1 ~ 1980 Watt
-0.1 W
Press Key
Press
Enter
Press Key
$
Kwh
h
m
Hold Meter
Key 3 sec
Rate Total Year Month Day
Press Key
Rate Total Year Month Day
SAVE
CO 2
SAVE
1, Upper LCD d isplays the measured stand by -off pow er level
plus a sm all buffer . It is autom atically measured when the u ser
first insta lls the unit , normally it will be sli ghtly high er tha n the
instant standby power of the ap pliance . In th is example the
measured value is 10.6W so the setting is 12.5W.
2, It is adjustable. If the user adjusts this standby-off power level
down to lower than appliance’s instant standby power (< 10.6W
for exa mple), the uni t will be always on , and the LED wil l stay
green..
3, Off = disable standby power comparative function , the unit is
always on and ON/OFF LED always green.
Standby Kill Mode Setting
-
-
Kill mode select and setting. Choose the mode which best suits your present requirements.
Standby kill mode will cut off power when the appliance is in standby mode (turned “off”)
and no motion is detected for the programmed off power delay time. Use this mode for
appliances such as televisions which typically consume power even when switched
“off”. This use will save energy by ensuring zero power is consumed by the appliance
when it is not in use. The motion sensor will ensure the appliance will respond to the
user and remote controls when you need it. This mode will not cut power to an appliance
that is turned on – regardless of detected motion.
Power kill mode will cut off power to the appliance regardless if it is turned ON or OFF
after no motion is detected for the programmed off power delay time. Use this mode
for appliances that you want to operate only when motion is detected and the user is
present such as space heaters and humidifiers. This use will save energy by ensuring
the connected appliance will only operate when the user is present. Use the off power
delay time setting to adjust for periods where you want the appliance to continue to
operate despite the lack of motion. For example, sleeping periods.
-
-
Standby kill mode and power kill mode setting :
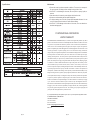
Power kill mode : Off power delayed time and PIR sensor detecting distances
setting :
Off power delayed time : 10 seconds to 12 hours, default is 4 hours.
PIR sensor detecting distances : Off (disable PIR function), 1 foot to 15 feet, default
is 15 feet.
Alarm mode :
Over Current : When the current load presented by the connected appliance exceeds
the max. Current (15A), the unit will switch to Over Current mode. The power will be
switched off to the outlet. The key will illuminate in red. LCD will display the OVER
icon and protected current value. Remove the appliance; press the key to erase the
main display, Over icon and protected current value. Then press the key to turn the
power back on.
Power Kill Mode Setting
Current Load 15.42 A
First Over Current
Rate Total Year Month Day
SAVE
Elap
Time
YES
Kwh
h
m
Standby
CO 2
mW V
s Hr A
Enter Sensor
NO
Rate Total Year Month Day
Press Key
+
Select Range
1O sec ~ 12 hour
SAVE
Press Key
Less time
delay
CO 2
SAVE
More time 2, The shorter the off power delayed time, more energy
will be sa ved, but the AC powe r on / off cyc les will
delay
occur more frequently. The app ropriate setting for off
power delayed time will be to balance appliance use
and save energy.
Meter
$
〈Flash Screen〉
W
Lb
Kg
$
1, Default is 4 hour.
-
W
Lb
Kg
$
CO 2
Elap
Time
YES
+
Press
Enter
Kwh
h
m
Standby
CO 2
mW V
s Hr A
Enter Sensor
-
SAVE
NO
Press
Meter
$
〈Change Screen〉
Over Current after
continuous 5 second
Rate Total Year Month Day
Elap
Time
Kwh
mW V
s Hr A
h
m
Standby
CO 2
Enter Sensor
NO
Meter
$
Press Key
+
Select Range
Sensitivity
OFF, 1-15 Ft
Press Key
CO 2
Less range
More range
SAVE
Elap
Time
Default is 15 feet.
Rate Total Year Month Day
SAVE
W
Lb
Kg
$
CO 2
SAVE
Kwh
h
m
Standby
CO 2
mW V
s Hr A
Enter Sensor
$
Standby
CO 2
Enter Sensor
NO
Meter
$
OFF = Disable PIR function: the unit
will cut power according to the off
power delayed time conditions only .
After off power delayed time setting
value, the unit will cut power . The
LED flashes green every 3 seconds,
and the unit will not activate the PIR
motion sensor function and will not
turn on power again even when
somebody moves into the PIR
effective area. It
is
NOT
recommended to disable the PIR
function.
NO
Press
Enter
Meter
W
Lb
Kg
$
CO 2
SAVE
Elap
Time
h
m
+
Standby
CO 2
Enter Sensor
$
Press
Rate Total Year Month Day
SAVE
W
Lb
Kg
$
CO 2
Kwh
SAVE
NO
YES
Elap
Time
mW V
s Hr A
Meter
Kwh
h
m
+
Standby
CO 2
〈Change Screen〉
W
Lb
Kg
$
CO 2
SAVE
Elap
Time
Kwh
h
m
Standby
CO 2
mW V
s Hr A
Enter Sensor
$
NO
Meter
〈Change Screen〉
Page 13
SAVE
Enter Sensor
$
mW V
s Hr A
NO
Meter
〈Change Screen〉
Rate Total Year Month Day
SAVE
YES
〈Change Screen〉
(Red LED Flash every 0.5 second)
Rate Total Year Month Day
YES
〈Flash Screen〉
Press
Enter
YES
Kwh
mW V
s Hr A
h
m
YES
〈Flash Screen〉
Elap
Time
W
Lb
Kg
$
-
SAVE
SAVE
-
CO 2
YES
Rate Total Year Month Day
W
Lb
Kg
$
-
SAVE
Retained measurements :
1. When power to the unit is interrupted, cumulative power consumption KWH, Elapsed
Time, Cost, and CO2 will be retained automatically into EEPROM. All user settings,
Rates, Standby power, Off power delay time, PIR distances are retained in EEPROM
after every user setting. This feature allows settings to be programmed one time only
without loss during power interruptions or when the unit is moved from outlet to outlet.
2. When the AC power is restored or when the unit is plugged into another outlet,
cumulative power consumption KWH, Elapsed Time, Cost, CO2, Rate, Standby power,
Off power delay time, and PIR distances will be retrieved automatically from memory.
Page 14
Specifications :
Maintenance
Protect the meter from adverse weather conditions. The meter is not waterproof.
Do not expose the LCD display to direct sunlight for long periods of time.
CAUTION : To avoid damage to the meter, do not expose it to sprays, liquids, or
solvents.
Clean the exterior of the meter by removing dust with a lint-free cloth.
Use care to avoid scratching the clear plastic display filter.
For further cleaning, use a soft cloth or paper towel dampened with water. You can
use a 75% isopropyl alcohol solution for more efficient cleaning.
CAUTION : To avoid damage to the surface of the meter, do not use abrasive or
chemical cleaning agents.
P3 INTERNATIONAL CORPORATION
LIMITED WARRANTY
P3 INTERNATIONAL CORPORATION ("P3") warrants to the original retail purchaser only, that its
product is free from defects in material or workmanship under the condition of normal use and service
for a period of six (6) months from the date of purchase. In the event that a defect, malfunction or
failure occurs or is discovered during the warranty period, P3 will repair or replace at its option the
product or component part(s) which shall appear in the reasonable judgment of P3 to be defective or not
to factory specifications. A product requiring service is to be returned to P3 along with the sales
receipt or other proof of purchase acceptable to P3 and a statement describing the defect or malfunction.
All transportation costs shall be borne by the owner and the risk of loss shall be upon the party
initiating the transportation. All items repaired or replaced thereunder shall be subjected to the
same limited warranty for a period of six (6) months from the day P3 ships the repaired or replaced
product. The warranty does not apply to any product that has been subject to misuse, tampering, neglect,
or accident or as a result of unauthorized alterations or repairs to the product. This warranty is void if
the serial number (if any) has been removed, altered, or defaced. This warranty is in lieu of all
warranties expressed or implied, including the implied warranties of merchantability and fitness for
a particular purpose which are expressly excluded or disclaimed. P3 shall not be responsible for
consequential, incidental or other damages, and P3 expressly excludes and disclaims liability for any
damages resulting from the use, operation, improper application, malfunction or defeat of any P3 product
covered by this limited warranty. P3's obligation is strictly and exclusively limited to the replacement
or repair of any defective product or component part(s). Some states do not allow the exclusion or
limitation of incidental or consequential damages, so the above limitation or exclusion may not apply
to you. P3 does not assume or authorize anyone to assume for it any other obligation whatsoever.
Some states do not allow limitation on how long an implied warranty lasts, so the above limitations may
not apply to you. It is the owner/user's responsibility to comply with local, state, or federal regulations,
if any, that may pertain to P3 products or their use. This warranty gives you specific legal rights, and
you may also have other rights which vary from state to state.
If you experience difficulty in the operation of your unit, or if your unit requires repair please contact :
P3 INTERNATIONAL CORPORATION
TECHNICAL SUPPORT
Tel: 212-741-7289
Fax: 212-741-2288
Email: [email protected]
REV. 0113
Page 15
Page 16