1
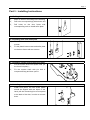
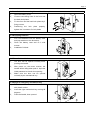
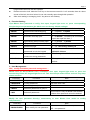
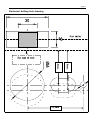
Page 1
User Manual
(Password+RF Card+ +Mechanical Key)
Page 2
Contents:
Part 1:Technical Parameters ------------------------------------------------------------------------------------2
Part 2:Product Structure Map -----------------------------------------------------------------------------------2
Part 3:Installing Instructions -------------------------------------------------------------------------------------3
Part 4:Operating Instructions -----------------------------------------------------------------------------------5
Part 1:Technical Parameters
Dimensions
160L*68W*36H(mm)
Material
Zinc Alloy
Weight
2KG
Operating Voltage
DC6V, 1.5V,
Static Current
≤20µA
4“AA”Alkaline Batteries
Dynamic Current
≤200mA
Ways to open
Password+RF Card+Mechanical Key
User Management Capacity
56 Passwords+56 Cards
Center Distance
60mm or 70mm
Door Thickness
30mm—60mm
Part 2:Product Structure Map
1:lock cover;2:front lock plate;3:latch;4:fixing screws of latch;5:strike plate;6:plastic
strike plate case;7: back lock plate;8:fixing screws of lock plate;9:battery;10:battery cover;
11:fixing screws of battery cover
Page 3
Part 3:Installing Instructions
3.1 Drilling Hole
1、 Mark on the door according to the drawing.
2、 Drill holes correspondingly with electro drill
3、 Drill holes on the door frame with
corresponding tools to install strike plate.
3.2 Installing latch and strike plate
1、 Fix the lock on the door broadside with two
screws.
2、 Fix the plastic bottom case and strike plate
on the door frame with two screws.
3.3 Installing square shaft of front lock plate
1、 Put the square shaft into square hole (on
the front lock plate) ;
2、 Fix the square shaft with pin bolt in
components bag and then open it.
3.4 Installing front lock plate
1、 Install front panel, the two screw pillars
should be aligned with the holes of the
latch, pull the connecting line of front panel
to the back of the door, in order to connect
them.
Page 4
3.5 Installation of connecting line and back lock plate
1、 Open the battery cover
2、 Connect connecting lines of the front and
the back lock plates.
3、 Fix the front and the back lock plates by 3
fixing screws.
4、 Positioning
the
lock
plate
properly,
tighten the 3 screws to fix lock plates
3.6 Equipping batteries
1、 Put 4 AA batteries into the battery case
and pay attention to the directions.
2、 Close the battery case and fix it with
screws.
3、 Installation finished.
3.7 Test after installation
1、 The door can be opened normally when
pushing the handle.
2、 After power on, the motor reverse, the
handle will be idling when push it. Input the
initial password to check door opening.
3、 Make sure the door can be opened
normally by the mechanical key.
3.8 Usage of emergency mechanical key
1、 Take down the lock cover on front handle
with plastic sucker.
2、 Insert the right mechanical key, turning 90
degrees.
3、 Push the handle, door opened.
Page 5
Part 4:Operating Instructions
1、Summary:
User Management belongs to three-level management model: Master User (first level), Group
Master User (second level), and User (third level).
z
Password capacity: one Master User password (user code 00), five Group Master passwords (user
code 01-05), fifty User passwords (user code 10-59, divided into five groups, ten for every group);
fifty-six passwords in total.
z
Card capacity: one Master User card (user code 00), five Group Master cards (user code 01-05),
fifty User cards (user code 10-59, divided into five groups, ten for every group); fifty-six cards in total
z
Passwords and cards belong to the same User Group and have the same user code.
2、User Specifications:
z
Master User: the user code is 00, and has the full administration permissions. The initial Master
User password is 00123456.
z
Group Master User: the user code is 0n (“n” means the group NO.), administrator of group n, can
add or delete Users in the group.
z
User: the user code is n0-n9 (“n” means the group NO.), user of group n, have no administration
authority.
3、Operation Hints:
z
When input the password to open the door, you need to input the user code as well, e.g. 00123456
(00 means user code,123456 is the password).
z
Enter normally open: the green light turns on when opening the door, hold # key for 3 seconds, the
sound of normally open rings and enter normally open.
z
Exit normally open: hold * key for 3 seconds in normally open situation, there is a long sound and
exits normally open.
z
Remote control to open: hold the “open” key on the remote control for 1 to 2 seconds, there is a
Page 6
long sound of the lock, the door opened.
z
Remote control to lock: hold the “lock” key on the remote control for 1 to 2 seconds, there is a short
sound of the lock, the door locked. It can exit normally open through this operation.
z
After enter setting or managing, hold * key twice to exit midway.
4、Function Setting:
Input Master User password to verify, door open, keypad light turns on, press corresponding
function key to set parameters (the black ones are factory default settings):
Press key
Functions
Note(the boldface are default setting)
*9#0#x#
password anti-eavesdropping
x:0-Disable,1-Enable
*9#1#x#
Key tones
x:0- Disable,1- Enable
*9#2#x#
automatic normally open
x:0- Disable,1-Enable (it is in normally
open after open the door )
*9#3#x#
light flashing when normally open
x:0- Disable,1- Enable
*9#4#x#
compositional verification
x:0-Disable,1-Enable
*9#5#n#
password length
*9#6#n#
times
*9#7#n#
of
continues
n:4-8. The factory default is 6
wrong
0: disable the function; The factory
passwords to lock the keypad,
default is 3 times.
minutes to lock the keypad after
The factory default is 1 minute
continuous wrong passwords
*9#99#999#
system empty and system reset
The system will be recovered to factory
default
5、User Management:
Add、modify and delete password management::
Master User (or Group Master User) verification, door open, keypad light turns on, press the
function key before the keypad light turns off. Two short beeps means failure and one long beep
means success
Press key
Functions
Note
*1#1#UUPP#
add passwords
UU is the user code,password is PP.
*1#2#UUPP#
modify passwords
UU is the user code
*1#3#UU#
delete single user password
UU is the user code
*1#4#n#
delete all passwords of group n
*1#5#
delete all passwords
This function is only for Master User and the
Master User password cannot be deleted.
Modify the user password directly ( unnecessary to enter Master User model to modify
self-password)
Press key
*5#UU#CP#NP#
Functions
User modify his own password
Note
UU:user code;CP:current password;
NP:new password
Page 7
Add、modify and delete RF card:
Master User (or Group Master User) verification, door open, keypad light turns on, press the
function key before the keypad light turns off. Two short beeps means failure and one long beep
means success
Press key
*2#1#UU#
Functions
Note
Press corresponding key, put the card close to
add card
inductive zone to add card
a new card replace the old card, and the old
*2#2#n#
modify replacement card
*2#3#UU#
delete a single card
*2#4#n#
delete all cards of group n
*2#5#
delete all cards
This function is only for Master User.
*2#6#
read card to cancel
Press # to cancel continuously
card is cancelled at the same time
UU is the user code
6、Access Control:
Master User verification, keypad light turns on, press the function key to set parameters before the
keypad light turns off. Two short beeps means failure and one long beep means success
Press key
*4#1#X#
*4#2#n#
*4#3#n#
Functions
Enable the function of
forbidden access control
Set the user groups which are
forbidden to open the door
set User types which are
forbidden to open the door
Note
x:0-Disable,1-Enable
n:1-5 group
n:(1-password,2-card)
7、Function of Empty Key
z
Hold the empty key for 3 seconds, there is one long beep, empty begins, and you will hear the
warming tone when finished.
z
z
Loose the empty key before the long beep, there is no operation, then exit.
After the long beep, Master User password was recovered to 00123456, all the passwords and
cards were emptied and recovered to default parameters.
Page 8
Enclosed: drilling hole drawing
70 mm
60 mm
90 mm