1
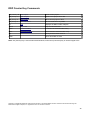
Sonoris DDP Creator 3.1.0 User’s Manual Copyright © Sonoris Audio Engineering 2014 & © 2014 Pieter Stenekes [email protected] Table of Contents Introduction ............................................................................................................................... 4 What Is It?.......................................................................................................................................................................................... 4 CD Authoring .................................................................................................................................................................................... 4 DDP Export........................................................................................................................................................................................ 4 DDP Import ....................................................................................................................................................................................... 4 DDP Creator “Pro” Version.......................................................................................................................................................... 4 DDP Creator Features ................................................................................................................. 5 DDP Creator Pro Features ........................................................................................................... 6 Basics and Terminology .............................................................................................................. 7 DDP (Disc Description Protocol) .............................................................................................................................................. 7 Compact Disc Audio Format ....................................................................................................................................................... 7 Tracks and Indexes ......................................................................................................................................................................... 7 PQ Codes ............................................................................................................................................................................................. 7 MCN (Media Catalog Number) ................................................................................................................................................... 7 ISRC (International Standard Recording Code) ................................................................................................................... 8 Enhanced CD .................................................................................................................................................................................... 8 Loudness Measurement and Normalization ........................................................................................................................ 8 Installing and Authorizing your Copy of DDP Creator ................................................................... 9 Installation ......................................................................................................................................................................................... 9 Authorizing DDP Creator in Trial Mode................................................................................................................................. 9 Authorizing DDP Creator in Licensed (Purchased) Mode .............................................................................................. 9 Main Screen ............................................................................................................................. 10 Project Workspace ...................................................................................................................................................................... 11 Edit Disc Data ................................................................................................................................................................................ 13 Editing Project Data .................................................................................................................................................................... 14 Deleting a Track or Index .......................................................................................................................................................... 15 Playback Tracks ............................................................................................................................................................................ 15 Playing a Transition between Two Tracks ......................................................................................................................... 15 Waveform Display........................................................................................................................................................................ 15 Adding a Track or Index Marker ............................................................................................................................................. 16 Moving Wave Objects ................................................................................................................................................................. 16 Trimming Wave Object.............................................................................................................................................................. 16 Fades and Crossfades (Pro Version Only) ........................................................................................................................... 16 File Menu................................................................................................................................. 17 New ................................................................................................................................................................................................... 17 Open .................................................................................................................................................................................................. 17 Open Recent File........................................................................................................................................................................... 17 Save ................................................................................................................................................................................................... 17 Save As ............................................................................................................................................................................................. 17 Save PQ Sheet as PDF ................................................................................................................................................................. 17 Quit .................................................................................................................................................................................................... 17 Edit Menu ................................................................................................................................ 18 Undo .................................................................................................................................................................................................. 18 Redo ................................................................................................................................................................................................... 18 2 Import Menu............................................................................................................................ 19 DDP Image ...................................................................................................................................................................................... 19 File(s) ................................................................................................................................................................................................ 19 User Tip: How to make a Gapless CD ........................................................................................................................................ 20 CUE Sheet........................................................................................................................................................................................ 20 Pmi Image ....................................................................................................................................................................................... 20 Cda Image........................................................................................................................................................................................ 20 Audio CD.......................................................................................................................................................................................... 20 Export Menu ............................................................................................................................ 21 DDP Image ...................................................................................................................................................................................... 21 File(s) ................................................................................................................................................................................................ 22 File Naming with Pattern (Pro Version Only):.................................................................................................................. 22 CUE Sheet........................................................................................................................................................................................ 23 Audio CD.......................................................................................................................................................................................... 24 Tools Menu .............................................................................................................................. 25 Check Project................................................................................................................................................................................. 25 Check MD5 ..................................................................................................................................................................................... 25 Load CD Text .................................................................................................................................................................................. 26 Save CD Text................................................................................................................................................................................... 26 Burn Folder to Data CD/DVD ................................................................................................................................................... 26 Upload Folder ................................................................................................................................................................................. 26 Check for Updates ........................................................................................................................................................................ 27 Audio Settings ............................................................................................................................................................................... 27 Settings............................................................................................................................................................................................. 27 Create ISO file (DDP Creator Pro Only) ............................................................................................................................... 27 Extract ISO file (DDP Creator Pro Only) .............................................................................................................................. 27 Measure Loudness (DDP Creator Pro Only)...................................................................................................................... 27 Loudness Normalization (DDP Creator Pro Only) .......................................................................................................... 27 Settings Menu .......................................................................................................................... 28 Help Menu ............................................................................................................................... 31 Help ................................................................................................................................................................................................... 31 About ................................................................................................................................................................................................ 31 DDP Creator Key Commands ..................................................................................................... 32 3 Introduction What Is It? Sonoris DDP Creator is a standalone Windows and OS X Compact Disc authoring application, compatible with virtually any DAW software on the market. DDP Creator allows you to assemble professional Red Book compatible audio CDs, and supports the import and export of DDP 2.00 images and Cue Sheet (.cue) files. It also enables you to burn and rip audio CD's, as well as send disc images to a replication plant using standard File Transfer Protocol (FTP). CD Authoring With DDP Creator, you can assemble a Red Book compatible CD by just dropping .wav, .aiff, .flac, or even .m3u files into the application’s workspace, and then quickly set the track order. After doing so, you can adjust the spaces between tracks, and audition the final playback sequence by playing back the transition from one track into another. You can also edit the PQ points, ISRC, MCN and CD-Text data. Finally, you can export to a DDP file set, Cue Sheet or CD file, as well as print a PQ information sheet if needed. DDP Export The main feature of the DDP Creator software is the export of a CD project to a DDP 2.00 file set. The industry standard DDP protocol is supported by all major CD replication plants, and ensures an error free transfer and manufacture of your CD master. With this workflow, there is no longer a need to burn a physical master disc, with its inherent error-prone nature and the risks that go with it. DDP Import Besides the export of DDP files, DDP Creator can also import additional file sets, including DDP images made by other software such as Sonic Studio HD, Sadie, Sequoia and Pyramix. This feature allows you to check on all details of an imported project, including PQ codes, ISRC, MCN and CD-Text data. You can edit the project, playback tracks and export to DDP, Cue Sheet or burn a Redbook compatible CD. With the workflows above, you need never worry any more about the integrity of your DDP masters again, no matter what DAW they have been generated from. DDP Creator “Pro” Version The Pro version of DDP Creator adds even more functionality. With this option you can measure and normalize the tracks using the ITU-R BS.1770-2 / EBU R128 loudness recommendation. It also adds Enhanced CD support to the DDP Creator allowing you to open and export Enhanced CD DDP files and CD’s. Adding a data session to an existing DDP file set is also possible. Other Pro features include: 24/32-bit support .csv CD text input .mp3 and aac encoding with file tagging Metadata editing (Allows you to open an existing DDP, edit metadata such as CD Text and save the DDP again without rewriting the image file. .wav export, with ISRC codes embedded, following the MPG / EBU standard 4 DDP Creator Features Supports import and export of .wav, aif, .flac and .m3u files Re-ordering of tracks Add/edit ISRC, MCN and CD Text per track and/or for the entire project Add/edit track indices, including on the fly during playback Playback of individual tracks or entire project Adjust and playback transitions between tracks, with pre-roll Export DDP 2.00 image files Import DDP 1.0x and 2.00 image files Cue Sheet (cue) support Undo / Redo Pyramix .pmi CD image support CD Architect .cda CD image support CD Text binary file import and export Audio CD burning Audio CD import (ripping) Data CD/DVD burning MD5 checksum files automatically created MD5 checking MD5 checker (Win/Mac) executable included in DDP image Red Book compliance checking PQ Sheet .pdf export with additional project fields Safe FTP uploading of DDP images, with verify of the uploaded data and resume of broken uploads Waveform display with zooming Edit functionality, moving and trimming of wave objects Reading ISRC codes embedded in .wav file following the MPG / EBU standard Automatic Updates Easy Online License Activation USB drive based license activation for offline computers 5 DDP Creator Pro Features Loudness measurement and normalization of tracks according to the ITU-R BS.1770-2 / EBU R128 Edit CD Text, ISRC or MCN of an existing DDP without rewriting the DDP image file Adjustable gain per track Adding fades and crossfades Dithering to 16-bit (if needed) with TPDF, HP-TPDF and three separate noise shaping flavors MP3 and AAC encoding, up to 320 kbps Automatic file tagging for .flac, .mp3 and .m4a files using CD text data Enhanced CD support Import of CD text with .csv files 24 and 32 bit file support 24/32-bit file export capability Export files with variable naming (%track name%) ISRC codes embedded in .wav file following the MPG / EBU standard 6 Basics and Terminology DDP (Disc Description Protocol) Disc Description Protocol is a format that details the specific content of an audio compact disc. DDP file sets are often used to deliver a disc premaster to a duplication plant, which then uses the DDP file set as the basis for manufacturing the physical audio compact disc. Compact Disc Audio Format A Compact Disc (CD) always contains audio in a 16-bit, 44.1 KHz stereo format. This audio data is stored in a whole number of frames, where every frame consists of 2352 data bytes of audio. At a sample rate of 44.1 KHz, this means that the frame rate of a compact disc is 75 frames / second. In general, frames are important because they define the boundaries that are used for the timing of the track. You can't have start or stop points between frames. Tracks and Indexes A CD can hold up to 99 separate tracks. Normally, each song gets its own track number; however, it is also possible for a CD to offer more tracks within each song. This capability can be useful if you want to give different sections in a song a separate track number, as is common on classical music recordings. Another, less common way to divide a single track into different sections is to use “indexes”. Some players support indexes, but in general this feature is not widely supported. Each CD track can hold up to 100 indexes, including Index 0. Index 0 is a special index; it defines the “pregap” or pause before the audio starts. Most players show index 0 by displaying a negative countdown to 0:00. It is not mandatory to use the index 0, and if you don't use it then you end up with a “gapless” CD (if burned in what is called Session at Once (SAO) or Disc at Once (DAO) mode). However, the very first index on a CD does have to be an index 0 entry, with a minimum length of 150 frames (2 seconds), as that is the requirement defined by the Red Book standard that all audio compact discs must confirm to. It is also mandatory to have an index 1 for each track on the disc. An index 0 entry normally defines a pause between two tracks, but it is also possible to fill the index entry with audio. While doing so is not strictly Red Book compatible, it is supported by many players. The DDP Creator software supports this feature as well. PQ Codes PQ codes are start and stop markers for the CD player to read, in order to know where each track begins and ends. They are added to the start and end of each track, when generating a DDP file. PQ codes refer to 2 of the 8 sub code channels that run alongside the audio data on a CD. The “P” and “Q” bits contain information such as track start, pause (end), index, and the basic Table of Contents data. They also include other information such as ISRC codes and the UPC code. MCN (Media Catalog Number) It is common to add a media catalog number (MCN) to a compact disc. This MCN number represents the standard UPC/EAN number, and should conform to the specifications of the UCC and EAN. EAN numbers are 13 digits long, and UPC numbers 12. UPC numbers should therefore have an extra 0 at the beginning. The last digit is a checksum of the preceding digits. 7 ISRC (International Standard Recording Code) ISRC numbers are issued per track and have the following format: CCXXXYYNNNNN o CC is the 2-character country code o XXX is the alphanumeric registrant code o YY are the last two digits of the year o NNNNN is a unique 5-digit number. Please note that there should be only one ISRC code on a track, and that it is only valid on the first index entry for each track. Enhanced CD Besides audio data, a CD can also hold computer data such as images, videos, song lyric text, or even computer application files. A CD with additional data is called an “Enhanced CD”. It is possible to add data in the space before the first track, or as a separate data session on the CD. DDP Creator supports this extra session, as this is the most common and compatible format. When an Enhanced CD is played back in a normal CD player it will play just like any other audio CD. However, when this CD is opened on a computer running the Windows or OS X operating systems, it will display the data session on the disc as an extra drive. Loudness Measurement and Normalization DDP Creator complies with the ITU-R BS.1770-2 / EBU R128 loudness recommendation. The loudness measurement and normalization uses a measurement algorithm as described by EBU r128. The DDP creator software also allows for adjusting the loudness of the audio to the so-called “-23 LUFS” level, as recommended by the EBU. More information can be found here: http://tech.ebu.ch/loudness. 8 Installing and Authorizing your Copy of DDP Creator Installation DDP Creator is available as a time-limited downloadable trial version, which can be evaluated free of charge. The trial version is available at: http://www.sonorissoftware.com/catalog/download_demo.php On the above web page, type in your email address, then click on the “Proceed to Download” link, where you can download a trial version of DDP Creator. Separate versions are available for Windows 32-bit, Windows 64-bit, and OS X. Once the installer file has downloaded, double click on it to open up the .zip file containing the installer file, then double-click the installer file itself. Follow the on-screen prompts that guide you through the rest of the installation process. Authorizing DDP Creator in Trial Mode In order to run DDP Creator in Trial of Licensed mode, you need to run the “License Activator” software, which can be downloaded at http://www.sonorissoftware.com For more information on using the License Activator software to use DDP Creator in Trial mode, see the documentation that is included with the License Activator software Authorizing DDP Creator in Licensed (Purchased) Mode When the demo period has expired, a license for the full version of DDP Creator (either the standard or pro version) can be purchased online at the Sonoris online store, located at: http://www.sonorissoftware.com/catalog/ddp-creator-p-47.html Select the version of DDP Creator you wish to purchase, then click on “Add to Cart”, then follow the onscreen instructions from the online store. A serial number will be emailed to you, using the email address you have provided. The purchased license can then be applied to the software to “unlock” the demo. This is done using the License Activator software. Until the DDP Creator software is activated, a dialog box will appear with a link to the following web page http://www.sonorissoftware.com/catalog/activation.php where you can read more information on the activation process. 9 Main Screen After starting the DDP Creator software, the main screen will be displayed. On the left, the large window is the “project workspace”. On the right is assorted text boxes and a buttons for disc data display, and navigation controls At the bottom, a waveform of the tracks’ audio is displayed. 10 Project Workspace The project workspace is the area where you add tracks and assemble the CD layout. The workspace consists of a table with the following columns: Track: This displays the CD track number of the entry, ranging from 1 to 99. After all of the files are added, you can change the track order by dragging a track to a new position. Note that before you can do this, you have to unlock the table by deselecting the “table locked” checkbox at the right side of the screen. Index: This displays the sub index of the track entry, ranging from 0 to 99 within a track. Changing the index is possible by pressing the “+” or “-” keys on the computer’s numerical keyboard. Please also note that before you can change an index, you have to “unlock” the table, by deselecting the “table locked” checkbox at the bottom of the screen. Offset: The offset value is the number of frames between the track’s index point, and the actual playback start of the track. Some CD players, especially older models, have a delay when jumping from one track to another, and this can cause problems when there is not enough space between the index point and the actual audio. In severe cases the start of the audio can be chopped off. To avoid this problem, DDP Creator allows the possibility to add an offset value, before a track’s index point. The recommended offset is a minimum of 5 frames, and the default value is 10 frames. You can change the default offset in the Tools / Settings menu. Start: The start value represents absolute position of the index entry, relative to the 0:00 start time of the entire project. File Name: This displays the name of the audio file that contains the audio of the index entry. This can be a .wav, aiff, .flac, .bin or DDP image file. If the file name for an index entry is empty, then there will be no audio in this entry, and it will be treated as a pause. The reverse is also true: all index entries, including 0, can contain audio if the file contains data for it. Duration: Duration represents the length of the index entry in frames. Note that the length of the offset is not included! You can change the length of a pause entry (index 0) by clicking on this field in the workspace, after unlocking the index table. The length can be entered in frames (such as 150 frames for a 2 second pause) or in Minutes: Seconds: Frames format (for example 00:02:00). ISRC: This displays the ISRC code of the track. The ISRC codes can be changed by clicking on the corresponding field. Adding an ISRC code is only allowed on the first index of a track. For the proper format please look here. If you enter ISRC data on track 1, the DDP creator will ask you if you want to apply incrementing ISRC codes for the other tracks. 11 Title, Composer, Performer, Songwriter, Arranger and Message: These fields represent the alphanumeric information used in CD Text discs, and can be edited by clicking on these fields. These fields can only be altered on an index 1 entry. The maximum number of characters is 160. All ISO 8859-1 characters are allowed. If you enter performer data on track 1, the program asks if you want to apply the same performer text for the other tracks. Clicking the title field will insert the filename of the track if it is empty. Gain (Pro Version Only): This field represents the gain, measured in dB, applied to this index. After unlocking the index table, you can adjust the gain by dragging the slider. Loudness (Pro Version Only): This field represents the loudness of this index, measured in “Loudness Units Relative to Full Scale” (LUFS). This field is only visible after either of the functions “Measure Loudness” or “Normalize Loudness” is executed in in the Tools menu. You can adjust the display of the above columns in the following ways: Drag the column headers left or right to re-order the columns that are displayed Drag the column separators left or right to adjust the column width Hide/show various columns by right clicking on a header, and then select /deselect the desired column. Fade In: This field represents the fade in time of this index, measured in milliseconds. Fade Out: This field represents the fade out time of this index, measured in milliseconds. 12 Edit Disc Data The CD Text information for the disc can be viewed, and modified, by clicking on the “Edit CD Text” button. A dialog window appears where you can enter in the following specific fields of CD-Text data: Title Performer Songwriter Composer Arranger Message Identification MCN Genre Language 13 Editing Project Data The project information can be viewed and changed by clicking on the “Edit Project” button. This information will appear on the DDP file’s PQ sheet when generated, and the information can be saved as a program default. Project settings that can be configured include: Engineer Studio Phone Email Client Project Source (Digital or Analog) Notes 14 Deleting a Track or Index Any of the tracks and indexes can be deleted by right-clicking (Windows) or Command-clicking (OS X) the index of a track. Note that to do so, the “table locked” box must be unchecked. A menu will appear and you can select to delete the index or track. Playback Tracks To play a track, select an index in the workspace, then press the “Play” button (or alternatively press the Space key on your computer keyboard). Pressing the button or Space key again pauses the playback. Playback will stop when the user presses the pause button again, while the transport is already in a paused state, or when playback reaches the end of the project. You can navigate between tracks, during playback, by clicking on the left /right arrow buttons. Clicking the left arrow button during the first few seconds of a track will skip back to the previous track, otherwise to the start of the current track. Clicking and holding the arrows will fast forward / rewind within the track. The playback slider displays the relative track position, and you can click anywhere within the slider, to quickly navigate to any position within the track. Playing a Transition between Two Tracks You can audition the transition between two tracks by pressing the “Play Transition” button. Pressing the “Play Transition” button again, or the pressing the Space key, pauses the playback. You will hear the end of the last index of the current track, played into the first index of the next track. If a pregap exists between the two tracks, it will be played in-between. The pre-roll time before the next track can be set in the Settings menu. Waveform Display The waveform display shows the amplitude of the audio for each track in the project. You can zoom horizontally in and out on the waveform display by either: o Using the mouse wheel o Sliding two fingers up on the track pad (OS X). You can zoom vertically in and out on the waveform display by either: o Using the mouse wheel o Sliding two fingers up on the track pad (OS X) while holding the control key (Windows) or command key (OS X) You can scroll horizontally on the waveform display by either: o Using the mouse wheel while holding the shift key o Sliding with two fingers on the track pad horizontally (OS X). Left clicking on the waveform display will move the cursor to that position. Right clicking, while the table is locked, will start or stop playback. 15 Adding a Track or Index Marker Right clicking (or control clicking) on the red cursor in the waveform display, while the table is unlocked, will display a contextual menu, offering four separate commands: Add Index Marker Here: This command adds an index marker at the current location of the red play-head cursor. Add Index Marker At Position: This command opens up a dialog box where you can enter in the precise position where the new index marker should go. The position can be typed in Minutes: Seconds: Frames or just frames. Add Track Marker Here: This command adds a new track marker at the current location of the red play-head cursor. Add Track Marker At Position: This command opens up a dialog box where you can enter in the precise position where the new track marker should go. The position can be typed in Minutes: Seconds: Frames or just frames. The above features are useful for taking a single audio file that represents one long continuous recording (such as a live performance) and adding separate tracks at appropriate points in time. Moving Wave Objects You can move wave object by dragging them. Dragging a wave object to the right, away from another object will add a pause index in between them if needed. Trimming Wave Object Trimming is possible by dragging a wave object’s border. When doing so, the cursor will change, when doing so, to reflect its current function. Fades and Crossfades (Pro Version Only) Fade in and fade out times can be adjusted with the fade handles, or by changing the fade values in the table. Dragging a wave object with a fade in over another wave object will add a crossfade. It is also possible to resize the waveform by dragging the small line at the top right corner either up and down. It is also possible to drag the track marker within a crossfade. As you drag the marker within the crossfade, the next track will now start at the point of time, within the crossfade, that you have adjusted the marker to. This is a very useful feature when you wish to fine tune the start of the track in the crossfade. 16 File Menu DDP Creator’s file menu offers various tools for working opening, saving, and exporting various file formats. It contains the following tools: New Selecting “new” discards the currently loaded project, and then creates a new one. If the current project is altered since the last save, you will be prompted to save the project first. Open Selecting “open” opens a previous saved project, using a standard Windows / OS X file dialog box. During the loading process, DDP Creator checks the existence of each individual audio file contained within the project. If it cannot find a file that is referenced by the project, you will be prompted to point to it in the dialog box. After you have done so, DDP Creator will look for the other referenced files in the same folder that has been pointed to. Open Recent File Selecting “Open Recent File” displays a group of the most recently opened files; you can then select the desired project to open. This method provides a quick and easy way to work with recent files, without having to manually navigate to the specific folder they have been saved to. Save Selecting “save” saves the currently loaded project. If the project is being saved for the first time, a dialog box will appear, allowing you to give a name for the saved project, and specify the destination of the saved file. The file format for the project is a “.dpf” file, short for DDP Creator Project File. Save As Selecting “Save As” saves the currently loaded project as a different file; a dialog box will always appear, since the project needs a new file name to distinguish it from the current version. Using the “Save As” command can be useful for saving different, simultaneous versions of a project such as: Creating different song order sequences for an album; you can then load each different project file and audition the different song transitions in each saved version, to decide which song order sounds best to you Creating different versions of a CD, for example, creating a normal version of a CD, and then creating a different version of the project file, that contains extra “bonus” tracks exclusive to the deluxe version of the CD. Save PQ Sheet as PDF Selecting “Save PQ Sheet as PDF” saves the project’s PQ sheet to a standard .pdf format file. It is recommended to send this sheet along with the DDP files to the duplication plant, as a point of reference. Before the command is started, the project is tested against the Red Book rules. Quit Selecting “Quit” will exit the DDP Creator application. If the currently loaded project contains any unsaved changes, you will be prompted to first save them before exiting. 17 Edit Menu DDP Creator’s Edit menu offers tools for undoing/redoing assorted operations. Undo Selecting “Undo” will undo the last action that has been performed in the program. Redo Selecting “Redo” will redo the most previously undone action. 18 Import Menu DDP Creator’s Import menu offers various tools for loading / importing different file formats. It contains the following tools: DDP Image Selecting “DDP Image” brings up a standard file dialog box, where you can import any DDP (Disc Description Protocol) file that conforms to the DDP 1.0x or 2.00 specifications. If the imported DDP file contains CD Text data, it will be referenced in the imported project. After the DDP file has been imported, the project window displays the current DDP image as a regular DDP Creator project. You are then prompted to point to a folder to save the DDP image. The DDP Image import function enables you to import DDP images made by other applications that have the ability to save a DDP file, and then view/edit the imported DDP file’s PQ points, CD text, ISRC, MCN and other data. You can also playback the audio from the imported DDP file, and burn a Red Book compatible CD, with or without CD Text. The project can be further modified, and other audio files can be added if desired. It is also possible to change the track order. Finally, the edited DDP project can be exported again to a new DDP file, CUE Sheet or physically burned CD. After importing a DDP file, a md5 check will automatically be performed if a supported md5 file is found. This feature can be disabled in the Settings menu or in the popup menu. File(s) Selecting “Files” allows you to add audio files into the currently loaded project (This function can also be performed by dragging the individual audio files into the main window of the currently loaded project). A DDP Creator project can import audio files in the following specific formats: .wav .aiff .flac .m3u Before the files are added to the current project, they are screened for compatibility. If a file does not meet the standard Compact Disc Red Book standard criteria (16-bit / 44.1KHz, stereo), an error message will appear. DDP Creator Pro, in contrast, will also allow the importing of 24 and 32 bit files. Depending on the default pause setting in the Tools | Settings dialog, a pause or pre-gap will be added before each track. Setting this default value to zero disables this function. Note that the DDP Creator does not change the imported audio in any way, like resampling or changing the bit-depth. However, the DDP Creator Pro version does have an option to change the gain of the imported file. If the DDP Creator Pro option is installed, adding a computer data .iso file is also possible. Doing so will add the .iso file as a data session to the current project. It will appear as the last track and have a green background color. The .iso file can be any regular ISO 9660 or hybrid HFS file. It is possible to create an .iso file with the Create ISO file function, available in DDP Creator Pro only. 19 User Tip: How to make a Gapless CD On some occasions, you may wish to make an audio CD that does not have any gaps between the different tracks when playing back. To do so, follow these easy steps: Add consecutive audio files using the import file command described above Delete the pauses in between each of the added files Set the Index Offset to zero. CUE Sheet Selecting “Cue Sheet” allows import of the widely supported CUE Sheet (.cue) file standard. Only cue sheet files using wav, aiff or flac files, and configured as a binary image file, are supported. All indexes and CD Text entries are preserved. This function ensures compatibility with other software that can export CUE Sheet files. Pmi Image Selecting “Pmi Image” allows import of a .pmi CD image, which would be generated by the “Pyramix” DAW. All indexes and CD Text entries in the .Pmi file are preserved. Cda Image Selecting “Cda Image” allows import of a.cda CD image, which would be generated by the “CD Architect” software. All indexes and CD Text entries in the .cda file are preserved. In the CD Architect software, click File /Save As, then choose “CD Architect image file *.wav” as the format. This is a wav file with all of the cd information embedded within it. Due to a bug in CD Architect, the performer field will not be exported. Audio CD Selecting “Audio CD” allows import of an audio or Enhanced CD residing in the computer’s optical media drive, by “ripping” its content to the computer hard disc. All indexes and CD Text entries are preserved. You will be asked where to store the audio files. DDP Creator depends on the error-checking capabilities of the computer’s optical drive to ensure that the audio data is read reliably with no errors. 20 Export Menu DDP Creator’s Export menu offers various tools for exporting the current project to different file formats. It contains the following tools: DDP Image Selecting “DDP Image” exports the currently loaded project to a DDP 2.00 format file set, including CD Text if that option is selected. Upon exporting, you are presented with a dialog box, and are prompted to enter a folder destination, and a name for the exported DDP file set image. The files will be stored in a folder with the name you entered in the folder you selected. (Pro Version Only): The export process offers dither/noise shaping settings, allowing the selection of specific dither options. When selected, dither will only be added when: The audio material has a bit-depth greater than 16 bit Any time that gain is applied Any time that fades are applied, and only to the actual faded audio An MD5 checksum file is also created, along with a Windows or OS X application, in order to allow for quick checking of the checksum values. The exported DDP file set can then be sent to your disc replication company of choice. By sending the data files, instead of a physical CD Master, you enjoy the following advantages: A computer data DDP file set is inherently more “foolproof” than a physical CD master. Whereas the data contained on a CD master can be damaged or corrupted, the DDP project file set is computer data; this means it can simply be transferred, over the internet, to the replication facilities’ computer, with the confidence that the file is 100% unchanged. The included checksum utility insures this, because it allows the replication facility to verify that the data file they receive is a 100% data match, down to the last byte, as the file you have sent them. There is no need to spend time and money mailing a physical object (a CD master) to the replication plant. The DDP file set can be sent to the replication facility using any commonly available large file transfer service, such as Dropbox, Google Drive, etc. DDP Creator Pro contains an additional useful feature; it will detect if any changes are made that would affect the DDP image file(s). If not, it will then ask if you only want to save the project metadata. This feature allows you to edit metadata such as CD Text, ISRC or MCN of an existing DDP file set, without rewriting the entire image file. This feature is very useful if the DDP’s actual audio content was already approved by the client. 21 File(s) Selecting “Files” exports the tracks in the current project to audio file(s). If the current project is an Enhanced CD project, the data section of the project will also be saved as a data (.iso) file (DDP Creator Pro only). A dialog box will appear, offering the option of exporting the project’s audio files as.wav, .aif or .flac files. (Pro Version Only): In the Pro version, additional functions are available for the File(s) function, including: You can also export the project’s files to .mp3 or .m4a (AAC). In this case, the exported .mp3/.aac files will be automatically tagged, using the data taken from the project’s CD text You can also output 24 and 32 bit files using the dither / noise shaping options. Wav files will have the ISRC code embedded, following the MPG / EBU standard The global “Image generation” setting also applies here to the export file(s) function. File Naming with Pattern (Pro Version Only): In the settings of DDP Creator Pro, you also have the option to enter a text pattern to use for the exported file names. When using this function, you may add a string of text (such as the performer of the project) and it will be automatically inserted into the file name of all exported files. Specific fields that can be used include: Track Title Performer Composer Songwriter Arranger ISRC CD Title Performer MCN For example, if the pattern is “%title%-%performer%” then the filenames will become “My song1-Dan, My song2-Dan” etc. 22 CUE Sheet Selecting “Cue Sheet” exports the current project to a CUE Sheet (.cue) file. All indexes and CD Text entries contained in the project are preserved. You will be prompted to enter a filename for the exported .cue file, as well as the accompanying .wav file. This function ensures compatibility with other software that can import CUE Sheet files. You can select between wav, aiff, flac, and bin file formats for the exported cue. (Pro Version Only): Dithering and noise shaping can be separately turned on/off during the export process CD Text can be exported during the process. The global “Image generation” setting also applies here to the export cue function. 23 Audio CD Selecting “Audio CD” will burn a Red Book compatible CD from the current project, using the optical media drive on your computer. All indexes and CD Text entries of the current project are preserved. The Device field allows you to select which optical drive to use for the burn process, as well as eject the inserted media. The status field displays the current status of the burn process The progress bar shows a visual indication of the completion of the burn process, measured in percentage completed Write speed can be manually selected Check the “use burnproof” option if you wish to insure that the drive’s buffers are used to protect against burn errors Check the “Leave Audio Session Open” option if you wish to add more audio racks to the CD at a later time Check the “Fast Erase” option if you wish to re-use a re-writable disc (Pro Version Only): Dither and Noise Shaping options are available Note that if DDP Creator is run on a machine without an optical drive installed, the burn menu will be “grayed out”. 24 Tools Menu DDP Creator’s Tools menu offers miscellaneous tools that deal with assorted functions of the program. It contains the following functions: Check Project When “Check Project” is selected, the currently loaded project is tested against a number of Compact Disc Red Book format rules. The following specific rules are checked: The project’s MCN code must have the proper format The first pre-gap in the project must have a duration greater than two seconds The maximum length of the project must not exceed 80 minutes in length The track numbers lie between 1 and 99 Every track must have an index point 1 The index numbers for a track lie between 0 and 99 Every audio track must have a duration that is greater than 4 seconds CD Text data on an index point other than 1 is not allowed Index points with a length of 0 seconds are not allowed ISRC codes must have the proper format The ISRC code is only valid on the first index entry for each track CD Text may only contain ISO 8859-1 character(s) Ensure the index pointing to a file is doesn’t exceed the file length. When an index points to a file, the index duration must be shorter than the file length to prevent running out of data. Even if you do not manually select the “Check Project” function, this test is automatically started before any export functions are done, or a PQ Sheet is printed. If any of the above criteria is not met, an error is shown. Non-critical errors have the option of being ignored. Check MD5 Selecting “Check MD5” opens up a dialog box, where you are prompted to open a checksum file (with extension .md5). This function tests the integrity of a DDP file set, by comparing its actual checksum against the checksum found in the checksum file. This way, you can check if anything has gone wrong during transferring a DDP file. 25 Load CD Text Selecting “Load CD Text” loads a binary CD Text file, and maps the data to the CD Text fields of the currently loaded project. In DDP Creator Pro, you can also load a standard .csv file that contains CD Text data. In this .csv file, the first line, if available, sets the order of CD text types for the rest of the file. If this line is not available then a default order will be used. The rest of the file has the text separated with a comma (,) character. Note: If you have commas in the text, make sure to use quotes around the text, such as “The world, according to you” Only available fields will be overwritten, as shown here: Save CD Text Selecting “Save CD Text” saves a binary CD Text file, created from the CD Text data in the currently loaded project. Burn Folder to Data CD/DVD Selecting “Burn Folder to Data CD/DVD” allows you to burn a data CD or DVD (as opposed to burning an audio CD). This function can be useful when sending images to replicators that do not accept digital transfer of computer files; in this case, you can send them a data CD/DVD of the project folder, which they can then load onto their computers. This workflow is still more secure than using a physical CD master, since the data on the burned CD/DVD will not copy to/from the CD/DVD, unless each and every byte of data is preserved and able to be copied accurately. Upload Folder Selecting “Upload Folder” allows you to upload the contents of a folder, such as a DDP image, directly to your duplication plant. The DDP image should be present in the folder, before you invoke the transfer. You will be asked to select a folder that contains the DDP image. Please note that ALL files in this directory will be uploaded, including sub-folders. If any interruptions occur in the upload process, the upload will resume automatically when allowed to do so. You will be asked if you want the uploaded data to be verified after uploading. If you select “yes”, then the data will be downloaded, once the upload is completed, and compared with the original data. This will ensure a perfect, accurate upload. The specific FTP server settings can be set in the Settings dialog in the Tools menu. 26 Check for Updates Selecting the “check for updates” function will check if there are any newer updates of DDP Creator. If you are currently running the latest version and no updates are available, a message will be displayed that no new updates are available. If a new update is available, a dialog box is shown with the details about the new release. It will ask if you want to download and install the update. Choosing “Yes” will automatically do so. Audio Settings Audio Settings: In this dialog box, you can select the audio playback device on your computer that is used to listen to playback of the project, as well as its settings. Settings Selecting the “settings” function brings up the settings screen, where assorted global settings for DDP Creator can be adjusted. For more details, see the “Settings” section of this manual. Create ISO file (DDP Creator Pro Only) Selecting “Creates ISO file” creates a standard ISO 9660 .iso file from a folder. The resulting .iso file can be added to the project as a data session, using the Add Track function. You will be asked if you want to add the file to the current project, if possible. Extract ISO file (DDP Creator Pro Only) Selecting “Extract ISO file” extracts the contents of an .iso file to a folder. Measure Loudness (DDP Creator Pro Only) Selecting “Measure Loudness” measures the loudness of each index, using the ITU-R BS.1770-2 / EBU R128 algorithm. After the measurement is completed, the loudness for each index, (using LUFS units), can be found in the “Loudness” column on the main workspace table. Loudness Normalization (DDP Creator Pro Only) Selecting “Loudness Normalization” measures the loudness of each index, using the ITU-R BS.1770-2 / EBU R128 algorithm. After the measurement is completed, the loudness (measured in LUFS) for each index can be found in the Loudness column on the main workspace table. After the measurement is completed the lowest found value is presented. In the following dialog window, a target value can be selected, with the aforementioned lowest found value as the high limit. In practice, this means that all tracks can be normalized, using the loudness of the quietest track, and will be attenuated with the gain setting. The resulting loudness is the found loudness + the gain. The EBU R128 recommends a target loudness of -23 LUFS. 27 Settings Menu The settings dialog box allows you to set various program settings that are used to customize the behavior of DDP Creator. These settings are not saved with a specific project, but are instead saved as global program settings, that are preserved upon re-launch of the program, and are applied to every new project that is created. Pre-Roll Time: This setting is used during the playback of a transition between two tracks, and defines how much time at the end of the first track will be played before the transition, and how much time of the second track will be played into. You can enter a pre-roll time between 5 and 35 seconds. Index Offset: This defines the number of frames that are added between the first index and the actual audio of a newly added track. For more information please see the explanation of the offset in the workspace. You can enter an offset value between 0 and 20 frames. Default Pause: This defines the length of a pre-gap, measured in frames, that is automatically added when a track is added. If the default pause setting is 0, then no pre-gap is added. For more information please see the explanation of Adding tracks to the workspace. You can enter a default pause value between 0 and 300 frames. 28 Image Generation: This selects whether the saved DDP image will be in the form of a single file, or instead in the form of split files, one for each track in the project. Time Display: This selects whether the main time display shows the track time or the disc time. Generate MD5 File: This selects whether an MD5 checksum file is generated along with the saved DDP image. MD5 Checker App: This selects whether the standalone executable application will be included with the DDP image, when one is saved. ISRC Auto Increment Value: This setting determines the time amount that will be used as the increment value, when the “Auto Incrementing ISRC values” is selected. Playback Dither (Pro Version Only): This selects the type of dither that will be used, when exporting tracks with a gain other than zero, or tracks that have been imported containing a bit-depth other than 16-bit. The dither type can be set to any of the three following types: "Off": Noise Shaping can still be applied TPDF (Triangular Probability Density Function): When used without noise shaping, the result is flat TPDF. HP TPDF. : The noise is shifted a bit to the higher frequencies, above about 2 kHz. Playback Noise shaping (Pro Version Only): This setting determines the type of noise shaping that occurs when a track is dithered from a higher bit-rate down to 16-bit. Choices include: Off Curve 1: 5th order noise shaping filter following an improved E-weighted response Curve 2: 9th order noise shaping filter following an improved E-weighted response Curve 3: 9th order noise shaping filter following an F-weighted response Playback Bit-Depth (Pro Version Only): This setting determines what bit-depth is used during playback of the currently loaded project. Choices include: Off 16-bit 20-bit Host: This setting is used to configure the hostname of the remote FTP server used Port Number: Configures the port number of the remote FTP server. The default setting is port 21 Username: Configures the username of your account at the remote FTP server Password: Configures the password of your account at the remote FTP server 29 Initial Directory: Determines the upload directory at the remote FTP server Encoder Bit Rate (Pro Version Only): Selects the bitrate when exporting tracks to MP3 or AAC. Choices include: 128 Kbit/s 192 Kbit/s 256 Kbit/s 320 kbps Encoder Bit Rate Mode (Pro Version Only): Selects the encoder mode used when exporting to MP3 or AAC. Choices include: Variable Bit Rate (VBR) Constant Bit Rate (CBR). CBR only works with MP3, and is not available when encoding to AAC. Encoder Stereo Mode (Pro Version Only): Selects the stereo mode that is used when exporting to MP3 or AAC. Choices include: LR Left Right MS (Mono-Sum) JS (Joint stereo) Filename Pattern (Pro Version Only): This setting controls the filename when exporting audio files with a filename pattern. The options are: track, title, performer, composer, songwriter, arranger, isrc, cd title, cd performer and mcn. For example, a track configured as “%track%-%title%” would yield the title 01-Hello Darling.wav."); Export Single Files: This button gives you the option between exporting the project as single, individual files, vs. one single file for the entire project. Show Tool Tips This setting turns the “tool tips” function on or off. When tool tips are turned on, hovering over a control in the interface will result in a small pop-up display, which explains the control’s function. Check for Updates: This setting connects to the Sonoris servers and checks if there is an update available to the software. If one is available, it offers to automatically download the new update. 30 Help Menu Help Selecting the “Help” menu will display this user manual as a standard .pdf file. About Selecting the “About” menu displays an about box with assorted information about copyright, the current version of DDP Creator, and user license information. 31 DDP Creator Key Commands Ctrl (Cmdr.) +N New Project Clear current project Ctrl (Cmd) +O Open Project Open a new project from disk Ctrl (Cmd) +S Save project Save current project to disk Ctrl (Cmd) +P Save PQ Sheet Save a PQ sheet to a .pdf file F1 Help Displays the DDP Creator help file Space Play Track Play the selected track Num + Increment Index Increment the selected index entry Num - Decrement Index Decrement the selected index entry Up Go to previous index or track Down Go to next index or track Note: Ctrl (Control) key is used for Microsoft Windows, while Cmd (Command) key is used for Apple OS X. Windows is a registered trademark of Microsoft Corporation in the United States and other countries. Mac and the Mac logo are trademarks of Apple Computer, Inc. registered in the U.S. and other countries. 32