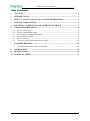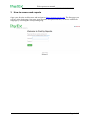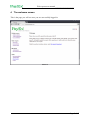
1
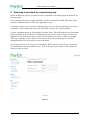
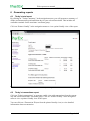
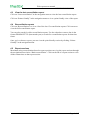
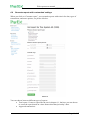
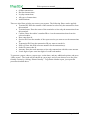
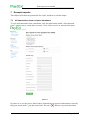
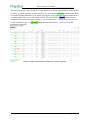
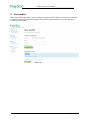
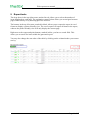
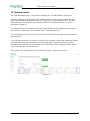
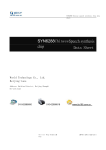
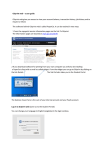
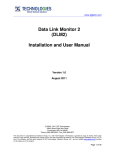
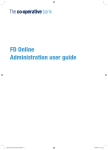
Web reports user manual_____________________ WEB REPORTS USER MANUAL www.payex.com Document information: AUTHOR: Dani Alexander Berentzen 1 Changes Change log: Date: 2008-11-25 Description: Initial version 2008-11-26 Revised the introduction and chapter 7.7. Added chapter 8. 2012-01-27 2012-05-07 2013-02-07 Revised chapter 2, 3, 4, 5, 6.1, 6.7, 7.1. Removed 7.2 Revised chapter 5 Updated screenshots and minor fixes. 2013-02-14 2013-10-11 2013-10-11 2013-10-11 2013-10-11 2013-10-11 2013-10-14 Updated screenshots Updated screenshots Revised chapter 5 Revised chapter 6.6 Added chapter 8 Added chapter 9 Added chapter 10 By: Dani Alexander Berentzen Dani Alexander Berentzen Ida-Maria Ringh Ida-Maria Ringh Dani Alexander Berentzen Ida-Maria Ringh Sigval bergesen Sigval bergesen Sigval bergesen Sigval bergesen Sigval bergesen Sigval bergesen Page 1 of 17 Web reports user manual_____________________ Table of contents 1 CHANGES ........................................................................................................................ 1 2 INTRODUCTION ............................................................................................................ 3 3 HOW TO ACCESS AND LOG ON TO THE WEB REPORTS ................................. 4 4 THE WELCOME SCREEN ........................................................................................... 5 5 SELECTING A MERCHANT OR A MERCHANT GROUP ..................................... 7 6 GENERATING REPORTS ............................................................................................. 8 6.1 6.2 6.3 6.4 6.5 6.6 7 Today’s total report ..................................................................................................... 8 Today’s transactions report ......................................................................................... 8 View the last reconciliation report............................................................................... 9 Reconciliation reports .................................................................................................. 9 Report sessions ............................................................................................................ 9 Generate reports with customized settings ................................................................ 10 EXAMPLE REPORTS .................................................................................................. 12 7.1 All transactions from a chosen timeframe ................................................................. 12 8 USER PROFILE ............................................................................................................ 15 9 REPORT TOOLS .......................................................................................................... 16 10 TERMINAL ADMIN ..................................................................................................... 17 Page 2 of 17 Web reports user manual_____________________ 2 Introduction This user manual describes how to use the PayEx web reports. It will cover topics such as logging in, creating different reports and how to access the reconciliation reports. Any questions regarding how to use the web reports should be directed to [email protected] (+47 99 40 11 50) if you can’t find the answer in this document. Page 3 of 17 Web reports user manual_____________________ 3 How to access web reports Open your favorite web browser and navigate to https://pospay.payex.com. The first page you will see is the login page. Just enter your username and password here, or choose a different language by selecting the corresponding flag. Picture 1 Page 4 of 17 Web reports user manual_____________________ 4 The welcome screen This is the page you will see once you are successfully logged in. Picture 2 Page 5 of 17 Web reports user manual_____________________ The menu on the left hand side is used to navigate between the different pages. Picture 3 Page 6 of 17 Web reports user manual_____________________ 5 Selecting a merchant or a merchant group Before making any reports, you need to select a merchant or merchant group as the basis for the report data. If you only have access to a single merchant, it will be selected by default. When this is the case, the information below will not be applicable to you. If you have access to one or more merchant groups, you can select the merchant you want to work with. Click on the menu item to the left called: “choose site”, pictured below. Choose a merchant group by selecting the first drop down. This will display a list of merchant groups available to you. Select the merchant group you want to create a report for, this will populate the site drop down where you have the opportunity to choose a specific merchant. This step is optional, you are able to create reports for the merchant group, for terminal management however, you need to select a merchant. If you know the site id, you may enter it manually. When selected, you will get a drop down list containing all site ids available to you. Type in the site id you want to create reports for and press enter to select. Picture 4 Page 7 of 17 Web reports user manual_____________________ 6 Generating reports 6.1 Today’s total report By clicking on ”Today's summary” in the navigation menu, you will generate a summary of all the card transactions performed that day for your selected merchant. This includes all available terminals for the merchant / merchant group. Click on “Printer friendly” in the navigation menu to view a print friendly view of the report. Picture 5 - Daily total report 6.2 Today’s transactions report Click on “Today's transactions” to generate a table view with transactions from the current day and selected merchant / merchant group. Click on “Printer friendly” in the navigation menu to view a printer friendly view of the report. You can click on a Transaction ID (not from the printer friendly view) to view detailed information about a transaction. Page 8 of 17 Web reports user manual_____________________ 6.3 View the last reconciliation report Click on “Last reconciliation” in the navigation menu to view the last reconciliation report. Click on “Printer friendly” in the navigation menu to view a print friendly view of the report. 6.4 Reconciliation reports Click on “Reconciliations” to view a list of the last 15 reconciliation reports. Click on one to view the full reconciliation report. You can also search for older reconciliation reports. Use the calendar or enter a date in the format DD-MM-YYYY (date-month-year) to search for reconciliation reports for that time frame. Once you’ve chosen a report, you can view the print friendly version by clicking “Printer friendly” in the navigation menu. 6.5 Report sessions Merchants using reconciliations based on report sessions can view the report sessions through the navigation menu choice “Bank reconciliation”. Click on the ID of a report session to view all the transactions on that report session. Page 9 of 17 Web reports user manual_____________________ 6.6 Generate reports with customized settings When you click on “Generate report”, you can make reports with criteria for date, types of transactions, and more options, see picture 6 below. Picture 6 You can choose between different types of reports: Total report: Creates a report like the one in chapter 6.1, but here you can choose to create the report based on a time frame other than just today’s date. Approved transactions Page 10 of 17 Web reports user manual_____________________ Offline transactions Declined transactions Loyalty transactions All types of transactions Authorizations There are also filters to help you narrow your reports. The following filters can be applied: Terminal ID: Enter the number of the terminal to select only the transactions from this terminal Terminal name: Enter the name of the terminal to select only the transactions from this terminal. Cashier: Enter the cashier’s number/ID to view the transactions done from the selected cashier. Host: enter host id Session ID: Enter the number of the report session you want to see the transactions for. Transaction ID: Enter the transaction ID you want to search for. POS ref: Enter this POS reference number for the transaction(s). Order ID: enter order id Amount: Enter the total amount to select only transactions with this exact amount. Last 4 digits of pan: enter last digits of credit card number To generate a report, choose a report type, set the dates, and any additional options, and press “Show report”. The result will be shown on a new page, and you can choose to see the print friendly version by clicking “Printer friendly”. To generate another report, just repeat the procedure detailed above. Page 11 of 17 Web reports user manual_____________________ 7 Example reports This chapter will show the generation of a report, and how to read the output. 7.1 All transactions from a chosen timeframe To view all transactions from a timeframe, click the radio button called “All transaction types”, and be sure to set the dates correctly. Click “Show report” to generate this report. Picture 7 In picture 8 we see the report. Most of these transactions are approved transactions, noted by the green check mark ( ) in the status field. The red x ( ) denotes a rejected transaction. Page 12 of 17 Web reports user manual_____________________ The transaction type can be found in column number two, and is represented by both text and a picture. A regular purchase is represented by the green arrow ( ), which means that it is a financial debit transaction. The dotted green arrow ( ) means that the transaction is an authorization. There are other arrows as well. The blue arrows ( ) mean that the transaction is a credit transaction. If there’s a cross on an arrow, it means that it is a reversal of that transaction type. E.g. means that the transaction is a reversal of a debit transaction (purchase). Picture 8 - Report showing all transactions for a chosen timeframe Page 13 of 17 Web reports user manual_____________________ If you click on a transaction ID you will see the transaction details, see picture 9. Picture 9 - Transaction details Page 14 of 17 Web reports user manual_____________________ 8 User profile The user profile page allows you to change your password. In future revisions you will also be able to register a valid email address to be used for password recovery, this feature is currently not available. Picture 10 Page 15 of 17 Web reports user manual_____________________ 9 Report tools The drop down in the top right corner, marked in red, allows you to select the number of items displayed on each page. The pagination control below allows you to navigate between pages either directly or by choosing previous and next. The buttons in the top left corner, marked in black, allows you to export the report in excel format or display a printer friendly view. The excel export will export all items in the report, whereas the printer friendly view will only display the current page. Right next to the export and print buttons, marked in blue, you have a search field. This allows you to search for items within the generated report. You may also change the sort order of the table by clicking on the column header you want to sort by. Picture 11 Page 16 of 17 Web reports user manual_____________________ 10 Terminal admin The Terminal admin page is accessed by selecting the “Terminal admin” menu item. This page displays a tabular list of all available terminals for the selected merchant, and allows you to change the terminal name, reset ppp key or request unlock codes. Terminal administration is not available for merchant groups, for information on how to select a merchant, se chapter 5. To change the name of a terminal, first check the checkbox in the right outermost column, enter the new name in the “new terminal name” field and click save. To reset the ppp key for a terminal, first check the checkbox in the right outermost column, and click reset. To get an unlock code for a terminal, first check the checkbox in the right outermost column, select the date when the terminal was locked and the type of lock code you need (full or terminal block) and click get unlock code. The unlock code will be displayed in the unlock code column for the selected terminal. The support code is displayed in the field called “Today’s support menu code”. Picture 12 Page 17 of 17