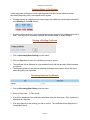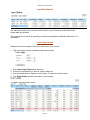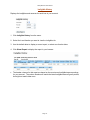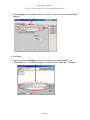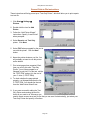
1
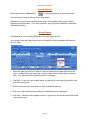
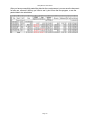
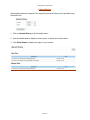
StuckyNet-Link
User Interface Manual
StuckyNet-Link User Manual
Contents
Introduction
Technical Information
General Information
• Logging In
• Session Timeout
• Changing Your Password
Working with the Borrowing Base
• Creating a New Certificate
• Editing a Saved Certificate
• Deleting a Saved Certificate
• Pending Status of a Certificate
• Viewing a Pending Certificate
• Reviewing Historical Certificates
• Calculating Availability
Reports
• Saving Reports
• Loan Ledger Report
• Loan Status Report
• Ineligible History
• Printing Reports
Uploading Supporting Documentation
• Uploading Files
• Uploaded Files History
• A/R Aging File Specifications
Extracting Data From Popular Accounting Packages
• AccuBooks
• Business Works
• Microsoft Excel
• Microsoft SBM
• Peachtree
• QuickBooks
• General Print-to-File Instructions
Page 2
StuckyNet-Link User Manual
Introduction
StuckyNet-Link offers you 24-hour access to your current loan status, ledger, and ineligible
balances through a user-friendly web interface. Additionally the system enables you to
complete your borrowing base posting online and frees you from the costly burden of printing,
packaging, and shipping back up reports, saving you hundreds of dollars per month.
If you’ve used the Internet before, you will immediately feel comfortable navigating your way
through your loan information in StuckyNet-Link. All the familiar web elements are here, from
menus and hyperlinks to tables and forms. We want your experience with StuckyNet-Link to be
easy to use and understand.
Both novice and experienced Internet users can benefit from the information in this booklet.
Please read through it once to get an overview of what StuckyNet-Link has to offer and then
keep it for reference if you should need it at a later time.
Technical Information
Minimum System Requirements
• Microsoft Internet Explorer 6 or greater with 128-bit encryption
-Or- Netscape 7 or greater with 128-bit encryption
• 56Kbps modem or other high speed Internet connection
• Internet Service Provider (i.e. MSN, AOL, Earthlink…)
Also Recommended
• Workstation access to electronic copies of supporting documentation
• Scanner for converting paper documents to an electronic format
• Microsoft Excel, Lotus Notes, or other spreadsheet software
Page 3
StuckyNet-Link User Manual
Logging In
•
Your collateral analyst will assign you a client code, username, and password. Enter these
codes in the corresponding fields on the login screen. Be aware that the password is case
sensitive.
Session Timeout
•
For security reasons, your session will end after 20 minutes if you are not actively using the
system. If your session ends you will be required to log in again.
•
Your session will also end if you close your browser window, switch to a different website
within the same browser window and then try to return using the Back button, and possibly
when you use the browser’s Refresh or Reload function. For these reasons it is
recommended that you use the system’s menu options to move through the website instead
of using your browser’s Back, Forward, and Refresh buttons.
•
You are limited to five connections to the system at any one time. New connections can be
created if you close your browser without logging out of the system or have multiple browser
windows logged into the system at the same time.
•
If you receive a message stating that your user ID is being reported as already logged in,
wait ten or twenty minutes for a new session to become available or call your collateral
analyst to free up the connections.
Changing Your Password
•
You may be required to change your password both the first time you log in and on a
periodic basis. When required to change passwords you will be prompted to do so
immediately after logging into the system.
•
To change your password you must enter your current password, a new password, and the
same new password in the Confirm Password field.
•
New passwords are required to be at least five characters in length and contain at least one
alpha character (A-Z or a-z) and one numeric character (0-9).
•
Passwords are case sensitive.
•
If you forget your password please call your collateral analyst and it will be reset.
Page 4
StuckyNet-Link User Manual
Creating a New Borrowing Base Certificate
1.
Click on Borrowing Base Posting from the menu.
2.
Enter a certificate number in the ‘Certificate #’ field under the heading ‘New Certificate’.
•
•
•
•
The certificate number can be from one to six characters.
The certificate number must be unique. If you duplicate a certificate number, you will be
prompted to enter a new number.
The certificate number can only contain alphanumeric characters. Unacceptable
characters will be changed to a dash character (-).
One recommended format for the certificate number is to use the date in the form of
mmddyy, e.g. use 112502 for Nov. 25th, 2002.
3.
Enter the date of the certificate, or use the calendar button
to select a date.
Entering an invalid date will cause the date to be recorded as the current date.
4.
Click the ‘New Certificate’ button. A blank certificate will be displayed.
•
•
•
•
The text fields with a gray background are for your data entry.
Text fields with a white background are calculated. If you type over a calculated field it
will revert back to its original value.
The beginning balances on each certificate are pulled directly from the most recently
updated data and do not reflect any other saved or pending borrowing base certificates.
Use the Tab key to move between text fields. If you hit the Enter key instead of Tab,
your borrowing base posting may be submitted accidentally. If you submit the posting
before you are finished, just open the borrowing base again in edit mode (see next
section).
Page 5
StuckyNet-Link User Manual
5.
Enter your posting information then click Save to submit the certificate when you are
finished.
6.
After saving, the certificate will be displayed in a non-editable, printable format with the data
you’ve entered in a bold font. You may print a copy for your records, or review the
certificate later as a saved, pending, or historical posting.
Page 6
StuckyNet-Link User Manual
Editing a Saved Certificate
Your borrowing base posting is stored as a saved certificate from the time it is first saved until
your lender’s next scheduled download. Once the lender downloads the certificate, it will be
considered pending and you will not be able to edit or delete it.
1. Click on Borrowing Base Posting from the menu.
2. Click the Edit button, or click the hyperlink for the certificate you want to edit.
3. The certificate will be displayed with your original data in the editable fields. Change the
information you need to, then click the Save button to resubmit the certificate when you are
finished.
4. Beginning balances and rates will be set to their current values, which may be different from
the values of the original posting.
5. If you make a mistake while editing a saved posting, you can use the Reset button to return
the values to their original state.
Deleting a Saved Certificate
1. Click on Borrowing Base Posting from the menu.
2. Click the Delete button next to the certificate you want to delete. The certificate you want to
delete will be displayed.
3. Click Delete again to confirm the deletion of the certificate.
4. A message will prompt you that the posting has been deleted.
Page 7
StuckyNet-Link User Manual
Pending Status of Certificates
A borrowing base certificate is held in a pending state from the time the collateral analyst
downloads the posting until it is accepted into the system.
•
Pending postings are displayed on the loan ledger with a different color background and the
word Pending in the Coll# column.
•
Pending postings show up in the borrowing base posting program with a View button next to
them. You may review a pending certificate but not edit, delete, or make changes.
Viewing a Pending Certificate
1. Click on Borrowing Base Posting from the menu.
2. Click the View button next to the certificate you want to review.
•
•
The certificate will be displayed in a non-editable format with the data entry fields formatted
in bold text.
The beginning balances and rates on pending certificates are the same values they were
when the posting was submitted.
Reviewing Historical Certificates
1. Click on Borrowing Base History from the menu.
2. Select a From Date – To Date range.
3. A list will be displayed of the certificates submitted within the date range. Each certificate is
displayed as a hyperlink.
4. Click the hyperlink for the posting you wish to review. The certificate will be displayed in a
non-editable format.
Page 8
StuckyNet-Link User Manual
Calculating Availability
•
New Collateral Balance = Collateral Balance + Sales/Additions – Credit Memos +
Adjustments – Cash/Removals – Discounts + Non-AR Cash
•
New Net Collateral = Lesser Of
1. (New Collateral Balance – Ineligibles) * Advance Rate – Reserves
2. Collateral Limit
•
Total Collateral = Lesser Of
1. Sum of all New Net Collateral fields
2. Revolving Limit + Sum of non-revolving New Net Collateral fields
3. Total Line Limit
•
Collections = Cash Removals
•
New Loan Balance = Sum of Loan Balances – Collections + Advance Request
•
New Availability = Total Collateral – New Loan Balance
The availability calculation may involve factors not listed here. If this formula does not
give you the same availability number as your borrowing base or loan status report,
contact your collateral analyst.
Page 9
StuckyNet-Link User Manual
Loan Status Report
The loan status report is an overview of all the loans in your account as of the last time the
system data was updated.
This report does not include any pending or saved borrowing base certificate information in its
calculations.
Loan Ledger Report
Displays the line-item ledger of activity for each loan in your account.
•
This report often requires Landscape mode when printed.
1.
2.
3.
4.
Click Loan Ledger Report from the menu.
Select the Loan Number you want to view the ledger for.
Use the default dates to display a current report, or select new from/to dates.
Click Show Report to display the report in your browser.
Page 10
StuckyNet-Link User Manual
Ineligible History
Displays the ineligibles and reserves for each loan in your account.
1. Click Ineligible History from the menu.
2. Select the Loan Number you want to view the ineligibles for.
3. Use the default dates to display a current report, or select new from/to dates.
4. Click Show Report to display the report in your browser.
•
The header columns for this report are based on the most recent ineligible/reserve postings
for your account. The column headers will match the latest ineligible/reserve figures posted,
but might not match older rows.
Page 11
StuckyNet-Link User Manual
Printing Reports
Each report includes a Print button
in the top right corner of the report screen.
Use this button to send the current frame to the printer.
Depending on your browser type and printer model, some printed reports may cut off the
rightmost part of the screen. If you have a problem, set your printer orientation to landscape
mode before printing.
Saving Reports
Click Save As in your browser’s File menu to save the report to a file.
You can also Copy and Paste reports from your browser into other programs like Microsoft
Excel or Word.
1. When the report you want is on screen, click your mouse on the upper left corner of the
report. Holding the mouse button down, drag to select the part of the report you want to
copy. Your selection will be highlighted when it is selected.
2. Click Edit -> Copy from your browser menu, or right click on your selection and click Copy
from the context menu.
3. Switch to the program or document you want to paste the data into.
4. Click on the point in the document where you want the data to be displayed.
5. Click Edit -> Paste from the program’s menu, or right click on the document and click Paste
in the context menu.
Page 12
StuckyNet-Link User Manual
After you have successfully pasted the data into the new document, you can save the document
for later use, reformat it the way you’d like to see it, print it from the new program, or use the
pasted data to do calculations.
Page 13
StuckyNet-Link User Manual
Uploading Files
1. Click on Upload Files from the StuckyNet menu.
2. Click on the Browse button to the right of the type of file you will upload.
3. In the Look in box, click on the drive or
folder containing the file.
4. Highlight the file you want to upload and
click Open.
5. The filename will appear in the field of
the file type. In the sample below, an
A/R Aging file will be uploaded to the
system.
Page 14
StuckyNet-Link User Manual
6. Click the Upload button.
7. A status bar on screen will let you know that the files are being uploaded. Make sure to wait
while your files are uploaded. If you navigate to a different page or close your browser the
file upload will be cancelled.
8. A list of all the files uploaded will be displayed after a successful file transfer.
Page 15
StuckyNet-Link User Manual
Upload History
Upload history shows the names of the supporting documents that you’ve uploaded using
StuckyNet-Link.
1. Click on Upload History on the StuckyNet menu.
2. Use the default dates to display a current report, or select new from/to dates.
3. Click Show Report to display the report in your browser.
Page 16
StuckyNet-Link User Manual
Aging File Specifications
Please provide the following information for the A/R Aging files:
Customer Information
1. Customer Number
2. Customer Name
3. Street Address
4. City
5. State
6. Zip Code
7. Telephone Number
Items 1 and 2 are required.
A/R Aging Information
1. Customer Number
2. Invoice Number
3. Invoice Date
4. Due Date
5. Transaction Type
6. P.O. #
7. Transaction Amount
All items except Item 6 are required.
Page 17
StuckyNet-Link User Manual
How To Print A Report To A File In Accubooks
We will use the Aging Report as an example.
1. Click on A/R Æ Reports Æ A/R Aging Report.
2. In the A/R Aging Report window, choose the third button on the Send Output To section to
print to a file.
3. Type in ARAging and the date of the aging report in MMDDYY format. (i.e.
ARAging030502.txt). Use txt as the extension for the filename. Click OK.
Page 18
StuckyNet-Link User Manual
How To Print a Report To File In BusinessWorks
We will use the Aging Report as an example.
1. Click on the Accounts Receivable button. Click on Reports Æ Aging Report.
2. Click on the Print Device button.
3. Click on File and type in a filename
(“ARAging.txt”) then click OK to export the
report to a flat file.
Page 19
StuckyNet-Link User Manual
How to Export Data from an Excel Worksheet
The flat file format is used to create text files that can be opened in most other programs. For
example, this format is required by mainframe programs and is often necessary for government
reporting.
1. Open the Excel Workbook that you want to save to a flat file.
2. Click on CTRL-A to select the entire worksheet.
3. Click Style on the Format menu, and then click to
clear all check boxes except Font.
4. Click Modify.
5. Click the Font tab, and then click a nonproportional font (for example, Courier New) from
the Font list.
6. Click OK twice.
The format style of your workbook is now changed
so that the column width is based on the number
of characters that can be placed in the column.
7. Adjust the column widths to suit your preferences.
8. On the File menu, click Save As.
9. In the Save as type list, click Formatted Text
(Space Delimited).
10. Click Save.
Page 20
StuckyNet-Link User Manual
How To Print To A File In Microsoft SBM
We will use the Receivables Report as an example.
1. Click on Reports Æ Sales Æ Print Receivables Trial Balance.
2. In the Receivables Trial Balance Reports, click on the drop-down and choose Historical
Aged Trial Balance.
3. Click the New button.
4. Type AR Aging Report for
Option.
5. Click on the Destination button.
Page 21
StuckyNet-Link User Manual
(How To Print To A File In Microsoft SBM, cont.)
6. In the Destination section click on File.
7. Click on the Browse button.
8. Type the filename “ARAging” followed by the
aging date in the format MMDDYY (i.e.
“ARAging030302”) and use the extension .prn.
Change the Save as type list to Tab Delimited
Files. Click Save.
9. Verify the File Name and File Format (Tabdelimited). Click OK.
10. Click on the Print button.
Page 22
StuckyNet-Link User Manual
How To Print A Report To A File In Peachtree
We will use the Accounts Receivable Aging Report as an example.
1. Click on Reports Æ Accounts
Receivable.
2. Choose Aged Receivables under Report
List.
3. Click on the EXCEL button.
4. Make any necessary changes on the
Aged Receivables window. Click OK.
5. Accept the default to “create a new
Microsoft Excel workbook” and click OK.
6. Peachtree will start the
automatic export of the
aging to an Excel
spreadsheet and start
Excel.
Page 23
StuckyNet-Link User Manual
(How To Print A Report To A File In Peachtree, cont.)
7. The Excel spreadsheet will be formatted similar to the one below.
8. Click on CTRL-A to select the entire worksheet.
Click on Format Æ Style.
9. In the Style window, uncheck all boxes except for Font.
10. Click on the Modify button.
Page 24
StuckyNet-Link User Manual
(How To Print A Report To A File In Peachtree, cont.)
11. Click the Font tab and then change the font to Courier New and click OK.
12. In the menu click File Æ Save As.
13. Type in the filename ARAging and then the aging date in the format MMDDYY (i.e.
“ARAging030302”). In the Save as type list, click Formatted Text (Space Delimited). Click
Save.
Page 25
StuckyNet-Link User Manual
How To Print A Report To A File In QuickBooks
We will use the Accounts Receivable Aging Report as an example.
1. Click on Reports.
2. In the Report Finder window, choose Customers & Receivables. Select A/R Aging
Detail in the report list.
3. Click on the Modify Report button to change/add report options.
4. Make any necessary changes to the report format. Please refer to the A/R Detail file layout
for required fields.
5. Click OK.
Page 26
StuckyNet-Link User Manual
(How To Print A Report To A File In QuickBooks, cont.)
6. Click on the Display button to preview the report.
7. Check the report and resize the columns as necessary. To change the size of a column,
point the cursor at the small diamond to the right of the column. Drag the small diamond to
the left or right to adjust the column width. In the example, the “Name” column needs to be
adjusted to show the full address.
8. Click on the Print
button.
Page 27
StuckyNet-Link User Manual
(How To Print A Report To A File In QuickBooks, cont.)
9. In the Settings tab, choose File as the printer option. Accept the default setting of ASCII
text file.
10. Click Print.
11. Type in the filename ARAging and then the aging date in the format MMDDYY (i.e.
“ARAging030302”). In the Save as type list, accept the default Text(*.txt). Click Save.
Page 28
StuckyNet-Link User Manual
General Print-to-File Instructions
These instructions will help you set up a “Text-Only Printer”, which will allow you to print reports
to a text file.
1. Click Start Î Settings Î
Printers.
2. Double-click the icon for Add
Printer.
3. Follow the “Add Printer Wizard”
instructions. Specify “Local Printer”
when prompted.
4. Select Generic and Text Only
printer. Click Next.
5. Select FILE when prompted for the port to
use with the printer. Click the Next
button.
6. Name the printer whatever you like. You
will probably not want to use this printer
as the default.
7. Print a test page when prompted. Each
time you print to this new “Text-Only
Printer”, you will be prompted for a
filename to print into. For this test, call the
file “TEST.PRN” and put it in the root of
your C: drive (C:\TEST.PRN)
8. To check whether the page printed
properly, run Notepad and open the file
C:\TEST.PRN. You should see the text
from the “Add Printer Wizard” test.
9. If you were successful adding the TextOnly Printer and creating the test file,
that’s all you need to do. Whenever you
need to create a report as a text file (so that you can send it electronically), just select your
Text-Only Printer and specify a file name.
Page 29