1
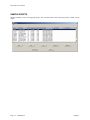
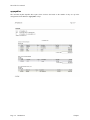
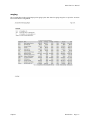
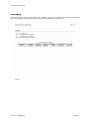
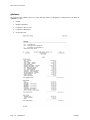
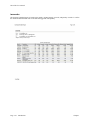
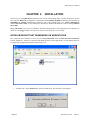
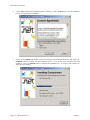
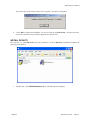
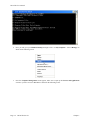
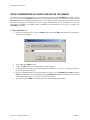
DP/AUTO
Event Triggering System
Part #450
User Manual
Version 7.3
Information in this document is subject to change without notice and does not represent a commitment on
the part of Data Pro Accounting Software, Inc. The software described in this document is furnished under
a license agreement or nondisclosure agreement. The software may be used or copied only in accordance
with the terms of those agreements. The purchaser may make one copy of this software for backup
purposes. No part of this manual or other materials included with the package, may be reproduced or
transmitted in any form or by any means electronic or mechanical, including photocopying and recording
for any purpose, other than the purchaser’s personal use, without the written permission of Data Pro
Accounting Software, Inc.
© 2004-2007 Data Pro Accounting Software, Inc.
Data Pro Accounting Software is a trademark of Data Pro Accounting Software, Inc.
No investigation was made into the common-law trademark rights of any word. Every effort was made to
capitalize or highlight, in some manner, any word with current registrations.
All companies, products, addresses, and persons contained herein are intended to be completely fictitious
and are designed solely to document and exemplify the use of Data Pro Accounting Software, Inc.’s
products.
Page i
This page intentionally left blank.
Page ii
TABLE OF CONTENTS
Description
Page
CHAPTER 1 INTRODUCTION ............................................................................................... 1-1
SAMPLE Scripts ..................................................................................................................................1-2
apaging .............................................................................................................................................................. 1-3
appayables ......................................................................................................................................................... 1-4
araging ............................................................................................................................................................... 1-5
arcalcaging......................................................................................................................................................... 1-6
arcollections....................................................................................................................................................... 1-7
glbalance............................................................................................................................................................ 1-8
glincome ............................................................................................................................................................ 1-9
imreorder ......................................................................................................................................................... 1-10
praccrual .......................................................................................................................................................... 1-11
calendaralerts ................................................................................................................................................... 1-12
calendarworksheet ........................................................................................................................................... 1-12
CHAPTER 2 INSTALLATION................................................................................................. 2-1
INSTALLMICROSOFT.NET FRAMEWORK ON WORKSTATION.........................................2-1
INSTALL DP/AUTO ...........................................................................................................................2-3
Logging.............................................................................................................................................................. 2-8
Pause.................................................................................................................................................................. 2-9
Close .................................................................................................................................................................. 2-9
New.................................................................................................................................................................... 2-9
To Add a New Task:....................................................................................................................... 2-10
CHAPTER 3 DP/AUTO SERVICE .......................................................................................... 3-1
CONFIGURE POWERSERVER OPTIONS ....................................................................................3-6
To Configure POWERServer Options:............................................................................................. 3-6
SETUP POWERSERVER AS A WIN32 SERVICE ON THE SERVER .......................................3-8
To Setup POWERServer: ................................................................................................................. 3-8
To Begin POWERServer for the First Time:.................................................................................... 3-9
INDEX............................................................................................................................................ 1
Page iii
This page intentionally left blank.
Page iv
DP/AUTO User Manual
CHAPTER 1
INTRODUCTION
Data Pro Accounting Software’s DP/AUTO (Event Triggering System) is a powerful new technology that extends
a company’s capabilities in many exciting new ways. This new technology allows firms of all sizes and shapes to
better manage their business from a more pro-active point of view.
Unlike a simple “macro” program, DP/AUTO has the capabilities to integrate seamlessly with all of your Data Pro
Infinity POWER applications in a “smart” fashion once the utility has had the ability to analyze information and
perform the steps you’ve directed it to take. It works in the background, on any timetable you establish, and
therefore becomes one of the most reliable tools any firm can deploy.
DP/AUTO is built using Microsoft’s .NET architecture and therefore requires that the .NET Framework be setup
on any Windows PC that intends to utilize this advanced capability. Although this is a free utility from Microsoft
that may be downloaded currently from their web site, Data Pro has also included the required “framework”
software on our CD-ROM for customer convenience.
This technology is unique in that it allows management to become aggressive in seeking data from its accounting
system instead of passively allowing the system to accumulate information that waits for someone to review the
correct report(s) and take a pro-active action on behalf of the company. Consultants can work hand in hand with
management to define the guidelines and rules by which the unique scripts should data mine the accounting system
in search for the desired information and direct the output to the right individual or group of staff to take action.
As an owner on the road traveling, it might be convenient to receive your Balance Sheet and Income Statement
nightly in your e-mail box so you always know where your company stands. Or, get the daily inventory trending
reports. That is just the beginning!
We believe that once you learn how to engage this unique new utility, it will be part of your business operations for
years to come! It will operate quietly in the background performing the specific tasks you define, every day, week
or month just as you dictate. It never calls in sick and can handle dozens of tasks at a time. This could include the
automatic calculation of your Aging Reports in Account Receivable or figuring out which customers just had open
items that went into the past due column last night at midnight. Better yet, how about DP/AUTO sending your
collections manager an e-mail with a complete list of those customers and the items that are past due so that they
could be immediately called each day?
Intrigued? You should be. This is a utility that virtually every company should be using in their daily business
operations. It is actually simple to install and configure. There are just two steps. The first step is to make sure you
have the Microsoft .Net Framework software loaded on your computer. As stated earlier, we’ve made that easy by
including this free download on our CD.
The second step is to load the DP/AUTO program and simply configure it to your Infinity POWER accounting
software applications. The user manual is available here in a PDF format for you to review and print. Eight
“trigger” events are included at no charge so that you may get an idea of the kinds of things that may be done with
this type of utility. However, they just represent the beginning of what is possible.
Chapter 1
Introduction
Page 1-1
DP/AUTO User Manual
SAMPLE SCRIPTS
DP/Auto includes several event triggering scripts. This section describes each script and provides a sample of each
output.
Page 1-2
Introduction
Chapter 1
DP/AUTO User Manual
apaging
The Accounts Payable Aging report calculate the vendor aging based on the current date and the number of days the
criteria is set in the DP/Auto configuration for the “apaging” script.
Chapter 1
Introduction
Page 1-3
DP/AUTO User Manual
appayables
The Accounts Payable Payables Due report selects invoices due based on the number of days set up in the
configuration for the DP/Auto “appayables” script.
Page 1-4
Introduction
Chapter 1
DP/AUTO User Manual
araging
The Accounts Receivable Aging Report prints aging by due date based on aging categories set up in the Accounts
Receivable Master Configuration.
Chapter 1
Introduction
Page 1-5
DP/AUTO User Manual
arcalcaging
The Accounts Receivable Calculate Aging report calculates againg by due date for all customers based on the
current date and aging categories set up in the Accounts Receivable Master Configuration.
Page 1-6
Introduction
Chapter 1
DP/AUTO User Manual
arcollections
The Accounts Receivable Collections report prints a daily report for any customer’s invoices that have met the
number of past due days set up in the DP/Auto configuration for the arcollections script.
Chapter 1
Introduction
Page 1-7
DP/AUTO User Manual
glbalance
The General Ledger Balance sheet runs in the following modes by changing the configuration for the DP/Auto
“glbalance” script.
•
Normal
•
Budget Comparative
•
Comparative Year-to-Year
•
Comparative Month/Year
•
Six Period Trend
Page 1-8
Introduction
Chapter 1
DP/AUTO User Manual
glincome
The General Ledger Income report can run in the following modes by changing the DP/Auto configuration for the
“glincome” script.
•
Normal
•
Budget Comparative
•
Comparative Year-to-Year
•
Budget Year-to-Year
•
Six Period Trend
•
QTD
•
YTD
•
Yearly Budget
Chapter 1
Introduction
Page 1-9
DP/AUTO User Manual
imreorder
The Inventory Reorder Report is based on the quanity on-hand, quanity reserved, and quantity on-order. It verifies
the minimum and maximum order to calculate the suggested order quantity.
Page 1-10
Introduction
Chapter 1
DP/AUTO User Manual
praccrual
The Payroll Personal Time Accrual Report calculates an employee’s vacation and sick pay based on the number of
years employed, personal time type, and minimum employment days. There are separate calculations for salaried
and hourly employees set up in the DP/Auto configuration for the “praccrual” script.
Chapter 1
11
Introduction
Page 1-
DP/AUTO User Manual
calendaralerts
The Calendar Alerts report generates an email alert to remind you of a scheduled event in the DP/DashBoard Event
Calendar.
calendarworksheet
The Calendar Worsheet report generates an email alert with a list of tasks as entered in the My Worksheet option in
DP/DashBoard.
Page 1-12
Introduction
Chapter 1
DP/AUTO User Manual
CHAPTER 2
INSTALLATION
The first step to getting DP/AUTO installed on your system is determining where you want the system to operate
from. Because DP/AUTO is designed to communicate with the Infinity POWER accounting system utilizing the
POWERServer TCP/IP communication technology that comes standard with every System Administrator
module (Part #100 or #695), it can technically be run from any Windows Workstation or Server running Windows
XP or 2003.
Ideally, DP/AUTO will be setup as a Windows “service” running quietly in the background on the schedules you
define for each “trigger event.” We’ll get more into how to set this up as a service shortly.
INSTALLMICROSOFT.NET FRAMEWORK ON WORKSTATION
First, ensure that the workstation or server you are installing DP/AUTO on has the Microsoft .NET Framework
software loaded on it. When you explore the CD-ROM and check for the applications, you will find that there are
two application programs that look like the following screen:
1.
<Double-click> on the “dotnetfx.exe” utility from Microsoft. The following screen displays.
Chapter 2
DP/AUTO Service
Page 2-1
DP/AUTO User Manual
2.
<Click> Yes to continue the installation process. Otherwise, <click> the No button to exit the installation
process. The following screen displays:
3.
<Click> on the I agree radio button to accept the Licensing Agreement from Microsoft, then <click> the
Continue button to continue with the installation process. If you do not agree with their terms and
conditions, <click> the Cancel button to terminate the installation now. If you agree and continue, the
following screen displays:
Page 2-2
DP/AUTO Service
Chapter 2
DP/AUTO User Manual
The system will copy all of the necessary files very quickly. The final screen displays.
4.
<Click> OK to complete the installation. You are now ready to install DP/AUTO. As shown previously,
you will be returned to where you had two applications to choose from.
INSTALL DP/AUTO
The next step is to install DP/AUTO onto your workstation. From the DP/AUTO installation CD-ROM, the
following screen displays.
1.
<Double-click> on the DPAutoSetup.exe option. The following screen displays:
Chapter 2
DP/AUTO Service
Page 2-3
DP/AUTO User Manual
2.
<Click> Next > to continue with the installation process or Cancel to exit. The following screen displays:
3.
The License Agreement screen will appear. You must <click> on the “I accept the terms in the license
agreement” button to proceed or cancel the installation. You may scroll through the agreement or <click>
on the Print button to generate a printed version to a printer. <Click> on Next> to continue. The
following screen will appear:
Page 2-4
DP/AUTO Service
Chapter 2
DP/AUTO User Manual
4.
The installation program will automatically default to install the program into the C:\Program Files\Data
Pro\DPAuto directory. You may <click> on the Change… button and choose to install it into another
existing directory or create a new directory. Once this is defined, <click> on Next> to continue. <click>
on “Back” to return to the previous screen. You may “Cancel” at any time. The next screen will appear:
Chapter 2
DP/AUTO Service
Page 2-5
DP/AUTO User Manual
5.
To begin the installation, <click> on Install> to continue. <click> on “Back” to return to the previous
screen. You may “Cancel” at any time.
The program will now be installed on your system. When completed, the following screen will be
displayed.
6.
<Click> on the Finish> button once the process is complete. You may <click> to have the program
launched automatically at this time or <click> on Finish> to exit the installation program at this point.
Once it is fully installed, you will be able to go to the Start, Programs, Data Pro program group (or
whatever name you used during installation) to now find that DP/AUTO has been added to the list of
applications on the menu as shown on the following screen.
When you <click> on DP/AUTO, the application will load on your Task Bar icon as shown below.
Page 2-6
DP/AUTO Service
Chapter 2
DP/AUTO User Manual
7.
By <double-clicking> on the DP/AUTO icon, the following screen displays. Notice that there are nine (9)
default triggering events pre-loaded that come with the system. These triggering events are not enabled on
purpose because they must be configured first before they will work properly on your system. Many more
triggering scripts may be added to your system at any time. This is the power of this utility. There is
virtually no limit to the amount of activities you can define for this tool to operate in the background for
your organization.
8.
If you <click> on the File option at the top left of the screen a drop down list displays as shown on the
following screen.
Chapter 2
DP/AUTO Service
Page 2-7
DP/AUTO User Manual
Logging
The first choice will be to have the “Logging” feature of the software turned on. This is a default setting within the
software. With the setting turned on, each time an event trigger is executed, two logs of the event are made so that
you can review them later to ensure that it has run every time as you have defined it to do. If not, you have the audit
trail to prove when and why it hasn’t (for instance, the POWERServer connection may have been lost and
therefore the event trigger could not run).
The first log that is maintained is called DPAUTO.LOG. This is the master log file maintained in the DP/AUTO
main program directory. It keeps track of all scripts that have been run each day with their time and date stamp on
each script. Therefore, it is easy for an administrator to go to this log to verify what events have taken place on a
single date in time by checking this log file.
The second set of log files are maintained in each script files’ set of directories. Notice on the following screen how
the date is placed first followed by the LOG extension for the script. In this case, the log files for running a Balance
Sheet are shown in this script’s respective directory.
It is optional to turn this logging feature off at any time. Just <click> on this option and it will turn the logging
feature to OFF. Occasionally, you may elect to utilize the feature located at the bottom left of the screen whereby
you may “Clear Log” which will clear the current DPAUTO.LOG file. This may save disk space as you find the
system working smoothly over time and it may be appropriate to periodically clear this file.
The secondary log files for each script, however, are maintained indefinitely. This is because that as some scripts
are developed, they may be keeping specific transactional data such as the number of transactions or order numbers
that were received each time a script was run. Therefore, it would be important to be able to return and review and
see what actually happened on a specific day as a complete audit trail. EDI type transactions would be a good
example of this kind of usage.
NOTE
Please note that at the top right of the screen that as each event is run, the run
date and time is noted (logged) and maintained next to each particular script
as they are executed. The system maintains the same information when each
script is “Last Modified” as well as “Last Executed.”
Page 2-8
DP/AUTO Service
Chapter 2
DP/AUTO User Manual
Pause
The next option down on this list of choices is the ability to “Pause” a script while it is running. Regardless of what
action the script is performing, to temporarily halt its execution, <click> on the “Pause” button. The result is that
the next time you <click> on the “File” option you will notice that it now says you can “Resume” the script by
<clicking> in the same place. It is a toggle function to allow you to stop/start scripts as necessary.
Close
The “Close” selection allows you to literally close the DP/AUTO windows from being active on your screen. This
has the same effect as <clicking> on the “Close” button located at the bottom right of the screen. To open this
screen again, simply double <click> on the DP/AUTO icon on the toolbar and the main screen displays again. The
“Close” option is different from the “Exit” option in that the “Exit” option literally shuts down the DP/AUTO
program from the toolbar and the “Close” selection shuts down the open window.
New
By <clicking> on the “New” button, DP/AUTO will allow you to setup a new Event to be triggered. Again, the
default software program comes with several trigger events for users to utilize and use for their own operations as
well as use as a guideline in developing their own scripts for other variations. Once a new script is developed, either
internally by your own staff or by a third party (i.e. Data Pro Accounting Software or your Data Pro Dealer), you
may use the “New” button to add the script to your existing configuration.
When you <click> on “New” the following screen displays:
Chapter 2
DP/AUTO Service
Page 2-9
DP/AUTO User Manual
To Add a New Task:
From the New Task window, enter an alphanumeric ID in the Name text box and a description of what the event
does for easy reference in the Description text box
1.
<Click> on the Enabled text box when you are ready for the event to start to be triggered. The Edit task
screens displays when the Edit button is used and will further allow us to better describe all of the options
that appear for each Event Trigger. There is great flexibility available to the user in how to deploy each
event trigger and therefore serious consideration should be given to each script when it is being developed
to the possible timeframes and timelines that can be used.
Under the Edit Task, we will review one of the sample scripts that is currently being shipped with the
product which allows the company to print its current Accounts Payable report to a specific user or group
of users each night to their e-mail account(s) for daily review and aged in seven day increments.
Notice the name is simply “apaging.” The description is AP Aging Report. However, it is not “enabled”
by default. Why? Because when Data Pro ships the DP/AUTO product, we don’t know what company
number you have established for your firm (100, RYT, 302, etc.) what is your IP Address, what your e-mail
address is and more. That is part of the necessary configuration that must be done before the scripts can be
run successfully each night.
Further, we also do not know if you have ever setup the POWERServer module. We know you have the
technology, because if you are running any Infinity POWER accounting module, such as Accounts
Payable, you have to have the System Administrator module. If that is the case, you have the
POWERServer module. But, you may never have set it up before.
NOTE
The SBS version of System Administrator (Part #692), does not include the
POWERServer or Advanced Security modules.
Plus, you must have implemented the “Advanced Security” system in the System Administrator module
instead of the “Standard Security” system. The POWERServer module must have the Advanced
Security version implemented to operate correctly. Both version of the security system come as a standard
feature with the System Administrator modules, therefore, there is no additional software that must be
purchased. It is just a matter of making sure which variation is deployed.
Page 2-10
DP/AUTO Service
Chapter 2
DP/AUTO User Manual
If you are not sure, just run the WINSTALL utility again from the Start, Programs, Data Pro menu and it
will go through the installation routine again without prompting you to reload your software programs.
The second screen to appear in this utility is the following screen:
2.
<Click> the Next button and you will see the following screen where you can define which version of the
security system you should be running.
Chapter 2
DP/AUTO Service
Page 2-11
DP/AUTO User Manual
Refer to the Windows/Character-based Installation Guide for complete instructions on how to configure
the Advanced Security options in this utility. It is located in your Product Kit or on the Infinity
POWER CD-ROM under “Documentation.”
Returning back to the AP Aging Report Event Trigger, notice on the next screen under “Trigger Type”
that the system is looking for a type of schedule. There are two choices in the pull down list box for this
field. The first selection is “DirMon” which stands for Directory Monitoring and “Schedule.”
The first selection “DirMon” is for those scripts designed to “poll” a specific directory in search of data
that may arrive on a periodic basis and then perform a task on that data. This would be ideal for
applications such as scripts used to receive EDI sales orders. Therefore, if a company were receiving EDI
sales orders from large customers, those orders could be automatically downloaded into a directory and a
script running from within DP/AUTO could be set to a specific timer (i.e. every 10 minutes) to search to
see if any new orders had arrived and if so, parse them into a format that could be used by the
POWERServer to submit to the Sales Order Entry module in real time to automate the Order Entry
process. Additionally, a packing list could be generated to the appropriate printer in the correct warehouse
with confirming e-mails to the right managers knowing when each order was received so that they could
stay on top of things.
This is a good example of the kind of automation DP/AUTO can bring to companies of all sizes. Order
Entry clerks cannot compete with this kind of efficiency at any level while the system is working around
the clock without fail once all of the scripts have been optimized.
A more traditional script will use the second choice which will be to “schedule” a specific time or range of
time to perform a specific task. The following screens outline the variety of choices available to users in
defining the scheduling of events to occur in their systems. Remember, each script can be unique and run
on its own schedule. Some scripts may even be part of a sequence and therefore should be factored to run
ahead of other scripts as part of the event sequence. Timing then should be factored when setting up these
schedules.
For instance, if you are going to use the Accounts Receivable Aging Report script, then you would
probably also want to use the Calculate Customer Aging script as well so that when the Aging Report is
run, all of the open items have been placed in their most current buckets. If you have an Aging Report that
is normally 400 pages long, then, you would want to provide enough time first for the Calculate Aging
option to run first before triggering the second event (Print Aging Report) to run. It doesn’t do you any
good to run the second triggered event if the first event is still in process when the second one kicks in.
The following screen shows the selection of the “Schedule” Trigger Type.
Page 2-12
DP/AUTO Service
Chapter 2
DP/AUTO User Manual
On the following screen, notice that in the box called “Schedule Details” that the check boxes for
“Immediate” and “Forever” and <clicked> OFF.
3.
These check boxes MUST be turned off to define a date range of starting and ending times for a specific
script. This means that you do not want this script to run on a continuous basis but only for a fixed amount
of time (i.e. two days, three weeks, six months, etc.).
4.
If this is the case, once these two check boxes are <clicked> OFF, you may select a Start Time which
includes a beginning date and its time of day. Notice the down arrow button on the right side of the field.
This will allow the user to utilize the pop up calendar to enter the appropriate date into this field. The
current date is circled in red for easy identification. You may scroll backward and forward through the year
using the arrow keys at the top of the calendar. The bottom will always maintain “Today’s Date” so that if
you <click> it, it will automatically enter this date into your field for you. Or, you may <click> on a
specific date and that will be entered automatically into the field as the Start Time’s beginning date.
Chapter 2
DP/AUTO Service
Page 2-13
DP/AUTO User Manual
5.
Next, <click> into either the Hour, Minute, or AM fields to make adjustments. Once you highlight any of
these three fields, you can either enter a valid entry to change them or use the up or down arrows to change
them until they change to the desired result. This combination plus the date will be your exact starting time
of the script.
6.
The same procedure would then be followed to enter the End Time of the script. Again, this could be a
couple of days, or 19 weeks. Whatever is the requirement is what is entered here. Only the fact that it is
not a continuous period of time is why this definition is used.
A good example of standard scripting schedules would appear on the next screen. You would <click> on
the “Immediate” and “Forever” boxes under the Schedule Details section to tell the system to begin
running the script immediately and continue forever until you tell it to stop.
7.
Next, you would select one of the three choices on the left (Daily, Week Days, Month Days). In this
example, Daily means you want to run the script every day. By selecting the Edit button, we then defined
that in daily intervals we want to run this script nightly at 1:00 am.
We could, however, change this to run the script within a period of time in various intervals of time. For
instance, if you look at the following screen, you will see the selections that appear when the “Range”
choice is made.
Page 2-14
DP/AUTO Service
Chapter 2
DP/AUTO User Manual
8.
Notice that you may define a beginning Start Time and End Time. You may <click> into either the
“Hour,” “Minute” or “AM” fields to make adjustments. Once you highlight any of these three fields, you
can either enter a valid entry to change them or use the up or down arrows to change them until they change
to the desired result. This combination plus the date will be your exact starting or ending time of the script.
9
Just below, you will define the interval periods for this script. It can be seconds, minutes or hours.
Therefore, if you want it to run every five minutes, select 5 and minutes. <Click> on Save and both the
date/time range plus the intervals have been saved. Cancel will allow you to exit this option.
The following screen illustrates the range definition deployed for this script.
The next major screen on the following page illustrates the usage of the Schedule Details option using
the Week in Days option. As you see on this screen when this item is selected, all seven days of the week
appear to allow the user to define specific days of the week to define a script to run on. The user may only
want to run a script on Sundays. Or, they may want Tuesdays and Thursdays only. Any variety of days is
possible regardless of dates using this feature. In addition, the user may continue to define the intervals and
time ranges within the same Days of the Week as were defined in the Daily feature earlier.
10. <Click> either the New or Edit button to schedule the specific times and/or intervals. Use the Delete
button to remove any existing times and start over.
Chapter 2
DP/AUTO Service
Page 2-15
DP/AUTO User Manual
The third option on this screen is to use the Days of the Month feature. Similar to the Days of the
Week feature, this option allows the user to define specific days of the month to run scripts. It can be a
single day of the month or multiple days. As shown on the following screen, the system will display up to
31 days for each month to run a script.
11. <Click> each day of the month that the script should be run. Define the intervals and time of day or
range as you would using one of the other methods described earlier.
Notice as you scroll down to the bottom of this range that the last choice is “last.” This means to use the
“last day in each month” since months do not have a consistent number of days. Therefore, if you are
writing a script to backup data or run reports on the last day of each month, you could not use one of the
other dates like “30” or “31” because it isn’t consistent across months. Using the “last” button makes it
global across all months.
Page 2-16
DP/AUTO Service
Chapter 2
DP/AUTO User Manual
The Action Type: defined on the top right is “Script.” At this point, this is the only choice available
although there will be future choices available in this section.
The next section allows the user to define the “Script Details” which are essential to having a script run
correctly. Now that you have defined which script to run and when to run, it must be defined where to find
the script and configure it to the accounting server and the various users, if necessary.
Chapter 2
DP/AUTO Service
Page 2-17
DP/AUTO User Manual
12. Remember, each script is a Microsoft Visual Basic script that is being executed by DP/AUTO. Any user
with experience in writing Visual Basic scripts can utilize this system and work with management to
generate new scripts for your system at any time, depending on what you want to accomplish. Using a
script editor, you may simply go to any of the directories automatically created by this installation to see
the kinds of commands and formatting used to create these special scripts.
NOTE
Each script should be maintained in its own subdirectory as shown on the
previous screen. This is where all of each script’s log files are written to and
maintained separately along with the individual content of each script. If you
are looking to “copy” a script, the entire directory should be copied and an
entirely new directory should be created along with the new script that is to be
edited and renamed.
This way all of the resources and associated files that go with the script are maintained in a single subdirectory for ease of management. There is no limit to how many of these directories can be created or
scripts can be executed. For instance, the Payroll Script which automatically accumulates Employee
Personal Time hours, such as Sick Time, Personal Days, Vacation Days and more, is based on the time
(i.e. Years of Service) an employee has worked.
It is not unusual though, for virtually every firm to have a unique set of rules that would apply to their
organization. Although this standard script may cover many of the calculations for the firm, this script may
be copied and modified in dozens of ways so that there are actually several different scripts running at
once. These variations would allow Management to take into account the firm’s unique Payroll policies.
Once the script has been configured and the schedule defined, this utility will continue to be run in the
background automatically over time. No additional intervention by Payroll staff or Management is
required. This script also allows users to define a minimum number of days of employment before an
employee is eligible for various accruals (vesting).
Once this initial period is achieved, users can then define the number of hours to accumulate each time the
script is run for hourly and salary employees. The number of hours to accumulate is specified based on the
employee's years of service for up to 25 years. The frequency of when the script is run is also defined by
the user (weekly, bi-weekly, monthly, quarterly, etc.). Because DP/AUTO offers the capabilities of
automatic background processing, firms can feel more secure that the process will work consistently on an
on-going basis once management approves the rules unique to their specific business needs.
13. During the browse function of selecting a script, the system will display a listing of the available directories
located under the DPAUTO directory similar to the following screen. Choose the directory for the script
you want to install as shown.
Page 2-18
DP/AUTO Service
Chapter 2
DP/AUTO User Manual
14. <Double-click> into the selected directory until the contents of the directory are displayed.
15. Select the Visual Basic script file to be run as shown on the following screen.
16. <Click> on “Open” to select the desired script file. It will insert the complete path and the file name into
the Script File name in the Script Details section as shown on the following screen. This means you now
have the new script named, described, enabled, scheduled and that all is left to do is to “Configure” the
final components.
Chapter 2
DP/AUTO Service
Page 2-19
DP/AUTO User Manual
17. <Click> on the “Configure” button in the Script Details section of the screen. The following screen
displays:
18. Each one of these line items must be configured properly to ensure the script is operating properly. The
first section is defining the connectivity with the Infinity POWER accounting system through the
POWERServer TCP/IP communication software tool. You must ensure that the POWERServer is
enabled on your accounting server prior to enabling any DP/AUTO scripts or they will not work.
Page 2-20
DP/AUTO Service
Chapter 2
DP/AUTO User Manual
19. This is the essential communication link between the accounting system and any web server for ecommerce, DP/DashBoard for Intranets, and DP/AUTO for real time event triggering. Once
POWERServer is operational, you may complete this configuration to complete the communication link
for each script. Remember, if you are operating for multiple companies, each script must be defined on a
company by company basis. Notice here the CompanyID is specifying the company that will be
communicated to.
20. Therefore, if your intention is to have a script perform similar functions to multiple sets of data files (i.e.
multiple companies), this is where you can copy the sub-directories and create multiple scripts and just
change the company ID to invoke a different deployment of the script each time for each different
company. To edit these items, <click> on a specific line item such as HostName = and <click> on the
Change button.
21. This is a text line and you can edit the line just as if you were editing a text line in a word processor.
Change the text description here from “testserver.mindspring.com” to the name of your accounting
server. This can be the domain name of your server or the actual IP address of the server. If DP/AUTO
and the accounting server are running on the same server, the answer here would be “localhost.”
22. Once you make your edits as shown in the following screen, <click> on the Save button and your edits for
this line will automatically be saved. If you don’t want to make a change, <click> Cancel to exit this
window.
23. Next, <click> on the PortNumber line to define the secure Port Address in which the POWERServer
should be communicating with your script. The valid ranges of port numbers are 1025 to 65000. It does
not matter which port number you decide to use, it’s just that it has to match what is also defined in the
POWERServer configuration and within the range of valid Port Numbers. Enter this number and <click>
to “Save” this line of information. Or, <click> on the Cancel button to exit this window with no changes.
Chapter 2
DP/AUTO Service
Page 2-21
DP/AUTO User Manual
24. The next line allows you to define which company this script should be executed for. Remember, Infinity
POWER allows processing for up to 47,000 different company files. Therefore, this Company ID is used to
define to the system which set of accounting records to utilize when executing the script. Enter the three
character (alphanumeric) ID number in this field for the company to be used for this particular script and
<click> on Save. Otherwise, <click> on Cancel to exit with no changes.
The next section of items is all about notification capabilities from the DP/AUTO system. Managers,
owners, employees and more can greatly benefit from this system by automatically being notified when an
“event” takes place. However, the system has to know how to inform these users and this is where this
information is configured.
The most common form of notification is through e-mail. Although reports and results can be generated to
printers and other forms of output, one of the major benefits of the system is to dynamically communicate
to managers and employees in an aggressive manner actions that should occur or information that they
should be aware of. This is why e-mail is important.
It is far easier to be sent an e-mail informing you that it is time to re-order six inventory items than to print
a 200 page report and try to perform this analysis yourself in a manual fashion.
Or, it is far easier as a manager to know that your collections staff is getting an e-mail every morning of all
of the customers who are now past due on their account as of midnight each night and they should be called
for quick follow up and reminding to pay their bills. With all of their past due open items and a summary
of the client’s account along with their contact information and phone number in the e-mail, there is no
excuse from the employee why they can’t be doing their job in keeping collections up to date. These are
just a few of the kinds of management improvements that DP/AUTO can bring to your firm.
25. In the first line under Notification, the system will prompt you for SMTPServer. This is asking for the
actual name of the mail server your company is using to send and receive e-mail. This could be a server
that is configured in house or a server that is used by an outside Internet Service Provider (ISP) such as
Earthlink/ Mindspring or Verizon. Check your current e-mail configuration and setup to find this
information if you are not sure. It will start with “smtp.” such as is shown in the screen that follows:
Page 2-22
DP/AUTO Service
Chapter 2
DP/AUTO User Manual
26. After this information is entered, <click> on Save or <click> on Cancel to exit this screen without saving
any changes.
The next line defines who you want to send the result of this script to. This can be a single individual, a
group, or multiple individuals separated by a semi colon. A group would be set up and defined within your
e-mail server so that multiple users can be sent information at once without having to identify them
individually each time.
27. Enter the e-mail addresses of the recipients of the results of the script which could be a simple report,
multiple pieces of data, one line of information or more. It could be a simple notification that the script has
run successfully and nothing more. Enter the e-mail addresses into this field and <click> Save or Cancel
to exit with no changes.
28. The next line defines the EmailFrom address which notifies the e-mail recipients who these e-mails are
coming from. This could be a server e-mail address, an administrator, or the President of the company.
This way when you receive e-mails into your “inbox” you have some idea who is sending them to you
which allows you to define them cleanly and prevent your filter programs from classifying them as junk
mail.
29. Enter the appropriate e-mail address and <click> on Save or Cancel to exit without making any changes.
Chapter 2
DP/AUTO Service
Page 2-23
DP/AUTO User Manual
30. The last line will vary from script to script and could possibly not exist on certain scripts. This is a
Criteria statement that will be passed along through the POWERServer module to the accounting system
so that when it performs the specific task, it knows what answers to provide the given report to use in the
printing of that specific report. In this example, we are asking the system to print an Accounts Payable
Aging report. There are two choices when running this report normally that the user would have to select
from (7 or 30 days). Depending on what you want the system to do while executing this particular script,
you enter the Criteria in a set order. If there are multiple questions that must be answered normally during
the printing of a report, then multiple criteria statements will be defined here and must be inserted in the
order in which they are prompted on the screen by a normal user interaction.
The following screen illustrates the Accounts Payable screen where this criteria question is prompted.
Notice the bottom left side of the screen is prompting for whether the Aging Criteria should be set to
7 Day or 30 Day. Actually, additional criteria could be identified for this report as well including whether
it should be printed in Detailed, Non-Detailed or Grand Total only format, Future or Past Due Aging Type,
which Bank Account to use and whether we should mask on a specific Job Cost Project. The possibilities
are very powerful. DP/AUTO will allow you to pass any of these criteria statements along in the
configuration of your scripts.
31. Enter the Criteria for this script and <click> on Save or Cancel to exit without making any changes.
Page 2-24
DP/AUTO Service
Chapter 2
DP/AUTO User Manual
32. When all of these lines have been edited to your satisfaction, <click> on the Close button. All lines’ data
has been saved along the way. You are now free to make any remaining edits on the setup of this script as
necessary. If all changes/edits are completed, <click> on the Save button and the new task will be added
to your list of scripts within the DP/AUTO menu system. <Click> on Cancel if you elect not to add this
script at this time.
33. The new script will be added to the menu system and you may <click> the Edit button to make any further
changes to the schedule or configuration as necessary. If you want to “Rename” this or any other script,
simply <click> on the Rename button and the system will allow you to rename the title of any script on
the list.
34. If you decide you no longer want the script on your list, highlight the specific script with your mouse, and
<click> the Remove button. Be careful with this option because once you <click> this option, this script
will be immediately deleted without any further prompts.
35. If you want to test a script to verify it is working, <click> on the Run button. Your script may be set to run
tonight at 1:00 am. You may not want to wait until then to find out if it is working correctly or not.
Therefore, you may <click> on the Run button at any time and it will immediately launch the script as if it
were on its normal predefined schedule.
Chapter 2
DP/AUTO Service
Page 2-25
DP/AUTO User Manual
NEW SCREEN
36. <Click> on the “Clear Log” button only if you want to delete the current details being stored in the
DPAUTO.LOG file which is tracking all of the events generated by each script defined. This was
discussed earlier and is separate from each individual script’s log file which store more detail with a daily
dated log file. For disk storage purposes, this file may be cleared periodically using this option.
37. To “Close” this active window from your PC screen, you <click> on the “Close” button. This does not
mean that DP/AUTO has been closed completely. It is still running on your taskbar. To close DP/AUTO
completely, <click> on File, Exit.
38. You must make sure that there is only ONE DP/AUTO process running at a time. Therefore, if you are
done editing your scripts and testing them, then you should use the File, Exit method to close the
DP/AUTO program or you can <click> on the icon on your taskbar and right <click> to exit the program.
Either method will ensure that the application is not running.
Page 2-26
DP/AUTO Service
Chapter 2
DP/AUTO User Manual
CHAPTER 3
DP/AUTO SERVICE
The best way to run DP/AUTO on a daily basis is to set the program up as a Win32 Service. This way it is running
quietly in the background all of the time without required intervention from any user. As a Windows Service, even
if the PC it is residing on is shutdown or rebooted for any reason, the system will automatically restart each time
without any user intervention.
After you have set up your script(s), tested them and are ready to operate your scripts on a regular basis, make sure
to exit the DP/AUTO program by using the File, Exit method as described previously. Next, get to a command
prompt by entering Start, Run, CMD. The following window displays where you can enter a command line
statement. You will change directories to the Program Files/Data Pro/DPAUTO directory. If you installed your
program applications elsewhere, Data Pro may be replaced by the other location.
1.
At the Program Files\Data Pro\DPAuto directory, type in “dpautoservice install” as shown in the
previous screen and press ENTER to start the service. You should be informed that the service has been
installed as shown on the following screen. Press any key to continue. Then, type “exit” to close this
window.
Chapter 3
DP/AUTO Service
Page 3-1
DP/AUTO User Manual
2.
Next, you will go to your Windows Desktop and right <click> on “My Computer.” Select “Manage” as
shown on the following screen.
3.
Once the Computer Management screen appears, make sure to open up the Services and Applications
section so you have access to “Services” as shown on the following screen.
Page 3-2
DP/AUTO Service
Chapter 3
DP/AUTO User Manual
4.
<Click> at the top right of this window to maximize your screen so you can view all of the services
currently running on your system. If you scroll down, you will find the DP/AUTO service as shown on the
following screen. Notice in the upper left section, that the system will prompt you to start this Service once
you highlight it as shown. Even though it is coded as automatic, it must be started the first time or you
must reboot your computer for this service to take effect.
Chapter 3
DP/AUTO Service
Page 3-3
DP/AUTO User Manual
5.
Once you <click> on the Start button, the service will begin running quietly in the background and continue
to run until stopped. Remember, YOU MUST STOP this service if you are going to make any edits or add
any new scripts to the DP/AUTO program. If you were to go to Start, Programs, Data Pro, DP/AUTO
and try to run this application while the service was already started, the following warning displays on the
screen.
Therefore, you would want to use the “Stop” function which automatically appears on the screen after you
have started the service so that you may make any desired changes to your scripts, test them and exit the
program before starting the service again.
Page 3-4
DP/AUTO Service
Chapter 3
DP/AUTO User Manual
6.
Since DP/AUTO is a scripting program, all administrators have to watch out for applications that would
prevent your scripts from being run successfully. The main culprits would be virus scanning software
applications like McAfee and Norton Anti-Virus software. As you can see on the following screen, there
is actually a switch in their software programs whereby you can choose to monitor scripts or not. If this is
turned on, it is very likely you will have problems with DP/AUTO. You must turn this capability off.
Chapter 3
DP/AUTO Service
Page 3-5
DP/AUTO User Manual
CONFIGURE POWERSERVER OPTIONS
As mentioned throughout this manual, DP/AUTO is not going to work correctly if you do not have the
POWERServer module configured correctly on the Infinity POWER accounting server. Make sure to review this
section to ensure that this is operating correctly before you attempt to execute your DP/AUTO scripts.
To Configure POWERServer Options:
1.
From the Infinity POWER – Security Administrator Main Menu options, <click> the System menu
option and select the System Administrator>POWERServer Module sub-menu option. The Main
Menu options update to reflect the POWERServer function.
2.
From the Infinity POWER – POWERServer Main Menu options, <click> the POWERServer Options
menu option and select the POWERServer Configuration sub-menu option. The POWERServer
Configuration window displays.
Page 3-6
DP/AUTO Service
Chapter 3
DP/AUTO User Manual
3.
Specify the login name in the Login User Name text box and password in the Login User Password
text box for the POWERServer’s initial login. This is the same User ID and Password that you defined in
the Security System in the previous procedure.
4.
Specify the channel/port number in the IP Socket Port # text box. This is the number (or channel) that
the POWERServer will be listening for connections on.
NOTE
Port number MUST be between 1025 and 65000, however, there can only be
one installed listening process on each port number.
The default
recommended number is 9500. The port number you specify here must also
be specified exactly the same when installing the DP/DashBoard system or a
connection cannot be made on the same channel.
Chapter 3
DP/AUTO Service
Page 3-7
DP/AUTO User Manual
SETUP POWERSERVER AS A WIN32 SERVICE ON THE SERVER
One of the servers or workstations on your network must now be chosen as the POWERServer “server.” This is
the server that runs the POWERServer process in the background, listening for connection requests from the
DP/AUTO and then accessing the accounting system. It is recommended that you choose the same network server
that the accounting system is installed on. If you are using a “Novell server” as your accounting server, then you
must choose a Windows XP, Windows 2000, or Windows 2003 workstation as the system to configure the
POWERServer module.
To Setup POWERServer:
1. From the Accounting Server, <click> the Start button and select the Run menu option from your desktop.
The Run window displays.
2.
Type “cmd” in the Open text box.
3.
<Click> the OK button. The Command Prompt window displays.
4.
Change the directory to where the accounting system is installed (i.e. cd c:\power). The prompt changes to
the accounting software directory.
5.
From the command prompt in the accounting software directory, type “POWERService install” and press
Enter on the keyboard. This command installs the POWERServer module as a Windows Service which
automatically starts whenever your server is turned on or rebooted.
6.
Type “exit” and press Enter on the keyboard to close the command prompt window.
Page 3-8
DP/AUTO Service
Chapter 3
DP/AUTO User Manual
To Begin POWERServer for the First Time:
Once the POWERServer has been installed as a service, you must start the process for the first time.
and select the Manage
1.
From your Windows desktop, <right-click>on the My Computer icon
menu option. The Computer Management window displays.
2.
From the menu on the left, <click> the Services and Applications option and then select the Services
sub-option. A list of services installed on your system displays in the right window. A list of services
installed on your system displays in the right window.
NOTE
If the POWERServer application or your accounting data resides on a
network server which require a specific path or security rights to be defined,
you must change the Log On to be a valid network user and password.
<Right-click> on the POWERServer service and select the Properties
option. <Click> the Log On tab and enter the network account user name
and password.
3.
Scroll down to the POWERServer service, <right-click> and then select the Start menu option. The
POWERServer utility starts and returns to the Computer Management window.
Chapter 3
DP/AUTO Service
Page 3-9
DP/AUTO User Manual
Page 3-10
DP/AUTO Service
Chapter 3
DP/AUTO User Manual
INDEX
C
Close ..............................................................................................................................................................................................2-9
Configure POWERServer Options ................................................................................................................................................3-6
D
DP/Auto
Install.........................................................................................................................................................................................2-3
DP/AUTO Service .........................................................................................................................................................................3-1
I
Installation .....................................................................................................................................................................................2-1
INTRODUCTION .........................................................................................................................................................................1-1
L
Logging..........................................................................................................................................................................................2-8
M
Microsoft.NET...............................................................................................................................................................................2-1
N
New ...............................................................................................................................................................................................2-9
P
Pause..............................................................................................................................................................................................2-9
PowerServer...................................................................................................................................................................................3-9
PowerServer
Begin .........................................................................................................................................................................................3-9
POWERServer...............................................................................................................................................................................3-8
POWERServer Options .................................................................................................................................................................3-6
S
Server.............................................................................................................................................................................................3-8
Setup
POWERServer ..........................................................................................................................................................................3-8
Setup POWERServer as a WIN32 Service on the Server ..............................................................................................................3-8
SETUP POWERSERVER AS A WIN32 SERVICE ON THE SERVER .....................................................................................3-8
Start ...............................................................................................................................................................................................3-9
PowerServer for First Time ......................................................................................................................................................3-9
T
To Add a New Task:.................................................................................................................................................................... 2-10
Index
Page I-1