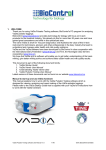
1
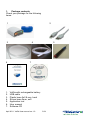
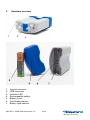
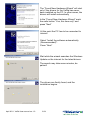
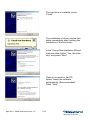
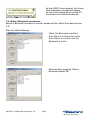
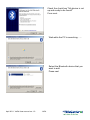
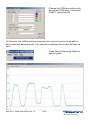
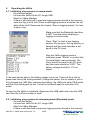
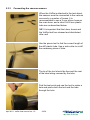
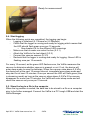
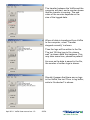
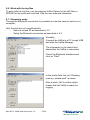
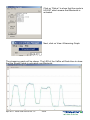
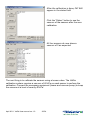
User manual
Ver 1.0
Contents
1.
2.
3.
Package contents ........................................................................................... 3
Hardware overview ......................................................................................... 4
First time setup................................................................................................ 5
3.1.
Install the software for the instrument, VaDia Manager .......................... 5
3.2.
Power up ................................................................................................. 5
3.3.
Install the USB drivers manually (NB! For advanced users only) ........... 5
3.4.
Problems that may occur during driver installation ................................. 9
3.5.
Select a unique ID ................................................................................. 10
3.6.
Make a Bluetooth connection................................................................ 12
4. Hardware ....................................................................................................... 18
4.1.
USB connector ...................................................................................... 18
4.2.
Battery ................................................................................................... 18
4.3.
Charging the battery ............................................................................. 18
4.4.
Indicator LED ........................................................................................ 18
5. Operating the VaDia ..................................................................................... 19
5.1.
Initializing a log session in normal mode .............................................. 19
5.2.
Initializing a log session for streaming mode (Bluetooth mode) ........... 19
5.3.
In the field.............................................................................................. 20
5.3.1 Secure the VaDia for leaks ................................................................... 20
5.3.2 Attach the VaDia to the test object ....................................................... 21
5.3.3 Connecting the vacuum sensors........................................................... 22
5.4.
Start logging .......................................................................................... 24
5.5.
Store the log to a file in the computer ................................................... 24
5.6.
Work with the log files ........................................................................... 27
5.7.
Streaming mode .................................................................................... 27
6. Configuration ................................................................................................. 29
6.1.
Calibrate the vacuum sensors .............................................................. 29
6.2.
Install the software VaDia Program Loader .......................................... 31
6.3.
Load new firmware to the VaDia ........................................................... 31
6.4.
Technical data ....................................................................................... 34
April 2011 VaDia User manual ver 1.0
2/34
1.
Package contents
Check your package for the following
items:
2
1
3
6
1.
2.
3.
4.
5.
6.
7.
4
5
7
VaDia with rechargeable battery
USB cable
Plastic hose 2x2.8 mm, hard
Silicon hose 2mm, soft
Application tool
User manual
Software-CD
April 2011 VaDia User manual ver 1.0
3/34
2.
Hardware overview
1.
2.
3.
4.
5.
6.
7.
Vacuum sensors
USB connector
Indicator LED
Rechargeable battery
Battery cover
Overheating sensor
Battery type selector
April 2011 VaDia User manual ver 1.0
4/34
3. First time setup
Before using your device, please follow the next steps.
3.1. Install the software for the instrument, VaDia Manager
The VaDia Manager installation program is found on the CD. Start the program
“Install VaDia Manager”, and the program will be installed on your computer.
.
3.2. Power up
Remove the plastic tab between the battery plus pole and the battery
compartment and make sure that the battery is properly inserted. The VaDia
startup sequence is:
- The indicator LED will flash red 5 times
- Then the indicator LED will flash green 7 times
- There will be a pause of 15 seconds without any light
- After this, there will be 4 green flashes every 15 second
If the indicator LED flashes red 5 times and then starts flashing red over and over
again, then the battery voltage is too low and must be charged. The battery is
charged from a PC trough the USB cable. Plug the USB cable into both the VaDia
and a PC to start the charging. In five hours the battery is fully charged.
3.3. Install the USB drivers manually (NB! For advanced users only)
As the drivers will be installed automatically when installing the VaDia Manager,
this way of installing drivers can normally be ignored.
Connect the VaDia and a PC using the USB
cable
As soon as the USB has been connected, the
installation of the first driver will begin (there
are two drivers)
April 2011 VaDia User manual ver 1.0
5/34
The “Found New Hardware Wizard” will start
only if the drivers for the VaDia has never
been installed on the PC. In other cases, the
drivers will install automatically
In the “Found New Hardware Wizard” mark
the radio button “Yes, this time only” and
press “Next”
At this point the PC has to be connected to
internet
Select “Install the software automatically
(Recommended)”.
Press “Next”
Wait while the wizard searches the Windows
Update on the internet for the latest drivers.
The search may take some minutes, be
patient!
The drivers are finally found, and the
installation begins.
April 2011 VaDia User manual ver 1.0
6/34
The first driver is installed, press
“Finish”
The installation of driver number two
starts immediately after finishing the
installation of the first driver.
In the “Found New Hardware Wizard”
mark the radio button “Yes, this time
only” and press “Next”
There is no need for the CD.
Select “Install the software
automatically (Recommended)”.
Press “Next”
April 2011 VaDia User manual ver 1.0
7/34
Wait while the wizard searches the
Windows Update on the internet for the
latest drivers.
The search may take some minutes, be
patient!
The drivers are finally found, and the
installation begins.
The second driver is successfully
installed, press “Finish
This confirms that the installation of the
drivers is completed.
April 2011 VaDia User manual ver 1.0
8/34
3.4. Problems that may occur during driver installation
It might happen that this message pops up when installing the drivers. The PC
was not able to find the drivers.
If this is the case, the drivers can be installed properly by starting the help
function “USB Fix” in the VaDia Manager. Start the VaDia Manager:
In the VaDia Manager, select “Help>USB Fix”.
This window will open. It can run for
several minutes, be patient!
When the window closes, unplug
and then plug the USB cable to
activate the drivers.
April 2011 VaDia User manual ver 1.0
9/34
3.5. Select a unique ID
To setup the VaDia, connect it to a PC trough USB and start the VaDia Manager
at “Start->All programs->BioControl->VaDia Manager”.
If the connection is OK, the system
parameters will be displayed on the
status field.
In the upper right corner the ID of the
present unit is shown. If required, the
ID can be changed by the user to any
text of maximum 15 characters which
will then be used as the program ID,
the USB ID and the Bluetooth ID
To change the ID, select
“Setup->VaDia Setup”
April 2011 VaDia User manual ver 1.0
10/34
Enter the desired ID, and press OK
After changing the ID, the VaDia USB
cable has to be cycled to make the
new ID valid.
Press OK to make the warning
disappear, and then close the VaDia.
Cycle the USB cable.
April 2011 VaDia User manual ver 1.0
11/34
As the USB ID has changed, the Found
New Hardware message will appear.
As the driver already exists on the PC,
the drivers will install automatically.
3.6. Make a Bluetooth connection
Before a Bluetooth connection is made, please set the VaDia ID as desired (see
3.5)
Start the VaDia Manager
Check the Bluetooth checkbox
Press Start to initialize the VaDia
Press Status to confirm that the
Bluetooth is active
Returned after pressing “Status”
Bluetooth started OK!
April 2011 VaDia User manual ver 1.0
12/34
Start the Bluetooth service of the PC
from
“Start->All Programs->Control
Panel”
Select “Printers and Other
Hardware”
In the left border, select “Add a
Bluetooth device”
April 2011 VaDia User manual ver 1.0
13/34
Check the check box “My device is set
up and ready to be found”
Press next
Wait while the PC is searching……
Select the Bluetooth device that you
want to add
Press next
April 2011 VaDia User manual ver 1.0
14/34
Enter the passkey “1111”
Wait while Bluetooth is installed
Write down the Outgoing COM-port
Press Finish
April 2011 VaDia User manual ver 1.0
15/34
Ready!
Return to the VaDia Manager
Goto Setup->VaDia Setup
April 2011 VaDia User manual ver 1.0
16/34
Change the COM-port setting into
the correct COM-port, in this case
COM71, and press OK
At this point, the VaDia must be connected to a vacuum source to be able to
show data in streaming mode. If no vacuum is attached, the cursor will stay on
zero.
Press View->Streaming Graph to
see the graph
April 2011 VaDia User manual ver 1.0
17/34
4.
Hardware
4.1. USB connector
The USB connector is located under
the rubber cap between the sensors.
Use the USB cable that was delivered
to make a connection between the
VaDia and a PC.
4.2. Battery
The delivered battery is rechargeable and has a capacity of 2500mAh. On a fully
charged battery, the device is able to log vacuum for 10 hours. It takes 5 hours to
charge a normally discharged battery (voltage 1.0V). As the charging is
electronically controlled, there is no need to unplug the USB when the charging is
complete. Leaving the USB connected means that the battery will maintained until
the next time to use the VaDia.
4.3. Charging the battery
Charging is performed trough the USB-cable, power is taken from the PC or a
USB charger. Charging of a normal discharged battery (1.0V) takes 5 to 10 hours.
As the charging is electronically controlled, there is no need to unplug the USB
when the charging is complete. Leaving the USB connected means that the
battery will be kept fully charged until the next time to use the VaDia..
4.4. Indicator LED
The LED gives information about the current status of the VaDia.
Status
Function
Off
Battery discharged
Red, short flash once per s
Battery too low to start
Green, 4 flashes once per 15 s
MODE is IDLE; VaDia not started yet
Green, 1 flash once per 15 s
MODE is LOG or LOG BT; wait for vacuum
Green, 2 flash once per 15 s
Same as previous; battery level low
Green, 3 flash once per 15 s
Same as previous; battery level very low
Green, 1 flash per s
MODE is LOG or LOG BT; vacuum present
Blue, 1 flash per s
MODE is LOG BT; streaming mode active
Red, one flash once per 15 s
Mode is STOP; Logs have been stored
While charging, the LED is yellow instead of green and violet instead of blue.
April 2011 VaDia User manual ver 1.0
18/34
5.
Operating the VaDia
5.1. Initializing a log session in normal mode
- Connect the battery
- Connect the VaDia to the PC trough USB
- Start the VaDia Manager
- If there is still data from a previous logging session stored in the memory,
save that log to a file first. When a new logging session is started, the old
data will be lost! Please see the chapter “Save a logging session” for how
to save a log.
Make sure that the Bluetooth checkbox
is NOT checked when initializing a
logging in normal mode.
Press “Start” to start a new logging
session. By doing so, the log memory is
deleted and the clock-calendar is set
equal to the PC clock.
After the VaDia logging mode is
initialized, press “Status” to confirm that
the initialization was successful. The
clock should be equal to the PC-clock,
and the mode should be “LOG”. The
battery voltage should be 1.3 V or
higher.
In the case shown above, the battery voltage is too low. There will be a risk for
power loss during the milking session! Charge the battery first or replace it with a
fully charged one. NB! After replacing the battery, the VaDia will enter IDLE mode
and the clock setting will be lost. It must be initialized again to enter the LOG
mode.
As soon as the VaDia is initialized, disconnect the USB cable and close the USB
cap. Now the VaDia is ready for work!
5.2. Initializing a log session for streaming mode (Bluetooth mode)
- Connect the battery
- Connect the VaDia to the PC trough USB
- Start the VaDia Manager
- If there is still data from a previous logging session stored in the memory,
April 2011 VaDia User manual ver 1.0
19/34
save that log to a file first. When a new logging session is started, the old
data will be lost! Please see the chapter “Save a logging session” for how
to save a log.
Make sure that the Bluetooth checkbox
is checked when initializing a logging in
normal mode.
Press “Start” to start a new logging
session. By doing so, the log memory is
deleted and the clock-calendar is set
equal to the PC clock.
After the VaDia logging mode is
initialized, press “Status” to confirm that
the initialization was successful. The
clock should be equal to the PC-clock,
and the mode should be “LOG BT”. The
battery voltage should be 1.3 V or
higher.
It is presumed that the Bluetooth connection between the VaDia and the PC is
setup correctly. See xxxxx for how to setup the Bluetooth connectiuon properly.
As soon as the VaDia is initialized, disconnect the USB cable and close the USB
cap. Now the VaDia is ready for work!
5.3. In the field
First of all: Make sure that the VaDia is set into LOG-mode, see 5.1 or 5.2 for
details.
5.3.1
Secure the VaDia for leaks
Place the VaDia in such a way that no water
can enter the box trough the battery cover or
the USB cap. Use tape to secure the
openings, both the battery cover and the USB
cap. The VaDia is splash proof, but will not
withstand continuously being sprayed by water
and should not under any circumstances be
captured by water.
April 2011 VaDia User manual ver 1.0
20/34
NB! The VaDia measures the vacuum in reference to
the air pressure in the test room. If the VaDia is
hermetic closed prior to the measurement, it is a
chance that the reference inside the enclosure may
differ from the air pressure in the room. Of that
reason, do not secure the VaDia for leaks until the
moment of using it.
5.3.2
Attach the VaDia to the test object
Attach the logger to the test object using PVC-tape.
Duct tape is used to attach and secure for leaks
April 2011 VaDia User manual ver 1.0
21/34
5.3.3
Connecting the vacuum sensors
When the VaDia is attached to the test object,
the sensors must be connected to the vacuum
sources by a number of hoses. It is
recommended to use a 2 mm silicon hose as
the main hose, and a short 2x2.8 mm plastic
tube mm as described below.
NB! It is important that the tubes, hoses and
the VaDia itself are cleaned and disinfected
after use!
Use the pierce tool to find the correct length of
the stiff plastic tube. Use a side cutter to cutoff
the necessary piece of tube.
The tip of the tool should be free and the rest
of the steel string covered by the tube.
Find the test point and use the tool to make a
hole and pierce both the tool and the tube
through the hole.
April 2011 VaDia User manual ver 1.0
22/34
The tool and the tube is pierced trough the teat
cup.
The tool is removed and the plastic tube is left in
the teat cup, ready to be attached to the silicone
hose.
Thread the silicon hose onto the plastic tube
April 2011 VaDia User manual ver 1.0
23/34
Ready for measurement!
5.4. Start logging
When the following points are completed, the logging can begin:
- Logging is initialized (5.1 Normal or 5.2 Bluetoth)
- Check that the logger is running and ready for logging which means that
the LED should flash green once per 15 seconds.
o See chapter 4.4 for the different LED meanings
- Make sure that no water can enter the box (5.3.1)
- Attach the VaDia to the test object (5.3.2)
- Connect the vacuum sensors (5.3.3)
- Recheck that the logger is running and ready for logging: Green LED is
flashing once per 15 seconds.
For every 15 second, as the green LED flashes once, the VaDia measures the
vacuum to determine whether vacuum is present or not. If not, the device will
enter sleep mode to save the batteries. When the vacuum raise above 2,5 kPa,
the device will at the next 15 second interval, immediate leave sleep mode and
stay alert for at least 10 minutes. Once per second the LED will flash green (blue
in streaming mode) as long as the vacuum stays above 2,5 kPa.If the vacuum
disappears for more than 10 minutes, the VaDia will enter sleep mode and will
check the vacuum only once per 15 second.
5.5. Store the log to a file in the computer
When the log session is ended, the data has to be stored to a file on a computer
prior to be further managed. Connect the VaDia to a PC trough USB and start the
VaDia Manager.
April 2011 VaDia User manual ver 1.0
24/34
The information in the status field
shows that the VaDia is connected. The
mode can be in different states, the log
file can be stored regardless of the
mode. If a log is present, do first select
the log format: Vadim vd5 or MT2000.
Then start the transfer of the logs by
pressing “Get logs”
A save dialog is opened. If this is the
first time when logs are stored,
navigate to a folder where files of this
type should be stored, e.g. My
Documents. The next time to store
data, the VaDia Manager will remember
which location that was selected the
previous time.
When the folder is correct, type a
filename in the filename field and click
“Save”
April 2011 VaDia User manual ver 1.0
25/34
The transfer between the VaDia and the
computer will start, and a counter shows
that the transfer is running. The end
value of the counter depends on the
size of the logged data.
When all data is transferred from VaDia
to the computer, a text “Transfer
stopped normally” is shown.
Then the logs will be written to the file.
The text “Writing logs to file, please
wait” is shown while this happens. This
may take some time, please be patient!
As soon as the data is saved in the file,
the number of written logs is shown.
Should it happen that there are no logs
in the VaDia, the text “Error in log buffer,
write to file aborted” is shown.
April 2011 VaDia User manual ver 1.0
26/34
5.6. Work with the log files
To work with the log files, use the program VaDia Viewer for the vd5 files or
MT2000 for the mmd and mmt files. See the user manuals elsewhere.
5.7. Streaming mode
Through the Bluetooth connection it is possible to view the vacuum online on a
computer.
Only the first time of using Bluetooth:
- Select a unique ID as described in 3.5
- Setup the Bluetooth connection as described in 3.6
Normally:
Connect the VaDia to a PC trough USB
and start the VaDia Manager.
The information in the status field
shows that the VaDia is connected.
Check the Bluetooth checkbox and
click on “Start”.
In the status field, the text “Deleting
memory, please wait!” is shown
After a while, OK! is written which
means that the VaDia is ready for
logging.
April 2011 VaDia User manual ver 1.0
27/34
Click on “Status” to show that the mode is
LOG BT which means that Bluetooth is
activated.
Next, click on View->Streaming Graph
The streaming graph will be shown. The LED of the VaDia will flash blue to show
that the Stream mode is activated over Bluetooth.
April 2011 VaDia User manual ver 1.0
28/34
6.
Configuration
6.1. Calibrate the vacuum sensors
The vacuum sensors of the VaDia were calibrated at the factory. Should it, of any
reason, be necessary to recalibrate the sensors then follow the instructions
below.
Connect the VaDia to a PC trough USB and start the VaDia Manager.
The information in the status field
shows that the VaDia is connected.
Check the “Advanced” checkbox
The calibration buttons appears
The two leftmost buttons have a *
character instead of a number. These
two buttons are used when calibrating
all the sensors simultaneously.
Make sure that the pressure/vacuum
is stable zero for all sensors
Click the *button next to “0kPa”
Wait one second while the VaDia
calculates
After the calibration is done, OK! Will
appear in the status area
April 2011 VaDia User manual ver 1.0
29/34
After the calibration is done, OK! Will
appear in the status field
Click the “Status” button to see the
vacuum of the sensors after the zero
calibration.
All four sensors do now show a
vacuum of 0 as expected.
The next thing is to calibrate the sensors using a known value. The VaDia
calibration system requires a vacuum of 40 kPa on each sensor to perform the
calibration. Connect the necessary equipment (hoses and vacuum pump) to keep
the vacuum at a level of exactly 40 kPa.
April 2011 VaDia User manual ver 1.0
30/34
Calibrate all sensors simultaneously
Make sure that the vacuum is stable
40.0 kPa for all sensors
Click the *button next to “40kPa”
Wait one second while the VaDia
calculates
After the calibration is done, OK! Will
appear in the status area
To calibrate the sensors one by one:
-
Make sure that the vacuum is stable 40.0 kPa for the sensor to calibrate
Click the number button next to “40kPa” that corresponds to the actual
sensor
Wait one second while the VaDia calculates
After the calibration is done, OK! Will appear in the status area
6.2. Install the software VaDia Program Loader
The VaDia Program Loader installation program is found on the CD. Start the
program “Install VaDia Program Loader”, and the program will be installed on
your computer.
6.3. Load new firmware to the VaDia
Shut down any running instances of the VaDia Manager and connect the VaDia to
a USB port of the computer. Only one VaDia can be connected to the computer
when uploading new firmware.
Start the program “Install VaDia Program Loader”. The program is started using
Start->All programs->BioControl->VaDia Program Loader
The first time the VaDia Program Loader is
executed, this warning might be shown.
Just press “OK” to continue
April 2011 VaDia User manual ver 1.0
31/34
Set the device address is equal to
1
Press the Browse button next to
the Intel hex file text field
Browse for the VaDia hex-file, in
this case “VADIM 1.00.005.hex”
Click “Open”
April 2011 VaDia User manual ver 1.0
32/34
Press “Start” to load the new
firmware.
Information about the unit will be
shown, and a counter will
monitor the programming status.
When the programming address
reaches the listed File size, the
upload is finished.
When the programming is
finished, the text “success” is
written
Close the VaDia Program
Loader
April 2011 VaDia User manual ver 1.0
33/34
6.4. Technical data
Measuring frequency:
200 Hz pr. Channel
Accuracy:
+-0,2kPa
Measurement range:
0 to -80kPa
No of channels:
4
Communication:
USB for setup and normal functions
Bluetooth Class 1 for Streaming mode, a maximum range
of 100 m can be obtained in a free visual line of sight and
good conditions. This requires that the Bluetooth module
in the PC is a 100 m version as well. The maximum range
is limited by the module with the shortest range.
Battery:
Rechargeable or replaceable standard format AA
Weight:
<80g with battery
Log transfer speed:
25 s pr. hour of log
Casing:
Splash proof, but care must be taken to minimize risk of
malfunction due to moisture inside the unit.
Memory:
10 hours of logging.
PC min. requirements: Windows XP, Windows Vista, Windows 7
100 MB available hard disk space, 500 MB RAM, USB
communication port
April 2011 VaDia User manual ver 1.0
34/34