1
AGINITY WORKBENCH
FOR GREENPLUM
FUNCTIONALITY
OVERVIEW
CONFIDENTIAL AND PROPRIETARY, AGINITY LLC.
DISTRIBUTE WITHOUT PRIOR AUTHORIZATION.
DO NOT
1
CONTENTS
1.
Overview ......................................................................................................................................... 4
2.
Database Connection Dialog Box...................................................................................................... 5
3.
Main Window of Aginity Workbench ............................................................................................... 8
3.1.
Object Browser ........................................................................................................................ 8
3.2.
SQL Editor .............................................................................................................................. 10
3.2.1.
Adding a New Tab in the SQL Editor ................................................................................ 10
3.2.2.
Accessing SQL Statement Management Functions .......................................................... 11
3.2.3.
Inserting a Object/Column Names into the SQL Editor .................................................... 11
3.3.
Result Set ............................................................................................................................... 11
3.3.1.
Managing Grid View ....................................................................................................... 12
3.3.2.
Exporting the Query Execution Result ............................................................................. 13
3.4.
Menu Bar and Toolbar............................................................................................................ 13
3.5.
Status Bar............................................................................................................................... 14
4.
File Menu ...................................................................................................................................... 15
5.
Edit Menu ...................................................................................................................................... 18
6.
Object Menu .................................................................................................................................. 23
7.
8.
6.1.
Functions Provided by the Object Menu ................................................................................. 23
6.2.
Viewing Database Space......................................................................................................... 27
Tools Menu.................................................................................................................................... 30
7.1.
Importing Data to the Database ............................................................................................. 37
7.2.
Using a 3-rd Party File Diff Tool in Workbench ........................................................................ 40
7.3.
Using Database Highlighting ................................................................................................... 42
Query Menu .................................................................................................................................. 44
8.1 Using Parameter Substitution ...................................................................................................... 49
CONFIDENTIAL AND PROPRIETARY, AGINITY LLC.
DISTRIBUTE WITHOUT PRIOR AUTHORIZATION.
DO NOT
2
8.2. Executing SQL Queries with Tracing ............................................................................................ 54
9.
Results Menu ................................................................................................................................. 60
10.
View Menu ................................................................................................................................ 61
11. Window Menu ................................................................................................................................. 66
12. Workbench Command Line Builder .................................................................................................. 67
12.1 Command Line Processing ......................................................................................................... 67
12.2 Specifying an Action ................................................................................................................... 67
12.3 Executing SQL Statements .......................................................................................................... 67
12.3.1. Building a command line for Workbench interactively ........................................................ 69
12.3.2. Execute with Trace in Workbench Command Line .............................................................. 72
13.
Help Menu ................................................................................................................................. 74
© Copyright 2013, Aginity LLC. All Rights Reserved.
No part of this user manual may be reproduced, transmitted, transcribed, stored in a retrieval system, or translated into
any language, in any form or means, electronic, mechanical, photocopying, scanning, recording, or otherwise, without
prior permission in writing from Aginity, LLC.
CONFIDENTIAL AND PROPRIETARY, AGINITY LLC.
DISTRIBUTE WITHOUT PRIOR AUTHORIZATION.
DO NOT
3
1. Overview
Aginity Workbench is an easy-to-use application that enhances your performance when you are
working with your data warehouse.
The application provides a powerful set of GUI-based tools for Developers, DBAs, and Data
Analysts to maximize the productivity of users in these roles.
This SQL database development tool offers unique capabilities that allow you to focus on MPP
databases. It provides an intuitive user interface for creating, managing, and tracking both individual
SQL queries, and entire database schemas. Created by and for Aginity’s own software developers,
Aginity Workbench is based on our profound knowledge of the functionality an advanced data
warehouse appliance is expected to provide, as well as on that of MPP solutions, and MPP system
implementations in particular.
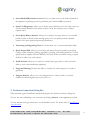
The bulk of the functionality provided by Aginity Workbench consists of the following capabilities:
·
Auto-complete. Allows you to greatly facilitate SQL development by automatically
completing the text that you are starting to type.
·
Parameterized Queries. Creates SQL templates that have parameterized values, thus
making it easy to store and re-use SQL logic.
·
Query Iterators Analysis. The ability to view how a query parallelism is distributed across
the appliance with respect to the resources.
·
Reverse Engineer. Allows you to reverse-engineer a database schema with complete
syntactic support.
·
Cross Platform Schema Migration. Allows you to compare a database schema within or
across appliances, and produce a script to synchronize the schemas while retaining original
data. You can retrieve the schema and data definition language (DDL) from the source
databases, and translate this data into your target system schema.
·
Data Distribution. Allows you to quickly view and alter data distribution.
CONFIDENTIAL AND PROPRIETARY, AGINITY LLC.
DISTRIBUTE WITHOUT PRIOR AUTHORIZATION.
DO NOT
4
·
Secure Shell (SSH) interface to server. Gives you quick access to the shell commands of
the appliance’s operating system for performing more advanced DBA operations.
·
Space Use Diagnostics. Allows you to analyze space utilization across the entire server in a
way that clearly identifies where and how space is used, thus making it easy to address
capacity issues.
·
Server Query History Analysis. Allows you to quickly view query history over extended
periods of time to identify slowly running queries. You can quickly perform a detailed
analysis of the query plans and processing distribution.
·
Vacuuming and Organizing Tools. Tools that allow you to vacuum and analyze tables.
·
Query Output Grid. Allows you to manage and analyze data more quickly by providing
sorting, column relocation, pinning, aggregation, grouping, and charting functions. You can
quickly analyze complex result sets directly in the query results set without having to export
the data to other tools, such as Excel.
·
Profile Column. Allows you to analyze a column’s data type profile, as well as check its
ability to show value distribution graphically.
·
Integrated Charting. Provides the ability to visualize the various aspects of a result set
graphically.
·
Integrity Analysis. Allows you to use packaged rules to analyze a table, or an entire
database for identifying data type issues, and so on.
2. Database Connection Dialog Box
When launched, Aginity Workbench automatically displays the database connection dialog box.
You can also start establishing a new connection by clicking Connect on the application’s toolbar.
You can simultaneously get connected to several database servers. For details, refer to Main Window of
Aginity Workbench.
CONFIDENTIAL AND PROPRIETARY, AGINITY LLC.
DISTRIBUTE WITHOUT PRIOR AUTHORIZATION.
DO NOT
5
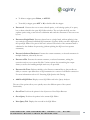
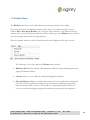
To establish a DB connection:
1. In the corresponding boxes, specify the values of the following parameters:
·
·
·
Server
User ID
Password
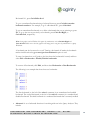
2. To specify the database to connect to, in the Database drop-down list, select or type the name
of the appropriate database.
3. If you want to change the port, in the Port combo box, select or enter the appropriate port.
CONFIDENTIAL AND PROPRIETARY, AGINITY LLC.
DISTRIBUTE WITHOUT PRIOR AUTHORIZATION.
DO NOT
6
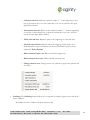
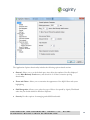
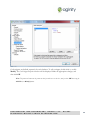
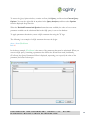
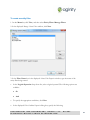
4. To save the provided configuration, click Save.
Once saved, a connection entry can be selected from the Saved drop-down list.
Connection entries are stored in an encrypted form and can be decrypted by the currently logged on
Windows user only. For security reasons, you can choose not to save your password with your
connection string. In this case you need to enter your password every time a connection to the
database needs to be established.
The following other capabilities are also available:
·
New. Creates a new connection entry.
·
Delete. Deletes a saved connection entry.
·
Rename. Renames an existing connection entry.
·
Copy. Provides access to a shortcut menu with the following functions:
o Duplicate Connection Entry. Creates a copy of the current connection entry.
o Connection String to Clipboard. Copies the connection string for the current
connection entry to the clipboard.
o Create an Entry from Connection String in Clipboard. Parses a connection
string that is currently in the clipboard, if any, and creates a new connection entry
based on its contents.
o Export to File. Saves a user-defined set of connection entries to a passwordprotected disk file. This is useful for transferring connection entries from one
computer to another.
o Import from File. Reads connection entries from a file created by the Export to
File function.
CONFIDENTIAL AND PROPRIETARY, AGINITY LLC.
DISTRIBUTE WITHOUT PRIOR AUTHORIZATION.
DO NOT
7
3. Main Window of Aginity Workbench
The most widely used window of Aginity Workbench application is the Query Analyzer window that
allows exploring the database schema and executing SQL queries. You can simultaneously connect
to several database servers. A new Query Analyzer window is opened for each new connection.
You can use the Ctrl+Tab and Shift+Ctrl+Tab key combination, or the Window menu for
switching between several Query Analyzer windows.
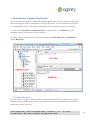
The Query Analyzer window consists of three major parts: the Object Browser, the SQL Editor,
and the Result Set.
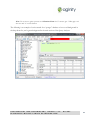
3.1.Object Browser
The left section of the Query Analyzer window is called the Object Browser. It allows you to browse
databases and their child entities, and view information that includes the databases’ size, number of
entities they include, and so on.
CONFIDENTIAL AND PROPRIETARY, AGINITY LLC.
DISTRIBUTE WITHOUT PRIOR AUTHORIZATION.
DO NOT
8
Note: You can manage the visibility of the Object Browser. Press CTRL+B to hide or display the object tree.
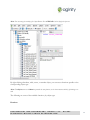
By right-clicking a database, table, server, or another object, you can access functions specific to the
corresponding object type.
Note: The Object menu on the Menu bar provides the same functions, as the shortcut menu available by left-clicking a tree
node.
The following are some of the available functions, by object type:
Database
CONFIDENTIAL AND PROPRIETARY, AGINITY LLC.
DISTRIBUTE WITHOUT PRIOR AUTHORIZATION.
DO NOT
9
·
Script Database Allows publishing a SQL file that contains all the commands that are
necessary for building the entire database structure of a selected database. You can also
specify the objects that must be included in the script, as well as include table contents for
the selected tables.
·
Show Query History. Displays a server side query history.
·
Compare Schema. Allows comparing the selected database schema to another database
schema.
·
Show User Sessions. Displays user sessions connected to the selected database.
Server
·
Server explorer. Displays hardware information about your database system for both master
nodes as well as each individual segment.
·
Open SSH terminal. Displays a window that allows connecting to the SSH terminal.
3.2.SQL Editor
The section in the upper right of the Query Analyzer window is used for editing SQL scripts.
You can access the Query Analyzer by clicking Connect button on the application toolbar.
The Query Analyzer allows you to access the SQL Editor to create and manage SQL statements
using an extensive set of easy-to-use functions.
3.2.1.
Adding a New Tab in the SQL Editor
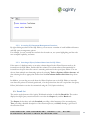
To add a new tab to write a SQL query in, click New tab. You can also add a new tab by pressing
CTRL+T if the Query Analyzer window is currently open.
To switch between several tabs in the active Query Analyzer window, press CTRL+F6 and CTRL +
SHIFT + F6.
CONFIDENTIAL AND PROPRIETARY, AGINITY LLC.
DISTRIBUTE WITHOUT PRIOR AUTHORIZATION.
DO NOT
10
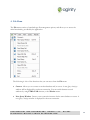
3.2.2. Accessing SQL Statement Management Functions
By right-clicking anywhere in the SQL Editor, you can access a number of useful additional features
and SQL query management options.
For example, you can override the row limit for the result set, use syntax highlighting and the code
auto-complete capability, and more.
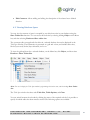
3.2.3. Inserting a Object/Column Names into the SQL Editor
If the name of a database entity or an entity column selected in the Object Browser needs to be
inserted into the SQL Editor, double-click the column. The column name will automatically be
inserted into the spot where the cursor is currently positioned in the open Query Editor. You can
choose from multiple text-formatting options by selecting Tools > Options >Object browser, and
then selecting the most appropriate format from the On column double-click insert drop-down
list.
In addition, you can drag any node from the Object Explorer tree to the SQL Editor to insert the
text where the pointer is currently positioned, or at the point where the text is copied into the Query
Editor (this behavior can also be customized using the Tools/Options windows).
3.3. Result Set
The section at the bottom of the Aginity Workbench window is called the Result Set. The section
displays the SQL Query execution result in two tabs: the Output tab, and the Result tab.
The Output tab has three sub-tabs: Standard, providing a brief summary of the executed query,
Text, providing a detailed description of the execution process, and Grid, allowing a grid view of
the execution result.
CONFIDENTIAL AND PROPRIETARY, AGINITY LLC.
DISTRIBUTE WITHOUT PRIOR AUTHORIZATION.
DO NOT
11
The system displays the Output tab regardless of whether or not an error has occurred during a
SQL script’s execution. If multiple statements were executed, and the server has returned several
result sets, the result tabs are added for those queries that had been executed before the failed
execution took place.
3.3.1. Managing Grid View
If you do not want the Text and Grid sub-tabs to be displayed in the Output tab, click Tools,
select Options > Result set options /Output options, and then clear the Enable Text and Grid
Output check boxes.
The Result Set allows you to drag a column from the Results tab, and perform grouping by this
column. To do this, drag the column that you want to group by to the drag a column header here
area.
Each result set grid can be represented in a single-row mode by using Show single row grid command
from a context menu on a result set grid. Single-row mode transposes the result set so that result
columns become rows and single row at a time is displayed in a transposed grid like shown on the
figure below.
CONFIDENTIAL AND PROPRIETARY, AGINITY LLC.
DISTRIBUTE WITHOUT PRIOR AUTHORIZATION.
DO NOT
12
To navigate through the data use the buttons below the grid or Go to record input element for
jumping to a particular record.
To define the desired formatting for numeric and temporal values in the data grid use Tools /
Options.
3.3.2. Exporting the Query Execution Result
You can export query execution results to the Excel 2003 XML or CSV formats or open it in
Microsoft Excel without producing a disk file. To do this, right-click anywhere in the Result tab,
and then navigate to Export menu to see the list of available commands.
The additional functions can be accessed by right-clicking in the data grid, and then selecting
Actions for the column Name (it is possible to create the Pareto and Frequency Distribution
Charts).
3.4. Menu Bar and Toolbar
The Menu bar provides access to several menus that are used to manage the bulk of the system’s
CONFIDENTIAL AND PROPRIETARY, AGINITY LLC.
DISTRIBUTE WITHOUT PRIOR AUTHORIZATION.
DO NOT
13
functionality.
The Toolbar is located under the Menu bar and provides access to the most frequently used
options.
3.5. Status Bar
The Status bar is located under the Result Set section. It shows helpful status information. If you
select more than 1 row in the result set, the Status bar can show the minimum, maximum, average,
and other data. To make this feature available, click the drop-down arrow in the right side of the
Status bar, and select the options that you want to be displayed.
CONFIDENTIAL AND PROPRIETARY, AGINITY LLC.
DISTRIBUTE WITHOUT PRIOR AUTHORIZATION.
DO NOT
14
4. File Menu
The File menu consists of standard-type file management options, and allows you to access the
main functionality, provided by the application.
The following is a list of the functions that you can access from the File menu.
·
Connect. Allows you to connect to another database and/or server. A new Query Analyzer
window will be displayed for each new connection. You can switch between several
windows by using CTRL+TAB shortcut, or the Window menu.
·
New Query Window. Creates a new connection instance for the same database or server. A
new Query Analyzer window is displayed for the new connection.
CONFIDENTIAL AND PROPRIETARY, AGINITY LLC.
DISTRIBUTE WITHOUT PRIOR AUTHORIZATION.
DO NOT
15
·
Open Query Set. Opens a set of queries using a specified path, and displays them in the
Query Analyzer window. Every time you open a query set, the application requests you to
establish a new connection, and displays the query set in a new Query Analyzer window.
·
Recent Query Sets. Displays the 10 most recently opened query sets. You can also open
any of the most recent queries by selecting it from a drop-down list box. You can adjust the
number of the recently opened query sets to be displayed by clicking Tools on the Menu
Bar, and then selecting Options > General settings.
·
Save Query Set. Allows you to save all tabs that are currently opened in the Query Analyzer
to a single query set file. The tabs that contain text loaded from a SQL file save the
corresponding SQL files. The SQL script that is contained in the tabs, and has not been
saved to a file, is saved to the query set file.
·
Save Query Set As. Allows you to save a query set under a different name.
·
Open SQL File. Opens a SQL file and adds it to the new tab in the Query Analyzer.
·
Recent SQL Files. By default, displays the 10 most recently opened SQL files. You can
adjust the number of the recently opened query sets to be displayed by clicking Tools on
the Menu Bar, and then selecting Options > General settings.
·
Save Query. Saves text in the open SQL Editor to a disk file.
·
Save Query As. Allows you to save a text in the active SQL Editor under a different name.
·
Open DDL File. Opens a DDL file from a local drive, and displays it in a new window.
You can compare this DDL file with another DDL file and/or database, save the DDL file,
and generate a SQL script from the open DDL file.
·
Recent DDL Files. Displays the 10 most recently opened DDL files. To adjust the number
of the most recently opened DDL files to be displayed, click Tools, and then select >
Options > General settings.
·
Print. Allows you to print text found in the SQL Editor.
CONFIDENTIAL AND PROPRIETARY, AGINITY LLC.
DISTRIBUTE WITHOUT PRIOR AUTHORIZATION.
DO NOT
16
·
Send. Sends an open query by e-mail, either as an attachment, or as a compressed
attachment.
·
Exit. Allows you to exit Aginity Workbench.
CONFIDENTIAL AND PROPRIETARY, AGINITY LLC.
DISTRIBUTE WITHOUT PRIOR AUTHORIZATION.
DO NOT
17
5. Edit Menu
Most of the functions provided by the Edit menu become available only when the pointer is
positioned in the SQL Editor (Query Analyzer).
However, some of the functions are also available when the keyboard focus is on the Result Set
grid, or on the Object Explorer tree.
The Edit menu allows managing text data. For example, you can undo the latest change, cut, copy,
or paste selected text, and make some minor changes to the text.
The following is a list of the functions that can be accessed from the Edit menu:
·
Undo. Reverses the latest change made in the SQL Editor.
·
Redo. Restores the result of an action that you have cancelled in the SQL Editor.
·
Cut. Allows you to cut a selected text in the SQL Editor to Windows clipboard.
CONFIDENTIAL AND PROPRIETARY, AGINITY LLC.
DISTRIBUTE WITHOUT PRIOR AUTHORIZATION.
DO NOT
18
·
Copy. Copies text, selected in the SQL Editor, or a cell range, selected in the Result Set
grid, depending on which part of the window has the keyboard focus. The command copies
selected grid data with, or without the headers, depending on the setting that can be adjusted
to your preferences in Tools/Options.
·
Copy with Headers. Allows you to copy selected rows, including the row headers, from the
result set in the Result Set window.
·
Paste. Allows you to paste text from the clipboard into the SQL Editor.
·
Find. Displays the standard Find window for the SQL Editor.
·
Find Again. Allows you to perform a search in the SQL Editor using the most recently used
search criteria, without requesting you to provide any more data.
·
Replace. Displays the standard Find and Replace window for the SQL Editor
·
Goto Line. Displays the Goto Line window for the SQL Editor where you can specify the
text line to which the pointer must be moved.
·
Bookmarks. Allows you to set anonymous or numbered bookmarks in the open SQL
Editor window. It is possible to create up to ten numbered bookmarks, and an unlimited
number of unnumbered (anonymous) bookmarks.
For example, you can place Bookmark 1 at the beginning of a complicated SQL statement to
which you want to be able to gain quick access, and Bookmark 2 at your current editing
location. After this, to quickly reach the SQL section, you need to press Ctrl+Alt+1. You
can return to your second bookmark location by pressing Ctrl+Alt+2.
To set a numbered bookmark, or to go to a bookmark that you have set previously, you can
use keyboard shortcuts, or the Edit menu. To set a numbered bookmark using a keyboard
shortcut, press Ctrl+Shift+Alt+<marker bookmark number>. For example, to set a
CONFIDENTIAL AND PROPRIETARY, AGINITY LLC.
DISTRIBUTE WITHOUT PRIOR AUTHORIZATION.
DO NOT
19
Bookmark N 1, press Ctrl+Shift+Alt+1.
To go to a numbered bookmark using a keyboard shortcut, press Ctrl+Alt+<marker
bookmark number>. For example, to go to a Bookmark N 1, press Ctrl+Alt+1.
To set an unnumbered bookmark, or to delete a bookmark that you are pointing to, press
F9. To go to the next or previously set bookmark, press Ctrl+Alt+Right, or
Ctrl+Alt+Left, respectively.
Note: Some graphics cards in Windows OS support key combinations, such asCtrl+Alt+Right and
Ctrl+Alt+Left. Make sure to check the graphics card settings prior to using these key combinations in Aginity
Workbench.
A bookmark can also be turned on or off. Turning a bookmark off makes the bookmark
marker invisible when the go to next/previous bookmark option is used.
To turn a bookmark on or off, point to the line where the bookmark is located, and then
select Edit > Bookmarks > Enable/Disable bookmarks.
To remove all bookmarks, click Edit, and then select Bookmarks >Clear Bookmarks.
The following is an example that shows three set bookmarks.
The first bookmark (to the left of the select 1 statement) is an unnumbered and enabled
bookmark. The second bookmark (to the left of the select 2 statement) is a numbered and
disabled bookmark. The third bookmark is a numbered bookmark that is currently enabled.
·
Advanced. A set of advanced functions for working with text in the Query Analyzer. They
include:
CONFIDENTIAL AND PROPRIETARY, AGINITY LLC.
DISTRIBUTE WITHOUT PRIOR AUTHORIZATION.
DO NOT
20
·
o
Comment selection. Adds the comment symbol "--" to the beginning of each
line of the selected text, or to the current line, if no text is selected in the open
SQL Editor window.
o
Uncomment selection. Removes the comment symbol "--" from the beginning
of each line of the selected text, or from the current line, if no text is selected
text in the open SQL Editor window.
o
Tabify selected lines. Replaces spaces at the beginning of a line with tabs.
o
Untabify selected lines. Replaces tabs at the begging of a line with a userdefined number of space characters (the tab size, measured in spaces, can be
adjusted in Tools/Options).
o
Make selection Upper case. Makes selected text upper case.
o
Make selection lower case. Makes selected text lower case.
o
Change selection case. Changes lower case symbols to upper case symbols and
vice-versa.
Outlining. The Outlining function allows you to expand, or collapse regions in the code in the
Query Analyzer.
By default, all code is visible in all Query Analyzer tabs.
CONFIDENTIAL AND PROPRIETARY, AGINITY LLC.
DISTRIBUTE WITHOUT PRIOR AUTHORIZATION.
DO NOT
21
This function can also help make the code more compact and readable by hiding the unnecessary
lines under the 'Region' clause. A region’s boundaries are defined by the following text: ‘-- region
RegionName’, to mark the beginning of the region, and ‘--endregion’ to mark its end.
To create a region, simply type the required text in the Query Analyzer:
Note: The "RegionName" text quoted in the above example is optional. Aginity Workbench also supports nested regions, as
illustrated in the following example.
The vertical line in the left side of the SQL Editor window uses a square with a minus sign (-) to
mark the start of each collapsible code region.
When you click the minus sign, the text within the code region is replaced with a box that contains
the region’s name, or the ellipsis sign (…), if the region name was not specified. The minus sign is
then changed to the plus sign (+).
When you click a plus sign, the collapsed code is expanded, and the plus sign is changed to a minus
sign.
If you point to the box with the ellipses sign, or to a region’s name, a tooltip is displayed that shows
the code contained in the collapsed region.
When Collapse is clicked, a region is compacted, and the region’s name is displayed.
CONFIDENTIAL AND PROPRIETARY, AGINITY LLC.
DISTRIBUTE WITHOUT PRIOR AUTHORIZATION.
DO NOT
22
6. Object Menu
The Object menu allows you to access the various commands, associated with functions that are
used to manage objects.
To perform an operation on an object, you must select this object in the Object Browser, click
Object on the main toolbar of the program, select the appropriate object type on the displayed
menu, and then click the required command.
Note: The same set of commands provided by the Object menu can also be accessed by right-clicking any object in the Object
Browser, and then selecting the required function from the displayed menu. The commands are available only if they are relevant
to the selected object.
6.1. Functions Provided by the Object Menu
Functions Specific to the Server Object Type
·
Server Monitor. Connects to the target server using SSH and launches some of useful Linux
commands for monitoring the state of the host.
·
Server Explorer. Displays various information about the master and all segments.
·
Open SSH terminal. Displays a window that allows connecting to the SSH terminal.
·
Refresh server information. Updates the status of all servers in the Object Browser.
Functions Specific to the Database Object Type
·
·
Refresh DB list. Updates the list of all databases in the Object Browser.
Comment on Database. Adds a comment for the selected database.
CONFIDENTIAL AND PROPRIETARY, AGINITY LLC.
DISTRIBUTE WITHOUT PRIOR AUTHORIZATION.
DO NOT
23
·
Script. Allows publishing a SQL command file that contains all the necessary commands for
completely rebuilding the database structure. You can also specify the objects that must be
included in the script.
·
Show User Sessions. Displays the Session List window that shows all those users who are
connected to the selected server. The Session List window provides an option for terminating
selected sessions.
·
Show Query History. Displays a server side history for all executed queries (up to a system
defined limit which is 2000 queries by default.
·
Show Tables Size*. Displays a window that provides a detailed description (i.e. the Data
Skew) of the currently selected database tables. For details, refer to Viewing Database Space.
·
Database Maintenance. Purges the previously deleted records from the database tables.
Functions Specific to the Table Object Type
·
Refresh table list. Updates the list of tables for the currently selected database.
·
Script. Generates the basic DML commands for the selected table, such as SELECT,
INSERT, and UPDATE, as well as DDL commands, inserting them into the open Query
Editor, New Query Editor, or copying them to the clipboard.
·
Data Review. Executes a SQL script that retrieves the top 100 records from the selected
table.
·
Advanced. Displays a set of advanced options for managing the selected table, including
Vacuum and Change Distribution.
·
Charts. Displays a frequency distribution chart.
·
Edit Comment. Allows adding comments to changes and modifications. Comments can
also be added to table columns. They can be edited using both Workbench functionality and
SQL queries.
CONFIDENTIAL AND PROPRIETARY, AGINITY LLC.
DISTRIBUTE WITHOUT PRIOR AUTHORIZATION.
DO NOT
24
·
Refresh Columns. Updates columns in the selected table.
·
Show Distribution. Visualizes how your data is distributed over the SPUs in your system.
The data highlighted in blue is live data. The red highlighting signifies data that has been
deleted, but is yet to be purged by using the Groom database, or Reclaim commands.
·
Import/Export Data. Imports and exports a table from and to an external text file. You
can specify how the data to be imported must be formatted.
Functions Specific to the View Object Type
·
Refresh view list. Updates the view list in the selected database.
·
Script. Generates a DML or DDL commands, either inserting them into the Query window,
or copying them to the clipboard.
·
Data Review. Executes a SQL script that retrieves the top 100 records.
·
Charts. Displays a frequency distribution chart. You are requested to select a numeric table
column to be used for creating the frequency distribution plot.
·
Create View. Inserts the CREATE VIEW SQL statement into a new SQL Editor window
for fast and easy view creation.
·
Edit View. Inserts the CREATE VIEW SQL statement into a new SQL Editor window,
providing all the required data from the currently selected view.
·
Edit Comment. Allows adding or editing the description of a selected view.
·
Refresh columns. Updates the columns of the selected view.
·
Export Data. Displays the Export Data window, and allows you to specify the various
parameters that affect the format of the output file.
CONFIDENTIAL AND PROPRIETARY, AGINITY LLC.
DISTRIBUTE WITHOUT PRIOR AUTHORIZATION.
DO NOT
25
Functions Specific to Sequences
·
Refresh Sequence List. Updates the sequence list in the selected database.
·
Script. - Generates a DDL command, and inserts it into a query window, or copies it to the
clipboard.
·
Edit Comment. Allows adding and editing the description of the selected sequence.
Functions Specific to the External Table Object type
·
Refresh external table list. Updates the list of external tables in the selected database.
·
Script. - Generates SELECT statements, INSERT statements, or DDL commands, inserting
them into the Query Editor, or copying them to the clipboard.
·
Refresh Columns. Updates the selected table’s columns.
Functions Specific to User-Defined Functions/Aggregates/Window Fun tions
·
Refresh UDF list. Updates the list of user-defined functions in the selected database.
·
Script. Generates a SELECT statement, inserting it into the Query Editor, or copying it to
the clipboard.
·
New. Allows creating a user-defined scalar/aggregate/window function. Fill in the
Function Properties form, and then click OK.
·
Edit. Allows editing the selected user-defined scalar/aggregate/window function.
CONFIDENTIAL AND PROPRIETARY, AGINITY LLC.
DISTRIBUTE WITHOUT PRIOR AUTHORIZATION.
DO NOT
26
·
Edit Comment. Allows adding and editing the description of the selected user- defined
function.
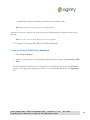
6.2. Viewing Database Space
You can view the amount of space is occupied by any table that exists in your database using the
Show Tables Size function. You can access this function by selecting clicking Object on the Menu
bar, and then selecting Database>Show tables size.
The system provides storage details for tables in a selected database that can be displayed in the
Table Space window. The information is presented as a grid and a chart, and includes data skew,
blocks/bytes used, blocks/bytes allocated, and so on.
To view the grid and chart for a selected database, on the Menu bar, click Object, and then select
Database> Show Tables Size.
Note: You can also display the Table Space window by right-clicking the database name, and then clicking Show Tables
Size.
The Table Space window has three tabs: Table Size, Table Options, and Chart.
You can switch between the sub-tabs by clicking the name of the required sub-tab. It is possible to
specify for which tables the chart must be created. The following options are available:
CONFIDENTIAL AND PROPRIETARY, AGINITY LLC.
DISTRIBUTE WITHOUT PRIOR AUTHORIZATION.
DO NOT
27
·
Smart. Attempts to optimize the number of the displayed largest entities, so that the chart
does not look over-cluttered with a lot of small tables.
·
Top 10 largest tables
·
Top 20 largest tables
·
All tables
In addition, you can set the component the chart must be based on by selecting it from the View
drop-down list. The following options are available:
·
Bubbles
·
Rectangular
·
Ring
By pointing to a component, you can display an area that provides general information on the
database associated with it. The information includes allocated space, used space, the percentage of
used space in the allocated space, number of rows, skew, and the created date.
CONFIDENTIAL AND PROPRIETARY, AGINITY LLC.
DISTRIBUTE WITHOUT PRIOR AUTHORIZATION.
DO NOT
28
CONFIDENTIAL AND PROPRIETARY, AGINITY LLC.
DISTRIBUTE WITHOUT PRIOR AUTHORIZATION.
DO NOT
29
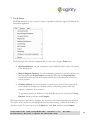
7. Tools Menu
The Tools menu allows you to access a variety of capabilities offered by Aginity Workbench for
Greenplum application.
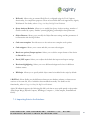
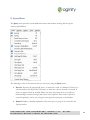
The following is a list of all the commands that you can access using the Tools menu:
·
SQL Dump Runner. Use this command to open a SQL file and run each of the queries
in the Debug mode.
·
Reverse-Engineer Database. Use this command to perform an operation similar to the
one launched by the Script Database command. Unlike with the Script Database
command, you must provide the connection details for the database that you want to
reverse-engineer.
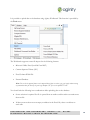
·
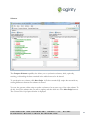
Compare Schemas. Use this command to launch an easy-to-use GUI tool that allows
you to effortlessly compare two database schemas, and quickly generate delta SQL
scripts to synchronize their structures.
To get started, specify two databases, or the NHS files, previously created by the Script
Database function, and then click Compare.
When the comparison procedure is complete, the structures of the selected databases are displayed.
The objects of the schema that are highlighted in red are either missing, or different from those in
the other schema. To access the tool, on the Menu bar, click Tool, and then select Compare
CONFIDENTIAL AND PROPRIETARY, AGINITY LLC.
DISTRIBUTE WITHOUT PRIOR AUTHORIZATION.
DO NOT
30
Schemas.
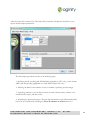
The Compare Schemas capability also allows you to synchronize schemas, while, optionally,
retaining, or discarding the data contained in the tables that need to be altered.
To synchronize two schemas, click Alter Script. A file that contains SQL scripts that reconcile any
existing differences between the schemas is created.
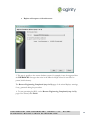
You can also generate a delta script to update a schema to be an exact copy of the other schema. To
do this, choose the schema that you want to update, and then click one of the Alter Script buttons.
The Generate Delta Script Options window is displayed.
CONFIDENTIAL AND PROPRIETARY, AGINITY LLC.
DISTRIBUTE WITHOUT PRIOR AUTHORIZATION.
DO NOT
31
If the Preserve Tables content check box is selected, the delta script is automatically modified
to retain the table data in the database being modified.
·
Migrate DDL. Allows you to generate a DDL script, and migrate a database from various
platforms to Greenplum. The supported platforms include Microsoft SQL server, MySql,
and Teradata.
CONFIDENTIAL AND PROPRIETARY, AGINITY LLC.
DISTRIBUTE WITHOUT PRIOR AUTHORIZATION.
DO NOT
32
To migrate a database from any of the above platforms to Greenplum, you first need to
choose the database type and establish a valid connection to the specified database. This is
done by clicking Tools, and then selecting Migrate DDL. After the connection is
established, the DDL Generator Wizard is displayed. The DDL Generator Wizard allows
you to generate the required DLL script.
Note: You must follow all the 4 steps of the wizard to successfully migrate the database.
To generate a DDL script:
1. On the Select Entities to Script (step 1 of 4) page of the wizard, select the entities that
must be included in the script.
2. On the DDL Generation Options (step 2 of 4) page of the wizard, select the DLL
generation options that must be used. The following options are available:
·
Char case. Select from a list.
·
Convert Pascal notations to underscores.
CONFIDENTIAL AND PROPRIETARY, AGINITY LLC.
DISTRIBUTE WITHOUT PRIOR AUTHORIZATION.
DO NOT
33
·
Replace whitespaces with underscores.
3. This step is specific to the source database system (for example, it may be suggested that
the HIERARCHY data type that exists in the Microsoft SQL Server be converted to
parent/child columns).
The Reverse Engineering Completed (step 4 of 4) page of the wizard displays warnings,
if any, generated during the procedure.
4. To start generating the DLL, on the Reverse Engineering Completed (step 4 of 4)
page of the wizard, click Finish.
CONFIDENTIAL AND PROPRIETARY, AGINITY LLC.
DISTRIBUTE WITHOUT PRIOR AUTHORIZATION.
DO NOT
34
The generated script will automatically appear in the Query Analyzer window.
·
Database Maintenance. Irrevocably deletes records from the selected database tables.
·
Load Testing. Provides access to the tools for performing load testing and analyze load
testing results.
·
SSH Terminal. Displays a new window that allows you to connect to the SSH terminal.
·
File Utilities. Allows converting a file to the CSV format, reformatting a txt file, and
changing the character encoding and line endings.
·
Import Data. Allows uploading data to the database. For details on this functionality, refer
to Importing Data to the Database.
·
Workbench Command Line Builder. Allows to visually construct a command line for
executing the Workbench in unattended (command-line) mode.
·
Options. Allows customizing Aginity Workbench for Greenplum.
CONFIDENTIAL AND PROPRIETARY, AGINITY LLC.
DISTRIBUTE WITHOUT PRIOR AUTHORIZATION.
DO NOT
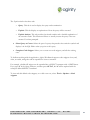
35
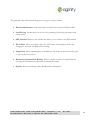
The Application Options functionality includes the following option-related sections:
·
General. Allows you to set the default query time, adjust the number of the files displayed
on the Most Recently Used menus, and switch on or off the Connection pooling
functionality.
·
Fonts and Colors. Allows you to customize the appearance of the SQL Editor and syntax
highlighting.
·
Shell Integration. Allows you to select the type of files to be opened by Aginity Workbench
when they are double-clicked in Windows Explorer.
·
Security. Provides options for managing cached SSH credentials.
CONFIDENTIAL AND PROPRIETARY, AGINITY LLC.
DISTRIBUTE WITHOUT PRIOR AUTHORIZATION.
DO NOT
36
·
Diff tool*. Allows using an external file diff tool, configured using the Tools/Options
functionality, for comparison purposes. There are several file diff tools supported by Aginity
Workbench. For details, refer to Using a 3-rd Party File Diff Tool in Workbench.
·
Query Analyzer Defaults. Allows you to modify the Query Analyzer settings, number of
results returned by a query. Enables syntax highlighting, and multiple other parameters.
·
Object Browser. Allows you to modify the Object Browser settings and the parameters of
its interaction with the SQL Editor.
·
Code auto-complete. Provides access to the various auto-complete code options.
·
Code snippets. Allows you to create and edit your own code snippets.
·
Result set options/Output options. Allows you to edit the output format of the data in
the Result Set section.
·
Excel/CSV export. Allows you to adjust the default data import and export settings.
·
Database highlighting. Allows you to use different background colors for different
database names.
·
DB Script. Allows you to specify which objects must be included in the script by default.
* Diff Tool. Allows finding out the differences between two database schemas, or between two
versions of the same file, one of which has been modified externally. For details on this
functionality, refer to Using a 3-rd Party File Diff Tool in Workbench.
Aginity Workbench supports the following file diff tools that are most wide-spread on the market:
Araxis Super Merge, Beyond Compare, WinMerge, Compare++, CodeCompare, ExamDiff and
Guiffy.
7.1. Importing Data to the Database
CONFIDENTIAL AND PROPRIETARY, AGINITY LLC.
DISTRIBUTE WITHOUT PRIOR AUTHORIZATION.
DO NOT
37
It is possible to upload data to the database using Aginity Workbench. This function is provided by
the Tools menu.
The Workbench supports source file import for the following formats:
·
Microsoft Office Excel (both 2003 and 2007)
·
Comma Separated Values (CSV)
·
Fixed Column Width File
·
External Database
Note: Files in all the supported formats can be imported directly from an archive (zip, gzip, bzip2) without creating
any intermediate disk file that may be quite large. Multiple CSV files can be imported at a time.
You should take the following into consideration while uploading data to the database:
·
Source selection is required if a file is opened from an archive and the archive contains more
than one file.
·
If there are more than one non-empty worksheet in the Excel file, select a worksheet to
work with.
CONFIDENTIAL AND PROPRIETARY, AGINITY LLC.
DISTRIBUTE WITHOUT PRIOR AUTHORIZATION.
DO NOT
38
After the source file is selected, the Data Import Wizard window is displayed, that allows you to
specify the data import parameters.
The data import procedure consists of the following steps:
1. Specifying the file encoding and field delimiter (applicable to CSV only), or the column
widths and file encoding (applicable to a fixed-width columns file only).
2. Selecting the limit for the number of rows or columns (specifying the data range).
3. Specifying whether or not the first row must contain column names, columns to be
included in the output, and their order.
4. Specifying the physical data types. The data type information is provided automatically,
but it can be customized by selecting the Treat all columns as varchar check box.
CONFIDENTIAL AND PROPRIETARY, AGINITY LLC.
DISTRIBUTE WITHOUT PRIOR AUTHORIZATION.
DO NOT
39
5. Specifying the destination database and name of the destination table.
Note: Importing data into an existing table is not currently supported.
After all the steps are completed, the newly created and completed table is displayed in the Object
Browser.
Note: You need to refresh the Object Browser for the table to be displayed.
7.2. Using a 3-rd Party File Diff Tool in Workbench
To use a 3-d Party File Diff Tool in Workbench:
1. Select Tools > Options.
2.
In the tree in the left pane of the displayed Application Options window, select General > Diff
Tool.
The first installed file diff tool that is recognized by the Workbench is selected in the Tool dropdown list. The appropriate arguments for the tool are automatically displayed in the Arguments
box.
CONFIDENTIAL AND PROPRIETARY, AGINITY LLC.
DISTRIBUTE WITHOUT PRIOR AUTHORIZATION.
DO NOT
40
Notes:
·
The Workbench allows using any other tool that is not listed, provided that this tool supports transferring files using the
command prompt.
·
Under Legend, a hint is displayed on how the Arguments box must be filled in for a tool that is not known to
Aginity Workbench.
3. Select another file diff tool installed on the computer, or select a custom file diff tool from the
Tool drop-down list.
4. If a custom diff tool is selected, specify the executable location and command prompt
parameters for the custom tool.
The green OK label is displayed if under the Arguments box if the program file has been located,
and the tool is ready to be used.
CONFIDENTIAL AND PROPRIETARY, AGINITY LLC.
DISTRIBUTE WITHOUT PRIOR AUTHORIZATION.
DO NOT
41
You can use the selected diff tool to find out the differences between two database schemas, or
between two versions of the same file, one of which has been modified externally and is currently
opened in the SQL Editor.
7.3.Using Database Highlighting
The database highlighting function allows modifying the appearance of the SQL window and the
background of the DB Name box. This is done by applying a set of modifiable rules.
To set or modify the rules to be applied:
1.
Select Tools > Options > Database Highlighting.
2. In the Database Highlighting section, click Add.
3. When the DB name is provided, click OK, and then verify the name that is now
displayed in the list.
CONFIDENTIAL AND PROPRIETARY, AGINITY LLC.
DISTRIBUTE WITHOUT PRIOR AUTHORIZATION.
DO NOT
42
Note: You can also use regular expressions in the Database Name box. For instance, type: '^A' to apply a rule
that starts with 'A' to all the databases.
The following is an example of a rule created for a “postgre” database to have a red background in
the drop-down list, and a green background in the main section of the Query Analyzer.
CONFIDENTIAL AND PROPRIETARY, AGINITY LLC.
DISTRIBUTE WITHOUT PRIOR AUTHORIZATION.
DO NOT
43
8. Query Menu
The Query menu provides several additional features that facilitate working with the Query
Analyzer (SQL Editor).
The following is a list of the functions that you can access using the Query menu:
·
Execute. Executes the current SQL query. A semicolon is used as a delimiter. If there is no
selection made in the SQL Editor, the query, in which the cursor is located, is executed. If
there is a selection made in the SQL Editor, the query the pointer is set on is split into
individual SQL statements using a semi-colon as the separator. Each of these queries is
executed separately, one by one, using the same physical connection to the database.
·
Explain. Displays a detailed explanation of how the query is going to be executed in the
Explain window.
CONFIDENTIAL AND PROPRIETARY, AGINITY LLC.
DISTRIBUTE WITHOUT PRIOR AUTHORIZATION.
DO NOT
44
The Explain window has three tabs:
o Query. This tab is used to display the query under examination.
o Explain. This tab displays an explanation of how the query will be executed.
o Explain Analyze. This tab provides the related statistics and a detailed explanation of
the execution result. This function will have to actually execute the query if the user
answers Yes when prompted.
·
Select Query at Cursor. Selects the part of a query that precedes the semicolon symbol and
displays it in the SQL Editor when you point to this query.
·
Complete Code Snippet. Allows you to create new code snippets, and edit the existing
ones.
To facilitate working with the application, Aginity Workbench supports code snippets: short, and,
often, re-usable, strings that can be expanded to create a statement.
For example, a default ‘sf’ snippet can be expanded into a SELECT statement with a LIMIT clause.
If you type ‘sf’ in the Query Analyzer, and then press ALT+C, the ‘sf’ will be replaced with the
actual pre-defined SELECT statement.
To view and edit default code snippets, or to add a new one, select Tools > Options > Code
snippets.
CONFIDENTIAL AND PROPRIETARY, AGINITY LLC.
DISTRIBUTE WITHOUT PRIOR AUTHORIZATION.
DO NOT
45
Code snippets are defined separately for each database. To edit a snippet, double-click it, or click
Modify. The Code Snippet Properties window will be displayed. Make the appropriate changes, and
then click OK.
Note: The pointer will remain in the position in which you will leave it in the box, until you click OK when using the
Add New, or Modify function.
CONFIDENTIAL AND PROPRIETARY, AGINITY LLC.
DISTRIBUTE WITHOUT PRIOR AUTHORIZATION.
DO NOT
46
To add a new snippet, click Add New, and then provide a valid code for the new snippet.
The code must consist of alphanumeric characters, and it can contain underscores. Add any valid
statement into the box, and then click OK. The new snippet will be added to the list of existing
snippets in alphabetical order.
After the snippet is created and saved, type the name of the snippet in the Query Analyzer window,
select it, and press ALT+C.
The selected text will automatically be transformed into a pre-defined snippet.
To delete a snippet, select it, and then click Delete. A confirmation dialog box will be displayed. If
you want to proceed with deleting the snippet, click Yes in the confirmation dialog box.
The following shortcuts can be used to add, delete, or modify a snippet:
·
To add a new snippet, press Insert, or ALT + A".
CONFIDENTIAL AND PROPRIETARY, AGINITY LLC.
DISTRIBUTE WITHOUT PRIOR AUTHORIZATION.
DO NOT
47
·
To delete a snippet, press Delete, or ALT+D.
·
To modify a snippet, press ALT + M, or double click the snippet.
·
Execute all. Executes the one or more selected queries, or all existing queries, if no query
has yet been selected in the open SQL Editor window. The tool splits the SQL text into
separate queries using a semi-colon as a delimiter and sends the statements to the server one
by one.
·
Execute as Single Batch. Executes selected text as a single batch, without splitting it into
any semicolon-separated, individual SQL statements. Executes all the text that is displayed in
the open SQL Editor if no part of this text is selected. The whole of the statement batch is
submitted to the database for processing (without splitting the SQL text into separate
statements.)
·
Execute in Selected Databases. Executes the current statement, or selected statements in
multiple databases, selected by the user.
·
Execute to File. Executes the current statement, or selected statements, writing the
execution result to one or more disk files. Various options for customizing the output
format, as well as for handling multiple result sets, are provided.
·
Execute with Trace. Behaves similarly to the Execute command above, but provides an
ability to execute a pre-defined set of SQL statements in a context of a different connection.
For more information refer to 8.2. Executing SQL Queries with Tracing.
·
Add New SQL Editor. Displays a new SQL Editor tab in the Query Analyzer.
The rest of the options allow you to quickly access the different parts of the system’s
functionality.
·
Go to Tree. Positions the pointer in the object tree of the Object Browser.
·
Go to Query. Positions the pointer in the current SQL Editor.
·
Next Query Tab. Displays the next tab in the SQL Editor.
CONFIDENTIAL AND PROPRIETARY, AGINITY LLC.
DISTRIBUTE WITHOUT PRIOR AUTHORIZATION.
DO NOT
48
·
Prev Query Tab. Displays the previous tab in the SQL Editor.
·
Word wrap. Turns on and off the word wrapping mode.
·
Current Query Options. Displays the options that are available for the open SQL Editor,
and allows you to switch on or off syntax highlighting. You can also override the default
time limit for query timeouts and returned rows limit, set in seconds. In addition, this
function allows you to specify the proper query type when you are editing a view, or
function (for example, you can change the behavior of the Execute function to Execute as
Single Block, so that no errors will occur when the function is created).
8.1 Using Parameter Substitution
Parameters are an essential part of SQL queries. Aginity Workbench supports parameter substitution
for parameters that follow the $ParamName, or ${ParamName} name mask.
You can enable this feature by selecting the Enable Parameterized Queries check box in the Query
Options window.
CONFIDENTIAL AND PROPRIETARY, AGINITY LLC.
DISTRIBUTE WITHOUT PRIOR AUTHORIZATION.
DO NOT
49
To access the Query Options window, on main tool bar, click Query, and then select Current Query
Options. You can also right-click in anywhere in the Query Analyzer, and then select Options
from the displayed drop-down list.
When the Enabled Parametrized Queries feature becomes available, the value of one or more
parameter variables can be substituted before the SQL query is sent to the database.
To apply parameter substitution, create a SQL statement that using the "$" sign.
The following is an example of a SQL statement that uses the $ sign:
select * from $TestParam
limit 10
In the above example, $TestParam is the name of the parameter that must be substituted. When you
execute a SQL query, containing a parameter that follows the $ParamName mask (incidentally,
$TestParam), the Query Parameters Editor is displayed, requesting you to specify the value of the
parameter, and select its data type.
CONFIDENTIAL AND PROPRIETARY, AGINITY LLC.
DISTRIBUTE WITHOUT PRIOR AUTHORIZATION.
DO NOT
50
The following is a list of the parameter types used:
·
Byte
·
Boolean
·
Date
·
Date and time
·
Numeric/Double
·
Int 16/32/64
·
Signed byte
·
String
CONFIDENTIAL AND PROPRIETARY, AGINITY LLC.
DISTRIBUTE WITHOUT PRIOR AUTHORIZATION.
DO NOT
51
·
Time
·
Unsigned int 16/32/64
·
Inserted 'As-Is'
The As-is parameter type is used to perform text replacement without parenthesizing the parameter
value. This allows you to use statements, such as "select * from $table", where a table can be defined
as an As-Is parameter.
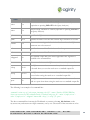
The following parameter names are automatically assigned a data type, other than String, if not
specified otherwise by the user:
Note: The user is still allowed to override the data type for the automatically assigned parameters manually.
·
$now. The type of the parameter is automatically specified as date and time, and its value is set
to the current default time value in the 'dd/mm/yy hh:mm:ss AM/PM' format.
·
If the name of a parameter contains time-related text, for example, testTime,
Timetest,testTimetest, the type of the parameter is automatically specified as date and time, and
the value of the parameter is set to the current default time value in the dd/mm/yy hh:mm:ss
AM/PM format.
·
If the date of the parameter contains date-related text, for example, date, testdate, testDatetest,
the text of the parameter is automatically specified as date, and the value of the parameter is set
to the current default date in the dd/mm/yy 12:00:00 AM format.
·
If the name of a parameter contains today-related text, for example, today, testToday,
testTodaytest), the type of the parameter is automatically specified as date, and the value of the
parameter is set to the current default date in the dd/mm/yy 12:00:00 AM format.
·
If the name of the parameter ends into _id', the type of the parameter is automatically specified
as Bigint, and its value is set to 0.
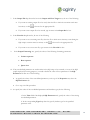
After the changes are made, the parameter values the SQL query contains are replaced with the
values that you have specified, and the query is executed.
CONFIDENTIAL AND PROPRIETARY, AGINITY LLC.
DISTRIBUTE WITHOUT PRIOR AUTHORIZATION.
DO NOT
52
CONFIDENTIAL AND PROPRIETARY, AGINITY LLC.
DISTRIBUTE WITHOUT PRIOR AUTHORIZATION.
DO NOT
53
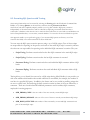
8.2. Executing SQL Queries with Tracing
The Tracing functionality can be accessed by selecting the Tracing tab in the Workbench Command Line
Builder, or by clicking Queries on the menu bar, and then selecting Execute with Trace.
The Execute with Trace capability uniquely enables you to log data related to SQL query execution
independently of the main transaction. This is achieved by employing an external transaction that is
connected to a database other than the one to which the main transaction is stored. This second database can
be the Greenplum database, or some other, external database. You can select from several database options.
This approach enables you to perform logging of your executed SQL queries at all times, even if the
execution has failed, or the main transaction has been rolled back.
You can trace the SQL query execution process using a set of 4 SQL scripts. Two of these scripts
are responsible for reporting on the process and result of the entire SQL script’s execution, whereas
the other two are responsible for reporting on the individual SQL statements’ execution. They are:
o Script Prolog. Performs execution before the first SQL statement in the main SQL script.
o Script Epilog. Performs execution after the last SQL statement is executed.
o Statement Prolog. Performs execution before each individual SQL statement within a SQL
batch.
o Statement Epilog. Performs execution after each individual SQL statement within a SQL
batch.
Tracing allows you to identify the reasons for a SQL script having failed. Besides, it can provide you
with some additional information that would otherwise be unavailable, for example, the number of
text lines in a specific SQL query. In addition, the feature can be very useful in profiling scripts that
are run on a daily basis, and analyzing the daily execution results in terms of the rows affected by a
statement. There are several internal Workbench parameters used in auxiliary SQL statements,
employed for tracing purposes:
·
$WB_ERROR_CODE. The error code of the most recently executed SQL script.
·
$WB_ERROR_MESSAGE. The text of the error of the most recently executed main SQL script.
·
$WB_ROWS_AFFECTED. The number of lines returned by an executed SQL statement that is
part of the main SQL script.
CONFIDENTIAL AND PROPRIETARY, AGINITY LLC.
DISTRIBUTE WITHOUT PRIOR AUTHORIZATION.
DO NOT
54
·
$WB_PROLOG_RETURN_VALUE. The value returned by an executed start script.
·
$WB_SQL_TEXT. The text of the most recently executed SQL statement.
·
$WB_STATEMENT_PROLOG_RETURN_VALUE. The value returned by the start SQL
statement script.
·
$WB_SESSION_ID. The session ID of the main script connection.
·
$WB_SESSION_DBHOSTNAME. The host name or IP address as specified in the main
connection string.
·
$WB_SESSION_DBPORT. The port number as specified in the main connection string.
·
$WB_SESSION_DBUSERNAME. The name of the user running the main script.
·
$WB_SESSION_DBNAME. The database name the main script is executed in.
·
$WB_SESSION_WINHOSTNAME. The host name of the machine where Workbench is
running.
·
$WB_SESSION_WINUSERDOMAIN. The domain of the user logged on to the Windows
workstation where the Workbench is running.
·
$WB_SESSION_WINUSERNAME. The user name of the user logged on to the Windows
workstation where the Workbench is running.
CONFIDENTIAL AND PROPRIETARY, AGINITY LLC.
DISTRIBUTE WITHOUT PRIOR AUTHORIZATION.
DO NOT
55
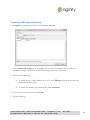
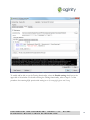
To execute a SQL query with tracing:
1. Click Queries on the Menu bar, and then select Execute with trace.
2. In the Connection string box of the displayed Execute with Trace window, select or enter the
connection string for the server on which the tracing result must be processed.
3. Do one of the following:
·
To specify the type of the database to be used, in the DB type drop-down list, select the
appropriate database type.
·
To specify the database type automatically, click Autodetect.
4. If you want to test the connection, click Test.
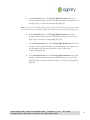
5. Do the following:
CONFIDENTIAL AND PROPRIETARY, AGINITY LLC.
DISTRIBUTE WITHOUT PRIOR AUTHORIZATION.
DO NOT
56
a. In the Script Start tab of the Tracing SQL Statements area of the
window, enter the SQL statement to perform tracing at the beginning of
the SQL script, or select the corresponding SQL file.
Note: If you want to enter a SQL statement by pasting it into the tab, keep the SQL script option selected.
To select a file instead, select the SQL file option. This is applicable for all the 4 auxiliary (tracing) scripts.
b. In the Script End tab of the Tracing SQL Statements area of the
window, enter the SQL statement to perform tracing at the end of the
SQL script, or select the corresponding SQL file.
c. In the Statement Start tab of the Tracing SQL Statements area of the
window, enter the SQL statement to perform tracing at the beginning of
the individual SQL statements within the script, or select the
corresponding SQL file.
d. In the Statement End tab of the Tracing SQL Statements area of the
window, enter the SQL statement to perform tracing at the end of the
individual SQL statements within the script, or select the corresponding
SQL file.
CONFIDENTIAL AND PROPRIETARY, AGINITY LLC.
DISTRIBUTE WITHOUT PRIOR AUTHORIZATION.
DO NOT
57
7. Click OK.
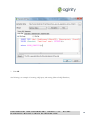
The following is an example of executing a SQL query with tracing (Microsoft SQL Database).
CONFIDENTIAL AND PROPRIETARY, AGINITY LLC.
DISTRIBUTE WITHOUT PRIOR AUTHORIZATION.
DO NOT
58
CONFIDENTIAL AND PROPRIETARY, AGINITY LLC.
DISTRIBUTE WITHOUT PRIOR AUTHORIZATION.
DO NOT
59
9. Results Menu
The Results menu is used to manage the Result Set section more quickly by using keyboard
shortcuts, to delete all result sets, and to display the Result Sets pane.
The Results menu consists of the three following options:
·
Clear. Closes and removes all the tabs from the result set.
·
Go to. Allows you to switch between multiple tabs in the Result Set, including the Output
tab. Up to 9 tabs are supported.
·
Toggle. Allows you to manage the visibility of the Result Set section, thus also maximizing
the size of SQL Editor.
CONFIDENTIAL AND PROPRIETARY, AGINITY LLC.
DISTRIBUTE WITHOUT PRIOR AUTHORIZATION.
DO NOT
60
10.
View Menu
The View menu is mainly used to change the way objects look in the Object Browser. It provides a
variety of options for viewing tables and sorting databases. You can also create your own entity
filters to choose from, and view a user's and server's query history to access more detailed user -, and
server-related information.
The following is a list of functions that can be accessed from the View menu:
·
Quoted Identifiers. Parenthesizes each identifier (databases, tables, and so on).
·
Entity Schema. Displays objects' entity schema in the Object Browser.
·
Group by Schema. Groups objects by entity schema in the Object Browser.
·
Sort Columns Alphabetically. Displays object columns alphabetically in the Object
Browser, as opposed to the physical column order, defined by the schema.
·
Entity Filter. Allows you to manage the existing entity filters, and create new ones. Those
objects that do not meet the filtering criteria are not displayed in the Object Browser tree.
CONFIDENTIAL AND PROPRIETARY, AGINITY LLC.
DISTRIBUTE WITHOUT PRIOR AUTHORIZATION.
DO NOT
61
To create an entity filter:
1. On the Menu bar, click View, and then select Entity Filter>Manage Filters.
2. In the displayed Manage Schema Filters window, click New.
3. In the Filter Name box in the displayed Schema Filter Properties window, type the name of the
entity filter being created.
4.
In the Logical Operation drop-down list, select a logical operand. The following options are
available:
·
Or
·
And
5.
To specify the appropriate conditions, click New.
6.
In the displayed Filter Condition Properties dialog box, specify the following:
CONFIDENTIAL AND PROPRIETARY, AGINITY LLC.
DISTRIBUTE WITHOUT PRIOR AUTHORIZATION.
DO NOT
62
·
Filter Field. The field the filtering must be performed by. The following options are
available:
o Schema
o Name
·
Criteria. The following options are available:
o Equals
o Starts with
o Contains
o Ends with
·
·
7.
Not Equals
Filter Value.
If you want the specified filtering values to be case-insensitive, select the Ignore case
check box.
8. To go back to the Manage Schema Filters window for verifying that a filter with the
specified filtering values has been added to the filters’ list, click OK.
9. In the Schema Value Properties dialog box, click OK.
The specified filters are displayed in the Filter area of the Manage Schema Filters window.
Now, the created filter needs to be applied to the Object Browser.
CONFIDENTIAL AND PROPRIETARY, AGINITY LLC.
DISTRIBUTE WITHOUT PRIOR AUTHORIZATION.
DO NOT
63
To apply a created filter to the Object Browser:
Click View, select > Entity Filter > Select, and then select the created filter.
Notes:
·
·
Only those objects, whose schemas and/or names meet the filtering criteria will be
displayed in the Tree view.
·
If you want to remove the filter, click View, and then select >Entity Filter>None.
User Query History. Displays the current user's Query History.
The application keeps a history of your queries issued from the current workstation. The
data is stored on the user's PC. This option is useful if you need to know if some specific
SQL command or query has been executed by the current user. By default, the main
workspace of the window contains a list of all user queries issued from your current
workstation. When a history record is selected and highlighted, the query is displayed in full
at the bottom of the window.
CONFIDENTIAL AND PROPRIETARY, AGINITY LLC.
DISTRIBUTE WITHOUT PRIOR AUTHORIZATION.
DO NOT
64
The query list can be filtered using the filters at the top of the window.
If you want to locate a specific text, type it in the Find box, or, if the keyboard focus is on
the history grid, just start typing the text to make a search for it.
The number of records in the history is defined in the application settings, and it is available
in Tools / Options.
To adjust the number of user queries stored on the current workstation:
1. To set this number, on the Menu bar, click Tools, and then select Options.
2. In the tree in the left pane of the displayed Application Options dialog box, select
Query Analyzer.
3. In the Keep [number] user queries in history combo box, select the appropriate
number of queries.
·
·
Server Query History. Displays a history of recently executed queries on the server. The data is
stored on the server in a special history database (if it was initialized by the DB administrator.)
Toggle Object Browser. Allows you to manage the visibility of the Object Browser.
CONFIDENTIAL AND PROPRIETARY, AGINITY LLC.
DISTRIBUTE WITHOUT PRIOR AUTHORIZATION.
DO NOT
65
11. Window Menu
The Window menu allows you to switch between several open windows more quickly.
If you have more than one application window open, such as, for example, the Query Analyzer
window (File > New Query Window), the Server Query History window, or any other non-modal
window, and you want to quickly switch between these windows, go to the Window menu, and then
select the required window from the drop-down list.
When the required window is selected, it becomes active and is displayed at the top of the list.
The following is a list of the options the Window menu includes:
·
Minimize All. Minimizes all open child application windows, without minimizing the main
Aginity Workbench window.
·
Cascade. Allows you to cascade all existing child application windows.
·
Show Job Monitor. Displays a window that contains a list of the application’s background
processes. The listed operations include, but are not limited to, importing and exporting
data, converting text files, and so on. The window is automatically displayed when you
execute any action that triggers background asynchronous processing in the application.
CONFIDENTIAL AND PROPRIETARY, AGINITY LLC.
DISTRIBUTE WITHOUT PRIOR AUTHORIZATION.
DO NOT
66
12. Workbench Command Line Builder
12.1 Command Line Processing
You can run the Aginity Workbench in unattended mode by specifying command line parameters at
the command prompt. Arguments can consist of a name and value argument pair, whereas others
are indicator-type arguments that do not have a 'pair'.
In the following example, two arguments are submitted to the application using the command
prompt:
Example: --arg1 --arg2 arg2value
where,
arg1 is a simple indicator-type argument, and arg2 - is a name-value type argument, where
arg2value (that is following the arg2 switch) contains the argument’s value.
The names of command line arguments can be prefixed by a -, /, --, or specified without any prefix.
12.2 Specifying an Action
An action command prompt argument is used to specify what action must be performed by Aginity
Workbench.
The following is an example of an argument that instructs the application to execute a query.
Example:-unattended -action exec --sqlfile “C:\script1.sql”
12.3 Executing SQL Statements
The following command prompt parameters are used to execute an SQL statement.
.Parameter Mandatory
Description
CONFIDENTIAL AND PROPRIETARY, AGINITY LLC.
DISTRIBUTE WITHOUT PRIOR AUTHORIZATION.
DO NOT
67
name
Execute a set of semi-colon delimited SQL statements one by one
action
Yes
action
Yes
sql
No*
Specifies the SQL statement to execute.
sqlfile
No**
Specifies the name of the file that contains SQL statements to execute.
connstr
Yes
stdout
No
Specifies the name of the file for the standard output.
stderr
No
Specifies the name of the file for the standard error.
stdappend
No
timeout
No
colsep
No***
recsep
No****
quote
No
(equivalent to pressing Shift+F5 in the Query Analyzer).
Execute a SQL statement as a block (equivalent to pressing Ctrl+F5 in
the Query Analyzer).
The connection string to the destination database where the SQL
statements are to be executed.
The standard output and error will be appended if this argument is
specified at the command line.
The command timeout for SQL statements’ execution, in seconds.
For SQL statements that return a result set, this is a column separator
to be used when you save the result set to a standard output file.
For SQL statements that return a result set, this is a record separator to
be used when saving the result set to a standard output file.
For SQL statements that return a result set, this is a character to be
used as a quote char when saving the result set to a standard output file.
The following is an example of a command line:
-unattended --action exec--sql “select current_timestamp; select 123” --connstr “Provider=NZOLEDB;Data
Source=my.server.com;User ID=admin;Password=***;Initial Catalog=my_db” --stdout “c:\temp\exec.txt” -stderr “c:\temp\exec.err” --stdappend --timeout 600 --colsep \\t --recsep \\n --quote ‘
The above command line instructs the Workbench to connect to the my_db database on the
my.server.com, and execute two SQL statements, one by one. The results of the execution are to be
CONFIDENTIAL AND PROPRIETARY, AGINITY LLC.
DISTRIBUTE WITHOUT PRIOR AUTHORIZATION.
DO NOT
68
appended to the exec.txt file in a temp folder. The errors, if any, are to be appended to the exec.err
file in a temp folder. The command timeout is 600 seconds. The result sets returned by the queries
will be written to the standard output file using a Tab character as a column separator and *nix-like
line endings. A single quote char will be used for quoting values that require quotes.
_____________________
* Either sql or sqlfile should be specified.
** See above
*** Use \\r, \\n, \\t to specify the CR, LF, and Tab characters respectively
**** See above.
12.3.1. Building a command line for Workbench interactively
To start creating a command line interactively:
1. On the Menu bar, click Tools, and then select Workbench Command Line Builder>New.
2. In the Command type drop-down list in the displayed Command type dialog box, select the required
command.
Note: Currently, only the Execute SQL command is available.
3. In the Connection string box of the displayed Workbench Command Line Builder window, specify the
connection string for the server to be used.
Note: To specify the connection string correctly, click the ellipsis button next to the box, select the appropriate database,
and click Connect.
CONFIDENTIAL AND PROPRIETARY, AGINITY LLC.
DISTRIBUTE WITHOUT PRIOR AUTHORIZATION.
DO NOT
69
4. Do one of the following:
·
To specify the type of the database to be used, in the DB type drop-down list, select the
appropriate database type.
·
To specify the database type automatically, click Autodetect.
5. In the Command timeout combo box in the Connection Details & SQL area of the window, specify
the time-out in seconds for the execution of the selected SQL script.
6. If you want the selected SQL script to be executed as a single batch, and not as a series of individual SQL
statements, select the Execute as a block check box.
CONFIDENTIAL AND PROPRIETARY, AGINITY LLC.
DISTRIBUTE WITHOUT PRIOR AUTHORIZATION.
DO NOT
70
7. In the Output File drop-down list box in the Output and Error Targets area, do one of the following:
·
If you want an existing output file to be used, select the file to which the execution result must
be written, or click
·
to browse for the appropriate file.
If you want a new output file to be created, type its name in the Output file list box.
8. In the Error file drop-down list, do one of the following:
·
If you want to use an existing error file, select the file to which errors that may occur during the
SQL script’s execution must be written, or click
·
9.
to browse for the appropriate file.
If you want to use a new error file, type its name in the Error file list box.
In the Output Formatting area, specify the values of the following formatting parameters:
·
Column separator.
·
Row separator.
·
Quote char.
10. If any user-defined parameters are used in either in the SQL script to be executed, or in any of the SQL
scripts employed for tracing purposes, you need to define the value of those parameters in the SQL
Parameters tab. Do one of the following:
·
To specify the values of the user-defined parameters, at the top of the Properties area, select the
SQL Parameters tab.
·
Go to step 14 of this procedure.
11. To specify the values of the user-defined parameters and their data types, do the following:
a. In the Value filed of the displayed SQL Parameters tab, specify the values of the existing
user-defined parameters.
b. In the corresponding Type drop-down list, specify the data type for the specified
parameter value.
CONFIDENTIAL AND PROPRIETARY, AGINITY LLC.
DISTRIBUTE WITHOUT PRIOR AUTHORIZATION.
DO NOT
71
12. Do one of the following:
·
To save the defined configuration as an executable file, click Save as CMD.
·
To save the defined configuration as a Workench CMD (.awbcmd) file, click Save.
·
Note: A Workbench CMD file can be opened with the Workbench Command Line Builder for viewing or
editing purposes. Also, it can be executed from the Windows command prompt by specifying the file as one that
contains the parameters for launching Aginity Workbench. To do this, the user can save the file as - action
awbcmd – file <the name of .awbcmd file> –pwd <file password>.
12.3.2. Execute with Trace in Workbench Command Line
The Workbench Command Line Builder allows tracing SQL statements to be specified. You can
access this functionality in the Properties area of the Workbench Command Line Builder by
selecting the Tracing tab.
CONFIDENTIAL AND PROPRIETARY, AGINITY LLC.
DISTRIBUTE WITHOUT PRIOR AUTHORIZATION.
DO NOT
72
To enable and be able to use the Tracing functionality, select the Enable tracing check box in the
upper left of the window. For details on using the Tracing functionality, refer to steps 2-5 of the
procedure for executing SQL queries with tracing in 8.2. Executing SQL Queries with Tracing.
CONFIDENTIAL AND PROPRIETARY, AGINITY LLC.
DISTRIBUTE WITHOUT PRIOR AUTHORIZATION.
DO NOT
73
13.
Help Menu
The Help menu allows you to access the online help and forums, check for updates, and view the
log file.
The following is a list of the available Help menu options:
·
About. Provides program's version and brief description.
·
Help. Displays online help documentation.
·
Tips and Tricks. Displays the Tips and Tricks window, where you can specify whether the
tips and tricks information must be displayed during the start of the application.
·
Check for Updates. Checks whether you're using the latest available version of Aginity
Workbench.
·
Provide Feedback. Allows you to send in a suggestion or feature request to developers.
·
Discussion Forums. Displays a page with Discussion Forums. You must be logged in to be
able post.
CONFIDENTIAL AND PROPRIETARY, AGINITY LLC.
DISTRIBUTE WITHOUT PRIOR AUTHORIZATION.
DO NOT
74
·
News. Under development.
·
Show Log File. Shows a system log file that contains all executed commands and errors that
have occurred, if any.
·
System Info. Displays system info.
CONFIDENTIAL AND PROPRIETARY, AGINITY LLC.
DISTRIBUTE WITHOUT PRIOR AUTHORIZATION.
DO NOT
75