1
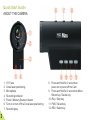
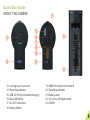
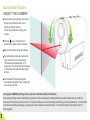
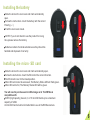
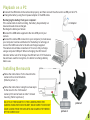
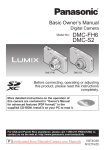
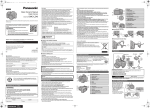
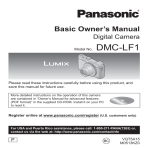
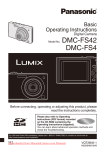
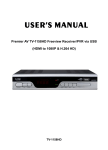
USER MANUAL
RoHS
Preface
The information in this document has been carefully checked for accuracy; however, no guarantee is
given as to the correctness of the contents. This information is subject to change without notice. This
document contains proprietary information protected by copyright. No part of this manual may be
reproduced by any mechanical, electronic or other means, in any form, without prior written permission.
Safety Information
Please read the following safety instructions, and keep the user manual for future reference.
Do not operate your HD Max Cam while moving.
Only handle the camera when it is safe for you and for others.
Do not place your HD Max Cam near sources of heat or near extremely high temperatures, as doing so
could damage the housing and main components. Take care to only use the camera within its
operating temperature range.
Your camera includes a class 2 laser pointing device (CDRH Class II, IEC Class 2).
Never look directly into the laser beam and never view the laser beam using an optical
instrument. Do not point the laser beam at people or animals.
Routine care
Clean your HD Max Cam with a soft cloth. Do not use abrasive powders or solvents, such as benzene or
thinner.
Disclaimer
HD Max Cam will not, under any circumstances, be responsible for injuries or property damage
incurred during the use of its products. HD Max Cam digital video cameras are exclusively intended for
sports video recording and must be used in compliance with local copyright laws. The user assumes
full responsibility for the use, reproduction and distribution of any sounds/images/videos captured
with HD Max Cam devices.
1
Technical specifications
1. Recording resolution:1920 x 1080 (30 fps) / 1280 x 720 (60 fps)
2. Image sensor: 5 Mega pixel, 1/2.5-inch CMOS sensor
3. White Balance: Auto
4. Wide angle lens : 135° in 720p, 110° in 1080p
5. Alignment:Cross laser positioning
6. Video output: HDMI CTS1.2 Compliant
7. Composite video output (AV-OUT)
8. Video signal format: H.264 encode/decode format bit rate: 15 Mbit/s
9. Recording format: MOV (AVC1)
10. Lens design rotates 200° to allow multiple camera mounting positions
11. Video Rotation 180°
12. Built-in microphone(single channel), Adjustable recording volume level
13. USB 2.0 / HDMI / 3.5 AV OUT, 1/4-inch to 20 tripod thread
14. Support external Micro SD Card up to 32Gb (Class 6)
15. Overwrite recording, Real-time stamp
16. System Language:English / русский / Italiano / Deutsch / 日本語 / 中文
17. PC Compatibility: Windows XP, Vista, Windows 7; Mac OS X 10.5 and 10.6
18. Built-in high capacity li-ion battery, 3.7V/1100mAh
19. Working humidity: 10% ~ 98%
16. Temperature: -10 ~ 60℃
17. Dimensions (H x W x D): 3.35" x 2" x 1.3" (85mm x 51mm x 33 mm)
18. Camera weight- 112 grams
2
Quick Start Guide
ABOUT THE CAMERA
1.
2.
3.
4.
5.
6.
7.
3
135° lens
Cross laser positioning
Microphone
Recording indicator
Power / Memory Status indicator
Turn on or turn off the Cross laser positioning
Recording key
8. Press and Hold for 3 seconds to
power on or power off the Cam
9. Press and Hold for 3 seconds to Menu
Return key / Delete key
10. Play / Stop key
11. FWD / Select key
12. REV / Select key
Quick Start Guide
ABOUT THE CAMERA
13. Locking key of rear cover
14. Recording indicator
15. USB 2.0 Port (file transfer/charging)
16. Micro-SD Holder
17. AV OUT connectors
18. Battery Holder
19. HDMI Port (cable not included)
20. Recording indicator
21. Battery Latch
22. 1/4-inch to 20 tripod thread
23. LEASH
4
Quick Start Guide
ABOUT THE CAMERA
Choose the appropriate mount and
ensure it is fitted securely and
tightly so that it can not
come loose while shooting your
videos.
Press [
] key and hold for 3
seconds to power up the camera.
Adjust the lens to the proper angle
Face a blank surface and press the
laser button to turn on the lasers
(The lasers will disappear in 15
seconds). The laser can be turned on
or off at any time with the laser light
button.
Check whether the laser light is
horizontally aligned. If not, rotate the
lens until it is in the.
Using your LASER pointing device (please read the safety information)
The laser pointing device indicates the position of the rotating lens. Rotate the lens until the laser line is perfectly
horizontal. The laser will come on for 10 seconds when you start recording and then go out automatically. To switch the
laser back on while recording, quickly press and release the record button. To switch it back off, press the record
button again.
5
Installing the battery
- Slide the lock on the rear cover and it will automatically
open.
- Follow the instructions. Insert the battery with the correct
Polarity (+/-)
- Push the rear cover closed.
- NOTE: If you do not intend to use the product for a long
time, please remove the battery.
- Batteries contain chemical substances so they should be
handled and disposed of correctly.
Installing the micro-SD card
- Slide the lock on the rear cover and it will automatically open.
Follow the instructions. Insert the SD card in the correct direction.
Push the back cover to the closed position.
When SD card cannot be accessed, The Memory Status LED will flash green.
When SD card is full, The Memory Status LED will be green.
You will need to purchase a microSD storage card. The HD Max is
compatible with:
- SDHC (high capacity) class 4, 6, or 10 microSD Cards up to a maximum
capacity of 32GB.
All microSD Cards must be formatted before use in the HD Max camera.
6
Playback on TV/ display device
Connect one end of AV-out cable / HDMI cable to the DIGITAL interface on the base of the camera, and connect the
other end of AV-out cable / HDMI cable to your TV or other display device.
Turn on the TV or display device, and enter into the AV-in / HDMI mode.
Press【
】to switch to Play Mode, the screen shows 6 video files per page in grid form.
Press【
】【
】to choose which video to play, the video will be highlighted with yellow borders, press【
to start recording, and press again to stop.
When playing video, user can Long press【
】【
】to Fast forward or reverse at X2/X4/X8.
When playing video, user can Long press【
】to delete video file.
Press【
】to stop playback, and return to the video files list.
AUDIO
Red
VIDEO
White
HDMI
Yellow
HDMI
7
】
Playback on a PC
Connect the USB cable to the camcorder properly, and then connect the other end to a USB port of a PC.
Charge the battery using the AC power adaptor or the USB cable.
Recharging the battery from your computer:
If the camera fails to start recording, the battery has probably run
down and needs to be recharged.
Recharge the battery as follows:
• Connect the USB cable supplied to the mini-USB port of your
camera
• Connect the cable USB connector to your computer (in most cases,
your computer must be switched on for the battery to recharge) or
connect the USB connector to the AC wall charger supplied.
The camera should take a maximum of 3 hours to fully recharge
using a computer USB port. When recharging, the LED record
indicator will be red. At full charge, the LED will turn off. If the device
has not been used for a long time, it is better to recharge battery
before use.
AC Adaptor
Installing the mounts
Follow the instructions. Fix the mounts to the
camera in the correct direction.
(Refer to picture 1)
Follow the instructions. Using the screw cap to
fix the mount to the 1/4 thread of
camera (Or it can be fixed on other 1/4 tread
mounts). (Refer to picture 2)
DO ATTACH THE MOUNTS TO THE CAMERA WHEN THE
CAMERA IS MOUNTED ON HELMET; MAKE SURE IT DOES NOT
COME LOOSE FROM THE MOUNTS AND CAMERA TETHERED
BY THE SCREW CAP.
picture 1
picture 2
8
Description of Function Icons
1. Record Mode
2. Video Resolution
3. System time
4. Record Overwrite Mode
5. SD card icon
6. Battery Life
7. Video Mode
8. Current Selection video file
System function settings
9
Record Mode
Video Mode
Long press【
】key to enter the settings menu.
press 【
】【
】 key to shift the blue cursor, choose the function.
Press 【
】【
】 key to choose the needed function, press 【
】 again.
After Pressing 【
】 key it will automatically return to the main menu.
When the AV OUT and HDMI do not access, the four key 【
】【
】【
】 and【
】 will be locked.
To avoid the misoperation when recording.
SIZE:
1920 X 1080p 30 frame per second (fps) bit rate: 15 Mbit/s, Field of View: 110°(Default).
1280 X 720p 60 frame per second (fps) bit rate: 15 Mbit/s, Field of View:135°.
TV OUT:
Choose the correct video output system when connecting AV OUT to TV. The image on the TV will be
flickering if the TV system is incorrect. Choose PAL or NTSC(Default).
VOLUME:
The volume of internal MIC can be set and there are 0- 7 grades to be selected,7 grades(Default).
RECYCLE:
When set as the 【 YES 】 mode, the video will default to 30 minute per file. When the card
is full it will start overwriting the earliest recorded files,【 NO 】(Default).
1.
2.
3.
4.
5.
System function settings
STAMP:
With this setting, the current time will be stamped on the video and the recording time can be seen
during playback.
OFF: No DATE and CLOCK stamp (Default)
DATE: DATE only
CLOCK: CLOCK only
DATE/CLOCK: both DATE/CLOCK
DATE/ CLOCK:
There is day / month / year / hour / minute to set up on the camera.
VIDEO FLIP:
Using this setting you can invert the image being recorded. This is useful if you wish to film with the
camera in the upside down position. The image will be flipped the right way up using this setting.
- OFF : Choose this setting when the camera is installed in the normal position
- On : Choose this setting when the camera is installed in the inverted position (Default) .
FORMAT:
Choose 【YES】and press【REC】key to format the micro SD Card.【N O】(Default).
Note: All files in the MICRO SD will be deleted and will be unrecoverable after formatting.
We suggest you format your memory card on a regular basis.
Should you have a problem with your camera, formatting the memory card will quite often solve the issue.
LANGUAGE:
Select the needed language
English(Default) / русский / Italiano / Deutsch / 日本語 / 中文
SYS.RESET:
Choose 【YES】and press【REC】key to sys reset.【N O】(Default).
Note: When select this function item, all settings shall be reset to the ex-factory values.
VERSION:
The user may view the software version.
10
PACKAGE CONTENT
Vented Helmet Mount
Battery Charger
3M sticker x 2
Dust Proof Cover
USB Cable
AV-OUT Cable
Elastic Strap
Battery
User Manual CD
Screw cap
INFORMATION FOR USERS according to European Directives 2002/95/EC and 2003/108/EC on the restriction of
the use of hazardous substances in electrical and electronic equipment and waste disposal.
The symbol of the crossed-out wheeled bin printed on the packaging indicates that this product must be collected
separately from other waste at the end of its working life.
The user must hand the product over to a designated collection site for waste electrical and electronic equipment or
return it to the retailer on a one-for-one basis when buying a new similar product.
By correctly separating this product for recycling, processing or environmentally friendly disposal, you will be helping
to prevent possible negative impacts on the environment and human health, and contributing to the recycling of its
component materials.
Users who dispose of this product illegally may be liable to prosecution under applicable laws.
11
Warranty
This product is guaranteed against manufacturing defects for one (1) year from the original date of purchase. HD Max
sole obligation in the event of such defects during this period is to repair or replace the defective part or product with a
comparable part or product at HD Max sole discretion. Except for such replacement, the sale, or other handling of this
product is without warranty, condition or other liability even though the defect or loss is caused by negligence or other
fault. Damage resulting from use, accident, or normal wear and tear is not covered by this or any warranty. HD Max
assumes no liability for any accident, injury, death, loss, or other claim related to or resulting from the use of this
product. In no event shall HD Max be liable for incidental or consequential damages relating to or resulting from the
use of this product or any of its parts. Because of possible user resealing error, this product is not warranted against
water housing leakage or any resulting damage.
Free maintain won’t be given under the following circumstance:
1. Repair label ripped off.
2. The breakdown caused by the manipulation that hasn’t follow the requests of the Manual.
3. The damage caused by the dismantle movement of a non-our-company authorized maintainer.
4. The breakdown, row harm or damaged because of the move or drop.
5. The damage caused by customer inappropriate preservation, maintain, or the usage.
6. Easy damaged pieces and present accessories are not concerned.
7. The breakdown and the damage caused by the Force majeure.
Warning:
Failure to follow these safety instructions could result in fire, electric shock, or other injury or damage.
12
Copyright c 2011 All rights reserved
Recycled paper