1
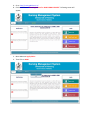
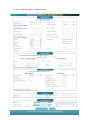
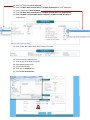
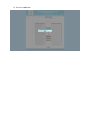
USER MANUAL
FOR
ANM APPLICANTS
[Year: 2015-2016]
Prepared by: NATIONAL INFORMATICS CENTRE, Bhubaneswar, Odisha
1. Go to http://nursingodisha.nic.in/
2. Click on the button “New Registration for ANM & GNM COURSES”. Following screen will
appear:
3. Move Mouse to Apply Online
4. Then Click on ANM.
5. Online Application screen for ANM will appear:
.
6. Enter Full Name as per H.S.C/Equivalent examination.
7. Enter Full Name of Father, Address Of Father, Occupation of Father.
8. Name Of Guardian Is optional. But if Name is given, then Address, Occupation & Relationship
with guardian is mandatory.
9. Enter Date of Birth as per H.S.C/Equivalent examination.
10. Select Educational Qualification.
11.
12.
13.
14.
15.
Select Category.
Select Sub Category.
Select Gender, Nationality, Religion, Marital Status.
Enter Contact No(Mob).
Enter Aadhar No, E-Mail ID (optional)
16.
17.
18.
19.
Select Native District.
Enter Present/Correspondence address, Pincode and select District.
Enter Permanent address, Pincode and select District.
If Present and Permanent address are same, then after entering present address details, click on
Do.
20.
21.
22.
23.
24.
Select 10th/Equivalent Name Of Board.
Enter Full Mark, Mark Secured W.E.O, % of Mark Secured W.E.O. of 10th/Equivalent.
Select +2/Equivalent Name Of Board.
Enter Full Mark, Mark Secured W.E.O, % of Mark Secured W.E.O. of +2/Equivalent.
Enter Full Mark in English, Mark Obtain in English,% of Mark Secured in English of
+2/Equivalent.
25. Enter Challan No, Challan Date, Branch Name, IFSC Code.
26.
27.
28.
29.
30.
31.
Click on Choose File/Browse File.
Then the pop up window will appear.
Select photo/signature file.
Click on Open Button.
Then click on Upload Button.
Click On Save and Continue.
32. View and Edit Screen will appear.
33. If any information has to be edited, the click on Edit Button. Edit require fields and follow step
31.
34. Give the Password and Reenter the password.
35. Enter the CAPTCHA code.
36. Click on Confirm Button.
37. Then Click on YES button (if details submitted are correct).Otherwise Click on NO button and
follow step 33 to 36.
38. The application number will be generated and displayed in the screen.
39. Click on “Click Here to Print the Registration Details” link.
40. Registration details will be displayed.
41. Click On PRINT Button.
42. Take the Registration Print Out.
APPLICANT LOGIN:
43. Click on Applicant Login.
44.
45.
46.
47.
Click on button ANM.
Enter Application Number & Password.
Enter the Captcha code.
Click on Login Button.
48. After successful Login following screen will appear :
49. Click On Print---- > Application to view registration Slip.
50. Click on Print Button to take the print out of registration Slip.
51. Click on Print---- > Choice Details link to print the choice list. If No choice entered by applicant,
then the following screen appears.
52. Click on Fill Choice Link to select the choice.
53. By default All button is selected & all institutes are displayed in Available box.
54. Select Govt button to display only the government institutes in the Available box.
55. Select Private button to display only the private institutes in the Available box.
56. Select the institute priority wise from the Available box and click on Add button.
57. For multiple selection, press CTRL key and click on institute name priority wise, then click on
Add button.
58. For adding all the institutes, click Add All button.
59. After addition of selected institutes, it will be displayed on Choice Box.
60. Select the institutes from the choice box and click on Remove button.
61. For multiple removal, press CTRL key and click on institute names then click on Remove
button.
62. For removing all the institutes, click Remove All button.
63. After removing of selected institutes, it will be displayed on Available Box.
64. It is not possible to remove one Private Institute when Govt button is selected and vice versa.
65. To change choice priority of institute, select the particular institute from the choice Box and
click on up Arrow and down Arrow button.
Up Arrow
Down Arrow
66. For swapping of choice prioriry,Press CTRL key and select both the institutes.Then click on
Swap button.
67. After swapping of choices, it will be displayed on Choice Box.
68. Swapping will not work, if more than two choices are selected in the Choose box.
69. After Choice filling, Click on SUBMIT button .The following message will appear.
“Are You Sure To Save The Institutes Preference Details...? “
70. Then Click on YES button.
71. The click on OK button.
72. The Institute choice details list will appear.
73. Click on Print button
to take the print out of choice list.
74. Click on Change Password for changing of password.
75. Password Change Successful.