1
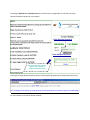
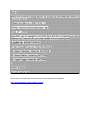
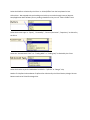
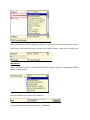
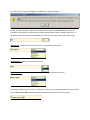
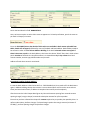
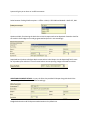
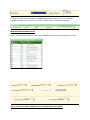
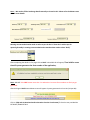
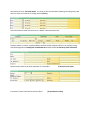
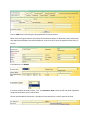
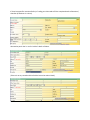
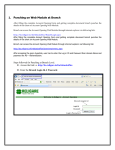
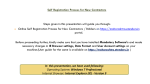
BRANCH PUNCHING
Steps followed for Punching at Branch Level.
01. Access the link i.e. http://bo.religare.in/fortisbackoffice
02. Enter the Branch Login Id & Password.
After we enter the Login Id & Password – Click “SUBMIT”
We get a Pop Up Window Stating “Please Enter Your Religare Domain Id and Password”
Click “Ok” to Proceed.
ABOUT INTRODUCTION
Click “INTRODUCTION” to find the latest guidelines if any uploaded for reference purpose.
ABPOUT USER MANUAL‐ Click “USER MANUAL” updated amendments and the latest guidelines for
reference purpose.
The Religare Domain Id and Password Needs to be Entered here (applicable for self branches only);
Review the below snapshot for more details
Enter Religare Domain Id
Enter Religare Password
Review the Space for Important
Updates along with Point of
Contact for Escalation (if any)
Once login through domain ID and Password, window appear giving details of cheque bounced (If any)
For more details do review the below snapshot.
We can Close this window and proceed further for reaching the Punching Module
Click – Account Opening > New AccOpen > Punch
We reach the following window for Punching the AOF.
We reach the following Window Consisting details towards Branch Code, Platform,
Account Type, Sub Account Type, Product etc.
The branch code needs to be Selected from the Drop Down List Box.
Select the Platform as Desired by the Client i.e. Online/Offline from the Drop Down list box.
Online client : Not mapped to branch trading terminal they can trade through internet (browser
base/Application base software) for any trading related issue they can call “CALL N TRADE” Desk
Select the Account type i.e. “Equity”, “Commodity”, “Currency Derivative”, “Depository” as desired by
the Client.
Select the “SUB ACCOUNT TYPE” viz. “Trading‐NSDL” or “Trading Only” as desired by the Client.
Select the Product as per the Addendum Provided i.e. “Upfront” or “Margin” also,
Need to Tick Upfront Scheme Button if Upfront Plan is desired by the Client likewise, Margin Scheme
Button needs to be Ticked for Margin Plan.
Incase, the client has Opted for Margin with Sub Types – Cash and Stock (as applicable) needs to ticked.
Stock N/a for Classic Flexi & Fix margin, minimum cash margin Rs.5000/‐ is required in all margin plans.
BANK INVEST
Incase, TRADING ONLY is Selected BANK TIE UP field gets enable, for trading plus NSDL it
appear in disable mode
Enter the PAN No to the Field and Click Cheque LD
We reach the following Window Post we Click – “Check LD”
System will Display the Company Pan No, Client Name, Branch Code, Address & Status Active/In‐Active if
client Exist in System.
APPROVER NAME – Is required In‐case AOF is to be Punched under NORMAL Scheme for which we
require APPROVAL.
Click Proceed to Process Further
Main punching page appears once clicked on “Proceed”
Points to be remembered while Feeding Client details in Main form:‐
¾ Don’t use special character while entering Data like @,”‐ etc.
¾ You can use / (slash) in address field and – @. in email address.
¾ Email id is mandatory for all online a/c’s. For offline accounts selected as Lite or Pro. And for
Currency clients
Fields with asterisk sign (*) are mandatory
Proceed punching with initial details related to client introducer, dealer, RM, BDR are very important for
revenue sharing.
Fill Introducer code, Dealer Code, RM code as per KYC. In RM code field we need to fill the employee
code of RSL/RMSPL.
•
•
•
•
•
In case Introducer code filled pertains to RIBL, then BDR code 7207B00007 will appear
automatically.
In case RM code filled pertains to Religare Wealth, then BDR code 9002B00001 will appear
automatically.
In case of Bank tie up case RM code of RSL employee need to be punched manually.
In case of form procured with Indusind Bank tie up, then Bank RM code and Bank RM name is
mandatory to punch.
In normal case either RM or BDR code is required and is mandatory.
For trading‐NSDL case Principal DP will not be in Edit Mode/is Freezed, however where client also has
any other DP which need to be punched then it is to be punched in extra DP details i.e. DPID2 in second
page. Refer the below snapshot for more details;
In Trading only case, Principal DP filled in the form, is required to be punched accordingly also, need to
have Demat proof (like Client master) of said Demat Account.
First / Sole Holder Details
Applicant name in Trading and Demat need to be strictly filled as per name appears at PAN SITE/PAN
CARD, (In Name field, don’t fill name as appearing in bank details), Fill other relevant details as given in
KYC like Father/Husband name, DOB, Educational Qualification, Gender, Marital status etc.
Fill first name, middle name and last name in specified boxes.
Address details
Punch Address as per the format assigned below;
First column Address Field should consist Building No/Name of the applicant,
Second column of the Address Field Street/Path incase, there is not any street or path in the applicant
address & Third Column consists Location of the applicant address.
City / District followed by State, Country and Pin Code needs to be Updated.
The Telephone number, Mobile number, Fax number and Email‐ID of the applicant needs to be
updated as per the KYC.
Note : Please note that employees/BP’s are not allowed to punch their own contact details, personal
details of employee/BP/BDR can only be filled in case they are opening their own account
E‐Confirmation – need to select as mentioned by client on KYC, by Selecting “YES” option the Contract
Notes are sent to the Client on the Registered E‐mail Id.
DP AMC Type – DP statements are Sent in Physical Format when we Select “NORMAL” and Electronic
Format While we Select “DIGITAL” at the Registered E‐mail Id of the Client.
DP AMC Frequency – Currently the Frequency for DP AMC Charges is Yearly/Monthly and the same
needs to be selected as per the KYC. In case client not opted in schedule of charge for any, then by
default it will be Yearly.
GENERAL DETAILS
The Details as shown below pertains to Financial Details Supporting Enclosed via. Client viz. Net Worth,
UID/AADHAR ID, ID NO, DATE PROOF DOCUMENT, Address Proof Document, Occupation etc.
NETWORTH – The Net Worth Amount and the Date as on Net Worth needs to Updated within the
Specified Column as shared by the Client within KYC.
POLITICALLY EXPOSED PERSON – Default “No” however, if the Client has shared the Details need to
Select “Yes” along with the Designation viz. MLA, MP etc.
RELATED TO POLITICALLY EXPOSED PERSON ‐ Default “No” however, if the Client has shared the Details
need to Select “Yes” along with the Details as per KYC.
PO Detail and RESEARCH – Needs to be Ticked incase, the POA Details have been filled within KYC.
We get to see this POP Up once, we Tick on POA asking us to Verify the Power of Attorney attached with
KYC and to see if its VALID and Signed by the Depository Account holder(s).
In case, the Client opted for product plan having facility to opt for free SMS & EMAIL, the option is
available to select SMS YES or NO the same needs to be Selected as opted in product addendum., or
otherwise if client wish to opt for paid SMS/Email research facility then need to select accordingly
SMS Scheme – Needs to be Selected as Per KYC i.e. Monthly/Quarterly/Yearly.
EMAIL Scheme – Needs to be selected as per KYC
EMAIL SCHEME – Needs to be Selected as per the KYC (Monthly/Quarterly/Yearly)
If Permanent address given by client, in Demat KYC is same as correspondence address then we need to
TICK on Same as Corr. Add , details will appear automatically. Refer the Screen Shot below;
Punch the bank details in field ‘BANK DETAIL1’
Here, we have an option to select client name as appears on his bank proof Name, punch the name as
per bank in Cheque print name.
Enter the IFSC CODE (IN case the details of IFSC code is not available in bank master uploaded from
NSDL, details will not appear) followed by name of the Bank and Bank address. Bank Address needs to
be entered in order Viz. First column Address‐Building of the bank in Second column street/path if
there is No street or path in the bank address, then leave the column “Blank” after that in third column
punch Location of the bank Viz. Near/Place where it is situated then city in city column then bank
account number, account type, MICR number and pin code.
Address of bank where street is mentioned:‐
Exceptional Handling for Bank Address
In‐case the Bank Address is found to be Brief viz. “HDFC RAMPUR UP, then need to Fill the Bank Name
again in Address Building column where street is not mentioned (here we’ll leave the street column
blank) and Area location blank, if address is complete then need to punch completely.
After that enter the initial cheque detail given by client with account opening form towards account
opening charges/ margin cheque/ or towards subscription amount for upfront product:
Ensure that you have collected the cheque for amount required as per product plan opted by client i.e.
upfront subscription, platform charges, if selected margin option then margin amount (minimum of
Rs.5000/‐), account opening charges and platform charges.
System will give you an alert on insufficient amount.
‐‐‐‐‐‐‐‐‐‐‐‐‐‐‐‐‐‐‐‐‐‐‐‐‐‐‐‐‐‐‐‐‐‐‐‐‐‐‐‐‐‐‐‐‐‐‐‐‐‐‐‐‐‐‐‐‐‐‐‐‐‐‐‐‐‐‐‐‐‐‐‐‐‐‐‐‐‐‐‐‐‐‐‐‐‐‐‐‐‐‐‐‐‐‐‐‐‐‐‐‐‐‐‐‐‐‐‐‐‐‐‐‐‐‐‐‐‐‐‐‐‐‐‐‐‐‐‐‐‐‐‐‐‐‐‐
Select between Trading Platform options – Offline > RALLY, LITE & PRO and ONLINE > RACE LITE, PRO.
Option available, for selecting the bank where initial cheque needs to be deposited. Please do check for
the credit in client ledger once code get generated and punch in axis accordingly.
Deposited bank (relates to Religare Bank account where initial cheque is to be deposited) field is must
for all product plan and also in case of normal where account opening charges collected from client.
ADDITIONAL PAYMENT DETAILS – Incase, the Client has provided 2 Cheque along with the KYC the
Second Cheque Details needs to be Filled accordingly.
Pledge Authorization and Third person authorization are by default Yes
In introducer details punch the details viz. TYPE employee code, employee name, pan number if
available and address of introducer. In case of BP, details need to be selected accordingly.
BROKERAGE AND EXCHANGE DETAIL
Need to Refer the Details Filled via. Client at the TRADING Preference Page. Ref. Page T2 as per KYC.
Incase, the Client has Opted NORMAL Scheme following Options get Enabled.
Note : ‐ We need to fill the brokerage details manually as shared In KYC. Please refer the below screen
shot for more details.
Running account authorization needs to select as per the KYC. If client don’t wish to opt for
quarterly/monthly in running account authorization mandate then need to select “Daily”
After completing the details in first page click on SAVE below POP UP will appear, Then hold for some
time till system generates the form number of the application,
Note : DO NOT click SAVE button more than 1’ce otherwise 2 or more form numbers are likely to get
generated.
After clicking on SAVE button below screen will appear. System generates the Form No. (Unique No)
Click on (Skip and Go Nominee Details otherwise close the Form button) if client has not provided the
EXTRA DP / BANK DETAILS
We need to fill Client “Extra DP details” viz. DP ID, DP Client ID, Beneficiary Name given along with proof
which he wants to map with his trading account (IF Any)
Second bank details need to filled as per the details mentioned within KYC.
Employer details viz. Name, complete address with PIN CODE, Telephone & Fax no of employer along
with the designation and Employed / Established since needs to filled. If shared by client within KYC.
Spouse Details needs to be filled. Applicable for commodity
Investment / Other broker details needs to filled
(If shared by the client)
(If shared by the client)
Click on SAVE button after filling the complete details to process further.
Below screen will appear wherein we need to fill the Nominee details Viz. Nominee’s Name relationship
with applicant and address with the PIN CODE etc. as per the KYC (If client has opted nominee facility in
DP Part.
If the Nominee is a “MINOR”
If nominee is Minor we have to select “YES” in Is nominee a minor column and fill the detail of guardian
along with the detail of minor, Date of birth
Contact and PAN details of Nominee / Guardian (In Case Nominee is a minor) needs to be filled.
If client has opted for nominee facility in Trading part. We need to fill the complete details of Nominee /
Guardian (If Nominee is a minor)
We need to punch the 2nd and 3rd holder’s detail as follows.
(If there is no any second and third holder leaves the column blank)
In case of client is NRI following details need to punch (leave the column blank in case of NORMAL
client)
Click on SAVE button to process further. We will get the following screen.
Note :
Significance of the Unique Form No.
A (Series)_YYMMDD_4 Digit Branch Code_Form No (Auto Generated) Viz. A1112310011737
Review the Below Mentioned Details;
Series
Year
Month
Date
Branch Code
AutoGen No
A
11
12
3
1001
1737